How to remove the indoor unit
To remove the indoor unit of any type of air conditioner, you need to snap off the lower clips. Most devices have them on the bottom and are indicated by arrows or serifs. Clip types:
- The hook on the wall plate is made from above. In these cases, the clips are pushed upward.
- Lower hook for the plate. In such devices, there are additional holes at the bottom. The fasteners are pulled down from the block.
- Clips located under the decorative cover. First, remove the cover, and then squeeze out the fasteners.
The removed indoor unit of the air conditioner is easier to disassemble.
Dismantling the indoor unit of the air conditioner
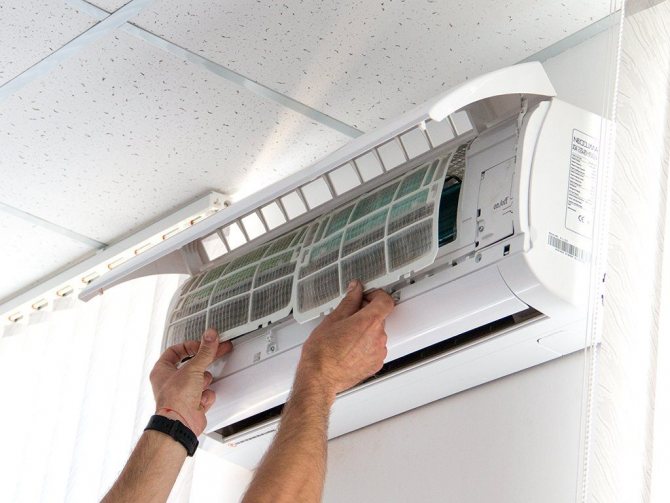
You can disassemble the indoor unit of the split system after disconnecting the device from the network. Then open the housing cover and take out the filters. The next step is to remove the case:
- Any air conditioner has self-tapping screws on the bottom, which are easy to find under the plugs. They must be unscrewed.
- There may also be self-tapping screws or latches under the cover behind which the filters are located. After unscrewing them, you can open the lower housing element.
- The next task is to release the latches located at the top of the case. They are quite tough; to detach them, you need to find out the fastening features. Most often, they can be unlocked by pulling the bottom of the case towards you and up.
- It remains to disconnect all wires, if any.
Having opened the blinds, it is easy to remove the body by pulling it towards you.
The next step is to remove the drainage container. Some models are made monolithic, so it will not be possible to separate the tray from the body in them. It is important to understand the features of its installation in order to properly install it in place during assembly.
It is recommended to prepare a container for condensation from the tray. To disassemble the container, it is enough to unscrew one self-tapping screw, and then disconnect the clips at the bottom. Disconnect the louver motor from the tray. After removing the container, separate the "tail" of the drainage hose.
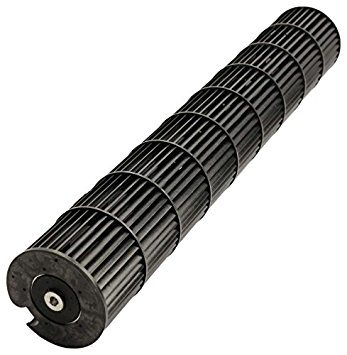
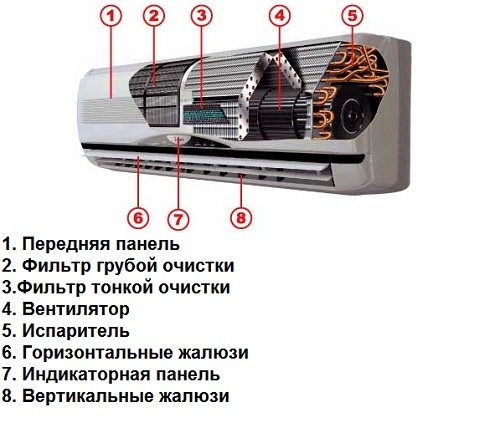
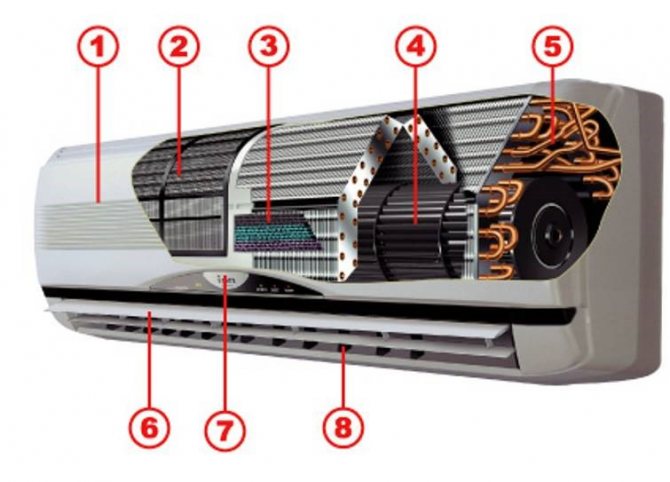
Air conditioner indoor fan (impeller)
The next task is to remove the fan (shaft). This procedure is the most responsible and complex. A simple option for removing the shaft is applicable when it is removed to the left, without affecting the control unit and the engine:
- Unscrew and release the left side of the radiator from the device case.
- Unscrew the fastening on the right in the shaft itself a few turns. This screw is often overtightened, so it is important to be careful not to damage the head of the fastener or break the blades.
- Remove the shaft from the bottom of the housing, taking care of the safety of the parts. Since the fan is often installed quite tightly, it takes a lot of experience to remove it. The screw can be held with a screwdriver while pushing the shaft.
When installing the shaft into the housing of the device, the screw must be exactly in the original position. Otherwise, the fan will touch the walls.
There is also a more difficult option for removing the fan. If the shaft is pulled out from the right side, you will have to remove the electric motor and control unit.
Sequencing:
- Remove the control unit from the housing. This will require disconnecting all wires and sensors. Then the latches are disconnected and the self-tapping screws securing the control unit are unscrewed.
- Unscrew all motor mountings. Detach cover with shaft.
- Carefully study how the shaft is disconnected from the motor. Carefully bend the copper pipes that fit the radiator.
Dismantling from video
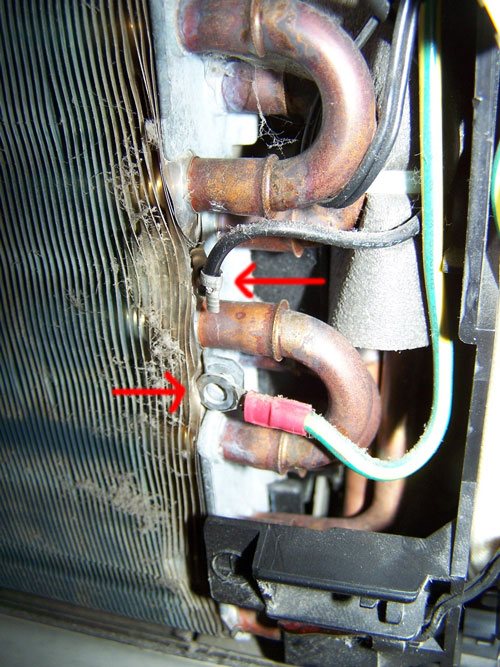
To dismantle the outdoor unit, you need to disconnect the copper pipes.To do this, they need to be cut off at a distance of about 20 cm from the fitting, and then the sections must be stamped so that there is complete sealing.
Important! Copper pipes cannot be reused because their extension is strictly prohibited.
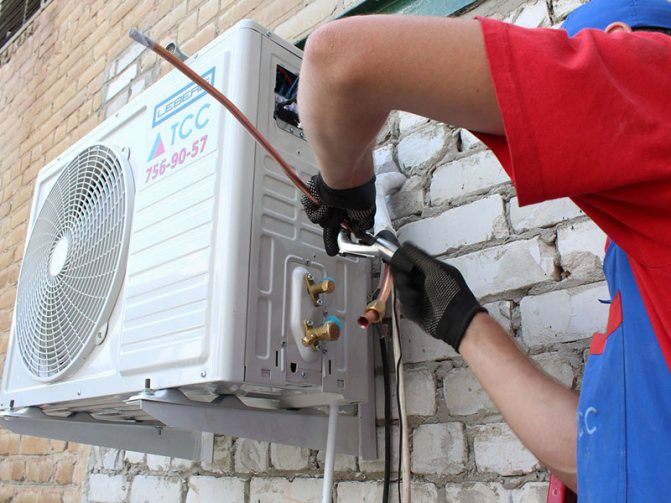
Outdoor unit
Remove thermal insulation after working with copper pipes. It is best when two people work: one is outside the premises, and the other is inside. Removing the device this way is faster:
- One - turns off the electricity, and the second - disconnects the wires, having previously marked the terminals in the place of their connection.
Important! You need to manually straighten the tubes so that they go through the holes in the wall, no problem.
- Also, the end of the cable is screwed to them, which is dragged into the room.
- Then the nuts are unscrewed, which hold the outdoor unit on special brackets.
- After the two of them, the block is removed and moved inside the room.
Important! The outdoor unit you have removed must be stored vertically only.
Indoor unit
How to disassemble the indoor unit so that the frion does not leak out? Dismantling the internal unit of the device has some nuances, without knowing which you will not be able to do all the work correctly, which can lead to breakage of delicate fasteners.
Here's how to remove the indoor unit of the air conditioner from the wall for wallpapering correctly:
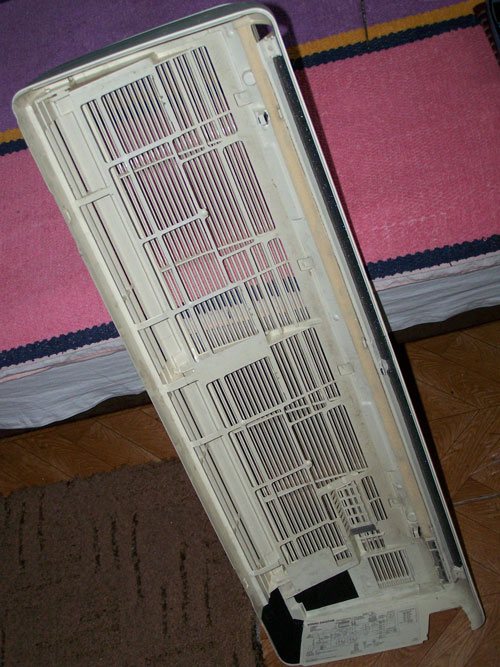
- Remove the housing cover using the pointers located on the bottom of the unit.
Important! Each manufacturer installs the cover differently. Study the instructions carefully to understand how to do it correctly.
- Disconnect the electrical cable by unscrewing it from the terminals and pulling it out carefully from the system.
- Disconnect the branch pipe, place the container first, because water can flow out of it.
- Remove the heat insulator and then disconnect the freon line. Unscrew the tubes carefully, as was done when removing the outdoor unit, screw them with caps or wrap them with electrical tape.
Important! You can also cut the tubing, squeeze it and then screw it back on. The main task is to prevent the ingress of polluting components into them.
Sooner or later, any user of a household air conditioner faces an unpleasant problem - after turning on the split system, a cool breeze bursts out of the blow hole, filled with the sweetish smell of stagnant mold.
This says only one thing - it's time to maintain your split, or rather, wash it thoroughly.
Here you can do in two ways - call the master and part with a certain amount of money, or rely on your own strength and independently disassemble the air conditioner.
This manual for disassembling the indoor unit of the split system (for example Toshiba RAS-07EKH
) will also help those who are faced with the problem of air conditioner breakdown and are eager to fix it on their own.
And the very last thing is a typical disassembly algorithm, and is suitable for most modern split systems.
What is needed
Yes, in general, a little. Several positive and negative screwdrivers of different diameters and (for some models) a set of hexagonal sprockets.
If you have stocked up with such a simple arsenal, it's time to get started!
And in order to finally dispel the last doubts, I clarify - in the process of all the operations described below, the internal block of the split system is not removed from the wall, the copper track is not disconnected, the freon is not drained.
Let's start cleaning the air conditioner!
Disassembly process
First of all, turn off the air conditioner and remove the protective filters of the indoor unit. This process is detailed in the manual for any split.
Now you need to remove the bezel. We unscrew the two bolts under the protective plugs,
and pull the frame towards you (two latches hold it on top).
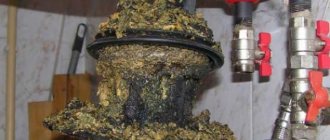
The inner side of the lid is covered with dust and mildew, it should be in the sink.
Now remove the airflow direction blade. To do this, you need to apply a little force and remove it from the grooves.
We get the following picture.
Now disconnect all electrical wiring, remembering to write down the location of the wires.
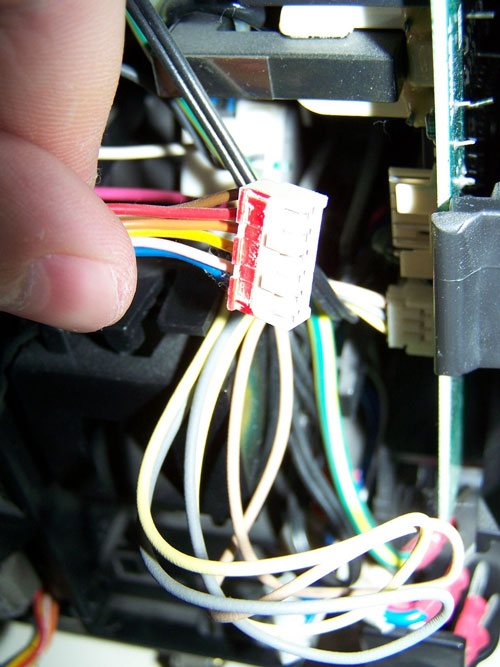
If you are lazy to write, and your knowledge of radio engineering is worthy of respect, during reassembly you can use the electrical circuit located on the inside of the front cover.
Be sure to disconnect the ground wires before removing the card from the slot.
Now we squeeze out the fastening brackets,
and take out the housing of the electronic unit along with the transformer.
Press out the three support catches and carefully remove the drain together with the outlet hose.
Look at those awful brown spots.
The blow-out opening of the indoor unit, as well as the fan blades, are also covered with a disgusting coating that exudes a stench.
But let's continue
We unscrew the bolt of the electric motor support,
very carefully raise the radiator and remove the motor support,
after which we take out the blade together with the engine from the cell.
We carefully put the radiator back so that it does not fall.
Removing the thermal lock of the motor pulley mounting bolt is not easy.
In order not to burn the energy-transmitting rubber element, use a thin soldering iron to gently heat the head of the bolt, periodically trying to unscrew it. I did it on the third try.
When the blade is separated from the motor, all dirty items should go to the sink.
Get rid of annoying mold with a Feri bottle, long-bristled brush and powerful spray from the shower hose.
Reassemble in reverse order.
Output
As you can see, the design of the indoor unit of the household split system is quite simple, if not primitive.
Therefore, if your hands grow out of the right place, and your wallet does not burst from the abundance of excessive freak, it is quite possible to serve your favorite air conditioner on your own ...
Regular maintenance of the air conditioner requires disassembling its indoor and outdoor unit. This is necessary when replacing parts of the split system and its complete cleaning. It is worth understanding the features of the process and the consequences of improper disassembly.
Disassembling the outdoor unit
Dismantling a mobile or window air conditioner does not take much time - just remove the device from the window or remove the air duct. When disassembling a complete split system, all refrigerant must be retained.

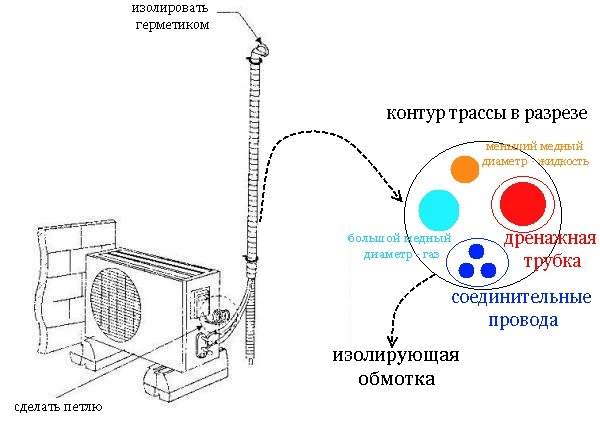
The connecting pipes, through which freon is transported, have different diameters. The thin channel is used to transport liquid refrigerant. The large tube is designed for pumping freon gas. When disassembling the air conditioner, it is necessary to "drive" the refrigerant into the outdoor unit. Then you can disconnect the trunk lines. To pump refrigerant, it is necessary, while the device is running, to screw the pipe with liquid freon, which goes from the outdoor unit to the room. The device pumps the gaseous substance into the outdoor unit in 1 minute. After that, switch off the device immediately.
Dismantling the outdoor unit of the air conditioner is carried out by two people. This way you can eliminate unnecessary risk and shorten the work time.
After disconnecting the device from the mains, disconnect the cables by marking the terminals.
The copper channels that carry the refrigerant can be straightened by yourself with care. Together with them, the electrical cable is removed into the room. It is screwed onto the end of the tube. Then you need to unscrew the nuts that hold the outdoor unit. Remove the block together. Last of all, the brackets are removed from the wall.
The removed outdoor unit requires vertical storage and transportation. To exclude possible damage, it is placed in a box with foam.
Removing the compressor
In some cases, only the dismantling of the outdoor unit is required, for example, when it is required to adjust the operation of the compressor. In this case, the indoor unit remains in place. The main task is to properly remove the compressor:
- dismantle the cover of the outdoor unit;
- disconnect the discharge and suction pipes;
- disconnect the electrical wires;
- unscrew the fasteners of the fan and condenser;
- remove the capacitor from the case;
- dismantle the compressor mounts and the part itself.
By following this sequence of actions, you can reduce the risk of damage to the piping and gain access to other elements located in the housing.
Preparatory stage
It is necessary to prepare a number of tools, without which it is impossible to cope with the task, before answering the question of how to remove the air conditioner from the wall during DIY repairs.
Required tools:
- Pipe cutter.
- Gauge manifold.
- Socket wrenches.
- Carob keys.
- Side cutters.
- Adjustable wrenches.
- Drill.
- Phillips screwdriver.
- Construction knife.
There are times when you need to acquire safety equipment.
Important! When removing the device, two people must be involved in order to carry out the work without risk to life and health.
Freon descent
There are three options for dismantling the air conditioner with your own hands:
- Disassembly with the release of freon.
- Conservation of gas inside the device.
- Using a special technique, with the help of professional equipment, save freon completely.
All methods are used, but the third one gives the best effect without any loss.
To remove the air conditioner from the wall with your own hands correctly, you need to study the design of the split system, which consists of a closed circuit filled with freon. It consists of such components - a compressor, a system of copper pipes and an evaporator with a condenser, which connects the entire system and ensures the extraction and supply of refrigerant.
To turn off the air conditioner without the loss of freon, it must be pumped into the condenser on its own, for this:
- Close the valve between the device and the thin bore pipe while the equipment is operating in cooling mode.
- After a minute, when all the refrigerant has been pumped into the condenser, close the valve on the thick pipe. By this action, you turn off the supply of freon and “close” it in the trap.
Consequences of improper dismantling
It is easy to damage the air conditioner if removed incorrectly. Possible unpleasant consequences:
- Depressurization of the cooling circuit, which entails leakage of freon. The next time you install the device, you will have to pay extra for refilling the system with refrigerant.
- Mechanical damage to the case of the outdoor unit, freon pipes, and other parts.
- Debris clogging the cooling circuit, moisture penetration. If dust gets in, the compressor wears out faster. Water can oxidize the surface of the copper freon line, causing the entire system to fail.
- Falling of the outdoor unit from a height. The installation height of the module is not important - after a fall, it will have to be replaced in any case.
The air conditioner is usually dismantled when changing residence, during repairs and cleaning. When disassembling simple units, you do not have to understand their device. However, full-fledged split systems require a careful approach. Since the equipment is expensive, it is better to turn to professional installers who will do the job efficiently and with a guarantee. You can disassemble the device yourself only if you are fully confident in understanding its device.