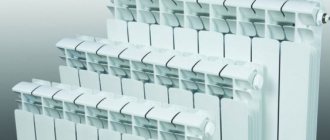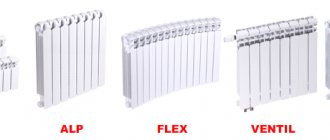
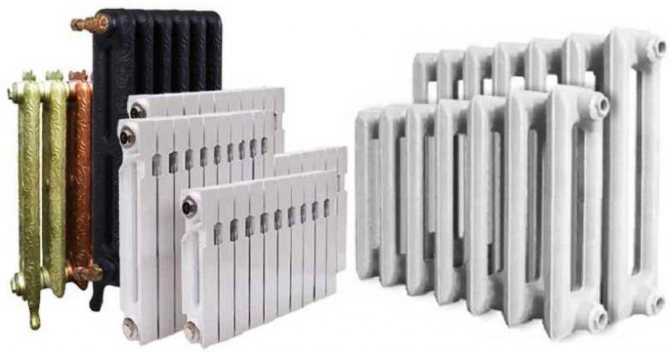
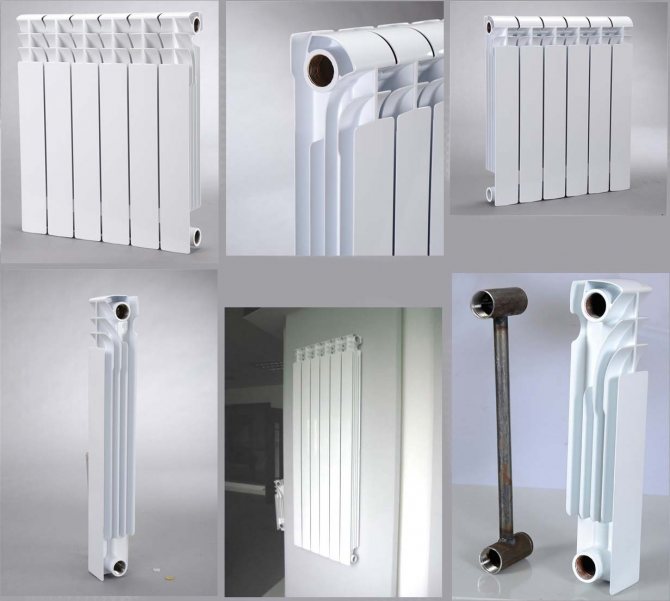
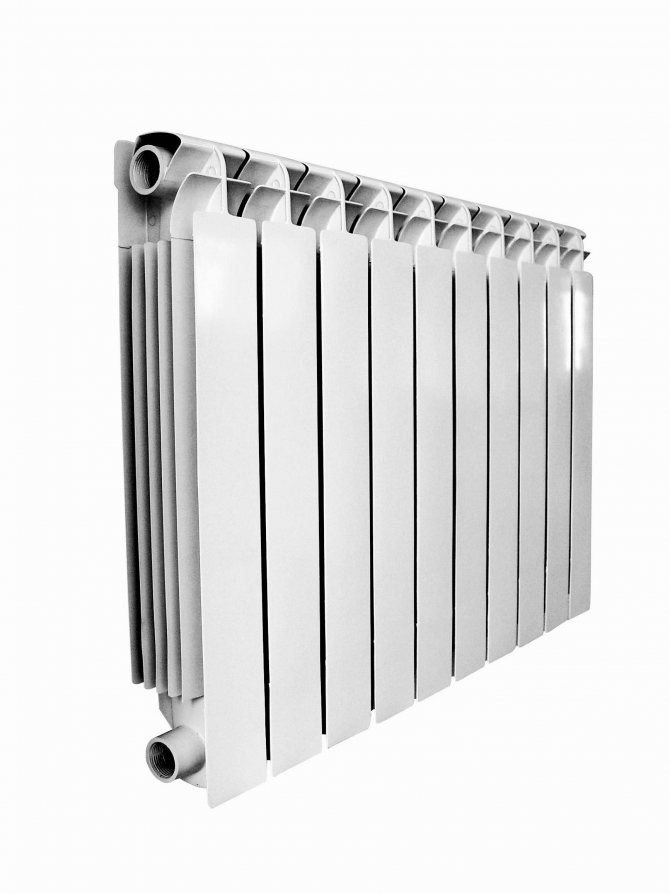
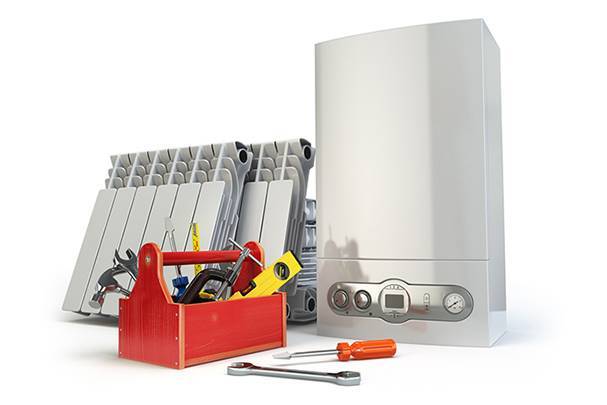
Features of aluminum radiators
In order to correctly assemble and disassemble a system consisting of aluminum radiators, you should first of all know the strengths and weaknesses that are characteristic of this type. Among the advantages of this type of battery are the following:
- The high thermal conductivity of aluminum compensates for the instability of the coolant pressure.
- The lightness of the material facilitates transportation and installation. Repair of aluminum radiators can be done by hand.
- The cost of batteries is several times less than bimetallic and copper counterparts.
- Sufficiently large bore diameters.
- Batteries heat up quickly and cool down just as quickly. This makes it possible to set the optimum room temperature in a short time when the weather outside changes.
Despite the large number of advantages, they have their disadvantages:
- Aluminum radiators cannot be called universal, since they do not fit with all and special adapters are required for their installation.
- Propensity to airborne. In radiators of this type, there is a high probability of leakage, since they cannot tolerate sudden pressure drops.
It is the disadvantages of aluminum batteries that require the skills to disassemble them. It should be noted that similar problems are relevant for bimetallic heating radiators.
Dismantling cast iron radiators
To dismantle such heating devices with your own hands, you will need the following tool:
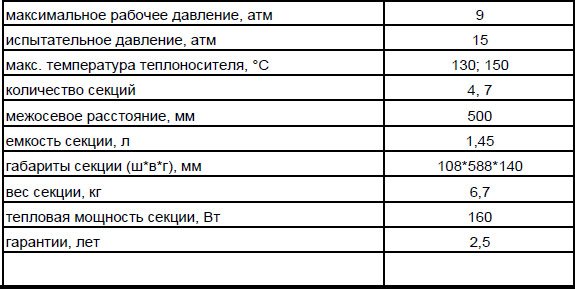
Dimensions of the cast iron battery.
- Pipe wrench number 3, for loosening the locknut and sleeve.
- A pipe cutter for cutting a pipe or a grinder.
- Hacksaw for metal.
- Chisel.
- Hammer and sledgehammer.
- Rust removal brush.
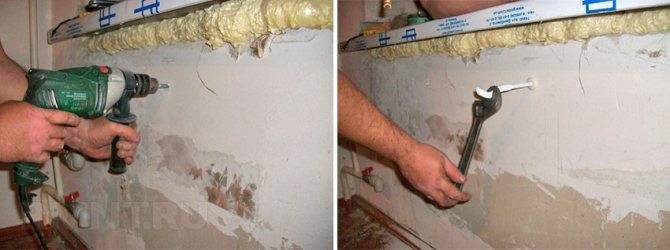
Dismantling of such heating devices, as a rule, is carried out in the summer, when the heating system is turned off. Before starting dismantling work, it is necessary to drain the water from the heating pipelines.
Then, with a pipe wrench, the locknuts on the water supply pipes are unscrewed, the sleeves are unscrewed and the radiator is removed from the brackets.
If it is impossible to unscrew the locknuts, the pipes supplying the coolant are cut off and the device is dismantled.
Procedure for dismantling old heating equipment
The second point is to disconnect the radiator from the general heating system. A prerequisite is getting rid of water. There are several differences in this process, as aluminum bimetallic radiators differ in design. Each of them has a special coupling that attaches the water supply hose to the radiator itself.
Perhaps a cutaway aluminum radiator will help to dismantle it. It can be found in blueprints and sketches. Well, after the coupling moves freely along the pipe, it should be removed from the thread. The removed radiator is placed on a flat surface. This could be the floor of a building or a editing table. Liquid and some dirt may remain inside the radiator.
In order to avoid getting the residue from the radiator onto the clean surface, cardboard paper or film is installed under it. The heating device is placed facing the installer. In this position, the right-hand thread will be considered on the one hand, and the left-hand thread on the left. This condition is used for a clear example of the execution of actions, therefore, in a real situation, after some work performed, the position may be changed.
These features are not very important for an experienced installer, but will become a serious problem for beginners to achieve results. The aluminum radiator Radolit also requires special attention. Its design and details are insignificant, but slightly different from the above model.
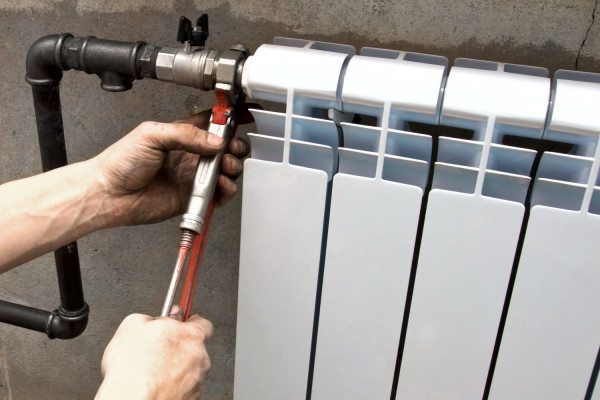
After placing the device in the position defined above, a special filter is removed from it. The main task of the installer is to instantly clean it from residues. If this cleaning process is not carried out, there is a possibility that the dirt will harden and the filter that can be used to install new equipment will need to be thrown out and replaced, which is a waste of money and time. At the end of the cleaning, a socket wrench (ring) is taken and the elements connecting the sections of the heating system are unscrewed with smooth unhurried actions.
Perhaps, to complete the unscrewing process, it will be best to use a wrench with a special ratchet. Upon completion of this stage, the key is replaced by a radiator key. Its design is so simple that in its absence it is created with its own hands, using an apparatus for welding metal products. With its help, we dismantle the nipples. The key for disassembling aluminum batteries is placed at the maximum nipple depth.
The turns must be done in an appropriate manner that will leave the threads intact and intact. There are two types of gaskets under the nipples. The silicone ones must be thrown away, and the second gasket must be cleaned of debris, dust or dirt. The moment the device is assembled, the silicone gaskets are replaced with new ones.
At this stage, the disassembly of the heating system ends. All parts of it are washed, sealant and grease are applied to the joints, new gaskets are installed, and the mechanism is assembled by analogy with the dismantling process. Only, operations are performed from the last point and gradually move up to the top of the list. For high-quality performance of work, you need to have a certificate of conformity for aluminum radiators.
The tool you need to get the job done
First of all, for work, you should find out the exact dimensions of aluminum radiators. To measure them, you will need a construction tape or a special folding rule. Also, if both types of devices are missing, you can use the standard student ruler. It should be noted that most of the rulers are only 30 centimeters long, so you will have to make notes on the radiator (it is better to use a pencil that can be easily washed off the surface).
Each new mark will be the end of the previous measurement and the start of a new one. The resulting sizes are added to the true size. Dismantling aluminum radiators requires other tools that are desirable to use for dismantling, namely:
- Complete set of wrenches (socket and ring).
- Radiator key.
- Pliers.
- Screwdriver.
Battery assembly
In principle, having the necessary tools at hand, even a beginner will be able to assemble or disassemble an aluminum radiator with his own hands.
To install an aluminum radiator heater with your own hands, you must:
Place the battery on a flat surface. This is necessary in order to inspect the device before installation and check all the joints for possible cracks or chips. Before connecting the elements of the heater, the threads at the joints are cleaned not only of debris, but also of factory paint. This is done using fine-grained sandpaper.
This is important, as the paint layer can crack in the future, leading to a leak. For the sake of presentation, manufacturers paint not only sections of radiators, but also their joints.When cleaning the battery from paint, you need to make sure that the sandpaper does not leave scratches on it, which can also cause leaks in the future.
All gaskets should be washed in soapy water, and if antifreeze is supposed to be used in the heating system, then they must be degreased, since this carrier is able to penetrate into any, even the smallest, irregularities. Before connecting the sections, it is advisable to study the drawing of the key for assembling an aluminum radiator in order to know how to use it.
This metal is very soft, so any too much force can damage the threads and then you will have to buy a new section. A paronite seal is put on the nipple nut on both sides. The key is placed on top and can be easily turned a couple of times, the same is done with the bottom hole. Only after the joints have been tacked can you tighten them with a lever more tightly. The hole that will not be used is closed with a plug, and the Mayevsky crane is attached to the other and the aluminum radiator assembly is ready.
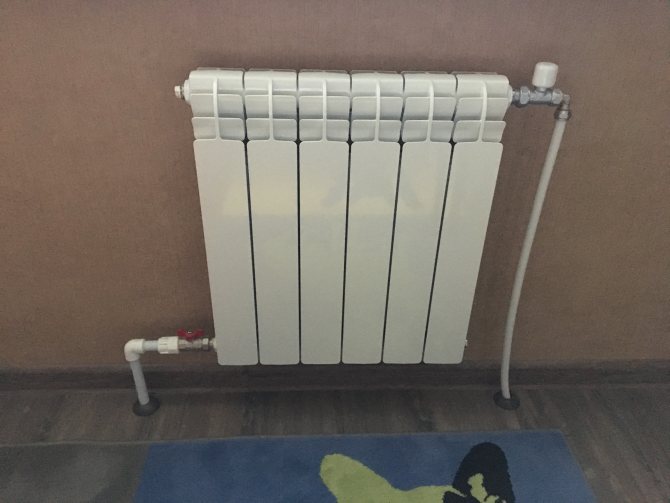
After all sections of the radiator have been assembled, it can be connected to the heating system and checked for possible leaks. Since aluminum batteries are quite lightweight, they can be easily connected by hand, even without the appropriate skills.
Basic installation rules
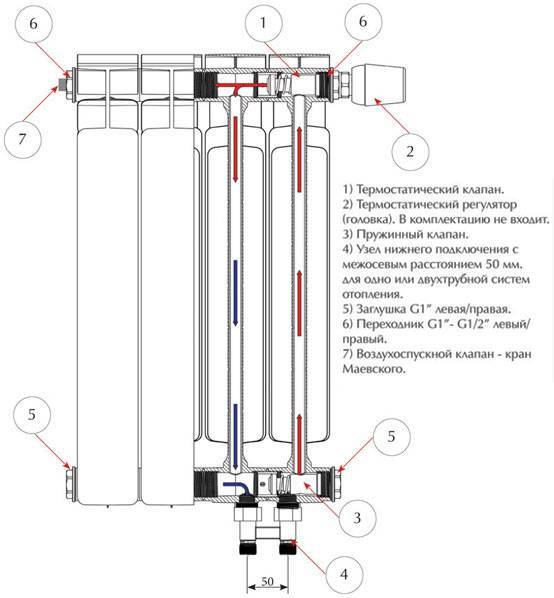
Diagram of a bimetallic radiator device.
Installation of bimetallic heating batteries requires the following basic rules:
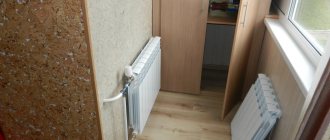
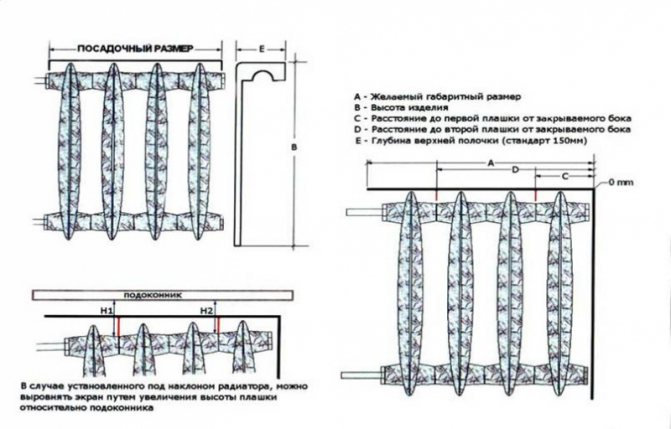
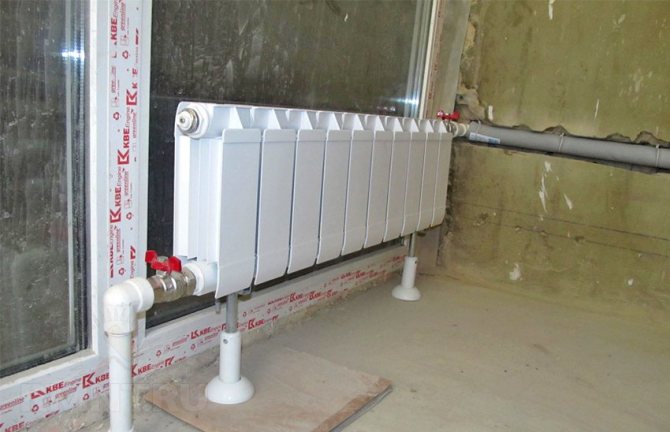
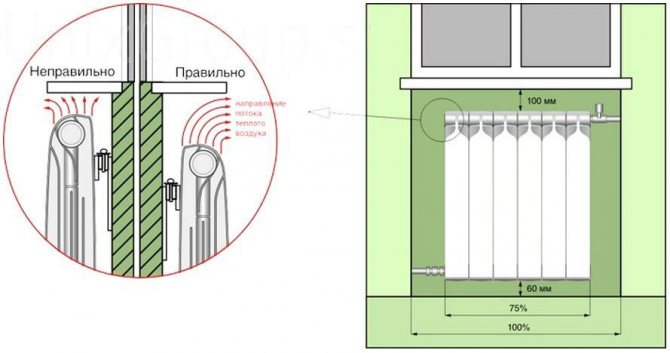
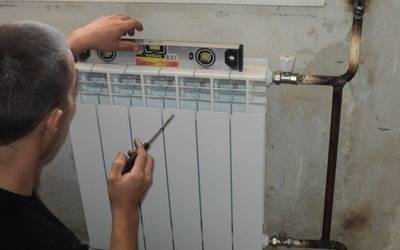
- The distance from the walls to the radiators should be 3-5 cm.
- The distance between the radiator and the floor should be 7-20 cm, and between the window sill and the radiator should be 8-12 cm. This will help improve convection.
- It is not recommended to remove the protective film from the radiators until all work is completed. Otherwise, damage to the enamel of the radiators is possible. If it was not possible to avoid chips of enamel, then it is recommended to cover the damaged areas with white enamel or replace the damaged sections.
- When tightening the battery connectors, the forces applied must be calculated, as tightening too tight can strip the threads. This can lead to the formation of leaks, as well as an insufficiently strong connection of the mounting elements.
Before starting the installation of any elements of the heating system, including batteries, it is necessary to find out if water is running into the heating system and, if so, take measures to shut off the water supply.
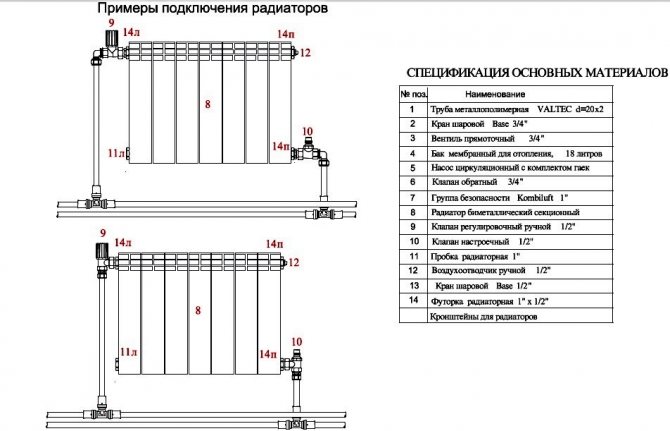
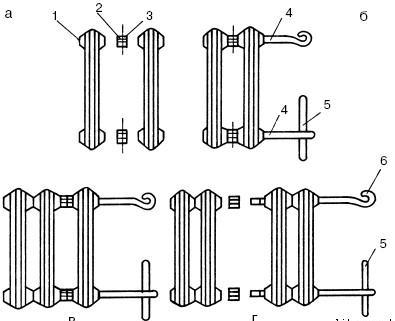
Radiator connection diagram.
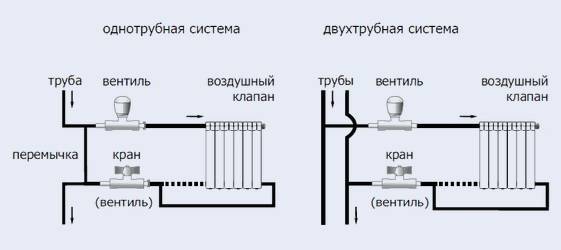
The procedure for installing heating batteries is as follows:
- mark the places where the brackets will be installed;
- fix the brackets to the wall with dowels or cement mortar;
- install the battery on the brackets so that the horizontal collectors are located on the bracket hooks, as a result of which the brackets will be located between the radiator sections;
- connect the battery to the inlet elements of the heating system, which end with a valve, tap or thermostat.
Heating batteries during installation do not allow the following actions:
- the arrangement of the sections is not vertical;
- the location of radiators relative to the wall, floor and window sill at a distance that does not meet the requirements.
http:
Correct installation of bimetallic radiators requires a responsible approach that will ensure the correct operation of the entire heating system. Therefore, approach the performance of these works responsibly.
Aluminum Heating Batteries
The progress of heating systems touched not only the devices for heating the heat carrier, but also the systems themselves, as well as heating devices.
If not long ago everyone had cast iron radiators in their houses, today they are successfully replaced with bimetallic or aluminum heaters.
Aluminum batteries - which ones are better?
In order to understand which aluminum batteries from a wide range of such products are better, you first need to understand their differences.
Today, heating devices are produced using two technologies, these are:
1. Extrusion. As a result of using this method, the aluminum part is extruded under high pressure, and the connecting places of the individual elements are glued with a specialized composite glue.
2. Foundry. A more classical method, in which parts of the heating devices are cast in specialized molds, and the joints are combined by welding.
Of course, the casting method, and the order is better when compared with manufactured batteries by extrusion, at least because welding in the connecting places holds an order of magnitude better when compared with glue.
On the other hand, heating devices made by extrusion are much more affordable. Plus, the differences between the radiators are also distinguished by the integrity parameter.
The batteries can be sectional and consist of individual parts, the connection of which must be done by welding.
One-piece radiator panels without mechanical connections are much more reliable. Wanting to get good aluminum heaters, it would be better to opt for cast one-piece models of batteries.
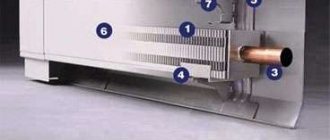
Technical properties of metal batteries
The huge demand for aluminum heating devices is determined by the technical and physical properties, as well as the good qualities of both the metal itself and the heating device in general.
1. Unlike other metals, aluminum has good heat conductivity and heat transfer, naturally, the heating device is heated an order of magnitude faster and less heat carrier is spent.
This is especially true for independent heating systems, as it makes it possible to significantly reduce the cost of using energy for a heating boiler.
2. Aluminum practically does not rust, especially if it is cleaned by anodizing. Such heating devices will be able to withstand very high pressure and not collapse for a very long period.
As for the indicators and dimensions of the radiator, it depends on the model that was selected and the number of sections.
Approximately the distance between the lower and upper tubes, along which the heat carrier moves, can fluctuate in the range of 200-800mm.
How to disassemble an aluminum heating battery?
In most cases, you need to disassemble an aluminum heating radiator, for example, in order to build up auxiliary parts, to flush it or to replace a failed battery element.
It is best to entrust the disassembly of the battery to a specialist, but if you have to do it yourself, you need to prepare a suitable tool.
In addition to ordinary pliers, a hammer and the rest of the usual tools, you need to purchase or borrow a nipple wrench. You can buy it in almost any store specializing in plumbing and everything related to it.
The nipple wrench allows you to separate one battery section from another. In order for the parts of the battery to unscrew more easily, you need to loosen the nipples in turn in the lower and upper pipes.
To begin with, loosen the upper nut by several turns, then the lower one, and then return to the upper one again and so on in turn until they are completely unscrewed.
Good advice on how to choose biometallic heating batteries according to the rules
For information on how to choose cast iron heating batteries, see here https://glavspec.ru/chugunnyie-batarei-otopleniya.html
Installation of heating batteries in the apartment, read here
Before proceeding to disassemble the battery, you need to make sure that it is not under pressure and a thermal carrier is not pumped into it.
And also watch a video on how to choose a heating radiator:
How to disassemble a cast-iron heating battery with your own hands
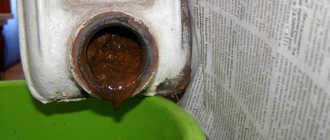
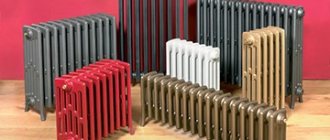
Sooner or later, it may turn out that even a cast-iron battery will require a complete replacement or you will just need to clean it. In both cases, the battery will have to be disassembled. How to disassemble a cast-iron heating battery with your own hands quickly enough and as professionally as possible? The fact is that such radiators are the best option for use in apartment buildings. These heating elements are able to withstand all the vicissitudes of an imperfect heating system. Sometimes, over time, even the cast iron has to be changed, because it has leaked or simply does not fit into the new apartment renovation.
Although even today, cast iron batteries are still relevant. Many users do not want to change such good heat sources for new ones, but such heat sources are so short-lived in comparison with cast iron. Therefore, most people try to get their batteries in order by simply repainting them. Some people use decorative screens for cast iron batteries. It is very convenient and looks like new radiators and there are no problems in design. (See also: DIY installation of heating radiators)
Any replacement of batteries can only be performed in the summer, when the heating season has not yet begun or, on the contrary, has just ended. But sometimes circumstances develop in such a way that it is necessary to change and disassemble the battery in winter. For example, if the battery leaks, what should I do? Wait for summer or the fact that one day the radiator will break through and the neighbors below will be flooded?
You can try to use the services of plumbers, but you can cope with the situation yourself. In order to disassemble a cast-iron battery, you need special tools and some knowledge, which we will tell you about.
Pros and cons of aluminum heaters
Aluminum radiators have become frequent "guests" of private houses and apartments in houses with centralized heating.
This became possible thanks to the qualities that have won the hearts of consumers around the world:
- Aluminum is one of the best conductors of heat, releasing it into the surrounding space in two ways: radiation and thermal convection. This feature is especially in demand in heating systems with unstable carrier pressure.
- Assembly of sections of aluminum radiators is possible without the involvement of additional forces. Since their low weight allows you to do everything yourself. They are easy to transport and install.
- These batteries are capable of withstanding pressures from 16 to 25 atmospheres, which makes them desirable in places that were occupied by cast-iron "accordions". There are 2 types of aluminum radiators. One of them is suitable for autonomous heating systems, where the load rarely exceeds 10 atmospheres. The second is for batteries connected to centralized heating, where drops of up to 15 atmospheres occur.
- Aluminum radiators are much lower than steel or bimetallic counterparts. This is one of the most important factors that attracts consumers.
- They are easily adjustable, which allows you to create the necessary microclimate in the room and save money on heating.
- They have an attractive design that fits easily into any interior.
These qualities have made aluminum batteries in demand all over the world, despite the fact that they have minor disadvantages:
- Aluminum is not resistant to corrosion, but modern radiators are treated with special agents that prevent corrosion. But even after processing, it is better to keep such heaters filled with a coolant, which is difficult to do in a centralized heating system, where water is discharged after each end of the season.That is why aluminum batteries are more in demand in autonomous systems, where there are no such discharges.
- Batteries of this type are prone to airing, therefore, at the beginning of the heating season, excess air must be vented from them.
- The threaded connection in aluminum models is weak and with a strong water hammer, leakage may appear at the joints. This defect can be eliminated only by knowing how to assemble an aluminum heating radiator using additional gaskets.
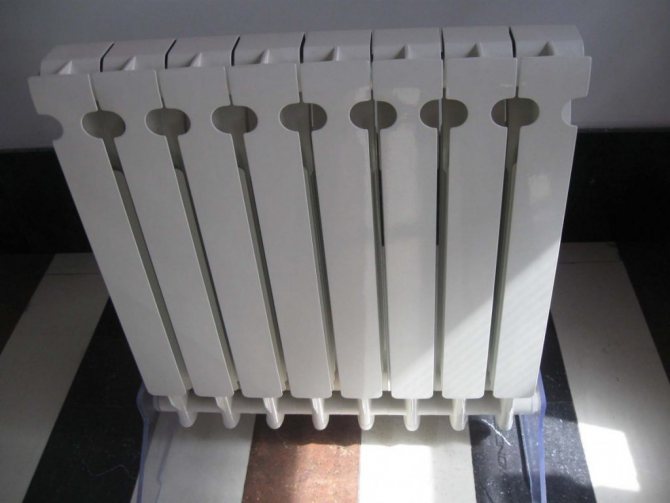
This type of radiator is available in two types: one-piece and sectional. The second is most common in private homes and apartments.
Features of mounting radiators
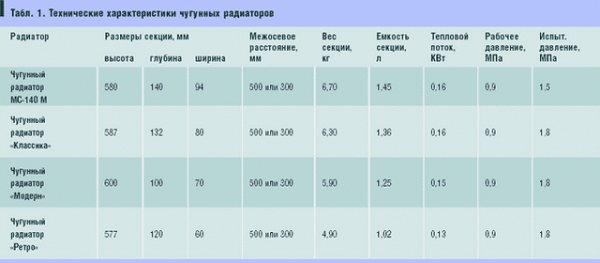
The most demanding for the strength of the fastening and base are cast iron radiators. In addition to the weight of the product itself, the internal volume of the section also plays a role. If the volume of the popular series of cast-iron radiators MC-140 can reach almost 1.5 liters, then for an aluminum radiator it is no more than 0.5 liters, and for bimetallic ones it is even less.
When calculating the number of brackets, they are guided by the provisions of clause 3.25 of SNiP 3.05.01–85 - one bracket per 1 sq. m of the heating area of the cast-iron battery (but there should be at least three of them). The heating area of one section depends on its type. For example, for the M-140 it is 0.254 sq. m, and for a battery of 12 sections, four brackets are already needed.
If the battery is mounted on three brackets, the mounting pattern looks like this: two points at the bottom, one in the middle at the top. The four brackets are installed in pairs on top of each other. And the bend of the bracket should wrap around the neck of the radiator (the junction of two adjacent sections).
Fastening of bimetallic and aluminum radiators follows the same scheme as cast iron. And the reason is no longer in the weight of the battery and the coolant, but in the thin walls of the steel liners of bimetallic products, in the low resistance to mechanical stress of aluminum and in the weak strength of the threaded connections of individual sections of both types of radiators. Therefore, they also need at least three points of support.
Cast iron radiators are installed on brackets with dowels fixed in concrete and brick walls. For bimetallic and aluminum radiators, the brackets can also be attached to wooden walls.
In other cases, for installation, you must use two floor stands with fixing to the wall of the upper part of the radiator. If the number of sections is more than ten, then three stands are needed.
Battery assembly
After diagnostics and troubleshooting, the batteries must be reassembled. The build process will be as follows:
- Lay all radiator components on a flat surface and inspect thoroughly. Threaded connections must not have cracks or chips.
- Clean all connections from dirt, and grind the ends, removing even a layer of factory paint. You can use fine-grain emery cloth to avoid damaging the surface and leaving it scratched.
- Wash all gaskets in soapy water, and if antifreeze is used as a coolant, then additionally treat them with a degreasing compound.
- Put seals on the nipple nuts and attach the sections on both sides. Using a special key, smoothly make several turns clockwise. Joining work is carried out starting from the upper holes, then the lower ones are fixed. Tighten the nuts all the way, but do it very carefully, since the aluminum thread can be easily damaged.
- Put a plug on the unused hole, and at the other end, install a valve for air release.
Next, the batteries are connected to the heating system, while it is necessary to ensure that the coupling connects the coolant supply pipe as tightly as possible. After the system is mounted, you can start the fluid and check for leaks.
The reason why the disassembly and assembly of aluminum sections becomes the first necessity, does not always arise spontaneously.
The most unpleasant reason forces the owner to attract a qualified specialist to urgent repair
your heating equipment.
The emergence cracks, obvious leaks, or fogging
weakened ribs, directly, on the section itself, lead to the idea of its inevitable replacement. Another reason -
increasing or decreasing the number of sections
radiator to change the heat transfer coefficient.
Dismantling an old cast iron battery
If the connections are painted over, a blowtorch is used to warm up
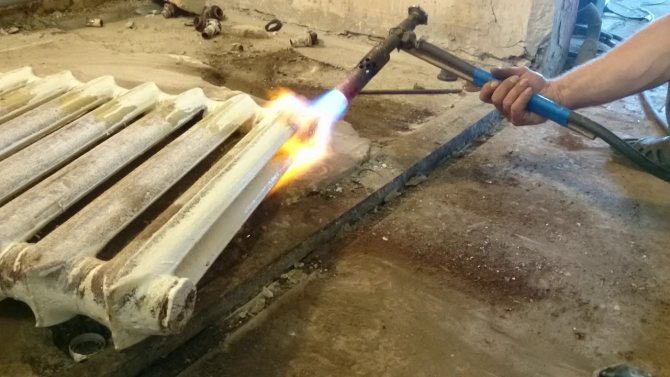
If you have to disassemble an old cast iron battery, some difficulties may arise. If the thread is stuck, it must be thoroughly warmed up before disassembling it using an autogen or blowtorch. When the joints are warm enough, you need to quickly rip off the nipples at the same time on both sides. By a similar principle, other stuck-on radiator elements are unscrewed.
After prolonged use of the device, the metal may corrode thoroughly. For drastic measures, a grinder and / or a hacksaw may be required. The remnants of the nipples are unscrewed from their places without fail, the thread is cleaned with a brush.
Sometimes the application of the described methods does not have the desired effect. The only solution to the problem in this case is to break the radiator with a sledgehammer. The battery is preliminarily removed from the mount, placed on a flat horizontal surface and hit on the axial part of the section until it falls off.
Dismantling and assembling an aluminum radiator with your own hands
The site where the radiator will be restored, covered with dense fabric
... If this is a table surface, then the main work will not take place on weight. The prepared place will protect soft aluminum from getting unnecessary deformations and scratches.
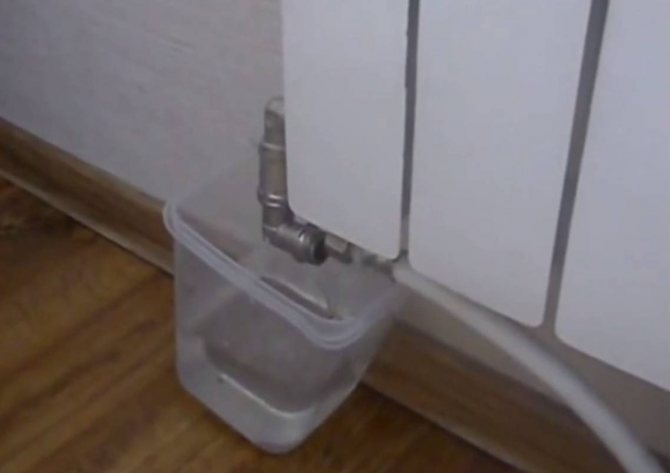
Important ! Before removing the union couplings, a rag is spread under the radiator to protect the floor from dirty liquid that may leak out during dismantling. You need to have a rag on hand to absorb the moisture remaining inside the sections
Disconnection from the heating network
Before starting disassembly, the radiator is disconnected from the heating network shut-off valves
... If the radiator has no shut-off valves, then
invite a housing and communal services worker
so that it turns off the heating riser for repair work.
During the heating season, after closing the radiator, pause. Since the water is still hot, wait a while until the liquid cools down
, and then disconnect the radiator from the heating pipes.
Heat carrier
remaining in the battery
poured into a prepared bucket
and proceed to the separation of the sections. Immediately after dismantling, the inner surface of the battery is rinsed with running water.
How to disassemble and reassemble the battery
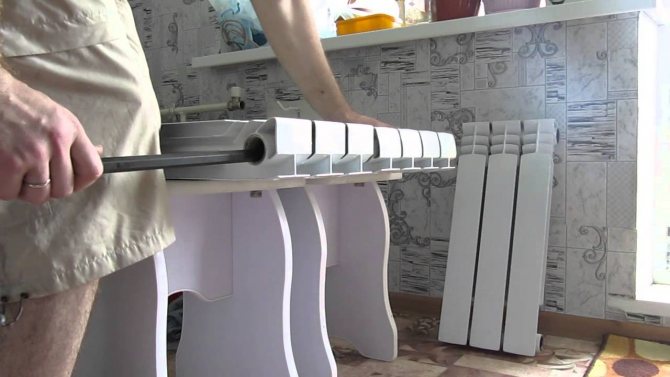
Aluminum sections, connected nipple nuts
... The inner part of such a connector has protrusions, for which a nipple wrench grips the nut and unscrews it. The nut is like a clutch, only
her thread is external
... One nipple nut has both right-hand and left-hand threads. They are made in pairs for the top and bottom connection. When the nipple is unscrewed, the sections diverge, when tightened, they are pulled together.
Preliminary all plugs and adapters are twisted from the ends
... The connector must be accessible from all sides for the nipple wrench.
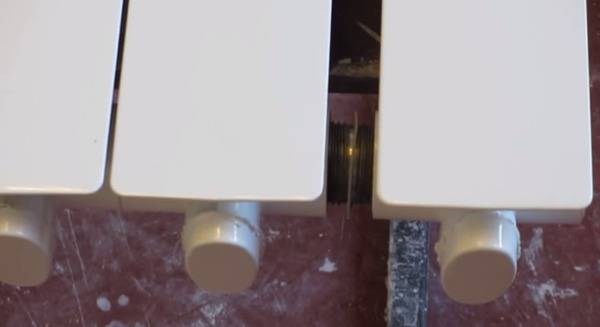
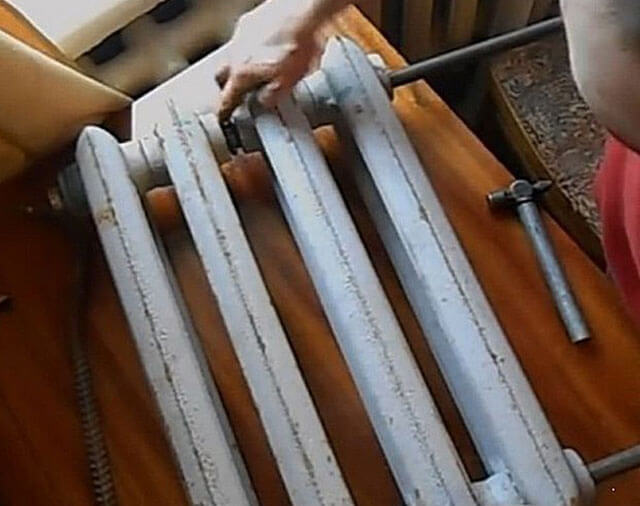
Photo 1. Fastening the sections of the aluminum radiator to each other: the nipple-nuts are unscrewed when disconnected.
To disassemble the battery, the tool blade is placed through the open end of the radiator into the slots of the unscrewed top
nipple-nuts and with some pressure make a trial
scroll counterclockwise
to move the connection. If the key turns the nut normally, then it is inserted into the grooves
bottom
nipple nut and, as in the first case, try to turn it a couple of turns.
Important ! When unscrewing the connectors, follow the sequence to avoid skewing. After disconnection, the exposed thread is carefully examined for cracks and chips, for thread integrity
If necessary, the joints are cleaned with fine emery cloth
After disconnection, exposed thread carefully examined for cracks and chips
, on the
thread integrity
... If necessary, the joints are cleaned with fine emery cloth.
Starting the assembly of the radiator sections, onto the upper and lower nipple-nuts put on o-rings made of paronite
, placed between the sections. I lightly press the sections against each other and screw them up alternately.
Turning the nuts
, so as not to get skewed, is limited
two turns of the key
.
If something went wrong
During operation joints between sections and steel nuts stick to each other
... This comes from the quality of the coolant supplied to the heating system. Sometimes even considerable physical effort is useless.
Despite the fact that sticking must be dealt with, aluminum is easily deformed
as it is a soft metal.
By heating with a construction hairdryer, the joints can be overcome stuck on rust
... If this did not help, too, having corroded too much, then the edging machine gets down to business.
Advice.
If the nipple nut does not loosen under heavy pressure, then
no need to increase the applied force with excessive leverage
... In the worst case, not only the nut itself will break, but both sections, which sit tightly on this nut, will crack.
The grinder is trimmed leaky section
, moreover, on the reverse side and stepping back from the edge of the joint by at least half the length of the coupling. This protects the working section from destruction and does not cut the connecting nut. The rust bounces off during trimming, making it easier to unwind the intact section.
Step-by-step description of dismantling works
A few words about when you may need to disassemble the heating battery:
- In the case of replacing the old radiator with a new one with greater performance and better appearance.
- If you need to add additional sections for the battery.
- If it is necessary to replace a single section or gasket that has leaked.
The instruction begins with the preparation of the necessary tools:
Step # 1: preparing the tools
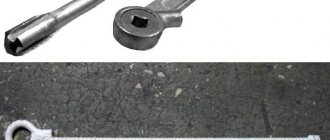
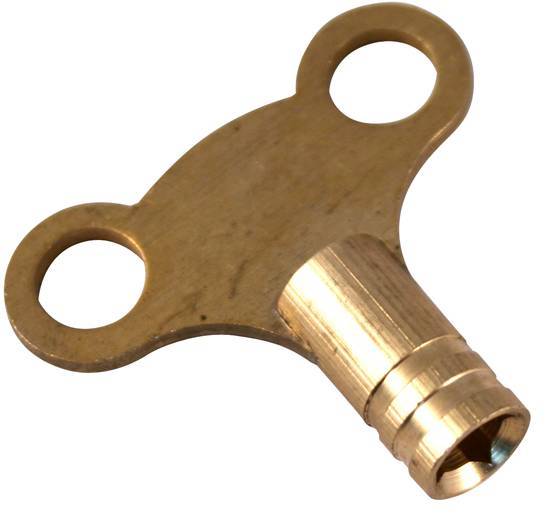
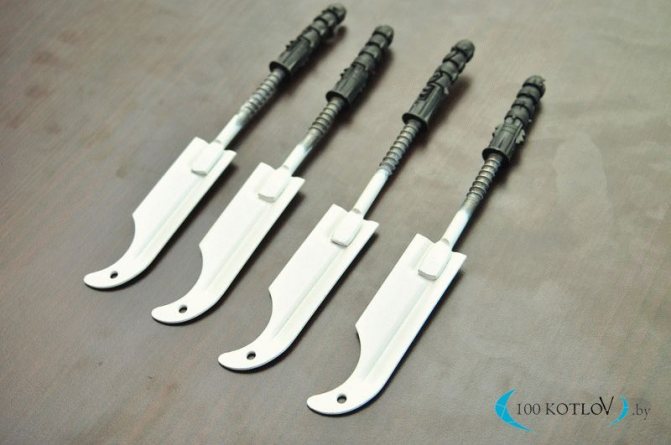
Photo of nipple wrench
Sample gas wrench
Advice: a nipple wrench, given that it is rarely needed on the farm, and its price is not the lowest, it is recommended not to buy, but to rent it, this will save the family budget.
Step # 2: disconnecting the battery
Before disassembling an aluminum or cast iron radiator, it is necessary to disconnect it from the heating system. To do this, it is imperative to turn off the heating and drain the water from the riser, otherwise you will simply flood the room and get burns.
Advice: it is recommended to cover the floor under the battery with a film, rags, or at least newspapers before starting dismantling in order to avoid getting any residual liquid onto it, which may end up in the circuit even after draining the riser.
Further, depending on the complexity, three situations can be distinguished:
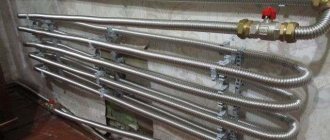
- Polypropylene pipes. In this case, the sleeve joint, as a rule, is twisted with bare hands, without causing any difficulties.
- Steel new. With some effort, you will most likely be able to spin the battery inlet and outlet with a gas wrench.
Disconnecting new steel pipes
- Old steel or cast iron pipes. First, we try, removing the paint from the docking place with a blowtorch and a metal brush, we try to untwist the connection as described in the previous version. But in systems that have worked for a long time, most often this does not work, and then we simply cut off the drive with a "grinder" or autogenous.
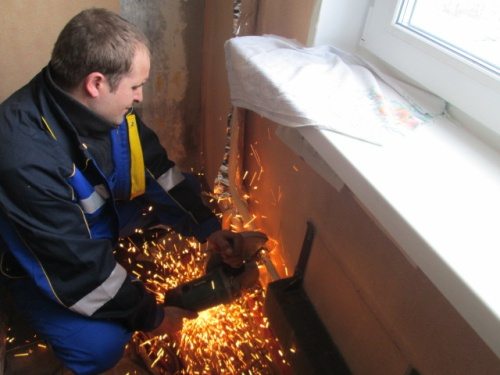
Cutting old sills using a "grinder"
After disconnecting the battery from the pipes, remove it from the hooks and place it on a flat surface.
Step # 3: disassemble the radiator
Battery section disconnection diagram
A piece of pipe or crowbar
The battery can be cast iron, aluminum or bimetallic.
The most difficult option for parsing is the first of the listed ones, and we'll start with it:
- How to disassemble a cast-iron heating radiator on your own:
Carefully, we check the thread on the futures or plugs, which can be either left or right. We insert the nipple wrench inside, we increase its torque using a piece of pipe or a crowbar
We tear off the thread by scrolling the tool a quarter of a turn, first at the top and then at the bottom. Then we also alternately continue to unscrew the nipples so that the radiator does not warp. The main problem with old batteries is that the fuses can become stuck in the course of many years of use and not give in to the key. In this case, the junction must be warmed up in a circular motion with a blowtorch, and then again try to unscrew the nipple. We repeat the procedure until the thread gives in. If, however, nothing comes of it, then you have to cut it with an autogenous gun.
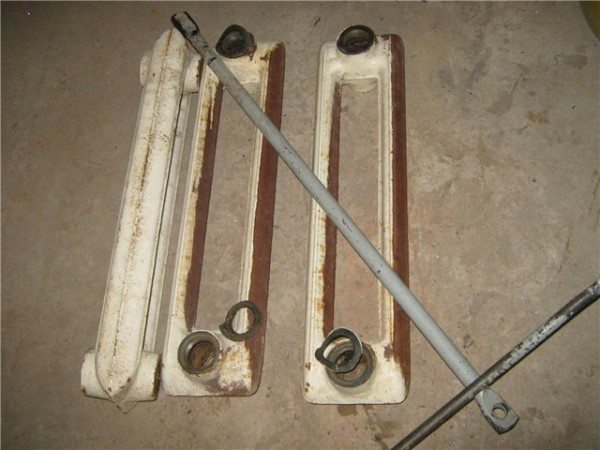
Disassembled old cast-iron heating battery
- Let's find out how to disassemble a bimetallic or aluminum radiator? The procedure is almost the same as above, but with a few differences:
- A smaller nipple wrench is used.
- It does not require as much effort when unscrewing the nipples.
- Plugs and futurocks are marked with the direction of the thread in the form of the letters S and D, where the first designates the left stroke, and the second - right.
- The metal gaskets between the sections are wiped, sanded and stored until the battery is reassembled.
Dismantling the aluminum battery
After completing the described tasks, you can replace the leaking part, add a section, or even install a new radiator in place of the old one.
Parsing into segments
To properly disassemble the aluminum radiator, you will need a special tool - a nipple wrench, which is made for this particular job. As a rule, it is not in stores, since it is a product of the mind and work of plumbing workers. You can get it in two ways.
The first is to try your luck in the local market (if there is one), where various used tools and other useful things in the household are sold. It is likely that you will find what you are looking for there, and at a reasonable cost. The second option is to contact any plumbing workshop and ask them for a nipple wrench for rent.
When your search is successfully completed, you can start directly disassembling the equipment. There is a specific order for this procedure.
- The first thing to do is to shut off the water in the riser to which the radiator is connected and drain the coolant from the system. If you are the owner of a private house, you can do it yourself. If you are dealing with a centralized heating system, then such issues can only be resolved through the organization that manages the building. To do this, you need to write a statement and then wait for the arrival of a specialist. By the way, in the case of living in an apartment building, you can perform such work only during the period when the heating season is already over. Otherwise, you simply will not be able to get permission, since stopping the centralized heating system will bring cold not only to yours, but also to your neighbors' apartments.
- After you figured out the disconnection of the water in the system, place containers under the joints of the radiator and the main line to collect the remaining coolant that will flow out during the separation of the equipment.
- Unscrew the fittings connecting the battery to the line. Check their condition at the same time.If you notice any shortcomings - cracks or "smoothed" threads - it is better to replace these elements with new ones. Just keep in mind that not all metals are combined with aluminum radiators. For example, fittings made of brass or copper cannot be used categorically, as this may cause an electrochemical reaction that will lead to the onset of corrosive processes.
- After detaching, remove the radiator from the brackets holding it.
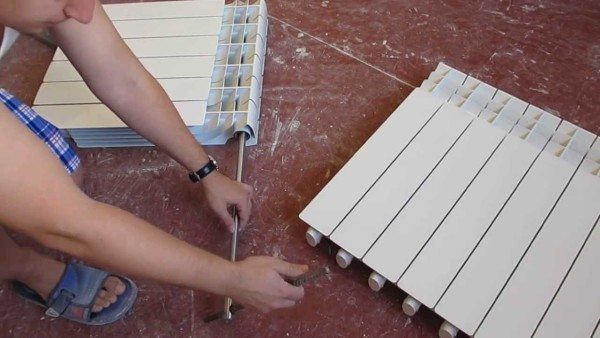
- Now it's time to use the very tool that you worked hard on getting it. The nipple wrench must be inserted into the battery exactly to the point that you are going to dismantle. Then you need to get the end of the tool into the hole provided for this on the connecting element. Once you have succeeded, turn the nut in the desired direction half a turn. In general, for this stage, it is advisable to invite an assistant who will fix the radiator in one place while you are fiddling with the connections. So, turned the nut half a turn, go to the one on the opposite side, and there repeat the same operation. Thus, by gradually unscrewing each element in turn, you can completely separate one section from the other. Be careful and patient - each nut should be turned just a little, about 5–7 mm. Otherwise, the section can be strongly skewed, resulting in damage to the radiator elements, and there will be a need to replace them.
- After unscrewing the correct nuts, remove the segment, and then check all the gaskets supplied with it. The quality and condition of the rubber seals plays an important role. Deformed gaskets can cause leakage. Therefore, in case of the slightest doubt about their suitability, it is better to replace these elements with new ones. Moreover, it is advisable to purchase paronite gaskets, since this material has proven itself best of all. If this is not possible, then try to find at least silicone seals. It is not recommended to put rubber ones, as they quickly fail.
How to determine the direction of the thread on a cast iron heating radiator
According to historians, the first cast-iron batteries appeared at the end of the 19th century. Epochs and views changed, new trends in fashion replaced the outdated ones, but, nevertheless, the device of a cast-iron heating radiator remained basically the same. Next, we will try to figure out what caused such a steady popularity and how difficult it is to install or replace such a cast-iron unit.
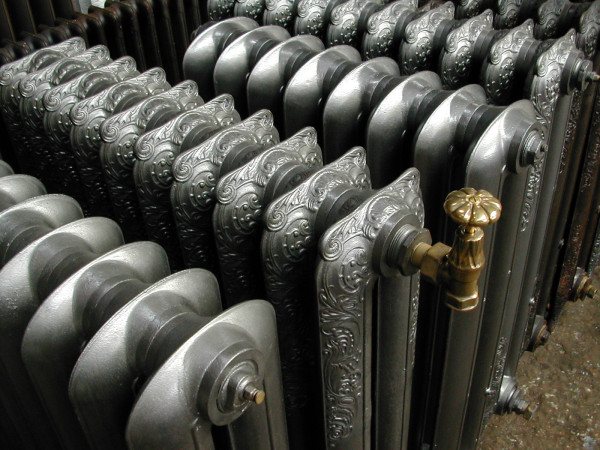
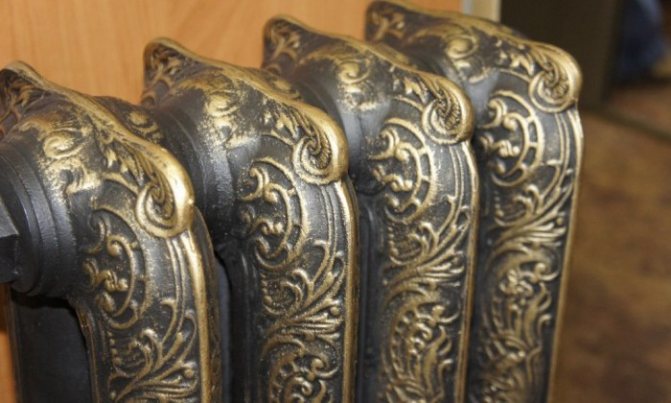
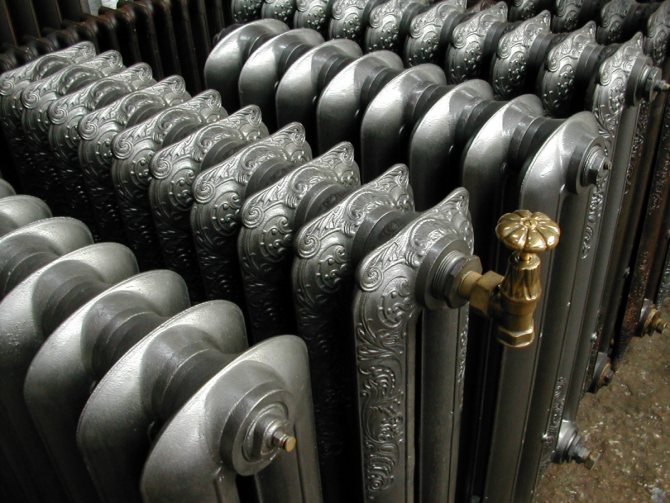
Photo of art casting radiators.
- Let's start with the fact that such units are considered almost the most durable... Most reputable manufacturers boldly give a 50-year warranty. And this is quite justified, for example, in Tsarskoye Selo, a radiator installed 110 years ago is still functioning;
Important: there is an opinion that now a cast-iron radiator is worse than Soviet times. This is only partly true. It all depends on the quality of the product and the manufacturer's firm. If the battery is molded according to national or European standards, then there is nothing to be afraid of. But purchasing units from Chinese or Turkish "masters", a person, in fact, takes a pig in a poke.
- Although cast iron is a brittle metal in terms of its characteristics, it is still quite strong... The working pressure for such a battery is 8 - 12 atmospheres, plus, with short-term surges or water hammer, it can withstand a load of up to 20 atmospheres. If we take into account the fact that in the urban network the pressure rarely exceeds 6 - 8 atmospheres, and the average water hammer force is 15 - 20 atmospheres, then the safety margin is obvious;
- Such batteries are present both in the budget segment of the market and in luxury goods.... The fact is that the price for the classic MS-140 is almost the lowest.At the same time, the cost of artistic thick-walled casting can sometimes be several times higher than the price of a good bimetal;
- Adherents of modern materials forget about the quality of the heat carrier in our urban networks... This tough "cocktail" is capable of knocking out many newfangled models. While cast iron is absolutely resistant to any chemical attack and neutral to corrosion, it simply does not rust;
Design of modern cast iron batteries.
- Due to the large diameter of the battery channels, any debris slips through it, practically without lingering, which is very important for urban high-rise buildings, with old piping;
- As you know, cast iron has a high heat capacity... The battery takes a long time to gain temperature, but also holds it for a long time. In case of interruptions in heating, this unit will give off heat for several more hours after it is turned off;
Battery connection options.
- Technically, installing a cast-iron heating radiator with your own hands is not very difficult.... With a tool and a couple of helpers, the job can be completed within a day;
- Another important advantage is the fact that components for cast-iron heating radiators can be found in any hardware store. and the price for them is quite acceptable;
Characteristics of modern cast iron radiators.
We sort of figured out the reasons for the nationwide popularity.
Now let's talk about the pitfalls of these heaters:
- The first reason many people refuse cast iron is the serious weight of the structure. Judge for yourself, a standard section has a mass of about 7 kg, on average 7 - 10 sections are installed per room. As a result, we have from 50 to 70 kg of an empty structure; when filling, another 1 - 1.5 kg is added for each section. In addition to installation problems, not every wall can withstand such a unit;
- The minimum volume of coolant in one cell is about 1 liter. For modern competitors, this figure is 3 - 5 times less. And as you know, the more liquid, the more energy is required to warm it up and maintain the temperature. Plus, it is very difficult to quickly regulate the temperature in such systems, due to the high inertness;
Data of the classic cast-iron radiator MC 140.
- The area of such structures, in comparison with modern counterparts, is somewhat smaller, respectively, and the heat transfer is lower;
- Reproaches about the unattractive design are not consistent, to some extent they can be addressed to the common MC-140. As for the figured casting, in their beauty they leave far behind their modern counterparts;
Tip: having decided on the type of design, it is better to start with the purchase of the batteries themselves. The fact is that such things as a cap for a cast-iron radiator, a Mayevsky crane, suspension brackets and other accessories are often included with the product.
If your cast-iron battery does not warm up well enough, and for some reason you don’t want to change it to a new one, you can prevent it, clean it, rinse it, repaint it and it will last as long.
Dismantling cast-iron heating radiators is an easy task, but it requires accuracy.
- Initially, you should make sure that the water is drained from the system, in this case you should not rely on your own knowledge, it is better to contact the locksmiths. Since even in the summer, the water may not be drained without special need;
- Further, the instruction prescribes to disconnect the unit from the system. If there is a threaded connection, then everything is simple, took a gas wrench and unscrewed it. In the absence of such, you will have to use a grinder, and then remove the structure from the awnings;
- In order to make major preventive maintenance, it is necessary to disassemble the "button accordion" into sections.Directly disassembling cast iron heating radiators begins with unscrewing all side plugs. There is one nuance here, so that the fragile metal does not burst, the plugs must first be heated with a blowtorch;
- Care should be taken when unscrewing. The thread of the cast iron radiator can be right or left;
- The problem of how to determine the direction of the thread in cast iron radiators among professionals is easy to solve. On the right side of the section, a right thread is cut, respectively, on the left side there will be a left one;
Advice: since it can be difficult for an amateur to determine the thread on a cast-iron radiator, especially when unscrewing the plugs, pay attention to the plugs themselves. Under a layer of paint, they must have the letter "P" or "L". Which means right-hand or left-hand thread.
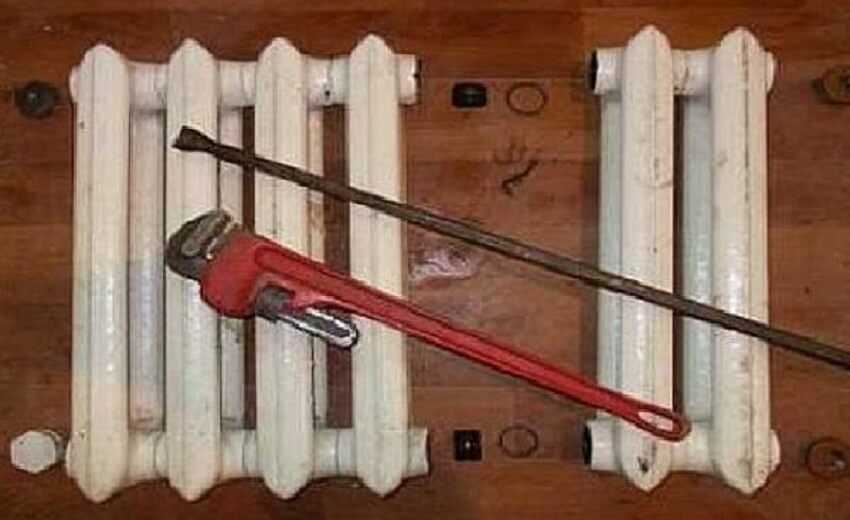
- After unscrewing the plugs, you have access to the inside. In general, the sections are connected by nipples, they resemble pieces of pipe with different types of threads at both ends. The nipple has grooves for the radiator key from the inside. The photo shows such a key and a screwing diagram;
- But, as a rule, in old batteries, the grooves for the radiator key are already rusted and even after heating, it is impossible to unscrew the nipple. This is where the usual grinder comes into play, the old nipples are simply cut. After that, their remains are sprayed with a rust remover and carefully knocked out of the thread with a chisel;
- When your cast-iron "accordion" is disassembled into sections, its interior is rinsed with water under high pressure. The paint on top can be peeled off using a drill bit or a grinder with a metal brush attachment;
Advice: if there are old iron pipes in the apartment, then it is better to immediately change them to plastic, and bump into the neighbors, from above and below. Several meters of pipes with fittings will cost a penny, and it is quite easy to solder them.
As already mentioned, the assembly of sections in such radiators is performed using nipples. Before connection, a sealing fum tape should be wound on the thread. Old masters prefer to seal with hemp and oil paint, but this takes skill.
Nipple with multidirectional thread.
The instruction is something like this:
- The radiator key is inserted into the section, a nipple with a fum tape is put on it, after which both sections are connected and the nipple is screwed in;
- Do not forget to first put a rubber gasket on it, it will serve as a seal between the sections;
- You need to tighten it with a reasonable effort so that the metal does not burst.
The connection of cast-iron heating radiators to the system can be side, bottom or diagonal, but whichever option you choose, it is better to install shut-off ball valves at the inlet and outlet immediately and mount a bypass. Thus, you will always have the opportunity to replace the radiator without shutting down the system and draining the water.
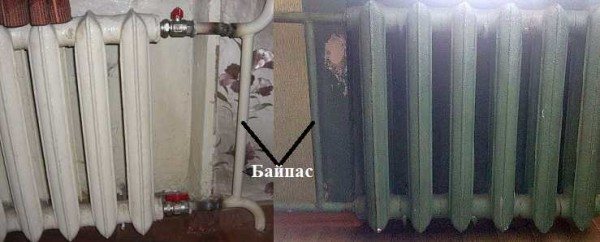
Connection with valves and bypass.
Fasteners for cast-iron heating radiators need to be taken special. If the brackets that come with the kit do not suit you, then when choosing from the catalog, you should pay attention only to the brackets or floor stands marked "reinforced", they are designed for the weight of cast-iron structures.
Important: for 6 - 8 sections, 1 bracket is installed from the bottom in the center and 2 brackets from the top. With an increase of 5 cells, an additional canopy is added at the top and bottom.
The video in this article shows the technology for installing radiators.
As you can see, installing a cast-iron heating radiator with your own hands is not the highest mathematics, and with a strong desire, such work can be done by any good owner. If the water is drained from the system, you can try, especially since you always have time to invite locksmiths.
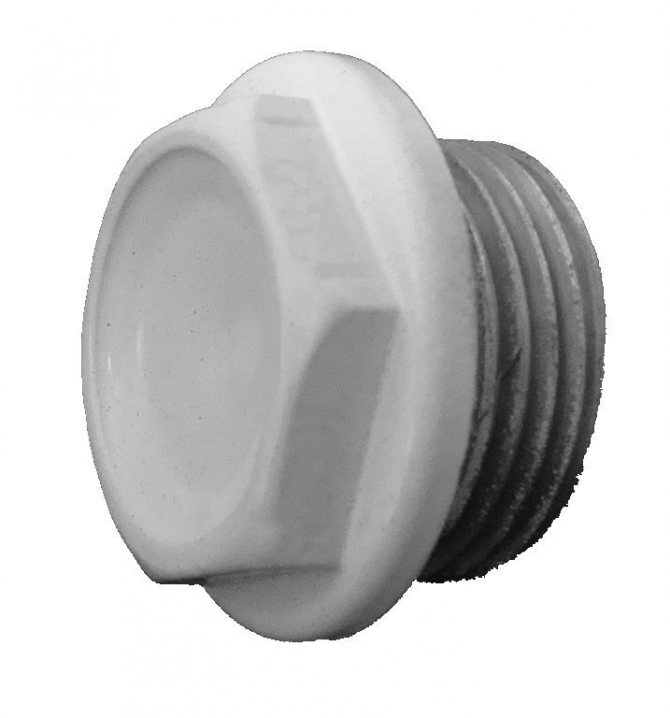
Heating radiators can be called the most famous equipment, since almost everyone has come across it.However, not everyone understands what is needed to install such a seemingly simple device and how its constituent elements work. In particular, we are talking about a radiator plug, which, most likely, not many people know about.
In most cases, radiators are sold assembled; for operation, the device only needs to be fixed on the wall and connected to the heating system. However, in addition to this, you will need to purchase additional devices. These include the following:
- Lead-through plug for a cast-iron radiator in an amount of at least 2 pieces. The fixture has holes on both sides, in which the threads are cut.
- Plugs screwed into the radiator housing to prevent coolant leakage.
- Mayevsky's taps for bleeding air from a heater.
- Accessories for installing radiators, these can be metal anchors or special brackets.
The number of radiator sections is determined by the need for thermal energy, so the length of the heating device is increased or shortened.
Modern specialty stores offer radiators and a complete set of accessories for their installation. This allows elements of the same color to be matched to the color of the heater. In addition, in this case, it is possible to select the most compatible materials. For example, if the battery is made of cast iron, then the plugs must also be cast iron. It is not recommended to use a cast iron radiator plug on copper heating appliances.
Due to the high risk of galvanic corrosion, it is very important to consider the combination of materials. In addition, individual metals are prone to the formation of a galvanic pair, in which case the cast-iron plug for the radiator becomes the cathode, and the material from which the pipe is made turns into the anode. As a result, the service life of the heater is significantly reduced.
The simplest element used in the installation and assembly of radiators is an aluminum stopper for heating radiators. But even the simplest device requires special attention, otherwise big problems may arise during operation.
The process of installing a radiator plug cannot be called complicated, since almost all of them are made of the same type, sizes or types of threads may be different. Such devices also work according to the same principle.
When choosing a stopper for a radiator, it is important to consider the following points:
- The radiator and plug materials must be matched.
- The plug thread must be of a specific type. For example, for installation on the left side of the battery, it is recommended to use a left-hand thread, and on the right side, a radiator plug with a right-hand thread is installed.
- The hole in the radiator can be closed off with a blind or through plug.
- The device should have an aesthetic appearance and match in color with the heater.
- The diameter of the thread in the cast iron battery at the inlet and outlet is of great importance, plugs can be used as transition elements.
Most often, the battery is equipped with the following devices:
- Transit plugs for radiators in the amount of 4 pieces.
- Brackets for installing the heater and plastic anchors for installing the fasteners themselves. Standard radiator sizes require 2 brackets and 2 anchors.
- Cap and tap of Mayevsky. Sometimes the second element is replaced with another plug.
According to the principle of action, plugs are divided into two types. In the first case, they simply block the path of the coolant, in other words, they perform the function of a plug. The second type is an adapter from one diameter to another. In this case, the plug has an external thread on one side and an internal thread on the other.
Before installing the plug for the aluminum radiator, fix the heater securely to the wall.
In general, you can follow the instructions below:
- First, the individual sections are assembled into a single heating device, the number of sections is selected individually for each case. When connecting the elements, FUM tape is used, which allows you to achieve maximum tightness.
- Next, they choose the place where the radiator will be located, most often they are installed under the window. In this case, it is very important to adhere to the recommended distances from the wall, floor and window sill.
- Then holes are made in the wall using special tools, plastic anchors are hammered into them and metal brackets are screwed in. A radiator is hung on them.
- Now you can install plugs for bimetallic radiators, especially since there is no difficulty in this process. Their body is made in the form of a hexagon, which allows you to use any key for tightening. Do not overtighten the plug to avoid damaging the threads or the body. During the swirling process, an invisible microcrack can form, into which water under pressure can flow. In addition, repairing batteries in the winter is not a pleasure for anyone.
- After the plugs are installed, the inlet and outlet piping can be connected. In parallel, a Mayevsky crane is installed in the upper hole of the radiator, and the lower hole is closed with a plug. It is worth noting that the air venting device is inexpensive and the heating efficiency is greatly improved. To make it easier for air to escape from the system, heating devices are installed with a slight slope, of several degrees.
- Testing of heating devices and joints. For this purpose, liquid is poured into the system and problem areas are examined.
Experienced craftsmen and professionals recommend taking into account the following points:
- Care should be taken when using a cast iron radiator plug on heaters. The fact is that cast iron is easy to compress, but it is considered a rather brittle material. Therefore, even a weak mechanical impact or impact on a hard surface can cause the formation of microcracks. As for steel products, they are more reliable in this regard.
- When studying the materials for the assembly and installation of heating devices, there are recommendations for using conventional paint for more tight joints. To some extent, these statements are true, however, it should be borne in mind that such connections do not have a very attractive appearance, and when disassembling them, you may encounter certain difficulties. It is important to understand that modern heating devices and their accessories do not require painting.
It is not difficult to choose and install radiator plugs, but it is necessary to approach this process quite responsibly. It is very important to select matching materials, to correctly determine the type of thread and the size of the plug, as well as its purpose. By following the recommendations of professional craftsmen, you can avoid many problems during the operation of the heating system, including batteries and radiators.
How to disconnect cast iron sections
Now about how to disassemble a cast iron heating radiator. The most common of them are in old houses and apartments MC-140. Their sections are also assembled using nipple nuts and gaskets.
If, it will be difficult to disassemble it:
- over time, the interface between the sections "boils" due to rust;
- key slots are corroded by water.
Prepare these tools:
- radiator key (nipple);
- plumbing analogs (No. 3 and 2) for twisting the sleeves (side plugs) and plugs;
- small sledgehammer and chisel;
- a blowtorch or a hair dryer and a metal brush.
- several bars to raise the battery off the floor.
The radiator wrench, the price of which is not very high, is a round rod with a section of 1.8-2 cm. The metal is flattened at one end.The width of this scapula is 2.8 × 4 cm, the thickness is 0.6 cm.
A ring is welded to the rod from the opposite end. A lever is inserted into it to facilitate work.
The length of the tool is half the length of the largest battery (12 sections), and about 30 cm is added to this value.
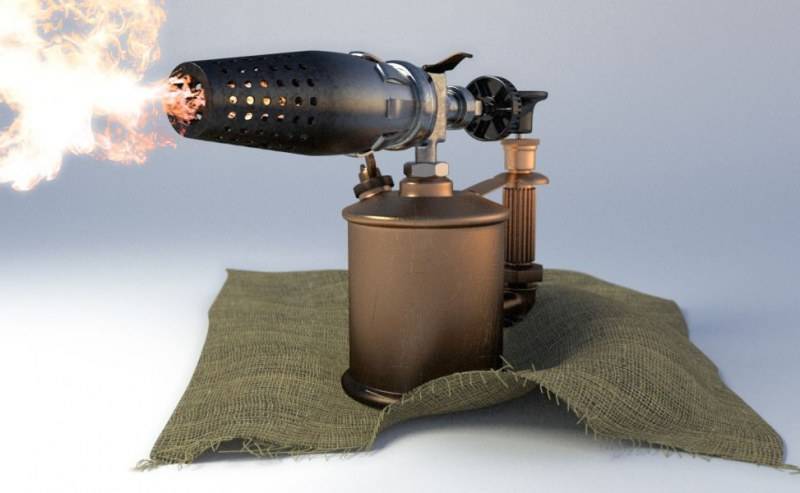
- It is difficult to work with stuck intersection joints. Sometimes they are so firmly "fused" that even great physical efforts do not separate them. In this case, the instruction recommends that before disassembling the joint, heat it up with a blowtorch or hairdryer.
- Heat the cast iron to a crimson glow, then try to disassemble the joint.
- Unscrew the plugs first.
- Place the wrench on top of the battery, aligning its head with the nipple-nut twisting area. Along the sectional end, draw a circle mark with chalk on the tool shaft.
- Snap the paddle into the lower inner groove. Turn the tool slightly along the left-right axis until it reaches the mark.
When the thread succumbs to your efforts, do not unscrew it immediately. Twist the nipple one full turn, then repeat the operation with the top nut. Thus, proceed until you unscrew the section
Such caution is needed due to the fact that cast iron may burst due to skew.
How to disassemble cast iron batteries with your own hands
Most often, old-style houses and apartments are equipped with MS-140 cast iron batteries. Nipple nuts and gaskets are also used to assemble their sections. It is especially difficult to disassemble an old battery. in the course of its long-term operation, the gaps between the sections boiled with rust. As a rule, in such cases, the key niches are eaten away by the coolant.
It is also important to keep in mind a significant mass of cast iron. For example, the weight of one battery for 12 sections is 90 kg: it will be difficult to cope with such a product alone.
To implement the procedure, you will need the following tools:
- Nipple radiator wrench.
- Plumbing fixtures for unscrewing sleeves and plugs.
- Small sledgehammer and chisel.
- Blowtorch (it can be replaced with a building hair dryer).
- Steel brush.
- Wooden blocks for installing the battery on the floor.
In the role of a radiator key, a round metal rod with a diameter of 18-20 mm flattened at one end is used. The dimensions of the flattened part are 28 × 40 mm, with a thickness of 6 mm. A ring is welded to the opposite edge of the rod, through which the lever is threaded. The length of the radiator wrench should be as long as half of the largest 12-section battery, plus 30 cm.
Product design
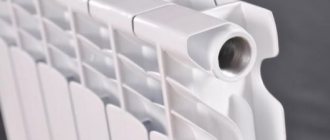
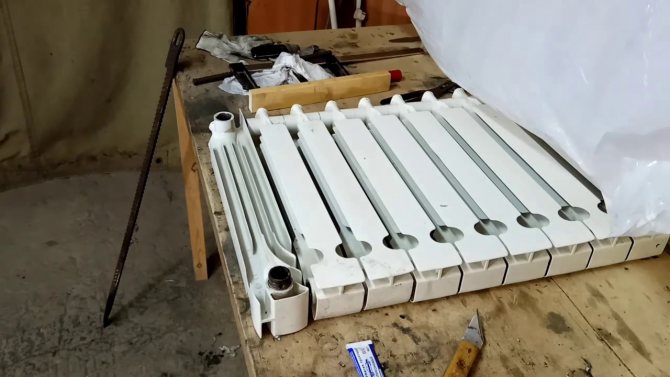
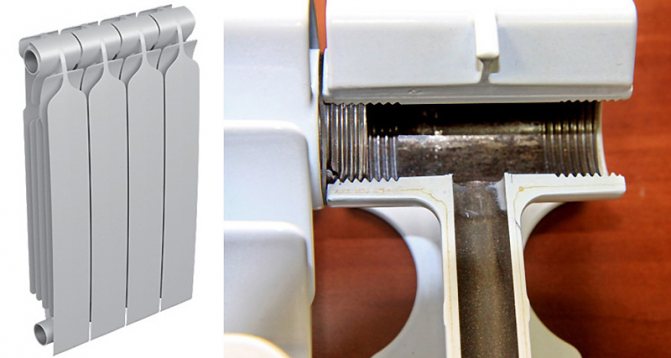
An aluminum radiator is a structure of separate sections, interconnected by means of nipple nuts. In fact, this connecting element is a cylinder, on each side of which an external thread is made. The cylinder is empty inside. Radiator sections are screwed onto each nipple-nut from both sides.
Connectors are located at both the top and bottom of the battery. Thus, each section of the radiator is attached to the adjacent one at four points. The nipple-nut is made in such a way that it is completely invisible in the assembled product.
There are projections on the inside of each connector that serve for the installation procedure. A special tool clings to them, with the help of which the nut is untwisted and tightened. In this case, the direction of the thread should be taken into account - on some elements it is right-hand, on others it is left.
In order not to play the guessing game, just pay attention to the markings in the corresponding areas. If the letter D is indicated there, this means that the thread is right-hand
The letter S indicates the left
It is very important not to confuse, as an attempt to unscrew the nut in the opposite direction can lead to thread stripping and, consequently, damage to the element.
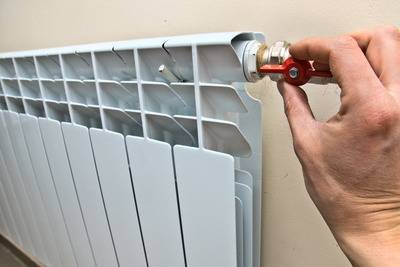
Installation of valves for radiators
After screwing in the passage plugs, you can proceed with the installation of shut-off and control valves.To do this, you can use ball or radiator valves with the ability to manually or automatically adjust the flow.
Cranes for radiators have several designs, but the most convenient in terms of installation are cranes with union nuts (American). By equipping the radiator with such a tap, you can quickly shut off the coolant flow, then unscrew the connection and dismantle the battery without stopping the entire system. The most important thing is that the American woman can be used repeatedly, and this does not depend on a rubber or paronite gasket, or the tightness of the joints is achieved using tapered metal parts.
From where the supply pipes are connected (from the slopes of a niche or wall), the use of corner or straight taps equipped with union nuts depends.
http:
In order to tighten such a type of connection as an American, you will need a special wrench that is inserted into a pipe with a nut. The sections can be varied. Best of all, if you need a hex wrench, all you need to do is get the correct size. The situation is complicated if there are two protrusions inside the American woman. In this case, for a high-quality hitch, you will have to select a profile of a suitable size. It is best to make a L-shaped square key yourself. Its working area should taper slightly towards the base. This will work with all types of American women.
The junction of the pipe and the plug must be sealed with a winding. Plumbers often use flax strands and UNIPAK investment paste for these purposes. FUM-tape can only be used for high quality threads, which do not have sharp corners and have a special notch that prevents twisting of the sealing materials.
To check the compatibility of two threaded parts, you must first connect them without tow. The required amount of tow depends on the density of collection of the compound. Too much winding can lead to deformation or cracks on the surface of parts. An insufficient layer can cause leaks.
http:
The sealing material is wound in the opposite direction of the thread. A thin rope is collected from individual flax fibers and a branch pipe is wrapped around it from the outer edge. Each turn should clamp the previous one, preventing scrolling. After the entire thread is filled with the reel, it is coated with paste and screwed into place.
Radiator connection kit overview
Good afternoon, dear readers. Today we will consider a rather light, but no less important topic: "Review of the kit for connecting an aluminum radiator (futorki)"
I won't write anything in the introduction, and it's better to get down to business right away.
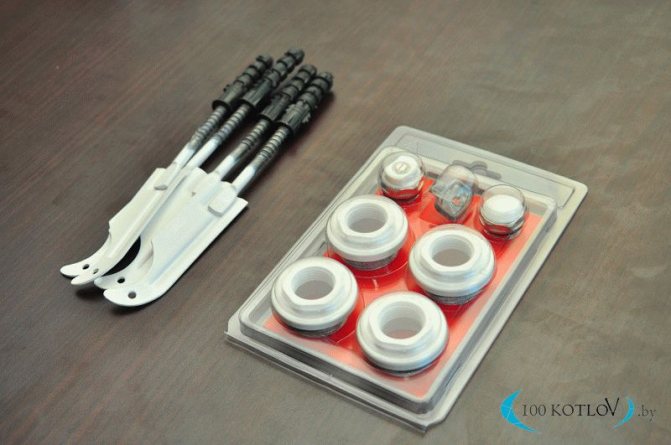
Before us is almost complete connection (except for taps).
- mountings for radiators with dowels
- a set of connection of foot-pieces 4 pcs., A vent (Mayevsky's tap), a plug, a key for an air vent
Fastening a radiator with a dowel.
The mount is metal covered with white paint, which will not stand out against the background of the radiator. First, we drill a hole in the wall, hammer in the dowel, twist the mount into the dowel. The radiator lies in the recess of the fastening. To mount the radiator for better fixation, you will need 4 pcs. fastening.
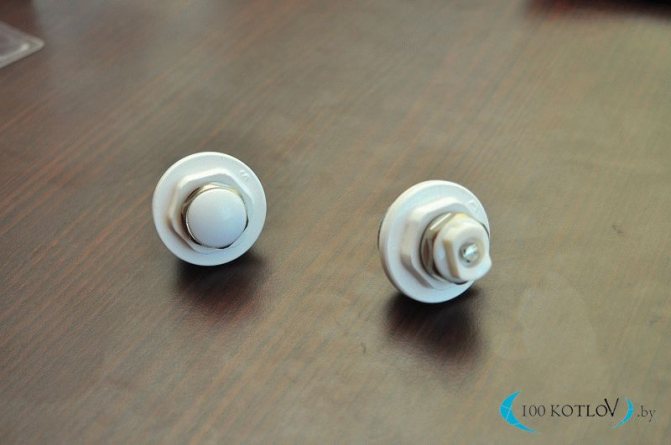
Futorka (right)
The set includes 2 pcs. shorts with gaskets. They are also painted white to make them stand out. They are screwed onto the radiator without much difficulty. If you look closely, you can see the letter "D" on the footboard - this means which side the footboard is screwed on. in this case "right".
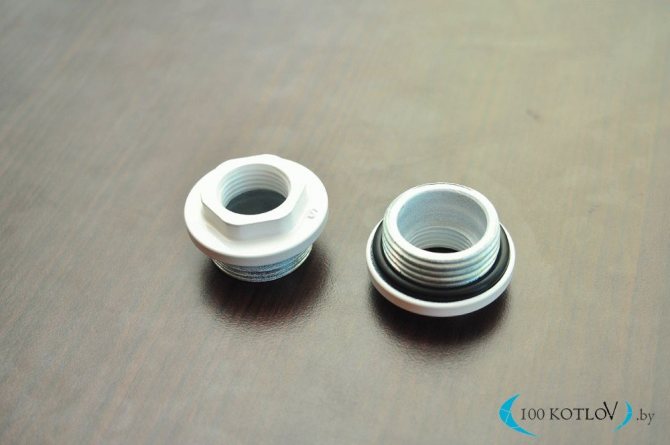
Futorka (left)
Everything is the same with the coating and application as the previous footwear, only here there is the letter "S" and, accordingly, the connection is "on the left".
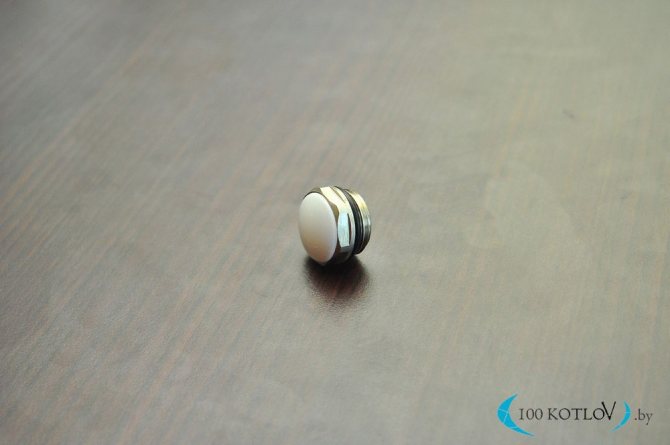
Plug
The plug is screwed into the foot just to plug if there is no connection on this side.The plug is screwed into absolutely all footwear, be it left or right foot. Plug color white, complete with gasket.
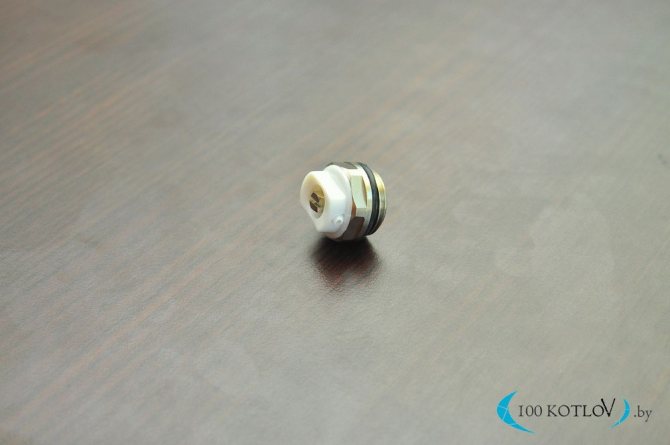
Air vent or Mayevsky crane
The function of the air vent is to remove the air that has formed in the heating system, or rather in the radiator. The air vent is mounted in such a way that the drain (small thin hole) faces downwards. When all the air is vented from the radiator, you need to drain a couple more liters of water and, accordingly, so that water does not splash in all directions, but strictly downward, the direction should be down
Note this mounting detail as the direction of the air vent hole. Air vent color white, gasket included
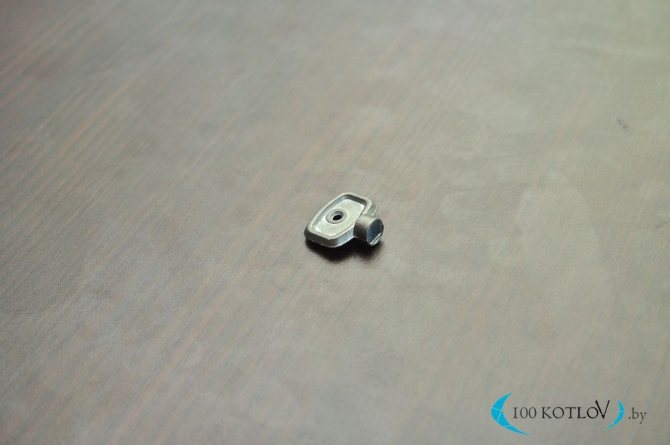
Airline key
You can open the air vent using a special key for this. If you do not have a key or you have lost it, you can use a regular flat screwdriver, just do not go to the construction markets specifically for it. There were such cases when this key was sold)))
Futorka with a plug assembly (left), a futorka with an air vent assembly (right)
This is how the assembled footwear looks like, whether it is a plug or a vent, or there is a continuation of the pipe suitable for the radiator.
Connecting an aluminum or bimetallic radiator.
Here is a schematic illustration of how the radiator (battery) is connected. I think it is unnecessary to explain something. Everything is perfectly shown. We connect either a ball valve with an extension with a pipe, or a plug, or an air vent into the footboard. But in any case, we will have a supply pipe to the radiator, a return pipe from the radiator, an air vent (always put in the upper part of the radiator, a plug.

Cutaway upper part of aluminum radiator with foot
This is what a screwed-in case looks like into a radiator. As you can see, the futorka is screwed into the radiator quite well and deeply, which is quite reliable.
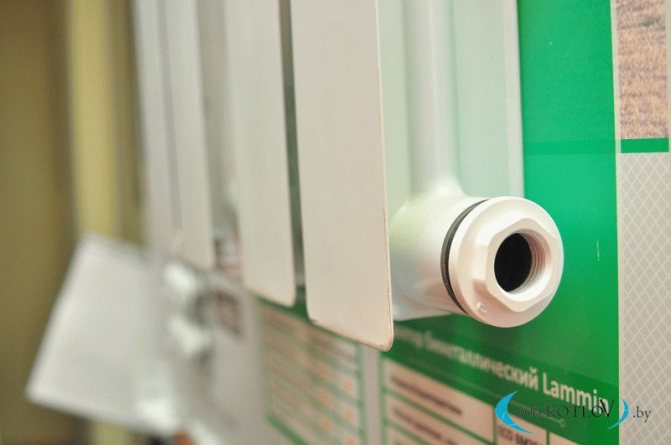
The box is screwed into the radiator (connection from the bottom)
Here we screwed the foot ("D" -right) into the one-piece aluminum radiator. to show how she looks from this side.
At first glance, the fittings are very simple and insignificant, but choose even these parts wisely. And remember, it is always better to entrust the business to professionals, both in terms of sales and installation.
Thank you for your attention, we will soon prepare you more necessary and interesting articles.