How to prepare the sewerage system for winter in an unheated cottage
One of the weak points of an unheated summer cottage, more precisely, a summer cottage where no one lives in winter, is the sewer system, of course, if there is one.
The fact is that even if no one uses the sewer in winter and the sewer pipes are laid with the correct slope, there is still water in the siphons and knees, the so-called water plug.
The task of the water plug is to keep odors and gases from the sewer out of the house. This quality, which is very necessary and useful in summer, can turn into harmful in winter. Because water, due to its physical properties, expands during freezing and can damage siphons and knees.
In order for the sewage system to work properly next year, in the fall, before leaving for the city for the winter, it is advisable to perform a few simple steps:
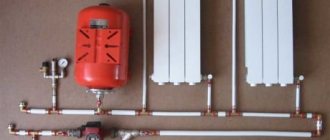
Installing a new accumulator membrane
If water is found in the air compartment, urgent measures are taken to replace the membrane. It serves as a fuse between the two main components of the device, the storage and air chamber. To get to the membrane, unscrew the flange with the water supply connection. The membrane is removed. The tank is dried and a new part is installed.
During installation, hermetic means are used. They are used to coat the contact point of the flange with the membrane. This allows you to organize the correct operation of the water supply system, protecting the tank from loss of air pressure through the unprotected joint. After carrying out all the work, the accumulator is connected to the water supply and drainage pipes. If the membrane is replaced not before the winter period, the device is put into operation.
Preparing the toilet.
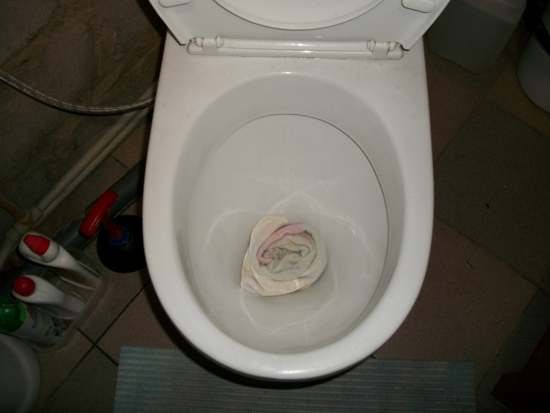
The largest water plug in terms of volume is in the toilet, and it is understandable - the largest traffic is through the toilet. In addition to being the largest, this plug is located in the knee of the ceramic toilet bowl, which has very low deformation properties. Simply put, when the water in the toilet bowl freezes, the bottom of the knee simply breaks off. Sometimes this happens very nicely and neatly, so that the breakaway part can be glued in place, but it is better not to risk it.
When preserving the summer cottage for the winter:
- flush the toilet cistern several times,
- shut off the water supply to the toilet cistern and flush out the water from the cistern.
- unscrew the tank lid and make sure that there is almost no water left in the tank, if you wish, you can remove the remaining water with a rag or sponge (this is not necessary if there is not much water left in the tank).
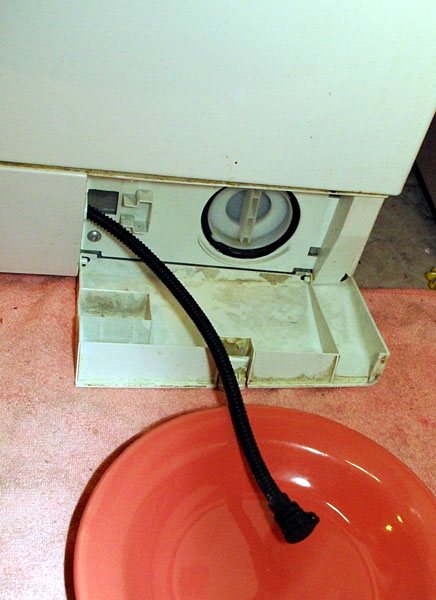
- Scoop out as much water as possible from the toilet bowl. It is best for this to use a special scoop made with a wallpaper knife from a plastic bottle, shaped like a ladle. However, you can scoop out the water with any means at hand.
- Remove excess water from the bowl with an old cloth or sponge.
- To prevent odors from the sewer network from entering the house in winter, plug the hole in the bowl tightly with a rag.
- You can still throw rags on top and even close the lid, although this is not necessary:
Preparation for the winter of suburban engineering systems and units
The anticipation of entertainment in winter can please when competent preparation for winter has been carried out. Thanks to a number of specific activities, you can not be afraid of the cold weather.
And also to prevent the risk of freezing of engineering systems if you plan not to visit the dacha in winter.
How is the preparation for the winter in a private house carried out? What steps does the algorithm of such preparation consist of? Experts will tell about this and many other things in our today's article.
In general, the dacha is not just a family's summer residence.Rather, it is a special place where you can feel the unity with nature. And also relieve the stress of being in a metropolis. The dacha can be viewed as a remedy against the crisis ...
Thoughtful preparation of the summer cottage for the winter can be considered the basis for a competent meeting of the cold season. After all, engineering systems in the country need protection. And in cold weather they can fail in the absence of their preparation.
The process of preserving a summer cottage for the winter consists of several steps. Each of them is important. And they must be carried out in strict accordance with the safety requirements and safety of devices and assemblies. Consider what actions need to be performed in the fall at the dacha.
Leaving water in pipes means getting a huge number of problems in the spring. A burst pipe is by no means the most pleasant surprise for a summer resident. And how often the sewerage breaks, if the summer cottage was not prepared for the winter! ..
It is water that can cause the most trouble. After freezing, it increases in volume and is capable of destroying even the strongest connections. Therefore, the drainage of water from the water supply system should be considered the most important component of preparing a summer cottage for the winter period.
The sequence of actions is as follows:
- the check valve stops working. He is responsible for the flow of water from the well into the house;
- when arranging your own well, the water will then merge into the drain;
Your own well allows you to get free water in unlimited quantities. Such pleasure is not cheap ... However, it is quite possible to equip your own well with your own hands. Read about it in the next article on our site;
- in the absence of such a valve, you will have to disassemble the unit for entering water into the house manually. And then drain the water from it.
After draining the water from the water supply, you will need to disassemble the filters. They come after the accumulator. The cartridges are removed from the filters, cleaned and sent to storage.
The presence of a pump in the house will require its release from water. Preparing the pumping station for winter at the dacha when located in a separate well will not require any action at all. After all, the pump is mounted at a considerable depth. And the soil freezes by no more than 1.5 m (information for the Moscow region).
However, many summer residents prefer not to risk it. The pump is removed from the well, water is manually poured out of it. And all equipment is kept in a warm room. Of course, such storage will be preferable.
Preparing the washing machine for winter in the country also requires certain steps. Some manufacturers note in a separate paragraph in the instructions that the unit can be left in an unheated room.
However, there is often no such footnote. What do you need to do? Preparing the washing machine for winter is carried out as follows:
- the "Water drain" operating mode is switched on;
- at the end of this mode, you should disconnect the machine from the network and sewage;
- open the door for additional cleaning. From there also drain the water and remove the debris;
- for more confidence, you can turn the machine upside down.
Now your washing machine is ready to face the cold. And it will retain its functionality by completely removing it from its water.
Choosing a washing machine, many are lost in front of the variety on sale. Which one to choose: front-loading or vertical? ..
Preparing a dishwasher for a cold season is similar to a washing machine. Water drain - only full! Even a small amount of it can quickly disable the unit. After all, if it remains, albeit in a small amount, in small tubes inside the car, the water will freeze and tear it apart. And replacing such small pipes can be very problematic.
As the owners of dishwashers say, inside these units there are real labyrinths of pipes filled with water.And if you are not sure about the complete absence of water inside the car, it is better not to risk it. And take the cars to the city in a warm room.
The toilet also needs frost preparation. After all, there is also a large amount of water inside it.
You will need to remove water from the drain tank. It is in it that its significant stock is stored. To do this, you will need to drain the water from it several times. Then close off the access of water to the toilet and drain the remaining water again. Now you need to scoop out the water from the toilet bowl. You can use a homemade scoop. You can make it from an unnecessary plastic bottle. But any remedy will do.
Now we wipe the toilet inside and out dry. And so that in winter the smells of the sewage system do not penetrate into the room, we plug all the openings of the toilet bowl with a rag. You can cover it with rags from above.
- Instead of water, an anti-freeze liquid is poured into the toilet bowl. It is made on the basis of alcohol. This allows her not to freeze even in severe frosts. Usually automobile "non-freezing" is used.
- Some people also add 10% salt to the same “non-freeze”. This gives additional assurance that the liquid will not freeze. In addition, the salt will not allow the liquid to freeze if the alcohol component disappears in the “non-freeze”.
These tips have been tried by many summer cottage owners. Maybe our readers will also share tips for preparing a toilet in the country for the winter?
Winter can be different. However, this year forecasters promise a very harsh winter ... And it will be necessary to protect the sewage system from the negative effects of frost.
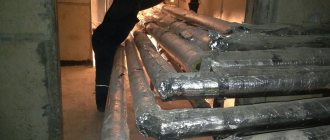
What is required for this? When arranging sewerage and wells, it is much more convenient to make insulation. But later you can do this work. For insulation, it will be necessary to excavate the rings and remove dirt from them. It is advisable to dry the reinforced concrete rings. Now we proceed directly to the insulation.
Any insulating material should be applied to the surface of the rings. It can be regular foam. Or you can choose more modern materials with better insulation. For example, expanded polystyrene foam. The material is attached to durable glue.
The advice given by the owners of their own houses and summer cottages is as follows. The area around a septic tank or well should also be insulated. You can use the same foam. However, the best option is penoplex.
This material is more resistant to external influences and has increased thermal insulation. You can put a layer (100 mm) on top of the hatch cover. This measure will also protect the well from freezing.
Alternatively, during heavy snowfalls, throw a thick pillow of snow on top of the hatch.
I like it! 4 I do not like it! 0
Wastewater treatment plant: how to choose an autonomous sewage system
A fixed box on a riser is a possible cause of trouble. Do you need it?
The heating season is on its way: how to prepare a heating system for a private house
Some owners of country houses and summer cottages use houses for residence only in the warm season, organizing an appropriate autonomous water supply from a well or a well. After the end of living with the onset of cold weather, many homeowners are faced with the question of how to drain the water from the water supply system for the winter.
It will be necessary to free from water masses not only the external and internal pipelines, but also the elements of automation of the electric pump and pumping equipment. The task is not so simple due to the presence in the house of a large number of plumbing and household electrical appliances, the work of which is related to water consumption and the remaining water can be stored in these devices for a long time.
Fig. 1 Drainage of water from a house into a well - an example of a diagram
We offer you to familiarize yourself with Decorative sunflower bear cub - and flowers and harvest
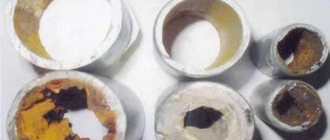
The presence of water in water pipes can lead to unpleasant consequences in the winter when it freezes, associated with the well-known physical effect of the lower density of ice and its expansion in comparison with liquid by 10%. The second reason why water should be drained in the absence of the owners for a long time is the corrosion of metals that forms when it is present.
The following objects pose a threat of damage, failure with financial losses, if water is found in them in winter:
- In an autonomous water supply, water intake is mainly made from borehole and well sources, while the pipeline is usually placed underground below the freezing depth. If the pipe is located above the freezing depth, then it must be dehydrated. Fig. 2 Diagram of drainage in a caisson for a well
- In the case of water intake, there is usually always water in the pressure pipeline immersed in a well or borehole. This is due to the fact that submersible pumps or the suction pipe section of a surface pumping station are often equipped with a check valve. For a deep electric pump, it is located at the outlet and is often built into the structure, at the station pipe - at the end of its suction pipe. Therefore, to free the section of the pressure pipeline from water masses, various types of engineering solutions are used in the structure or a suction pipe, an electric pump is removed from the source.
- In a house abandoned in winter, the owners try to maintain minimal heating, otherwise severe frosts will damage the interior decoration of walls, ceilings, floor coverings, furniture, household appliances, and household items. However, in order to avoid unforeseen situations, water from the internal water supply system is drained just in case.
- The pumping equipment and the electric pump itself are usually dismantled for winter, while the water must be drained from all units.
- In the country house (washing machine, dishwasher) and water heating equipment, in the absence of operation, there are water residues that lead to corrosion and can cause damage to the units when freezing.
- Also, water is present in the hydraulic seals of plumbing fixtures and it is advisable to remove it.
Fig. 3 Valve drain in wells
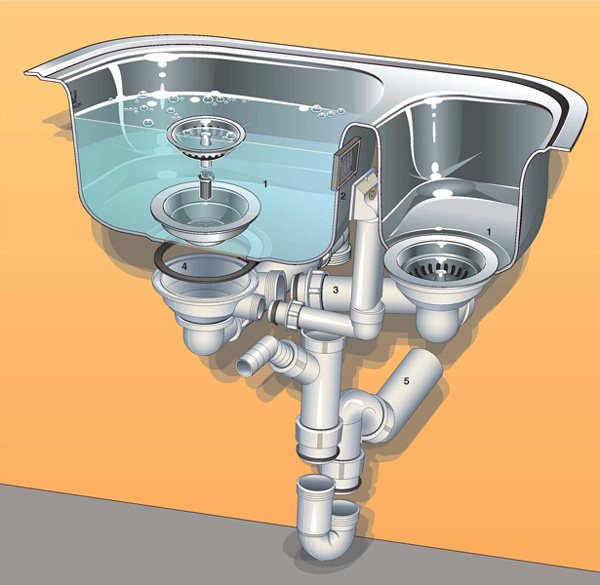
Preparation of siphons for washbasins, sinks, sinks.
If you have a plastic sewage system and, accordingly, plastic siphons, then theoretically they can be strongly prepared for winter and not cook. The water plug in plastic siphons is small in volume, plastic has higher thermal insulation properties than metal or ceramics, in addition, plastic can deform a little, so usually the water that does not have time to evaporate from the siphon before the onset of frost freezes a little slower than in ceramic bowl or cast-iron knee and turning into ice siphons do not tear. If you have cast-iron siphons, then it is imperative to remove water from them for the winter. This can be done in several ways, for example, with a kvachem (plunger) push the water from the siphon further along the pipe. If there is no plunger, then you can try to blow it with a bicycle or car pump, or gently insert a cloth between the drain grate and gradually soak up all the water. After removing the water, plug the drain hole with a stopper or rag (it is advisable to press the rag from above with something heavy) so that odors from the sewer network do not enter the house.
I have been using these technologies for 15 years and so far everything is reliable. And yes, don't forget to drain the tank. One friend of mine did everything right, but she did not drain the water from the tank. When frosts came, the tightness of the gasket in the tank was broken, the water went into the bowl and froze there. As a result, I had to change the toilet.
I hope, dear reader, the information presented in this article helped you at least a little to understand the problem you have. I also hope that you will help me get out of the difficult situation that I found myself in recently.Even 10 rubles of aid will be of great help to me now. I do not want to burden you with the details of my problems, especially since they will be enough for a whole novel (in any case, it seems to me so and I even started writing it under the working title "Tee", there is a link on the main page), but if I was not mistaken in your conclusions, then the novel will be and you may well become one of its sponsors, and possibly heroes.
After successfully completing the transfer, a thank you page with an email address will open. If you would like to ask a question, please use this address. Thank you
... If the page did not open, then most likely you made a transfer from another Yandex wallet, but in any case, you do not need to worry. The main thing is that when making a transfer, please indicate your e-mail exactly and I will definitely contact you. Plus, you can always add your comment. More details in the article "Make an appointment with the doctor"
Yandex Wallet number for terminals 410012390761783
For Ukraine - hryvnia card number (Privatbank) 5168 7422 0121 5641
Myth 2. The larger the volume of the accumulator, the better.
So much the better for what? For the accumulator itself, for the reliability of the system, for the pump? A large volume tank is more expensive, takes up more space, and the cost of replacing a membrane is higher. Some cons.
But there is a certain logic in the statement and it consists in the following: the larger the volume of the hydraulic tank, the less often the pump will turn on. And the less often the pump is turned on, the longer it will work, since the resource will be preserved (the mode of starting the electric motor is the most intense - a jump in the starting current, high starting torque, increased load on the pump parts).
However, on the other hand, it is logical to assume that there is a certain limit on the volume of the accumulator, at which it is necessary to stop. After all, it never occurs to anyone to buy a hydraulic accumulator for a private house with a volume of thousands of liters. Although with such a tank, the pump can turn on only once or twice a day or not turn on at all. Do not forget that the effective volume of the accumulator is about 30%.
The misconception is that even if we reduce the number of pump starts per hour by half (by increasing the volume of the accumulator), the pump will not last twice as long. Even knowing the number of starts per hour, we cannot estimate the total operating time in each cycle, which is much more important for the resource. Likewise, if you only use the pump for six months, for example, during the summer season, you do not need to expect that the pump will last twice as long as that of a neighbor who uses the pump all year round.
Read also How to melt garden pitch for trees
Engine manufacturers do not give a specific limit on on / off for the entire service life, after which the engine fails or requires repair. The engine life is affected by the total operating time and thermal conditions. But at the same time, it is really important that the number of short-term pump starts per hour does not exceed the values specified by the manufacturer (these data are in the technical documentation for the pump). This is the main criterion by which the volume of the accumulator is selected. And if the pump is equipped with a soft starter, then the number of these same starts can be increased. Those. the volume of the hydraulic tank can be reduced.
Myth 3. All accumulators are the same. If there is no difference, why pay more?
If we pay attention only to the external aspect, then it is difficult to disagree with this statement. If we are talking about standard hydraulic tanks with a replaceable membrane, then outwardly they really look alike like twin brothers.
But as often happens, the most important thing is inside. Although accumulators have a really simple device, even here there is room for nuances.That is why air escapes in some hydraulic tanks, and the membrane fails in a year or two, while others hold pressure and serve much longer.
Myth 4. The accumulator needs to install an air vent.
The water supply system (not to be confused with the heating system) can do without an air vent without any problems. Air bubbles with correctly laid pipes are removed through the tap during the drawdown. And with improperly laid pipes (with the possibility of the formation of air pockets), the air vent will not save the matter.
Note that pressure switches can also work with air (for example, installed on compressor equipment).
It is possible to install an air vent for complacency, but this does not give a real effect.
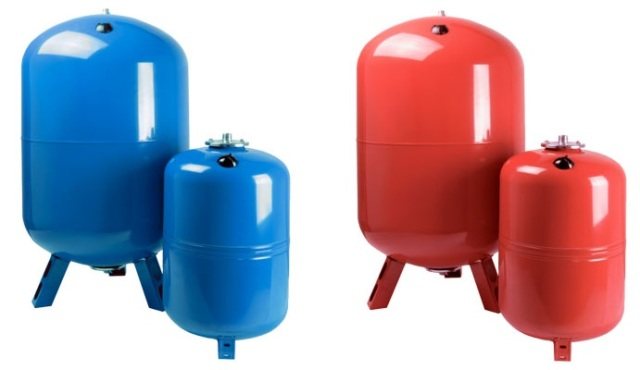
Myth 5. All accumulators are blue.
Helping the buyer to navigate in the variety of expansion tanks, most manufacturers actually produce hydroaccumulators (expansion tanks for water supply systems) in blue. The standard color association works, and there is nothing wrong with that.
However, the accumulator is only painted on the outside, so there is no technological problem for color change.
Hydraulic accumulators are an integral part of many domestic and industrial pumping stations (they come with them). Manufacturers of pumping equipment do not independently produce expansion tanks and purchase them from specialized enterprises. For marketing purposes, these tanks may have not only a different nameplate with a different name from the original (which is not uncommon today), but also a different color. At the request of the customer, the manufacturer of hydroaccumulators can paint them in any color at the factory.
For example, Grundfos used green accumulators for a long time, Pedrollo had red tanks, and DAB used white ones. Moreover, even different consignments of goods could be of different colors. Sometimes the choice of the color of the accumulator depends on the general color scheme of the pump manufacturer.
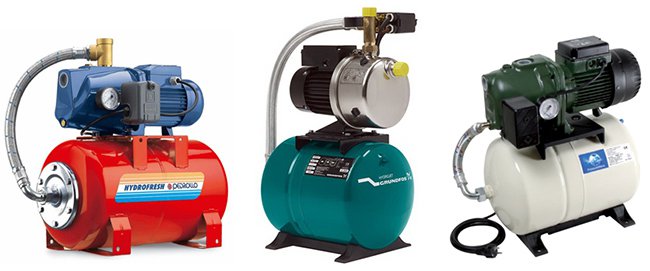
The color itself does not in any way affect the technical characteristics of the accumulator and, by and large, can be anything.
Therefore, if, for example, a green hydraulic tank from a Grundfos station is out of order, there is no point in looking for a tank of the same color.
Of course, blue is the most common color on the accumulator market, but not the only one.
Myth 6. For the winter, it is necessary not only to drain all the water from the accumulator, but also to release the air.
Indeed, if you plan to still use your accumulator next year, then it is necessary to drain the water from the tank. However, there is no need to bleed air after draining the water. The membrane is strongly compressed under air pressure and squeezes out all the water.
It is believed that the membrane is easier in a free state and it is better to remove it for the winter. Without arguing or even taking into account labor costs, here is just one important counterargument. All accumulators are sold with preliminary factory air injection, which greatly deforms (compresses) the membrane, since there is no back pressure of water when not connected. In this form, a new tank can be stored for more than one month, or even a year, until it finds its owner. And there is nothing wrong with that. The accumulator is installed, the air pressure is controlled, the system is started and everything works great.
Read also How to cook salted cabbage for the winter
Our experience in the operation of domestic water supply systems indicates that the positive effect of the complete emptying of the air cavity for the winter period has no practical confirmation.
Of course, you can go to the extreme, disassemble half of the water supply system for the winter and a hydraulic tank in addition. Rinse, dry and fold everything at home in a warm place. But this option is better left for "experts". The maximum that needs to be done is to drain all the water and purge the system with a compressor.
Myth 7.It is better not to replace the membrane, but to change the entire accumulator at once.
If the membrane fails, it is necessary to decide the issue of replacing only one membrane or replacing the entire accumulator.
Want to extend the life of your membrane? Remember to control the air pressure.
It is logical that the decision is made on the basis of comparing the cost of the new membrane and the entire accumulator assembly. For some expensive European brands, the cost of the membrane is about 60% of the total cost of the product. Of course, this is not the real cost of the membrane, but the impudent policy of the manufacturer trying to make money on spare parts and service, which is quite usual today. In addition, it is far from always possible to find a similar replacement, since manufacturers can specially manufacture membranes with a non-standard neck. Therefore, it is not surprising that the buyer makes a decision to buy new equipment.
For other manufacturers, the cost of membranes is at the level of 30-35% of the cost of a new accumulator. In this case, we would advise you to assess the condition of the body and flange, and, if they are in a satisfactory condition, make a choice in favor of replacing the diaphragm. This operation is not difficult.
If the accumulator is not always in a humid environment, then its body and flange can serve for a long time.
Treat basement and cellar from mold
The end of the summer cottage season is a good time to process the cellar and basement, so that the "mold kingdom" does not start in them during the winter. First of all, in dry weather, take all the jars outside and dry the room, and then treat the walls and other structures with an antiseptic (this procedure must be repeated every few years).
As an antiseptic, you can use a solution of copper sulfate (100 g per 1 liter of water).
Fans of solving problems in a radical way recommend using a sulfuric smoke bomb to treat the basement. Seal all ventilation openings in an empty room, cover metal parts (if any) with polyethylene. Check that there is no one in the house (you will have to leave it for a day), and then set fire to the wick of the checker, go out and close the doors tightly. When you return, ventilate all areas properly.
Exchange contacts with neighbors
If you are still not familiar with your neighbors in your summer cottage, fix it immediately. This is necessary not only in order to fit into the framework of social etiquette, but also for mutual assistance "if something happens." Exchange phone numbers or other contact information with your neighbors. Agree to contact each other if you suspect that something is wrong with the neighboring area.
In addition to all of the above, do not forget about the flower garden: dig up and store perennial plants that require it, cover roses and other flowers. Read about what else needs to be done in the garden in our material:
Preparing the toilet.
The largest water plug in terms of volume is in the toilet, and it is understandable - the largest traffic is through the toilet. In addition to being the largest, this plug is located in the knee of the ceramic toilet bowl, which has very low deformation properties. Simply put, when the water in the toilet bowl freezes, the bottom of the knee simply breaks off. Sometimes this happens very nicely and neatly, so that the breakaway part can be glued in place, but it is better not to risk it.
When preserving the summer cottage for the winter:
- flush the toilet cistern several times,
- shut off the water supply to the toilet cistern and flush out the water from the cistern.
- unscrew the tank lid and make sure that there is almost no water left in the tank, if you wish, you can remove the remaining water with a rag or sponge (this is not necessary if there is not much water left in the tank).
- Scoop out as much water as possible from the toilet bowl. It is best for this to use a special scoop made with a wallpaper knife from a plastic bottle, shaped like a ladle.However, you can scoop out the water with any means at hand.
- Remove excess water from the bowl with an old cloth or sponge.
- To prevent odors from the sewer network from entering the house in winter, plug the hole in the bowl tightly with a rag.
- You can still throw rags on top and even close the lid, although this is not necessary:
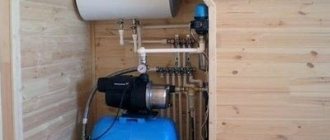
Drainage and conservation of the pumping station
The sequence of actions is as follows:
- The pumping equipment is disconnected from the electrical network.
- The hose is disconnected through which the liquid is sucked in.
- All valves and outlet taps are open, the water must drain completely.
- The pumping station is different from the pipeline, the remainder of the liquid flows from the pipes.
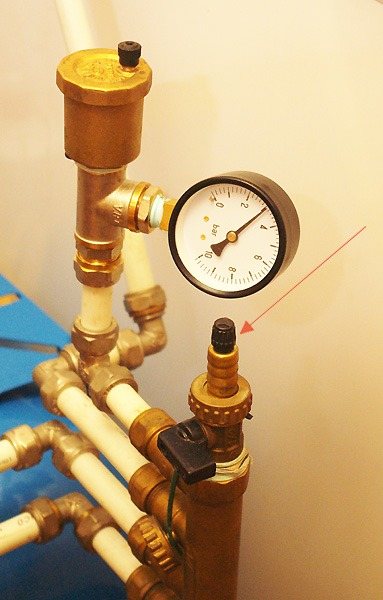
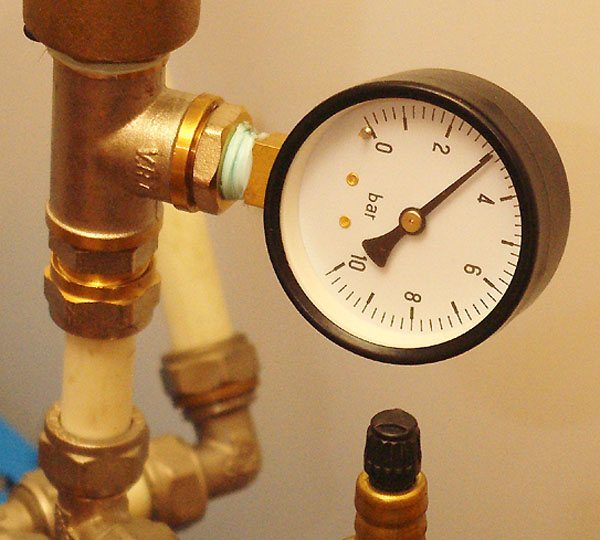
- The pressure in the hydraulic tank is checked (the norm is 1.5 bar, as indicated in the data sheet).
When insufficient pressure is required, use another pump to pump out the remaining water from the pumping station. If the liquid remains anywhere, you will have to throw in the equipment in the spring and buy a new one.
In addition, it is necessary to go along the circuit of the system, checking that there is no water in any of the nodes. The boiler is emptying. Storage tank, circulation pump, filters must be empty. During this period, it is convenient to check the cartridges, rinse the meshes, and carry out preventive maintenance. In the spring, when the system has to be started, it will be enough to connect the pump, fill the pipes and press the start button.
Most plumbing equipment has special shut-off valves designed to drain water from the working chambers. But if the valve is not provided, it will be necessary to disconnect the equipment not only from the mains, but also from the pipes connecting the device with other devices.
How to drain the toilet for the winter
It may be necessary to install or change a toilet bowl under a variety of circumstances: moving, repairing, or its unexpected breakdown. If there is no time to wait for a plumber or you want to save money, then it is quite possible to do it yourself.
Preparing a summer cottage for the winter - 15 important things you could forget about
In order not to end up in a “broken trough” with the beginning of the next season, you need to properly close the current season. It's time to carry out work that will help preserve the suburban area until spring. So, here's how to prepare a summer cottage for the winter.
Surely, you have already begun to perform the main part of the work. We have no doubts about your summer cottage experience, and, nevertheless, we propose to check - suddenly something "flew out of my head"?
Prepare the lawn for wintering
The first step is to clear the lawn of debris. A layer of dead leaves or twigs will interfere with photosynthesis and can also be an excellent home for pathogens and pests. Also, the lawn needs to be mulched to preserve the sown grass and reduce moisture evaporation. Do not forget about cutting the grass - this procedure in the middle lane can be carried out until the end of October. Moreover, the mowing height should be 1-2 cm higher than usual (i.e. if during the season you cut the lawn up to 4 cm, now the grass height should be 5-6 cm).
In the first half of October, do not forget to feed the lawn with phosphorus-potassium or special autumn lawn fertilizer (according to the instructions). If pits and bald spots have formed on the cover, they need to be “patched up” by adding soil and sowing seeds.
A little about relay adjustment
Accumulator pressure switch setting
Do not forget about the seriousness of adjusting the relay - this is a delicate procedure that must be treated with extreme caution. One minor adjustment error can damage the entire system, which means wasted time and money for repairs.
In addition, the warranty does not provide for damage to the unit in such cases.
How the pressure switch is adjusted
Initially, it is necessary to achieve the optimal pressure in the accumulator.This can be done by disconnecting the pumping station from the power supply and draining all the accumulated liquid in the tank. Now, using a special compressor with a sensor, create an optimal pressure level in it. Then remove the cover over the relay, while still gaining full access to the small and large adjustment spring.
Setting the minimum pressure is achieved by turning the large spring: to increase the indicator - clockwise, to decrease it - counterclockwise.
As you can see, you can deal with most of the faults with your own hands, without resorting to the help of specialists. This will save you money and, most importantly, give you a new experience with pumping stations.
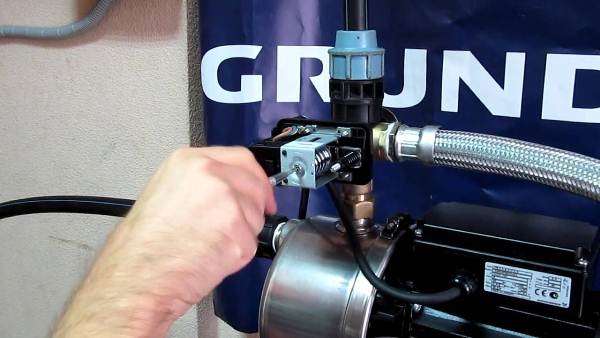
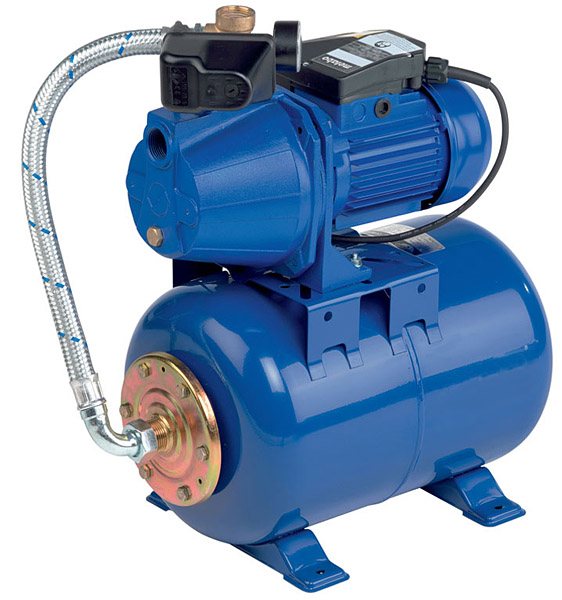
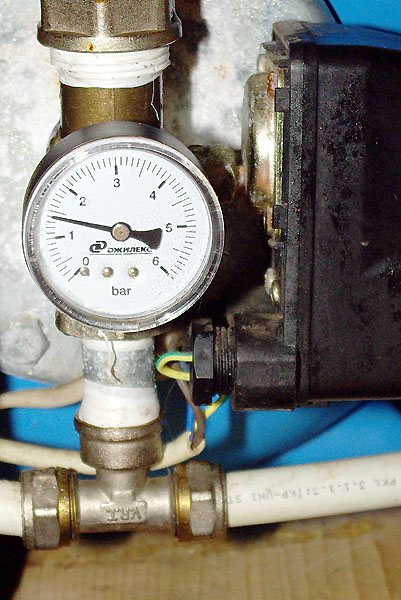
The reservoir of the pumping station plays a very important role - it accumulates water in itself. Those. when the tap is opened, water from it will flow without turning on the pump itself until the pressure in the system drops to a threshold value. But during operation, the pump accumulator is subject to various influences, as a result of which defects may appear that disrupt its normal functioning. For example, in our case, the flange rusted, and one fine evening a thin stream of water splashed out of it. The flange itself could not be found in stores, and therefore the replacement of the pump accumulator, which was found in almost every specialized store, became inevitable.
So, let's get down to the work itself. In our case, we have a 24-liter Jileks accumulator. The products of this company are relatively inexpensive. This largely determines their widespread prevalence.
The first step is to de-energize the pumping equipment. This should be done for two reasons - firstly, so that the pump does not turn on during work, and, secondly, to avoid contact between water and electricity.
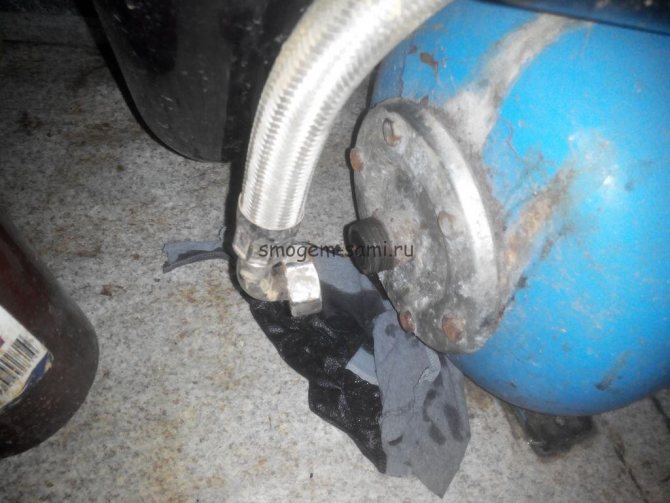
Next, you should drain all the water from the system. You can, for example, flush the toilet or turn on the tap with water. And we are waiting for a dull click of the relay, which will signal that the pressure in the system has dropped.
The next step is to substitute a basin or other container under the connecting hose of the accumulator and pump. Although the pressure in the system dropped, the water remained in it. And in no small amount. And then you can twist the hose itself. An adjustable wrench is suitable for these purposes. To quickly drain the water from the system, you can unscrew the filler plug.
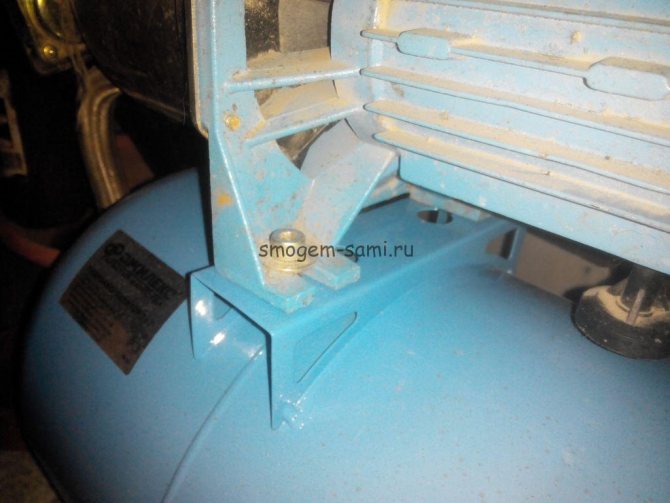
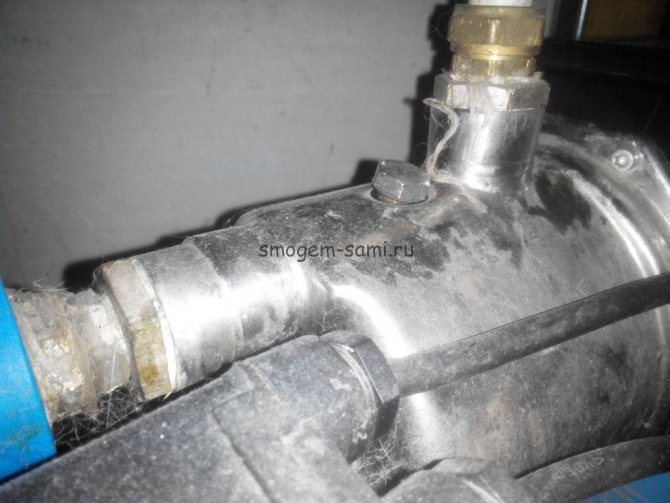
As soon as the water is drained from the tank and the hose, we proceed to removing the automation of the pumping station. To do this, it is enough to unscrew only two bolts with a 13 key, which attach it to the accumulator. The photo shows a bolt with a hex hole. I didn't find such a nozzle. Therefore, I held the bolt shown in the photo with pliers, and unscrewed the nut from below with a 13 key. That's it! Dismantling of the tank is complete.
Then you can repair the "24 G hydraulic accumulator" or replace it with a new one. The pumping station is assembled upside-down. Those. first, we attach the automatics to the tank with two bolts and fasten the water supply hose. Upon completion of the work, the pressure in the accumulator should be checked with a pressure gauge through the spool on the body. Its value should vary between 1.5 and 2 atm. If it is lower, then air should be pumped up with a conventional machine pump or compressor.
Communities Boys and Girls Blog How to protect your toilet from defrosting without draining it
Comments 163
from some kind of dacha forum apparently stolen) I have a village at my dacha. generally nishtyak, it doesn't even smell too much
We drain the water from the tank, disconnect the supply, squeeze the water out of the siphon with a plunger. Even if a drop remains, it will simply freeze and that's it. Is this a problem?
complete stupidity to build a comfortable toilet on the street
even at + 5 there is no buzz on the toilet, the cold does not sit down
Such clever advice, I'm shocked. Buy a pack of salt, dissolve it in warm water and pour it into the toilet and all the siphons in the washbasins. Cheap and cheerful!
Previously, there were amenities on the street) Now I am finishing building the cottage there, everything is inside, everything is convenient and thoughtful)))
All the same, our army in the fresh air is nicer))
yeah in summer, maybe in winter? at -25?)))))
I do not happen there in the minus)
Elementary. As well as the car. Pour antifreeze into the tank.
Well, if it's a crack, then change it unambiguously, but if it's just from the inside, then repair it, it's not difficult.
Is it difficult to change? It's just ridiculous to discuss.
and if not already issued?
You take off the mechanism and go to the store
I heard the story of how a long time ago, in the toilet at the factory, someone thought of pouring a bucket of solvent into the toilet ... then a man came in, sat down on a large scale, lit a match and threw a match into the toilet, not suspecting a surprise ... they say he took out the stall door running out)))) picture)
I heard such a fable))
I heard the story of how a long time ago, in the toilet at the factory, someone thought of pouring a bucket of solvent into the toilet ... then a man came in, sat down on a large scale, lit a match and threw a match into the toilet, not suspecting a surprise ... they say he took out the stall door running out)))) picture)
because you don't have a kuirt on the glasses ...
But free hair removal)
on the ass then? do you need it at all?
As an option, antifreeze dlch smstm heating, it does not freeze into ice.
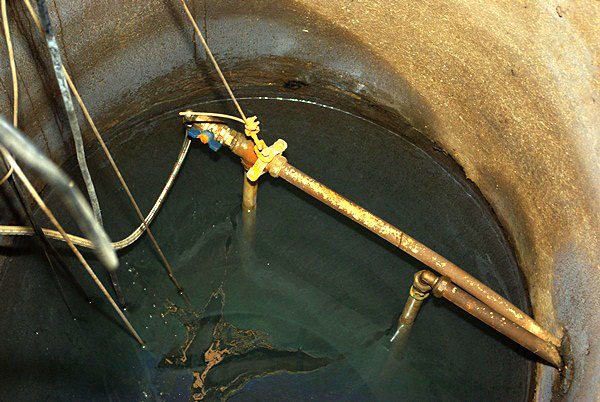
Check the well
The well does not require special preparation for winter. But if the water has acquired an unpleasant smell of hydrogen sulfide (the smell of rotten eggs) or a cloudy sediment, you need to take measures for cleaning and disinfection. You will probably cope with a small well (2-3 rings) on your own. Use a drainage or pump pump to pump out the water, go down into the well, clean the walls of dirt. Then disinfect the well.
To disinfect the well, you can use tablets designed for purifying pool water. They are dissolved in a bucket of water (1 tablet per 1 well ring), then the mixture is poured into a well filled with water and left for 6-8 hours. After that, the water is pumped out again.
If you clean the well in the fall, it will not be necessary to do this in the spring - ordinary disinfection is sufficient.
Preparation for work
How does a hydraulic accumulator for water supply work? It is charged by a pump to a certain pressure and then feeds the consumer system with water until the pressure drops to the lower limit.
Then the pump is switched on again. For everything to work correctly, you need to make settings and check the air filling of the tank.
Pressure setting
Russian manufacturing plants, as a rule, set the pump start-up pressure to 1.5 atm, and its shutdown at 2.5 atm.
Foreign relays are set to 1.4–2.8 atm. There are parameters that are unusual for a private house: 5-7 atm. In this case, make sure that the relay can be adjusted within the required range: 1-3 atm. Information about this is in the passport of the goods. Set 1.5-2.5 atm after purchase.
You can adjust the regulator to other numbers, but there is no point in this. After all, the main household consumers are designed for 2 atm: a shower, a washbasin, a washing machine. Only a few, for example, a jacuzzi, require 4 atm. At 6 atm and above, the seals in the system and consumers fail.
The difference between the pressure on and off the pump should be no more than 1.5 atm. A large drop leads to a strong elongation of the membrane (balloon) and a shortening of its life.
If the pressure is indicated in bars, nothing changes in the settings, because 1 atm = 1.01 bar.
Pumping air into the accumulator
You can measure the air pressure in the storage tank for water supply with a wheel manometer, and pump it up with a car pump.
How much you need to pump is indicated in the passport and on the body of the accumulator. But it is better to use other numbers in order for the device to work correctly.The air chamber should contain 0.2–0.3 atm less than the pressure at which the pump is turned on.
For example, if the relay is set to 1.5–2.5 atm, then the air chamber is pumped to 1.2–1.3 atm. This is done when the water pressure in the system is released.
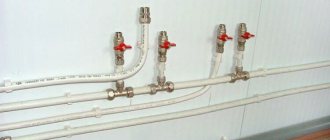
Prepare plumbing
The water supply system in the country in winter is especially vulnerable, so you need to take care of its safety in advance. If you do not plan to use it in the winter, then the water will have to be drained from the pipes. To do this, you need to shut off the water supply and open the drain taps at the lowest points so that the water flows out by gravity. If there are no drain valves, use an autocompressor. To blow through the pipes in the country for the winter, close all the valves on the manifold and attach a compressor to the pipe. Then you need to create a pressure of 3-4 atmospheres and open one of the collector taps - under air pressure, water will come out of the pipe. Repeat the procedure with each line.
For the safety of the pipeline outdoors and in unheated rooms, leave the valves slightly open and dismantle the mixers. Also, don't forget to drain the water from the filters.
If the pipes are not deep enough, they must be insulated. To do this, over the place where the pipes pass, lay sheets of expanded polystyrene or polystyrene and fix it by pressing down with bricks and digging in.
Drain the water! Tips while waiting for frost
30 Sep 2013
Listen
81638
Summer always ends earlier than we would like. It seems that the grass is still green, and the leaves are not falling, but it is clear that very soon there will be the first frosts, and then there will be snow and cold.
Summer always ends earlier than we would like. It seems that the grass is still green, and the leaves are not falling, but it is clear that very soon there will be the first frosts, and then there will be snow and cold. The rest at the dacha is coming to an end and work begins to prepare it for the winter. Quickly tint something according to the last sun, check (with the help of autumn rains) the condition of the roof, remove the grill, swing, trampoline placed all over the site in the barn ... And at the end of October drain the water from all the devices and devices in which it is located.
Sometimes even experienced owners who have a house for seasonal living make mistakes when preserving it for the winter. And if the owner of the house bought it in the spring, and this is his first winter, then he should prepare for it as carefully as Nansen for the drift on the ship "Fram" through the center of the Arctic.
Let's leave aside the option in which electric heaters, for example, warm floors, remain on to maintain a positive temperature in the house. Such a solution is fraught with fire in the event of a failure of electrical equipment or, which happens much more often, "defrosting" of everything that is filled with water in case of an emergency power outage. Let's carry out the "classic" preparation of the house for the winter.
Water pipes
What should you pay attention to? What and where to drain? Let's walk around the house together and see. Obviously, first of all, you should take care of draining the water from the water pipes. The designs of the summer water supply system can be different for everyone, the material of the pipes and types of valves, the working pressure and the place of installation of the pump may also be different, but a properly made system should have several common properties: - The pipes are laid so that they have a slope towards the water source (for example, a well), which facilitates its drainage. - On the pipe, through which water is supplied to the house, there is a "check valve", which in the operating mode prevents it from draining. Depending on the length of this pipe and the depth of the well or well, the valve can be installed either in the well or in the house, next to the accumulator. The owner's task is to "neutralize" it and ensure that the water is drained back into the well (if a well is used), or into a specially arranged drain (if a well is used).
For this, a drain valve is mounted on the supply pipe, located between the check valve and the accumulator.If the crane is located in a well, it is supplied with a long pull handle, which allows it to be operated without going down. Instead of a manually operated valve, a so-called “normally closed” solenoid valve can be used. When voltage is applied to it, it opens, allowing the water to drain. The advantages and disadvantages of such a solution are obvious - you can drain the water without leaving your home by simply pressing a button, but this requires either mains voltage or connection to alternative power sources.
If the check valve is located in the house, near the accumulator, then everything is much simpler - in a properly mounted system, the section of the pipe equipped with such a valve is duplicated by a parallel pipe on which the drain valve is installed, and for manual control they do not need to climb into the well. If there is no such pipe with a tap, then you will have to disassemble the water supply unit, drain it manually. Some owners disassemble this unit sometimes in order to make sure that the accumulator is emptying, believing that the freezing of water residues in it can damage the rubber membrane. However, many years of experience in operating this device have shown that freezing a small amount of water in it does not lead to its destruction.
Having finished draining the water using the drain tap (by the way, the taps on the faucets should be open at the same time), you should make sure that it has left the pipes laid through the house. With proper installation of the system, tees with drain valves are installed at the lowest point of each branch of these pipes. However, for complete confidence in success, it will be useful to purge the system. But we will talk about this operation a little later.
Filters and pumps
As a rule, before and after the accumulator, filters are installed - mechanical coarse and fine, coal, ion-exchange and others - bringing water to the required parameters.
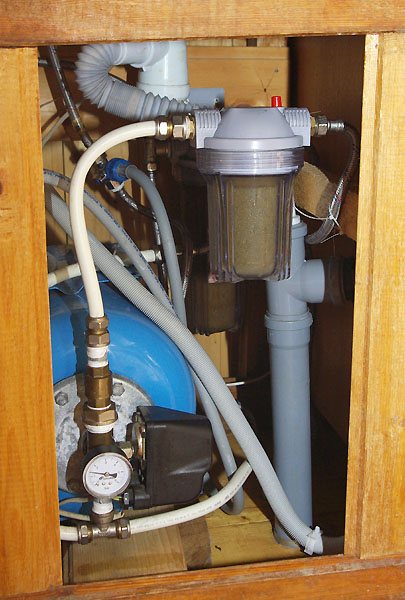
The coarse filter installed at the very entrance to the system, as a rule, is self-cleaning by backwashing, after which it should be left without water. The rest of the filters have replaceable cartridges. All of them, after draining the water, must be disassembled, cartridges, the shelf life of which has not expired, washed and stored (if their design allows a long stay without water).
The next element of the system that should be inspected is the pump. It can be in a well or a well, then there is nothing to worry about - in the Moscow region, wells do not freeze, at least they do not freeze to the depth where the pump is usually suspended. If the pumping station is installed in the house, then you should open the special drain plugs and make sure that there is no water left in the pump housing.
Sometimes it should be tilted to make sure the water drains out completely. This operation should be described in the pump manual.
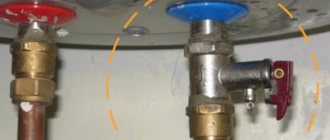
Water heaters
Now we should deal with water heaters. From flowing electric heaters
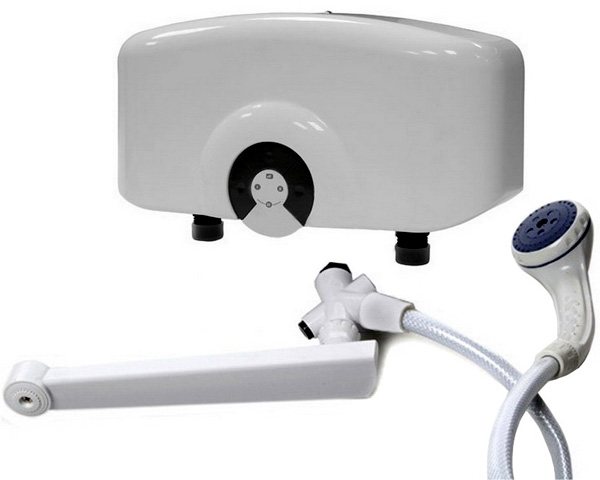
water leaves when the system is drained, although checking if this has happened will be the right decision. However, storage heaters of the boiler type are more common. I am familiar with several "dacha owners" who at one time equipped houses with storage heaters, and after the first winter threw them out - they did not manage to properly drain the water. How can you avoid mistakes? First of all, it should be borne in mind that the pipe through which hot water is supplied to the mixer takes it from the top of the tank, and the cold water supply pipe should be used for draining. A safety valve is regularly installed on it, the purpose of which is to exclude the possibility of heating elements operating without water in emergency situations, or to start discharging water when the operating pressure is exceeded. Formally speaking, through the safety valve, opening it manually, you can drain the water from the tank. However, this requires patience.It is recommended to place a tee equipped with a drain cock with a drain hose between the safety valve and the cold water inlet.
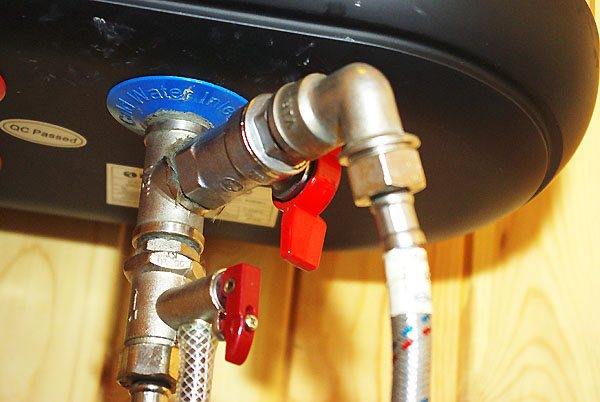
You can do without a tap,

but then every time the water is drained, you will have to remove the safety valve and substitute, for example, a bucket. If the volume of the tank exceeds 40-50 liters, the drain valve, the hose from which is connected to the sewer, is the only way to quickly and conveniently release the heater. In this case, do not forget that if there is a septic tank, you cannot pour hot water into it - the microflora will not withstand this.
When draining water from the tank, allow air to enter it. It is best to disconnect the pipe supplying hot water to the mixer for this. As a rule, storage heaters are suspended from the upper part on the wall in such a way that their lower part only rests on it. When the water stops flowing out, you should shake the tank several times without removing it from the wall. Most likely, some more water will flow out of it. After that, you can safely leave it until spring.
Purging the system
After the water heaters are emptied and the pipes supplying them with water are disconnected (as a rule, such heaters are connected to the network using flexible hoses in a metal braid), the plumbing system will be divided into several fragments, in which a significant amount of water should no longer remain ... Now, for complete confidence in its absence, they can be blown out. For this, a special valve is used, to which a pump or compressor is connected to inflate car tires. The valve is screwed to the ends of pipes or flexible hoses released after draining the water from the heaters. By closing the mixer taps and opening the drain taps, the compressor is put into operation and the pipes are freed from the remaining water. Sometimes such a valve is installed permanently in the system.
Since all valves in such systems are ball valves,
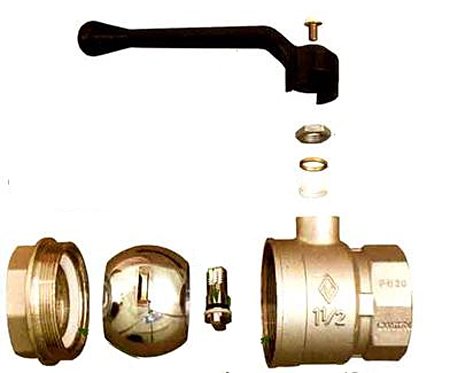
then it must be borne in mind that they have a cavity in which no water should remain in winter. This can happen if the ball valve on the pipe is closed before draining the water from the pipe. The same is true for one-handed mixers. Therefore, at the end of the pipe draining operation, open all mixer and drain valves and leave them in this position. The shower net, especially the one that is equipped with a mode switch, should be removed from the tube, poured (or even shaken out) the water, removed before spring.
Washing machine and dishwasher
Nowadays, you will not surprise your neighbors in the country with a washing machine and dishwasher. How to prepare them for winter?
The washing machine should be disconnected from the water supply and sewerage system and the ends of the hoses should be lowered into a vessel with low edges, for example, into a basin. Switch on drain mode. At the end of work - disconnect the machine from the power supply and unscrew the cover of the drain pump,
substituting some kind of small flat vessel. There is now a small amount of water left in the machine in the thick rubber hose connecting the tank to the drain pump. Freezing of this water is permissible, but sometimes it is advised to turn the car upside down and leave it until spring. Some machines are equipped with a special pipe for draining the remaining water.
The situation with dishwashers is less clear.
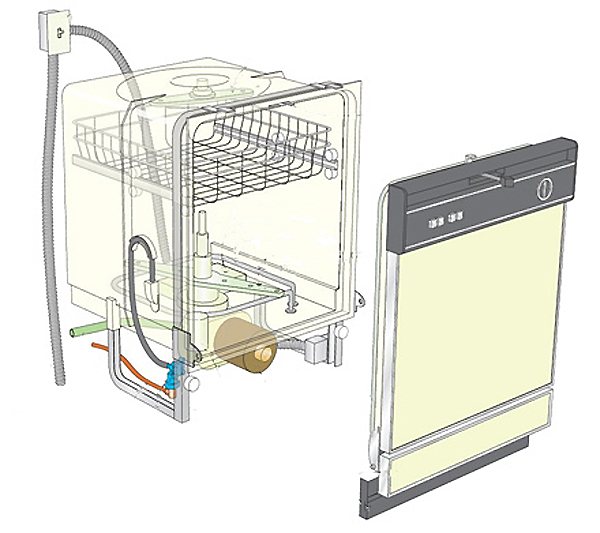
Their designs are very diverse, the paths of movement of water and the cavities in which it can remain differ depending on the manufacturer of the machine and its type - for example, floor and table machines have noticeable differences. If the instructions for the car do not directly indicate that it can be in an unheated room in winter and there is no algorithm for preparing it for this, then it is better not to risk it.
There are no trifles
Let's not forget that in addition to the water supply system, we have a drainage system, and the water in it also has a place to freeze. You should, at a minimum, disassemble the siphons under the sinks.If there is a toilet bowl, the water from the tank should be drained, and from the water seal - pumped out with a syringe, rubber bulb, etc. To prevent the house from being filled with the "aromas" of the septic tank after pumping out, antifreeze is poured into the water seal. In the spring, it is pumped out in the same way as water in the fall. Of course, you cannot drain antifreeze into a septic tank.
As a rule, in country houses there is another device that requires attention at the end of the season, although it has nothing to do with the water supply. This is a mobile air conditioner. Our "nervous", as meteorologists say, the climate forces us to purchase this device and actively use it in the summer for cooling, and in the rainy off-season - for heating and fighting dampness.
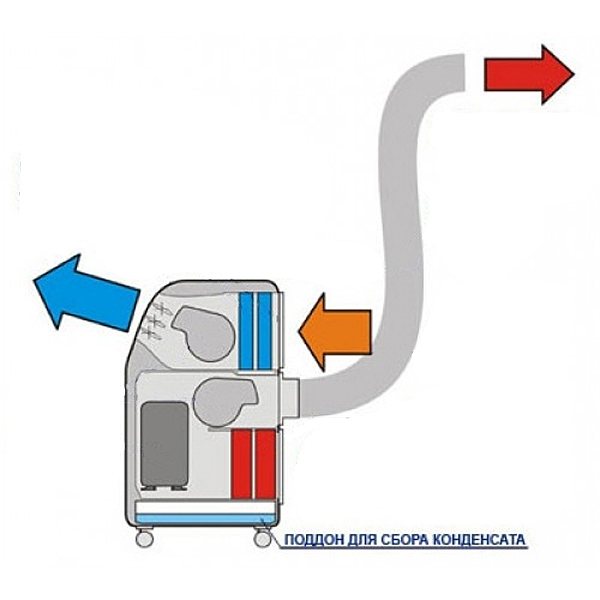
Do not forget that, unlike window air conditioners and split systems, a floor-mounted mobile air conditioner does not have drainage pipes, and the water taken from the air during operation is accumulated in a special container. Some models have special pipes for draining water into a sump or basin during operation of the air conditioner, but even in this case, a noticeable amount of water may still remain inside it. Residual water should be removed by tilting the device towards the drain hole. In addition, it is highly advisable to turn the air conditioner on for winter storage for about an hour in ventilation mode in order to dry the heat exchanger.
*** Well, we have finished preparing the "water-containing devices" of a typical country house for winter. While we were doing this, a short autumn day came to an end, and the sky was strewn with bright October stars. We fiddled for a long time! Now we have to go home after dark ... It's a good thing that we didn't have to service the solar water heater and the hydromassage shower.
But the main thing is that the job is done. And now you can calmly rest from the summer cottage until next spring.
Is it possible to cope faster?
Faster - it is possible, but in the case of an improved system. Therefore, this information will be useful to those who are going to rebuild or seriously alter their summer water supply system.
First of all, you can get rid of the main drain valve on the supply pipe, which was discussed at the beginning of our conversation and, accordingly, not waste time on manipulations associated with it. It is replaced by a drainage device of two types. The first, the most primitive option is a tiny (about 1 mm) hole in the wall of the supply pipe in the well, right after the check valve. The pump capacity is so high that the presence of such a hole does not affect the consumer qualities of the system, but when the pump is turned off and the mixer taps are open, water leaves the system rather quickly. A significant drawback of this method is that water slowly leaves even with the taps closed, forcing the pump to constantly turn on to maintain the operating pressure in the system.
The second, very elegant from a technical point of view, is the installation in the same place of a non-volatile automatic drain valve that opens the drain hole when the pressure in the system drops to 0.2 atmospheres, that is, when the pump is turned off and all the taps are opened.
Above we talked about plumbing systems assembled from rigid pipes. As a rule, they use metal-plastic pipes and connecting elements for them, the choice of which is very large on the market, as well as pipes made of polypropylene. Such pipes are considered more resistant to freezing of water residues in them, since they have some elasticity. It is very convenient to connect them by welding, but for the summer water supply it is better to use special couplings - in this case, in the spring we can easily replace the burst section. The operating pressure in such systems is up to 3 atm., And the relay that controls the pump is usually set so that it turns off when the pressure reaches 3 atm., And turns on at 1.7 atm.
It is possible to radically change the complexity of servicing the system by using flexible hoses on the site from the well to the house that are not afraid of water freezing in them. There are hoses that can withstand high pressure - 3-6 atm., But you can use ordinary garden reinforced hoses. True, they will not withstand high pressure, and the relay will have to be adjusted so that the pump turns off at 1.7-1.8 atm., However, if 3-4 people permanently live in the house, and they do not open all the taps at the same time, then this pressure quite enough.
These hoses can safely survive severe frosts in the absence of the owners. They can be laid directly on the surface of the earth, used until late autumn, and at the last moment rolled up and removed. Even if we miss the moment, and the water in them freezes before our arrival (and it freezes earlier than in the pipes laid in the house), they can be safely left in their places until spring.
Even more useful information from the real estate world on our Youtube channel Real Estate +
Answers from experts
Take a toilet brush and push the water down into the pipe with it. Almost all the water will go away, it will become a little. And then a good remedy, I have - SANOX, pour it for a few minutes.
directly with gloves and directly into the water with a special chemical agent. I do not pump anything out and everything is washed
do not start and the duck helps cool + ordinary toilet brush, go for it)))
buy those chem. the product is washed with water, and if something is a glove + a brush, that's all. what's so complicated about that.
do not want to moor, fill in a 33% solution of hydrochloric acid and leave it for several hours and you will be happy
buy 4 different products, then pour them in, and the plunger will finish its job)))
you just need a good toilet cleaner. I bought it here, you don't have to drain the water. everything is well washed. just pour in for a few minutes
xylitol for toilets and no need to climb anywhere everything eats away after 10 minutes
Check back often, use special tools and there will be no problems.
Think correctly if the toilet is very dirty and there will be no layering without pumping out. Put on gloves, soak with a sponge, then pour Silit for toilets, let it stand with it for 5-10 minutes, then take an iron washcloth and go. This is for heavy dirt.
You go and buy a new fan pipe at the store
Throw the floor rag, then pull it out as it absorbs water
Push out with a plunger, of course, it won't work dry, but this will be enough
How to completely remove water from the toilet (from the toilet siphon)?
It is necessary to completely drain the toilet, that is, not only drain the tank, but remove the water from the toilet siphon.
How can this be done, what is the best, more convenient and faster way?
At the beginning, you need to turn off the water supply tap to the toilet, then completely drain the water from the toilet tank, perhaps the tank is leaking (drain fittings) and if this is not done, then the water will constantly drain into the toilet (bowl).
Further options to choose from:
If this is a toilet bowl with a PVC drainage attachment to the floor, or the toilet bowl is installed through just such a corrugation,
We unscrew the bolts (key for 10, less often for 9-11).
Raise the toilet with a slope towards the sewer and drain the water from the toilet siphon.
It is not necessary to remove the toilet cistern, unless it rests against the wall and does not interfere with raising the toilet at an angle (talking about a compact toilet)
If this option is not suitable (for example, the toilet is installed on a cement-sand mortar, sealant, or the neck of the toilet goes into a cast-iron tee), then you can drain the water without dismantling the toilet.
You can use this pear
If there is no such pear, a large-volume medical syringe, or even an enema, will do.
If this is not the case, then you need a large rag, a natural fabric that absorbs water well.
We lower the rag into the toilet siphon (the rag should be large so that it does not slip into the sewer), take it out, squeeze it into a bucket and repeat the steps.
It is better to work with gloves, the cloth can be replaced with a sponge.
After you completely remove the water from the toilet, change the damp cloth to a dry one and wipe the toilet.
How to drain the toilet for the winter
Preparing the toilet
- Flush the toilet cistern several times, shut off the water supply to the toilet cistern, and flush the water out of the cistern. unscrew the tank lid and make sure that there is almost no water left in the tank, if you wish, you can remove the remaining water with a rag or sponge (this is not necessary if there is not much water left in the tank).
- Scoop out as much water as possible from the toilet bowl.
- It is best for this to use a special scoop made with a wallpaper knife from a plastic bottle, shaped like a ladle.
- However, you can scoop out the water with any means at hand. Remove excess water from the bowl with an old cloth or sponge.
To prevent odors from the sewer network from entering the house in winter, plug the hole in the bowl tightly with a rag. You can still throw rags on top and even close the lid, although this is not necessary.
Video: instruction: draining water for the winter in a double house
Draining the remaining water from the accumulator
Before carrying out repair work on this device, it is necessary to organize the drainage of the remaining liquid from the tank. This process is carried out in different ways, depending on the design features of the hydraulic tank. Some models of the device are equipped with a drainage mechanism. When it is opened, the accumulated liquid is quickly drained away.
If the hydraulic tank does not have such a function, use the connection of the device with nozzles by the threaded method. The use of the American fitting is the most convenient way. The presence of such a unit in the plumbing system allows you to remove the hydraulic tank for draining the remaining water and subsequent repairs. Before draining the water from the accumulator, the electric pump is de-energized.
After that, the drain itself is carried out. This sequence of actions will ensure the safety of shutting down the water supply system. The accumulated water is drained in such cases:
The water tank is drained in different cases.
- Before renovation work. They can be caused by a violation of the integrity of the storage tank, loss of tightness of rubber gaskets.
- After a long stagnation of the system. Draining is carried out before the supply of fresh water.
- Preservation of the system for the winter. Necessary operation to protect the integrity of the tank.
- Failure to comply with the organization of water drainage in winter leads to freezing of water inside the accumulator increases the risk of its breakdown.
The tightness of the safety diaphragm plays an important role. It separates the air and water chambers. The integrity of the membrane is difficult to determine. The operation of the system does not change if it is damaged. But with the onset of frost, the membrane that has lost its integrity is finally destroyed.
After draining the accumulated liquid, the accumulator is pumped. The air cavity becomes accessible after removing the membrane. After removing it, make sure that there is no water in the air compartment. Inspect the tank walls for corrosion. Its presence is a sign of a violation of the membrane tightness. The reservoir is dried and the damaged area is cleaned. There is no need to inspect the water tank. It is made from a thick layer of rubber.
How to defrost the water in the toilet bowl?
Immediately, I want to note there should not be water in the toilet cistern, if it is a toilet in an outdoor toilet, or a toilet in a house that is not heated. She (water) is simply not needed there, no one uses the toilet.
To prevent the smell of sewage from entering the room, the toilet (structurally) has a "siphon" which provides a water seal.
It is the toilet siphon that will have to be defrosted.
I strongly advise against using boiling water, the toilet will burst immediately due to the temperature drop (unless, of course, this is a stainless steel toilet, such a toilet is very rare).
Instead of boiling water, the desired temperature at which the water will thaw, it is better to use a regular hair dryer (construction is not the best option).
We turn on the hairdryer and gradually warm up the bottom of the toilet (there is water).
A warm stream of air from a hair dryer should be distributed evenly, that is, one area cannot be heated for a long time.
In time, this process is long, you can completely defrost the toilet for 30-40 minutes.
If there is water in the toilet cistern, it defrosts in the same way with a hairdryer, do not drain the cistern until it is completely defrosted.
Video: preparing the toilet for the winter
How we built a house ”What to do to prevent the toilet from freezing in winter?
The owners of summer cottages and country houses of temporary residence have one serious problem - how to prevent the toilet bowl from freezing in an unheated house in winter in cold weather? The water frozen in the siphon will expand and may simply burst the toilet. On the Internet, you will find a huge number of tips on how to avoid this, so that when you arrive at the dacha in winter you will not find this picture:
The most reliable way to solve the problem is to drain the toilet siphon before storing the house for the winter. But what about those who plan to visit the dacha on weekends all winter? Refuse to use the toilet or have fun once a week by draining the toilet just before leaving. In addition, after draining, it is necessary to plug the sewer with something else so that odors from there do not spread throughout the house.
Someone suggests adding salt. But salt water freezes even at -5 degrees, and our temperature outside can drop to -30. During a long absence, even the most insulated house will also have time to freeze well.
They also suggest pouring alcohol instead of salt. But this is some kind of non-targeted use of a valuable product.