DIY repair of a single-lever mixer: stages of work
When suddenly there are problems with the mixer, this does not mean that you need to immediately call the plumber. You can make repairs to a single-lever mixer with your own hands. To do this, you just need to understand the features of this device and have the necessary tool at hand.
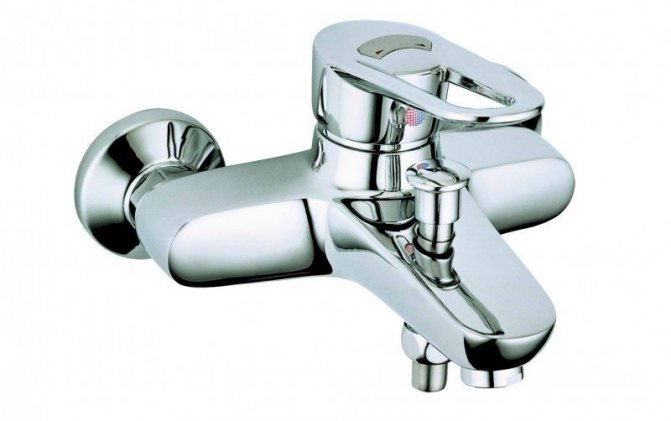
Articulated faucet - the best option for the kitchen and bathroom
As you know, the mixer is designed so that you can mix cold and hot water and set the desired temperature. One of the popular models today is the single swing handle design. They are called mono-command, articulated and even joysticks.
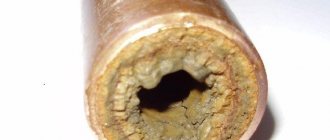
The long service life is due to the absence of metal rubbing parts. Almost all the wear parts that are so common in a conventional mixer are replaced here with ceramic parts, which are processed with great precision. It is only badly affected by abrasive particles. Therefore, in new models, the filter is often installed directly into the mixer itself. But it is still better to provide good cleaning directly at the water inlet.
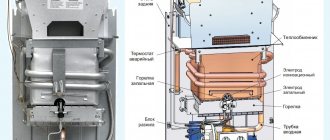
Single lever mixer device
They also appeal with their modern design. The body is distinguished by the smoothness of lines and transitions. They are often finished with chrome, nickel or colored coatings such as black gold.
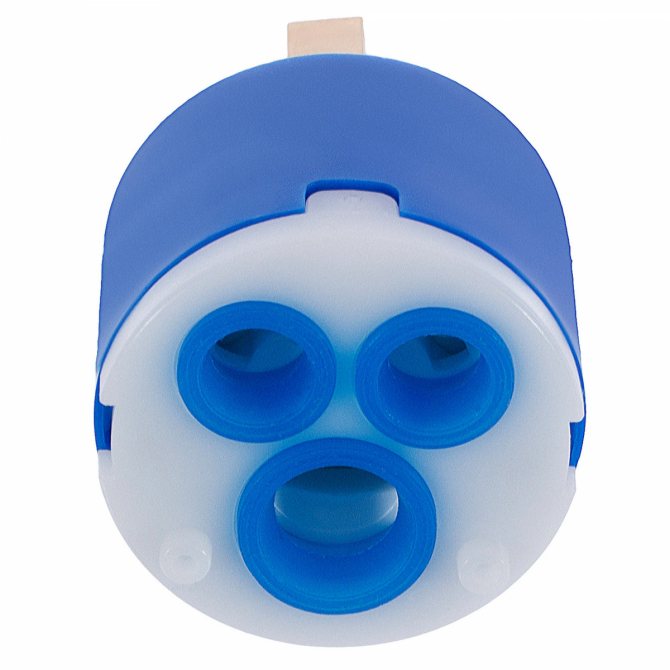
With one slight twist, you can adjust both the water pressure and the temperature. Simplicity is complemented by reliability and ease of use. Therefore, knowing the device of a single-lever mixer, it will be possible to quickly repair it. The main component is the cartridge. Therefore, most often it is necessary to replace this particular element. But first you need to figure out what such a device is directly:
- handle or lever for easy control;
- the adjustment stem is fixed with a nut and washer;
- inside the body is a ball valve or ceramic cartridge with three holes. The stable position is due to the rubber seats;
- there are also adjustment and steam collars and an adjustment ring.
The causes of malfunctions may be different, but if the cartridge is not damaged, then repairing the mixer will not take much time. This will depend in part on where it was installed.
Single-lever mixers - causes of breakage
Despite the fact that such mixers are of two types, the causes of breakdown are often similar, although there is some difference:
Articulated faucet for kitchen
- a ball valve mechanism is considered to be more reliable. However, over time, the steel ball corrodes. Teflon seals and gaskets will also wear out and then water will seep out. They can be quickly replaced. However, if the ball itself is cracked, then you will need to buy a new one;
- The ceramic disc cartridge is resistant to rust and hard water. A single-lever kitchen faucet like this will last for many years. The structure itself consists of thin plates that are carefully fitted to each other. The gap is hundredths of a millimeter, so trapped debris or a grain of sand can cause chipping and breakage. In this case, it will also be necessary to make a replacement;
- a blockage sometimes deforms the rubber seat and the valve itself. Therefore, you will need to disassemble, clean and replace the rubber;
- a loose lever will cause water seepage. To stop this, it is enough just to tighten all connections well;
- a small crack in the housing itself can be repaired with a sealant. If this fails, then it is better to find another mixer.
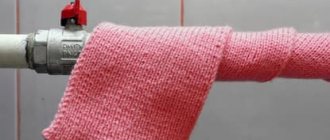
A common cause of malfunctions lies in the water itself, or rather, its hardness. Even an ordinary cleaning filter will allow a single-lever bathroom mixer to last much longer and without breakdowns.
Mixer repair: procedure
Before starting work, it is necessary to turn off the valves on hot and cold water, after which it is necessary to open the tap and drain the available water. You can also cover the sink to avoid damaging it.
The algorithm of actions is as follows:
- using a screwdriver, you can remove the decorative plug and unscrew the screw that fixes the control lever;
- the lever must be removed very carefully, since for some models you will have to make a little effort;
- now you can see the dome of the crane and the plastic eccentric. The cartridge is located under it. Only such a decorative cap sometimes has to be unscrewed. It is better to do this by hand, since it is made from plastic or thin metal;
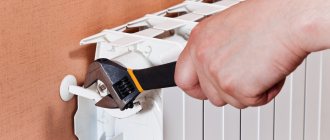
- all that remains is to remove the ball and make sure it does not crack. To get to the ceramic cartridge, you will have to remove the retaining nut. To do this, you need a Swedish adjustable wrench. In case of a breakdown of the cartridge, you will have to buy a new one. It is very important here not to be mistaken with the choice, otherwise the replacement simply will not succeed due to the different shapes and sizes, since each manufacturer makes its own small changes; Disassembly of a mixer with one valve
- most often you have to deal with seals. They are sold both individually and as a set. The general rule is that the gasket diameter is slightly larger than the socket diameter. It will be very important to carefully tighten the nuts, as misalignment will lead to premature wear and water seepage. The springs that hold the ball valve in place are also best replaced with new ones. The old ones are usually not as resilient;
- if water leaks directly under the spout, then it will be necessary to remove it and replace the old sealing rings with new ones;
- rubber seats can often get clogged too. They must be thoroughly wiped with a rag. You can even wash off the dirt a little with a little water pressure;
- after cleaning and replacing the seals, which would be nice to lubricate with plumbing grease, it remains only to thoroughly clean the landing nest from rust and small debris, as well as the overflow holes. Installing a new cartridge is carried out in reverse order.
Product structure
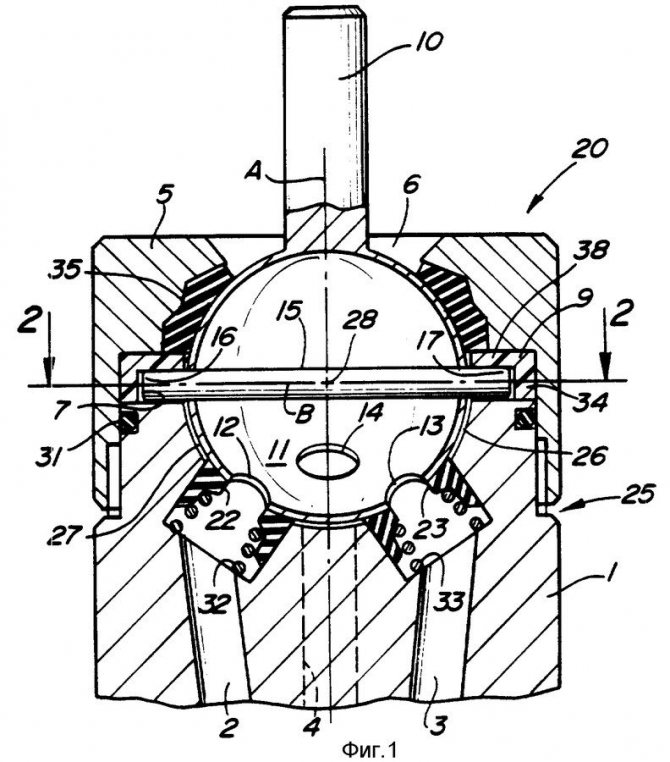
Ball mixers are characterized as reliable and durable devices due to the non-separable cartridge included in their mechanism.
All its constituent elements are carefully lapped in relation to each other.
The basic basis of these designs is a hollow ball, located in the valve body, polished to a high gloss with holes and a pin for attaching it to the handle, which ensures the rotation of the ball.
Cold and hot water through two brass pipes and flexible pipes enters this ball.
After that, it mixes there and flows out through a tap of a certain temperature.
Tightness is achieved due to the presence of gaskets.
As a preventive measure
from the user's getting burns, the tap cartridges are equipped with a special ring that limits the angle of rotation of the handle in the direction of hot water.
The cartridge inside can be made of stainless steel or ceramic.
Ceramic consists of two plates
, high-quality polished using ultrasound and perfectly ground to each other.
This surface polishing prevents liquid droplets from seeping between the plates.
If you disassemble the cartridge, remove the washers from it and lay them on top of each other, then the elements should be attracted to each other, as if magnetized.
Using this elementary method, the quality of the cartridge is determined. In a single-lever device, no additional seals are provided in the mixer mechanism.
Due to the lack of seals and the strict compatibility of all parts, there is nothing to wear off in ball mixers.
Moreover, this work is not very difficult, and almost any man who has the following tools on the farm can handle it:
- hex key,
- flat screwdriver,
- small hammer,
- pliers.
Before you start disassembling the tap, you need to turn off the water supply in the house or apartment (read where the insert in the water supply network is located).
Ball valve repair and replacement
The situation when you yourself need to repair a ball valve at home is quite common. By design, it differs from conventional similar devices. However, repairing it is not difficult for any man with minimal skills. To do this, you need to know:
- how the ball valve works,
- what parts it consists of,
- how the water is supplied.
Many people are accustomed to replacing the rubber or silicone gasket in an ordinary tap, and the device can be used. A ball structure can cause similar problems, but there are other reasons for its poor performance.
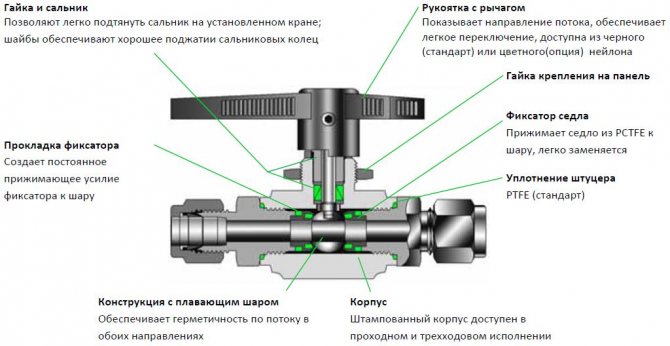
Ball valve device
The ball valve consists of the following main parts: A shut-off device in the form of a metal ball with holes for water passage is mounted inside the mixer or the valve. By turning this ball, the water pressure increases or decreases or the device is completely closed. The faucet has two openings for cold and hot water. And at the outlet there is one hole for water outlet of the required temperature.
Ball valve device
Therefore, if difficulties arise, then the repair of ball valves should be entrusted to a plumber, who will do everything quickly and efficiently. But you can save money, and fix all the problems yourself.
Problems during the operation of a ball valve
If the ball valve device has obvious damage in the form of cracks on the body, then the valve can no longer be repaired and must be replaced. This defect is often found in cheap devices that are made of low-quality materials.
If the water pressure has decreased, then you do not need to immediately disassemble the tap and look for problems inside. First, it is necessary to determine whether the head has become less due to a decrease in water pressure in the system. To do this, you should look at what pressure other taps in the house have.
Another reason may be that the aerator (mesh) on the outlet channel is clogged and just clean it.
In the event that rusty water flows from the tap, then most often the cause of the problem lies in the water supply system, and not in the tap.
In a ball mixer, the following malfunctions are most common:
- water leaks from the mixer;
- the pressure of water from the tap is weakened;
- the water temperature is incorrectly regulated.
Water leakage is more often due to the fact that the space between the rotary element (ball) and the rubber gaskets in the cartridge is clogged. A small grain of sand is enough, and the tightness of the structure will be broken, as a result, there will be a leak.
Therefore, in this situation, it is necessary to disassemble the mixer and clean this place, otherwise, the leakage will increase due to the fact that the grain of sand deforms the rubber gasket over time and will have to be changed.
The reason for the decrease in water pressure may be a partial clogging of the valve.To avoid this situation in the future, a filter should be installed in front of the mixer or at the entrance to the house. Changes in water temperature may clog one of the holes with sand particles or pieces of rubber gasket.
If it is not possible to find the causes of the malfunction, then it is necessary to replace the valve on the riser with water. The reason for this is that some people buy the cheapest faucets and taps. And such devices are made of cheap material - silumin, which has low strength and often simply crumbles even with a slight mechanical stress.
It is better to buy a normal device once than to often change or repair cheap faucets.
How to repair a ball valve
Disassembly sequence of the ball valve:
- first of all, you should turn off the hot and cold water in front of the tap;
- the screw that holds the swivel arm of the mixer must be unscrewed. Then the lever should be removed by applying some effort and shaking it slightly from side to side;
- after removing the lever, the threaded part of the device opens. Use a screwdriver to unscrew it by turning it slightly clockwise.
Types of malfunctions
There is a space between the ball cartridge and the rubber seats that hold the element in place. Clogging is the most common cause of ball valve failure. Even a seemingly insignificant speck can lead to a violation of the tightness of the connection. As a result, the rubber seat may deform, causing the ball mount to become unusable.
Another common breakdown is clogging of the shutter. As such, repairs are not needed in this case. This problem is solved by simply cleaning the plumbing fixture. True, for this, the crane will have to be disassembled. But then, when you collect it, everything will be in order again.
Water may seep out from under the knob cap. In this case, tighten the connection. If the flow of water stopped, then the reason for it was hidden precisely in the loose connection.
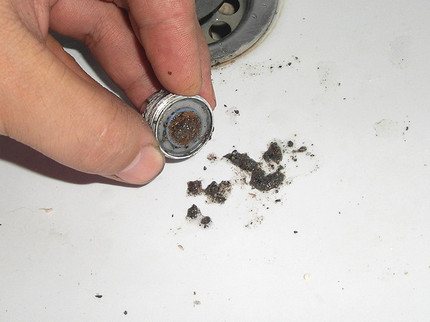
The easiest way to solve the problem is the clogging of the aerator. It is he who can become an obstacle to creating a normal water pressure. If you remove the aerator and try to run water without it, then by changing the pressure it will become clear whether the aerator was the cause of the malfunction. The aerator can be rinsed and replaced. Or you can simply change it to a new one, as they do in the event of a complete failure of this part.
Valve repair
Hello dear blog subscribers and guests. In this article, we will analyze how to repair a water valve.
Earlier I wrote an article "How to shut off the water yourself", in which he briefly dwelled on the issue of self-repairing the valve, if it was impossible to turn off the water supply.
After some time, I noticed that often from the search engines people came to this article on requests: “how to fix the faucet”, “turned off the faucet, but the water is flowing”, “the valve does not hold, what to do” and the like, but the bottom line was - the man in the street does not know how the valve, the faucet is arranged, does not know whether it is possible to restore the operability of this important element of the water supply system, and when he got to my blog, he could not find an answer to his question.
I decided to eliminate this gap and make a separate post on valve repair, the plumbers call it - revise
So, you are faced with the problem of turning off the water, I will try to help in solving it.
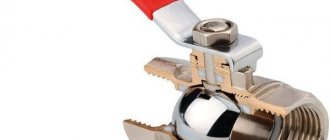
Regardless of what material it is made of, even if it is bronze, or cast iron, or polypropylene - the device is identical. If a ball valve fails, it is easier to replace it with a new one than to bother with an audit.
But let's talk about everything in order. Here is a sectional diagram (click to enlarge).
1 - body; 2.13 - nut; 3.12 - washer; 4 - rubber gasket; 5 - valve; 6 - sanitary flax, or gasket; 7 - stem; 8 - stem sleeve; 9.16 - stuffing box packing; 10 , 15 - sealing sleeve; 11 - flywheel;
14 - clamping nut.
Possible valve malfunctions:
- wear of the rubber gasket, or its complete absence; - the valve has flown off the stem; - there is a piece of scale, which does not give a uniform pressing of the gasket to the "mirror"; - the stem is bent; - "mirror" of the body has scratches, pores. With the first three possible You can deal with the reasons yourself. I described in detail how to replace the gasket in the video posted at the very end of the article.
If the valve has flown off the stem, then you have to tinker a little, and how to fix this will become intuitive when identified. I happened to fix it by pressing the top of the "seat" of the valve with pliers. If there is scale, remove it. If the stem is bent, it is necessary to replace it, or the valve to the axle box completely.
Be sure to make sure that there are no scratches, chips, pores on the "mirror" of the case, if they are present, there is nowhere to go - you need to change the valve.
Another malfunction happens: a stud is screwed into the valve, onto which a gasket is put on and tightened with a nut, it breaks off from long-term operation, the rest of it must be drilled out, the thread must be driven out with a sword, and a new one can be screwed in - in general, you can cope with this problem on your own, of course, that it will take some time. If time is limited, then you will have to change the crane axle box - it takes a few minutes.
As for the ball valve, here you can limit yourself to considering only three possible malfunctions:
- it is not possible to turn the handle; - leakage from under the clamping nut; - a crack in the body.
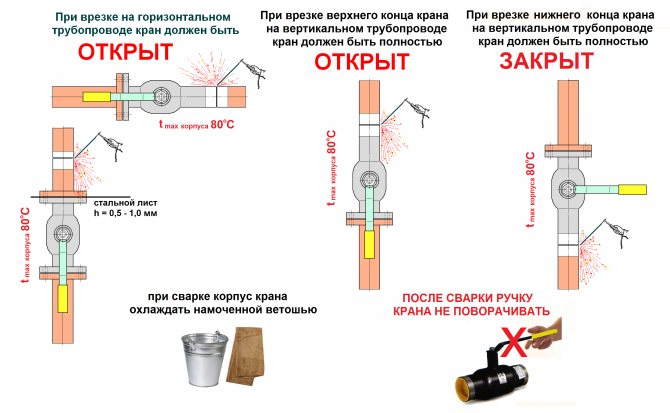
The first reason arises mainly due to the fault of the owners, the fact is that the crane works only in two positions - open or closed, it is not permissible to operate it in the so-called "quarter turn", which some, out of ignorance or deliberately use to regulate the pressure ...
The open surface of the ball is covered with various deposits, because it is no secret to anyone that the chemical state of our water leaves much to be desired. Because of these deposits, and then there is no way to move the ball from its place, as a result - not a working crane. In this case, there is only one way out - replacement with a new one.
You can, of course, try to spray the VD-40 anti-corrosion liquid on the stem, or drop kerosene, but it is far from a fact that the result will be positive.
So that such an opportunity does not happen, I can recommend compliance with the operating conditions, and it would not be bad to occasionally, at least once every 2-3 months, turn the handle of the tap - close / open.
The second possible problem can be eliminated simply - you need to remove the handle and tighten the clamping nut. This should be done without making any special efforts, and stop pulling up immediately after the water flow stops.
Well, the third implies a replacement.
Attention:
Before proceeding with the repair work, make sure to turn off the water supply to the item being repaired.
How to turn off the water yourself?
What taps are reliable for the water supply.
If you still have questions, or have something to add, you are welcome in the comments column. I recommend that blog guests subscribe to receive new articles, for this, fill out the form that will open when you scroll to the bottom of the page, I assure there will be more useful information.
DIY ball valve repair
When it becomes necessary to carry out an urgent repair of the ball valve, many (even experienced craftsmen) are lost. This is due to the fact that the design of the ball valve differs significantly from the usual one.
With an ordinary tap, everything is quite simple - you unscrew a couple of nuts, replace the gasket or the crane-axle box, tighten the nuts, check - it does not flow! But the ball valve can make you seriously sweat, especially if you take on the repair "on a swoop", without proper preparation.
So, suppose you have a ball valve installed, which you need to repair yourself, and at the same time - in a short time.
This situation is quite common, because the device of the ball valve itself, along with ease of use (excellent and very accurate adjustment of the pressure and water temperature), also has a number of disadvantages: if a number of factors coincide, which we will talk about below, ball mixers either begin to flow, or - they simply stop providing temperature control by mixing hot and cold water in an arbitrary ratio.
Ball valve design
Before you repair the ball valve, you must familiarize yourself with the general diagram of its design.
Crane construction
Ball valves are produced by many plumbing manufacturers, but their structure is unchanged:
- In the center of the mixer there is a hollow ball made of stainless steel. In the cavity of the ball, water is mixed: hot and cold water comes from two inlets, and water of the required temperature comes out of the outlet.
- The ball itself is mounted in a special sleeve - a cartridge. To fix the ball in the cartridge, special rubber seats are equipped, which securely fix the ball under water pressure.
Ball Mixer Operation Problems
What are the most common problems with a ball mixer?
If you do not take into account the situation when the mixer has obvious mechanical damage (a crack on the body) or there is a problem with the water supply in general (for example, rusty water flows from the tap), then the following problems are most common.
Namely:
- Water leaks from the mixer
- Weakening the pressure (provided that the pressure in the water supply system has not changed)
- Temperature control problems (water is very hot or very cold)
The most common cause of a valve leak is a blockage in the space between the rubber seats in the cartridge and the ball. A microscopic speck, falling into the gap, can break the tightness of the connection, and over time, deform the rubber seat.
Aerator in which solids collect
The head can be adjusted by changing the position of the rod that connects the ball to the lever. By "playing" with the rod, you can set such a position of the supply pipes in relation to the holes in the ball, which provides the required water pressure in the mixer.
Also, pressure problems may be associated with the fact that the valve is partially clogged. In this case, the problem is solved by removing the aerator, cleaning it and returning it to its previous position. To avoid blockages in the future, it is possible to recommend the installation of water filters in the supply pipes - they will catch the solid particles that clog the mixer.
Output
As a result, I would like to note that the range of these products on the market is quite wide and some manufacturers are making their own design innovations. We talked about the most common system. But don't be alarmed if your faucet shows an extra seal or extra gasket, the base usually remains unchanged.
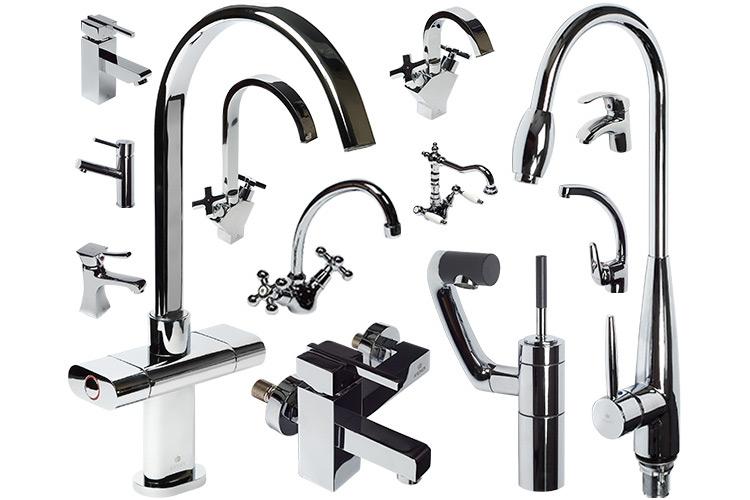
Assortment of different mixers.
Did you like the article? Subscribe to our channel Yandex.Zen