The main steps in creating a residential attic
Before proceeding with the immediate actions associated with the alteration of the attic space with your own hands, you need to draw up a plan. It should include all the main activities related to the arrangement of a residential attic.
The list of main stages includes the following components
:
- This stage is associated with planning the future dwelling. Here you will have to turn on all your imagination and think over everything to the smallest detail. Special computer programs can come to the rescue, which can visualize all your decisions on the planning and arrangement of the attic.
- Consider your financial capabilities. Try to take into account all financial costs, both for large constructive communications and for smaller ones.
- This stage is associated with the purchase of all the necessary materials and missing tools.
- Cleaning in the attic. Since the cold attic is mainly used for storing old or rarely needed things, you will have to find another place for them. When cleaning, be extremely careful, as nails sticking out of the elements of the rafter system may not be bent and cause serious injury
.
- After cleaning the room, all dimensions are measured. You need to understand, for example, if the room is located under the slopes of a gable roof, then not the entire area will be used for living on it. The minimum attic height is 0.5 m for roofs with a slope of 60 ° or more. When the slope of the roof slopes is 30 °, the height of the sloped ceiling can be equal to 1.5 m. For other angles of inclination, you can calculate the height by linear interpolation, or use reference materials and SNiP.
- The most crucial and important stage is working with the roof and floor. It is necessary to make a thorough inspection for breakdowns of elements of the rafter system, lathing, steam and waterproofing membranes (if any were installed before), roofing material. An inspection of the attic subfloor and the quality of the insulation in the ceiling is also carried out. With the proper quality of all structural elements, you can start organizing the entrance to the attic. To do this, they cut out an opening with their own hands, which will serve as an entrance from the lower room. The location of the entrance and the construction of the stairs are designed at the stage of planning the premises.
- Before the main work, all the necessary communications are carried out: heating, lighting, water supply and ventilation. In this period, these works, to design and perform will be easier and more correct.
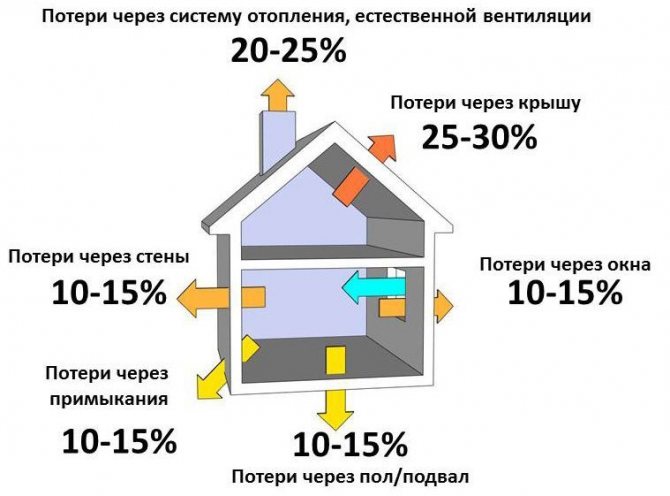
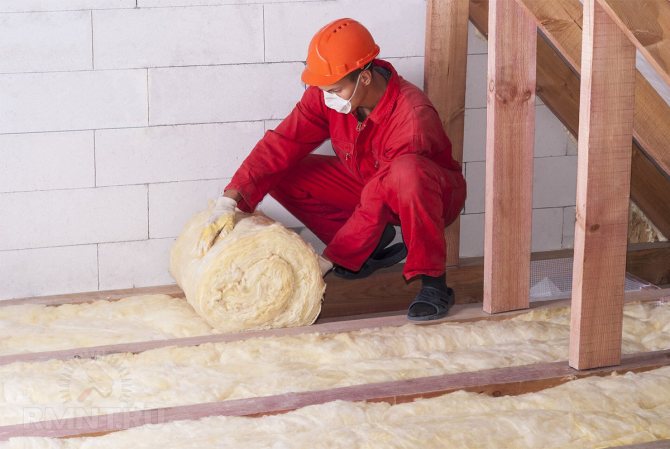
- Thermal insulation of the attic in a private house is one of the key points. If the thermal insulation of the subfloor remains in good quality, then it can be left. But the roof will have to be insulated. The largest heat losses are known to occur through roof slopes. That is why, most often, the insulation is placed between the rafters in two layers.
- Exterior and interior decoration. It all depends on the preferences of the owners of private houses. When working outdoors, it is necessary not to spoil the overall architectural concept of the whole house with design "delights".
- Arrangement of the attic space with your own hands in the living area. You can make a children's room, living room, billiard room, etc.
Attic floor repair
Question:
Hello, Semyonitch. We faced such a problem. We bought a house in the village. In the attic, the floor began to collapse. It became scary to walk on it. We decided to see what the problem is. The boards are covered with clay on top. When the clay layer was removed, we saw that the boards were completely rotten (in some places completely, in others a little).We started to change the boards. Now the question has become, what is the best way to cover them? If possible, give sensible advice. How can we resolve this issue. After all, I want the warmth of the house, through the floor on the roof, not to go into the air. I will wait for an answer. Thank you.
Valya, Rivne, Ukraine.
Answer:
Hello, Valya from Rivne!
As far as I remember, the name of your city came from the expression of a landowner who bought villages and land in the district. When their number reached 100, he said with relief: "Exactly!" At least this is the legend of the formation of the name. Or are there other versions now?
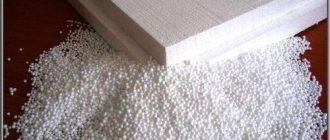
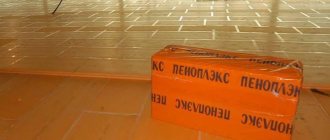
And now on the merits of the question. If there is money and an opportunity, then by now, in most cases, the owners prefer to use purchased heaters. In their capacity there can be all kinds of foams, polyurethane foams, mineral insulation such as isover, ursa, basalt fiber.
(But you should immediately make a reservation that, with ease of installation, they are far from being as environmentally friendly as their manufacturers say. A persistent smell of chemistry or tiny particles suspended in the air in 99% will always be present.)
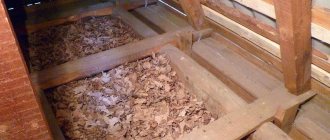
And there are also more natural and natural ones. They cost in monetary terms sometimes an order of magnitude less, and some are completely free, they can be collected in the district. For example, dry soil, peat with a smaller fraction, chaff, ordinary dry leaves from trees, slag from industrial waste, sawdust or shavings, and other materials.
These natural, otherwise natural, materials, depending on the outside temperature, can be installed in either a larger or a smaller layer. The thicker the layer, the less the possibility of freezing the ceiling and the higher the temperature in the premises of the house.
The temperature record for the cold registered in your city was minus 34.5 degrees Celsius.
In order for the house to have a comfortable temperature for covering the attic, you will need a layer of slag or earth of at least 24 centimeters. If shavings, then 10 centimeters, and if a sheet, sawdust, peat or straw chops, then about 8 centimeters.
At the same time, it should be remembered that the weight of one cubic meter of the same slag is approximately equal to a ton, and dry earth is even more - about one and a half tons. Therefore, the attic floor must be strong enough not to collapse from such a load.
The weight of a cubic meter of all other materials ranges from 120 to 300 kilograms, which is more acceptable.
Since you write that the old boards have rotted, the possibility of this sad incident is not excluded - the ingress of moisture through the roof. To avoid a repetition of this, it is necessary to put a moisture-proof film or at least glassine on top of the covered layer of insulation. And it doesn't hurt to check the roof material either, what if it needs to be repaired?
Everything. Good luck!
Construction in Moscow and Moscow region
We work with a guarantee! A wide range of construction services. Foundation, walls, floors, roof, turnkey!
+7 (905) 797-20-34
luxurykomfort.ru
Other questions on the topic of floors:
- Lags thickness - table of sections of wooden logs
- The cost of replacing the floors in the bath - Estimate
- The beams of the floor of the country house sagged
- Thermal insulation of interfloor floors made of wood
- What film is needed for a floor cake on the ground
- To increase the ceilings in the extension to the house made of sleepers
- Pillar under the floor beams of the attic floor
- Wooden floors in the garage
- Open beam ceiling
- Leveling floors in a log house
- Insulation of the attic floor
- Replacing the kitchen floor with an old wooden floor
- Interfloor overlap in a log house
- Extension to a panel one-story house
- How to fill up the underground
- Why apartments have always had wooden floors
- Thermal insulation of wooden interfloor floors
- Coating with bituminous mastic of a concrete floor in a bath
- Reinforcement of ceiling lags for the attic floor
- Floor beams for the ceiling in the garage 7 by 7 m
- Workers to replace the floor in the country
- Harmful substances from furniture
- Sagging of the slab between the first and second floor
- Replacement of joists and floors under a partition with a door
- Overlapping a house from an aerated block with a channel
- Support for the log and shrinkage of the log house
- Make a floor hatch to access the subfloor
- Finishing the old concrete floor on the balcony
- Replacing rotted ceiling beams
- Floor screed device
- Insulation of old floors on the balcony without removing
- Floor cake on the ground
- Replacement of support pillars for lag
- Overlap between the steam room and the residential floor
- Waterproofing the floor in a wooden house on the ground
- Fighting mice in insulated wood floors
- Ceiling uterus in the garage
- House with mezzanine under the wards for children
- How to insulate wooden floors in a gas block house
- Replacing a rotten floor in a Finnish house
- Calculation of floor beams
- New floor on top of old wood
- How to insulate floors in a bath
- Round log floors
- Concrete floors in a log house
- Non-insulated floors in a black bath
- The price of replacing a wooden floor in a brick house
- Replacing the ceiling with an increase in its height
- Sagging unsupported beam alignment
- How to fix sagging wood floor
- Warm water floors in a log house
- Pie floor in the bathroom of a log house
- Replacement of wooden floors in a house of 1906
- Wooden floors in the house from SIP panels
- The floor sinks in the frame on piles
- Strengthening the wood floor
- Leveling the deflection of wooden floors
- Bloated wood floors
- How to change beams built into walls from a block
- Sheathing of the ceiling of an adobe house with euro clapboard
- Change of sex in a cinder house
- Floor on the ground in an old wooden house
- Tiled floors in a wooden bath
- Thermal insulation of a wooden floor
- Plywood floors on logs
- How to level a subfloor under a laminate
- How to reinforce a trimmed timber joist
- Coating the log floor with a bituminous primer
- How to restore old beams
- Porcelain stoneware on wood floors
- Replacement of logs and subfloors in a house from a bar
- Sagging ceiling beam
- Repair of sagging floors in a wooden house
- Lower the floor in an old log house
- Laminate flooring in an old village house
- Compatibility of polystyrene foam and wood in construction
- Bulkhead flooring in a brick house due to squeak
- Logs from a bar 150 by 4 meters of span
- How to level a sagging ceiling in a house
- Replacing rotten floor logs in a log house
- Replacement of floors on the ground in the bath
- Waterproofing the subfloor of the house
- Beamed ceiling
- Blackened ceiling in the bath
- 12mm plywood flooring in two layers
- New floors to old
- Aligning beams in a house from a bar
- Strengthening the interfloor timber floor
- Hardwood ceiling-to-floor pie
- How to raise a lag without opening the floor
- Option for arranging the floor in a log house from OCB
- Is it possible to replace the beams
- Interfloor wooden floors
- How to cut a block diagonally with a circular saw
- Glassine in the house slab pie
- The floors are dry - what to do?
- Repair of the ceiling of an old wooden house
- How and what to paint OSB
- Fixing the lag to the foundation
- Floor waterproofing on the ground
- Floating floor on the ground
- Floor pie over floor beams
- Strengthening the ceiling lag
- New overlap without touching the old one
- Floor insulation in a village house
- How to strengthen the floor joists 150x50 span 6 meters
- Arrangement of floors in the annex to the house
- Wooden floors on the ground
- Cement screed to the ground
- Cold floors in the house
- Can logs be installed after assembling a log house
- Section and spacing of beams for a span of 5 meters
- Cover the floors in the cinder-cast building
- Fastening of sex lags in a log house
- Attic floor in an old cinder block house
- Channel or I-beam for floor beams
- The smell of floor polish - how to get rid of
- Floor on rotten crowns
- Gouged out the floors in the country house
- How to decorate a wooden ceiling over a gas stove
- Replacing a rotten floor - the cost of work and material
- Floating wooden floor in the country
- Metal I-beam as a ceiling beam
- Fc plywood floors on an open terrace
- What is the best way to lay wood floors on a concrete slab
- Film faced plywood for sub-floor
- Rotted floors what to do
- How to change a subfloor without analyzing the final one
- Ventilation of the floor in a log house on a slab
- The mushroom is eating our home
- Installation of logs to the walls of the log house
- Country house made of blocks and wood
- Beam 8 meters what is the section
- Replacing the subfloor and floor in a log house
- Insulation with polyurethane foam of a floor in a log house on piles
- The thickness of the lag for the ceiling
- The floor rots and molds
- Subfloor made of cement-bonded particle board and insulation
- Plakhi for attic overlap 5 m
- Replacing a beam under a brick wall
- Reconstruction of an old floor in an old house
- Open beam ceiling
- What to support the floor beams
- Sandwich panel floors
- Log floor beams
- How to remove part of the floor beam
- Insulation of the floor from the subfloor
- Cold floors in a warm brick house
- Floor arrangement in an old brick house
- Insulation of the floor of the 1st floor in a log house
- Soundproofing the floor of the 2nd floor in a wooden house
- I-beam joist
- Insulation of the floor in the house on stilts
- The choice of the section of the log with a span of 5 m
- Repair of the ceiling of an old house
- Laminate flooring on the second floor in a log house
- Floor insulation in an old wooden house
- The worm wears away the wooden floors
- Overlapping in a wooden house
- Distance from ground to floor
- Protection of the log floor from moisture
- Wood floor to laminate
- Reinforcement of wooden floors
- How to install floors in a cold house in winter
- How to replace a rotten floor
- Floor insulation
- How to strengthen floor joists
- Second floor floor beams
- Floor insulation with foam
- Laying the floorboard
- Channel bars as interfloor overlap
- Interfloor overlap in a silicate brick house
- Chicken coop floor
- How to strengthen the overlap of a garage basement
- Support beam 6 meters
- Moldy subfloor
- Raise floors over the old floor
- Mastic for covering subfloors and logs
- How to lay plywood on floor logs
- Squeaky floors in the apartment
- Bath floors and drainage
- The logs and the rough floor of the country house have rotted
- Lags of 9 meters
- How to block the first floor of a log house of 8 meters
- Rotting sub floor
- What ceiling logs to choose
- How to put ceiling beams in a bath
- Transfer of beams in a log house in height
- Strengthening old timber beams
- Overlapping the first floor of a house without a basement
- Thermal insulation of wooden floors with moss
- About lumber for floor and roof
- Strengthening or replacing the ceiling lath
- Ground floors
- Tiles on the floor in the bath
- Laminate floor in the country
- Subfloor and roofing material
- Replacing the Support Structural Beam
- Finishing floor on an old floor with insulation
- Tiled floor in a wooden house
- How to insulate the subfloor
- Laying parquet boards in the apartment
- What to put on the veranda floor boards
- Renovation of an old sub-floor
- Fixing the log floor
- Sub-floor repair
- Waterproofing a floor from a board
- Floor beams - reinforcement
- Plywood thickness on logs
- Squeaky wooden floors how to clean
- Strengthening the interfloor overlap
- Film faced plywood for repairing wooden floors
- Leveling floors when shrinking at home
- Thermal insulation of wooden floors
- Installation of floor slabs
- Fastening beams to a vertical concrete wall
- How to join three skirting boards in a corner
- Floor log supports
- Floor beams for a span of 7 m
- The device of the floor in the house from a bar
- How to make a floor in an extension from a foam block
- Which timber to choose for a beam floor
- Bath floor repair
- Second floor terrace floor
- Round timber floors
- How to strengthen hardwood floors
- How to change a decayed beam
- Replacing floor beams in an adobe house
- Support for strengthening the beam
- Ceiling logs
- Laminate concrete floor
- Maximum distance between floor beams
- The middle of a wooden house sank
- Repair of floors in an adobe house
- Heated floors in a wooden house
- Raise the floor in an old house above ground level
- Replacing sex lags in an old house
- Attic floor repair
- Floors - asbestos-cement pipes for poles under logs
- Fastening the lag to the slabs
- Strengthening the log in a log house of 7 meters
- Bath floor device
- Warming of floors using Izospan V film
- Floor ventilation below ground level
- The floors in a log house are rotting
- Floor insulation on a concrete screed under linoleum
- How to make garage floors
- Types of flooring for the home
- What thickness of the floor board should be 28, 36, 40 ...
- Fastening the floor log in a panel house
- Concrete floor in a wooden house
- Repair of the wooden floor on the balcony
- Installation of logs in a log house
- Concrete floor screed on top of a Sip floor
- Strengthening and warming the floor from wood blocks
- How to align floor joists
- Strengthening timber beams
- Whether to tie the concrete floor to the house
- Insulation of a regularly flooded floor
- Insulation of the floor of the house on sleepers
- How to fix floor joists on top of a round log
- Replacing rotten floors
- Glassine in the underground of a log house
- Film blows up over the subfloor
- Questions about the floors in the garage 2nd floor
- Arrangement of a rough floor in a rounded log house
- Monolithic floors on the ground
- The better to sheathe the walls and floor of the garden house
- How to level a concrete floor in a panel house
- How to level the floor in the kitchen
- Bath floor
- What to support the floor logs on
- How to strengthen interfloor logs in a brick house
- Economical floor slabs
- Insulation of concrete floor slabs
- What is better to put under linoleum
- Sub-floor repair
- Floor arrangement with gas silicate
- Replacing floors in a country house
- Moisture resistant slabs floors
- How to put linoleum on an old floor in an apartment
- Leveling floors in an old house
- Genital lag processing
- Choosing a floorboard in the house
- Heat and vapor insulation in the floor pie
- Raise sagging floors without dismantling
- Heat and sound insulation of a floor in a panel house
- The floor in the hallway of a private house is rotting
- Rotten floor in a wooden house
- How to change the floor under the fireplace
- Concrete floor in the garage
- How to wax a floorboard
- How to make a wooden garage floor
- Repair of the concrete floor on the balcony
- Replacing subfloors
- Moisture resistant laminate for wooden floors
- How to cheaply remodel the floor in an apartment
- Bath floors
- Arrangement of subfloors
- Sagging logs and floor
- How to change a rotten floor
- How to properly lay the floor on the loggia
- Wooden floor device in more detail
- Larch sub-floors for the 2nd floor
- Second floor subfloor
- How to hide air conditioner pipes in a tile floor
- Replacing a rotten floor
- Floor repair in a panel house
- Lay the floors on the attic loggia
- The new wood floor has started to rot
- Repair of a wooden floor in a country house
- How to insulate a wooden floor
- Again about floor insulation
- Larch floors on the loggia
- Foundation and floors of an adobe house
- Floor in a ready-made (transportable) bath
- How to arrange a floor on an open balcony
- Underfloor insulation
- Connecting the ends of the floor board
- Concrete floor in the garage
- How to level the subfloor
- How to put a new floor on an old one
- How to lay a subfloor
- How to raise floors in a house
- How beautiful to lay the floors
- Underground ventilation
- How to align log beams under flooring
- The subfloor beams began to rot
- Laying the floor with a board without a thorn
- Floors in a country house
- Floor on the balcony-loggia
- Floors - leveling log logs
- Asbestos cement pipes for lightening concrete floor
- Insulation of the underground space
- Preparing the base for the laminate when laying the floor
Construction in Moscow and Moscow region
We work with a guarantee!A wide range of construction services. Foundation, walls, floors, roof, turnkey!
+7 (905) 797-20-34
luxurykomfort.ru
Construction in Moscow and Moscow region
We work with a guarantee!A wide range of construction services. Foundation, walls, floors, roof, turnkey!
+7 (905) 797-20-34
luxurykomfort.ru
Construction in Moscow and Moscow region
We work with a guarantee!A wide range of construction services. Foundation, walls, floors, roof, turnkey!
+7 (905) 797-20-34
luxurykomfort.ru
Floors
All questions to Semyonich about construction
Semyonich (author of materials)
Our site is regularly updated with interesting and unique materials and articles on the topic of lumber, building materials and works, the author's opinion and knowledge of a real shabashnik with more than 15 years of experience is given. There is a section - funny stories of shabashniki. If you would like to receive information about this, subscribe to the newsletter of our website. It is guaranteed that your address will not be passed on to third parties.
Apartment renovation in Moscow and Moscow region
We work with a guarantee! A wide range of renovation works. Professional craftsmen.
+7 (905) 797-20-34
luxurykomfort.ru
| Country house | Bath |
| For giving | Tool |
| Materials (edit) | Bikes |
| Foundation | Log cabins |
| Roofs | Warming |
| Walls | Siding |
| Floors | Cellars |
| Attic | Window doors |
| Stairs | Outbuildings |
| Wells | Toilets |
| Balconies | Loggias |
| Condensate | Flooding |
| Fences | Kennels |
| Sidewalk | Birdhouse |
| Adobe | Carts |
| Garages | Barn |
| Greenhouses | Bath |
| Swing | Brazier |
| Shower |
| Horizontal bar |
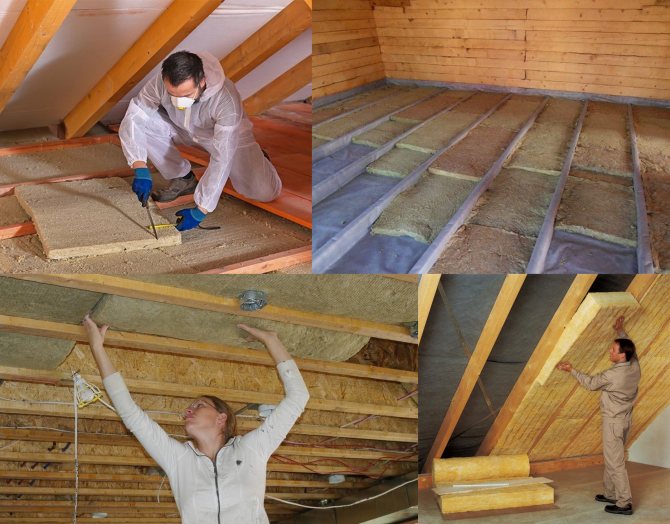
DIY attic floor
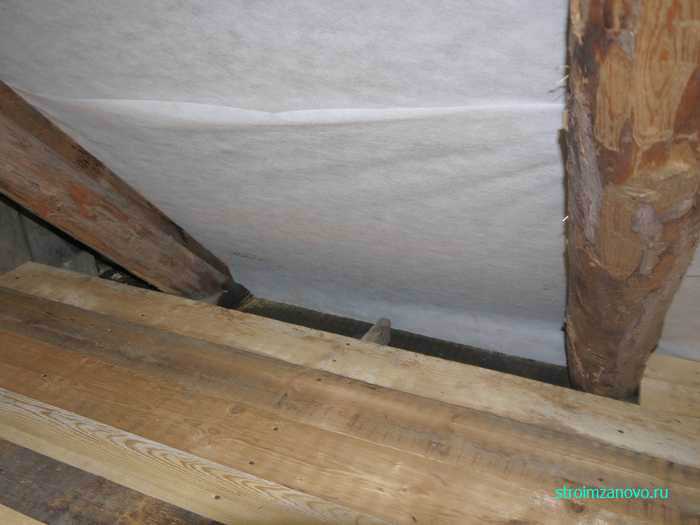
When converting an attic into a living room, it may turn out that the heat insulator located in the ceiling has become unusable and has lost its thermal insulation properties. The reasons for the loss of performance can be very different: from local leaks to poor ventilation of the attic and, as a result, wetting of the insulation from the formed condensate. Wet, decaying planks can also cause an entire floor to be remodeled.
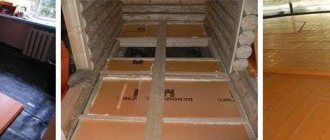
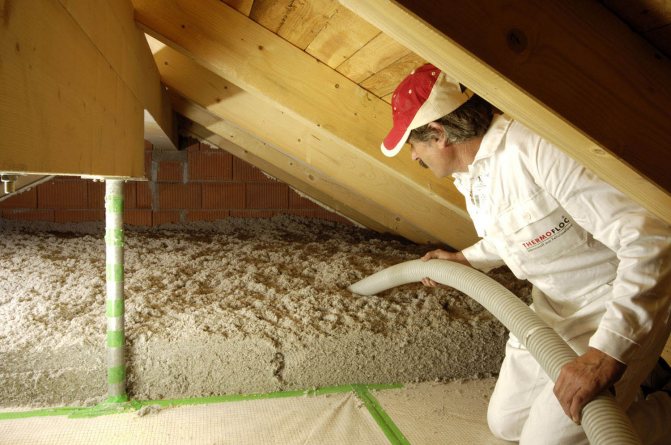
Alteration of the ceiling begins with the installation of additional lathing between the floor beams. As a lathing, most often, pine beams are used, which are fastened perpendicular to the beams using metal corners or in another convenient way. To prevent the penetration of condensate from the lower room, a layer of vapor barrier membrane is laid. As a heater, stone wool slabs are often used, which, depending on the required thickness, can be laid in two layers.
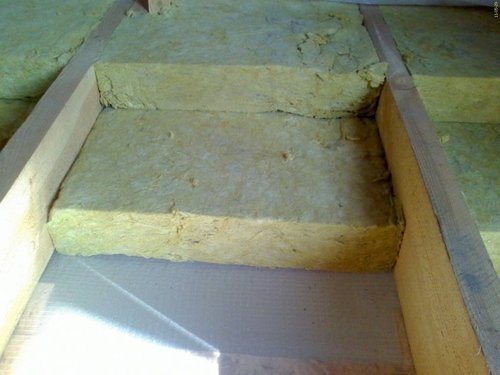
When laying the heat insulator in two layers, the joints should not be on the same level. The insulation is staggered.
A second layer of vapor barrier is laid on top of the slabs. The membrane is fastened with a construction stapler. The basis for the subfloor can be slabs made of tongue-and-groove moisture-resistant chipboard. They are tougher and stronger than conventional boards, and are also environmentally friendly. Thanks to the longitudinal projections and grooves, it is easy and convenient to mount the plates, and the surface is perfectly flat. For the final floor, laminate or linoleum is used.
Installation of the floor in the attic
So that you can move around the attic without any problems in the future, the heat-insulating layer must be covered with old flooring or some new material. Not bad for these works is a tongue-and-groove board, with the help of which it is possible to form a flooring without through gaps and to increase the thermal insulation of the floor. Then you can lay the flooring. For example, cork, which has excellent thermal insulation properties.
Having completed the described activities correctly, the owner will receive reliably insulated housing. Now heat will not escape through the ceiling, and heating costs will be reduced.
What is an attic
The attic space is limited by the roof slopes and the ceiling of the residential floor. This place is often used for arranging additional living space.
The attic of private households is of two types:
- Residential... It is called the attic. It can be used to equip a living room, study, bedroom, library, etc. The height of the room in this case should be at least 220 centimeters. In addition, it is necessary to provide ventilation, natural lighting, and insulate the slopes in it.
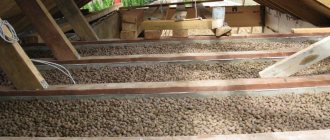
- Non-residential... Such an attic space is usually used for placing technical equipment, storing old or unnecessary things.In this case, a 2-meter height will be enough, and it is not necessary to equip natural lighting. Instead of insulating the slopes, they make thermal insulation of the attic floor.
When deciding on the repair or rebuilding of the house, you need to decide in advance for what purposes the attic will be used in order to make the calculation and the design of the floor. The list of required materials and the gap between the beams depends on this. They must provide the required strength and bearing capacity.
The procedure for performing work on insulation
The technology of laying the material in layers into the interblock space is almost no different from the insulation of the roof slopes. However, depending on the material used, certain adjustments to the design may be made.
The process of interbeam insulation begins with the installation of a rough ceiling on the lower floor. This requires regular low-grade lumber. Some insulation technologies, for example, using penoizol, assume a reinforced film as the base, which will become the base for the rough ceiling.
After that, it is necessary to carefully close up the cracks in the structure, which are always in the places of the manhole, the outlet of pipes and other engineering communications. For this, polyurethane foam, waste insulation materials or special mastics are perfect.
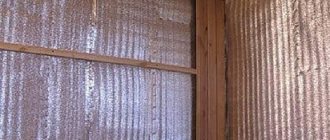
A vapor barrier material is spread over the entire overlap area, as a rule, for this, an ordinary polyethylene film with a thickness of 150-200 microns is taken. But at the same time, you should take into account that such a material cannot be called practical, it does not tolerate low temperatures well and is susceptible to mechanical damage. If extruded polystyrene foam is taken as a heater, it is possible to exclude the laying of a vapor barrier layer, since it itself is an excellent vapor barrier.
To avoid breakage of the film during installation of the insulation, it must fit freely, that is, without any tension. It is optimal if it completely describes the floor surface, covering the interbeam space and beams. The fastening of the vapor barrier layer is done with staples, with a stapler. All joints must be glued with a special tape, so that the individual vapor barrier strips turn into a single canvas.
Functional purpose of floors
The design of the attic floor depends on the parameters of the structure and the purposes for which it is planned to use the under-roof space. The attic has the function of a kind of air gap that separates the cold roof from the heated floors.

The attic floor has a number of tasks:
- carrier... The overlap, located between the upper residential floor and the attic space, has a load-bearing function, therefore it is made reliable and durable, since people will move along it, it is planned to place equipment on it and equip storage places;
- insulating... In a cold attic room, the temperature is not much different from that outside the house. In this case, the floors in the attic have a thermal insulating function, thereby preventing air cooling on residential floors. To keep warm, thermal insulation of the attic floor is required. It is advisable to entrust such work to professionals.
Features of the device and construction of floors
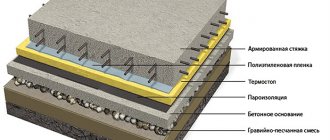
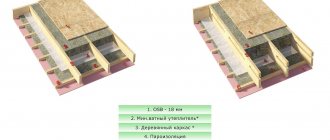
Since the overlapping of attics performs two functions - load-bearing and insulating, they have a multi-layer structure. Each of the elements of the "pie" complements each other, which provides the created structure with a long service life, strength and the ability to withstand heavy loads.
The flooring in the attic assumes the presence of the following layers:
- Finishing floor... This name is given to the floor covering, which is laid on a rough base. If this is an attic, then when arranging a final floor, linoleum, laminate, parquet, etc. are laid.In non-residential premises, the finishing flooring may not be available.
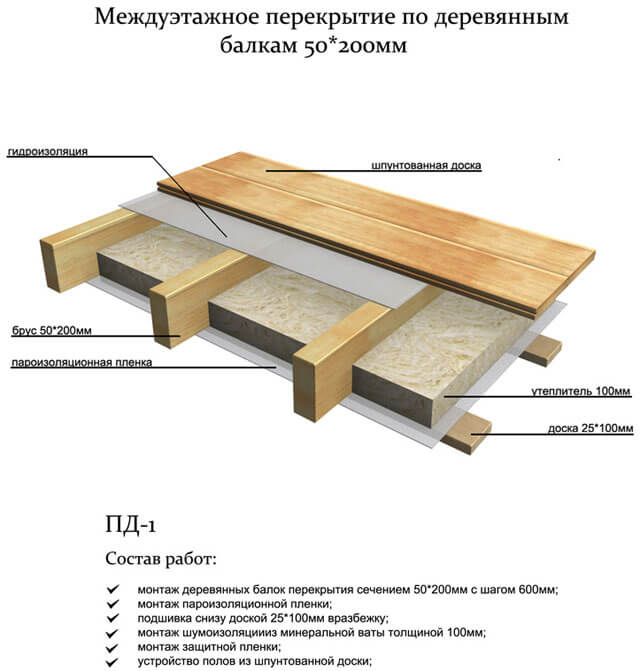
- Rough base... It is a boardwalk that is mounted on logs. The subfloor is lined from edged boards with a thickness of 4-5 centimeters or, in order to save money, from unedged boards.
- Lags... These are solid, even wooden elements that are laid perpendicular to the floor joists to create a floor covering. When the arrangement of the attic floor on wooden beams is carried out, a heater is placed between the logs, which is protected from below with a layer of vapor barrier, and covered with waterproofing material on top. If you do not use insulating layers, then repairs will be required after a few years.
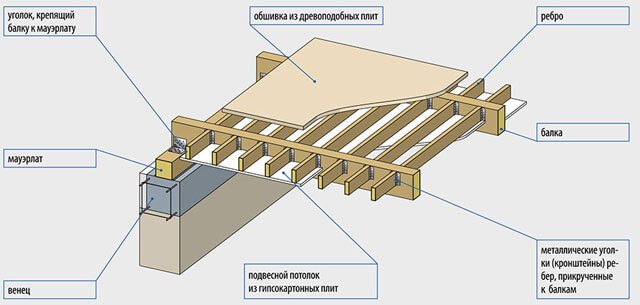
- Beams... The ceiling frame is built from thick and durable beams, which are either mounted on the protrusions of the walls, or embedded in them. They must support the entire weight of the structure. A flat roof can also be made over wooden beams, which is quite practical.
- Ceiling sheathing... From the side of the rooms, the floors are decorated with finishing materials, for example, natural wood or drywall.
Requirements for the device of the pie
Since the safety of staying in the house depends on the quality of installation and repair of attic floors, a number of requirements are imposed on their arrangement.
In order to know the value of the maximum permissible load that the structure can withstand, it is necessary to perform the appropriate calculations, and then, based on their results, they begin to develop a project, from which it will be clear how to properly insulate the attic floor in the house.

- Bearing capacity... It directly depends on the material for the manufacture of beams and on the gap between them.
- Distances between structural elements... The maximum allowable value for this parameter in accordance with building codes is 4 meters.
- Resistance to temperature extremes... It is necessary that the beams can withstand such changes without problems. The fact is that the difference between the air temperature in residential floors and in the attic always exceeds 4 degrees.
- Insulation... The pie of the attic floor of a cold attic should protect the premises of the household from the penetration of cold and moisture from the under-roof space.
In the design process, the requirements for the beams used to equip the attic floor should be taken into account so that the result is reliable and durable. The distance between them must be calculated based on the loads exerted on them.
The technology of creating an attic floor on wooden beams
If you have experience in performing construction work, you can mount the ceiling of the cold attic on wooden beams with your own hands. This process is carried out at the final stage of the roofing work.
The sequence of actions will be as follows:
- Installation of load-bearing beams. For a small private house, wooden floors made of a bar with a cross section of 150x150 or 200x200 millimeters are suitable. They are laid on concrete or masonry walls.
- Installing lag. They are placed on the edge perpendicular to the beams in 60 centimeters increments. Lags are made from boards with a section of 150x50 millimeters.
- Thermal insulation laying. Insulation is placed between the logs - it will protect against cold penetration from the attic.
- Installation of rough and final floor.
- Sheathing of load-bearing beams from the side of the room in order to decorate the ceiling surface.
When insulating the attic floor, one should not forget about the arrangement of hydro and vapor barrier.
Over time, many owners of private houses come to the idea of converting the attic into a living space. And for this, it is first of all necessary to carry out the installation of the floor in the attic, as well as the insulation of the roof. In order to do everything right, you will have to carry out a number of calculations and design the position of the elements, and then mount the structures.
DIY attic floor
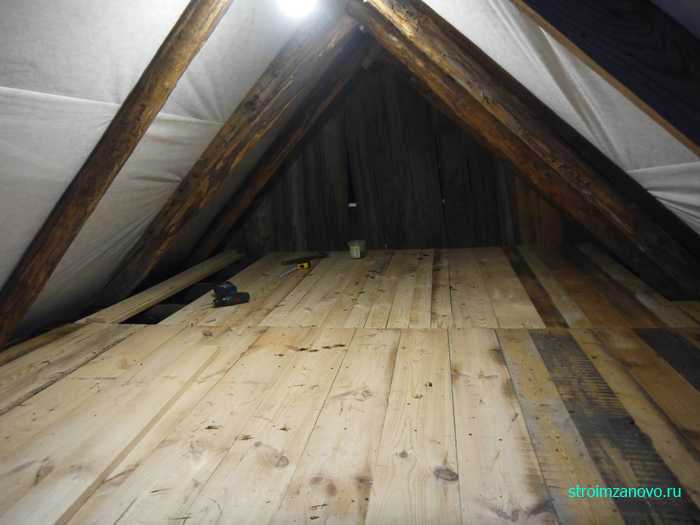
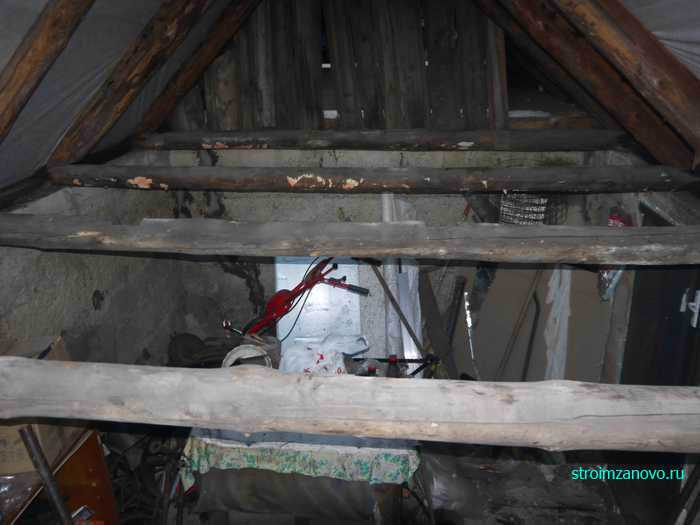
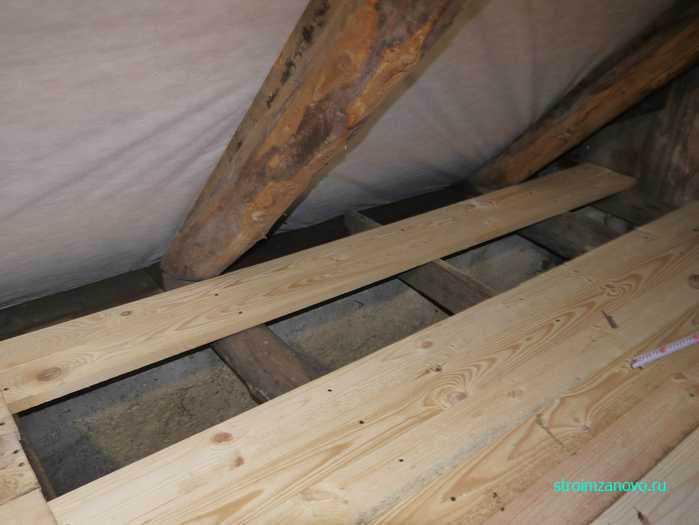
After the repair of the barn for household purposes located on our site, it became necessary to restore the attic space. The fact is that the under-roof space of this building was not used due to its emergency condition. The pediment of the shed was almost rotted away, and the planks on the floor of the attic were practically absent. And now, after replacing the roofing of the shed from slate to metal, the turn came to the construction of the attic.
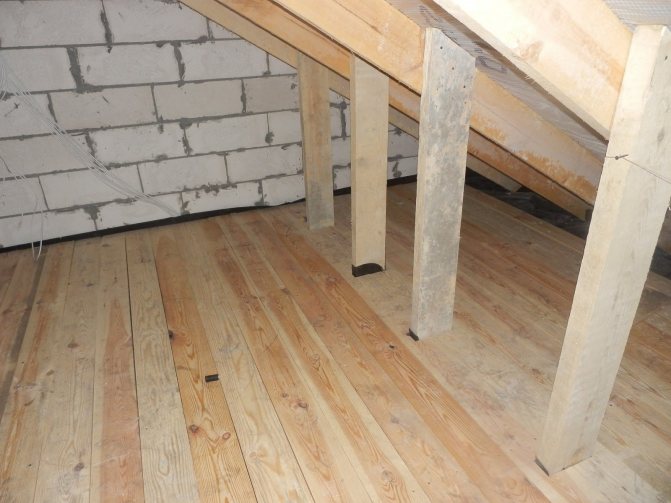
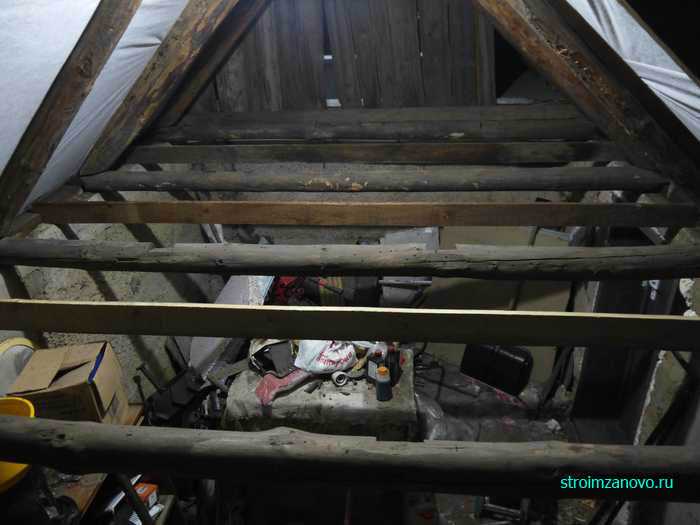
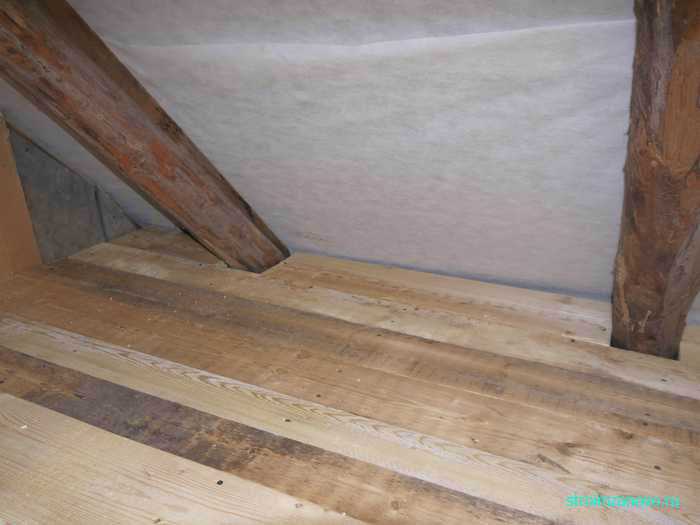
The first step was to remove the rest of the pediment. Then they dismantled the old attic floor boards, leaving only the floors. They were made of pine logs with a diameter of about 10 cm. Since the distance between the walls of the building on which the logs were laid is 3 meters, this diameter was quite enough for the attic floor. The only drawback, in our opinion, is the distance between the floors themselves. It was 1 meter, which was a lot for the installation of a reliable attic floor.
Having cut off several boards 3 m long, 10 cm high and 3 cm thick, we placed them on the edge on the walls of the shed between the main floors. We attached them to the Mauerlat bars through the metal corners with self-tapping screws. Now the distance between the ceilings is 50 cm, which is quite enough so that the floor boards in the attic do not bend under the weight of a person.
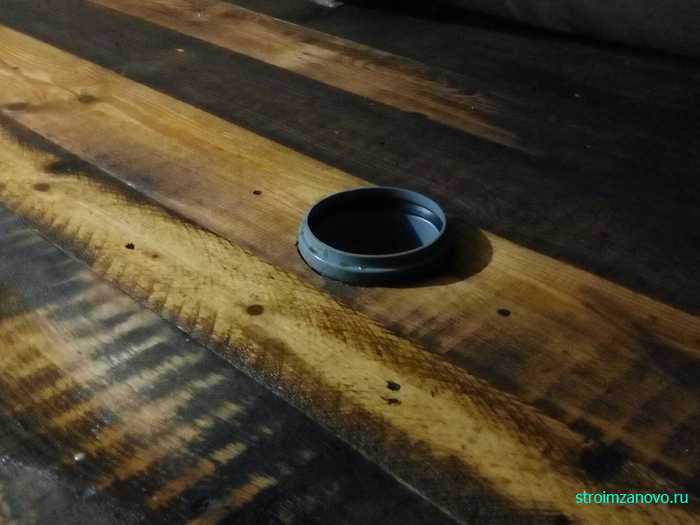
Now you can proceed directly to laying the floor. To do this, take a pine board of arbitrary width, 25 mm thick. On the one hand, we cut it off with an electric plane. We will start laying from the corner of the attic from the side of the pediment, attaching a ladder to the wall. Having laid several gaps in a row, with the planed side up, fasten them with self-tapping screws or nail them to all floors. Further, into the depths of the attic, it will be possible to move along these nailed boards. Let's not forget to cut a hole in the floor for the ventilation duct.
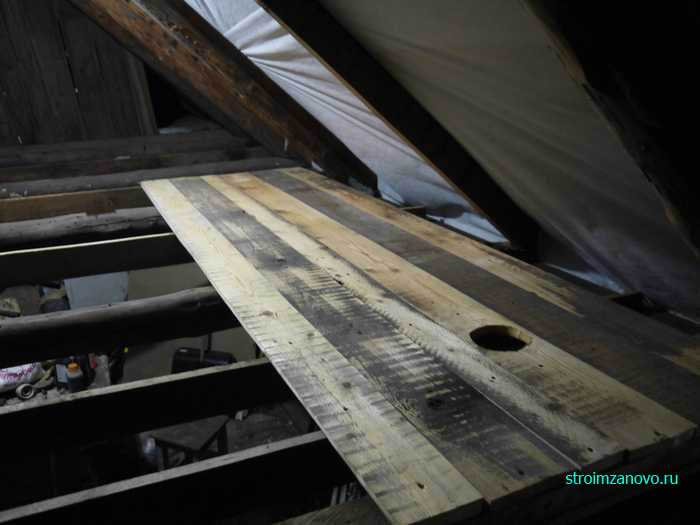
It is necessary to dock the floor to each other over the ceilings, nailing their edges to them so that the ends of the gaps do not dangle loose. Therefore, it is better to mark each board along the length separately, since the floors may not be laid parallel to each other.
When you reach the opposite rafters and until the end of the row there will be a couple of planks to nail, it is better to attach the penultimate gut next to the rafters.
This will be much more convenient, and with the last board you will close the gap formed by measuring its dimensions along the perimeter.
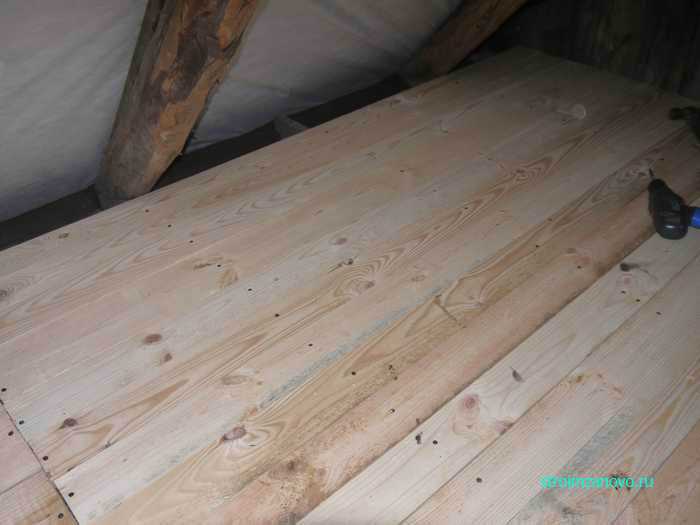
The remaining gaps between the rafters will also need to be closed with gaps so that these gaps do not spoil the aesthetics of the attic floor.
Each board will need to be measured individually in length and width, laid in a gap and screwed to the edge of a nearby board with self-tapping screws.
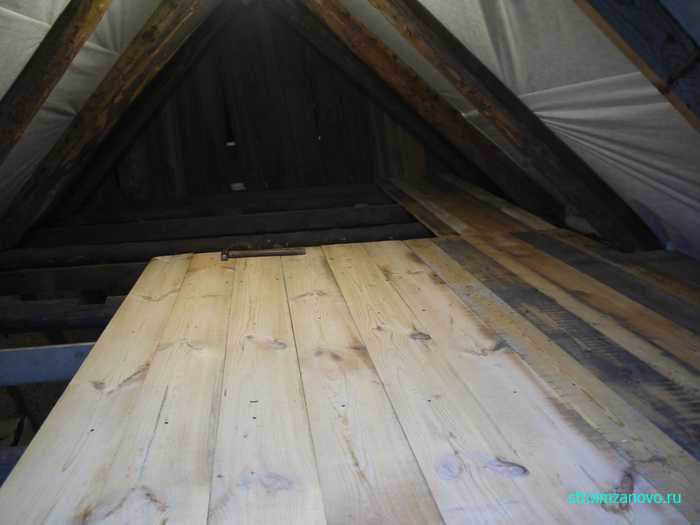
And one more useful tip: if it's dirty outside, it is better to take off your shoes so as not to get the newly laid floor dirty. Agree, shoe marks are not the best patterns even on the attic floor.
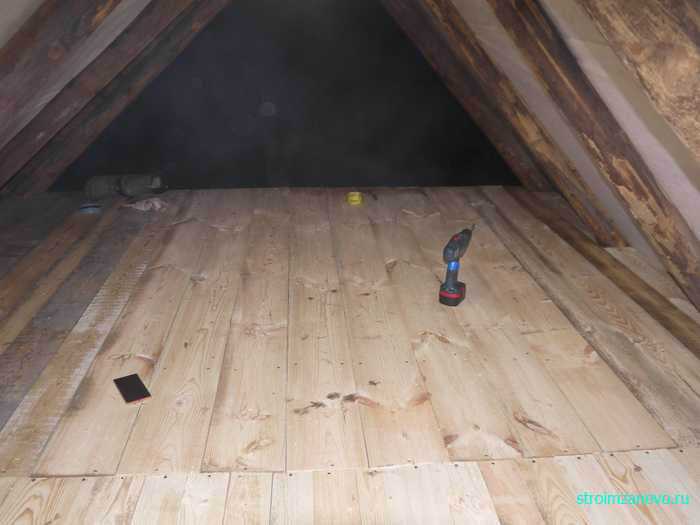
Do not forget to install a ventilation system element in the drilled hole.
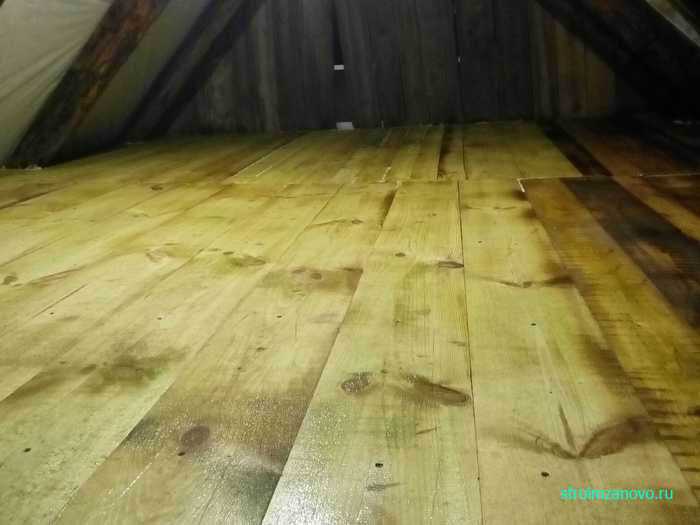
Finally, it is imperative to paint the attic floor with a protective coating. If you think it is too expensive to spend paint in the attic, you can treat the wood with an antiseptic. It is much cheaper than varnish, but it will bring the same benefits - it will protect the floor of the attic from premature wear and tear and from being eaten by harmful grinder beetles. As a result of such a floor repair in the attic, it will be possible to store all sorts of things that did not find a place in the barn.
Stages of work

To begin with, we will consider all the stages of work to be performed in the attic, among them it is noted:
- The first step is planning the premises.
- The second stage is the calculation of finances, which will also be decisive in the choice of materials and structures.
- Next, you need to carefully clean everything in the attic.
- The next step is measurements.
- Now it is necessary to inspect the flooring and the integrity of the rafter system.
- The next step will be the arrangement of all the necessary communications.
- And finally, the device of the subfloor, as well as thermal insulation, which we will talk about in more detail.
- Upon completion of the previous stage, internal and external finishing works are carried out.
- And the last stage of the device is the arrangement of the space in the living space (furniture, etc.).
Let's consider each of the stages in a little more detail.
Planning
The first and fundamental stage of the work is the planning of the future premises. After all, it will depend on the floor arrangement, the need for insulation and strengthening.
To complete this stage, it is better to resort to the help of specialists. Doing it yourself, you can make mistakes that will adversely affect the final result.