Home / Landing
Back to
Published: 26.04.
Reading time: 8 min
0
1
- 1 Requirements for heaters
- 2 Features of insulation under the screed
- 3 Materials for screed insulation 3.1 Expanded clay
- 4.1 Laying
- 8.1 Pros and cons
Requirements for heaters
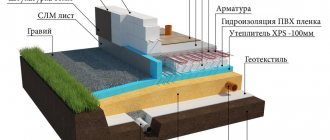
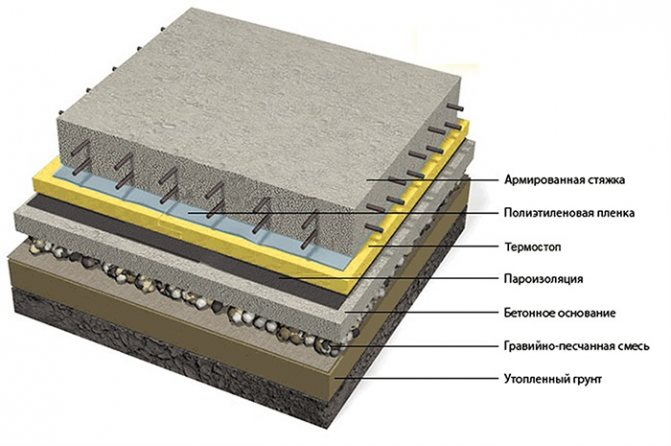
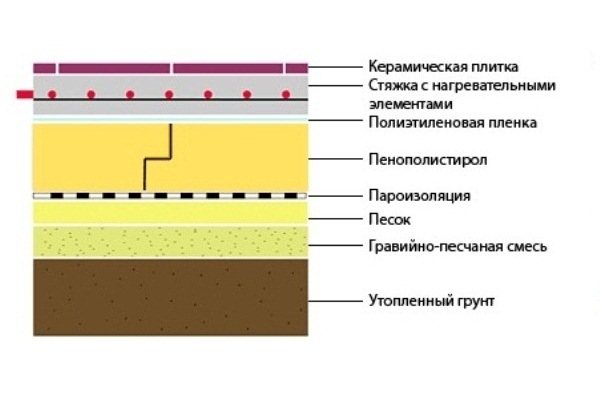
Scheme of insulation of a cement screed on the ground
Before using one or another version of thermal insulation, it is necessary to take into account some operational characteristics, as well as the permissibility of using the material for the screed device.
- Any type of insulation at the time of installation and during its service life must maintain the shape specified by the manufacturer.
- The material should be as environmentally friendly and safe as possible. Once fixed under the screed, it should not emit unpleasant odors.
- Good vapor permeability will ensure the release of moisture to the outside, respectively, the material will not get wet.
- The dense structure will make it possible to create a sufficient level of thermal and noise insulation.
Each of the materials has individual requirements for installation, differs in its own characteristics, which are permissible for use in a particular case.
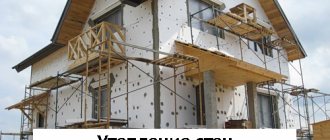
Required materials for concrete floor on the ground
It is advisable to purchase everything you need for work at a time. Professional builders know that transportation costs can exceed 10% of the estimated cost of a property. Sometimes paying for the delivery of missing materials can cost more than themselves.
Therefore, it is important to correctly determine the list of components, calculate their required number of all. One of the key questions, how to insulate a concrete floor in a private house? The best solution today is the use of polystyrene foam boards.
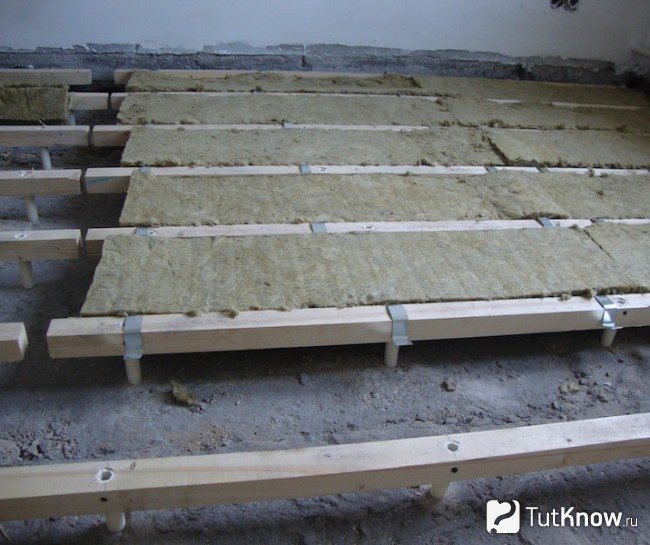
Mineral wool is used much less often because it is too elastic and mobile. In exceptional cases, its use is allowed, but only when stacked in specially prepared lathing cells or in the inter-lag space. Then a rough floor is made from boards, sheet materials
One of the key questions, how to insulate a concrete floor in a private house? The best solution today is the use of polystyrene foam boards. Mineral wool is used much less often because it is too elastic and mobile. In exceptional cases, its use is allowed, but only when stacked in specially prepared lathing cells or in the inter-lag space. Then a rough floor is made of boards, sheet materials.
The work becomes more time consuming if it is decided to apply this material to the floors. Insulation on a concrete floor that can withstand the planned load without additional operations is preferable.
In addition, the estimated cost rises significantly without a noticeable improvement in performance. The only indicator where there is a clear advantage is sound insulation. But the ground is not a source of noise, so when choosing a heater on the floor, you should not think about it.
This advantage is completely devalued. In the overwhelming majority of cases today, concrete floors are insulated with expanded polystyrene. This is justified by the following characteristics:
- economic benefit;
- sufficient strength;
- material reliability;
- long service life;
- environmental Safety;
- non-susceptibility to decay, corrosion, the appearance of mold, moss and other microorganisms;
- polystyrene foam insulation for a concrete floor is easy to process, which makes it convenient for independent work.
Such an insulating layer is not hygroscopic, but small surface and capillary penetration is still observed. Floor insulation in this situation will lose its effectiveness over the years. Multiple seasonal freezing cycles can damage the material.
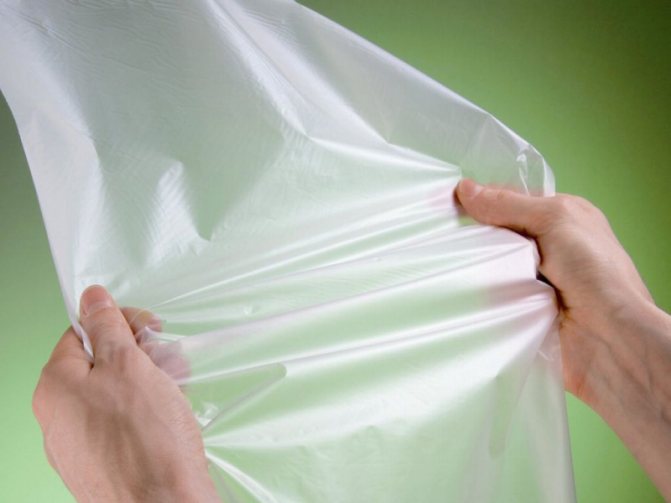
Thermal insulation of a concrete floor needs to be protected from moisture penetration into it, both ground and water from the solution when installing the screed. A wide range of waterproofing materials will create a reliable barrier to liquid. Used roll, sheet products of this category on a polymer or bitumen basis. The quantity is calculated, taking into account overlaps and waste when cutting.
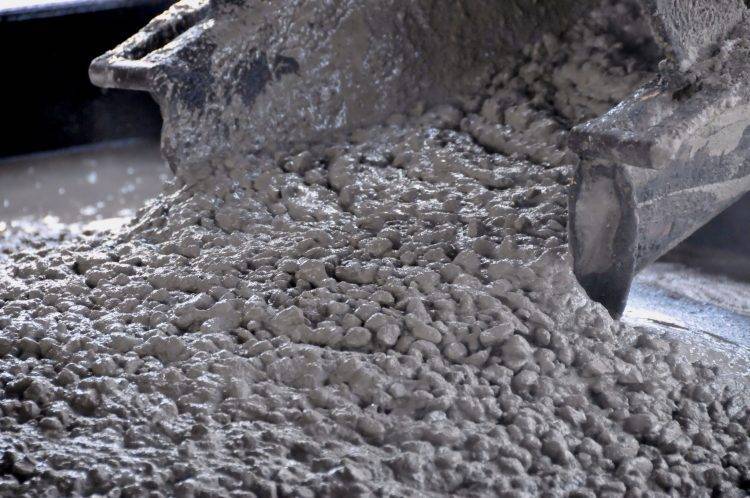
The main consumable by weight is the concrete mix. It is possible to accurately determine the amount of required components in a simple way. Without delving into the essence of complex professional formulas, experienced craftsmen use the following technique - 1 m3 of the following concrete grades contains cement:
- M 150 - 260 kg (cement M 300);
- M 200 - 290 kg (cement M 300), 250 kg (cement M 400) and 220 kg (cement M 500);
- M 250 - 340 kg (cement M 300), 300 kg (cement M 400) and 250 kg (cement M 500);
- M 300 - 350 kg (cement M 400) and 300 kg (cement M 500);
- M 400 - 400 kg (cement M 400) and 330 kg (cement M 500);
When preparing a dry mix, it is recommended to use the values of mass, not volume. So, a cement having a high specific gravity should weigh about 3-5 times less sand and crushed stone in a solution.
However, in terms of volume, this value can reach a difference of 6-7 times. Depending on the brand of cement, as well as the desired quality of concrete, crushed stone is imported at the rate of 4 to 7 tons per 1 ton of binder.


Features of insulation under the screed
Thermal insulation of this type is considered one of the most labor-consuming, while requiring the master to have not only a theoretical base, but also practical skills. In the case of this type of concrete floor insulation, it is not enough to be able to hammer in nails or drill holes with a drill, it is necessary to be able to fill the screed perfectly evenly, focusing on the lighthouses.
First of all, it is important to choose the right insulation that will be applied under the floor screed.
There are 4 main types of screed heat insulators:
- expanded clay;
- foam granules;
- mineral wool;
- extruded polystyrene foam.
They all have their own advantages, so they deserve special attention.


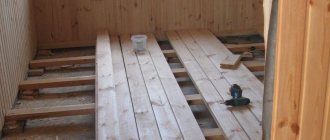
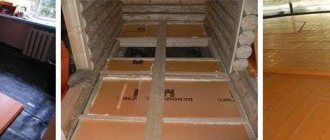
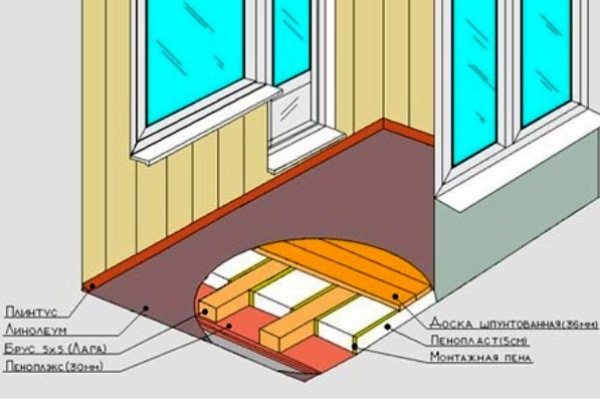
Floor insulation with logs
Thermal insulation of the floor with extruded polystyrene foam occurs by laying its sheets between the logs. The PSB - C 15 brand is well suited, since the lags will take the main load. The instruction advises to take the insulation thickness equal to ten centimeters for insulation of the first floors of the house, and five between the floors.
Important. It is imperative to fill in the gaps between the lags and the foam, as well as the technological gaps. To do this, you can take ordinary fiberglass, it is more suitable for these purposes and costs less.
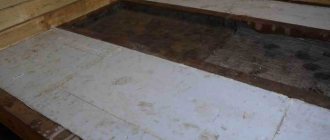
The process of insulating a wooden floor
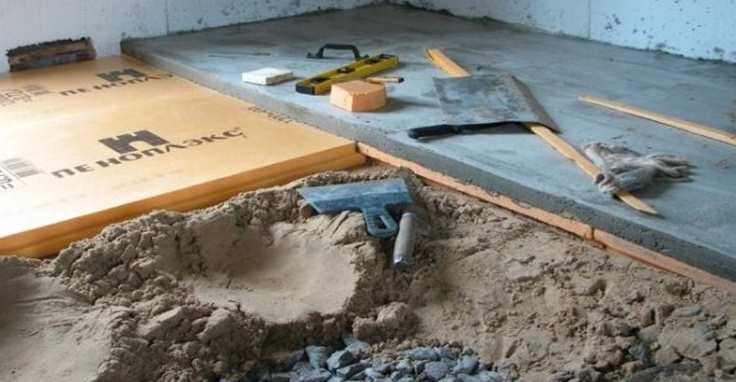
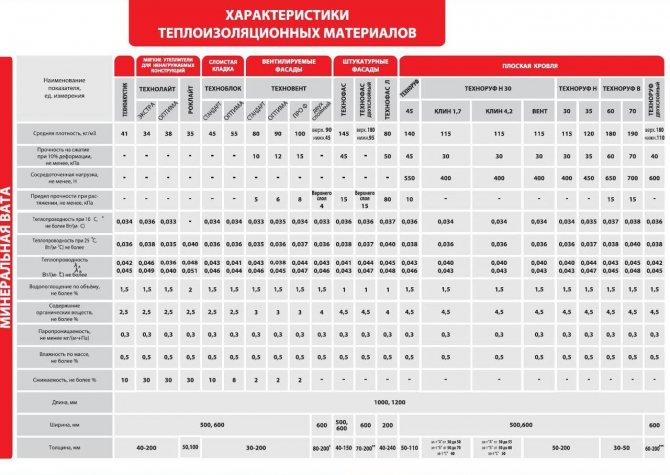
Screed insulation materials
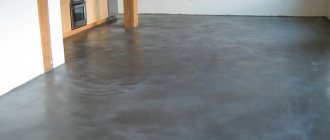
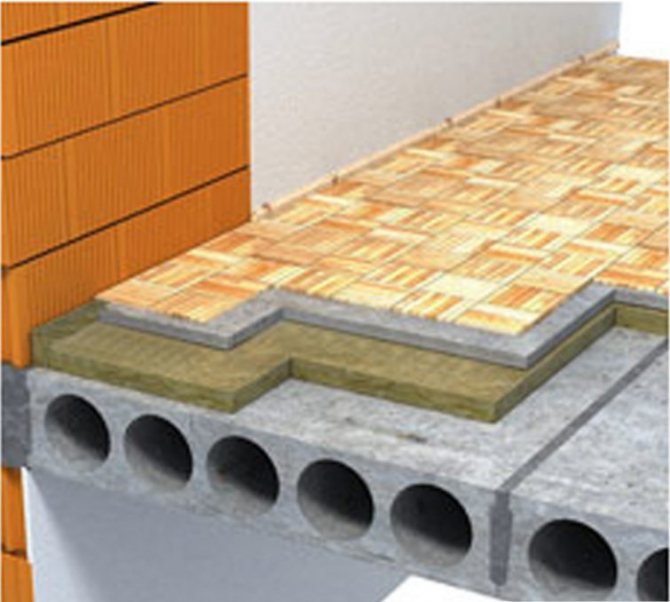
Insulation of the floor screed with expanded polystyrene
In order to properly organize the insulation, it is necessary to choose the appropriate raw material option.
You can create an optimal level of thermal insulation at home using foam or expanded polystyrene. These materials have a relatively elastic structure. They are laid in slabs, having previously selected the desired thickness. This raw material contains 96% air, therefore it is considered natural. Thanks to this material, it is possible to minimize the heat transfer rates under the concrete screed in the house and in the apartment. The main advantage of the canvas is its versatility.
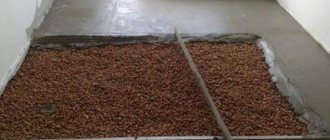
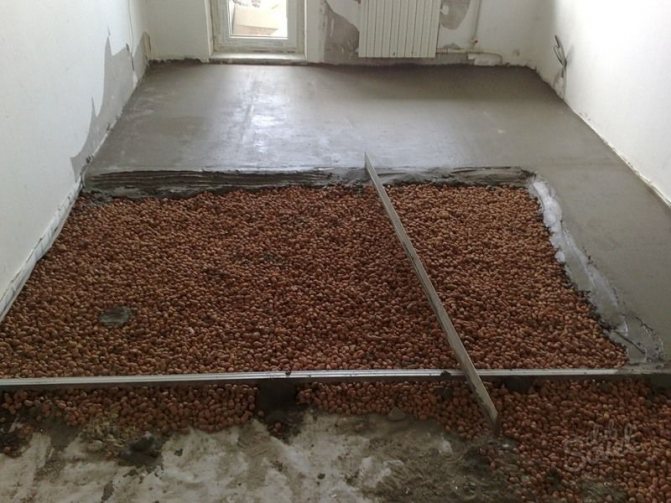
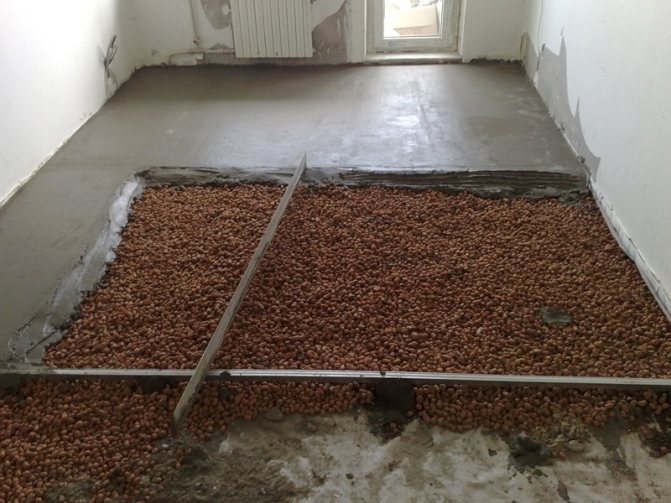
Expanded clay
Expanded clay is a loose insulation for a floor under a screed of a coarse fraction. It is based on foamed fired clay. The material is poured into specially prepared niches and evenly distributed over the surface. Initially, only this raw material was used to insulate the floor screed. The main condition when using expanded clay is the installation of waterproofing from above, since when the screed is poured, all thermal insulation turns into expanded clay concrete.
The foil fabric consists of two layers. The first plays the role of a base and substrate, the second is a reflector. Such insulation is usually based on expanded polyethylene under the screed or polystyrene. It comes in white or blue. It is laid under concrete and has good reflective properties. The product with foil retains heat well and also prevents moisture penetration.
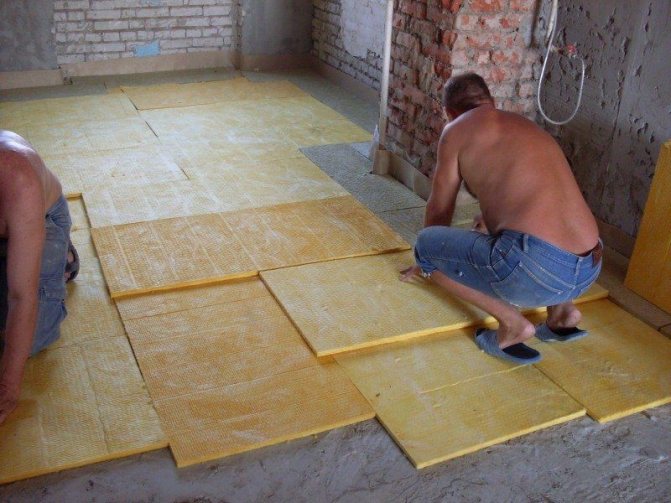
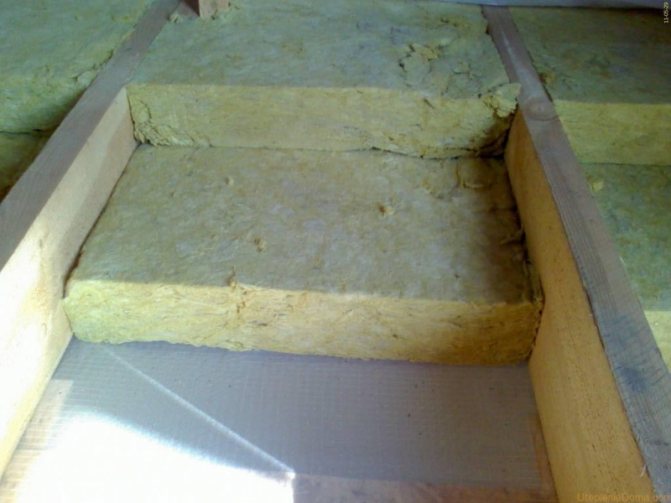
Mineral wool is inconvenient for insulation under a screed, since it is difficult to properly lay it and isolate it from moisture
This insulation under the screed is considered inconvenient for installation on concrete floor slabs. It is quite difficult to properly lay it and isolate it from moisture. Raw materials require special surface preparation, in particular, laying a vapor barrier film. A special waterproofing material is also laid on top of the insulation before pouring concrete. If this is not done, the interior equipment of the floor will not fulfill its function.
They are a kind of foam. You can fix the insulation on the floor under the screed using special glue or cement mortar. It is also allowed to make a floating insulation cushion. This material has good deformation resistance and excellent moisture resistance.
We invite you to familiarize yourself with Lavender chemical composition
What insulation to choose
The parameters for choosing an effective insulation under the screed must meet the following requirements:
- light weight;
- fire resistance;
- environmental friendliness;
- resistance to decay;
- ease of installation;
- good indicators of thermal conductivity;
- affordability.
The most commonly used types of floor insulation are the following materials:
- foams;
- polyurethane foams;
- mineral wool;
- expanded clay;
- sheet penoplex.
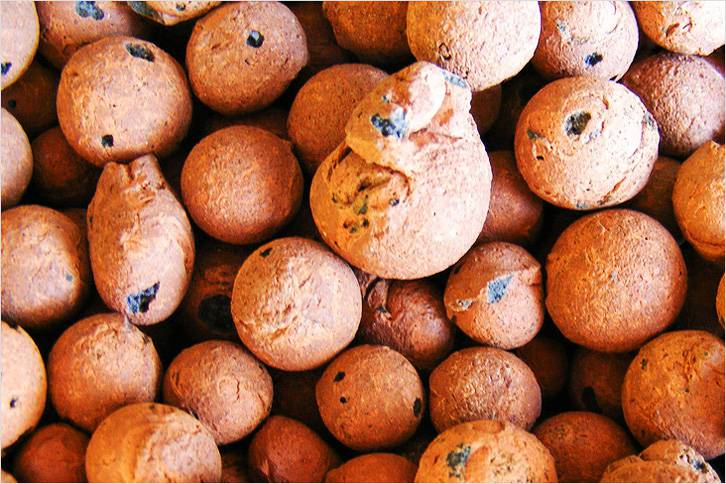
Expanded clay
As a refractory eco-friendly material, granules of which have porosity, expanded clay is considered brittle, and when laying it requires extra care.
It is obtained with the help of clay swelling and is used in the insulation of residential buildings and industrial buildings as a heat and sound insulator.
Expanded clay consists of granules of different sizes, depending on which expanded clay gravel, sand, crushed stone are separated by fractions. The ideal option is when the granules are mixed and non-uniform in size: this will avoid the "failure" of the floor.
After laying, the material should be well tamped.
Styling
Based on the fact that the maximum load is on the floor surface, it is very important to choose the right thickness of the insulation. This is done so that after a while the insulator does not deform or sag along with the floor covering. In the case of expanded clay, for effective insulation, the layer must be at least 15 cm.
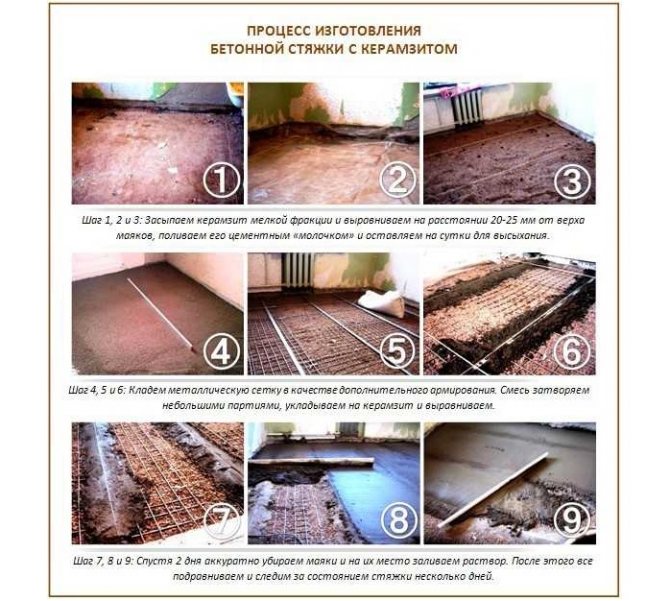
Laying steps:
- First, a layer of waterproofing is put, and only on top of it is a heat-insulating material.
- Then beacons should be set up, which will ensure the perfect evenness of the concrete placement. The first beacon should be installed at a distance of about 20 cm from the wall, then set evenly and parallel to each other, depending on the size of the floor.
- After that, a fixation layer is laid, consisting of cement mixed with water. The solution must fill all voids in order to expel air.
- This is followed by a direct screed with a mortar from a mixture of sand with concrete, and the more the latter is in the composition, the harder the mixture. Typically, a ratio of 60% cement and 40% sand is used.The solution is poured over expanded clay, and then evenly spread with a spatula, leaving to dry.
Insulation for underfloor heating
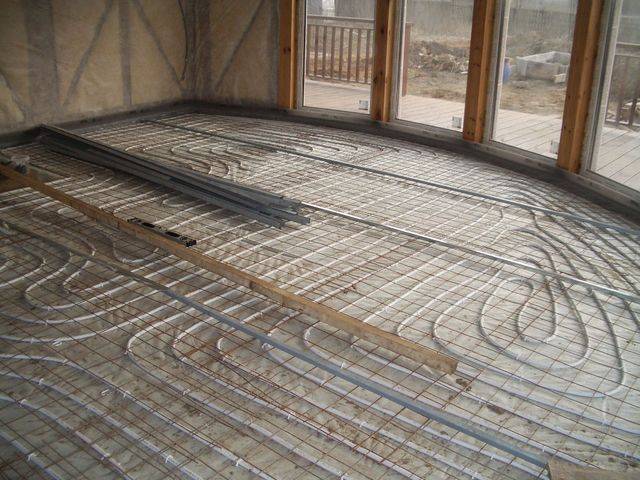
When installing a warm floor, heat loss is reduced by 20%, moisture resistance increases, additional sound insulation appears, and the cost of heating decreases. Therefore, it is necessary to correctly resolve the issue of thermal insulation. Warm floors can be water or electric. Insulation requirements are still the same.
Before insulating the floor in an apartment, you need to choose a material. The product should have low thermal conductivity, not react to deformation, be elastic, and should not be subject to changes in high humidity.
To insulate a warm floor, use:
- mineral wool. Good insulation under an electric warm floor. With mineral wool, it is easy to install and it is low in price, it copes well with the functions assigned to it;
- cork backing - low thermal conductivity and good density, environmentally friendly. When applied, the floor rises to a height of 4 cm. It also requires the installation of an additional reflective layer;
- metallized lavsan film - thermal conductivity is also low. The film must be laid in a continuous layer, including the places where the pipes pass;
- expanded polystyrene - suitable for a water-heated floor. Resistant to moisture, cheap, durable and easy to install. The fungus does not act on it at all and it serves for a long time;
- polypropylene - has a cellular structure that is closed. Differs in high sound and heat insulation characteristics. Can withstand high temperatures (130 degrees), does not react to moisture. Does not cause difficulties during installation.
The insulation should be placed on a clean and completely flat base. Therefore, it is necessary to dismantle the existing screed and level the base so that the height differences are no more than 10 mm.
A waterproofing layer is installed in front of the insulation. A damper tape is attached around the perimeter. Thanks to it, thermal expansion during heating is compensated.
The whole construction of a warm floor is like a multi-layer cake. The production of each layer must be done with high quality. The work is carried out in the following sequence:
- Preparation. The existing screed is dismantled and the height differences are leveled. Also, the floors are cleaned of dirt, which helps to do the following work efficiently;
- Thermal insulation for a warm floor is made directly on the base. This reduces heat loss to a minimum. The characteristics of the materials are given above. The thickness of the insulation required is different. If the room above is insulated, then a layer thickness of up to 30 mm is sufficient. And when the rooms on the ground floor are insulated, the thickness will increase to 50-100 mm;
- Installation of the mesh. It serves as a reinforcement and helps to distribute heat evenly. The size of the cells is made depending on the distance between the heating elements;
- Installation of a heating element. If a water floor is being made, then you need to choose the right material from which the pipes are made. Reinforced plastic and XLPE pipes are suitable. An electric floor can be of different designs: single-core or two-core;
- Screed. Its thickness over the pipes is recommended to be no less than 30 mm. It is carried out using plasticizers that protect the solidified material from cracking;
- Installation of flooring. Ceramic tiles - option number 1 for a warm floor, because they have high thermal conductivity.
In cold living quarters, the problem of insulation cannot be solved simply by replacing windows and doors, without floor insulation. By insulating the floors, and at the same time the walls and ceiling, you will create a cozy and comfortable atmosphere in the house.
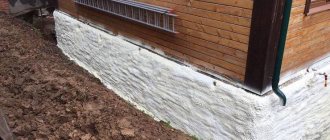
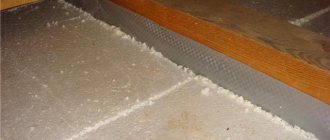
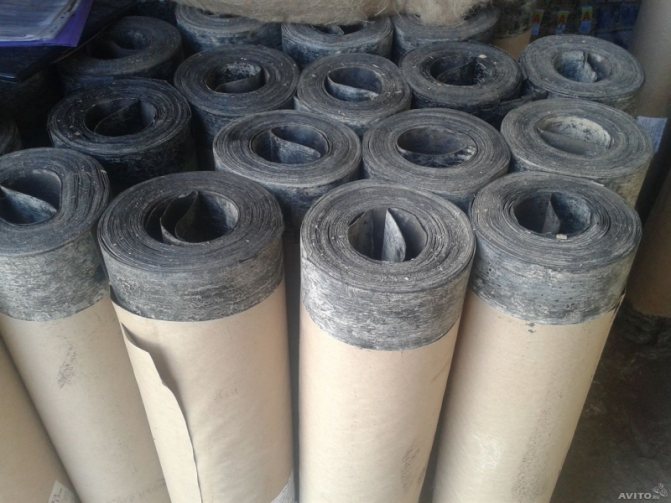
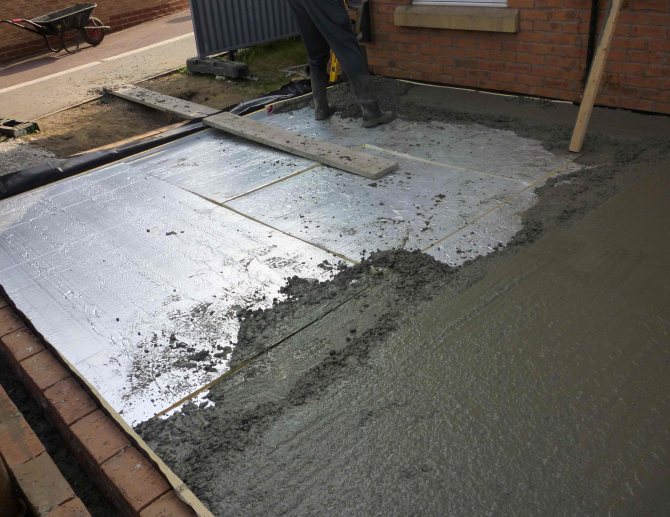
Rough screed waterproofing
Waterproofing with bituminous cloth
Rough screed is found mainly in their own homes. It is the pouring of concrete directly onto the ground.Also, this design is optimal for arranging a yard or garage structure.
After the stage of filling the screed, waterproofing should be performed in order to completely eliminate the formation of condensation from the soil. It is mounted using special roll insulators - usually a bituminous sheet or membrane films.
The insulating layer must be applied to adjacent walls approximately 10-15 cm. To remove the excess layer, sand the surface must be performed.
If it is not possible to lay the waterproofing material on the ground in front of the concrete screed, first fill in a small layer of the monolith. After solidification, a layer of bituminous material or roofing material is applied.
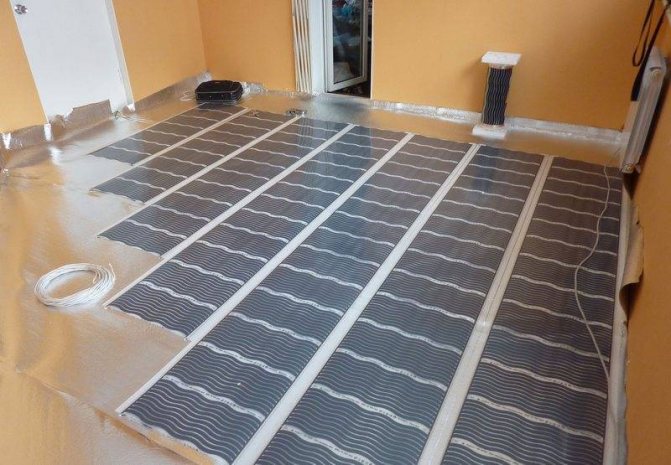
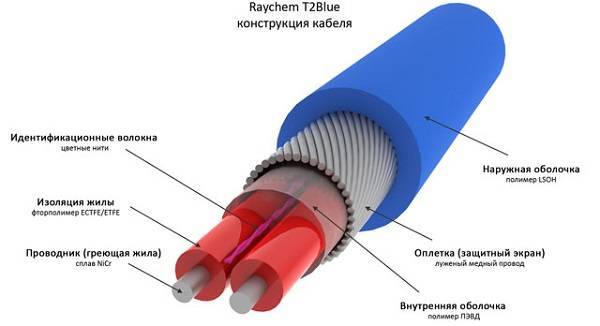
Electric underfloor heating
Less equipment is required for the installation of this structure, the installation is easier. The absence of a liquid heat carrier greatly simplifies the entire heating system. For heating, a heating cable or infrared film is used; they are connected to electrical circuits through thermostats.
Laying heating cables and plates
In the absence of a liquid coolant, waterproofing on the slabs can be excluded, since there will be no chance of leakage. When laying on the ground, it is recommended to leave the pre-screed and waterproofing. Such a warm waterproofed floor in a private house will exclude the penetration of moisture from the ground into the room. Otherwise, the screed materials and sequence remain the same.
Cables are laid in the same way, snake or snail. To warm up well-insulated rooms up to + 18-25 ̊С, 150-200 W / 1m2 are required, if you take 3-5 m of cable per 1m2, then the laying step will be 10-30 cm. The temperature threshold for rooms is calculated based on their functional purpose, in the bathroom is warmer - up to +25 ̊С, in the hall - +20 ̊С. Manufacturers make different cables, when buying, you need to be interested in how much power 1 running meter consumes.
Infrared plates are produced in rolls 800 mm, 500 mm and 1 meter wide, 0.7-15 m long.They are fixed to the thermal insulation coating with thermal tape, stacked 20 cm from the walls and no closer than 6 mm from each other, connected in parallel to network 220V.
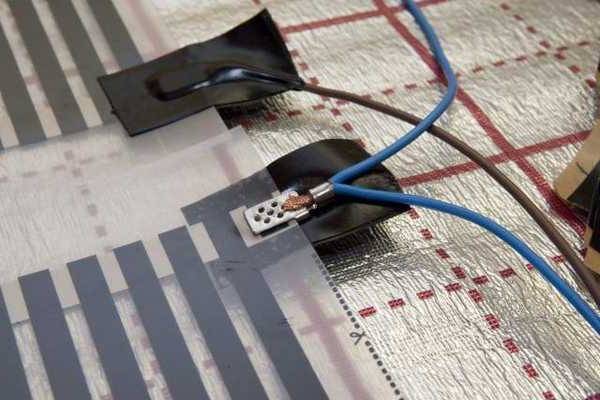
Example of laying and connecting an infrared plate
The power consumption of the plates is 45-65 W / m2 * h, this is the amount of electricity consumed by 1 m2 of film per hour, the melting temperature of the insulating film on the plates is 130 ̊С. There are ready-made mats, heaters with a reflective layer to them are fixed on infrared plates, the width of such products is 83 cm, the length is 1-12 m.
It is imperative to take into account the installation locations of furniture and large-sized household appliances (washing machine, refrigerator, cabinets) in the room. It is not recommended to lay cables and plates under them.
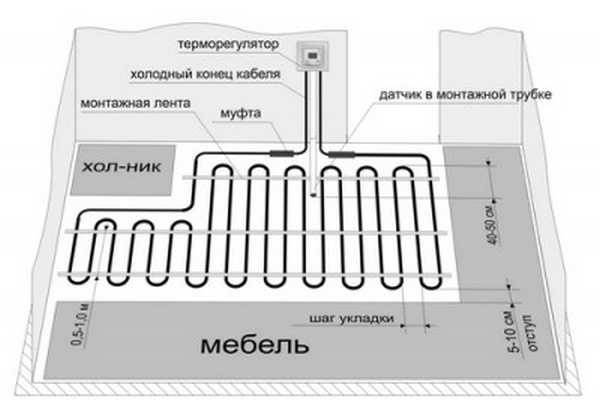
Layout of heating elements
Laying of heating cables and plates should be planned on the free surface of the floor covering. This will reduce the load on heat sources, and the space in the room will be heated more efficiently.
Connecting electrical heating elements
There are different types of cables:
Single-wire - not divided into parts, produced with a certain capacity and length. After laying, they are connected to the network through a thermostat, with opposite ends;
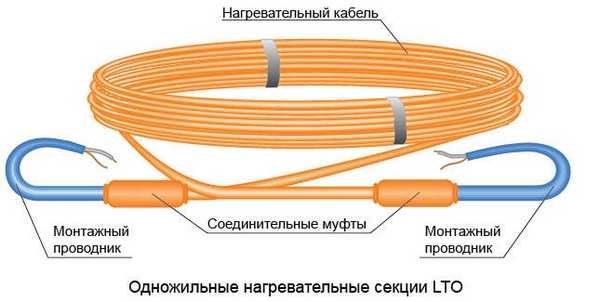
Single conductor cable design
Two-wire - cables shorted at one end, which is hermetically sealed with a plastic cap. The other end with two wires is connected to the network through a thermostat, the cable is not cut into pieces.
Two-core cable design
Two-wire self-regulating cable - cut into pieces at specific locations. The thermostat is a film matrix located along its entire length between the copper conductors. The resistance varies with the ambient temperature. The current begins to flow between the wires in those places where the temperature is below +5 ̊С. The lower the temperature around the cable, the greater the current and heating of the cable. Such models are expensive.
Styrofoam granules
When using this method of floor insulation, there is no need to lay the base surface under the material. This insulator is considered the lightest, and also capable of not repeating the unevenness of the surface, therefore it is indispensable when screed into uneven floors.
We invite you to familiarize yourself with Properties and methods of application of cocoa powder
Basically, foam granules (polytherm) are used as an additive to a solution that also consists of water, coarse sand, cement, fiberglass and plasticizers.
The lightness of the material is due to the low density of the granules. This type of screed is ideal for insulating attics, roofs, basements and floors of the first floors of houses. In this case, the foam should have a thickness of about 50 cm, and if it is used as interfloor sound insulation, then first a layer with a thickness of about 60 cm is poured, and then a semi-dry screed is laid on top.
After filling the screed with a solution, it is leveled, dried, and then sanded.
Household communications, water heated floors, as well as electrical wiring placed inside the corrugation are ideally placed in the polytherm.
Floating screed technology
longBurn, if in the rest of the apartment the sad consequences did not appear within a month after the screed was poured, then leave everything as it is. On the dismantled site. Let's estimate the thickness of the floor pie layers based on your information. Total thickness 85-90 mm. The thickness of the mineral wool is 25 mm. 60-65 mm remains on the screed. For the high-quality performance of the DSP screed, this thickness is very suitable. The only thing is, what year was your house built? DSP weight 10 mm thick. is ~ 20 kg. per 1 sq.m., which corresponds to ~ 120-130 kg. in your case. Without going into details, for relatively old houses this is an overweight per square meter. If you have any doubts in this regard, it is better to return to the expanded clay layer and reduce the thickness of the DSP to 45-50 mm. Well, quite rightly, this is a project order and its approval
Regarding the waterproofing between the cotton wool and the DSP screed. This is a very important piece of the cake. Without it, cotton wool will suck moisture from the laid DSP solution. The rapid loss of moisture in the screed is a guarantee of an unsatisfactory result.
About the reinforcement. You need to reinforce. For the end result - no matter what. Can be wire mesh. You can use basalt mesh. You can use a polymer mesh. Can be reinforced. You can use fiber. Fiber is the cheapest. And at the cost of the fiber itself, and at work. One thing: not everyone is able (or does not want) to comply with the technology of working with it. There are certain tricks and nuances. In the absence of confidence in the qualifications of the performers, if I were you, I would choose a wire mesh: you should try to break the technology of working with it (the only requirement is that the mesh should be in the thickness of the screed, and not at the very bottom), and any spectator inexperienced in construction will be able to clearly control the work process.
Regarding the material for the DSP screed. The best way to make a good screed is to do it yourself. Take sand, the quality of which can be preliminarily controlled (particle size, absence of impurities) and the freshest (ideally two to three weeks from the date of manufacture on the package) cement of a large manufacturer. At the expense of sand in Moscow (you’re from there?) I don’t know where to get it, but it’s better to buy cement in large building markets (Leroy drives), where you yourself in the trading floor select bags based on their date. Regarding ready-made mixtures of DSP (M300, M150) that are sold in Moscow, I will not really say anything. Several times I was invited for orders to Moscow, I went and chose all sorts of different mixtures, a lot of everything that I don't have in the city. Plus, even products of well-known common brands can be produced at another plant. In my city, if there is an urgent need for a ready-made mixture, lately I tend to AHTON sand concrete from Leroy (produced by Mr.Zhukovsky MO). The quality of the mixture IMHO on the C grade, but stable, without tricks and surprises. Plus, you can always take bags 5-7 days old.
About screed care. You pay hired specialists not for the amount of work performed directly at the moment of pouring the screed, but for the result that will appear after a time after pouring. The set of design strength, minimization of the shrinkage deformation of the screed made of DSP, directly depends on the subsequent maintenance of it for several days. It is up to you to decide who will take care of the screed, but in any case, this is a necessary stage at which the following should be taken into account. The basis of care is the creation of a very humid microclimate in the room, which prevents the transfer of water from the screed to the external environment. Let's recall physics from a school course or a trip abroad: in dry Egypt you won't have time to reach the sunbed, it's already all dry, and in humid Southeast Asia, swimming trunks do not dry out on a clothesline overnight. Here are the main points: First, there must be no air movement: windows / doors are closed, the cracks underneath are blocked, the hoods are plugged, etc. And it is better to extend this rule to the entire apartment, and not just to a room with a filled screed. Secondly, exclude the fall of direct sunlight on the screed. Third, if there is any way to lower the temperature in the room (shut off the batteries), do it. Fourthly, water the screed from the next day with water, it is better less (remember the neighbors below), but more often. If there is no finishing repair on the walls, you can spray the walls, you can place wide containers with water in the room. Fifthly, after watering, cover the screed with a film (or even better with sawdust, but this is already exotic). Ideally, you can control the humidity in the room with at least some kind of device, you can use a cheap Chinese one. Humidity should not be lower than 90% (and under the film everything is 100%). Follow the care regimen for up to a week.
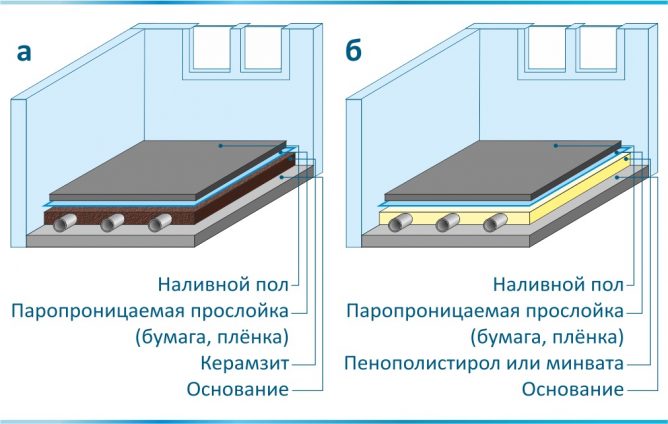
Options for floor insulation under the screed
In the basement level, thermal insulation is made from materials that are not subject to moisture absorption
There are several options for installing insulation under a concrete screed. Each of them is applied in individual cases.
- Floor slab. In such designs, it is advisable to use a standard film, which is laid in two layers. This makes it possible to achieve an insulation thickness of 300 microns. Fused bitumen is also used. However, it is not very practical, as it retains all the unevenness of the concrete screed.
- In the basement level. There is usually a basement, garage or cellar under the floor slab. In this case, thermal insulation is made from materials that are not subject to moisture absorption (styrene foam, polystyrene and others).
- Between floors. To prevent heat loss in apartments during the heating season, thermal insulation is performed between floors in layers of concrete screed. For such structures, expanded clay, basalt wool or expanded polystyrene are considered the best options.
There are several options for floor insulation. In fact, if you delve into the nuances, there are as many as there are masters. But there are so-called technological skeletons, from which it is impossible to move away with all the desire. This is an algorithm, a sequence of actions and general rules for the selection and use of materials.
The process of floor insulation also has such skeletons, and everything here depends on the type of material for insulation:
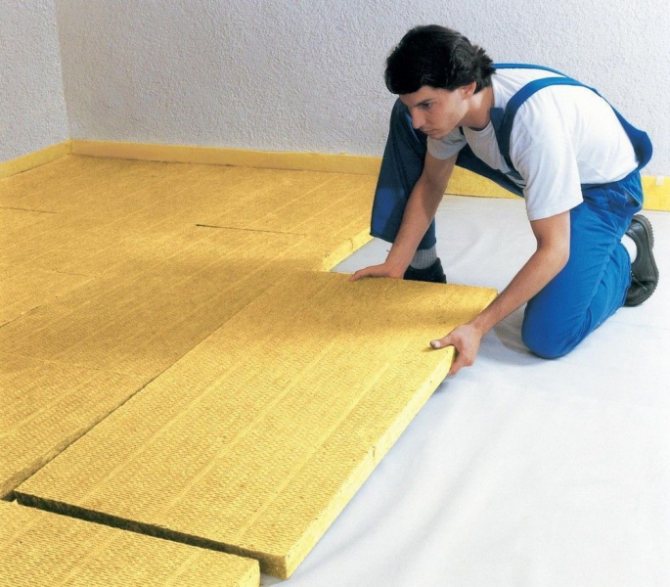
- Mineral wool is laid on a ready-made concrete screed, which should be even without flaws. For this, a special box is assembled, it is divided into compartments, compartments, where the insulation is placed. From above it is sewn up with wooden plates. The same method of insulation is used for expanded clay;
- In the case of using foam, Penoplex, the material is laid on a rough screed. Topcoat layers are applied on top.In this case, the insulating effect can be enhanced by using a foil film.
- The expanded clay pillow can be filled with cement or the material is added to the solution. In the first case, it is necessary to pour the insulation with cement milk. This will ensure a better solidification of the solution.
We suggest that you familiarize yourself with Drip irrigation for indoor plants with your own hands
When laying sheet materials, it is necessary to leave a small gap between the insulation and the wall. This is done with a damper tape. The gap is necessary for the unhindered expansion of materials during temperature changes.
Helpful article? Bookmark it!
Floor insulation technology with stone wool
The thermal insulation process consists of a number of stages, each of which is designed to provide reliable thermal and waterproofing in the building.
Preparatory work before installing stone wool
Before laying the heat insulator on the floor, perform the so-called "semi-dry screed", which levels the surface. These works got their name due to the fact that less water is required than in traditional solutions. As a result, the load is lightened, as well as the labor intensity of the work is reduced. The reduced level of humidity will not interfere with the simultaneous finishing in adjacent rooms.
To prepare the solution, we stock up on cement grade 400 D20, washed sand and individual additives, which are designed to improve the streamlining of the mixture. Water can be taken from a regular tap. 3 shovels of cement and 1 sand are alternately poured into the trough until the required volume is obtained. After that, water is added until a consistency is obtained, in which the lump of solution will not release moisture, but will be able to maintain the shape given to it.
Now you can start pouring the mixture onto a pre-prepared pallet made of waterproofing film with sides 10-15 cm high. To prevent the solution from getting on the walls, a restrictive tape is used. On top of the base, special level beacons are installed. This role can be played even by heaps of mortar on which guide profiles are placed.
The mixed mortar is thrown with shovels until the required height is reached. After that, the surface is compacted, and a semi-dry solution is poured on top. The screed is leveled and compacted at the same time. The finished surface is immediately sanded. As a rule, the thickness of such a screed should be within 4-5 cm.
A day later, expansion joints are planned and cut out, the width of which is 3 mm, and the depth is up to 1/3 of the thickness of the screed itself.
In cases where pouring is carried out in hot weather, the floor surface must be moistened daily, thereby avoiding cracking of the mixture. Compliance with all these rules will allow you to create a high-quality, perfectly flat surface for thermal insulation.
Considering the various aspects associated with thermal insulation work, we need the following materials: insulation in mats or rolls, ground paint, vapor barrier material, cement and sand, glue mixture, laminate for finishing, plinth with fixings.
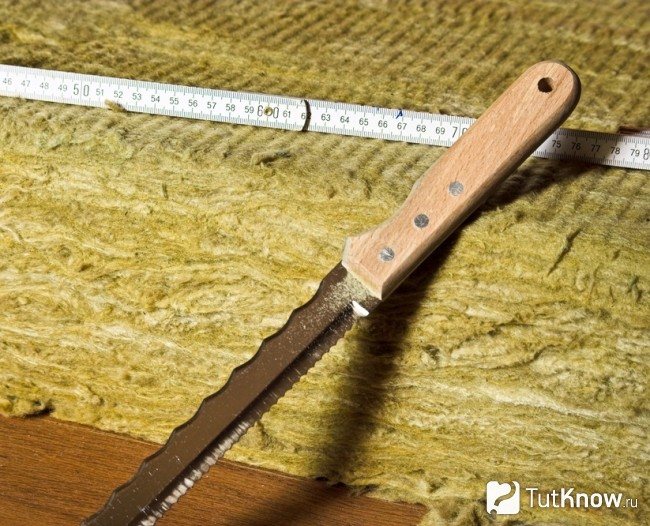
As tools, you must prepare in advance: a hammer, shovels, trowel, level, pencil, tape measure, scissors, hacksaw, building corner.
Instructions for installing stone wool on the floor
It all starts with the procedure for leveling the floor surface, which is especially necessary when it comes to the first floor standing on the ground. Even when we are installing a heat insulator on floor slabs, cracks and defects are often found in them. To even out irregularities in the ground, the surface is covered with a 10 cm layer of rubble. After that, a layer of sand of the same thickness is laid on top.
After the screed is prepared, a vapor barrier film must be laid on it - floor insulation with stone wool cannot be sufficiently effective without this. This is due to the fact that a heat insulator unprotected from moisture easily damp, and this immediately reduces its insulating characteristics.
A plastic film or even roofing felt, which is widely used in construction, is well suited for the role of a vapor barrier. Today on sale you can find special vapor barrier membranes, which consist of several layers. It is necessary to lay such material as tightly as possible in relation to the surface of the walls and interfloor floors. Any ventilation openings will lead to condensation.
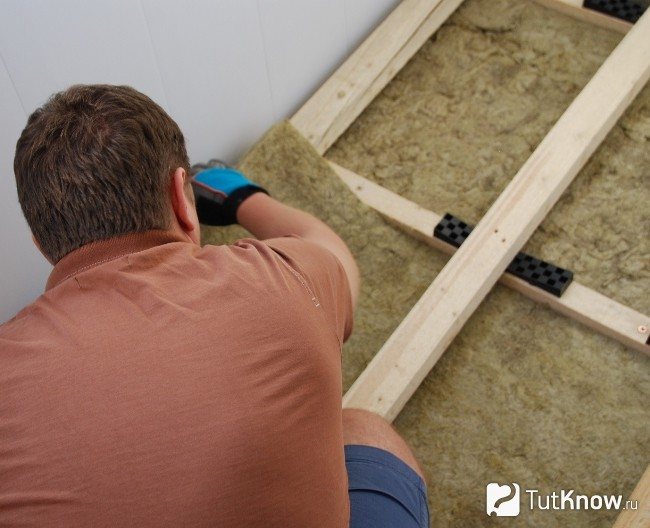
The algorithm for carrying out insulation work will be reduced to approximately the following actions:
- First, wooden logs are prepared. They will secure the material and create cells in which it can be stacked. To equip the logs, you need to purchase dried wood, which is then sawn to the required size and cleaned.
- A roll of stone wool is taken, unwound and placed on the vapor barrier in such a way that there are no free slots and gaps. This will prevent moisture build-up.
- After the mineral wool is laid out, it is covered with another vapor barrier. Such an operation is especially in demand when insulating attic rooms. In this case, the ventilation holes are allowed - through them, moisture will evaporate, which has got under the vapor barrier.
- As soon as the insulation is installed, you can start forming the finished floor. Prior to finishing, it is advisable to use a cement or concrete screed to create a level surface.
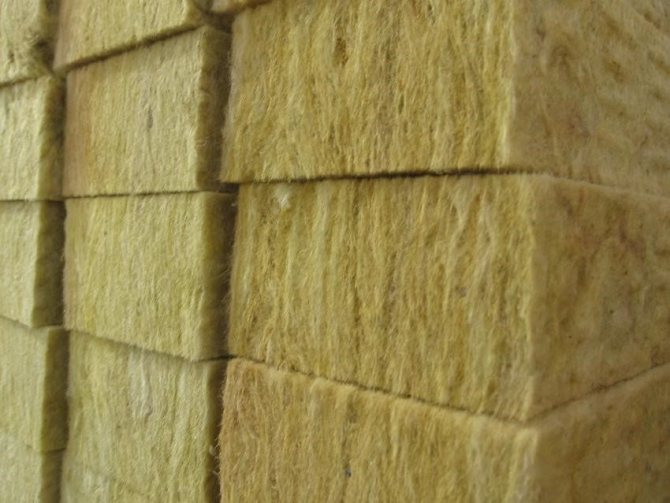
Mineral wool
Mineral wool is considered a common material for thermal insulation: affordable, but quite effective. It is mainly used to insulate attic rooms or floors of the 1st floor.
Mineral wool consists of thin fibers and can be corrugated, spatial, horizontally or vertically layered and have the following substances in the main composition:
- blast furnace slag;
- volcanic rocks (basalt, stone, etc.);
- glass.
Pros and cons
The main advantages of the material are: crease resistance, good vapor permeability, frost resistance, economy, resistance to temperature changes, low biological activity (resistance to the spread of mold, fungi). In addition, mineral wool is easy to install and screed, and can also serve for many years.
However, when choosing this material, one should take into account its disadvantages in the form of a large layer height and insignificant resistance to moisture penetration. Therefore, when installing mineral fibers, it is imperative to lay a layer of waterproofing. In terms of moisture permeability, glass wool has proven itself well, but it consists of free-flowing sharp elements, which can bring some inconvenience when laying it as a heater.
Mineral wool is produced in the form of rolls, layers such as flexible mats or hard plates.
The stages of installing mineral wool are carried out in approximately the same algorithm, the nuances consist only in the form of a surface. First, the base is carefully prepared, then a waterproofing layer is laid, a heater and a vapor barrier are laid on top of it. The final stage before the screed is the final coating.
Advantages and disadvantages of floor insulation with stone wool
Among the main advantages of stone wool, I would like to dwell on the following qualities:
- Fire safety due to the complete incombustibility of the material. In other words, it additionally also protects against the spread of the fire in the building. The insulation is able to withstand up to 1000 degrees Celsius without changing its properties.
- High heat-insulating and sound-insulating characteristics. Not every heater can boast of such a combination. By purchasing stone wool, the owner solves at the same time 2 of his problems - insulation of floors with basalt wool and insulation from extraneous noise that penetrates into the room from the outside.
- Resistant to aggressive chemicals or biological influences.
- Excellent vapor permeability distinguishes cotton wool from a number of synthetic heat insulators.
- Resistance to mold, rot, various fungi, rodents and parasites, which can easily destroy all efforts and investments in the purchase and installation of insulation.
- High frost resistance allows using basalt or stone wool even in severe frosty winters.
- Convenience of installation and its ease. The material itself weighs very little, and this greatly facilitates the work on thermal insulation of buildings.
- Preservation of the original shapes and sizes, which is associated with the features of the structure of the material.
- The economy of carrying out insulation works, caused by the low cost of stone wool.
Among the possible disadvantages, we highlight the following points:
- Despite the fact that the material is recognized as environmentally friendly for humans, when shaking it, dust clouds can be created, which are undesirable for the pulmonary tract. That is why protective respiratory masks should not be neglected when working with it. Allergy sufferers must take special precautions.
- It is not allowed to use stone wool as a heat insulator in public catering facilities, although in many cases they turn a blind eye to this.
- This insulation gives a higher load on the structure in comparison, for example, with the same expanded polystyrene.
- The disadvantage is the appearance of cold bridges at the joints. That is why it will be necessary to seal these gaps with mounting cotton, which will avoid heat loss.
Otherwise, any disadvantages from the use of stone wool can be associated with the purchase of low-quality material or its unfair storage.
Installation tips
Leave a gap of 1-3 cm between the wall and the floor
To properly lay the insulation on the floor on the screed, you need to follow some simple guidelines. Every nuance can be decisive in the installation process.
- When screed is made, a gap of 1-3 cm should be left between the wall and the floor.
- Without waterproofing, thermal insulation for a concrete screed is not made.
- It is important to follow the sequence of work when organizing thermal insulation.
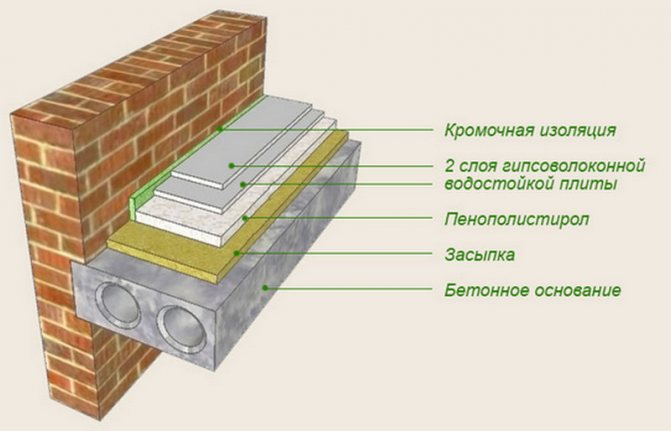
- The floor cake should have at least five layers.
Upon completion of the installation of thermal insulation for a concrete floor screed, professionals recommend additionally installing insulation reinforcement.
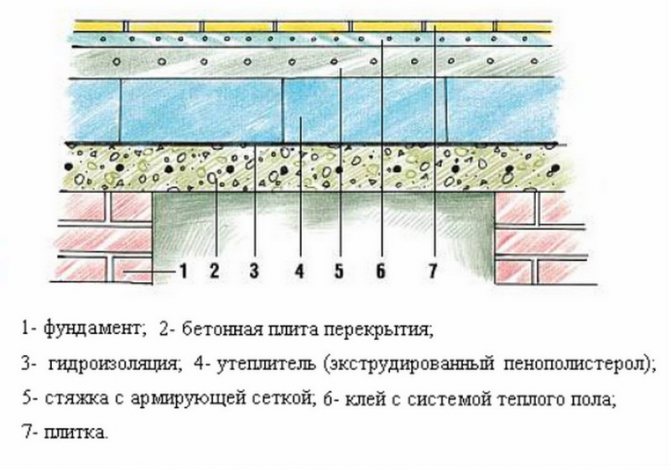
Insulation of floors laid on the ground
By and large, these works differ from the previous section only in the preparation of the soil and the laying of layers preceding the installation of the insulation:
- The soil for the base is leveled and tamped;
- Crushed stone about ten centimeters thick is poured, it is leveled and tamped;
- Next, sand with a fine fraction is poured, it is needed to fill the voids formed between the rubble;
- Waterproofing is laid;
- Then the insulation for the floor is taken from expanded polystyrene or polystyrene and is adjusted on top of all layers. The second option will be slightly cheaper.
In hardware stores, you can purchase not only materials in the form of sheets and plates, but also the components of these materials in a liquid state. When they are mixed, a chemical reaction occurs and a heater is formed.
Floor insulation on the ground
It must be said that such work as insulating a loggia or balcony can be carried out using such materials, since they are suitable for almost all thermal insulation work (see for more details the article Insulating a loggia with foam, a modern way to reduce heat loss throughout an apartment).
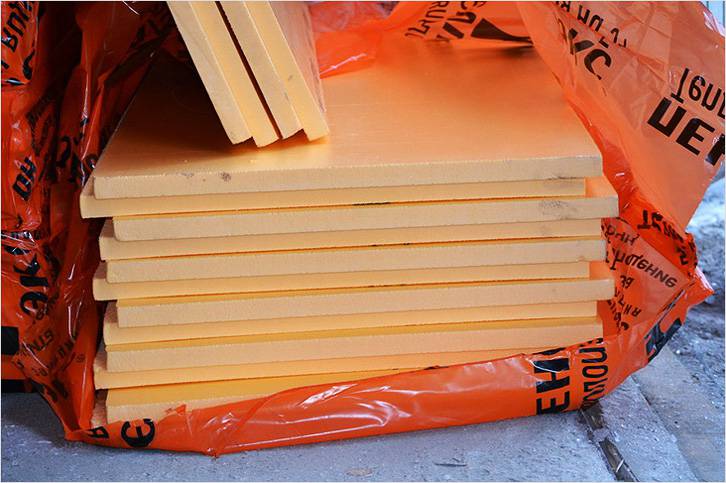
Extruded polystyrene foam
The priorities of materials based on expanded polystyrene are low thermal conductivity and light weight. Extruded (foamed) polystyrene creates a reliable barrier to heat loss on the treated surface, and also prevents excess moisture from penetrating inside.
Basically, the material is used to insulate floors in basements or plinths. It does not absorb groundwater at all, and if moisture does get on top of it, then the structure of expanded polystyrene, swelling, does not change.
This insulation is compatible with the underfloor heating system and any electrical equipment. Only 1 sq. m. of material is able to withstand up to 400 kg of weight. In addition, polystyrene is resistant to biological and chemical influences, immune to temperature extremes and easy to install.
It is important to avoid contact of the material with organic solvents, which could lead to their melting. Insulation is considered inexpensive and it is easy to work with it even for a completely inexperienced craftsman. Difficulties can arise only at the stage of pouring and leveling the concrete solution.
Laying schemes and installation features of the listed heat insulators differ depending on the quality and material of the surface.
Features of floor insulation with stone wool
The basis of this heat insulator is made up of several key components: molten rock, slag or glass, in some cases - quartz.
In the production of stone wool, the rock is first heated, then blown up with air to such a state that thin fibers are formed. Binder polymers combine them into a single web, which is characterized by a porous and loose structure. Unlike glass wool, the fibers of its mineral analogue do not have the same thorniness.
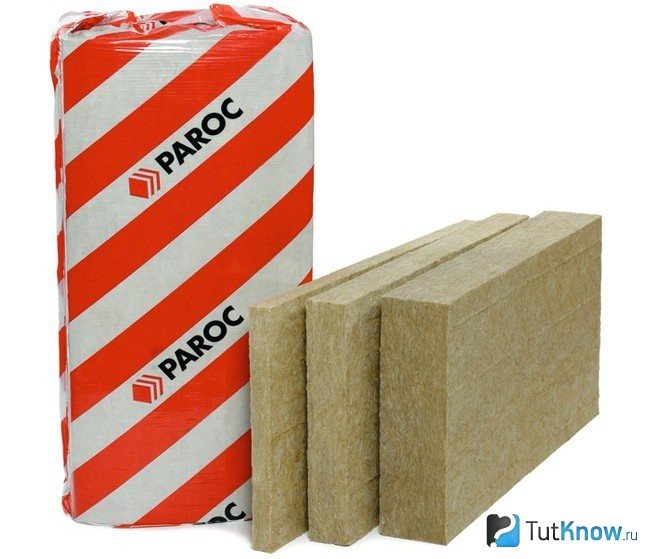
Basalt wool for the floor is produced in mats or rolls, which may differ in their characteristics. Such products are convenient to use in insulation works. It is enough to unwind the roll and cut the required piece along the length of the room, then the next one.
Depending on the area of application, the thickness of the material can vary from 50 to 200 mm and even more. If there is no stone wool of the required thickness on sale, you can make insulation in several layers. For example, if in the central regions of Russia 150 mm of wool is needed for thermal insulation of the floor, then this role will be successfully performed by a 50-mm material, subject to three-layer insulation.
Before purchasing stone wool for insulation, read the following tips:
- When choosing a material, pay attention to its packaging. If it has traces of significant damage, which led to the exposure of cotton wool, it is better to refuse to buy. The material could get wet and lose its heat-insulating qualities.
- To insulate cold ground floors and basements, you will need to choose products with a thickness of at least 150 mm.
- If the building is located in a zone of severe frosty winters, it is better to carry out insulation in 2 layers or immediately buy a two-layer stone wool.
Note! The thickness and density of basalt wool for the floor is selected taking into account the climatic features and the nature of the room. For mild climates or buildings that are used only in the warm season, a thickness of 50 mm is sufficient. But in houses where year-round living is planned, it is better to use 200 mm insulation.