When arranging a cottage or a country house, the task of building a bath often arises. The classical bath has developed a number of specific traditions dating back to ancient times. Previous generations have created proven construction and finishing technologies. Thanks to these techniques, the bath has unique healing properties. Today we'll talk in more detail about how insulate the ceiling of the bath
.
Ceiling insulation
When constructing baths,
installation and insulation of the ceiling is considered one of the important points. What is acting on the ceiling? In the process of using the bath, it undergoes a number of aggressive influences. Inside the steam room, conditions of high humidity and air temperature are created. Hot steam rises to the ceiling, and if there is a slight heat transfer through the ceiling, the space inside the bath will not warm up, and
bath
will not serve as intended. There are many ways to insulate ceilings, consider some of them.
An old way to insulate the ceiling of a bath
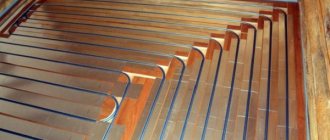
On the grooved boards, a solution of pasty clay about 5 cm with the addition of chopped rye straw is spread from the attic side. After drying, the clay cracks. This dried layer is rubbed with a solution made up of clay and sand. When both clay layers are dry, a sandy pillow 10-12 cm thick is poured on top. The clay-sand layers serve to absorb excess moisture that is formed from wet steam. Due to the high temperature in the bath room, when there is no steam, the clay layer dries up and keeps the heat in the bath.
Filling method
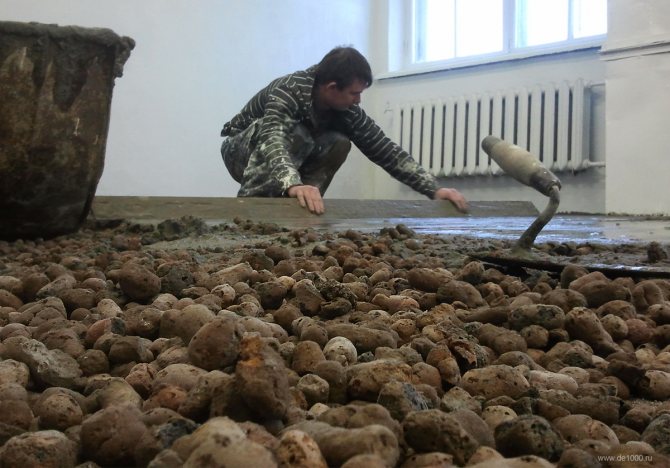
Grooved boards are nailed to the beams. They need to be proliferated. A layer of boards with moisture gaps is attached to the grooved boards. A layer of waterproofing is covered on top. A 20 cm pillow from bulk types of heat insulators is poured onto the waterproofing layer. It can howl slag, sand, a mixture of sawdust and clay. A good option for this method of insulation is considered to be backfilling with expanded clay granules.
Combined method of how to insulate the ceiling of a bath
The ceiling is sewn up with thick boards, the thickness of which ranges from 7 cm or more. A vapor barrier is laid on the boards (waxed paper, rolled cardboard, foil). Then a pillow is made of soft clay, on which a 15 cm thick insulation is laid.
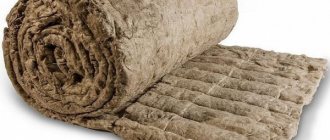
Various organic and mineral heat-insulating substances are used as insulation. For example, sawdust with clay, expanded clay, modern mineral fiber materials. A sand-cement screed is made on top of the thermal insulation, flooring is made on top. Mineral wool is additionally covered with a film or fiberboard sheets.
Combined method with sawdust
Two layers of boards are screwed to the beams with the help of screws, the first layer consists of non-edged boards, and the second (on the inside) is a finishing lining made of aspen, leaving gaps. On top of this structure, cardboard is covered from the attic, and on it - 2-5 cm of a clay layer mixed with sawdust. The next layer is 15 cm of basalt insulation. All this "pie" is covered with plastic and attic boards.
In the modern construction market, you can find a great variety of insulation made from jute, flax fiber and other materials. There are good reviews about jute felt, which does not emit harmful substances.
There are several ways how to insulate the ceiling of a bath
... I will be glad if I helped you with advice.
The bath is not only a place to wash.This is a place where you can simultaneously enjoy water procedures and heat, activate the immune system, metabolic processes, and cause an accelerated cleansing of the body from toxins and toxins.
If the bath is poorly insulated, then a large amount of heat will simply go nowhere, and it turns out that energy is wasted. It is clear that it is better to make high quality insulation once
than to disentangle the consequences later. After all, if there is no insulation layer on the floor beams, then they will simply get wet from condensation and quickly collapse.
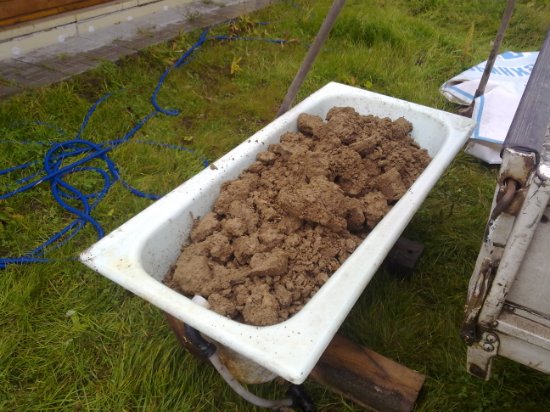
Insulation is done using a variety of materials. Thermal insulation of the ceiling of the bath with clay
- an old and financially inexpensive option.
This technology has been used for more than one hundred years, and therefore it has been worked out to the smallest detail, which allows you to carry out insulation yourself without special training and construction skills.
The ways
The easiest way
clay warming begins with planking the ceiling. Their minimum thickness should be 4 cm, but it is better if it is 6 cm. Before carrying out work, the boards must be well dried. In no case should it be painted and varnished boards, because many paints and varnishes are simply not adapted to high temperatures and under its influence they can begin to release poisonous resins and polyesters into the space.
At all it is better not to use chemistry in the bath
if you do not intend to constantly inhale its destructive vapors.
After finishing the sheathing, you must carefully and carefully cover the cracks between the boards with clay and wait until it dries completely.
The next step begins by preparing a mixture of sand and clay, which should be quite thick. All boards laid on the ceiling are covered with this mixture. The thickness of the layer should be at least 5-7 cm. Then you should wait until the layer is completely dry, and this can take quite a long time. A thick layer of sand is laid on the dried clay.
Then the ceiling is impregnated first with liquid vapor, and then dry. The clay, accordingly, first soaks, and then finally dries up and acquires the ability to keep your bath warm for many years.
So that the insulated ceiling retains its heat-insulating properties for as long as possible
, there must be ventilation in the attic. The easiest and at the same time reliable way to create ventilation is two windows opposite each other.
Another way
consists in warming with several layers of clay with intermediate filling of clay with layers of sawdust or expanded clay. In order to prepare the clay, it is slightly moistened and thoroughly mixed with straw until smooth. The straw is pre-crushed. The final consistency should be similar to soft plasticine or mortar, which is used in the laying of brick walls.
The clay layer will again be 5-8 cm. After application, it must be carefully smoothed out. Sealing the perimeter of the ceiling requires special care. The clay will dry in 20-30 days, provided that the temperature outside is above zero. Cracks may appear after drying. This is normal. Another thinner clay layer can be applied to the cracks, and from above it can be covered with sawdust, expanded clay or chips.
“I have heard more than once about noble estates and stables, where they made warm floors and walls. We passed channels from the stoves, where warm air passed. But I see this option for the first time.
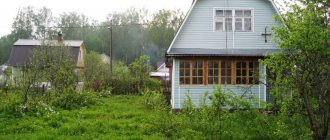
I found this technology on the blog of Gleb Tyurin, the author is the owner of the house, Elena Bukovskaya. Our family inherited a grandmother's house in the Voronezh region. 10 years ago, at a family council, they decided not to leave the house, to put it in order as much as possible.
At the house - an allotment of land, 50 acres of Voronezh chernozem, a vegetable garden, a garden, a mowing.
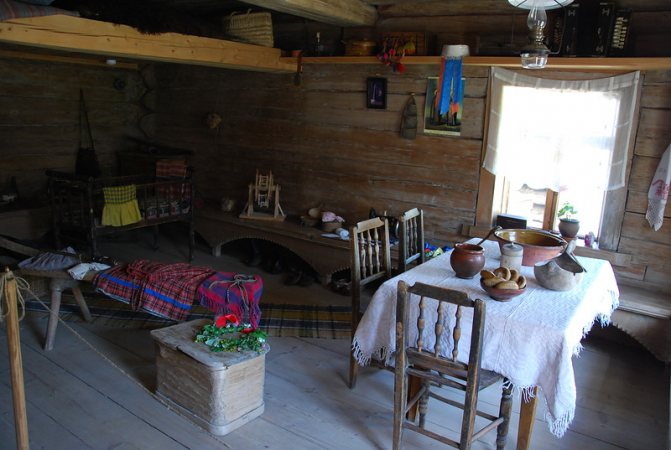
The house has never regretted the decision and the garden never ceases to delight and surprise us and our friends who come from Moscow “just to sleep off and catch their breath, remember the taste of“ potatoes and apples ”. Thanks to deep pruning in 2008, the garden survived the drought of 2009, 2010, 2011, and last summer even old apple trees, trunks with a diameter of 50 cm, all in hollows that were “silent” for 10 years, gave an excellent harvest. Jam from Antonovka, cooked in cast iron on pear coals, has no equal! And our house allows us to make a lot of discoveries. The house of grandparents is built of oak logs, the walls on the outside and inside are smeared with clay and straw, on the outside they are sheathed with iron (they brought galvanized troughs from the Urals, dismantled and covered the walls and roofs - believe me, this "siding" stood for 60 years! - this is an environmentally friendly thermos, keeps warm in winter and wonderful coolness on hot days. An example of a wonderful old technology can be a wattle. In August, the floors in the house were reshaped, and we opened a sample of energy-saving technologies of the early 19th century - at a distance of 1 meter from the dam along the perimeter of the whole the room was lined with a wattle fence 50-60 cm high, smeared with clay from the outside, with an open corner facing the Russian stove - we were told that such "reflectors" were done to "drive" heat from the stove under the floor and keep it there - which is not peculiar floor heating? Without a single nail, only natural materials - clay, sand, straw, vine - and hands! The Russian stove stands in the corner, far from the windows, on an adobe foundation. nya opens about 1.5 meters near the stove, just at the level of the foundation. With constant use of the stove, the foundation gradually warmed up and gave off heat. Under the floor between the wall and the fence, everything is really covered with earth, and an air cushion is left inside the fence - an empty space between the floorboards and the ground, where the warm air "flowed" from the foundation. We learned this from the stories of the old-timers. We are restoring the Russian stove, the floor has already been moved, we will be happy to inform you how the technology will be tested. We need to re-learn how to live in respect to nature, then she will not remain in debt ... "
Lunarman, reading your posts, it is logical to draw only one conclusion - you are a seller of heaters, such as mineral wool and other nasty things in terms of ecology + high cost, or a firefighter who has suffered with extinguishing "naked" sawdust. they have not done anything with them, but such material is not afraid of anything, so your negative opinions about sawdust as about insulation - "peas against the wall".
Now I'm wondering about mineral wool, the second person is already talking. What is her "bad ecology"? Basically, tell me, what do you think it consists of? Minvata is bad in the walls - it must be nailed or pressed, otherwise, over time, voids will appear at the top, but the topic is about the ceiling. It’s also strange to hear about the “high cost”. Any "Ursa", etc. not really worth it, frankly. Rockwool is more expensive, of course, but also, in my opinion, a relative trifle.
And how much fire-prevention impregnation you have worn out on I have lived all my life in pieces of wood with a ceiling and floor insulated with sawdust, in these houses there were stoves. There was and is warmth in them, although there was no mineral wool in them. All these houses were over 20 years old, except for one.
For some reason, I think that mineral wool will not give a house to a wooden fire-resistant properties. But a normally executed wiring, a good chimney and a working stove will give some confidence)
How to insulate the floor in an old wooden house
Date: 15 September 2014
Our reader asks:
Hello! We got an old village house. A solid wooden blockhouse, quite warm, but cold floor. We often visit it in the off-season and, no matter how you fire up the stove, you can't walk barefoot on the boards, your feet are freezing.Tell me how you can insulate it, maybe put something on top? After all, today there are a lot of all kinds of insulation, we were advised in the store to put foil Teplon.
Expert answer:
There is no simple answer to your question. Or rather, there is: most likely, only a traditional rug can be put on the floor of an old village house - and nothing else.
The fact is that in Russian huts (and in German houses, by the way, too), they did not do not only insulation, but also waterproofing of the floor, although these technologies have long been known. An unfilled underfloor space is best combined with stove heating, provides optimal humidity, warmth in winter (the ground does not freeze) and coolness in summer. If your house is really built in accordance with the canons of folk architecture - most likely, under thick floorboards and one or two powerful logs there is open ground, probably well trampled clay. Yes, you yourself mention something like that. Therefore, even if your hut is built in a dry place, moisture penetrates from the "damp earth" into the underground space. It can go out into the street through holes in the foundation or into the room through holes in the floor, gaps between the boards, and even the wood itself.
Neither waterproofing nor floor insulation was done in a traditional wooden house - only ventilation
If this is the case and there is no waterproofing, placing a thin layer of insulation (cork, foam polyethylene of any brand, insulated linoleum) on the boards of a water vapor-impermeable layer of insulation will lead to waterlogging of the floor boards and their accelerated destruction. And to build an additional layer on top with an air-permeable heat insulator, a ventilated gap and a new flooring will not allow the low ceiling of the hut.
Our tip: Place carpet on the floor, only on a woven backing, not a solid PVC backing. The presence of natural fibers in the pile will make it warmer to the touch. Remove the woolen carpet from the wall and place it on the floor.
If the carpets do not give the desired result, and the desire to increase the comfort in the home is great, you will have to open the floors.
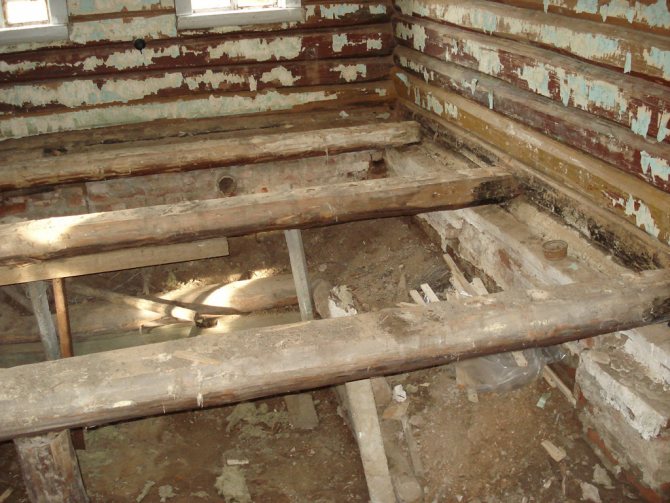
To effectively insulate the floor in an old wooden house, you will first have to disassemble it.
Remove the boards, level the level with sand if necessary, carefully spread the waterproofing on the ground. It is easier, cheaper and more environmentally friendly to use a vapor barrier roofing film, carefully pressing and gluing it to the foundation and posts on which there are logs. You can press it with wooden planks, and stick it on uneven concrete or rubble with construction sealant or assembly glue. Lay a layer of mineral wool or glass wool on the film or sprinkle expanded clay, perlite, aggloporite, broken foam glass.
Expanded clay is not the most effective, but inexpensive and almost moisture-absorbing insulation.
Thermal insulation based on organic materials (sawdust, wood concrete, ecowool) can be used if you are sure that you have completely eliminated moisture penetration. A layer of insulation of any type - the thicker, but between it and the floor boards, it is necessary to leave a gap for ventilation of at least 4 cm.
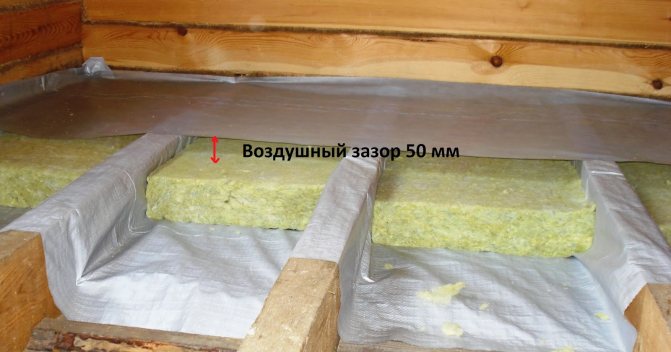
Don't forget the ventilation gap
Now you can lay the boards back, at the same time checking their condition and treating them with a protective agent on the back - they will last longer. And if you really want to arrange comfort, as in the royal chambers, you can contrive to remove the sleeve from the stove, cover the insulation with wind insulation so that it does not get dusty, and, if necessary, blow warm air into the underground space with a fan. But this is a topic for a separate conversation.
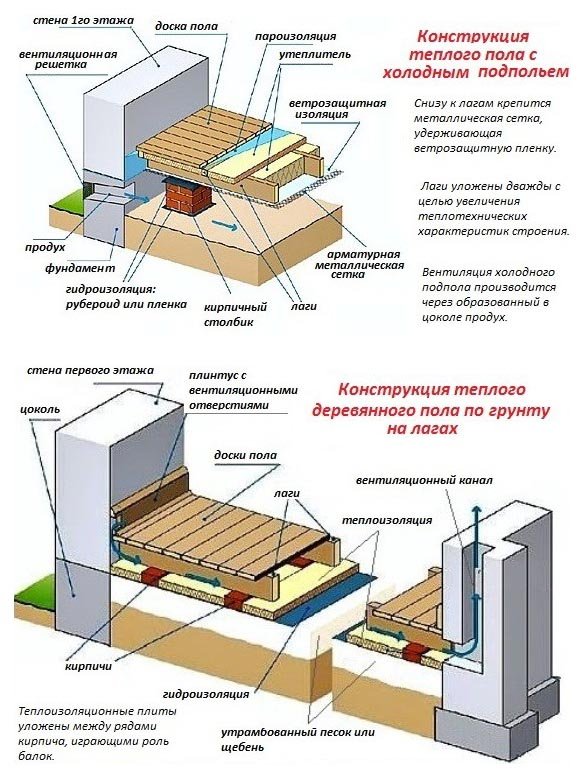
Various options for insulating a wooden floor on the ground. Details depend on the features of the existing structure, but in all cases, waterproofing is required
And, in fact, on the floor in the hut it is supposed to walk not barefoot, but in home felt boots 
Warming of houses in Russia
Wood was the main building material in Russia. Each owner always knew how much material and wood is needed to heat a new house, because in ancient times they used a large Russian stove to heat the premises. Even during construction, our ancestors thought about heat protection: they selected the thickness of the logs, installed double window frames, and insulated the attic floor. Nowadays, many houses have forced-air ventilation, and in ancient times there were practically no problems with airing the premises.
In winter, the house served not only for the owners, but also became a haven for livestock. The stove did not let anyone freeze, and the heat of the animals was used as an additional source of heating. But, of course, this was a necessary measure. The correct layout of the house also insulated the room, protecting it from the cold northerly winds. In the walls that were directed to the north, only in extreme cases were windows and doors made. The stove was located near the coldest wall so as not to allow the hut to cool down. The windows were directed to the south so that the sun's rays fell into the house longer. These tricks helped our ancestors insulate their homes at no extra cost.
Just a few decades ago, no one used modern insulation, glass wool. About such "miracles" as built-in convectors in the floor, people could not even think of. If we talk about the houses in which our ancestors lived, then there was somehow kept warm. What exactly did people in Russia do to create a suitable atmosphere in their homes?
Warming with other materials
In the old days, wood was usually used for construction. In the process of building a house, it was necessary to provide:
- multilayer attic overlap;
- installation of double window frames.
Cotton wool was used to insulate the windows. The most common method of thermal insulation was the use of hay or straw. The material was stacked in the attic.
To protect the house from the outside, woodpiles were made. There was a double calculation here. The logs were needed to heat the stove in winter, in addition, they acted as an insulating barrier that did not allow cold air and wind to pass into the house. Turf was also often used.
Rose of Wind
In the process of building the house, the wind rose was certainly taken into account. All windows were located on the south or southeast side of the house. Doorways and windows facing north were not made. In addition, the stove was located next to the coldest wall or in the center of the house. In this case, she coped with the heating of the entire room. In Russia, they approached the insulation of the house in the most careful way, and at any time of the year it was really warm in the dwellings.
Insulation of foundations prolongs their life for a long time, since it reduces the impact of negative temperatures, and also - waterproof insulation acts as a waterproofing. It so happens that in some houses the floors are warm throughout the winter without any heating, in others they are cold, despite a fair layer of thermal insulation under them. Practice shows that insulation of foundations helps to solve this issue. Underground temperatures are much higher than outside temperatures, and floors are cooled more slowly.
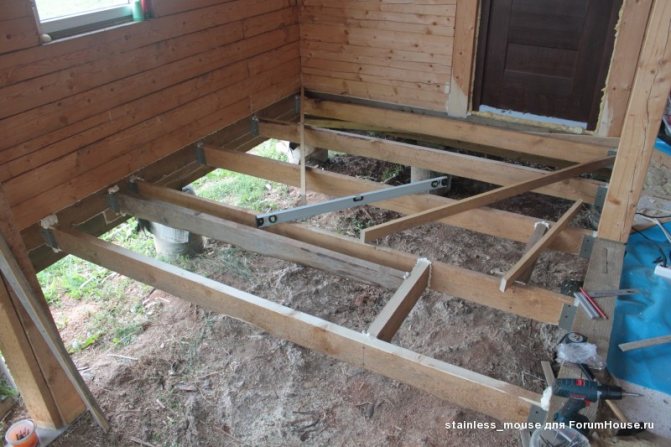
Installation of wooden floors
We got acquainted with the general provisions of this type of coating. Now we will consider in detail the device of the floor in a log house, made in different ways.
On support pillars
Log floor beams on support pillars
- We remove from the underground the ground half a meter deep.
- Pour gravel or river sand into the vacant space. We moisten each layer of the embankment and carefully ram it with a vibrating plate.
- At the end of the process, the level of the pillow should be twenty centimeters higher than black soil.
- We mount the support pillars along the perimeter of the building, and then on the inside. We use red bricks or ready-made concrete products as pillars. The installation step is 70-90 cm. We keep a distance of about a meter between the rows.
You should know: in buildings with a small area, you can do without internal supports. Since they are completely replaced by floor beams.
- On top of the supporting products, we lay waterproofing in the form of a polyethylene film or roofing material.
Lags on support pillars
- We install logs from a bar on the water-repellent material.
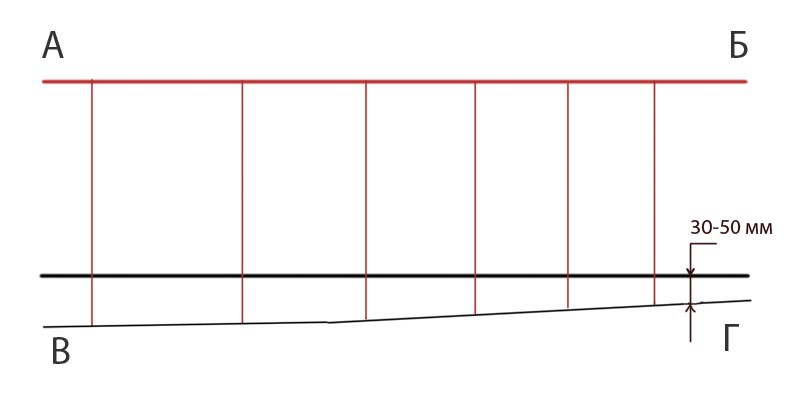
- Using a spirit level, level the lag level by placing wood wedges.
- We place at a distance of about seventy centimeters from each other, fixing with nails.
- From above we lay the boards along the light falling from the window.
- We mount the first one, stepping back 10-15 mm from the wall. This will allow air movement under the deck. For interior decoration, we will cover it with a baguette.
- For better fixation, we hammer in the nails at an angle. We choose their length so that they are at least twice the thickness of the wood product.
- We putty the joints and the heads of the nails and paint. After drying, the coating is ready for further work.
This method of flooring implementation is convenient in buildings that are heated during the cold season. Because the frost expands the gravel or sand cushion and can damage or displace the support pillars.
Single from the boards
In this case, two ways of execution are possible.
- If the distance between the supports does not exceed one meter:
- We lay the beams on the ends of the support columns.
- We fix the boards with nails on them.
- If the distance between the supports is more than one meter:
- On top of the beams, we mount logs in the form of beams with a section of 5 cm and a step of 50-60 cm.
- We check the evenness of the surface with a spirit level. Align, if necessary, using shims.
- After leveling the lathing, fix it with steel nails.
- Only after the work done with the stele, a rough or finishing coating.
In both cases, when installing the rough layer, an unedged board is used, and when installing the finishing layer, a grooved floorboard is used.
Subsequently, linoleum or laminate can be laid on the rough floor. Finishing is covered with several layers of varnish.
The cost of such work is relatively low, which makes this method the most affordable. A significant disadvantage is poor thermal insulation.
Double of planks
Double coating, as we noted earlier, means there is both a rough and a finish layer.
The following instructions will help in its installation:
- We mount cranial bars on the surface of the beams.
- Across the bars, we tightly install unedged boards with a thickness of about thirty millimeters. Even the use of low-grade lumber treated with anesthetic agents is allowed.
- Create an insulating layer on top. Materials suitable for this are listed above. Mention should also be made of the possibility of implementing an electric or water floor heating system. Which will be the most effective, but also the most expensive solution.
... Subsequently, linoleum or laminate can be laid on the rough floor. Finishing is covered with several layers of varnish.
The cost of such work is relatively low, which makes this method the most affordable. A significant disadvantage is poor thermal insulation.
Double of planks
Double coating, as we noted earlier, means there is both a rough and a finish layer.
The following instructions will help in its installation:
- We mount cranial bars on the surface of the beams.
- Across the bars, we tightly install unedged boards with a thickness of about thirty millimeters. Even the use of low-grade lumber treated with anesthetic agents is allowed.
- Create an insulating layer on top. Materials suitable for this are listed above. Mention should also be made of the possibility of implementing an electric or water floor heating system. Which will be the most effective, but also the most expensive solution.
.
Subsequently, linoleum or laminate can be laid on the rough floor. Finishing is covered with several layers of varnish.
The cost of such work is relatively low, which makes this method the most affordable. A significant disadvantage is poor thermal insulation.
Double of planks
Double coating, as we noted earlier, means there is both a rough and a finish layer.
The following instructions will help in its installation:
- We mount cranial bars on the surface of the beams.
- Across the bars, we tightly install unedged boards with a thickness of about thirty millimeters. Even the use of low-grade lumber treated with anesthetic agents is allowed.
- Create an insulating layer on top. Materials suitable for this are listed above. Mention should also be made of the possibility of implementing an electric or water floor heating system. Which will be the most effective, but also the most expensive solution.
Grooved floorboard - an easy solution to the problem ”href =” https://shkolapola.club/derevyannie/394-shpuntovannaya-doska-dlya-pola ”> grooved floorboard.
Subsequently, linoleum or laminate can be laid on the rough floor. Finishing is covered with several layers of varnish.
The cost of such work is relatively low, which makes this method the most affordable. A significant disadvantage is poor thermal insulation.
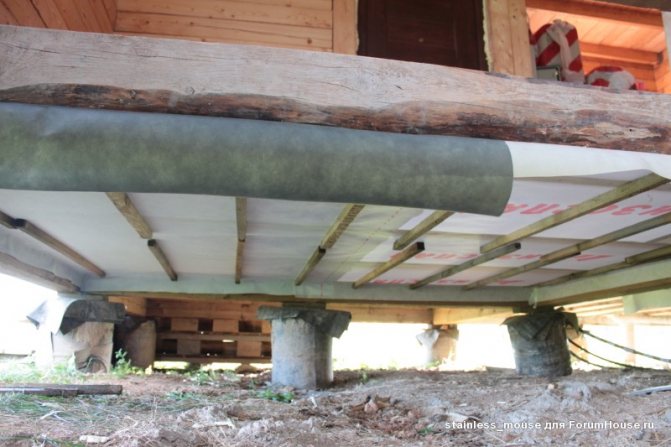
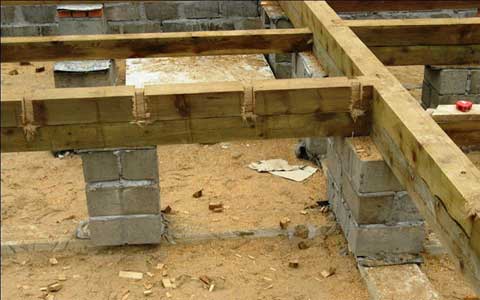
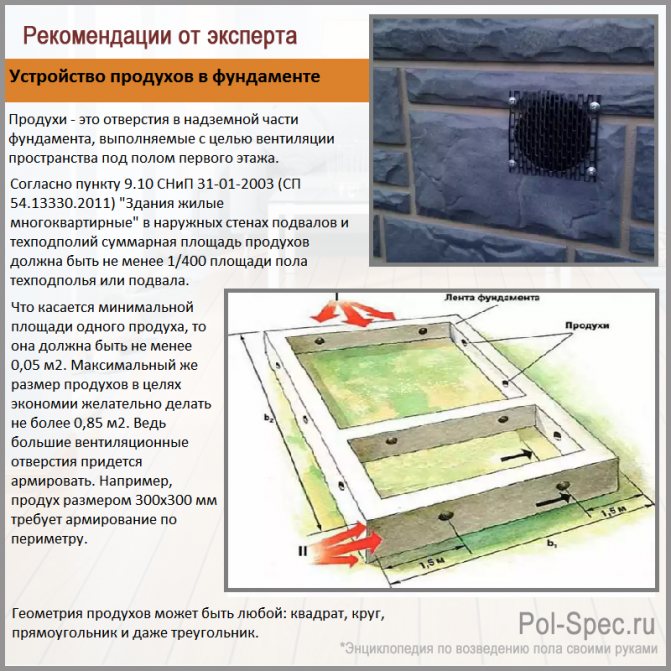
How foundations were insulated in the old days
Not for nothing since the old days, when there was only one stove from the heating devices in the huts, they were sure to arrange a blockage around the perimeter of the house. After all, even strip foundations made of concrete were rare, mostly houses were erected on large stones, as on a columnar foundation. Since only sawdust and straw were available from the heaters, which could not stand for a long time outside the house, the subfloor along the perimeter was covered with sand, filled up with medium-sized stones, etc.
Photo of a typical blockage - for warming the foundation and the space of the subfloor
At the same time, the problem of protecting the foundation from frost and moisture was also solved, which means that the durability of the foundation increases.
Modern insulation of foundations
Technologies have made great strides forward, but even now the insulation of foundations is in great demand. Moreover, the space inside the foundation is often used for technical and even residential premises. Often, the boiler room, sauna and other rooms are located in the basement. Cold non-insulated walls (they are the foundation of the house) are unacceptable in such rooms - condensation will constantly accumulate, fungus will form, etc.
Experts advise using Penoplex insulation to insulate foundations. Plates are easily mounted on a ready-made foundation, do not absorb or conduct moisture, and are resistant to damage by bioorganisms. Environmentally friendly and durable material.
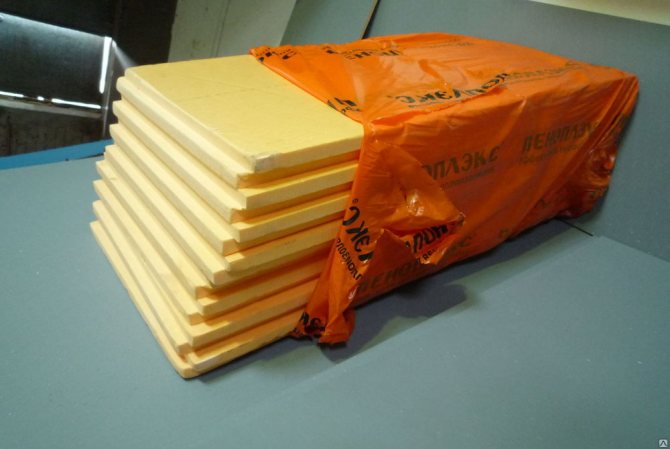
Insulation slabs are attached to the surface of the foundation with solvent-free bitumen-based adhesives. In fact, glue will be needed only until the moment it is backfilled with soil. The filling is performed in layers, with a seal.
After warming the foundation with foam, the concrete turns out to be not only thermally insulated, it is frozen soil in winter, but also moisture insulated, because the material does not allow water and moisture to pass through.
In a warm room in winter it is much more cozy and comfortable. Despite the fact that wooden beams and logs have excellent thermal insulation properties, there are vulnerabilities that require additional thermal insulation.
The construction of wooden houses has its own specific features, one of which is the insulation of walls, floors and ceilings.
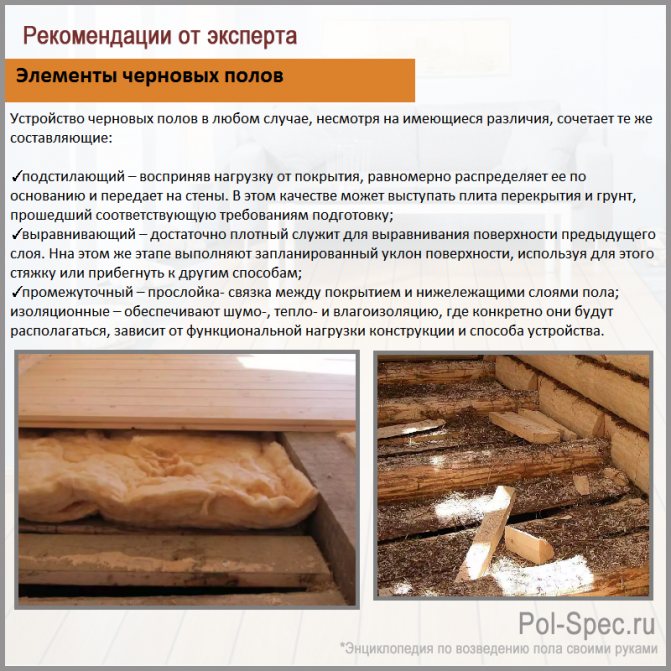
Why install a sub-floor?
The main requirements for the quality of the log floor are: strength, reliability and good ventilation. It is for their implementation that sub-floors are installed. In addition to the properties listed above, they perform a number of significant functions:
Sub-floor installation scheme.
- play the role of a frame of rigidity;
- serve as a base for placing thermal insulation and waterproofing;
- provide the opportunity to carry out high-quality ventilation, since with their help an air gap is formed, which, in turn, maintains heat in the room, prevents decay processes and possible distortions of the structure.
In order to make subfloors, you will need unedged boards with a width of 15-50 cm. All of them must be carefully treated with an antiseptic compound.
What and how should be insulated in a wooden house?
In a wooden building, additional insulation is required:
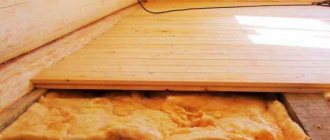
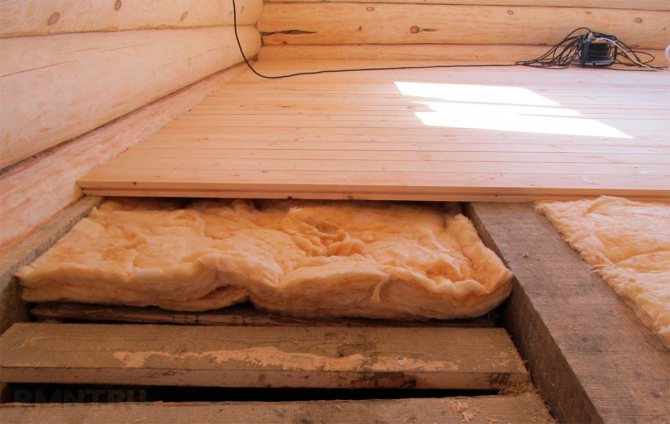
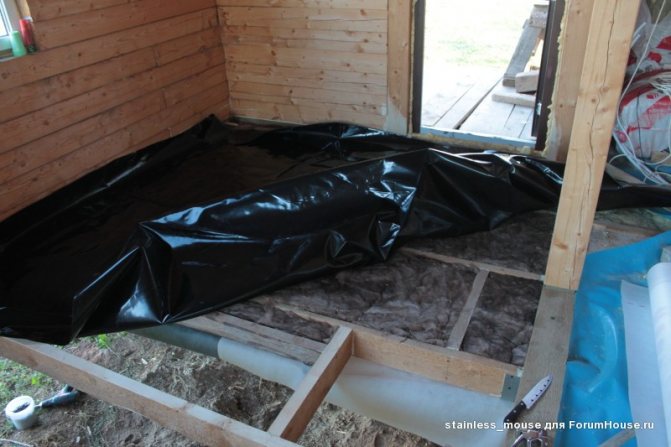
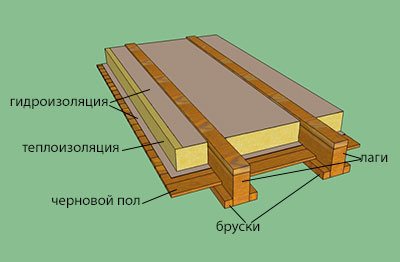
The floor is insulated with a layer of heat-insulating material placed on top of wax paper or waterproof film used as waterproofing.
If the house has a basement, then the film or paper is spread over the ceiling of the basement. If the house is on the ground, the waterproofing is laid on the base plates.
The thicker the insulation layer, the less heat will leave the house through the floor. The plank floor is laid on top of the insulation.
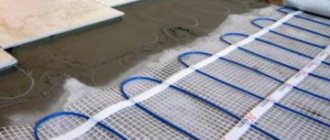
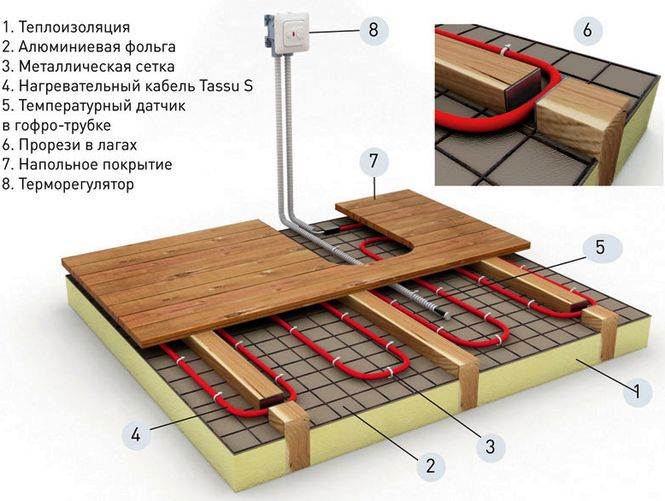
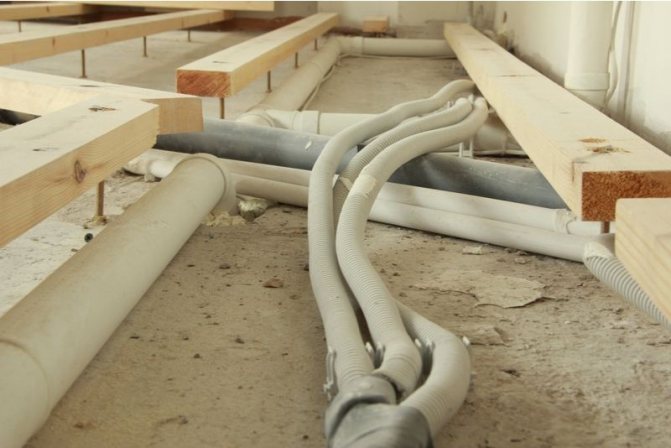
In addition, at present, the so-called system of the so-called is becoming popular in wooden houses. underfloor heating
:
If the house has an attic, then the insulation of the ceiling is carried out in the same way as the insulation of the floor. On the side of the attic, a layer of hydraulic insulation is laid, on which the insulation is laid.
Insulation of the attic floor
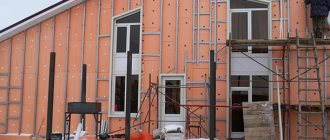
The walls of a wooden house are insulated by two methods:
At the main temperature change occurs in the facing layer. At the same time, wooden structures are in more favorable conditions. The temperatures inside the house and on the outside of the log (in the presence of external insulation) differ little.
External insulation of a wooden house with expanded polystyrene
External insulation is carried out mainly by finishing a wooden house with different materials - clapboard, brick, lining with aerated concrete blocks, etc. A layer of insulation is laid between the external wall and the cladding.
When lining a wooden house with a brick, it is necessary to leave a gap for ventilation between the wooden wall and the brick. This will ensure timely removal of excess moisture and protect the wood from premature aging. Aerated concrete blocks can be laid without a ventilation gap. They are more vapor permeable than wood, so excess moisture is quickly removed.
See more about the methods of external insulation:
When a wooden wall in winter is under the influence of large negative temperatures. This contributes to conditions that adversely affect the condition of the logs.
Insulation of the house from the inside with mineral wool
Excess moisture can accumulate between the insulation layer and the wall, which leads to faster aging of the wood.
The insulation method is the same: waterproofing and a layer of thermal insulation are applied to the wooden wall. If the house is insulated from the inside, higher requirements should be imposed on the environmental friendliness of the insulation than with external thermal insulation.
Decorative finishing on top of the insulation can be made with boards.
Also, which does not seem so obvious, sometimes it is not superfluous to insulate the roof and foundation. Cm.:

How to make a log floor on logs
Some builders often perceive subfloors as the base of a surface that is intended for flooring. However, they are mistaken here. Most often, the bases, or as they are also called "substrates", are constructed using any sheet material - plywood, chipboard and others, or when using boards pre-laid on logs.
[ads1] These underlays are necessary for leveling the surface of the subfloor, as well as for the forthcoming even laying of the floor covering itself and for uniform loading on the slabs. They are used in both wooden and monolithic houses.
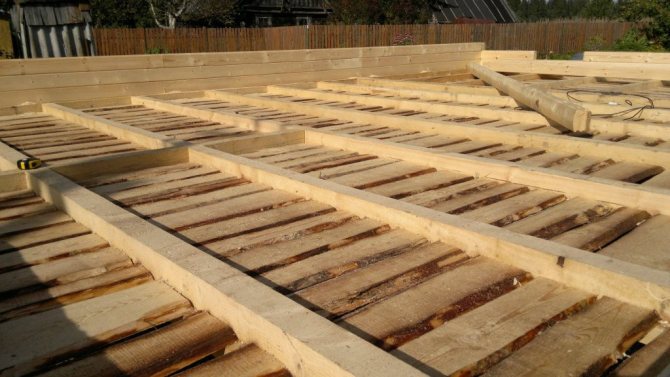
Another definition of a subfloor is a two-layer plank base layer located at the very bottom.This layer is used when laying on beams or floor joists in the case when there is a wide log between the beams and the joists. It is in this case that the boards of the subfloor are shifted along the diagonal of the boards of the final. In addition, due to this, additional strength of the overlap can be achieved, which is obtained due to the different directions of the wood grain.
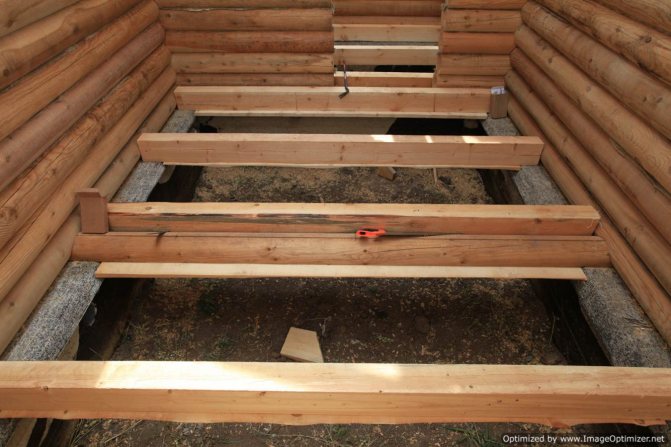
Also, the lowest floor layer is considered to be a rough wooden floor - double insulated. In this case, the flooring of the boards performs the functions of a retainer for both a waterproofing and a heat-insulating layer.
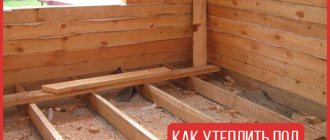
Rough insulated log floor
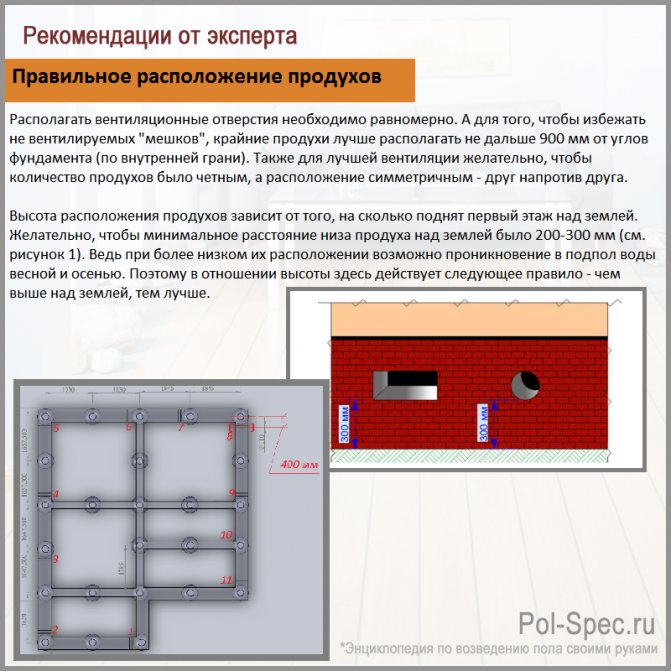
DIY floor installation action plan:
- First, you need to consider ventilation for the floor so that the boards of such a floor are not exposed to moisture and rot. Ventilation can be easily removed by drilling several holes in the joint corners of the house. The size, which should be about 50-60 mm. After that, they are covered with decorative grilles. It is best to raise openings and grates by 5 cm to prevent water ingress. However, sometimes ventilation holes are built in the baseboards.
- Next is the waterproofing of the foundation itself. To do this, you can apply:
- Blind area;
- Roofing material;
- Lubricating waterproofing materials
- After that, the lower crowns, logs, as well as the boards of the floor itself should be thoroughly treated with antiseptic agents to prevent the appearance of fungi and destruction on the wood.
To do this, use insect repellants and standard used engine oil.
Video: Laying the subfloor.
How to make a log floor installation methods
Laying is done in three ways:
- On beamed shoulders (shaped like an inverted T);
- On the cranial beams (they are previously nailed to the edges of the beams);
- Pre-prepared puzzles in beams (they are similar in shape to the letter H).
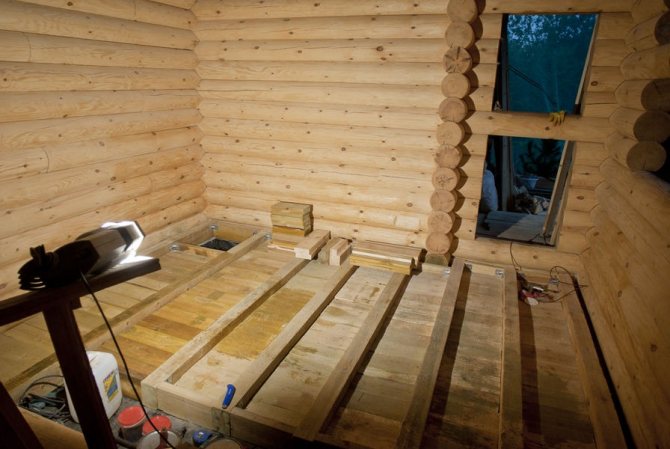
Floor insulation
The simplest and easiest way to lay the floor is to install it on cranial blocks. On which waterproofing material, insulation and vapor barrier material are subsequently laid.
Tip: the best option for floor insulation is mineral wool.
After installing the vapor barrier, a clean floor should be laid. As, which is used a grooved board or chipboard. After that, the preferred flooring is laid on the finished floor.
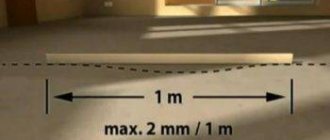
Due to the fact that the temperature difference between the rooms and the floor surface should not exceed 2 degrees, it will need to be insulated thoroughly. Yes, even closing the eyes of the norm, it is clear that treading on cold floors is not very pleasant. The following materials are used as waterproofing:
- Roofing material;
- Isoplast;
- Polyethylene film;
- PVC membranes.
Having decided on the insulation and waterproofing, you can start installing the wooden floor on the logs. First of all, you need to build a rough floor on which the waterproofing layer will creep. On top of it, thermal insulation is applied, as well as vapor barrier. And only after that you can proceed to the finishing flooring.
Finishing flooring
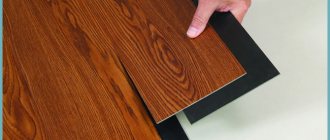
For laying the finished floor, a milled board is used. It is worth noting that today there are such boards that are connected by spikes in grooves. Their size is (28-44) x (98-145) mm. The size of the vents on the back side is 20 mm. Air is necessary in order to ensure natural air circulation.
However, in the case when there is no milled board, then other options can be used. These can be folded boards:
- With slats in tongue;
- With segmental, straight and trapezoidal spikes.
But it should be noted that there is no air in such boards, so very careful control over their fit on the logs is required. After the finishing flooring is finished, you can start finishing.
Remember that the boards should be laid, guided by the growth rings of the wood, that is, so that the rings look in different directions.
Video installation of a wooden floor
Concrete floors
With concrete floors, things are easier. Here you just need to make the correct cement screed by reinforcing it. But first, let's consider whether concrete floors work well for wooden houses.
Benefits of a concrete floor:
- Durability, reliability and strength;
- When using modern, so to speak, "chips" in the form of self-leveling mixtures, and in general it can become the most ideal floor for you.
- It is good to lay down on the basis of such a floor not only linoleum, but also ceramic tiles and laminate.
But during the construction of the concrete floor, there are also some nuances. Next, consider how to properly fill the floor for a log house with your own hands?
There are 2 mounting methods in total:
- Concrete laying on logs;
- Laying on the ground.
Laying on the ground
After you decide on the floor level in a log house, you should make marks using a cord previously tied on pegs. The cord serves as a yardstick to which the concrete base will reach (about 10 cm). Following this, sprinkle with a layer of gravel. This is to keep the gravel at the same level with the pegs that will then be removed. Sand is poured on top of the gravel layer and the layer is compacted.
Now let's get down to the waterproofing layer:
- We take an ordinary plastic wrap (you can use the thickest one) and lay it on the sand so that its edges are above the very level of the concrete floor.
- After waterproofing, fill the already prepared base with concrete. We level and cover the solution with a film (this must be done in order for the ripening to occur faster). But do not forget to periodically moisten the floor.
- The concrete structure is not disturbed for about a month. This time is required for the concrete to reach the required strength.
- After a month, so to speak, "exposure" to the concrete surface, you need to apply liquid cement for the installation of the screed.
In winter, the temperature in the room may be low due to the cold. Therefore, it is better to immediately think about warm floors. It can be both water and electric floors. In both cases, the thickness of the floor covering should not exceed 25 mm. For this reason, laminate, ceramic molding and linoleum would be an excellent option for finishing.