Here you will find out:
- Purpose of heating elements
- Heating element selection
- How to connect a heating element with a thermostat
Electric water heating and heating equipment has received great demand among consumers. It allows you to quickly organize heating and hot water supply with minimal initial costs. Some people even create such equipment on their own, with their own hands. BUT The heart of any home-made device is a heating element with a thermostat.
How to choose the right heating element and what to focus on when choosing it? There are a lot of parameters:
- Power consumption;
- Dimensions and shape;
- Built-in thermostat;
- Corrosion protection.
After reading this review, you will learn how to independently understand heating elements with thermostats and will be able to connect them.
Consider connecting a three-phase heating element through a magnetic starter and a thermal relay.
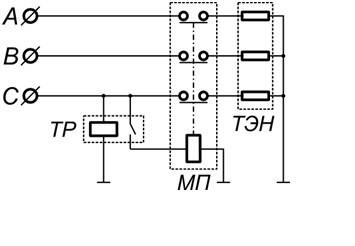
Fig. 1 heating element is connected through one three-phase contactor with normally closed contacts MP (Fig. 1). It controls the TP thermostat starter, the control contacts of which are open when the temperature on the sensor is lower than the set one. When a three-phase voltage is applied, the contacts of the starters are closed and the heating element is heated, the heaters of which are switched on according to the "star" scheme.
Fig. 2 When the set temperature is reached, the thermal relay turns off the power to the heaters. Thus, the simplest temperature controller is realized. For such a regulator, you can use the RT2K thermal relay (Fig. 2), and for the starter - a third-magnitude contactor with three groups for opening.
RT2K is a two-position (working on / off) thermal relay with a copper wire sensor with a temperature setting range from -40 to + 50 ° С. Of course, the use of a single thermal relay does not allow maintaining the required temperature accurately enough. Turning on all three sections of the heating element each time leads to unnecessary energy losses.
Fig. 3 If we realize the control of each section of the heater through a separate starter connected to its own thermal relay (Fig. 3), then it is possible to carry out a more accurate maintenance of the temperature. So, we have three starters, which are controlled by three thermal relays TP1, TP2, TP3. Response temperatures are selected, let's say as t1 elektronchic.ru
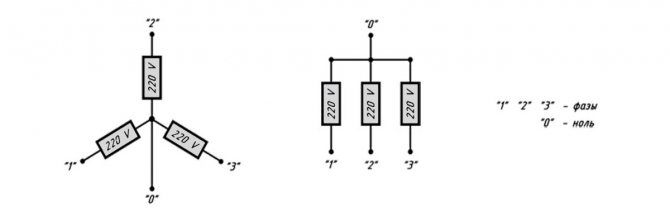
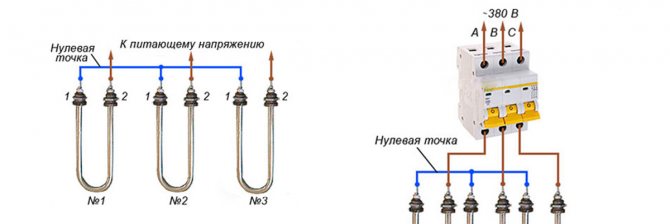
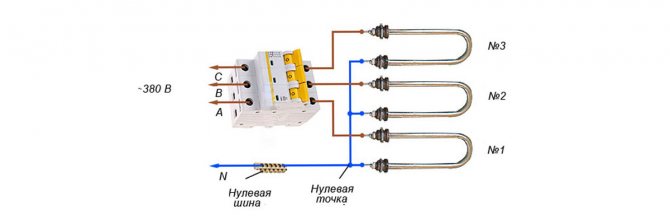
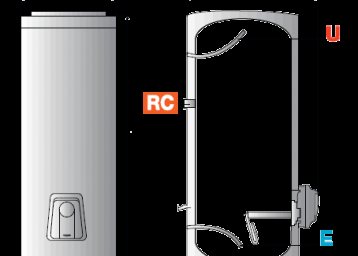
Diagram of connecting the electric boiler to the 220 V power grid (single-phase)
As you can see, the 220 V boiler supply line is protected by a differential circuit breaker that combines the functions of a circuit breaker (AB) and. Also, without fail, grounding is connected to the device case.
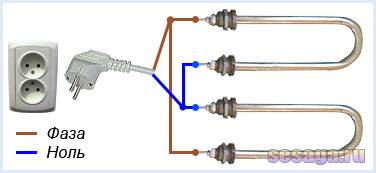
Heating elements or heating elements (if there are several of them) in such a boiler are designed for a voltage of 220V, respectively, a phase is connected to one of the ends of the tubular electric heater, and zero to the other.
To connect the boiler, you need to lay a three-core cable (Phase, Working zero, Protective zero - grounding).
If you did not manage to find a suitable differential automatic shutdown or it is simply too expensive in your chosen line of protective automatics, you can always replace it with a bunch of Automatic circuit breaker (AB) + Residual current device (RCD), in which case the diagram for connecting a single-phase boiler to the mains looks like So:
Now it remains to choose the cable of the desired brand and section and the ratings of the protective automatics for the correct wiring to the electric boiler.
When choosing, it is necessary to start from the power of the future boiler, and it is best to count with a margin, because in the future, if you decide to change the boiler, you will no longer be able to choose an older model (more powerful), without serious reworking of the wiring.
I will not load you with unnecessary formulas and calculations, but I will simply lay out a table for choosing a cable and protective automatics, depending on the power of a single-phase electric boiler 220 V. In this case, both connection options will be taken into account in the table: through a differential switch and through a bundle of Circuit breaker + RCD.
For laying, the characteristics of a copper cable of the VVGngLS brand will be indicated, the minimum permissible PUE (electrical installation rules) for use in residential buildings, while the calculations are made for the route from the meter to the electric boiler 50 meters long, if you have a greater distance, you may need to adjust the values.
Selection table for protective automatics and cable cross-section according to the power of the electric boiler 220 V
The residual current device (OUZO) is always selected one step higher than the circuit breaker that is paired with it, but if you cannot find an RCD of the required rating, you can take the protection of the next step, the main thing is not to take it lower than it should be. There are usually no special difficulties and discrepancies when connecting an electric boiler for 220V, we go to the three-phase option.
The general wiring diagram for connecting a 380 V electric boiler is as follows:
As you can see, the line is protected by a three-phase residual current circuit breaker; an earthing connection must be connected to the boiler body.
As usual, by tradition, I post a diagram for connecting a three-phase electric boiler with a circuit breaker (AB) plus a residual current device (RCD) in a circuit, which is often cheaper and more affordable than Dif. machine.
It is convenient to select the ratings of the protective automatics and the cable cross-section for three-phase electric boilers of various powers according to the following table:
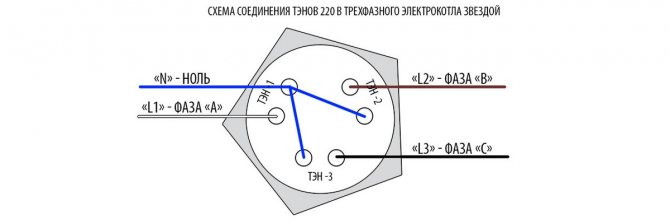
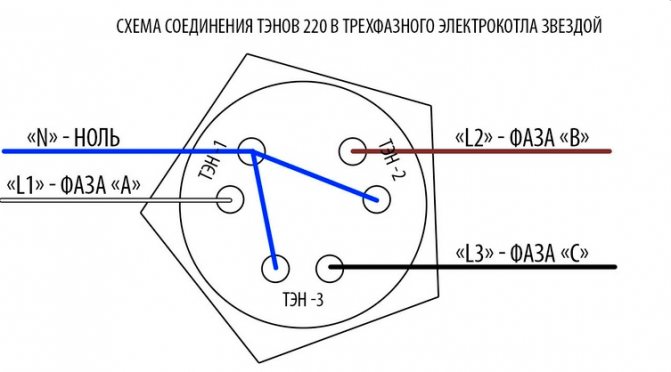
In three-phase electric boilers, three heating elements are usually installed at once, sometimes more. At the same time, in almost all household boilers, each of the tubular electric heaters is designed for a voltage of 220 V and is connected as follows:
This is the so-called "star" connection, for this case the neutral conductor is supplied to the boiler.
The heating elements themselves are connected to the network as follows: a jumper is connected at one of the ends of each of the tubular electric heaters, the phases L1, L2 and L3 are alternately connected to the remaining three free ones.
If your boiler has heating elements designed for a voltage of 380 V, their connection diagram is completely different and it looks like this:
Such a connection of the heating element of an electric boiler is called a "triangle" and at the same voltage of 380 V, as in the previous "Zvezda" method, the power of the boiler increases significantly. In this case, a zero conductor is not required, only phase wires are connected, the electrical connection diagram, respectively, looks like this:
Do not deviate from the connection diagrams acceptable for your electric boiler, if there are heating elements for 220V with a three-phase connection, do not remake the circuit into a "triangle". As you understand, theoretically they can be reconnected and a voltage of 380 V can be obtained on the heating element, respectively, and an increase in their power, but at the same time they will most likely simply burn out.
Purpose of heating elements
What are heating elements with thermostats for? On their basis, autonomous heating systems are designed, boilers and instantaneous water heaters are created. For example, heating elements are mounted directly into the batteries, as a result of which sections are born that can work independently, without a heating boiler.Some models are focused on the creation of anti-freezing systems - they maintain a low positive temperature, preventing freezing and subsequent rupture of pipes and batteries.
On the basis of heating elements, storage and instantaneous water heaters are created. The purchase of a boiler is not available for every person, so many assemble them on their own using separate components. By cutting a heating element with a thermostat into a suitable container, we get an excellent storage-type water heater - the consumer will need to equip it with good thermal insulation and connect it to the water supply.
Heating elements for heating water with a thermostat are necessary not only to create water heating equipment, but also to repair it - if the heater is out of order, we buy a new one and replace it. But before that you need to understand the issues of choice.
Heating element selection
When choosing a heating element, you need to pay attention to some details. Only in this case, you can count on a good purchase, high-quality heating, durability and compatibility of the selected model with a water heating tank, boiler or heating battery.
Shape and size
Dozens of models of heating elements are presented for the choice of buyers. They have various shapes - straight, round, in the form of "eight" or "ears", double, triple and many others. When buying, you should focus on the use of the heater. Narrow and straight models are used for embedding in sections of radiators, since there is not enough space inside. When assembling a storage water heater, you should pay attention to the volume and shape of the tank, and on the basis of this, choose a suitable heating element. In principle, almost any model will work here.
If you need to replace the heating element in an already operating water heater, you must purchase an identical model - only in this case you can count on the fact that it will fit into the tank itself.
Power
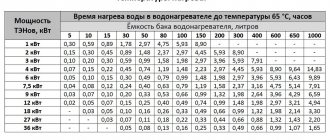
If not everything, then a lot depends on the power. For example, this could be the heating rate. If you are assembling a small volume water heater, then the recommended power is 1.5 kW. The same heating element will be able to heat up incommensurably large volumes, only it will do this for a very long time - with a power of 2 kW, it can take 3.5 - 4 hours to heat 100-150 liters of water (not to boil, but on average by 40 degrees).
If you equip a water heater or a water tank with a powerful heating element of 5-7 kW, then the water will heat up very quickly. But another problem will arise - the home electrical network will not stand up. If the power of the connected equipment is higher than 2 kW, it is necessary to lay a separate line from the electrical panel.
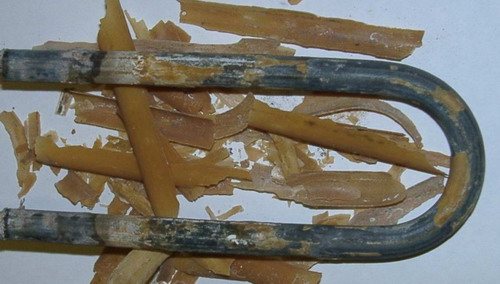
Corrosion and scale protection
When choosing heating elements for heating water with a thermostat, we recommend paying attention to modern models equipped with scale protection. Recently, models with an enamel coating began to appear on the market. It is she who protects the heaters from salt deposits. The warranty for such heating elements is 15 years. If there are no similar models in the store, then we recommend buying stainless steel electric heaters - they are more durable and reliable.
The presence of a thermostat
If you are assembling or repairing a boiler or want to equip a heating element with a heating element, choose a model with a built-in thermostat. It will save on electricity, turning on only when the water temperature drops below a predetermined mark. If there is no regulator, you will have to monitor the temperature yourself, turning on or off the heating - this is inconvenient, uneconomical and unsafe.
How to connect a heating element with a thermostat
Now you know how and by what parameters the heaters are selected. But how is the connection made? In order to connect a heating element with a thermostat, you must choose a wire with reliable insulation. We also pay attention to the cross-section - it must be such that the wire can provide full power to the heater and not melt. For example, for a 3 kW heater, the wire cross-section must be at least 2.5 mm. We recommend choosing cables with copper conductors for connection.
Application
A water heating element with a thermostat is used for various purposes:
- Heating. The device is installed in the battery using a connector. It should not be used for constant heat generation.
- Heating water.
- Water supply to showers, sinks, sinks. For these purposes, the device is installed in a ready-made container.
Experts advise to use the equipment for its intended purpose, if you want it to last a long time. The rules for its use are usually indicated in the instructions.
How it works and how to choose
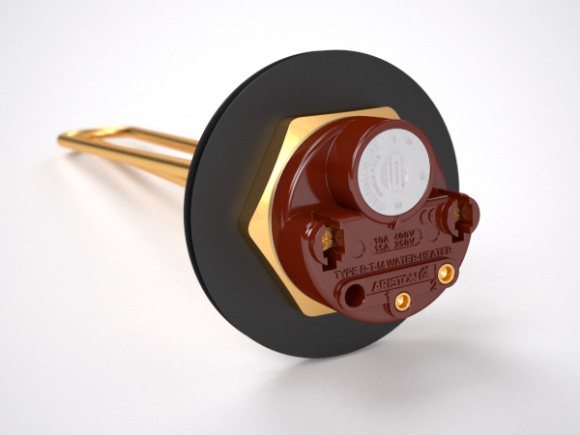
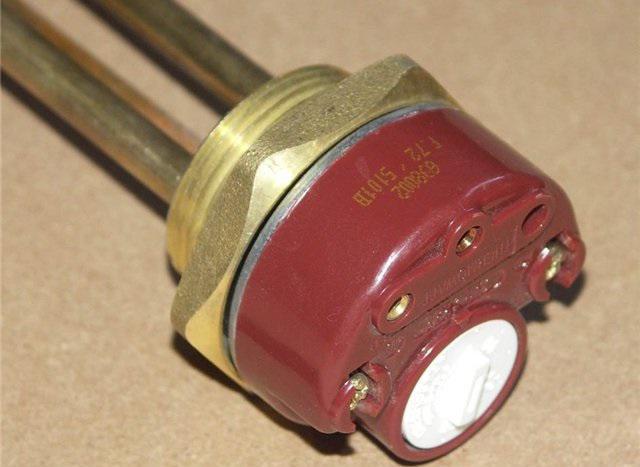
The heating element with a built-in thermostat has a simple structure, consisting of two parts, a heating element and a temperature sensor connected to a temperature controller. But even here there are several features that significantly affect the serviceability and service life of the device.
- The first thing to look at when buying is its case. A more durable heating element will be made of copper and have a corresponding noble color, the cheaper option is usually made of "acid-resistant stainless steel". There is no way to be sure how resistant this stainless steel really is in the store, so give preference to the brass version of the case. The outer diameter of the tube is usually 13 mm, but there are also thin, low-power options - 10 and even 8 mm each;
- Marking. Since we are considering a heating element for a water heater, you should make sure that in the marking, before the designation of the operating voltage of 220V, there is a letter "P", denoting work in water and weak alkaline solutions;
- Power. It should be borne in mind that when connecting to a regular home network, you should not use a heating element, more powerful than 2.5 kW - this gives too much load on ordinary wiring. If you plan to connect a more powerful heating element with a thermostat, lay a separate cable from the shield with the appropriate section to the place of its installation.
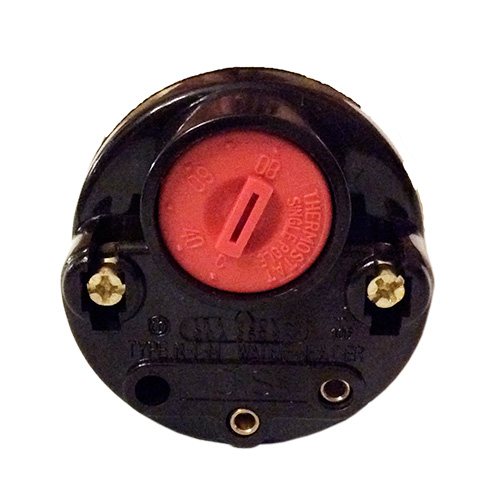
- The temperature sensor is located in a separate tube and, if necessary, is removed from it together with the thermostat. Evidu is a pivot. Inside contains a thermocouple, which, when heated, activates the thermostat mechanism. Often, the failure of the thermal sensor forces the heating element to turn off at low temperatures.
How to choose a heating element for heating equipment?
When choosing a heating element for replacement in a water heater or in a radiator, you need to pay attention to its power, design, tube length and the availability of additional features. Therefore, before buying, you need to find out as much as possible about all its characteristics.
Calculation of the power of the device
The large power of the heating element is not always a positive quality.
When choosing, it is important to consider several factors that are related to the level of energy consumption:
- the maximum heat transfer power of the heater as a whole;
- electrical wiring capabilities;
- the volume of the room.
You cannot buy a device with a power that is more than 75% of the maximum heat transfer level of the heating equipment.
For example, there is a radiator with 10 sections, each of which gives off 150 watts of heat to the air, a total of 1.5 kW. When an electric heater with a power of 2 kW is installed in it, the surface of the battery will not be able to quickly give up all the generated energy. As a result, the heating element will constantly turn off due to overheating.
In apartments with worn-out wiring, the constant load on the outlet should not exceed 1.5-2 kW, otherwise it may catch fire and lead to sad consequences. Therefore, before buying a heating element, you need to check the condition of the wiring and, if necessary, dismantle the old one and lay a new power grid.
When the issue with the electrics and the capabilities of the equipment is resolved, you can begin to calculate the required power to maintain a comfortable temperature in the room.
In well-insulated houses and apartments, a level of 40 W / m 3 will be sufficient. And if there are gaps in the windows, the heating power should be increased to 60-80 W / m 3. You can buy a specific model only after taking into account all the above energy factors.
Consideration of design features
Most heating elements have an alloy steel shell, which provides strength and resistance to corrosion. Copper devices are mainly used in water heaters, although there are no restrictions on their use in homemade radiators.
Also, when choosing, it is necessary to take into account the direction of the thread of the plug, which can be right or left. Different models of electric heaters also differ in the diameter of the flanges. They can range in size from 0.5 to 1.25 inches.
Usually, a short instruction is attached to a heating element of a good manufacturer, which describes its design parameters. Studying them will help you buy a device that will exactly fit your existing heating equipment.
Heating tube length
The length of the tube is one of the main characteristics that determine the efficiency of the device.
Its large length with equal power leads to an increase in the surface area of the electric heater and an acceleration of heat exchange with the working medium. This has a positive effect on the durability of the heating element and the rate of circulation of the coolant.
It is desirable that the tube runs along the entire length of the working area of the heater, not reaching the opposite wall by 6-10 cm. This recommendation will allow you to quickly and evenly warm up the coolant.
Availability of additional functionality
It is not always necessary to overpay for additional features of heating elements. If the heater is used as an auxiliary heater and does not have its own built-in automation, then buying a model with a thermostat makes sense.
But if the radiator or electric convector has its own temperature sensors and temperature control mechanisms, additional functions will remain unclaimed.
Therefore, it is recommended to purchase expensive electric heaters with built-in automation only if there is a clear need for such equipment. If you need an individual selection of the temperature background, it is better to buy a thermostat in an outlet, which can be used periodically.
As for the manufacturers of heating elements, their choice is not fundamental. The main suppliers are firms from Russia, Ukraine, Turkey and Italy. The quality of their products is about the same, so there is no point in overpaying for the brand.
Scope of application.
Heating element with a thermostat is a universal device and is used as a heating element for:
- Temporary electric heating organizations. For this, through a special fitting it is inserted into a register or into a cast-iron battery;
- Heated shower water. To do this, it is enough to have a container in the body of which a hole is made next to the bottom, into which the heating element is inserted;
In general, a heating element with a thermostat is the cheapest source of heat and hot water at the installation stage. The cost of the device starts at $ 5 (2 kilowatt model Ariston), and a set of appropriate fittings (gasket and nut) will not cost more than $ 1.
Types of heating elements
Heating element with a thermostat may differ in:

Equipment can be straight or curved in shape. Experts advise focusing on the design of the room where such a device will be located. According to the composition of the design, the products are:
- Pipeline. It is a metal tube with a conductor. There is dielectric sand inside, which serves as an insulator.
- Closed. Dry is in a protective flask.The space contains special oil or quartz sand. This model does not come into contact with water.
According to the installation method, the heating element with a thermostat is flanged with a thread and a nut. Copper and stainless steel are used in the manufacture. In dry-type devices, magnesium silicate is used, which is used to obtain a flask.
disadvantages
In principle, the price of the device ends with all its advantages and the disadvantages begin:
- Uneconomic. In principle, this is not a "disease" of the heating element itself, but rather of the devices that are assembled with its help. Most often these are artisanal heating registers and homemade water heaters. Both the first and the second do not provide at least some kind of energy conservation, therefore, the electricity bills will be obscenely huge;
- Fragility. Due to the proximity of the thermocouple to the heating elements, the heating element with a built-in thermostat very often performs an on / off cycle, which negatively affects all automation and disables it after a maximum of 2 years of use. True, the positive side is that the automation changes without problems and the need to remove the thermal element;
- Inability to accurately adjust the temperature. The knob on the thermostat gives a very rough idea of what the outlet temperature will be. Again, the close proximity of the heat sensor and the heating coil makes accurate adjustment nearly impossible;
- No moisture protection. Considering that such a heating element is often installed in a bathroom to provide hot water, you will have to take care of splash protection yourself and place it in such a place so that water does not get onto its body.
In general, a heating element with a thermostat solves two questions posed to it:
- Security temporary heating
- Security temporal hot water supply
We do not recommend using this device as a permanent heat source and preferring higher quality and more economical products.
Video.
An example of how heating elements can be used to organize very cheap heating.
Comments:
Stas
The device is the very thing if you need to quickly make an electric radiator from a conventional radiator. This design helped out many times. Instead of one bottom plug, such a device is screwed in and the battery is filled with water. Everything. electric battery ready
Denis
Stas, so it turns out not an electric radiator, but an energy eater. The efficiency tends to zero, and there is no heat transfer.
Stas
Denis, I don’t argue. I wrote it quickly. Those. when it comes not to a permanent connection, but to a temporary hut. For builders in a living room during the off-season, for example. Would you like to buy an electric convector for a month if the central heating is turned on in a month? And sitting in the cold is not an option either.
Denis
I do not know why the author did not like the stainless steel heating element - in my experience, both brass and stainless steel options serve the same
Leave a comment cancel reply
Similar posts
Flat horizontal water heater pros and cons of the design.

How to install an electric storage water heater.
We change heating elements on the Termeks water heater. Step-by-step instruction
What is it for and how to choose a storage floor water heater
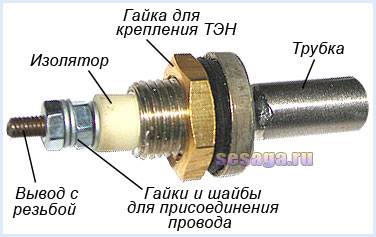
Heating element device.
The heating element is an electric heating element made of a thin-walled metal tube (shell), the material for which is copper, brass, stainless and carbon steel. Inside the tube there is a nichrome wire spiral, which has a high specific electrical resistance. The ends of the spiral are connected to metal leads, which connect the heater to the supply voltage.

The spiral is insulated from the walls of the tube by a compressed electrically insulating filler, which serves to remove heat energy from the spiral and securely fixes it in the center of the tube along its entire length. Fused magnesium oxide, corundum or quartz sand is used as a filler. To protect the filler from moisture penetration from the environment, the ends of the heating element are sealed with a heat and moisture resistant varnish.
The heater leads are insulated from the tube walls and rigidly fixed with ceramic insulators. The supply wires are connected to the threaded ends of the terminals using nuts and washers.
The heating element works as follows: when an electric current passes along a spiral, it, heating up, heats up the filler and the walls of the tube, through which heat is radiated into the environment.
When heating gaseous media to increase heat transfer from heating elements, they are used ribbing
made of material with good thermal conductivity. As a rule, corrugated steel tape is used for ribbing, wound in a spiral onto the outer shell of the heating element.
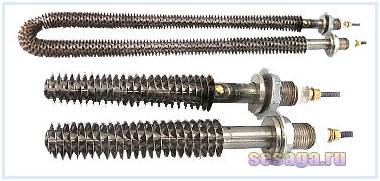
The use of such a constructive solution helps to reduce the overall dimensions and current load of the heater.
The composition of the heating element
The heating element includes the following details:
- The tube, which can be copper, steel, brass, titanium. All types have different performance indicators. A corrosion-resistant device should be selected. There must be a protective layer on the walls of the tubes.
- A spiral made of wire that has a high resistivity.
- Non-conductive filler. Periclase is usually used. The filler is used to separate the coil from the tube.
- The contact rod is an element for connecting the heater to the network.
- The insulators are made of porcelain and are located at the ends of the tubes.
- Tubular sheath.
- Sealant.
- Thermal sensor that regulates the temperature of the water.
Schemes for the inclusion of heating elements in a single-phase network.
Tubular electric heaters are designed for a specific value power
and
stresses
, therefore, to ensure the nominal operating mode, they are connected to the supply network with the appropriate voltage. According to GOST 13268-88, heaters are manufactured for rated voltages:
12
,
24
,
36
,
42
,
48
,
60
,
127
,
220
,
380 V
, however, the most widely used heating elements are designed for voltages of 127, 220 and 380 V.
Consider possible options for connecting the heating element to a single-phase network.
2.1. Plugging into an outlet.
Heating elements with a capacity of no more than 1 kW (1000 W) can be safely connected to the outlet through a conventional plug, since the bulk of electric kettles and boilers with which we heat water have such power.
Through an ordinary plug, you can turn on parallel
two heating elements, but both heaters should have a power of no more than 1 kW (1000 W), since when connected in parallel, their total power increases to 2 kW (2000 W). Thus, you can turn on several heaters, but their total power should be no more than 2 kW, and to connect to the outlet, you must use a more powerful plug.
There is a situation when several heaters designed for an operating voltage of 127 V are lying around at home, the hand does not rise to throw them out, and you cannot turn them on to the home network. In this case, the heaters turn on consistently
, which makes it possible to apply increased voltage to them. When two heaters with a voltage of 127 V are connected in series, their power remains the same, and the total resistance is doubled. For example, when two 500 W heaters are turned on, their total power will be 1000 W.
Installation options
So, first, let's figure out the options for connecting an electric boiler in a private house and apartment with our own hands:
- If the capacity of the water heater does not exceed 3.5 kW, then it is usually powered from the outlet. In this case, the use of a single-phase 220V network is allowed.
- In the event that the power varies in the range of 3.5-7 kW, it is necessary to carry out electrical installation with your own hands directly from the junction box. This is due to the fact that the socket may not withstand high current loads. As in the previous case, the 220-volt network is allowed for use.
- Well, the last option that may be encountered is an electric boiler with a capacity of over 7 kW. In this case, it is necessary not only to lead a separate cable from the junction box, but also to use a more powerful 3-phase 380V network.
Connection diagram
Since the device has direct contact with water, there must be protection against electric shock. current - RCD (or diffavtomat) and short circuit by means of a circuit breaker (AB). Due to the lack of built-in protection of the RCD against overcurrent and natural inertia AB, it must have a current rating at least one step higher (25 A in conjunction with a 16 amp circuit breaker).
The thermostat (TP), or thermostat, plays an important role in heating equipment. It is a versatile device that controls heating systems. Its design can be different, the function is the same: TP stabilizes the temperature of a given environment for a certain period of time. You need to know how to connect a thermostat so that it correctly fulfills its purpose.
Calculation of power and types of heating elements
There is a generally accepted formula with which you can correctly calculate the required power, the calculations are performed in terms of the fact that 1 kW of energy is spent on heating 10 m2 of the room area ... It looks like this:
P = 0.0066 * m * (T1-T2) / t, where
m is the volume of the heated liquid,
t1 - final temperature of the liquid, degrees Celsius,
t2 is the initial temperature of the liquid,
t is the period for which the liquid is heated, min.
P is the power of the heating element.
Let's try to calculate for an aluminum battery of 6 sections, the volume of the contained liquid is about 4 liters. It is necessary to warm up the radiator from 15 degrees to 60 in 15 minutes. We carry out the calculation:
P = 0.0066 * 4 (60-15) / 15 = 0.792, so the power should be 0.8 kW.
Video about connecting the heating element to a one- and three-phase network:
Electric water heating and heating equipment has received great demand among consumers. It allows you to quickly organize heating and hot water supply with minimal initial costs. Some people even create such equipment on their own, with their own hands. BUT The heart of any home-made device is a heating element with a thermostat.
How to choose the right heating element and what to focus on when choosing it? There are a lot of parameters:
After reading this review, you will learn how to independently understand heating elements with thermostats and will be able to connect them.
Types of thermostats
Basically, there are 3 types of thermostats:
- Bimetallic plate;
- Thermocouple;
- Infrared sensor.
Bimetal plate
Under the influence of heating or cooling, the plate bends in one direction or another. Thus, closing or opening the contacts supplying electricity to the heating elements. The plate is a two-layer strip welded from two metals with different coefficients of thermal expansion. Because of this, when heated, the expansion forces "force" the plate to bend.
Thermocouple
The element is a V-shaped bracket made of heat-sensitive metal alloy. A weak current flows through the wire. When the temperature changes, the resistance of the conductor changes, which affects the characteristic of the current.This factor acts through the control circuit on the heater supply relay.
Internal arrangement of electric heaters
It is convenient to consider the device on the example of a tubular model. The electric heater is a ceramic or metal tube filled with a thermal conductor with a spiral located inside. In the place where the tube is fixed to the flange, there are insulating bushings that make it impossible for the conductive spiral to contact the heating element body.
The electric heater is fastened mainly with a flange connection, which makes it possible to seal the internal environment of the heater from the external space. The disadvantage of this design is the impossibility of replacing the coil when it burns out internally.
Areas of application of thermostats
In everyday life, an example of the use of a thermostat can be a washing machine. A thermal sensor connected to a heating element in the tank "monitors" the level of water heating. In the car, the thermocouple of the cooling system "controls" the mode of turning on the radiator fan.
A temperature regulator is necessarily built into various room heaters of a sufficient level of complexity. Not a single underfloor heating system is complete without solid-state TR. In the refrigerator, the thermostat is an integral part. In all PCs and laptops, temperature sensors turn on the fans, keeping the hardware from overheating. Air conditioners, microwave ovens, electric ovens - they all have thermostats. Various water heaters, electric boilers, gas boilers included in the heating system of buildings and structures work only together with thermostatic control units.
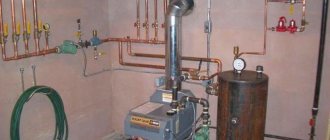
CONNECTING THE ELECTRIC BOILER TENSIONER
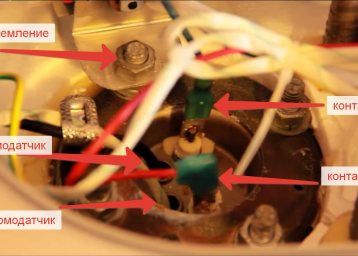
For an electric boiler, you can choose several connection options, but in this case we will consider connecting dry heating elements to a three-phase network with a voltage of 220 Volts in the "star" type. Due to the high power of dry tubular heaters, it is important that the supply wires are connected securely to them. Therefore, it is recommended to strictly adhere to the wiring diagram for the terminals of the heating element according to the instructions.
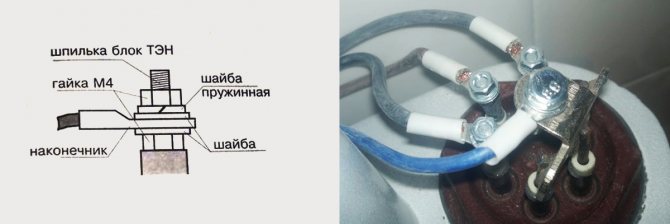
When connecting the phase wires to the terminals of the electric heaters, first of all, screw on the m4 nut. After that, you need to apply a washer and put on the ring tip of the supply wiring. Next, a washer is again superimposed, and a spring washer-grover rests on top of it. All this is clamped with an m4 nut.
The wire that will be connected to the neutral phase is tightened with an m8 bolt. It will be located in the jumper between the pins of the heater holes.
After connecting the wires, the heater body and the heating element connection wires should be grounded. Usually, for boilers, there is a bolt for grounding on the left side of the electric heater block, to which the grounding conductor should be connected.
As a protective earthing switch, you can use a separate conductor of the additional equipotential bonding system or take it from the ground terminal of the control unit.
After the above works, we can assume that the connection of the heating element of the electric boiler is completed. Now all that remains is to install the protection casing on the heat exchanger block.
To control the temperatures of water and air, special thermal sensors
... On the main panel of the electric boiler control unit there are two marked regulators - "air" and "water". Each of the regulators has its own graduation with a digital code, which indicates the temperature measured in Celsius. Thanks to such regulators, you can easily set the required thermal values of the coolant. The regulator works on the principle of adjustment, when the temperature of the electric boiler reaches the values that were set in the options, the heating element will stop heating, and as the values fall below the required level, the heating devices will start their work again.
Connecting and installing the thermostat
There are two known connection options for the thermostat. These are ways of connecting two-core and solid wires.
Connecting the two-wire cable to the thermostat
A two-core wire is used when the TR requires full power supply from the mains for the functioning of a closed control system for the heating mode of a certain volume. These are integrated circuits based on microprocessors.
The received data from the sensor in the form of a change in current strength, resistance values are analyzed by the device. As a result, commands are sent to the heater element starter with a predetermined time interval and a boundary threshold for warming up a specific space.
Note! An example of connecting a two-wire wire is a diagram of how to connect the thermostat to the circulation pump of a water heating boiler.
Connecting single core cable to thermostat
A cable from one core is used in the connection diagram of thermostats in the case when the device itself is installed in a break in the phase wire leading to the positive terminal of the heating element. That is, the cable serves as a phase break in the mains current supplying the heating elements.
Device and connection
It is best to install room thermostats in living rooms. If you install a thermostat in the kitchen or in the hallway, false alarms can occur. It is best to install in a room with the lowest temperature or in a room with the most people.
However, you cannot install a room thermostat next to a battery or heater. And also the rays of the Sun should not fall on the device. It is also recommended not to install thermostats near electrical appliances that can emit thermal noise, and you should also avoid installing the thermostat in a draft.
The boiler can be turned on and off using a special relay. The thermostat can be connected via a cable or using a terminal on the boiler. Batteries are required for the programmer to work. The technical data sheet of the device indicates the rules for connecting the thermostat. It is necessary to carefully study the instructions.
Connection options
- To the underfloor heating system;
- To the heating element;
- To the heater.
Connecting the thermostat to the underfloor heating system
A standard underfloor heating thermostat is included in the delivery set with detailed instructions for connecting the device to the underfloor heating system. You can connect the TR yourself, using the designations under the terminal blocks.
On the back of the regulator there are three pairs of terminal sockets for wires. The first pair is for connecting a two-core network cable. Socket "L" - phase, "N" - zero.
The second pair of sockets is designed to connect to the underfloor heating outputs - L1 and N1. The fifth and sixth terminals are used to connect to the temperature sensor.
Floor temperature regulators can be plugged into a socket box or mounted on the wall. The temperature sensor can be either built into the device body or installed at the end of the remote cable.
In the first case, the temperature of the air inside the room is measured. In the second version, the sensor measures the degree of heating of the finished floor covering.
Connecting the thermostat to the heating element
The connection of the thermostat to an electric heater has to be done through a magnetic starter. This is due to the fact that the power of the regulator is far from comparable to the power of heating elements.
A magnetic starter (MP) is needed when controlling a thermostat with several heating devices at once. The MP is cut into the phase wire in parallel with the thermostat. The tenov operation modes are regulated by a thermostat, the supply current passes through the MP. This makes it possible to use a three-phase power grid, which allows the operation of high-power heating elements.
Many TRs are equipped with electronic microprocessors, which additionally provide indicators of the level of humidity, pressure and time required to achieve the values of the set parameters.
Connecting the thermostat to the heater
There are mechanical and electronic thermostats. Recently, the second models are actively replacing their mechanical counterparts. The use of modern electronics makes it possible to more effectively control the temperature regime in a given environment.
TR for space heaters is built into the housing of the air heaters or taken out to a distance from the heating devices. The regulator, first of all, is connected to the electrical network, then through the control circuit it is connected directly to the temperature sensor.
Additional Information. Infrared heaters are connected to a thermostat in most versions via a magnetic starter. To make the correct connection of the device, you must strictly follow the points of the attached instructions.
Features of how temperature control devices are connected depend on the type of heating devices. This can be a single-core or two-core connection of TP underfloor heating. The connection of a two-phase thermostat to heating elements of three-phase current is carried out only through a magnetic starter. For water heating, the thermostat is cut directly into the radiator. In each case, there is a separate circuit for connecting the thermostat.
Inserting heating elements into the heating system of the house
If you want to replace or find a backup heat source for your solid fuel boiler, such as, for example, Don, Cooper, Evan, Brener Aquatan or Teplodar, this option is great, since it is not very laborious and financially expensive.
When carrying out such a procedure, observe safety measures, since any measures using electrical energy are extremely unsafe.
Let's consider in more detail how to connect heating elements on the boiler. When using it as a backup heating method, remember about changes in the pressure level, it is recommended to use a pump to equalize it.
Let's consider step by step how to install such a device:
Air lock in the heating radiator
- Install the heating element into the pipe. In order for the hole to be airtight, use the gaskets that come with the kit, if not, make them.
- Connect the heating element and thermostat to the radiator.
- If you have not previously installed the Mayevsky crane, install it. Since it will be necessary to release air from the system.
Then fill the system with liquid, use the Mayevsky tap to release the accumulated air. Using a tester, check that the heating element is isolated from the battery to avoid electric shock, if there is still a breakdown, check the health of the heating element. If his insulation is broken, you need to change it. Then run the installation again.
Installation tips
A few tips:
- Before buying a TR, you need to make sure that the characteristics of the regulator and heating elements are compatible.
- You need to choose the installation of the device in the most accessible place.
- When deciding on the purchase of a device, one should evaluate the economic feasibility of using a specific model of a thermostat.
- If you do not have enough experience in installing such devices, then it is better to seek help from specialists.
A person sometimes does not know about the number of thermal control devices surrounding him. They have become a part of everyday life. Their operation brings significant savings in energy costs.
The power of the heaters and their temperature supply, depending on the connection diagram of the heating element
When choosing a heater, the buyer first of all pays attention to its power.Technical practice shows that with a permanent connection to a certain network, when transformers are not used, power indicators depend only on the electrical resistance of the resistive element, which is located in the heating device itself. Dependency is defined by the formula:
where P is the power,
U is the voltage between the ends of the heating element,
I is the current flowing through the resistive element.
For the reason that the current passing along the spiral depends only on the voltage applied to the ends and the intrinsic electrical resistance (R) of a particular section of the spiral, the formula can be simplified:
From this we can conclude that under constant voltage conditions, the power will increase only when the resistance drops.
The electrical resistance of most heating devices directly depends on the temperature output of the heating element itself. But, the resistance within a few hundred degrees will change slightly. It should be understood that the situation with silicon carbide heaters will be completely different. Since a non-metallic rod performs the function of a heating element in them, the resistance here will not change in a linear order. The resistance of such devices can be in the range of 0.5 ... 5 Ohm, which will not allow directly connecting the heating device to a 220 Volt network, and even more so 380 Volts. By technical standards, silicon carbide heaters can be connected to a standard network if they are assembled in a daisy chain. But. It is worth noting that this technique is ineffective if it is necessary to accurately control the power and adjust a certain oven temperature. The best way is to connect the electric heaters to the network using laboratory controlled autotransformers or standard statistical electromagnetic devices.
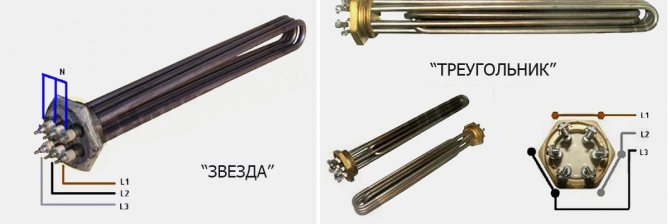
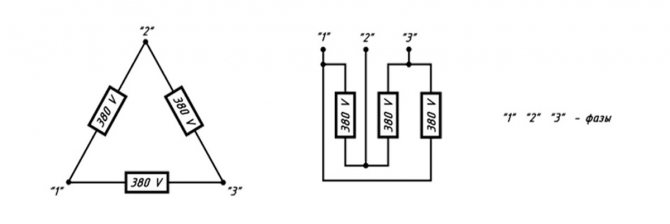
There are heaters that are made immediately for a three-phase network, for example, block heating elements or W-shaped silicon carbide heaters. The way they are connected depends on the calculated voltage according to the "star" or "delta" circuit. When connected according to the "delta" scheme, it is meant the connection of three heating units, whose resistances are equal and each will be supplied with a voltage of 380 volts. The "star" circuit with the presence of a neutral wire is described in detail above and is intended to supply a voltage of 220 volts to each consumer.
A neutral wire is required to connect consumers with different electrical resistances
Pickup: Moscow, st. Molodogvardeyskaya, 57
We deliver orders throughout Russia and the CIS:
Delivery by Transport Company.
Delivery by Russian Post - 400 rubles.
Delivery by Courier in Moscow - 450 rubles.
We value our clients! It's a pleasure to work with us!
The thermostat is designed to maintain the set temperature by controlling the heating (cooling) elements.
These devices are of several types, ranging from simple mechanical devices to electronic multifunctional and even intelligent devices.
The principle of operation is that the device has a remote temperature sensor that reports the ambient temperature to the device. To maintain and adjust the set limit, the thermostat is used. They are used for maintenance in various devices, such as: refrigerator, warm floor, water heating or heaters, incubator, greenhouses, etc.
Star connections.
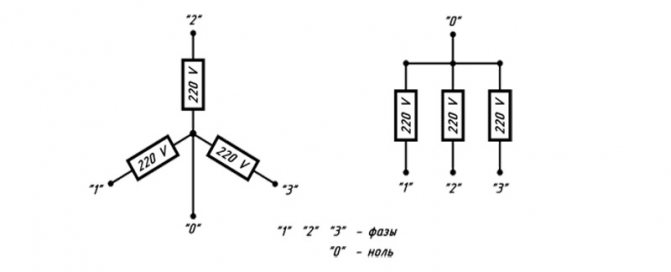
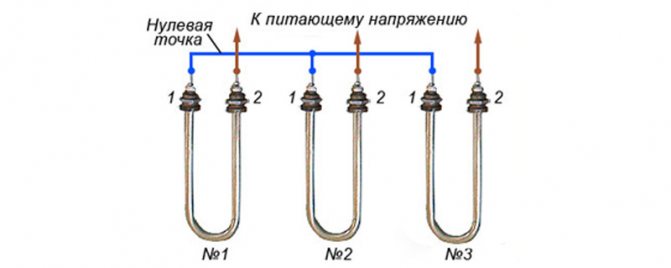
As an example, let's imagine a "star" circuit, which is composed of three electric heaters.
The corresponding phase is supplied to the second terminal (2) of each of the heaters. The first conclusions (1) of the heating elements are connected together with the simultaneous formation of a common point, which is called zero or neutral. This type of load connection is a three-wire one.
Three-wire connection it is advisable to use at an operating voltage of 380 volts. Below we propose to consider the wiring diagram of the three-wire connection of heating elements to a three-phase power grid. In this case, the supply and disconnection of voltage occurs thanks to three-pole circuit breakers.
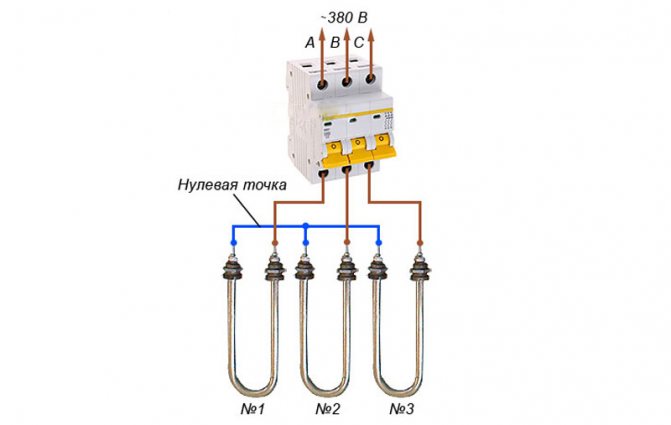
In the presented diagram, it can be seen that the leads located on the right side of the electric heaters are connected to phases A, B and C, and the leads located on the left are connected at the zero point. Between the terminals that are on the right and the zero point, the operating voltage is 220 volts.
In addition to the described scheme, you can use and four-wire... When connected according to the type of a four-wire circuit, it is assumed that a three-phase load type with a voltage of 220 volts is included in the network. In this case, the zero point of the load is connected to the zero point of the power source.
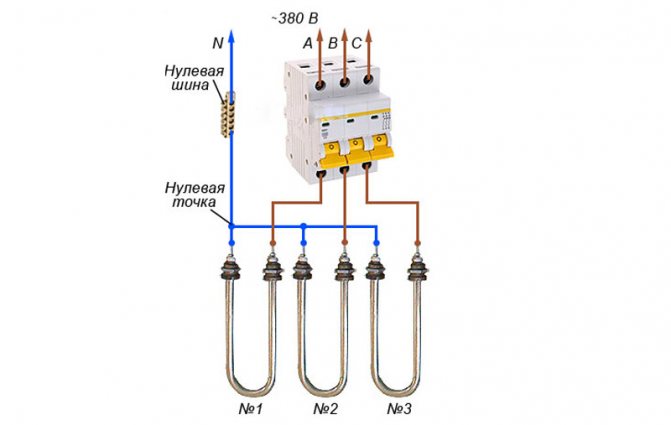
In the diagram presented above, the right terminals of the tubular electric heaters are connected to the corresponding phases, and the left ones are closed at one point, which is connected to the zero bus of the power source. The voltage between the zero point and the terminals of the electric heaters will be 220 volts.
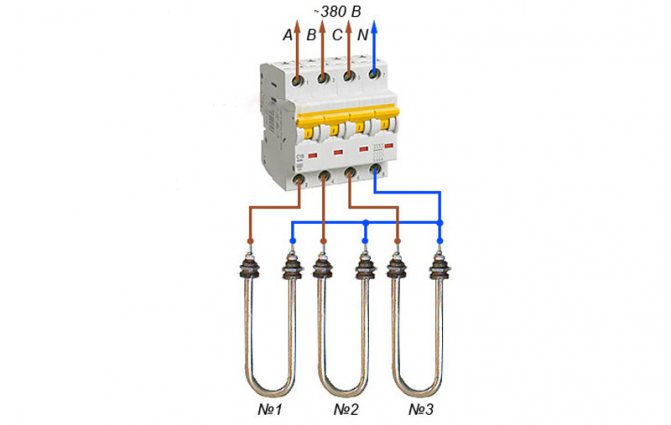
If it is necessary to completely disconnect the load from the mains, automatic switches are used "3 + N" or "3P + N"... Such machines turn on and off all available power contacts.
Laws in force when connecting heaters according to the "star" type:
Delta connection
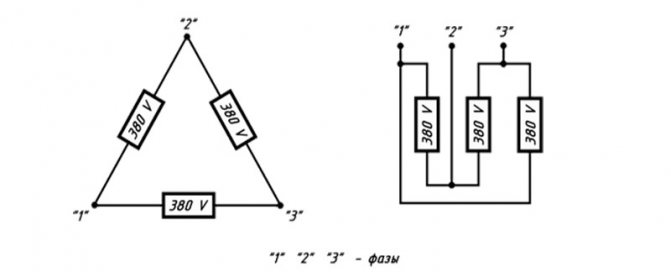
With a delta connection, the leads of the electric heaters are connected to each other in sequential order. According to the connection diagram of three tubular electric heaters, the connection is carried out in the following order: the first output of the heater # 1 is connected to the first output of the heating element # 2; the second terminal of device # 2 is connected to the second terminal of device # 3; the second terminal of the heater # 1 is connected to the first terminal of the device # 3. As a result of this connection, there should be three arms - "a", "b", "c".
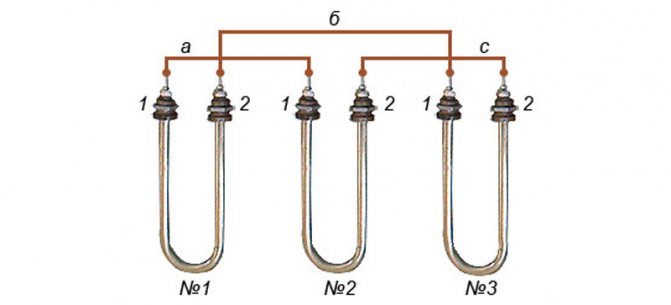
Then, the corresponding phase is fed to each shoulder: phase A on shoulder "a", phase B on shoulder "c", and phase C on shoulder "c".
Laws in force when connecting heaters according to the "triangle" type:
Elemag has extensive experience in the production of heating systems. For all questions regarding the purchase or connection of electric heaters, please contact us by phone or e-mail. Our experts can advise you on the choice of a suitable heating element connection. STAR and TRIANGLE connections are used in our production of dry heating elements and traditional electric metal blocks of heating elements.
Delta connection
When connected according to the "triangle" scheme, the leads of the tubular heater are connected in turn. A wiring diagram of this type means that: pin number 1 of the first heater will be connected to pin number 1 of the second heater; terminal # 2 of the second heating element will be connected to terminal # 2 of the third heater; from the first heater terminal # 2 will be connected to terminal # 1 of the third heating element. If you follow the above scheme, you should end up with three shoulders - "a", "b", "c". Each shoulder will have its own phase: