The problem with hot water for many private property owners, where there is no connection to the central heating system, remains relevant today. Installing a boiler requires serious investment, but making an indirect heating boiler with your own hands can be an alternative in solving this important issue. Its main benefit is that hot water is supplied as needed without any special monetary costs on your part.
Boiler design
Many private homeowners are interested in the question: what kind of device is it, how the water is heated in it. A product of this type is a large storage structure that does not depend on standard energy sources (gas, electrical system), in other words, a circulation type water heater.
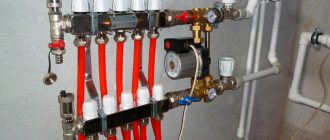
A spiral pipe is installed inside the tank - it is in it that water circulates, heated by an autonomous heating boiler. Cold water enters through a pipe located at the bottom, heats up evenly in the tank and is supplied to the user through an outlet pipe located at the top. For maximum convenience, ball valves are connected to the pipes. The outside of the tank is covered with a thick layer of thermal insulation.
The drawings for this product are quite simple and easy to read if you have at least a basic technical background.

Varieties of systems
Those users who use gas water heaters and various types of boilers to obtain hot water are well aware of the mass of problems that arise during their operation: you need to wait a while until the water heats up to the desired temperature, if you turn on hot water in the kitchen and in the bathroom at the same time, then its temperature will drop. An indirect boiler eliminates these problems: the water coming from it always has a constant temperature, no matter where it is supplied. Such water heaters can be of several types.
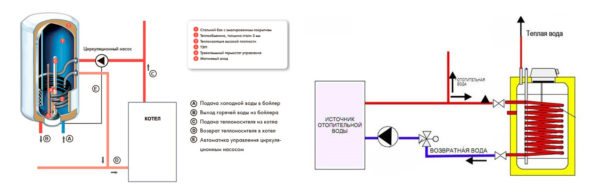
- The most common design is with a coil, which is installed inside the tank, and hot water circulates through it. Cold water entering the tank contacts the coil and heats up to the set temperature.
- Another option is when the coil is mounted along the walls of the tank, and not in its center.
- If there are two containers - a large and a small one, then the smaller one is inserted into the larger one. Water circulates between them: hot water is pumped into the small one, and around it - cold water for heating.
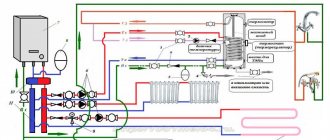
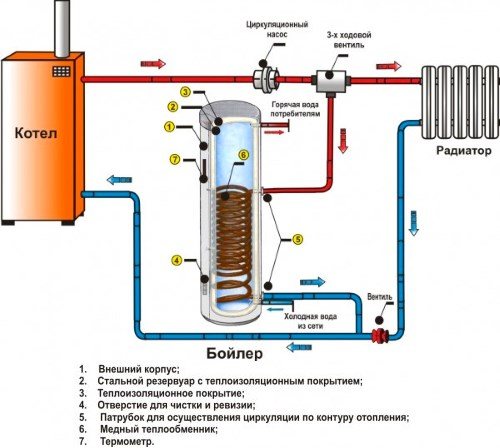
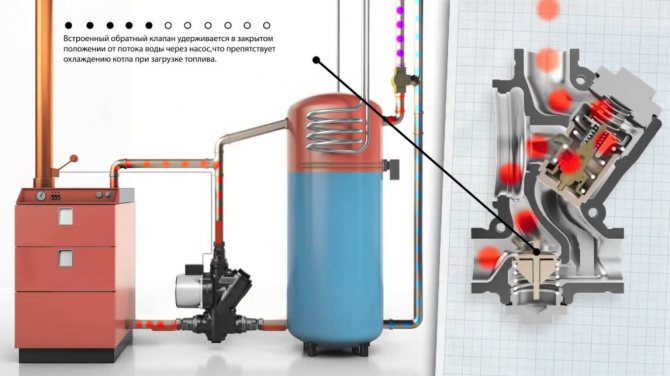
The principle of operation of such water heaters is simple, in order to clearly understand the operation of the system, there is a detailed diagram.
Design features of an indirect boiler
The indirect type boiler is a stainless steel tank. The inner walls of the tank are covered with a special material that not only protects the surface of the water heater from corrosion processes, but also reduces the concentration of harmful bacteria and microorganisms.
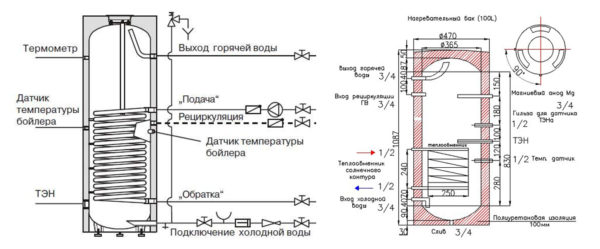
Diagram of the device of an indirect type boiler with a single-circuit coil
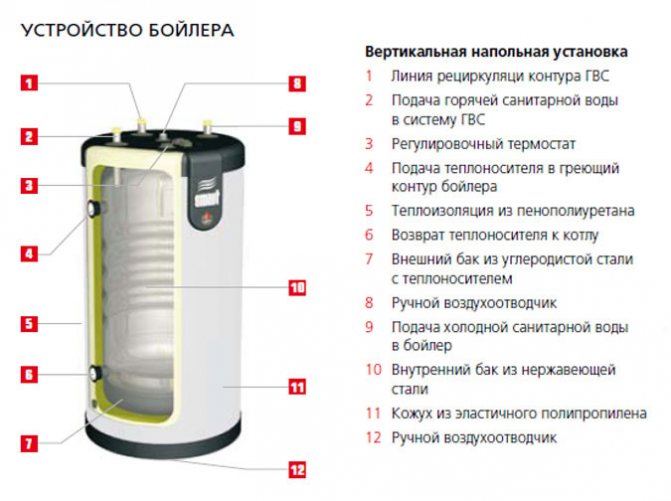
The rest of the boiler of the simplest design consists of the following components:
- heat exchanger - spiral tube or smaller tank. Depending on the volume of the tank, it can be located in its upper and lower parts;
- inlet nozzle - a fitting in the lower part of the device for supplying a pipe with cold running water;
- outlet pipe - connection for connecting the hot water outlet pipe;
- magnesium anode - additional protection of the tank walls from corrosion processes;
- internal thermometer - a device for measuring the temperature of water heating;
- thermostat - a device that prevents equipment overheating;
- control unit - rotary knob with divisions for setting the heating temperature;
- thermal insulation - a layer of insulating material that helps maintain a given temperature of heated water;
- outlet - valve for draining stagnant water;
- revision - a large-diameter hole designed for boiler maintenance, repair and modernization.
The design of new tank models may differ slightly and have a number of modifications from manufacturers, but in general, any indirect type boiler consists of the listed elements.
Boiler working principle
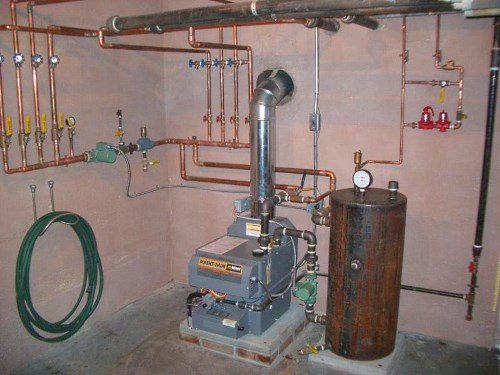
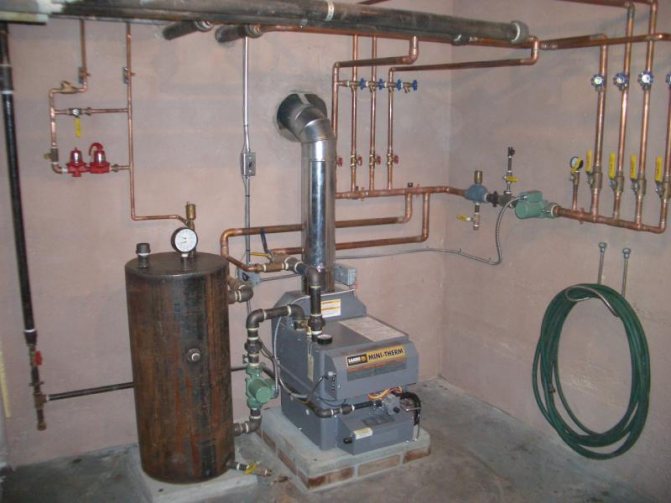
An indirect type boiler is part of the heating system and is connected directly to a gas, electric or solid fuel boiler, which heats the coolant using the energy released during fuel combustion.
The heating medium circulates through the DHW system and passes through the heat exchanger located in the indirect heating boiler. Due to the release of thermal energy from the hot coolant, cold water is heated, with which the reservoir of the device is filled. From it, the heated water is transported through a pipe through an outlet to the bathroom, to the kitchen and to other rooms with plumbing equipment.
The indirect type boiler can work with all types of heating boilers
When the heating boiler is turned off or when it goes into an economical mode of operation, the coolant cools down quickly. Due to the design, which provides for the insulation of the walls of the tank with urethane foam, the water in the tank cools very slowly. This allows you to use the entire volume of warm water for several more hours.
Advantages and disadvantages of an indirect heating boiler
The advantages of a self-designed indirect heating boiler over other water heaters:
- the ability to connect to a centralized heating system;
- the main tank is installed in the immediate vicinity of the autonomous heating boiler;
- installation of the entire structure does not take much time;
- reduced consumption of electricity and gas;
- the house is provided with hot water of the same temperature all the time.
There are not so many disadvantages of this design:
- you will need a special room for installation;
- it takes a long time to heat the water in the tank to the optimal temperature at the first start, and this guarantees losses on the general heating of all other rooms;
- the coil must be cleaned at least twice in 12 months so that it does not become clogged with deposits.
Important! This option is valid only during the autumn-winter season, after which the built-in heating element turns on. Owners of private buildings who use autonomous heating can cut off the water supply for heating the house, and continue to heat the water in the tank with the help of a boiler.
If you use electric heating elements, it is better to turn them on at night, during the benefits period.
Materials and tools
At the first stage of self-manufacturing a boiler, you need to find a suitable container. The main thing here is to find out how resistant the material is to corrosion. It can be plastic, stainless steel, or aluminum alloy.
Please note: a used gas cylinder is not the best option for a boiler tank - it starts to rust very soon, and the water will smell of propane for a long time.
The second main element is a heat exchanger, that is, a coil, its price is low, since for this we select a pipe of small diameter. Pipe material - copper, brass or metal-plastic, the main thing is that there is a high heat transfer.
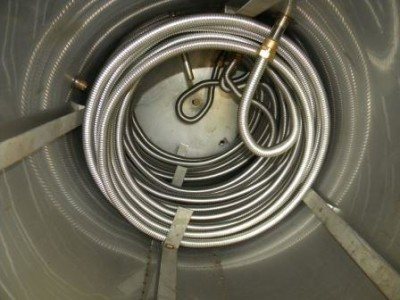
In order to make a spiral from a pipe, it is necessary to choose a cylindrical shape, which can be a log or a container.Having fixed one end of the pipe, we make circular rotations, remove the spiral upon completion.
Please note: the more turns the coil has, the faster the water will heat up.
It is possible to assemble a boiler without a coil on the tank-in-tank principle. A smaller tank installed in the middle of the tank will act as a heat exchanger.
After that, you can start isolating the container. Foil mineral wool, polyurethane foam and other materials are suitable for this.
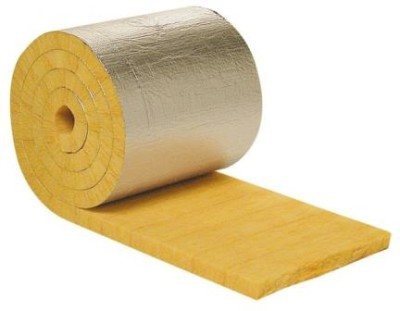
We fasten it around the entire perimeter of the container with a wire tie or glue. In order for the insulation to look aesthetically pleasing, we put a bent sheet of metal on top of it.
So, by the beginning of work we have:
- Tank
- coil
- plastic tubes
- electric heating element
Armed with a welding machine, we can get to work.
Types of work and materials
To make a boiler with your own hands, you need to do the following work:
- prepare a metal container with good anti-corrosion characteristics;
- gently bend the pipe for the coil;
- make high-quality thermal insulation of the structure;
- complete assembly of the entire system;
- bring water;
- the coil is securely connected to the home heating system;
- connect the heated water supply to the domestic water supply.
To perform some operations, you will need the following materials and equipment:
- pipes made of metal-plastic or stainless steel;
- nitro-enamel-based primer;
- nut with a diameter of about 32 mm;
- a large container - a simple gas cylinder will do for a small family;
- need welding.
We have decided on all the materials and the upcoming types of work, now we are proceeding with the direct installation.
Boiler manufacturing procedure
To make a homemade storage boiler for heating water, you need:
- We install a container that will provide the required amount of hot water supply.
- We place the made coil with our own hands from a metal pipe. Preferably stainless steel.
- We wrap the tank with a layer of insulating material.
- Using a hose and fittings, we feed the coil from the heating of a private house.
- In the same way, we carry out the installation of the cold water supply, having previously installed an emergency valve.
- We install a return hose with hot water supply to the house wiring.
What and how to make a tank
You can make your own hot water tank. It is ideal to pick up a stainless steel barrel, unused plastic or metal tanks are also suitable. The volume is planned based on the required amount of hot water. In the process of creating a structure, you will need a cutter and a welding machine.
Without basic skills in electric welding and knowledge of the principles of working with a cutter, the manufacture of a tank for a boiler is prohibited.
We make a boiler from a gas cylinder with our own hands. The used cylinder must be divided into two parts and thoroughly rinsed with industrial substances. Then we process the inside of the product with a layer of primer paint.
- LiveJournal
- Blogger
Holes are made in the container: for connecting a cold water supply hose, for draining already heated water and two holes for mounting a coil. The connection to the autonomous heating is operational in the cold season.
In order for the structure to work in the summer, the boiler device is equipped with an electric heating element.
Thermal insulation
Due to the fact that the water heater with its own hands heats the water to low temperatures, it is recommended to wrap the tank with a heat insulator. Insulation of the outer walls of the vessel is carried out before the final assembly of the structure. In the absence of special materials, polyurethane foam is used for this. To increase the efficiency, the heat insulator is covered with a layer of waterproofing.Thermal insulation can be made from a container with a larger diameter than the tank.
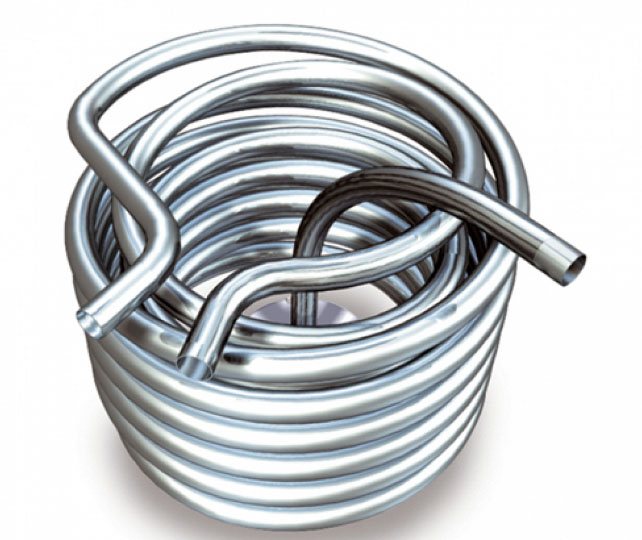
Coil manufacturing
We will take care of creating the design of a snake device to make a boiler with our own hands. The pipe for cooking the device must have a high level of heat capacity. Therefore, most often the coil is created from stainless or metal pipes. Inside the tank, they are located in the center of the structure or along the walls of the water tank.
The pipe diameter and the number of turns used for the coil depend on the volume of the tank.
In particular, industrial water heaters are equipped with steel pipes with a diameter of 63 mm and above. For less consumption, workpieces of narrow diameters will be needed. The dimensions of the coil have a positive effect on the speed of preparation of hot water supply. However, this principle should not be used for small containers, since the amount of heated water in the tank will decrease. The coil needs regular maintenance and cleaning from all sorts of accumulations that arise during the use of the indirect heating device.
- LiveJournal
- Blogger
Assembly and connection of the structure
- Three ¾ "thread holes are drilled in the water tank. We weld the fittings to the walls of the tank and screw a valve into each of them. The first tap is responsible for the supply, the second is for the intake of hot water supply, the third is designed to regulate the pressure inside the tank and drain the water during the period of non-use of the heater.
- We insert the finished coil into the tank. At the ends of the device, holes are drilled in the walls of the tank. And the wiring is connected to connect to the heating system according to the principle of valves. Inside the container, you can fix the coil for welding, but not tightly so that it can be dismantled later.
- We carry out work on the tightness of the coil. Each bend and joint is carefully treated with a special solution. We check the integrity of the system using a compressor.
- We finish the visual design of the structure. DIY boiler can be painted in any color. Handles are attached to the device. A lid with latches is installed in the open part of the tank.
- We carry out insulation procedures. We mount the heat insulator layer.
- It remains to install the boiler yourself. As a result, we connect cold water supply. Checking how the boiler works.
Assembly technology
We will describe in stages how to make an indirect heating boiler with our own hands - the whole complex of work will consist of the sequential assembly of different parts of the structure.
Water heater tank
The volume of the container, where water will be supplied for subsequent heating, depends on the needs of the homeowner: the standard consumption is up to 70 liters per household per day, so 200 liters will be quite enough for a family of 4 people.
The material of the tank should be chosen from an alloy of aluminum, as well as other non-ferrous metals that do not corrode, if finances allow - stainless steel. A good alternative is a gas cylinder, but the inner walls must be treated with a special primer, otherwise the hot water will have an unpleasant rotten smell.
You need to cut at least 5 holes in the tank body with your own hands: two from either side - they are designed for inserting the coil, at the bottom there are also 2 - for water supply and a drain valve, at the top there is only one - hot water extraction.
Making a coil
This element, made of a copper pipe of small diameter, but thick-walled, can necessarily have different dimensions - it depends on the volume and height of the container. Experts say that for every 10 liters. water needs 1.5 kW of heat output of the coil.
You can use pipes from a different material to save money from your home budget, but always with excellent heat dissipation. During manufacturing, you must very carefully monitor the formation of turns:
- they do not touch in any way - there must be a gap between the turns;
- you cannot make excessive efforts - this will greatly complicate the removal of the finished product from a special mandrel;
- the number of turns is strictly calculated and depends on the dimensions of the tank.
For the mandrel, use a pipe of the required diameter or a round wooden log without knots. After manufacturing, the spiral is carefully coated with a protective heat-resistant varnish.

We insulate the structure
From the outside, the tank is necessarily covered with thermal insulation to reduce losses and increase the efficiency of the product - this can be a special foam for installation or another material with excellent thermal insulation properties, for example, foam plastic.
It is fastened with wire, special ties, or put on glue. On top of the insulation, the craftsmen recommend strengthening the foil sheets or using insulation with one foil side. For insulation, some craftsmen insert the boiler into a larger container, and fill the space between it and the inner walls with insulation of any kind.
Final assembly
When all the details of the future structure are prepared, its assembly begins.
- The coil is installed in the center or along the inner surface of the container, pipes are attached to the ends (soldering or welding).
- When placed vertically, we weld the legs to the container, when placed on a wall - special fastening loops.
- A heating element is welded to the bottom of the tank.
- A cover is installed on top and welded to the body.
- The coil is connected to the autonomous system circuit according to the selected scheme.
- We connect pipes for supplying cold water and a line for removing hot water.
- We connect the water heater to the domestic water supply system.
For a consultation, so that there are fewer questions, we advise you to watch this video:
Then you just have to enjoy the abundance of hot water without significant financial investments.
Installation of a coil and heating element
Next, we start making the coil - we recommend choosing a copper tube, since copper bends easily and resists corrosion well. The recommended tube diameter is 10-20 mm. To calculate the length, we will use a special formula l = P / π * d * Δt, where l is the length of the tube, P is the heat capacity of the coil, d is the tube diameter in meters, and Δt is the temperature difference. The heat output should be 1.5 kW per 10 liters of water. The temperature difference is calculated by subtracting the supply water temperature from the heating medium temperature.
Let's try to calculate using an example in which we have a copper tube with a diameter of 0.01 m and a tank of 100 liters. The required thermal power of the coil is 15 kW, the inlet water temperature is +10 degrees, the coolant temperature is +90 degrees. Using the above formula, we find out that the length of the coil should be approximately 6 meters.

Wrap the copper tubing around the plastic pipe. The rate of water heating in the tank will depend on the number of turns of the resulting spiral.
To make a coil, we wind a copper tube on some kind of base, for example, on a plastic sewer pipe. Winding with effort is not needed, otherwise it will be problematic to remove the coil from the base. In conclusion, we solder the fittings to the coil - with their help we connect to the fittings inside the tank. This completes the work with the coil, and we just have to install the heating element in the lower part of our homemade boiler by cutting it in in a convenient way.
Combined water heaters for indirect heating are designed so that the heating elements are located in the lower part, from where the heated water can rise upward, gradually mixing.As for the coil, it is advisable to turn it around a little and install it so that the water is heated throughout the entire volume - this will ensure faster heating.
Budget manufacturing option
Experts offer an original version of the manufacture of a similar type of water heater, but for this you will need the following components:
- copper or bronze pipe;
- boards of different sizes;
- sheet aluminum;
- a collector made of copper or its alloy;
- glass sheets of a certain format;
- special composition of paint.
We make a case from boards of the required size, sheathe it from the inside with sheet aluminum. Along the perimeter, we install pipes like a coil, we attach a collector to them, taking into account which side there will be an entrance, and where is an exit.
Such a system is quite simple and functional - with its help you will heat the required amount of water, and the manufacturing technology is similar to the standard version.
To make the structure better absorb heat and not give it to the outside, glass and special paint are used.
In the manufacture of such a water heater, an enviable saving of money resources is obtained - you just have to choose an option that is acceptable for your premises and start work.
Coil manufacturing
This device is made from a plastic or metal pipe with a small diameter. It is carefully wound on a cylindrical mandrel, which, in turn, can be represented by a fairly strong pipe of large diameter, a cylindrical log, etc.
The size and configuration of the tank depends coil diameter and the number of its turns. If the area of the coil with which the water interacts is large enough, this contributes to the fact that it warms up much faster to the desired temperature. Do not wind the pipe too tightly on the mandrel, otherwise a too tight fit will lead to the fact that the coil will then be very difficult to remove.