SNiP requirements
Any construction work, including the installation of heating radiators, is carried out in accordance with certain rules and regulations. The technical data sheet for each heater contains detailed information on the type of battery holder. Nevertheless, it will not be superfluous to familiarize yourself with the requirements specified in SNiP 3.05.01-85.
Here are the main standards:
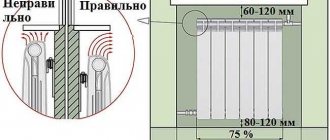
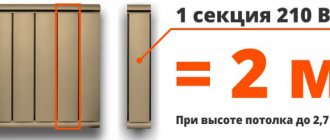
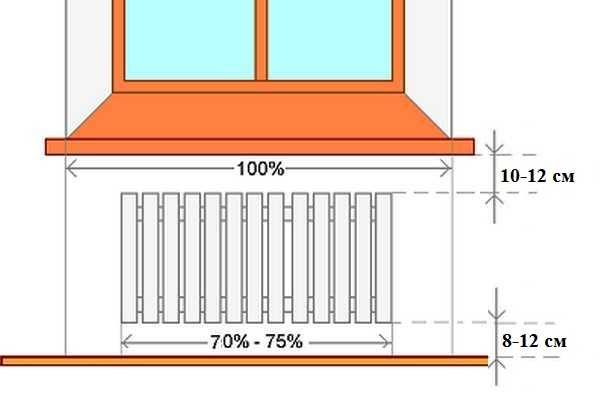
- The location of the heater is considered optimal if its center point is as close as possible or completely coincides with the central vertical axis of the window. A deviation in one direction or another is allowed no more than 20 mm.
- The width of the heater should be about 50-75% of the window size. This rule is not strictly binding and is rather advisory in nature. The fact is that the reliability of fastening for heating radiator batteries does not depend on their size - it will only affect the amount of heat transfer.
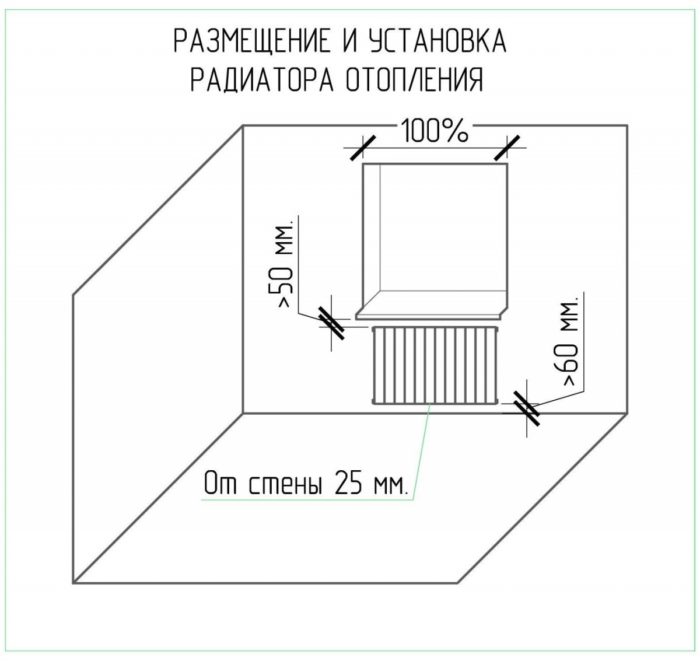
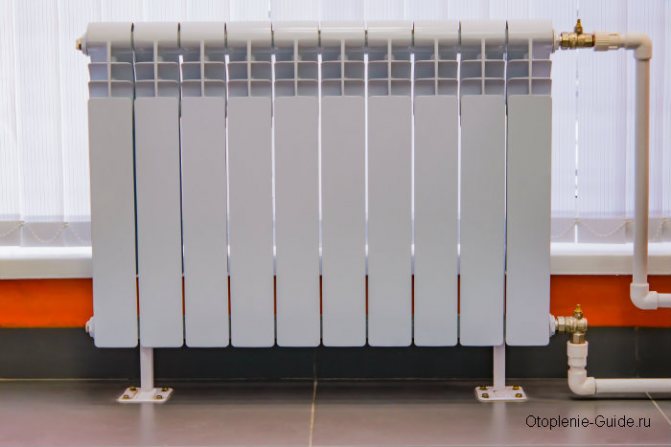
- The distance from the radiator to the floor covering must be at least 60 mm - this is a fire safety requirement.
- There must be a gap of at least 25 mm between the heating radiator and the wall, and even better - 30-50 mm.
- There must also be a gap of at least 50 mm between the window sill and the battery.
- It is important to choose the right number of support points, that is, wall mounts for heating radiators. For a radiator with 6-8 sections, you will need two upper and one lower holder. For each subsequent 5-7 sections, it will be necessary to add one more holder at the top and bottom.
- In the same way, the number of floor stands for radiators is selected. A battery for 6-8 teeth is installed on two points of support, and with the addition of each subsequent 5-7 sections, one more mount is installed.
- The number of cells on the heating radiator should not be too large. If the system works in conditions with natural circulation of water, for example, in a private house, no more than 12 teeth in a row can be installed there. If we are talking about multi-storey buildings in which the coolant circulates under constant pressure, it is allowed to install a radiator with a total of up to 24 sections.
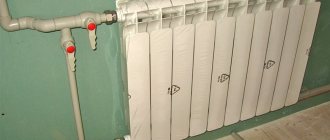
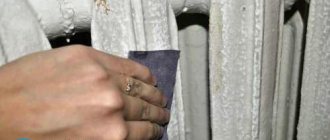
Please note that in order to reduce heat loss as a result of senseless heating of the outer wall, it is recommended to place heat-insulating foil material behind the radiator. It will redirect heat waves into the room.
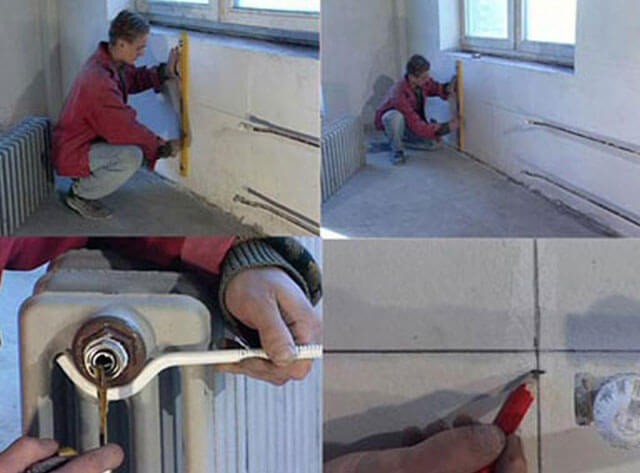
Installation site marking
Determining where to install the battery
Before purchasing a mount for heating batteries, you need to decide on the method that will be used for fixing. After that, they begin to markup, taking into account the requirements from SNiP.
- When installing a wall-mounted radiator, it should be borne in mind that its center should be located in the center of the window sill. The permissible error is no more than 20 mm.
- It is recommended to purchase radiators, the dimensions of which will correspond to 75% of the window sill length.
- The distance from the floor covering to the bottom of the battery must be at least 60 mm. It is important to consider this when marking out before installing the bracket.
- There must be a gap between the wall and the radiator. The estimated distance is 30-50 mm.
- The gap from the window sill to the radiator must be left at least 50 mm.
- The number of fasteners should be selected depending on the number of sections. For example, for 8 pieces, it is enough to place two brackets at the top and one at the bottom. The type of attachment can be anything.
Carrying out markings for the attachment points of the new battery
When installing a floor-standing radiator battery, markings are made on the finishing or rough surface. Two brackets are required to accommodate the battery in six sections. The larger the number of sections, the more fasteners.
After considering all the placement standards, they begin to draw auxiliary lines.
- Having chosen the middle of the window, draw a vertical line from the window sill to the floor.
- If there is a lower wiring, a horizontal line is made, along which the upper edge of the battery will pass.
- If additional lateral routing is present, make another horizontal line, which will become the border of the lower part of the radiator.
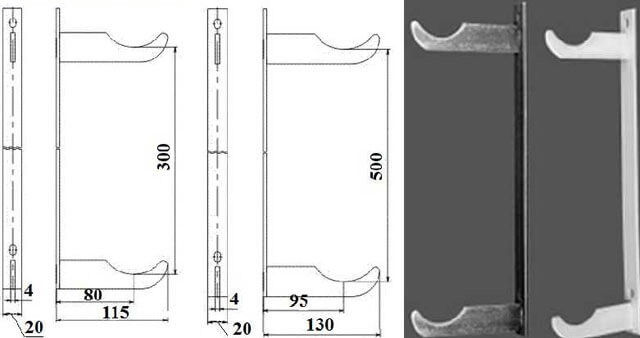
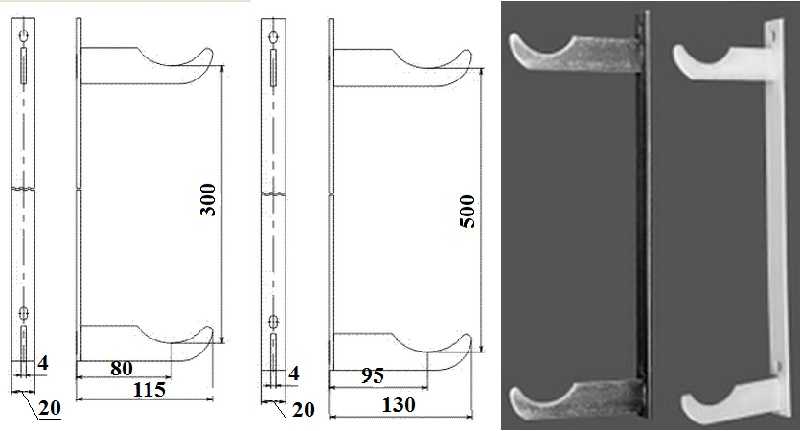
Focusing on these lines, brackets are installed. The distance between the bottom and top must be at least 300 mm. The gap from the wall to the seat is 80 mm. As a result, the battery hung on the holder should occupy no more than 130 mm of distance from the edge of the window sill.
Any wall-mounted radiator battery can be installed on floor holders. In this case, the height from the floor to the middle of the heating equipment should be 140-190 mm.
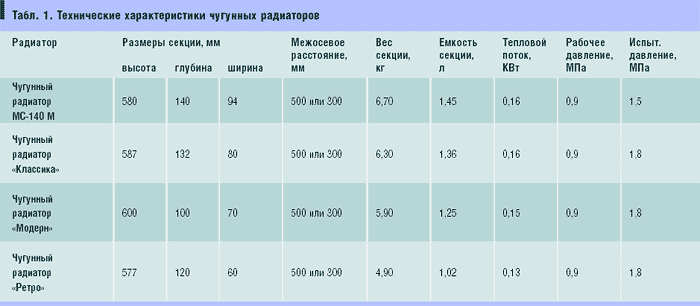
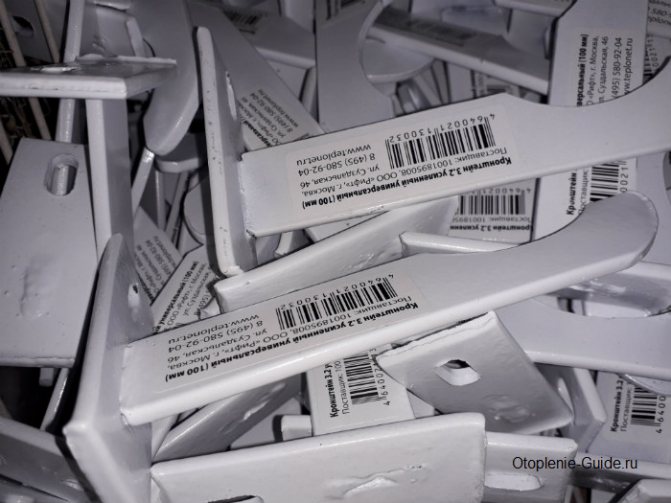
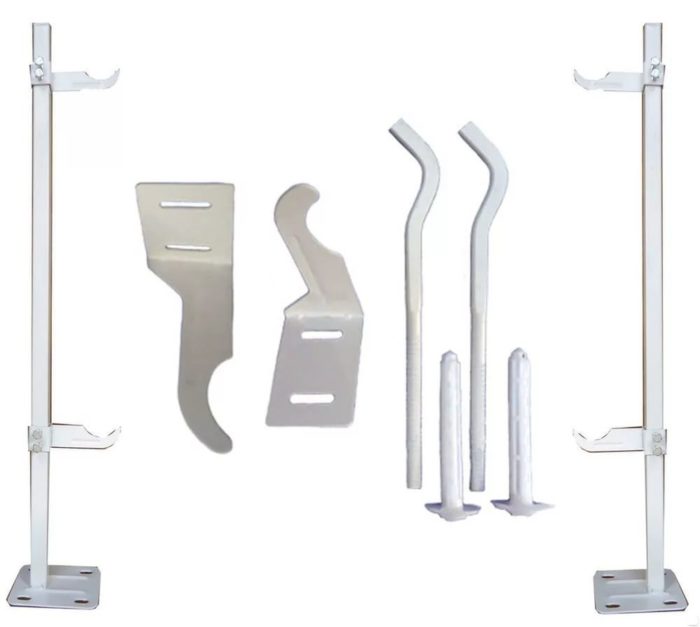
Fasteners for cast iron batteries
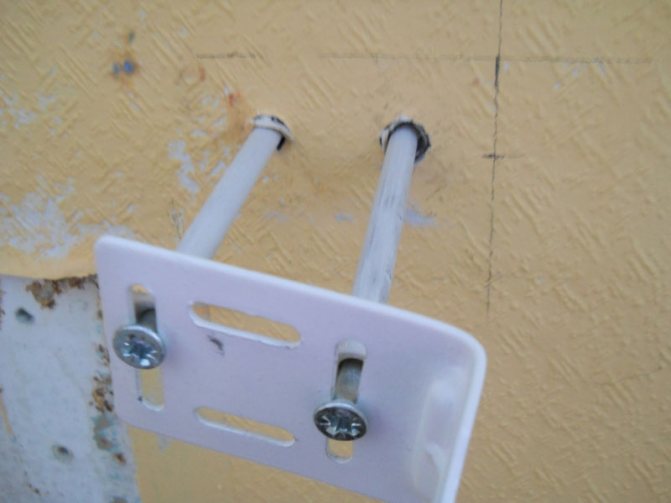
Cast-iron radiators, which are quite popular at the present time, are distinguished by a large weight, therefore, a stand for a cast-iron battery must be reliable enough to withstand such a load. As a rule, for cast iron radiators, metal pins are used that are bent in the shape of a section.
The installation technology in this case is quite simple. First, a hole of the required diameter is drilled in the brick, then a dowel is inserted into it and the fastening pin is screwed in. If it is necessary to fix the bracket in a reinforced concrete wall, the technology will be slightly different.
Since it is rather difficult to make a deep hole in a reinforced concrete slab, the fastening pin is fixed to a small metal plate. It is attached to the slab at four points, but at a shallower depth. The reliability of such an attachment in both versions is approximately the same.
The base for a cast iron radiator is sometimes a mounting plate with two support points. Such a fastener is fixed to the wall in such a way that the upper and lower brackets bear approximately the same weight of the radiator. On sale you can find strips with brackets fixed at a certain distance, as well as with adjustable elements.
Quite often, floor mounting racks are used for cast-iron batteries. Just like vertical strips, racks are monolithic and adjustable.

Note that there are two ways to secure the battery to the stand. The standard option is to mount with a metal bracket. Some models use a flexible multi-link chain for fastening.
It is worth noting that the markings on the cast iron radiator mounts indicate that they are reinforced. This information should be considered when selecting the mounting brackets.


Professional installation of radiators
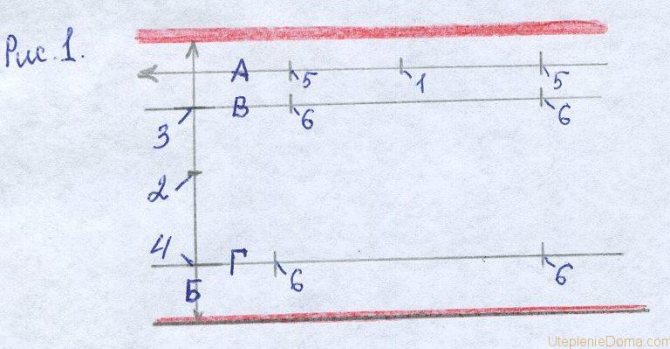
Fig. # 1
Reliable installation of any heating element of the heating system depends on how correctly the bracket is selected and how competently and firmly it is fixed. All work must be carried out in strict accordance with the regulation of SNiP of 2003 on heating, ventilation and air conditioning systems.
How to mark the brackets for a heating radiator? To answer this question correctly, experts offer the following calculation scheme and detailed photos.
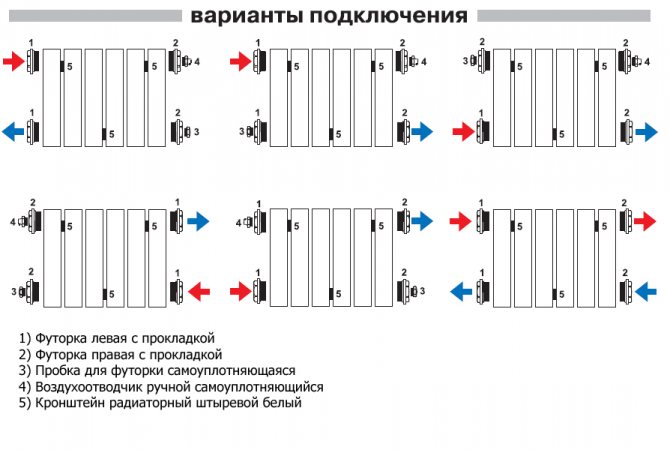
Figure 1 uses the following conventions:

Fig. # 2
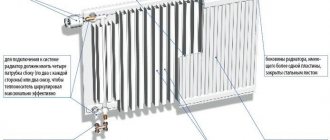
- segment A - denotes the length of the window sill under which the battery will be mounted;
- point 1 - denotes the middle of the window sill. This mark is fixed on the wall above the position of the heating element itself. Purpose - The mark remains visible during installation;
- the segment that runs between marks 1 and 5 is the distance from the middle of the window sill to the extreme section of the heating equipment. In this case, you need to pay attention to Figure 2;
- segment B - equated to the distance from the window sill to the floor;

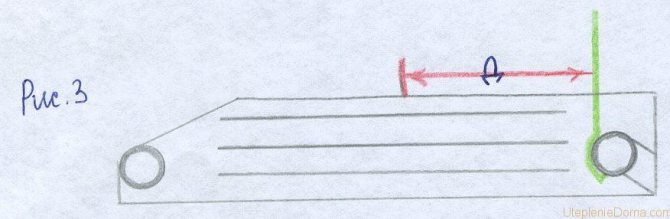
Fig. Number 3
- mark 2 - located in the middle of segment B;
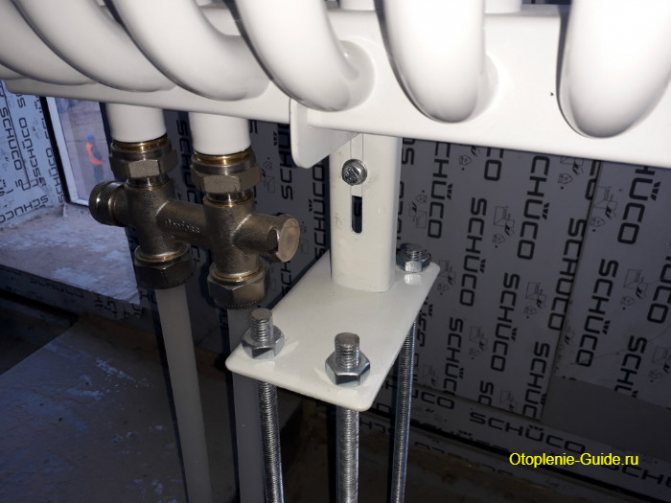
- segment D is the distance from the bracket, which is applied to the radiator pipe, to the middle of the heating element;
- point 3 - is plotted from point 2 and is equal to the length of the segment D;
- point 4 - located below point 3 by 500 mm;
- line B is drawn from point 3 using a level strictly horizontal;
- line G is drawn through point 4 strictly horizontally also with the help of a level "
- points 6 - they are carried out with the help of a weight and are lowered from level 5.
In a similar way, the location of the fasteners and the distance between the radiator brackets are established. Many people ask how many brackets do you need for a radiator? If we are talking about an aluminum heating element, then 3 wall brackets are required for 12 sections. One at the bottom and two at the top. When the number of sections exceeds 10 pieces, 4 fasteners are used, two at the bottom and two at the top. Bimetallic radiators are heavier, and therefore for 10 sections you need 3 brackets, and if the number of sections is more than 10 pieces, then 4 clips.
Cast iron radiators are considered the heaviest, and therefore the most brackets are needed to fix them. So, here it is mandatory to use floor brackets-stands. The number of brackets per radiator increases with the size of the heating element.
Brackets for steel radiators
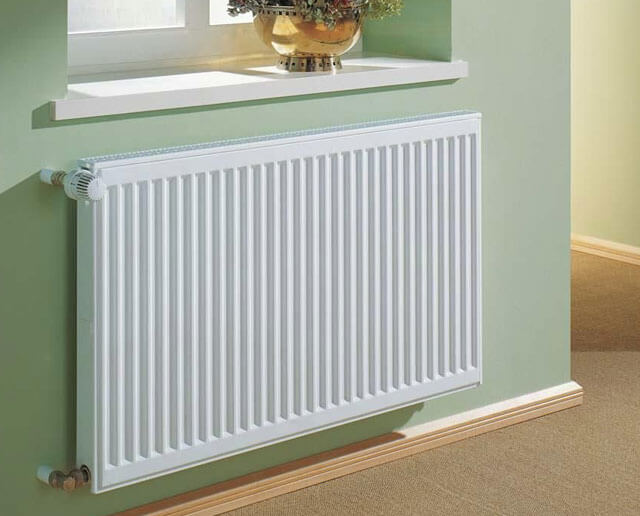
Steel batteries are available in several configurations - they can be tubular or panel. In this regard, the holder for the heating radiator must be selected individually, based on the type of fixation.
To mount panel heating batteries on the wall, special brackets are produced that look like metal corners. One wing of the wall bracket for the heating radiator is fixed to the wall with anchors, and the other is equipped with special hooks for hanging the battery. On the panel-type radiator itself, there are brackets with which it is attached to the hooks.

Some models of steel panel radiators do not contain mounting brackets, so they are mounted on vertical strips with clips. Since these batteries are lightweight, this type of mount is quite acceptable.
Tubular steel radiators are attached in a slightly different way. Due to the low weight of the structure, only 2 upper supports are enough to fix it. At the bottom of the radiator, plastic clips are installed, which abut against the wall to hold the battery in an upright position.
Selection of brackets for radiators
When choosing fasteners that will be used when installing heating batteries, it is necessary to take into account some features of both heating devices and the premises in which they will be installed. By design, the radiator brackets can be designed for mounting batteries on straight and corner wall sections. Their shape (degree of curvature and structure) must correspond to the configuration of sections of different types of batteries. Radiator brackets also differ in the material of manufacture, which directly affects the maximum permissible loads:
- for heavy cast-iron structures, fasteners must be massive, durable, made of high-quality steel;
- for less massive aluminum and bimetallic products, more elegant radiator brackets made of durable light alloys are quite suitable.
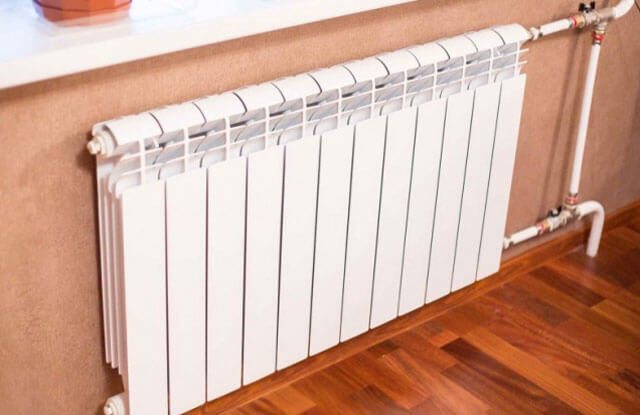
Fixation of bimetallic and aluminum batteries
If we talk about the mass of bimetallic and aluminum radiators, then in this parameter they are almost identical.Therefore, the bracket for a bimetallic radiator can be successfully used to mount an aluminum battery.
A fastener of this type practically does not differ from a stand for a cast iron radiator. The only difference is the lower bearing capacity. As a rule, such clamps are universal corners, one side of which is fixed to the wall, and the other contains recesses on both sides. This configuration allows such fasteners to be mounted in any direction.
It is noteworthy that bimetallic and aluminum batteries do not initially provide for the possibility of floor mounting. However, it is not possible to attach radiators to surfaces such as glass, drywall or sandwich panels. In this case, a floor bracket for aluminum radiators is used, similar to the stands for cast iron batteries.

How to hang a radiator on a bracket
Installing a bracket for a cast iron radiator
The mounting methods for the radiators differ depending on the type of battery selected. Each option has its own step-by-step instructions.
Often cast iron radiators installed under the window. This makes it possible to achieve correct air circulation throughout the room.
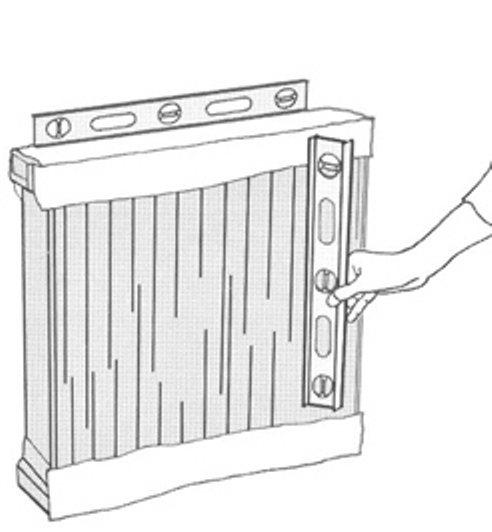
- First of all, they are determined with the points where the fasteners should be installed. The bracket for the cast-iron radiator should be located exactly in the place where the sections of the cast-iron radiator are connected to each other.
- The bracket for cast-iron batteries is fixed 2-3 mm above the center of the section of the heating inlet pipe into the battery. All fasteners are installed in the same way.
- The lower holders are installed using the same technology.
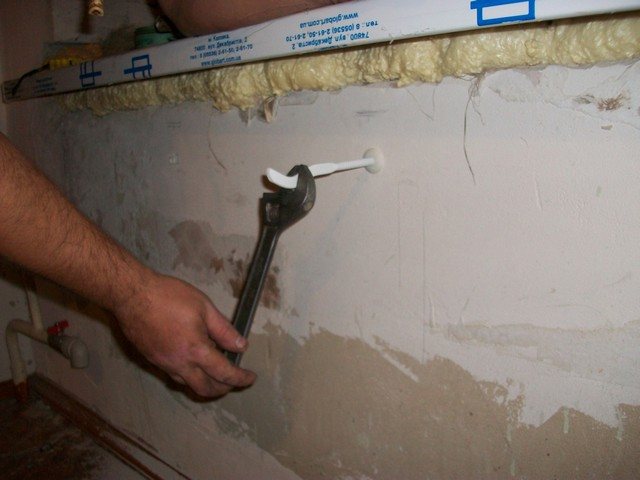
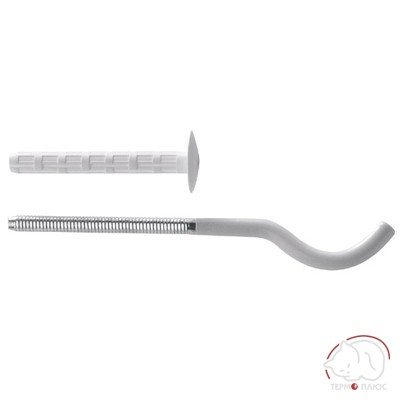
- In order for the brackets to have a tight adhesion to the wall, it is necessary to pre-drill a hole of the required length with a diameter 1-1.5 mm less than the thread diameter of the fastener.
- Dowels are inserted into the prepared holes, into which threaded brackets are subsequently screwed in.
- After making sure of the reliability of the installed elements, the cast-iron radiator is hung. After it sits securely in the grooves, you can start to solder the communications for heating.
Bracket for fixing sectional radiators to the floor
Steel batteries mounted on wall and floor brackets. Such work is carried out in stages.
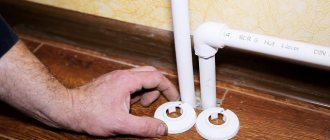
- Holes are prepared and self-tapping screws are screwed into them. The gap between the cap and the wall should be 3-5 mm.
- Next, the brackets are hung on the wall, after which the screws are screwed in until they stop.
- The radiator is being hung on the wall brackets.
- The floor clamp is installed and matched to the battery.
After installing the battery, the pipes and additional elements of the radiator - thermostats, regulators - are soldered.
In private houses, steel radiators are usually installed on long metal brackets. They are designed for top and bottom fixing at once. Installed on the wall with self-tapping screws.
Attaching the bracket for the aluminum radiator to the wall
Have aluminum batteries there is a special holder directly on the case. Brackets are often included. To hang the radiator on the wall, you must:
- Measure the center of the window and align it with the center of the heater.
- Draw borders with a simple pencil on the wall in accordance with the dimensions of the structure.
- Step back two sections from the edges of the battery, mark the distance taken and transfer it to the wall from the drawn border of the radiator.
- Drill holes in the indicated places, and then fix the brackets in them.
- After that, batteries are hung and switched to the general heating system.
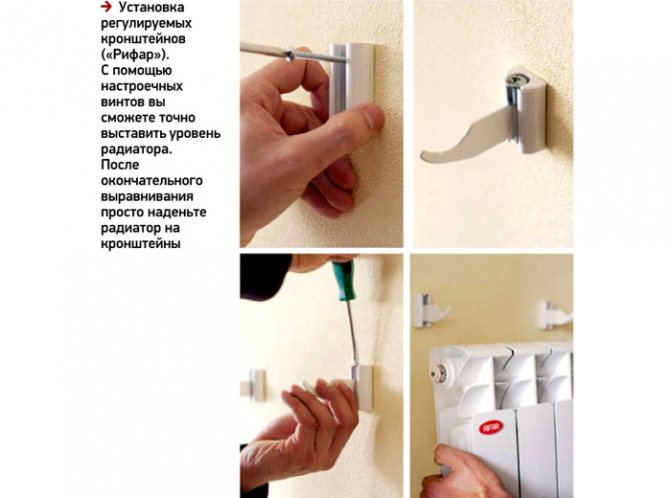
Before installation bimetal radiator such brackets must be installed on the wall that will support the weight of the heating structure. It is important to follow the following rules here.
- The distance from the radiator to the wall must be at least 50 mm.
- The structure is hung with a slight forward slope, respectively, and the mounts are installed in a similar way.
- The plugs must be exactly at the same level as the pipes in the system.
The slope is made so that airflow does not occur in bimetallic radiators. In this case, the installation principle remains the same as for other batteries.
Work technology
The owners of private houses can replace radiators at any time convenient for them. To do this, you just need to turn off the boiler and drain the water from the heating circuit. But in the apartment of a multi-storey building, the replacement of the radiator will have to be coordinated with the service utility organization in advance.
If all installation work is carried out in the summer, when the heating is turned off, there will be less difficulties. However, you still have to clarify whether the water was drained from the system or not.
Please note that many experienced locksmiths advise replacing radiators just in the conditions of a working central heating. This is done because when the coolant is supplied to the circuit under pressure, you can immediately check the operability of the radiator - if the installation was performed incorrectly, leaks will occur.
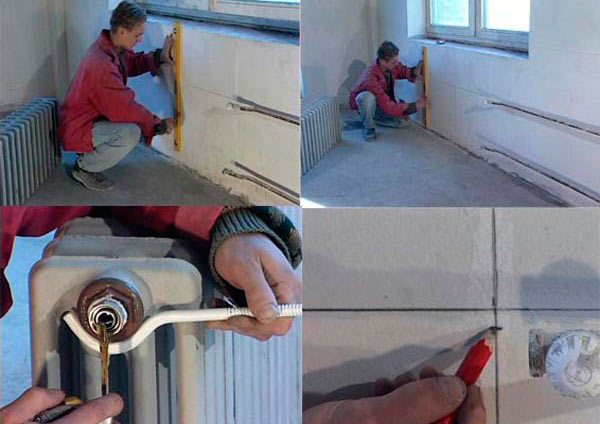
The efficiency of their work will depend on how well the radiators are fastened to the floor or to the wall. The fasteners must be installed absolutely evenly, as in case of skewing, problems can arise when connecting the system.
Using the tools at hand - a pencil, a level, a plumb line and a tape measure - perform the initial marking. Mark the central axis of the window, which should coincide with the middle of the radiator. A horizontal line is drawn through this point along which the upper supports will be attached.
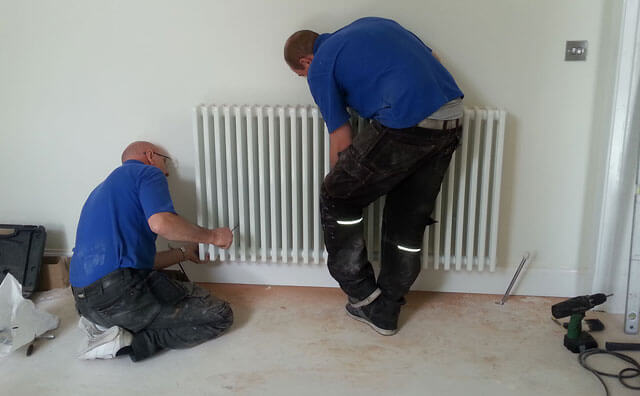
In cases where there is only one lower support element, it is mounted on the central axis. If there are several of them, another horizontal line is drawn parallel to the upper line. After marking, start drilling holes and mounting brackets.
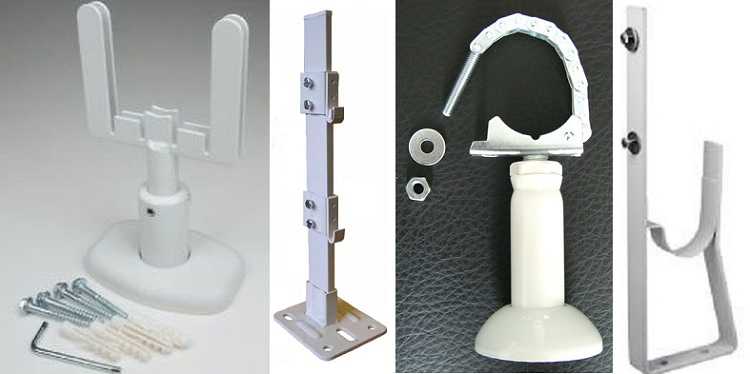
Types of holders
Hooks on a steel bar.
The procedure and rules for installing batteries do not depend on their type, only the type of holders changes.
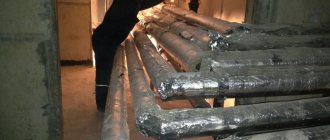
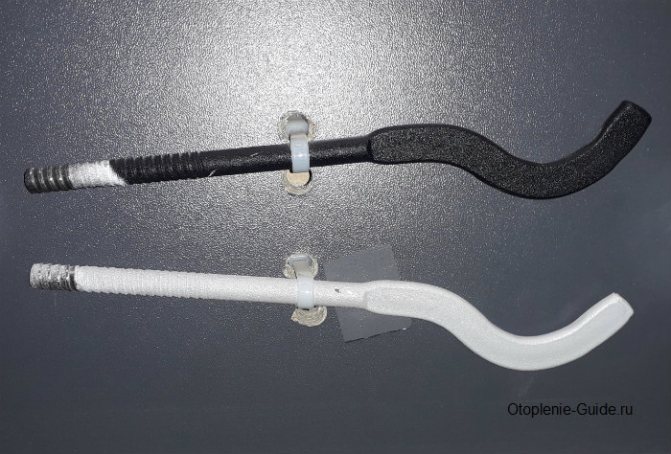
Cast iron radiator supports
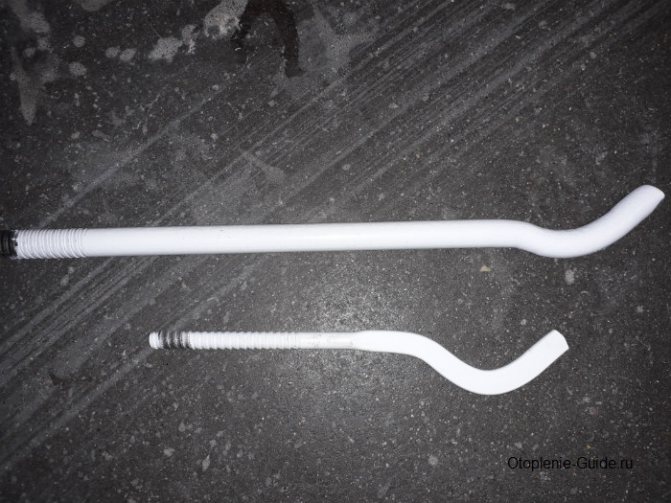
The mountings for cast iron heating radiators are the thickest and heaviest, because must hold a lot of weight for years. These curved pins or flat hooks are manufactured separately or attached to a steel bar in 2-3 pieces.
Products are not painted or white (standard) coating is applied to them. Other colors can be selected to order.
The most common such mount is for cast iron radiators.
The photo shows a steel pin holder.
- Cast iron pin holders.
- Adjustable steel legs. They make it possible to change the gap between the wall and the radiator, at the same time trimming the battery horizontally and in height.
- Steel pin brackets.
- Holders grouped on a metal strip.
Note! Consider the dimensions of the supports before purchasing. They are made for fastening sections with different depths. In any case, the holder must provide a gap to the walls of at least 30-50 mm.
In addition to pin brackets for batteries, hooks are made of cast iron. They are completed with dowels. The product is mounted as follows: a hole is drilled into which a plastic dowel is driven. A holder is screwed into it, which has a thread on one side.
Brief instructions for installing brackets.
In addition to wall fixing, there is also a cast iron floor installation with the help of legs. Their price depends on whether their height can be adjusted or not.
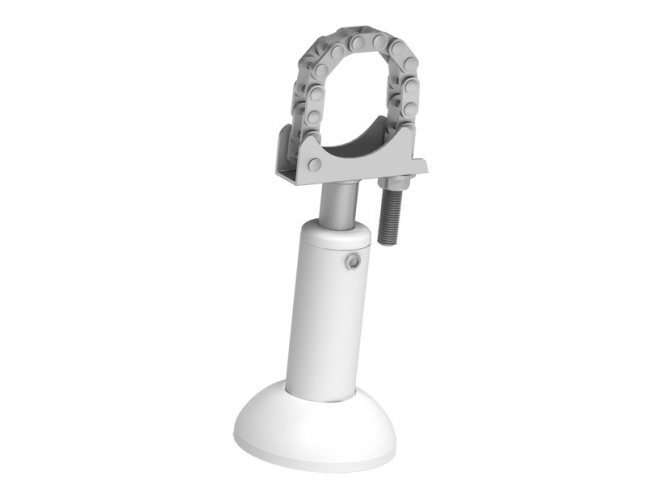
The upper arcs, which fasten the sections to the support, also differ. They are made of steel wire or have the form of a chain of movable conjugate links.In any case, the radiators are fixed to the stop with bolts and arcs.
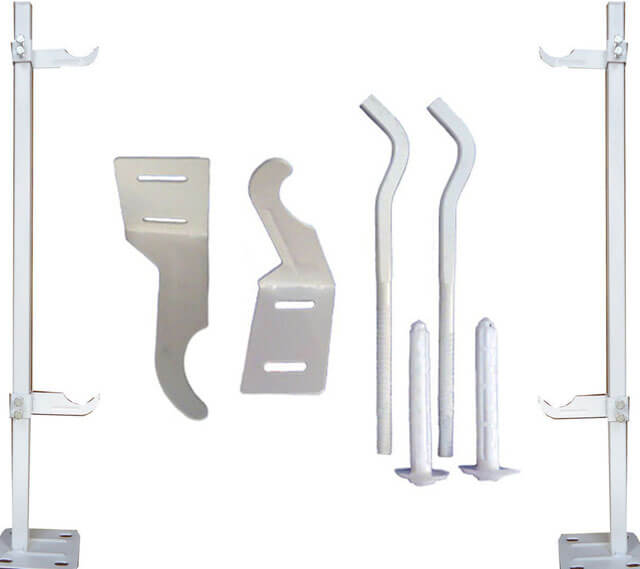
Fasteners for bimetallic and aluminum batteries
Universal holder for bimetal and aluminum.
The mount for aluminum radiators and bimetal is similar to the counterparts for cast iron, but is made of thin metal.
- The most popular corner universal holders for both types of devices. They are equipped with collector recesses at the top and bottom. Thanks to this, they can be attached to both the left and right.

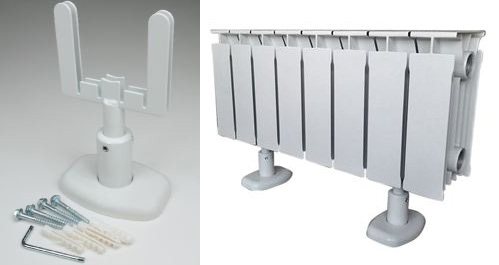
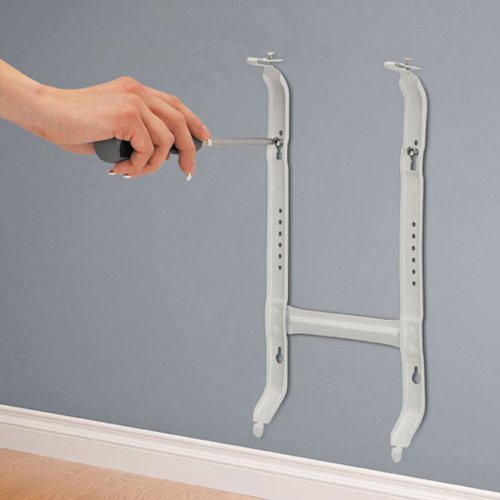
Floor stands.
- Legs for bimetal and aluminum are not produced. But they produce racks that allow for floor-standing installation of batteries. First, such a support is attached to the floor, then a radiator is placed and attached to it.
The use of floor stands is optimal when the walls cannot support the additional weight. For example, it is difficult to attach radiators to sandwich panels, glass, gypsum board.
Steel instrument supports
Standard mounting for panel radiator.
There are two types of such devices: panel and tubular counterparts.
They need different types of fasteners.
- Special brackets are welded to the back walls of panel batteries. With their help, devices are hung on brackets. Such a fastener for steel radiators has a special shape designed for brackets.
Note! When installing panel devices, you should carefully monitor the vertical placement of the brackets, because 4-6 shackles should hit the hooks exactly. It is necessary that the wall is absolutely smooth and even.
- Since the weight of the radiator is small, it will be enough to fix it on the brackets from above. You can put supports below, they will give it a horizontal direction. They cling to the staples with hooks and only abut against the wall.
- For greater reliability, the part of the fastening for steel radiators facing the wall expands.
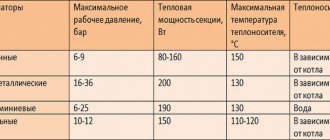
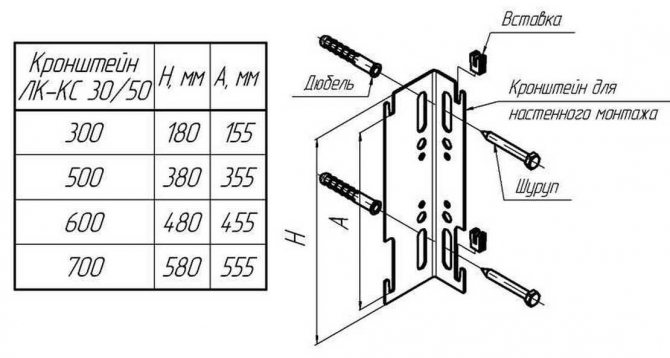
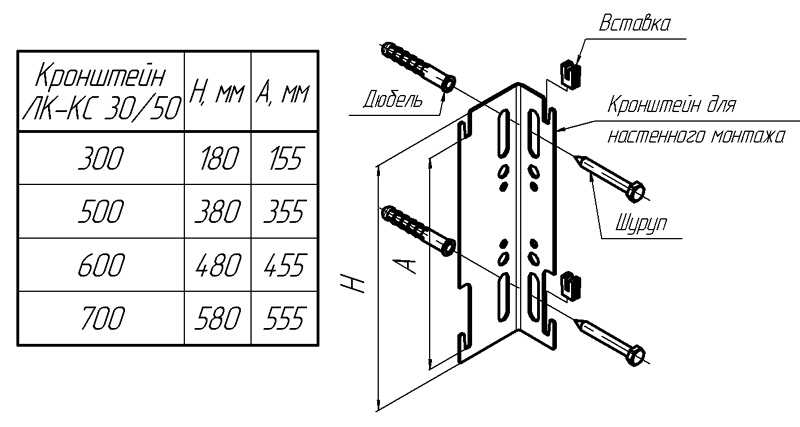
The table below shows the dimensions of the fasteners described.
| Bracket model | Length in centimeters | Overall height in centimeters (H) | Distance between bottom and top hook in centimeters (A) |
| LK-KS / 30 | 30 | 18 | 15.5 |
| LK-KS / 50 | 50 | 38 | 35.5 |
| LC-KS / 60 | 60 | 48 | 45.5 |
| LK-KS / 70 | 70 | 58 | 55.5 |
There are also special strips for simplified installation. These are metal strips with plastic clips on the bottom and top. With this method of fixing the brackets on the radiator are not needed. The strips are screwed to the wall, a battery is inserted into them, held by plastic hooks.
The bracket for fastening a tubular heating radiator is similar to a product for a sectional analogue.
It also consists of hooks, only of a different size, which are equipped with plastic pads.
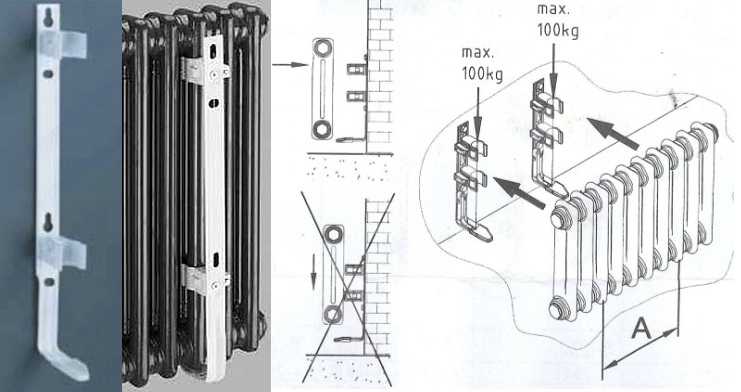
SMB mount.
- Manufacturers also produce a special SMB holder with tube grippers.
- This is a steel bar with plastic clips and a support-shelf for the battery at the bottom.
- Such fasteners can be used when the weight of the radiator filled with coolant is no more than 100 kg.
- Battery installation is extremely simple here. Install the device on a support, bring it up to the clamps. Those, clasping the nearest tube, snap into place.
There is also a second model for simplified installation - the SVD holder. It consists of two nodes. The first is fixed on the wall, the second on the battery. When installing the device, they are mated and connected with a steel loop.
Floor fixing of such batteries can be carried out using tubular stops welded already at the factory or stands with hooks. The device is hung on them, the stand itself for attaching the radiator is fixed to the floor.
Installation work
You can change the batteries in your own cottage whenever you want. There is nothing complicated here, turned off the boiler, drained the water and off you go. It is much more difficult to replace a radiator with your own hands in a city apartment, here you cannot do without coordination with utilities.
Of course, there will be fewer problems if the work is carried out during the summer season, when the heating is not yet working.But you still need to turn to locksmiths, because often the system is left full so that the pipes rust less.
Strips for quick assembly.
Advice: experienced craftsmen recommend changing the batteries exactly when the heating is running. In any case, you will have to pay for disconnecting the riser and draining the water, but in the heating season, the start-up will immediately show a leak if you make a mistake during installation.
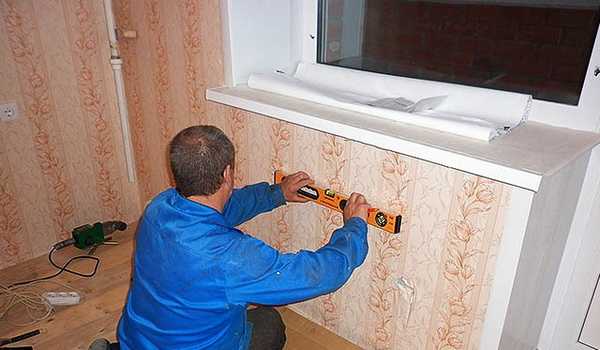
A high-quality installation largely depends on how to mark the mounts for the radiators, because the slightest misalignment will affect the operation of the battery, and can also lead to problems when connecting pipes. Fortunately, for this you only need a pencil, tape measure, level and plumb line.
Level check.
Initially, you need to clearly mark the central vertical of the window opening, as already mentioned, it must coincide with the center of the battery. Further, using a level, a horizontal line is applied, on which the upper support fasteners will be mounted.
If there is only one bottom mount, then it is installed on the central axis. If there are more of them, then you will also need to beat off the lower horizontal. All other actions are performed according to the above described scheme. Drill a hole, insert the dowel, fix the bracket.
Radiator installation.
The video in this article shows the intricacies of editing.