When building a country house, many are interested in the most important issue - heating the room. There are many different ideas on the market today, among which Devi's warm floor installation instructions occupy a serious niche. Today, the technology of underfloor heating is not new, but still not fully curbed, so many have not yet had time to get acquainted with all the advantages of the unique technology.
To order installation of underfloor heating Devi - call +7 495 205-205-2
The presence of a warm floor allows you to set the most comfortable temperature in any room: bath, bedroom, living room, etc. A wide range of heating cables and mats from the world famous Devi company allows you to choose a system exactly for any client's request. Now you can inexpensively buy or order underfloor heating not only for residential premises, but also for a garage, a drain, and so on.
Installation of electric floors
The most difficult is the installation manual for underfloor heating from separate Deviflex cables. However, this is only in comparison with the laying of mats. In fact, the installation is not much different from the usual laying of heaters under the screed.
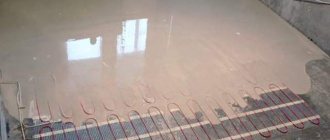
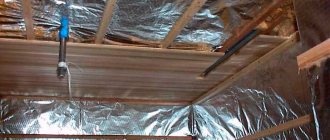
The subfloor should first be thermally insulated and laid with a foil-lined reflective film so as not to waste electricity on heating the floor slab and lower rooms. Alternatively, one layer of Penofol is suitable with gluing all seams with aluminum tape. But only if the neighbors "warm" your floor from below, otherwise you cannot do without an additional layer of thermal insulation.
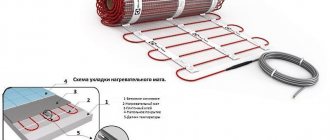
Further, the order of work with Devi will be as follows:
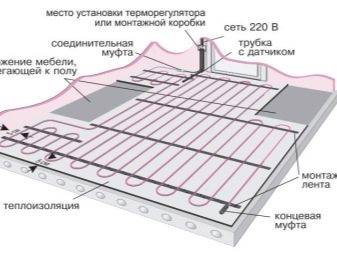
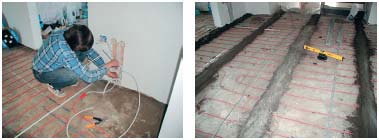
1. Metal mounting tapes are fixed to the floor in advance with a pitch of 200-250 mm - they will fix the heating cable in one position.
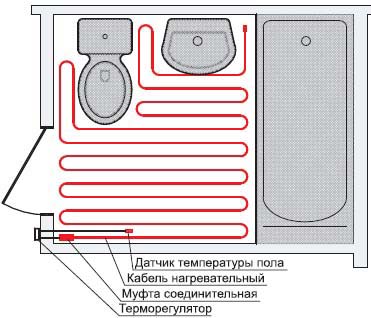
2. First of all, the temperature sensor is installed. Only then can the heating elements be laid.
3. Underfloor heating Deviflex is unrolled on the prepared base in even turns. Leave a gap of at least 50 mm between them.
4. Secure the cable with steel tapes. Thanks to them, the heat transfer of the system becomes more uniform, and the distance between the Deviflex turns can even be increased.
5. The last stage before pouring is connecting the temperature sensor to the cable and household network. It should be hidden in the corrugated tube, but not embedded in the floor.
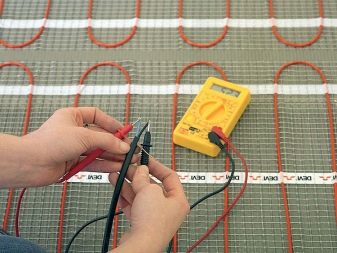
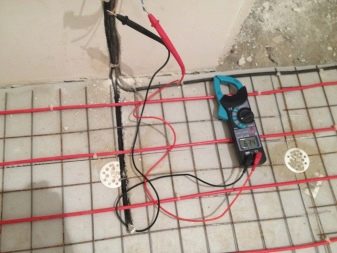
According to the instructions, it is forbidden to cut Devi heating elements, so carefully consider the choice of their length. Also, do not check the work before the solution finally hardens. The maximum that is allowed is to "ring" the installed line with a tester.
When installing a warm floor for filling and facing with tiles, it is necessary to take into account that building mixtures will undergo thermal expansion. Choose suitable formulations for this parameter. Before pouring the screed, do not be too lazy to take a photo of the Devi system and apply approximate dimensions. Customer reviews indicate that it will be useful to know for the future where exactly the cable runs under the concrete.
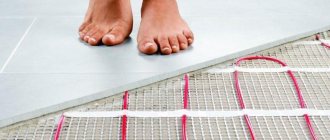
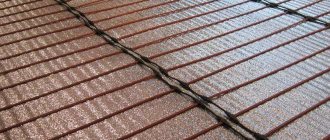
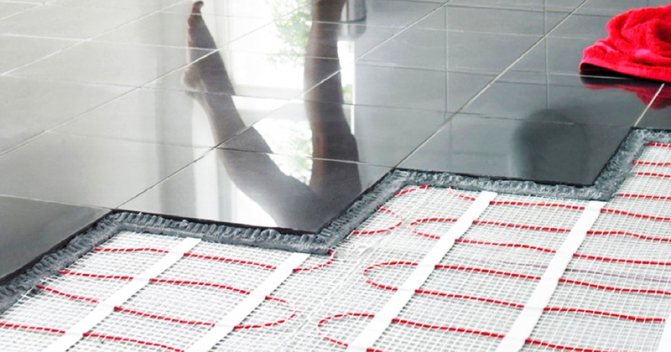
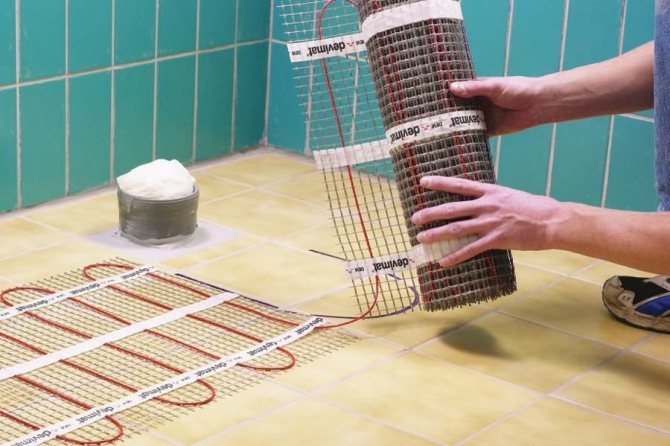
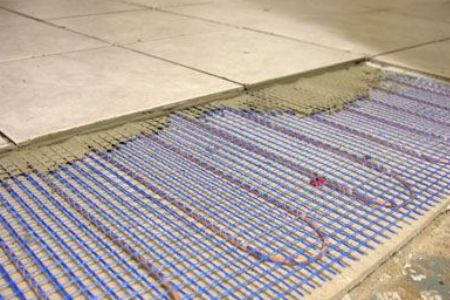
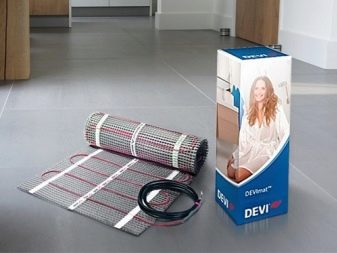
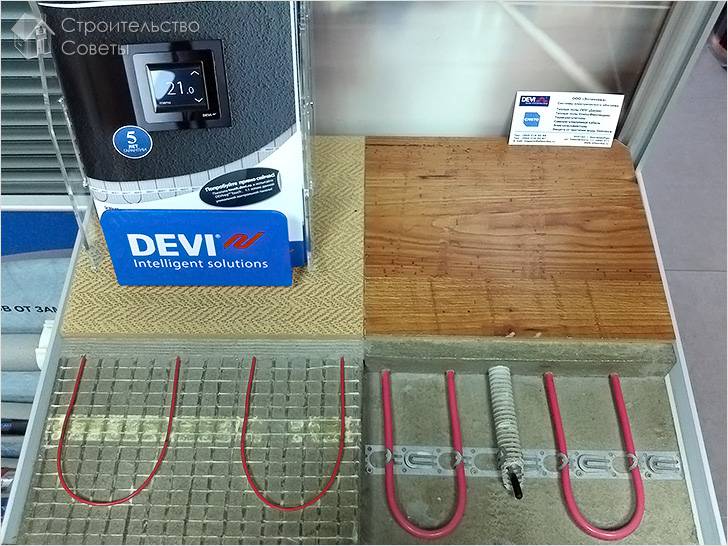
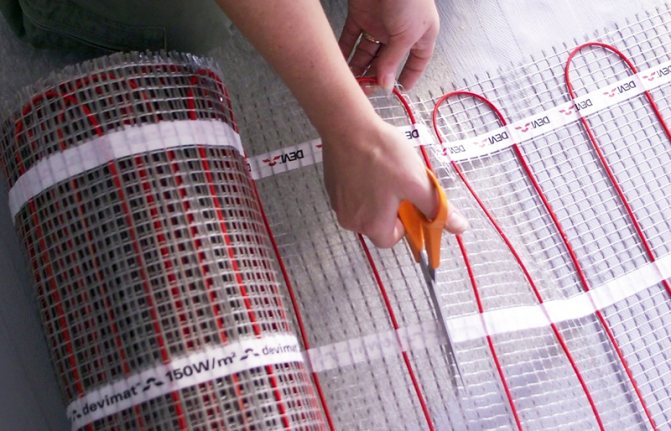
Heating mats
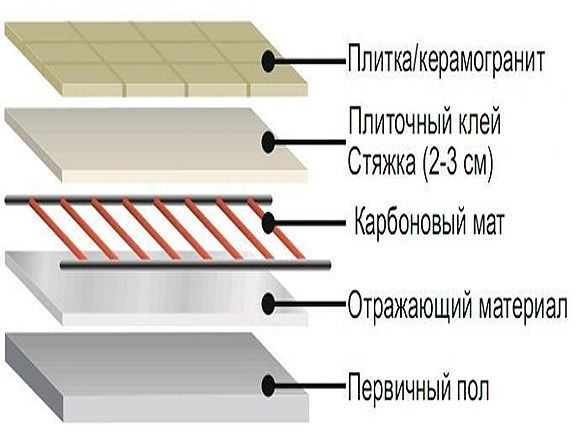
For the equipment of the heating system in the premises, it is recommended to install heating mats. They are thin, 3 mm. A single-core or two-core cable is fixed on the surface of the mesh made of heat-resistant plastic.
An adhesive layer is applied on the base of the mat, which makes it possible to quickly carry out installation work. Mats are laid on any surface: on wooden logs, concrete screed, on old tiles.
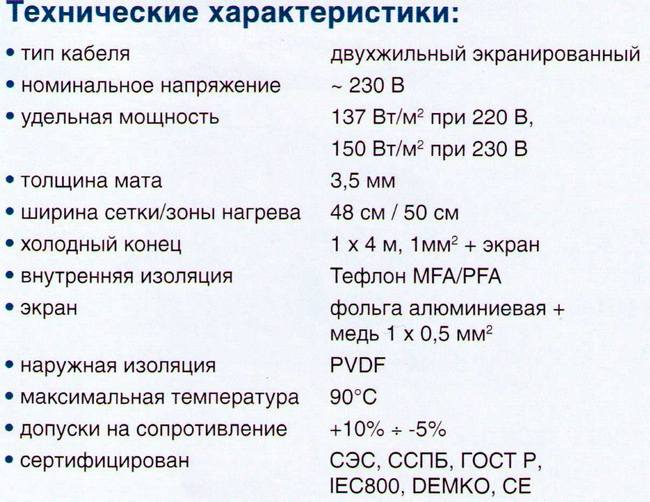
- "DEVImat" has a power of 150 W, operates from a voltage of 230 V. The product is used in rooms with any temperature regime and humidity.A two-core cable is located on the mesh with a snake.
- DEVI mats have one more modification - DEVIheat DSVF 150 S. The system is manufactured with a single core cable. Two cold ends of the conductor are connected to the thermostat. The system is not recommended to be laid under the screed. Tile adhesive is used for the heater. The mats are suitable for installation on wooden joists. Cable diameter 2.5 mm; suitable for thin floors. The system is placed under the laminate.
- "DEVIcomfort DTIR-150" - equipment power 150 watts. A two-core cable is attached to the mats. Devimat operates from 220 watts. It is recommended to lay the mats under the ceramic tiles. A layer of tile adhesive no more than 2 cm.
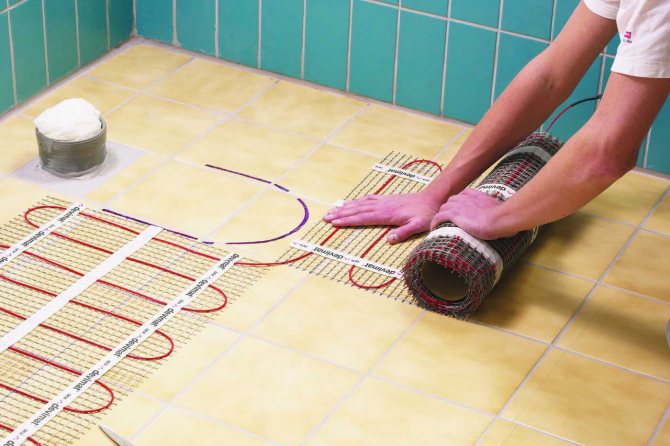
The mats are placed on the surface with the cable facing up. The net should be fully extended. Thanks to the adhesive base, it adheres well to the floor. Additionally, you can strengthen it with tape. If there is a need to turn the mat, then cut the mesh, do not touch the cable. It is not recommended to violate its integrity. The product is turned by 1800 and installation work is continued.
The bending radius of the cable should be equal to 6 conductor diameters. The distance between the turns is maintained at 2-4 cm. A thermal sensor is placed on the mesh between the turns of the conductor. The wires from the mats and the sensor are connected to the thermostat. They are preliminarily placed in corrugated tubes.
Since the mats are designed for thin floors, the system is vulnerable to mechanical stress. Heating is established only on the usable area of the room. According to the instructions, it is not recommended to lay the system under cabinets and a sofa, which fit snugly to the floor.
Locking of the cable may occur. Carpet or carpet is not laid on the warm floor. Ceramic tiles are used as cladding.
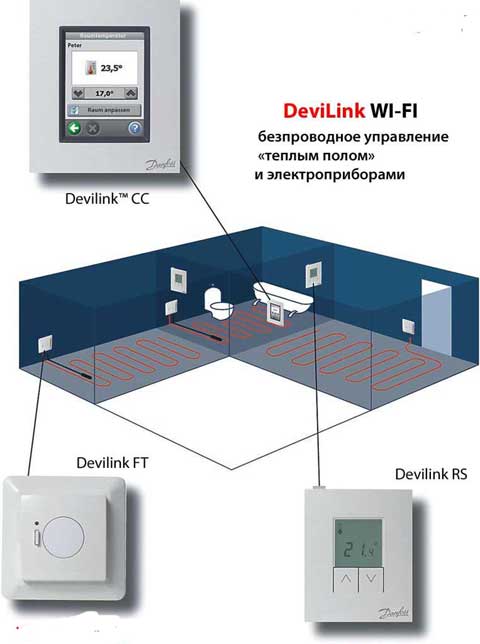
It will take time to warm up the systems, up to 48 hours. In order to always have a comfortable microclimate in the house, it is recommended to connect the sensors to the software and control the heating system through a computer. DEVI has a representative office in Moscow and other large cities throughout the CIS.
YouTube responded with an error: Access Not Configured. YouTube Data API has not been used in project 268921522881 before or it is disabled. Enable it by visiting https://console.developers.google.com/apis/api/youtube.googleapis.com/overview?project=268921522881 then retry. If you enabled this API recently, wait a few minutes for the action to propagate to our systems and retry.
- Similar posts
- Features of underfloor heating made of metal-plastic pipes
- How is expanded polystyrene used for underfloor heating?
- Features of the system "combined heating: warm floor and radiators"
- How to assemble a Valtec underfloor manifold?
- How to install a warm floor without a screed?
- What is a mobile floor heating?
Installation
Thermostat for underfloor heating
The principles of installation work for some categories of underfloor heating are briefly described below:
- For a heating cable, the installation principle is quite simple. Installation is carried out by the snake method into the floor screed, then the connection to the temperature controller is performed. When plugged into the network, the cable heats up, which leads to the appearance of heat in the premises. The heating time is rather short, which allows you to get a warm, comfortable floor in a short time interval.
The most common option at the present time is the self-regulating version of the cable, due to which heat is accumulated.
- The installation of the heating mat is not too difficult, as well as its adjustment. You need to connect the mat according to the scheme provided by the manufacturer. To do this, you need to roll out the roll onto the base and connect the cable to the socket, which has a temperature controller. This option is considered the best for tiles, because it can be laid directly on the cable system.
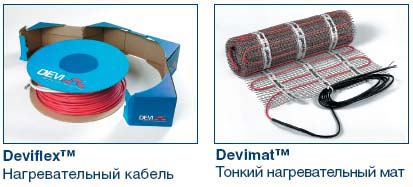
Types of underfloor heating Devi offered by the manufacturer
A review of such products should begin with their varieties according to the method of installation. It is worth clarifying right away that only electrical products are produced under this brand. There will be no talk of plumbing systems today.
According to the method of installation, the warm floor "Devi" can be divided into a heating mat and a cable system. Let's consider them in more detail.
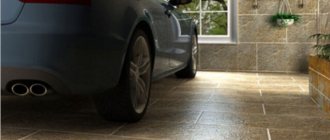
Underfloor heating can be installed under any surface PHOTO: keromax.ru
Installation of underfloor heating devi
How to choose a thermostat for a warm floor
The technology of underfloor heating is quite simple, and therefore, the installation can be done independently. Otherwise, if there is no experience in such matters, then it is better to call a specialist who can carry out a high-quality installation of a Devi warm floor, thereby ensuring the maximum efficiency of the system during its operation.
Several popular mistakes that occur when installing a warm floor:
- When planning, the area that will be covered with furniture and household appliances is also taken into account. When developing a scheme for the further installation of a warm floor, it is necessary to take into account only the area that will be in the public domain. If the furniture is without legs, and under it there will be a warm floor, this can disrupt heat regulation, which will lead to overheating of the heating cable and failure of the entire system;
- The branded cable has a certain length. If the cable was chosen longer than the required size, then later it will not be possible to shorten it, since this is prohibited by the instructions for the underfloor heating technology;
- The first test of a warm floor can be carried out only after the screed and the mortar that was used for laying the cables have dried;
- Before installing the underfloor heating, it is recommended to thoroughly clean the surface, and, if necessary, priming the base, which will allow you to achieve an even floor level;
- It is forbidden to walk on the heating cable in solid shoes, as it has a small tensile strength;
- The temperature sensor should be installed in a corrugated pipe. It must be remembered that it must be freely available, and therefore it is strictly forbidden to hide it under the wallpaper, and even more so to fill it with concrete;
- When installing a warm floor, from the very beginning to the end of the installation, the resistance indicator is monitored. The results obtained must be verified with the data in the system passport. Consumption between indicators should not be higher than 10%;
- The warm floor is insulated without air gaps. Their presence can disable an individual cable or system completely;
- It is strictly forbidden to turn on the warm floor, thinking that this will help speed up the drying of the heavy. In almost all cases, this leads to a breakdown of the warm floor.
Features of the device of Devi systems
Devi merged in 2003 with the largest Danish manufacturer Danfoss and from that time began to specialize in the development and production of electric underfloor heating systems. One of the best achievements of the company is devimat, although the quality level of the cable heating system is no less. Devi is distinguished by the use of two unique developments - the Deviflex cable and the devi thermostat for underfloor heating.
Warm floor devi mat
The heart of any heating mat is a cable (one or two cores). And Devi has never once allowed to doubt their reliability and safety. And this is despite the fact that they are presented in the company's products in different versions of insulation, different thicknesses and sizes. Various methods and materials are used to shield them.
The manufacturer cares about its consumers and one of its main goals is to simplify the organization of underfloor heating as much as possible. Since 2006, Devi has been producing mats based on an advanced self-developed self-adhesive mesh made from synthetic raw materials. This development was a complete triumph for Devi, as the installation of the mat became simple and reliable.
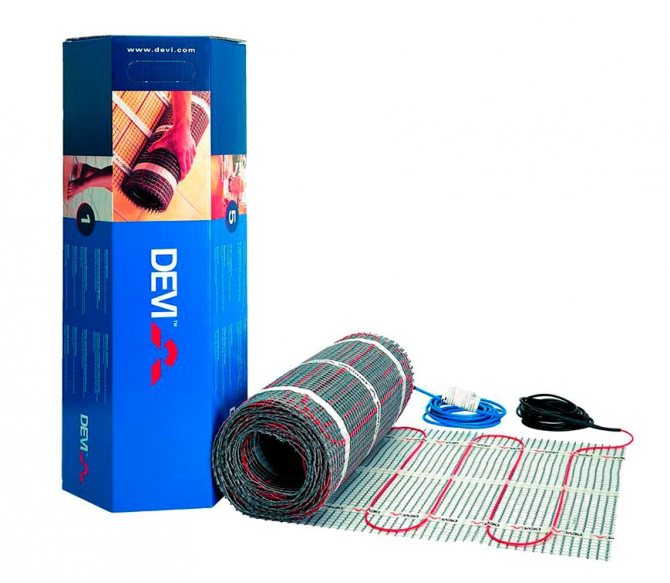
Today the following Devimat models are most in demand.
Models DTIF-150 and DTIR-150 - have a thickness of up to 4 mm, so they can be installed on an existing floor covering. Their design includes a two-core cable that is fixed to the Devi mesh. Most often, it is mounted under a tile, porcelain stoneware or stone.The small thickness of the product is not a hindrance to this, since the high-temperature Teflon, from which the insulation is made inside, provides it with high mechanical strength.
The outer shell of the DTIR is made of PVC and reliably shields the mat over the entire surface. For DTIF shielding, fluoroplastic is used, so these models are more expensive.
The main functions of the underfloor heating thermostat
Thermoregulator for water underfloor heating
The system under consideration consists of a thermostat and a special temperature sensor. This sensor is installed in the required location. It is installed using the supplied corrugated mounting tube. In the case of a warm floor, it is placed in an ordinary cement-sand screed.
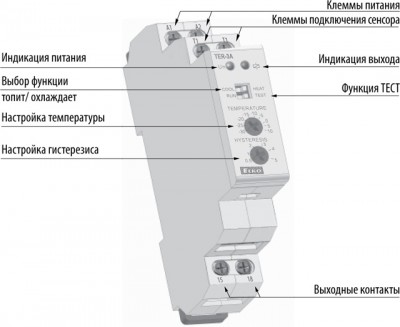
Selecting functions on the thermostat
Most often, such devices are equipped with underfloor heating systems that work with a heating cable. Thermostats are commercially available that can be programmed. This allows additional energy savings.
Thermostat for underfloor heating
For example, the user can program the thermostat so that in the absence of tenants, the system will operate in the minimum mode, and shortly before they return, it will switch to normal operation in order to have time to warm up the room to the required level.
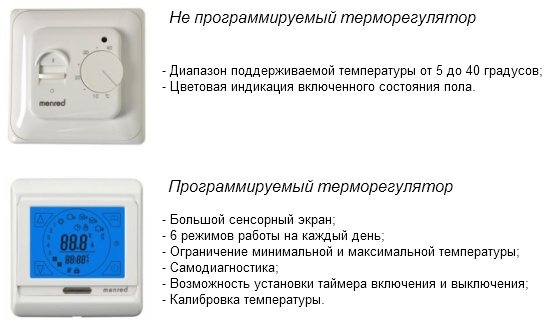
Types of thermostats
Programmable thermostats are more expensive than their non-programmable counterparts, but, as practice shows, the existing price difference pays off in no more than 1-2 seasons.
Advantages of Devi warm floors
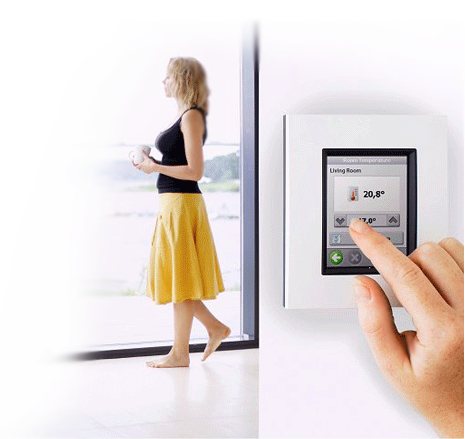
You can turn on each room separately - control is carried out via a PC
Warm electric floors by DeVimat have many advantages and stand out from analogues from other manufacturers. Customers note their improved characteristics, quality of materials, ease of use and during installation, durability and maximum reliability. The list of the main advantages of the system includes:
- the ability to evenly warm up the entire area of the room during one heating cycle;
- savings on electricity due to thermostats, which allow you to save up to 25% of the total amount of payments in the cold season;
- the ability to use the system at any time, regardless of the operation of centralized heating;
- combination of the system with any type of floor covering;
- the ability to warm up both the entire room as a whole, and a separate zone;
- the most simple installation;
- no additional costs for system maintenance.
The system is suitable for all types of interiors as it is completely hidden under the floor. It does not violate the style of the room and can be combined with all types of floor coverings.
How to choose
Below are a few rules for choosing a warm floor:
- When buying an electric heating element, you should pay attention to the compliance of this brand with the floor covering, under which the warm floor will be laid. It is not difficult to find out: you need to pay attention to the pictograms indicated by the manufacturer on the packaging.
- The power of the heating elements is also an important factor. There is a relationship between the flooring and this indicator. It is necessary to consult the seller.

- Indoor wiring. It is important to know here whether the existing wiring can additionally take the load from the warm floor.
- Calculation of the required power. To do this, you need to know the characteristics of the building, glazing zones and much more.
- Manufacturing firm. The emphasis should be on branded products: even if they are more expensive than analogues, the consumer will be calm about the quality of the product. After all, such a system should last for several decades.
Tile selection
When choosing a tile for a warm floor, you should pay attention to the following characteristics of the material, which the instructions contain:
- Hardness. For residential premises, 5-6 hardness classes are sufficient.

Underfloor heating device for tiles - The degree of wear resistance.This indicator characterizes the resistance of tiles to abrasion and scratches. For rooms where they do not wear top shoes (toilet, bathroom, balcony), the second class is enough, and for the hallway and kitchen, the fourth or fifth class is needed.
- Water absorption. For the bathroom, it is better to choose tiles with a low rate, and for the kitchen, up to 6% is allowed.
- Chemical resistance. It is important for the bathroom and kitchen.
- Porosity of the material. For a warm floor, it is necessary to select dense tiles.
Cannot be used for underfloor heating such coatings as bamboo parquet, carpet and classic wooden parquet.
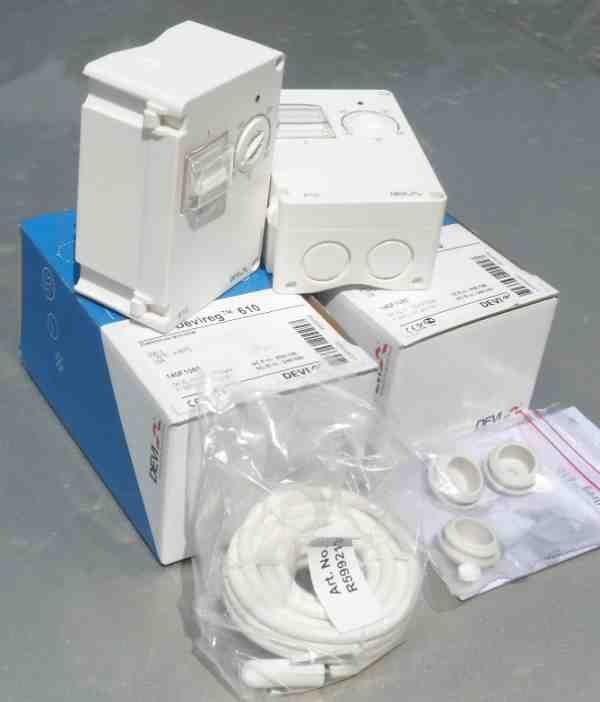
Devireg D 610 connection
To connect the D 610 regulator, you need to unscrew the two screws for a Phillips screwdriver on the upper (front) housing cover.
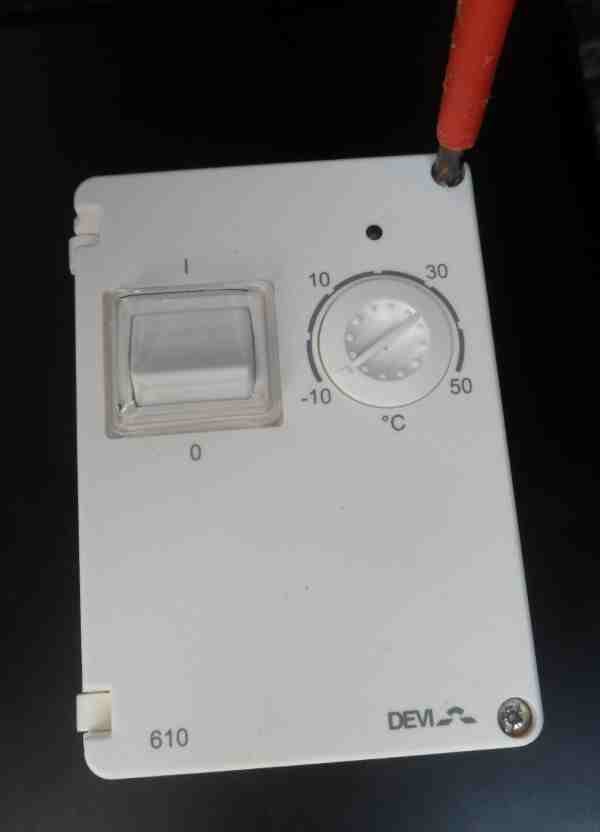
The front cover opens easily, but it is strong, like an armored front door, and the regulator itself resembles a small safe.
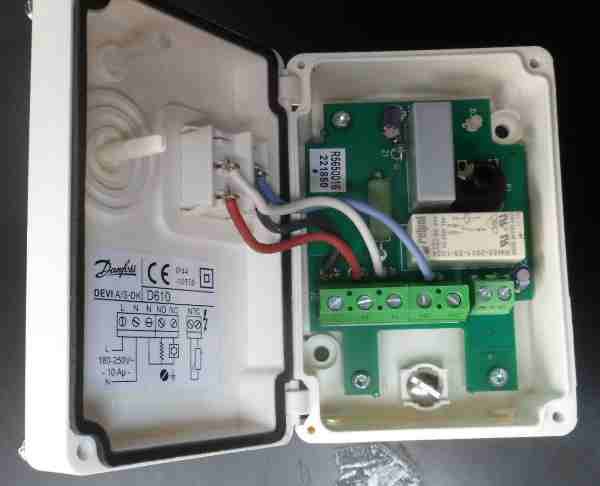
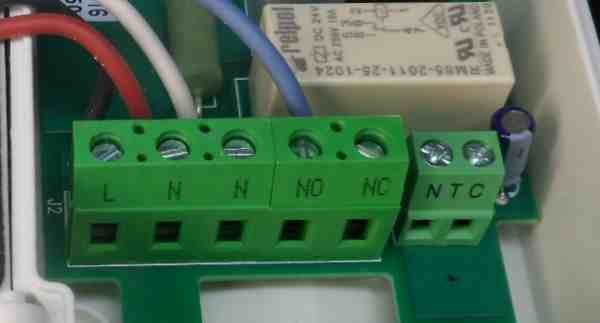
The connection of the load conductors, temperature sensor and 220 Volt power supply is carried out to the terminal blocks, they are marked with letter markings "L", "N", "NO", "NC", "NTC". According to the electrical diagram given here, the wires are connected as follows:
1) To control heating systems (underfloor heating, electric heating systems, heating cables):
- the wire supplying 220 Volt power is connected to terminals "L" and "N" ("L" - phase, "N" - working zero);
- heating cables are connected to terminals "NO" (normally open) and "L";
- a temperature sensor is connected to the small “NTC” block.
2) To control cooling systems (air conditioners, ventilation):
- supply wire, 220 V is connected to terminals "L" and "N" (phase to "L", working zero to "N");
- the cooling system is connected to the "NC" (normally closed) and "L" terminals;
- a thermal sensor is connected to a small block "NTC".
The braided shield from the heating cables and the shield from the cooling systems are connected to the grounding conductor of the supplied power (yellow-green wire).
After connecting and installing the front panel in place, do not forget to make sure that the jog wheel is in place and has full stroke from -10 ° C to + 50 ° C.
It will also be useful to recall that all connections and electrical connections can only be made by qualified electrical personnel with an electrical safety group of at least 3 to 1000V as repair or operational-repair personnel.
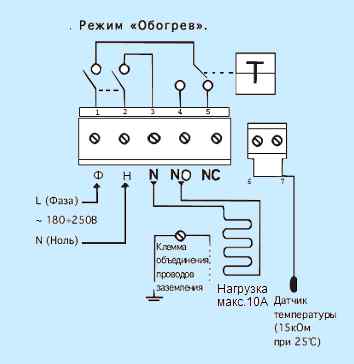
Connection diagram
General installation trends
When performing work under the screed, it is necessary to first clean the future surface of furniture sets, floor lamps, etc. Then dismantle the old floor covering. With the help of special beacons, mark the future foundation, having determined the zero level, if necessary, restore the difference in heights with 2-3 layers of cement mortar. After complete drying, seal cracks and seams. Remove excess debris and prime the surface. Having spread the insulation around the entire perimeter of the future system and gluing the joints with construction or assembly tape, the laying mesh should be laid out on top. If you have not added the location of the temperature controller to the installation diagram, then be sure to do it at this stage.
Arrangement and connection of the temperature controller is carried out before laying the electrical cable!
Next, we place the cable on the laying grid with a step of 250 mm. It remains to cover the entire area with cement mortar prepared in proportions of water, sand and cement 3: 2: 1. We place the topcoat no earlier than 5 days after the previous point has been completed.
Errors when installing DEVI underfloor heating
Despite the fact that the installation of underfloor heating (and heating mats for tiles and heating cables in the screed layer) is not an extremely difficult process and simple adherence to the installation instructions will allow you to enjoy the comfort of a warm floor for many years, many working roofing felts by virtue of their own carelessness, roofing felts from the "big" mind make mistakes, from which the client then suffers.Unfortunately, failure of a heating mat or cable is fraught not only with the installation of a repair sleeve on the heating element, but also with the loss of one or two expensive floor tiles, which have to be broken to get to the place of cable damage. And who knows, maybe this collection of tiles has already been discontinued?
Here are the most common mistakes made by installers when installing underfloor heating (not only DEVI, but also from other manufacturers).
- A common mistake when installing a heating mat is when the cold end (the power cable that goes to the regulator in the wall) is not removed into the gouged groove in the screed, with a smooth transition from the wall to the floor, but simply thrown from above onto the screed. The wire at the wall-floor junction sticks out, and when laying the tiles, the tiler cuts or damages the supply wire of the heating cable with the sharp edge of the tile, breaks the external insulation, lowering the insulation resistance, which eventually leads to the failure of the entire heating element.
- A common mistake when laying heating mats in the kitchen is to move away from the kitchen furniture. When laying a warm floor, as a rule, an indentation is made from the walls of 10-15 centimeters. This is done to reduce the heating area and is permissible, since, as a rule, no one is standing close to the wall. However, it is completely wrong to make such an indent from the kitchen (cutting table, sink, hob, etc.) in this case, the person stands exactly close to the furniture and, the heels are in a warm zone, and the toes feel all the coldness of the tiles near the cabinet. This causes discomfort. The heating element should be positioned along the line of the kitchen cabinet work wall.
- When laying tiles, craftsmen sometimes damage the outer insulation of the heating element. If any damage occurs to the heating cable, its outer sheath, and even more so to the screen or cores, do not wrap this place with electrical tape. Over time, especially quickly in humid rooms, the heating cable will begin to deteriorate, its insulation resistance will decrease and, in the best case, the protective automatics will start to work. In the worst case, the heating cable will burn out and you will have to break the tiles when the repair is finished to install the repair sleeve. It is better to immediately contact a specialized service that will install a repair heat-shrinkable adhesive sleeve with a quality guarantee. The cost of such repairs is much lower than the subsequent search for the place of damage and repair. And it's almost impossible to buy one or two tiles to restore the floor after repair (especially if several years have passed since the release of the batch). It is optimal to preserve several tiles of different patterns after repair, since damage to the heated floor when installing door stoppers, trimming tiles in place, and also completely eliminating factory defects.
- It is necessary that during laying the junction of the heating cable and the "cold" (supply) wire should be laid flat. Do not allow the heating cable to turn sharply immediately after the bushing. During the operation of underfloor heating, permanent deformation of the outer sheath of the cable occurs. As a result, after a few years, with constant mechanical stress at the junction at the turn, the internal heating conductors can simply be pulled out of the bushing sleeves, which leads to the failure of the heated floor.
- If you need to drill a hole in the floor where the heating element is installed, it is better to call a specialist with a thermal imager, who will accurately indicate the location of the cable so that later expensive repairs are not required.
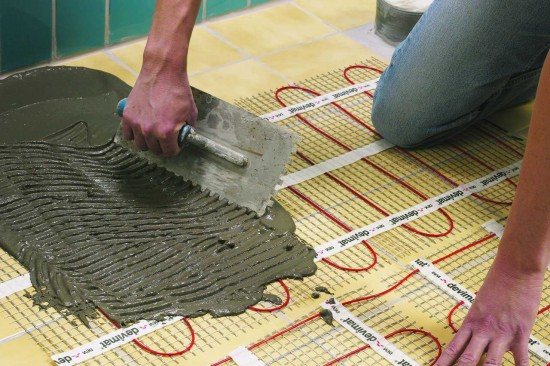
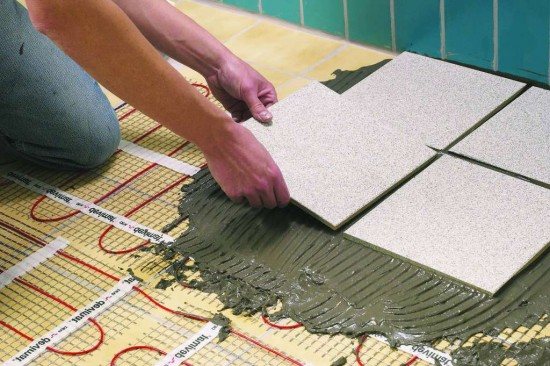
Laying tiles on a warm floor
Tile adhesive is diluted according to the instructions in small quantities. 2-3 liters is enough. It is picked up quickly, and the work is specific. The mats manufacturer recommends keeping a 5 mm layer of adhesive over the cable. That is, taking into account the thickness of the mats themselves, 3 mm, in total it turns out that 8 mm of glue should be applied under each tile.
To comply with the specified parameters, you will need a laser level and a building corner.
The laser level is set on the floor, and with the help of the angle, the level at which the tile surface should be is determined. For this, the thickness of the tile is added to the 8 mm adhesive layer. For example: tiles with a thickness of 8 mm, + an adhesive layer of 8 mm. This means that relative to the floor, the surface of the tile should be at a height of 1.6 cm.
This work is painstaking, therefore, the glue had to be diluted in small portions.
Each tile is required to be checked for horizontal occurrence. Between adjacent elements of the flooring, insert corners, 2 pieces each. to one side. The last tiles are trimmed with a grinder and a cutting disc.
The first switching on of the warm floor, you can carry out not earlier than in 3 days... Usually, this is how much tile adhesive needs to gain the declared strength. The switching mode is the following, on the first day, the temperature is set to 18 ° C, and then every day, the heating is increased by 2 ° C, up to 26 ° C.
After such a "run-in", the warm floors can be switched on in the operating mode.
Description Devireg D 610
Dust-and-moisture-proof regulator Devireg D 610 is designed both to control Devi heating cables in systems such as electric underfloor heating, in snow melting and anti-icing systems, heating pipes, tanks, tanks (frost protection), and for control in cooling systems (ventilation , air conditioners).
The Devireg D 610 thermostat can be installed outdoors, the operating temperature of the environment is from -30 ° C to + 50 ° C. In addition to installation on a street wall of a house, the Devireg D 610 regulator can be fixed with clamps on a heated pipe, and, of course, it can be installed inside warm rooms, incl. and in damp rooms.
In essence, this D 610 regulator is analogous to simple mechanical ones: D 130 regulators controlled by a temperature sensor, and is also similar to the principle of operation of D 330 regulators, which are mounted on a DIN rail.
Airframe Devireg D 610
The dust and moisture-proof housing of the B 610 regulator is made with a high degree of tightness, and in accordance with Russian standards it complies with IP44. The on / off button is protected by a transparent rubber strip. A rubberized seal is installed under the temperature control wheel. A protective rubber gasket is laid around the perimeter of the opening cover.
From the ends and from the bottom of the regulator, there are holes for entering wires from the sensor, from the heating cable and 220 V power supply, the holes are drilled with a crown (do not knock out with a screwdriver). The kit includes rubber seals, which are inserted into the holes made by the installer and the wires are passed through them. Alternatively, instead of rubber seals for wire entry, you can screw in a cable gland (purchased independently). Diameter of holes to be punched - 20 mm 3 pcs (one on the side and two on the bottom) and 10 mm 1 pc (top).
With all the listed advantages, this regulator is not devoid of a relative disadvantage, namely, it is a small current load power that the D 610 can pass through its own relay contacts. The connected load (power of heating cables) should not exceed 10A, which corresponds to 2.2 kW at Russian 220V.
Benefits
Among some of the advantages of "Devi" warm electric floors, it is worth noting:
- simple and rational placement of heating cables;
- ease of installation;
- the speed and efficiency of warming up the heated room;
- no obstacles to interior design;
- optimal air circulation;
- profitability;
- wide range of applications depending on the type of premises;
- high quality assurance and long operating time.
Features and characteristics
Underfloor heating from well-known manufacturers Devi is very popular in interior decoration.The materials produced by this brand are manufactured to high standards and qualities. Anyone who decides to install floor heating comes across this brand.
Devi underfloor heating differs from other manufacturers in that it produces not only heating cables, but also special equipment - regulators, connection elements, thermostats with an LCD display. Cooperation between heating systems has been created. Thanks to this, this brand is recognized as the safest and most environmentally friendly device: it received the ISO 14001 class certificate.
The main advantages of Devi underfloor heating:
- Heating of the house takes place in a fairly short period of time. Due to the installed Devireg thermostat, a certain constant temperature can be set without the risk of fluctuations. You can control the system using a PC. It is possible to set a different temperature in each room.
- Energy streams are transferred to the surrounding air. They go up, and heat passes through the legs. Due to the fact that the energy does not rise to the ceiling, it is not wasted, as with conventional heating of the apartment. Therefore, the heat dissipates evenly throughout the room.
- Works independently of the main central heating.
- Does not emit foreign odors and harmful vapors.
- Warranty of the manufacturer of the warm floor is 10-20 years, but the real terms are much longer.
- Installed under any floor covering and in a specific area that needs to be heated.
- Does not take up space in the apartment, thus the interior of the house does not change.
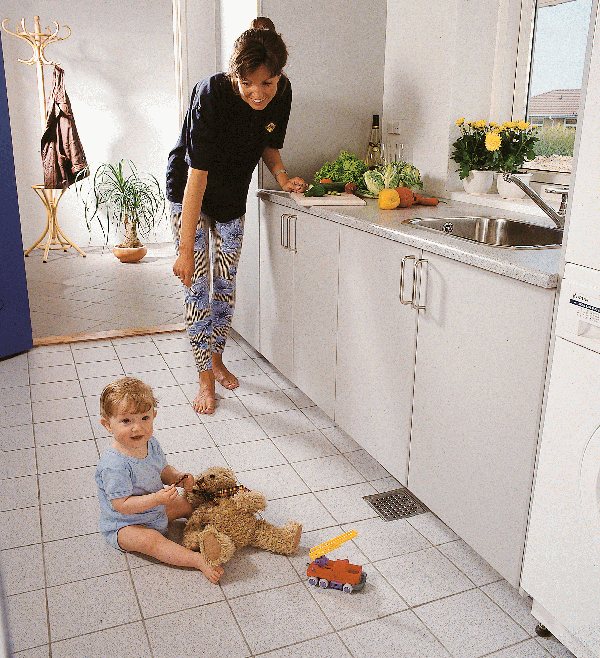
- Suitable for families with small children. Thanks to its automated system, if a human touch is detected on the cable, the system will automatically shut down.

Like many other types of underfloor heating, the Devi product has its drawbacks:
- High cost of production.
- The use of this heating is prohibited in case of chronic diseases of the legs.
- The operation of an electric floor requires special attention. If the structure breaks down, it will be difficult to find out where the failure occurred.
- Heat dissipation near the walls is much higher than in the middle of the floor. Therefore, it is necessary to install an electric floor so that the heat transfer is evenly distributed.
- Electricity can damage rooms that have high humidity.
Warm floor
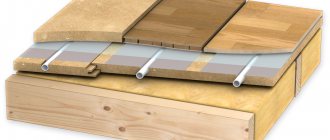
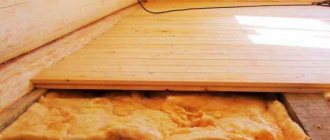
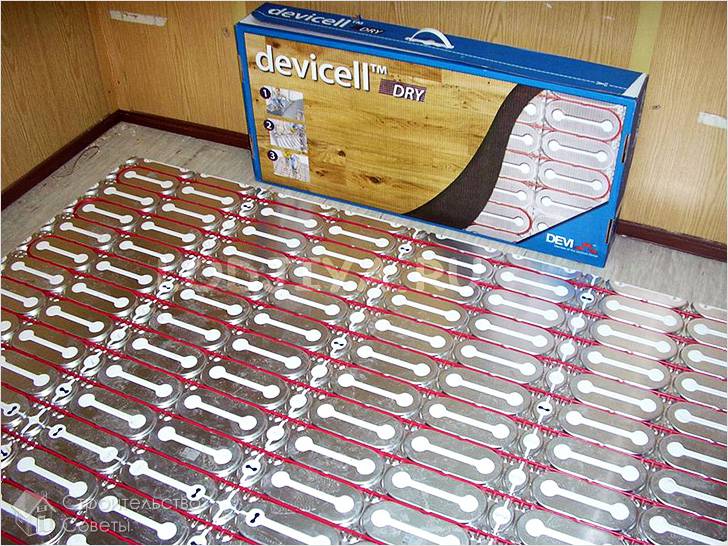
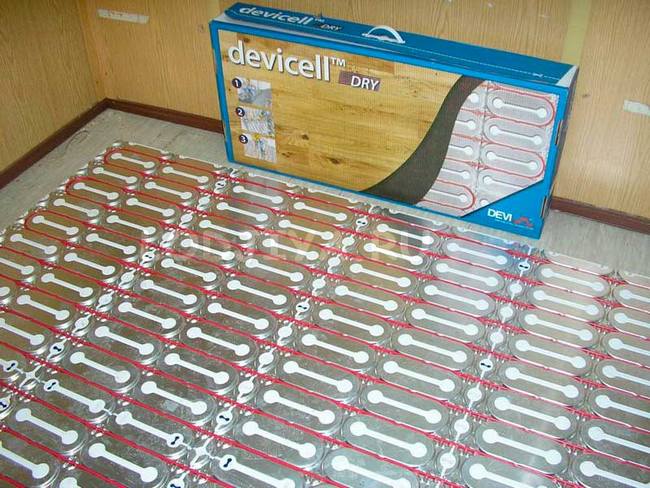
DEVI offers three installation options. The first option is when the heating cable is installed in a cement-sand or concrete screed 3-7 cm thick. The second option is when a thin heating mat is used, which is installed in a layer of tile adhesive and which does not increase the building height of the floor. The third option is when the heating cable is laid on a special Devicell ™ Dry mounting sheet under the wooden floor without screed.
The cable heating system can be used as a "Total heating" system or a "Warm floor" system (a system of comfortable heating of the floor surface). In the first case, the DEVI heating system is the only heat source in the room. As a "warm floor", the DEVI system must necessarily work simultaneously with another heating system, for example, with electric convectors or water radiators.
The "Total heating" system compensates for heat losses and provides a constant set air temperature in the room, while the "Underfloor heating" system is aimed at maintaining a comfortable temperature of the floor surface.
Specific power
Power density is the wattage per square meter of floor area (W / m2).
In the case of full heating, this power must compensate for the calculated heat loss of the room and provide the required set air temperature.
Heat loss mainly depends on the climatic conditions and the thermal insulation of the building. Thermal calculations of the heating system for specific conditions must be carried out by a specialist.We assume that they are calculated and information about them is available.
After calculating the total power of the heating system, take into account the free area of the room. This means that the area occupied by stationary objects: bathrooms, toilets, refrigerators, stoves, etc., is subtracted from the total area of the room.
We recommend increasing the total installed capacity by approximately 30% (safety factor 1.3). The result of the calculations will allow you to determine the required power of the heating element: cable or thin mat.
In central Russia and Ukraine, the estimated specific power of the heating system for new buildings using thermal insulation materials is 100-150 W / m2, for old buildings it can reach 180 W / m2 or more. If the calculated installed power exceeds 180 W / m2, we recommend using additional heating systems.
For comfort floor heating systems, the specific power may vary depending on the design of the floors, the temperature regime in the lower room, the presence and quality of thermal insulation, and special requirements for the temperature of the floor surface.
So, for example, for the "warm floor" system in an apartment of a typical panel house (with the exception of the first floors and rooms located above arches, etc.), the specific power value is 100-130 W / m2 for a kitchen, corridor, children's room, bedrooms and living room, and 130-150 W / m2 for bathrooms and toilets.
Special applications include heated pool lanes, heated floors and sun loungers in baths and saunas, floor areas in hallways for drying shoes. The specific power in the above cases is calculated based on the specific requirements of the customer.
Heated lounger in Turkish bath
In rooms with large glazing, we recommend that you additionally provide heating for the edge zones: a zone 0.5-1 m wide along the outer walls with glazing. The installed power in the edge zone is about 200 W / m2. B
Equipment selection
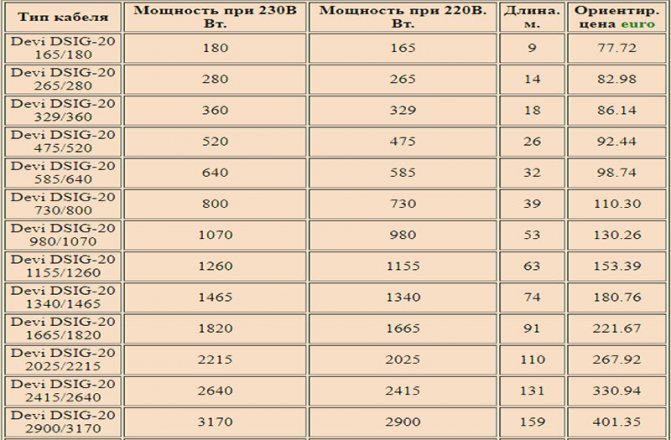
When installing heating systems, Deviflex ™ heating cables with a maximum power output of 20 W / m are used.
The Devifast ™ mounting tape (cable fixing increments in multiples of 2.5 cm) will allow you to safely, quickly and easily unfold the heating cable.
You can also use Devimat ™ thin heating mats with a power of 100 or 150 W / m2.
After calculating the total required power of the system, choose a heating cable or mat from a number of those manufactured at the factory with the nearest higher power.
To achieve optimal comfort and economy of the system, we recommend using thermostats with a simple or smart timer: Devireg ™ 535, Devireg ™ 550.
Installation
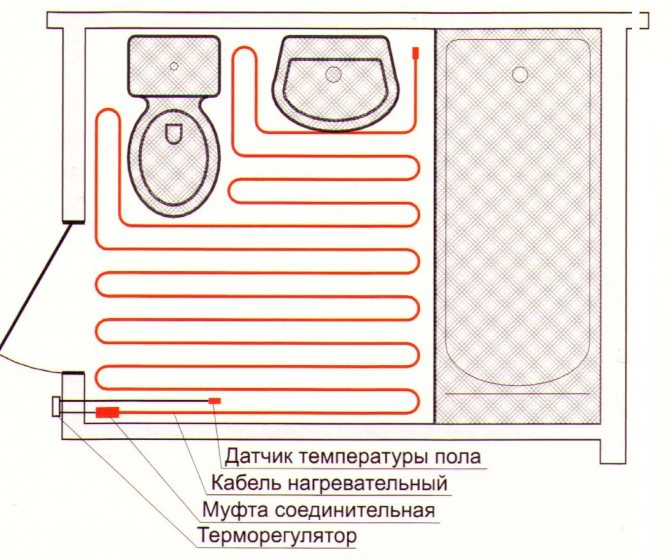
We recommend laying heating cables in a free area, i.e. to the area that is not occupied by stationary equipment (refrigerator, stove, kitchen wall, bathroom, washing machine, wardrobe, etc.).
The laying step allows you to maintain the capacity per 1 m2, which is calculated and laid at the design stage.
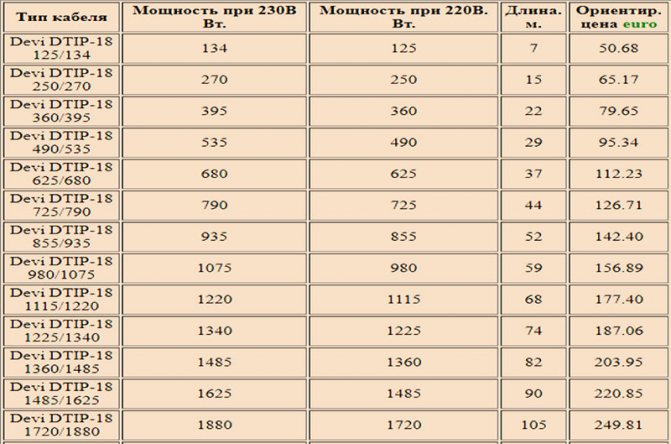
To maintain an even distribution of heat over the floor surface, the thickness of the concrete or cement-sand screed above the cable with a specific linear power of 17-18 W / m (DTIP-18) must be at least 3 cm, unless there are other restrictions (for example, in terms of mechanical strength ).
You can reduce the thickness of the screed if you use a heating cable with a lower heat input, for example 10 W / m (DTIP-10). In this case, the laying step will be reduced by almost 2 times and the minimum screed thickness can be about 1.5-2 cm.
The Devimat ™ heating thin mat does not require any screed at all. The mat is placed in a layer of tile mastic or glue.
With an increase in the thickness of the screed, the time for the system to reach the specified operating mode increases.
The heating cable can be switched on only after the natural hardening of the screed (for cement-sand screed it is about 28-30 days, for mastic for thin floors 3-7 days).
Thermal insulation
Laying of thermal insulation is necessary in cases where there is a cold room below or there are local cooling zones (unheated basement, ground, etc.).
Cases of installation of cable heating systems on balconies and loggias require special attention.
The use of heat-insulating material allows to reduce energy consumption, however, the appropriateness of its use should be determined for each specific case.
It is recommended to use certified products with sufficient mechanical strength as thermal insulation materials: cork agglomerate, extruded polystyrene foam, expanded clay backfill, etc.
To avoid overheating of the heating cable, it is necessary to make a preliminary tie (minimum thickness) between it and the thermal insulation or lay the cable on a metal mesh (with a cell of 2-5 cm). In this case, the screed, poured in one step, turns out to be monolithic and with a reinforcing frame.
Floor section with the "warm floor" system

Another important element is the vertical insulation of the screed near the outer walls. It should prevent heat loss at the joints of the walls with the floor.
Waterproofing
Waterproofing can be laid both under the heating cable and above it, since the cable itself can work at any humidity, including in water. The installation site of the waterproofing must be selected for design reasons or the requirements of construction documentation. The main condition that must be observed is that the heating cable must not lie directly on or under the waterproofing layer.
If the heating cable is laid over the waterproofing, then, as in the case of thermal insulation, it is necessary to make a minimum dividing screed or use a metal mesh.
When the waterproofing layer is installed above the heating cable, it is necessary to pre-fill the cable with a cement-sand screed.
When using bitumen waterproofing associated with the use of burners, it is necessary to provide protection of all exposed parts of the heating cable system from flame and high temperature.
Mounting methods
For the installation of Deviflex ™ heating cables, we recommend the use of Devifast ™ mounting tape. The steel tape is laid in increments of 50-100 cm. The average consumption of the tape is 1-2 m per 1 m2 of area. You can fix the tape in any way - with dowels, nails, glue, etc.
Alternatively, the heating cable can be secured to the steel reinforcing mesh laid in the screed using clamps.
Floor covering
The heating cable can be installed in a screed under almost any floor covering. Check with the coating manufacturer before using adhesives and mastics.
When installing wooden or structurally similar floors directly on a concrete screed with a heating cable, the manufacturer's instructions and the installation technology must be followed.
Highly insulating materials used for flooring, such as thick wool carpets or rubber linoleum, can limit heat transfer to the surface.
In such cases, please consult the manufacturer of these materials for use with a heating cable system.
Example. The object is a kitchen-living room with a total area of 15 m2.
Option 1... The cable heating system is the main one ("Total heating").
The estimated heat loss of the kitchen-living room with a total area of 15 m2 is 1500 W (100 W / m2).
Tiles are used as flooring. Stationary equipment (refrigerator, stove, sink, etc.) occupies 5 m2 of the total area of the room. Thus, the cable must be installed in a free area of 10 m2.
1) Required installed power taking into account the safety factor:
2) Selection of a cable suitable for the nearest higher power, if we use a DTIP-18 cable:
Power 2135 W, length 118 m
3) Distance between cable lines (C-C).
When using Devifast ™ mounting tape (cable fixing in multiples of 2.5 cm), the cable laying pitch will alternate between 7.5-10 cm.
4) Choice of thermostat.
For a total heating system, we recommend Devireg ™ 535, 550.
Devireg ™ 131, 132, 531 or 532 can be used.
Option 2... Cable heating system is used for comfortable floor heating ("Warm floor").
1) Required installed power taking into account the safety factor:
2) Choosing a cable suitable for the nearest higher power, if we use a DTIP − 18 cable: Power 1340 W, length 74 m
3) Distance between cable lines (C-C).
When using Devifast ™ mounting tape (cable fixing in multiples of 2.5 cm), the cable laying pitch will alternate 12.5-15 cm.
4) Choice of thermostat.
For comfort floor heating systems we recommend Devireg ™ 535, 550. Devireg ™ 130 or 530 can be used.
Installation sequence of system with Deviflex ™ heating cable.
1. Determine the place of installation of the thermostat (if necessary, make a groove in the wall for hidden wiring). Select a free area. Draw a layout diagram for the heating cable. If necessary, provide thermal insulation and intermediate material (eg reinforcing mesh and / or pre-screed).
2. Unfold the mounting tape and fasten it to the floor.
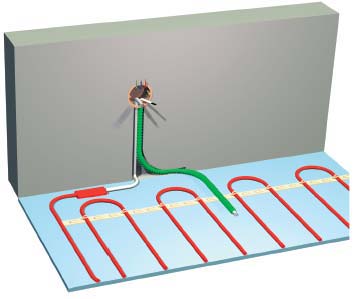
3. Unfold the heating cable and fix it on the tape, observing the installation step. Also, fix the floor temperature sensor on the tape in a copper or corrugated tube (corrugation - protection against squeezing when pouring with a solution) and bring the "cold" leads of the heating cable and the leads of the sensor to the installation site of the thermostat.
The tube of the temperature sensor (9-16 mm) must be plugged from the side of the sensor to prevent the solution from getting inside when pouring the screed. The opposite end of the tube is led out into a junction box, in which the thermostat will then be mounted. To ensure free movement of the temperature sensor in the tube (the possibility of replacement during operation), we recommend that when passing from the wall to the floor, perform two large bending radii of the tube in two planes.
In the process of pouring the screed and laying the floor covering, pay attention to the integrity of the temperature sensor tube (no dents or damage).
4. Fill with mortar or mixture (usually, for DTIP-18 cable, the screed height is 3-5 cm, for DTIP-10 - 1.5-2 cm).
5. Lay the floor covering (tiles, carpet, etc.)
6. Install the thermostat and connect the temperature sensor, cold cable leads and mains wires.
7. Allow the cement-sand screed to harden for about 30 days and turn on the thermostat.
COMMENT!
When carrying out construction work by different specialists, there is a possibility of damage to the heating cable system. To avoid this, we recommend:
1. Carry out the installation in accordance with PUE-2001 (Rules for Electrical Installations) and VTT KSO-2003 (Temporary technical requirements for the installation of cable heating systems).
2. In the process of laying the heating cable, pouring the screed and installing the floor covering, control the ohmic resistance of the heating conductors of the cable and the integrity of its insulation.
3. Immediately after the installation of the heating cable, draw up a real installation diagram indicating the main bindings in place (location of the end sleeve and connecting piece, the number of heating cable threads laid, the location of the temperature sensor, etc.).
4. Bring this information to all specialists and warn about the impossibility of carrying out special work that can lead to damage to the cable heating system (drill and chisel the floor, gouge grooves, screw in self-tapping screws, etc.).
In case of damage to the DEVI heating cable system, contact the company's service department.
Heating cable routing options
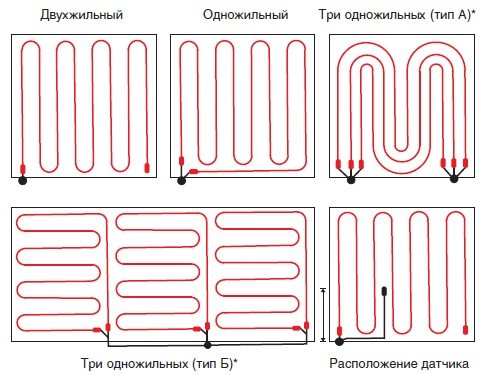
Type A and B - three-phase system with star / delta connection.When distributing power to three phases, the system is connected to the thermostat through a contactor.
Underfloor heating Deviflex - screed heating sections
Advantages: by changing the step of laying the heating section, you can change the power of the heating system, laying is possible with any configuration of the heated surface, due to its large thickness, the system is inertial - it heats up for a long time, but also keeps heat for a long time after that. minimum increase in floor level 3 cm, inertia of the heating system
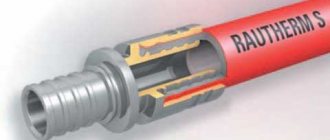
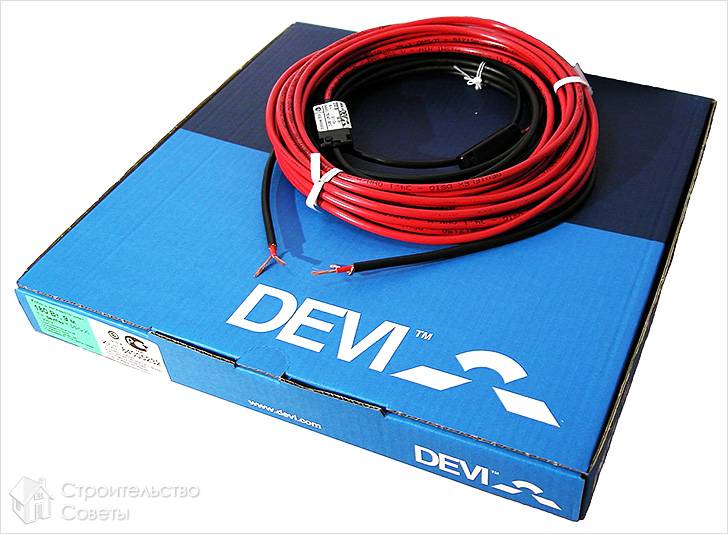
Under the general name DEVIflex, a whole series of different heating sections for electric underfloor heating systems is presented. A heating section is a piece of heating cable of a certain power and length, to which an electrical power cable is connected (power, "cold" end). They are connected using a special sealed coupling. Heating cable thickness is 6-9 mm. For example, the diameter of the most popular DEVI cable for underfloor heating equipment - Deviflex 18T - is 6.9 mm
Therefore, it must be taken into account that the use of heating sections for laying a warm floor entails an increase in the floor level by at least 3 cm.When working with heating sections, you must remember a few rules:
- It is forbidden to directly connect the heating cable to electricity (connection is only through the "cold" wire)
- It is forbidden to shorten or lengthen the heating cable (if necessary, you can shorten or extend the "cold" power cable)
- It is forbidden to crush, strongly bend the heating cable during installation (this leads to local overheating and further cable burnout)
- In case of local failure of the heating cable, a special repair sleeve is installed
- If a sufficiently large section of the cable has burned out, it must be replaced with exactly the same cable to maintain the power characteristics of the heating section.
As a rule, in systems "electric underfloor heating" heating sections are installed in a screed layer (DSP) with a thickness of 3 centimeters. DEVIflex sections are fixed to the subfloor using a special mounting tape, or with plastic clamps to a mounting mesh reinforcing the screed. The heating section is laid in a "snake" pattern. The distance between the turns of the cable (laying pitch) is calculated depending on how much power the heating system needs to be made. For example, on balconies or loggias, it is recommended to mount a system with a capacity of 180-200 W / sq.m. Those. to heat 3 square meters of the balcony, you will need a heating section with a capacity of 550-600 watts. In this case, the laying step can be calculated using the formula:
h (laying step, cm) = (S area, m * 100) / (L cable length, m).
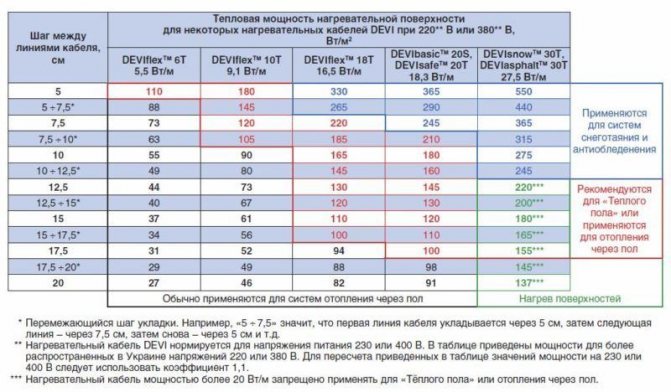
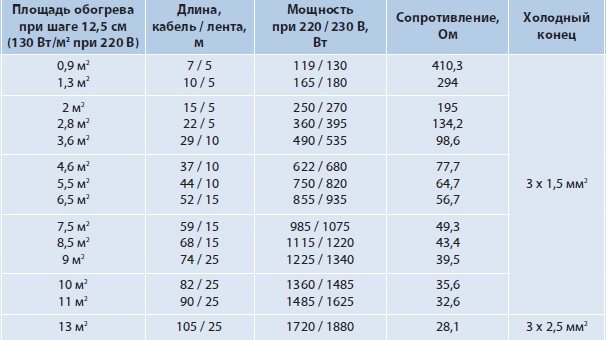
Underfloor heating with a power of 130 W / m from DEVIflex 18T sections under the screed at a laying step of 12.5 cm
For installation in concrete floors, the Deviflex 18T cable line is available under the Devi brand. This is one of the best underfloor heating cables. The warranty period for it is 20 years.

Design
The operation of the electric heating system of the floor surface is based on the properties of the electrical resistance of metals. When current is applied, they begin to heat up, transferring heat to the environment. For operational safety, each of these heating elements is protected by a sheath made of non-conductive material.
There are many systems of this type, but the Devi electric underfloor heating has some characteristic features:
- Availability of a single-core or two-core cable in the range. They are used depending on the required heat output per 1 m². It is a multilayer structure in which the heating element is insulated using a polymer material with a high thermal conductivity coefficient. An aluminum layer is needed to shield electromagnetic radiation. The outer sheath is made of soft PVC.
- Various base options for laying the heating element - ready-made mats or galvanized mounting strips.
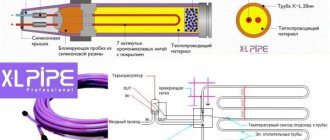
- Electronic components - thermostats, kits for mounting sensors and protection of elements from sudden voltage surges.
The general scheme is shown in the figure:
Structurally warm floor Devi under a tile or other covering consists of thermoelements, a temperature sensor and a thermostat.

Warranties and equipment
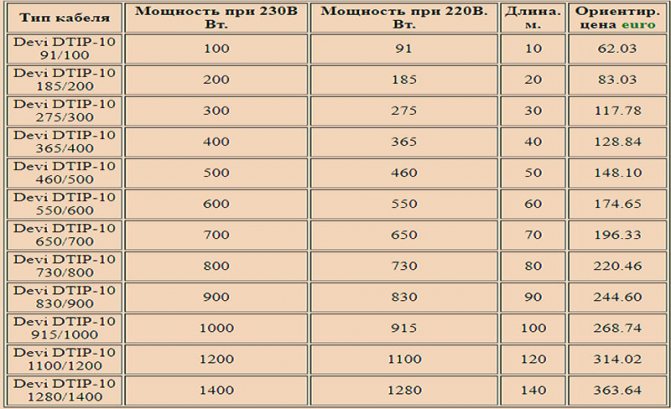
In this moment, the Devi firm keeps the brand. On their heating cables, they give a 20-year warranty, subject to the integrity of the insulation. A very bold statement requires tight control over the products released. Therefore, Devi cables are sold only in single pieces! In other words, you will not be sold 50 meters of cable in a store. There are sections of 40 m, and there are 60. Take any. And if you shred it, then the guarantee is removed.
There are a lot of standard sizes, and it is unlikely that it will be possible to find some kind of length grading system. For some series, the step is 5, 7 or 14 m, for some it is 3 and 6 m. If you wish, you can choose it to suit your needs. But the prices are quite high. The "cheapest" heating cable, will cost ≈ 170 rubles / r.m. Subject to the purchase of a bay of 198 m.
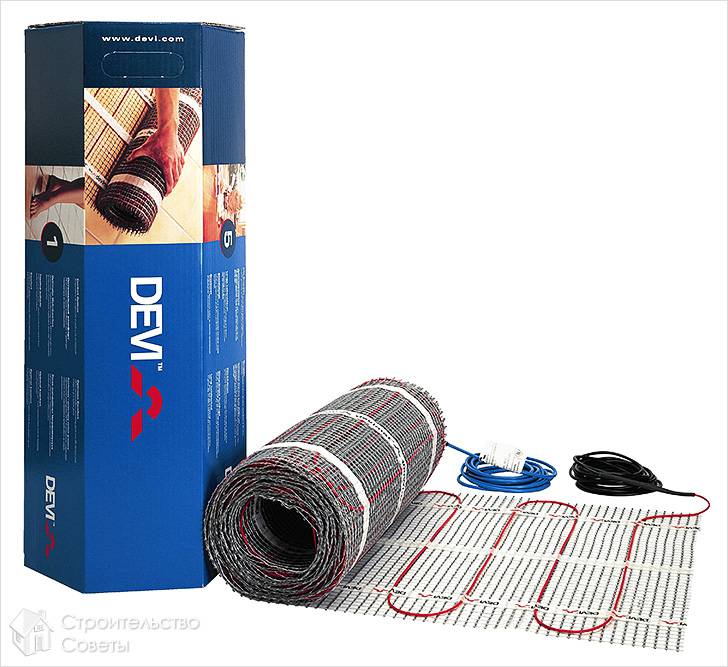
Heating mats are even more expensive. With a single standard of width (50 cm), the lengths of the mats vary from 1 to 24 meters. At the same time, a mat with an area of 0.5 m2 will cost ≈ 5.5 thousand rubles, and 12 m2 at 26 thousand rubles.
That is why, on sale there are no ready-made sets "Heated floor Devi". For each room, an individual set is made. Considering that the products of this Danish company are sold in specialized centers, you can count on the full help of consultants.
Thermostats
Devi thermostats deserve special attention. A demanding and lazy European consumer forced the manufacturer to develop and release a product that looks, to put it mildly, absurd for the Russian market. If color and touch screens are still understandable and pleasant, then Internet access for Devi thermostats is already something futuristic.
The simplest models of the touch series, 130 or 330, have a standard set of functions, plus a stylish design and a touch screen. But the 550 series or Link, this is already a full-fledged controller, with Internet access and a Wi-Fi module. They are able to regulate the temperature in several rooms, taking readings from a couple of dozen sensors. Moreover, the sensors are not only integrated into the floor, but also located on the walls of the room.
The prices for this thermostats are very decent. Simple models will cost 4-5 thousand rubles, and sophisticated ones cost more than 30 thousand rubles.
Overview of Devi thermostats for underfloor heating
Thermostats that control underfloor heating operate basically according to the same principle: activation and deactivation of the heating cable by a temperature sensor.
The algorithm for triggering the underfloor heating for all controllers is as follows: the sensor, sensing the temperature drop on the floor, changes its resistance, and when the floor temperature drops below the set value, the thermostat closes the contacts of the enabling relay and starts supplying 220V power to the underfloor heating heating cable, and this heating the cable, accordingly, heats up, and with it the floor structure heats up.
The floor temperature sensor under the influence of heating begins to change its resistance in the opposite direction, and when it reaches the temperature set in the regulator (i.e. when the floor heats up to the one you defined in the temperature regulator), it gives a command to turn off the relay. The warm floor begins to cool down.
The cycle is repeated an infinite number of times. The only difference between programmable regulators: they control the time of day and day of the week, and if you and your household are not at home or you are sleeping, and the regulator knows about this through the settings you have set, then the heated floor will not turn on. In addition, some controllers have a built-in air temperature sensor.
Pros and cons of underfloor heating Devi
Like any similar product, underfloor heating has both its own advantages over other brands and disadvantages. If you summarize all their pros and cons, you can see the following picture.
| Dignity | disadvantages |
| Benefit from the purchase in terms of cost. The price of underfloor heating Devidry, Devimat or Deviflex is noticeably lower than that of competitors. | In order for the service life to correspond to that declared by the manufacturer, it is necessary to include a stabilizer in the power circuit. The rest of the shortcomings can be attributed to other brands of similar products. |
| High quality products, safety, environmental friendliness. | |
| These products are durable. With proper installation, the service life can be up to 50 years. | |
| Equipment. There is no need to look for a separate sensor and regulator. The company manufactures these products itself. | |
| Possibility of programming temperatures and control using a PC, tablet or smartphone (on some models of thermostats). |
As you can see from the table, the quality characteristics of the Devi underfloor heating are at a height, which allows you to give preference to this particular manufacturer when choosing without hesitation.
Devi is a very famous Danish company, popular in our country PHOTO: 2gis.ru