Some subtleties of heating the garage
The garage belongs to non-residential premises, so the optimal temperature is much lower here. In order not to harm the car, it is enough to maintain 150C. If a person is dressed in appropriate clothes, then under such conditions he will feel quite comfortable. In addition, a large amount of energy is required for strong heating, which is disadvantageous from the economic point of view.
The thermal insulation of the garage also deserves attention, because it will be very difficult to maintain a comfortable temperature in an uninsulated room with thin walls and a large number of cracks. For wall insulation, you can use any insulation, for example, penofol. You should not save on thermal insulation, this cost item quickly pays off due to energy savings.

In contrast to living quarters, increased loads are placed on the floor surface in the garage. This includes the impact of the machine wheels and unexpected impacts from tools and parts. Consequently, the screed over the heating elements must be high enough, the optimal value is 4-8 cm. Such a thickness makes the use of an infrared heating film unprofitable, which in these conditions will give an insignificant amount of heat.
Most often, they install electrical systems or a water-heated floor in the garage with their own hands. In the first case, a heating cable is used as a heating element, in the second, steel pipes. Each type of heating is characterized by its own advantages and disadvantages, which should be discussed in more detail.
Laying technology
If you nevertheless decided to install, then we offer you detailed technological maps for successful work. Of course, if you make a warm floor in the garage with your own hands, and do not resort to the help of professionals, which is fraught with considerable costs.
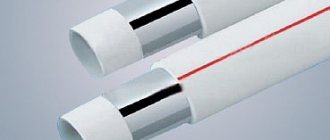
Water
A hot water heating system can be implemented in two ways:
- with the placement of pipes in a concrete screed;
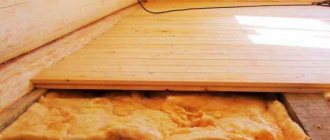
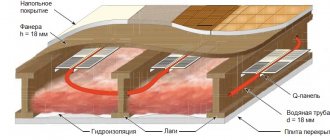
- with laying pipes in polystyrene foam plates or a wooden box.
The second option is lightweight, but it also requires post-pouring with concrete.
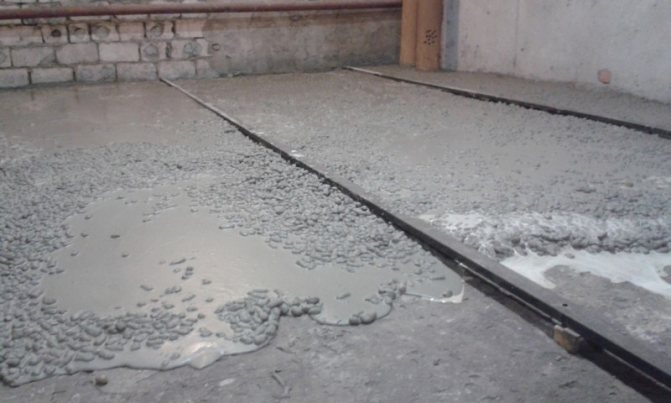
For optimal heating, it is recommended to lay pipes with a distance between the turns of no more than 10 cm.After all the necessary calculations, we proceed to the steps:
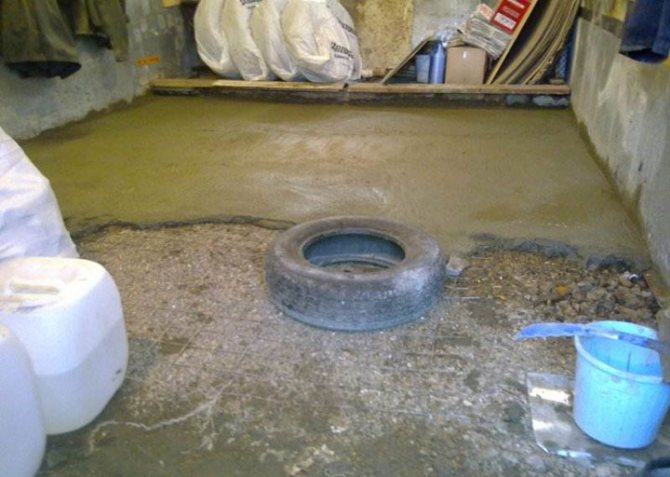
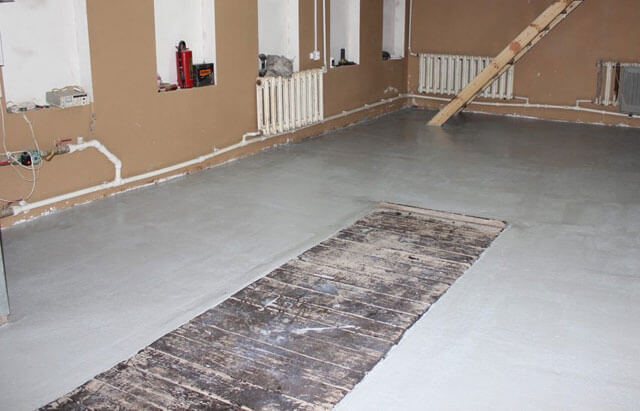
- we clean and level the base by pouring a concrete screed;
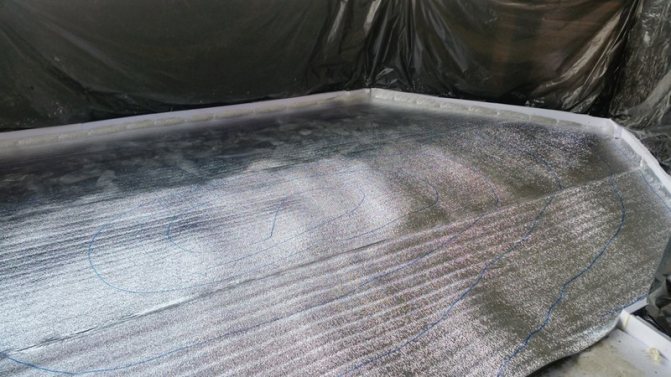
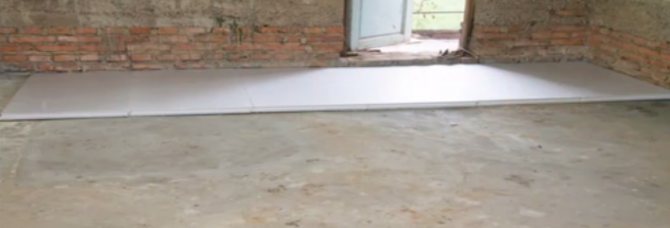
- after drying, lays down a heat insulator;
- we fix the damper tape around the perimeter;
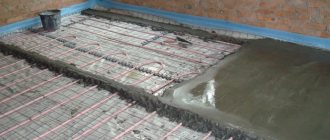
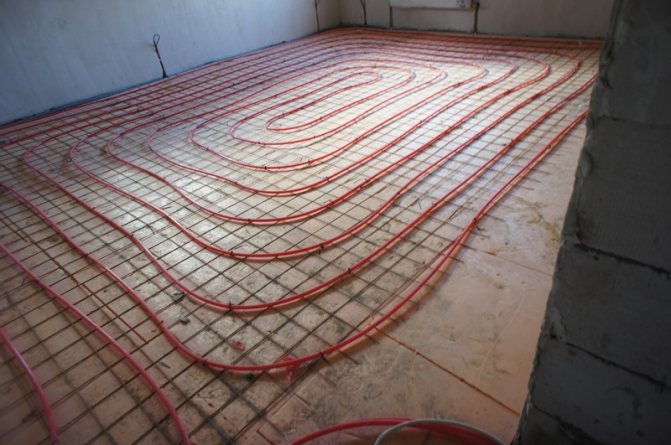
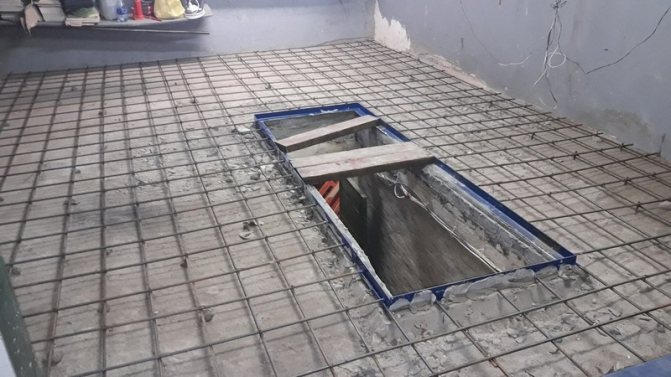
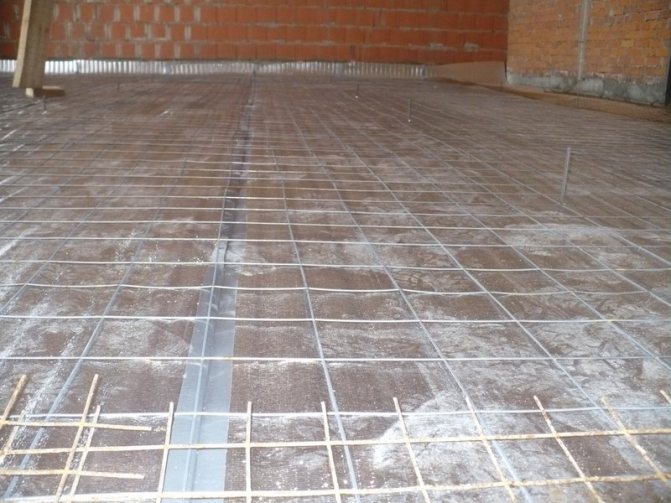
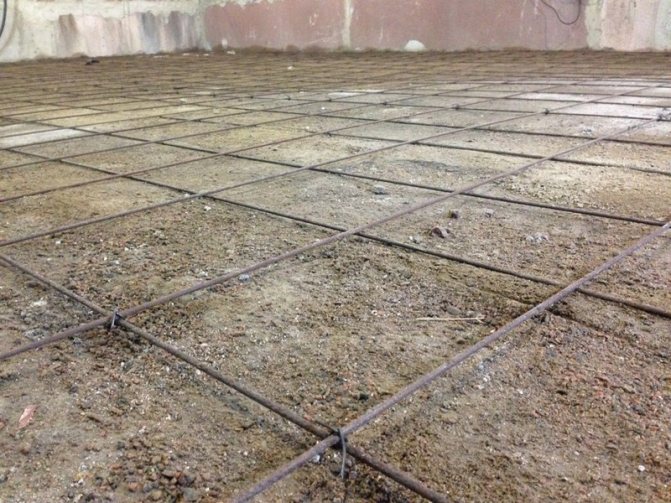
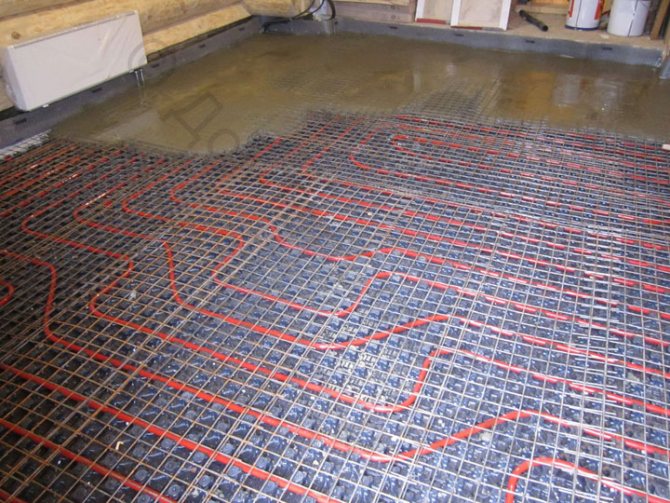
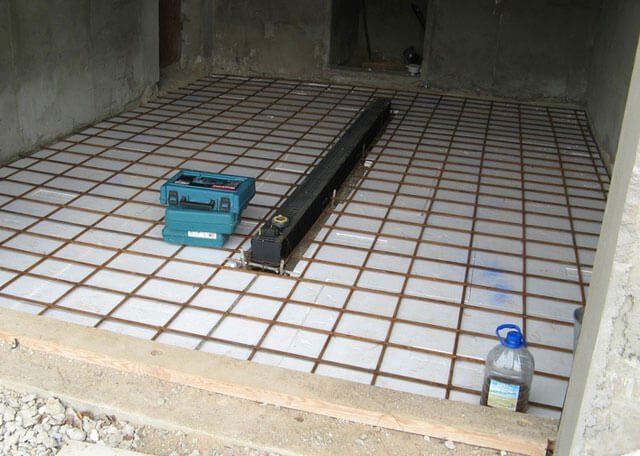
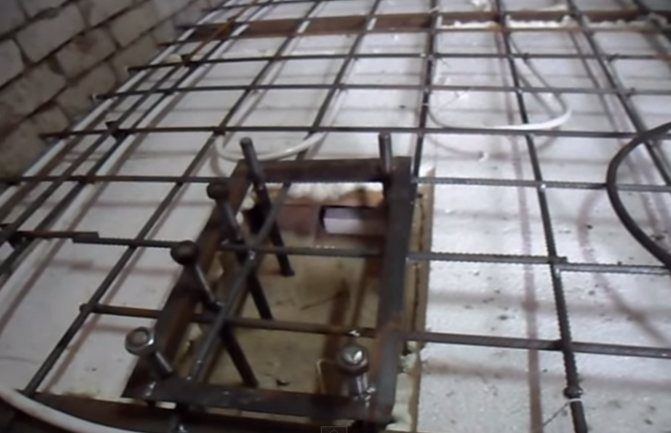
- we lay plastic wrap and reinforcing mesh;
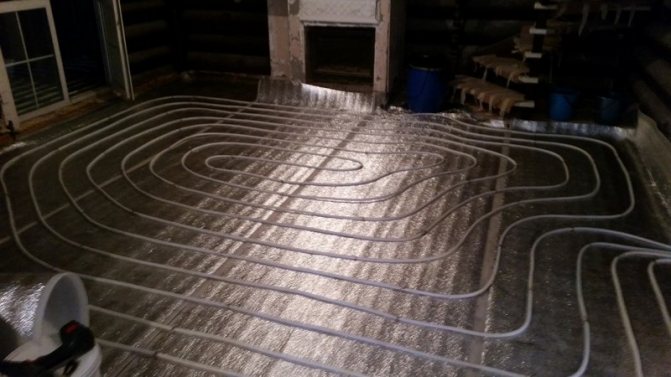
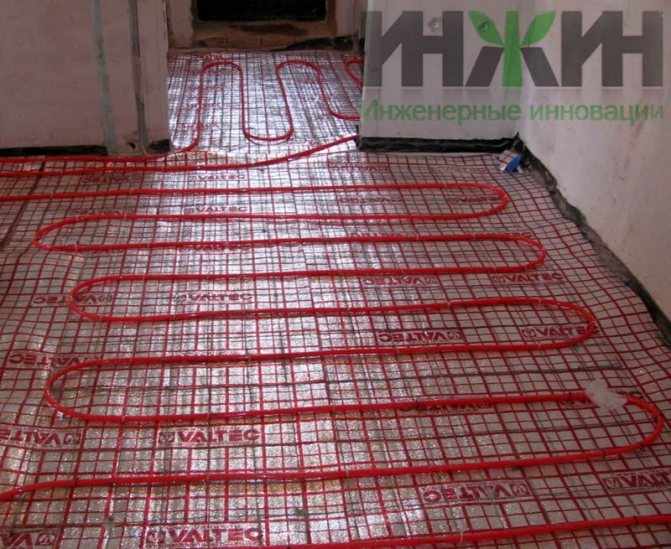
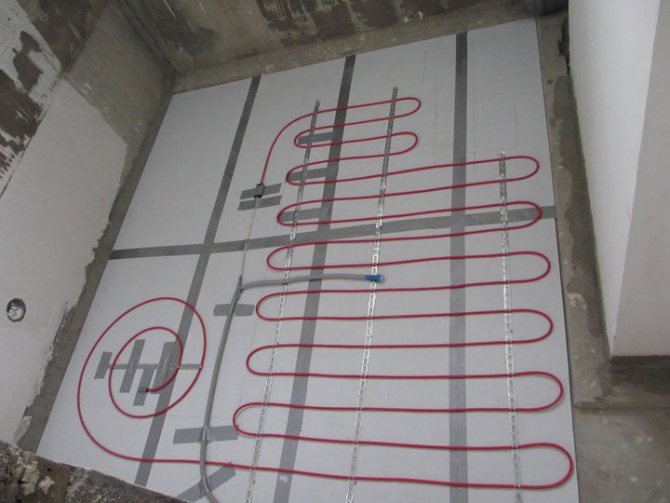
- we fix the pipes to the mesh with clamps - best of all in the form of a snake, the most common way;
- install a water discharge valve;
- we check the tightness of the installation by increasing the pressure in the coolant - approximately 2 times higher than the standard value;
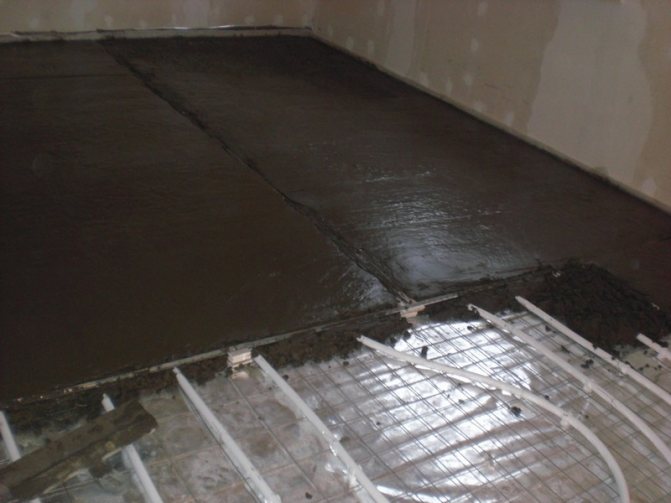
- if there is no pressure drop within 24 hours, then we carry out the final work - pour another concrete screed with a total layer thickness of at least 10 cm.
After all this, lay the film on the floor - let the screed freeze, and after about a month you can check the warm floor in action.
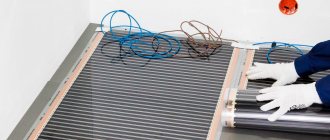
Electric
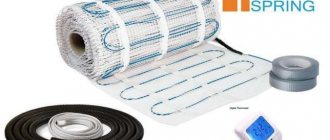
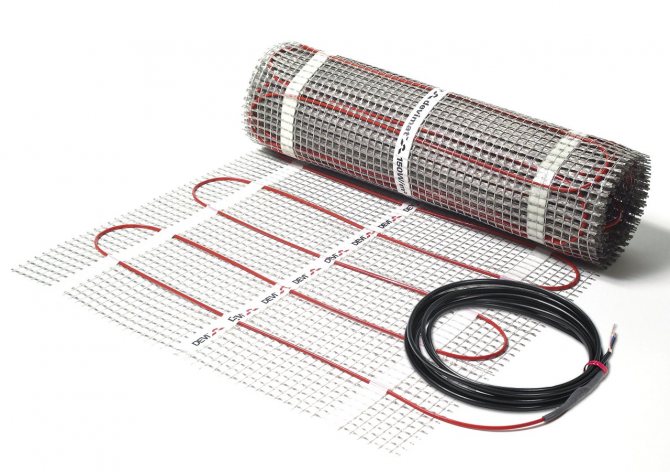
There are a large number of modifications of the electric underfloor heating on sale, so you can save a lot of time by installing ready-made flexible mats with conductors or infrared films. However, it is quite possible to be content with the option with a resistive one or two-core cable.

Before installation, a calculation should be made by multiplying the power of the heating element by the total area of the room.
Otherwise, everything is very simple and differs from laying a water-heated floor only in some details:
- clean the concrete base from dust and debris and make a screed;
- lay the waterproofing layer in such a way that the film overlaps the walls a little - by about 15 cm;
- glue the damper tape around the entire perimeter;
- lay a layer of heat insulator - you can use foil insulation "Penofol" (during installation, place a foil layer on concrete, to strengthen the structure, foam is additionally used) - as well as a reinforcing mesh;
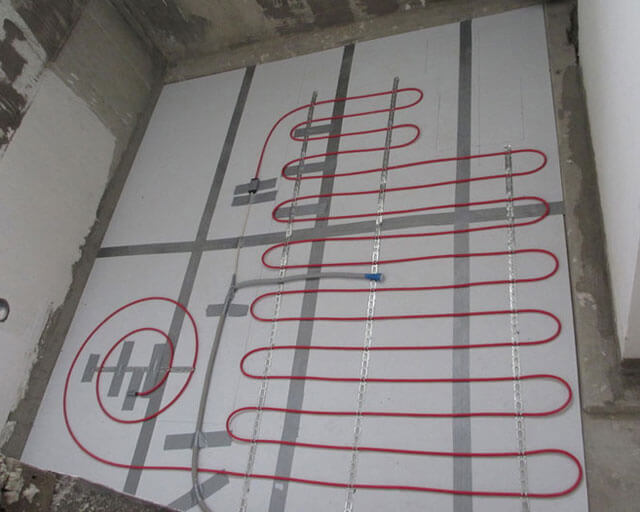
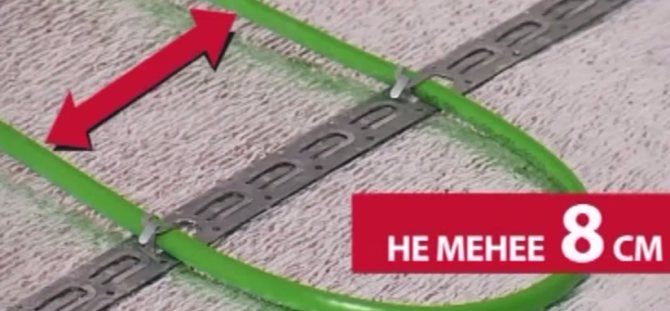
- if you do not use mats and films, but a heating wire, then lay it in a zigzag and fix it with clamps, just be careful - there should be no intersections and bends;
- when installing the film, take into account the fact that it should be located about 10 centimeters from the walls and cover at least 70% of the entire area of the room;
- then connect the contacts with clamps and reliably insulate with mastic the places where the contacts and wires are connected.
It remains to isolate the thermal sensor and connect the system to the power supply. If everything works fine, then fill in the final screed and leave the room for about 28-30 days.
Underfloor heating electrical system
In this case, when an electric current passes through a flexible conductor, heat is released. The screed heats up from the conductor, which in turn transfers heat to the room.
Electric underfloor heating is characterized by simple installation and high reliability. However, electricity costs with this type of heating are quite high, especially in cold winters.
To reduce costs, it is important to make high-quality thermal insulation of the walls and ceiling. The optimum insulation thickness for these garage surfaces should be more than 6 cm. Floor insulation should also be considered.
When drawing up a project for an electric underfloor heating in a garage, it is important to take into account the load that will be exerted on the electrical network of the garage. The calculations are based on the amount of energy required to heat 1 m2 of the room, which is 120-140 W. If this value is multiplied by the area of the garage, then you get the required amount of energy. In the process of arranging a warm floor, it is important to be sure that the wiring in the garage is capable of withstanding such a load for a long time.
Do I need a warm floor in the garage, its pros and cons
In the garage, it is not uncommon to look under the car, for this you need to lie on the floor. That is why many owners are thinking about installing heating, while most prefer warm floors.
Making repairs lying on a heated surface is not only comfortable, but also not hazardous to health. And for a car, it is better to stand in a heated box in winter than in the cold.
In addition, such heating is capable of evenly warming up the room. The costs are not significant, since a sufficient temperature for the garage of 15 degrees is a comfortable environment for both a person and a car. And if you use gas or solid fuel boilers, the costs will be even lower. When insulating walls and ceilings, it is not difficult to maintain the required temperature level.
Remote adjustment is possible by installing the appropriate equipment.
It is impossible not to say about the disadvantages of heating floors:
- When the car arrives from frost into a heated garage, the snow begins to melt and drain. There are places in the car that are not accessible for anti-corrosion treatment, but humid air can get there.
As the liquid heats up, it evaporates and condensation is created, which affects the cold parts of the machine.And until all parts are warmed up, moisture will have time to negatively affect them. Many people try to solve this problem by installing supply and exhaust ventilation.
- The garage floor is under constant pressure from the weight of the vehicle. Therefore, it is required to correctly calculate the load and make proper installation so that the weight from the wheels does not disrupt the operation of the system.
- Repairing a heated structure is difficult, since the surface will have to be completely dismantled.
- Metal elements on the gate may freeze, and ice may appear on the outside of the door.
- When installing a water floor, if there is no source of hot water supply, installation of equipment for heating water will be required.
- When using electric heating, there will be, although not significant, but constant expenditures on energy.
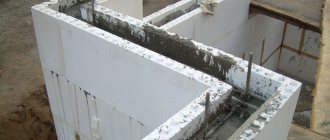
Foundation preparation rules
Most often, there is soil under the garage floor, therefore, before making warm floors from water heating or electricity, you should pay attention to thermal insulation. The fact is that improper insulation can lead to significant heat losses, up to 30%, which are associated with warming up the soil.
The insulation process is as follows:
- The soil is carefully leveled and compacted.
- A rough concrete screed is poured over it. It is important to control this stage so that the surface is as flat as possible without sudden changes in height.
- The screed is left to solidify, after which the insulation material is laid.
Thermal insulation of electric underfloor heating
The best option for self-warming a warm floor in a garage is considered to be penoplex or polystyrene. For high-quality thermal insulation, the material must have a thickness of 3-8 cm, which is determined by the severity of the local climate. For example, insulation with a thickness of 3 cm can be used in regions where the air temperature does not fall below -150C. If the region experiences severe winters, then it is better to use material up to 8 cm thick.
When insulating a floor with a heating element in the form of a cable, a special mounting tape is laid on top of the insulation to fix the coils of the cable. The recommended distance between strips of tape is 0.5 meters. The tape is fastened with dowels to the rough screed. If mats are used as a heater, then the mounting tape is not required, so you can immediately start the installation work.


Leading sales company
Many residents of Moscow and other large cities opt for Teplolux floors. Such products are perfectly used with parquet boards, linoleum, laminate and tiles. It is quite easy to fold and unfold such a floor.
We recommend: What kind of warm floor is better to put under the tiles?
The front layer of the cover is made of elastic felt. It is an artificial but very durable material. The weight of such a product is less than 3 kilograms. Floor power is equal to the interval from 300 to 560 watts. A 2.5 meter long wire acts as an accessory.
Before you start using such a floor, you need to study the instructions for its use.
Thanks to the new thermostat, the control system has become the most simple. Thanks to her, it is possible to set different modes for each day of the week. This floor saves energy up to 70%. Warming up can be carried out at any time of the day.
- Similar posts
- What should be the laminate for a warm water floor?
- What concrete is suitable for a warm water floor?
- How to install Eastec underfloor heating?
- Features of underfloor heating made of metal-plastic pipes
- What are the advantages of Heat plus underfloor heating?
- How to install a water-heated floor with your own hands?
Laying the heating element
Installation of underfloor heating with heating cable is carried out as follows:
- The wire is laid in coils, maintaining a distance of 0.3 meters between them.
- Each turn is fixed with special antennae on the mounting tape.
- In the process of laying, it is necessary to ensure that the turns are parallel to each other.
- It is not recommended to bend the wires less than 90 degrees or to pull them too tight.
- The heating element is placed in places where there are no pieces of furniture. In other words, no wire should be laid under shelves or a workbench to avoid interfering with the warm air flow.
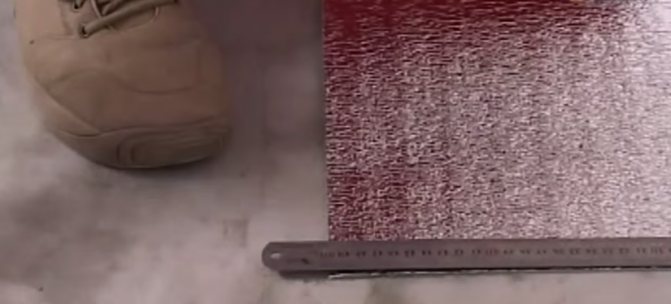
- When performing installation work, it is not recommended to step on the cable in order not to damage the insulation.
- Use only solid wires, without twisting or soldering. Otherwise, the service life of such a floor, as well as its reliability, is significantly reduced. In case of damage to a single section of the cable, the entire circuit must be replaced.
Installation of underfloor heating in a garage with heating mats is easier, since it consists of cable coils, laid according to certain rules and fixed on a reinforcing mesh. The installation process consists of laying the heating mats on the floor. After that, they immediately start connecting the system.
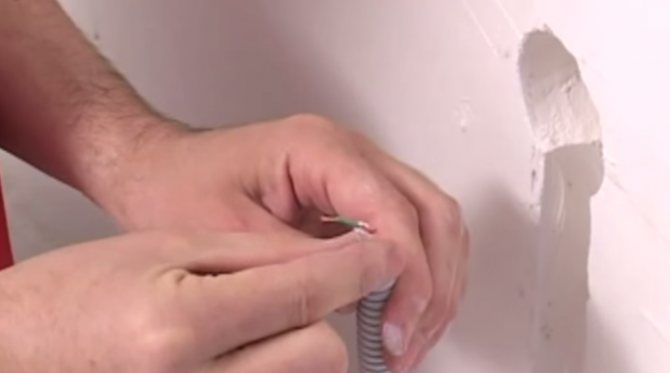
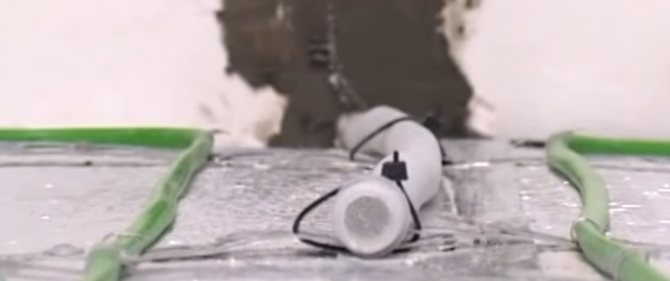
After laying the heating elements, they begin to install the temperature sensor, for this they perform the following actions:
- Having retreated from the wall about 0.5 meters, a small depression is made in the heat-insulating layer.
- A corrugated pipe is placed in it, the diameter of which is 2 cm. Thanks to the pipe, the sensor can be replaced even after the screed is poured.
- A thermal sensor is placed in this pipe.
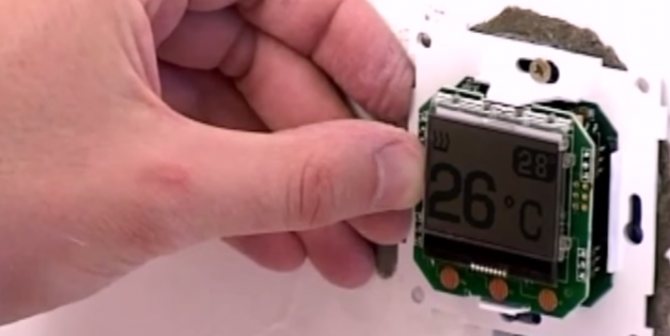
Further, at a height of 0.3 meters from the floor surface, a thermostat is mounted.
Scope of use
A mobile floor is a special equipment that can be used in absolutely any place where electrical networks are used. It can be mounted to heat the living area, in bathrooms, on balconies and loggias.
Most of the people are covered with warm floors in office and household premises, as well as country houses and kiosks. The use of a warm floor, which can be installed in absolutely any place, allows you to make the room more cozy and comfortable.
They also produce variants of carpets that can be used in cars. They have an adapter in the kit, which allows the workflow to be carried out from a battery.
Advantages and disadvantages
There are many positive features of this coverage:
- easy to use;
- there is no need to install a warm floor;
- oxygen is not burned during heating;
- safe to use;
- does not produce harmful secretions that would cause an allergic reaction;
- uniform and fast heating;
- high efficiency rate;
- average heating temperature;
- acceptable cost.
We recommend: What are the myths about the dangers of underfloor heating?
Like any other equipment, the mobile floor has its own disadvantages. One of these is operating costs. Also, when using it, it is imperative to follow the safety rules.
Connecting the "warm floor" system
It is recommended to connect the electric underfloor heating system only using copper wires, the cross-section of which is determined by the final load.
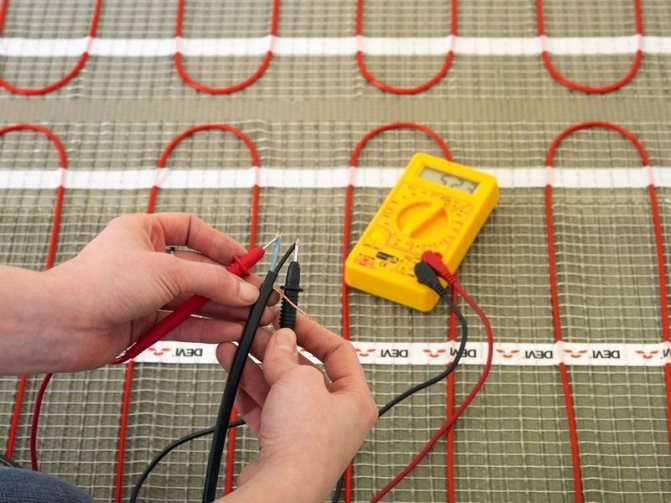
A thermostat is installed on the wall and a heating element and a temperature sensor are connected to it. The work is carried out in strict accordance with the instructions that the manufacturer attached to the regulator.
It is strictly forbidden to check the electric underfloor heating by supplying voltage to the system. To ensure the integrity of the insulation and the correct connection, before connecting to the thermostat, measure the resistance of the heating element and compare the result with the recommended value. The difference should not exceed 10%.

To connect the electric underfloor heating to the network, use its own differential current switch.
Voltage supply to the "warm floor" system is carried out only after the screed has completely hardened.
As a finishing option, it is recommended to use a special screed for a warm floor, which is characterized by the best thermal conductivity coefficient. In addition, it is allowed to use ordinary concrete screed or self-leveling floors. The height of the screed is determined by the weight of the vehicle and the planned work in the garage. The optimal height is 3-5 cm above the heating element. Taking into account the thickness of the used heat-insulating material of about 5 cm, the minimum screed height should be 5 cm. The optimal screed thickness is chosen after assessing the intensity of the load on the heated floor surface.
When deciding how to make a warm water floor in a garage, it should be remembered that you can turn on the underfloor heating system into the power supply only after 28 days. During this time, the screed over the heating element will completely solidify.
The concrete screed can act as a finishing coating; it is also possible to install a warm floor under the tiles in the garage. In any case, the heating properties of the floor will not change from this.
Cable electric floors: characteristic features
Unlike water counterparts, electric underfloor heating is less whimsical installation conditions. To improve efficiency, it is also necessary to use thermal insulation materials, but the system can be laid over uneven surfaces.
It is important to note that the thermal insulation layer must be at least 30 mm. Otherwise, during the first frost, the efficiency of this type of heating can drop by up to 30 percent.
Electric floor
For installation, a special fixing mesh is used, to which the heating cable is attached. It is important to note that if you need to prepare the floor for electricity, DIY garage products are not a good idea. The communication and connection of the thermostat should be entrusted to a specialist.
By adjusting the pitch of the cable, you can select areas with high heating - the frequency of turns there will be more than in the rest of the room. This is needed to neutralize the cooling effect from the walls in contact with the street.
Advantages of cable electric floor:
- ease of installation;
- the ability to regulate the temperature;
- fast warm-up.
In addition, such a cable can last for a considerable period of time - more than 50 years. Unlike water floors, this type of underfloor heating can be safely turned off even in severe frosts - nothing will happen to the cable.
Heating mats are used for easier installation. In fact, these are mounting grids with a heating cable already installed. This is one of the ways how to make a warm floor in the garage quickly and without unnecessary difficulties. In addition to simplified installation, this subspecies of an electric hearth is no different from a cable one.
Throughout the entire process, it is important not to step on the cable and to monitor the integrity of its sheath. In case of damage, it is strongly not recommended to cut out the damaged area and make twists. At best, this will reduce efficiency and service life, and at worst it can cause trouble.
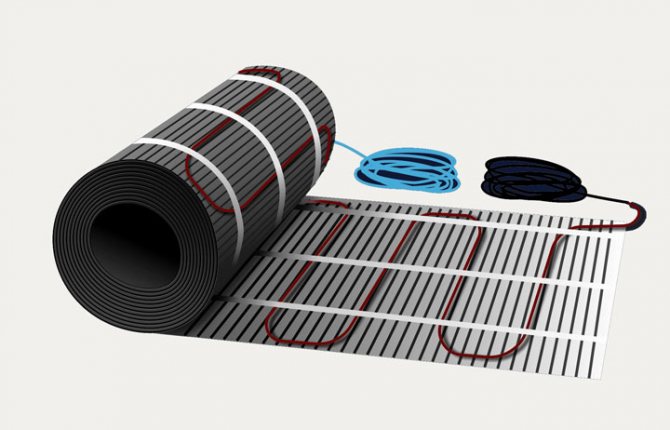
Heating mats
The best solution in this case would be to replace the entire cable.
It should be noted that after the electric underfloor heating is installed, the electricity consumption in the garage will increase dramatically. However, this drawback is completely offset by the fact that such a heating system is able to warm up the garage in a very short time, so you can not keep it on all the time.
Water system "warm floor" in the garage
A water-heated floor in a garage is considered a more economical heating option, but for its operation it is necessary to install a boiler or crash into the heating system in the house.It is this fact that makes the installation process more difficult and costly in material terms.
However, do-it-yourself warm water floors are considered beneficial as they do not require high energy costs compared to electric underfloor heating.
It is recommended to install the boiler if it is impossible to use other options, which is due to large financial investments.
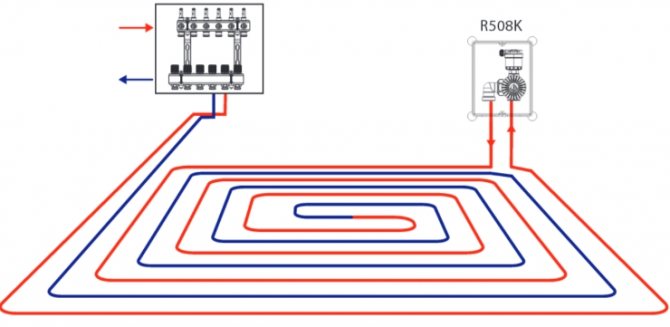
When drawing up the project, attention should be paid to the connection diagram of the warm floor to the general heating circuit and to correctly determine the location of the distribution unit. Also, in the process of solving the problem of how to make a warm floor in a garage, it is necessary to calculate the length of the pipes in accordance with the area of the garage and select a pump of the appropriate power for the flawless operation of the system.
When connecting to a radiator heating system, take into account the excessively high temperature of the medium in the circuit. To reduce this parameter, a mixing unit is installed. Here, the heated coolant will mix with the cooled liquid that has passed through the entire system. When using a separate boiler for the underfloor heating system, the temperature values can be adjusted directly on the boiler.
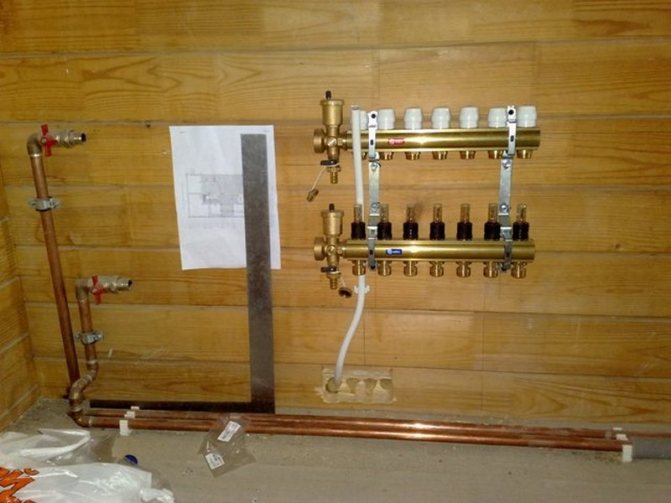
The distribution unit includes a mixing unit, a collector group and a pump for forced circulation of the coolant. All of this is housed in a control cabinet, which can be purchased at any specialty store. In this case, you can choose a cabinet of a certain capacity, assembled and tested at the manufacturer. The selected cabinet is installed in the most suitable place and connected to the general heating system. After that, the warm floor is connected to the collector group.

Garage water floor: advantages and installation features
If the selected warm floor is water, you will have to think over the water supply system in the garage. Obviously, this type of floor is only suitable for those cases when the parking space of the four-wheeled friend is attached to the house.
Otherwise, it will be very expensive to pull communications.
Garage water floor
The advantages of this type of flooring include:
- Durability. Correct installation guarantees up to 20 years of trouble-free service. Depending on the pipes, such a system can last over 50 years.
- Profitability. In fact, the power of the common boiler is used to heat the water. At the same time, the cost increases slightly.
- The ability to regulate heating. As the water gradually cools down, an ideal temperature distribution throughout the room can be achieved: the hot water pipes are located closer to the outer walls, thereby solving the problem of natural cooling.
It should be added to the list that, if you wish, you can make a water-heated floor in the garage with your own hands, although considerable theoretical and practical training will be required.
Pipes are laid exclusively on a flat surface. This means that you will need to fill the floor with a screed. Irregularities can not only complicate the entire installation process, but also disrupt the functionality of the system.
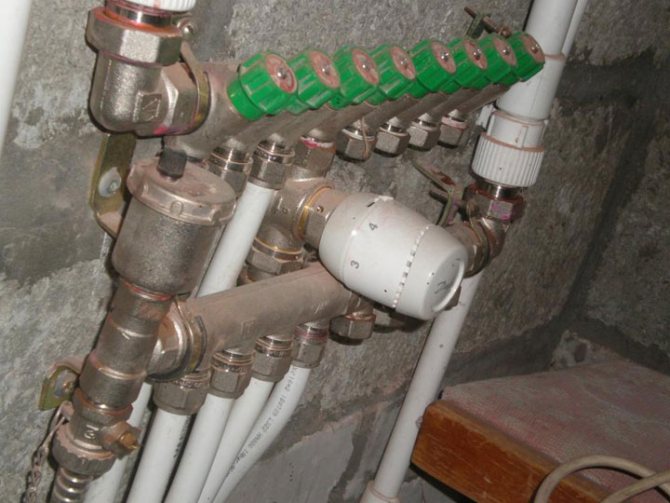
Heating manifold
For greater efficiency, thermal insulation is applied over the primary screed. It is needed so that the heat does not go outside.
Only after a flat heat-insulated area has been obtained does the installation begin. Depending on the pipes, fastening takes place either using a special mesh, or using fixing devices.
Pipes are laid taking into account the permissible bends, since too steep an angle creates more pressure in the area of rotation of the water flow. Due to this, leaks can occur.
The final stage is the final concrete casting.
It should be added that the pipe path itself may be different. Depending on the possibilities and the situation, one of three methods is used:
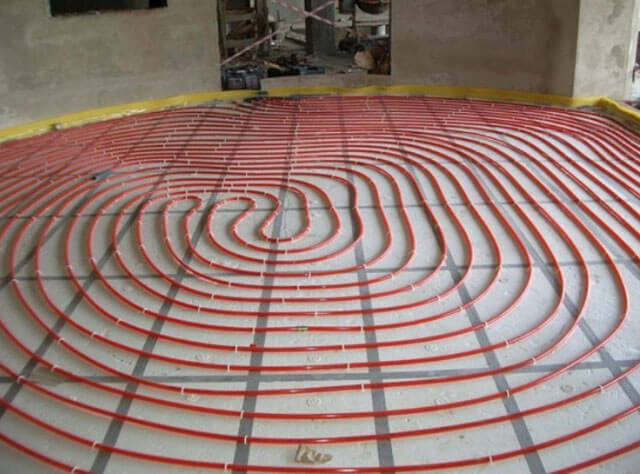
- snail - pipes are arranged in a spiral, the reverse corresponds to the direct one;
- snake - the hearth area is filled with straight turns;
- double snake - the reverse is parallel to the straight.
A forward passage is called a pipe through which water enters, and a reverse path through which it returns.
Despite all the advantages, you should not rush to collect a warm floor in the garage with your own hands. There are also a number of disadvantages:
- Spending. In addition to the costs of consumables and pipes, you will also need to buy a pump to adjust the water supply to the heating system.
- Difficulty in repair. You can only find and fix the leak by disassembling the floors.
- Vulnerability to cold. In winter, such heating cannot be turned off without draining the water. Otherwise, it will turn into years and the pipes may burst.
All this must be taken into account when choosing.
Base for a water-heated floor
In general, the base for all types of the "warm floor" system is prepared according to the same scheme. In the case of a warm floor in a garage from heating, it should be borne in mind that the height differences should not exceed half the diameter of the pipe. In this case, it is possible to prevent the formation of air jams that impede the normal circulation of the coolant and the warm floor from the heating will work as it should.
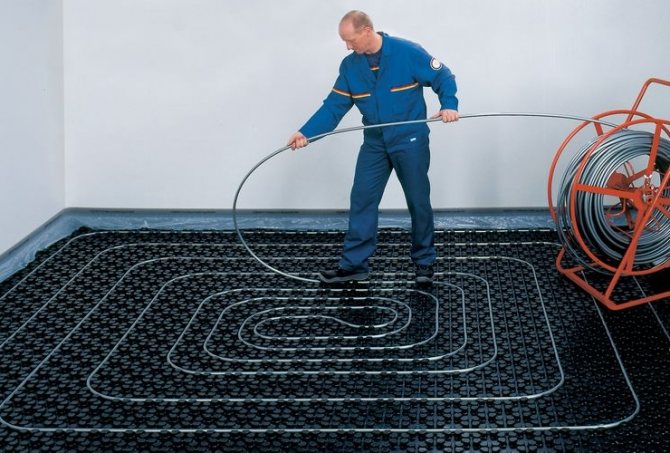
A distinctive feature of the water underfloor heating system is the presence of special thermal insulation, which makes pipe laying easier. The upper layer of insulation is equipped with small staggered protrusions, in which the tubes of the water circuit are laid. It should be noted that the price of this option will be higher.
When using conventional insulation with a height of 3-8 cm, the pipes are distributed on the mounting grid.
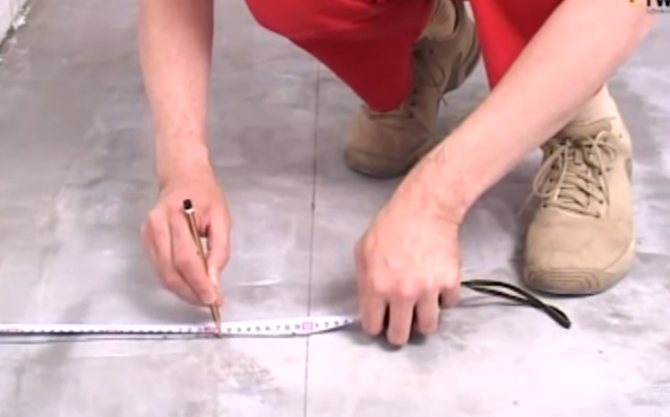
Floor making instructions
Before you independently make a warm floor in the garage, you need to draw up a plan for laying out pipes or an electric cable. For this, a floor plan of the garage is drawn with dimensions, on which the entry and exit points of the heating circuit pipe or the electrical connection point are marked. After that, the path of the future route of the heating element is depicted.
The preparatory steps for any type of floor are the same. First of all, you need to remove the floor covering and, if necessary, dismantle the old screed. If the rough screed is even, then it will be possible to proceed to the next stage. If not, you will need to perform an additional screed.
Operation stages
As soon as the subfloor becomes level, monolithic and ready to withstand a high load, proceed to the direct installation of the heating system. The steps are identical for any type of heating. Their essence boils down to isolating the system from the penetration of groundwater and providing thermal insulation to prevent the extraction of heat by the rough screed.
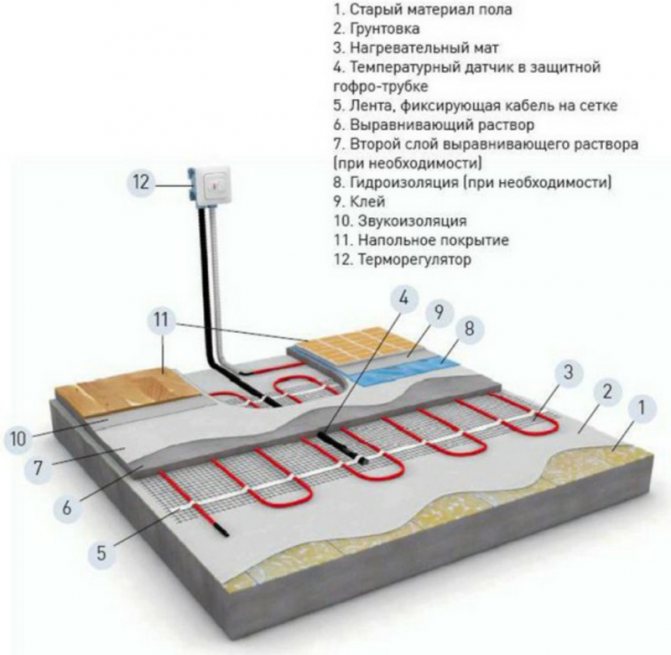
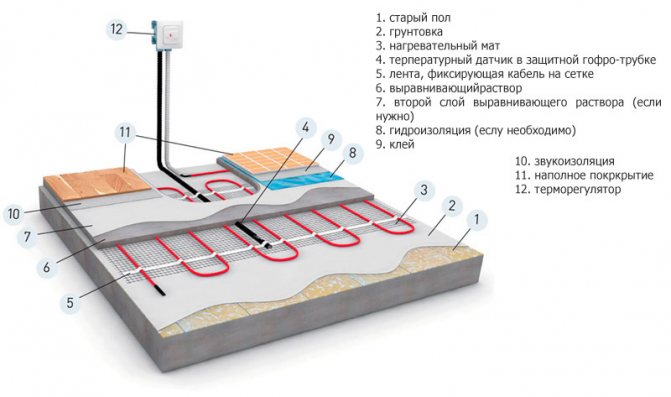
When installing the underfloor heating system, you must adhere to a strict sequence
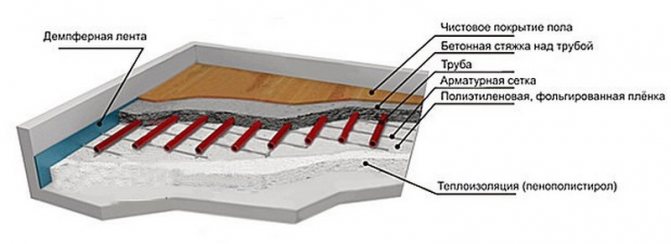
When assembling the floor, adhere to the following sequence:
- A polyethylene film up to 0.5 mm thick is placed on the cleaned screed for waterproofing, and on top of it - a heat-insulating material. It should be fairly tight to avoid sagging. As such a material, polystyrene or penoplex is used with a thickness of at least five centimeters and a density of more than 35 kg / m³.
- A damper tape is glued to the walls around the perimeter of the garage, slightly going under the insulation. Its purpose is to compensate for the expansion of the concrete screed. Typically, a twenty centimeter high polyethylene foam tape is used.
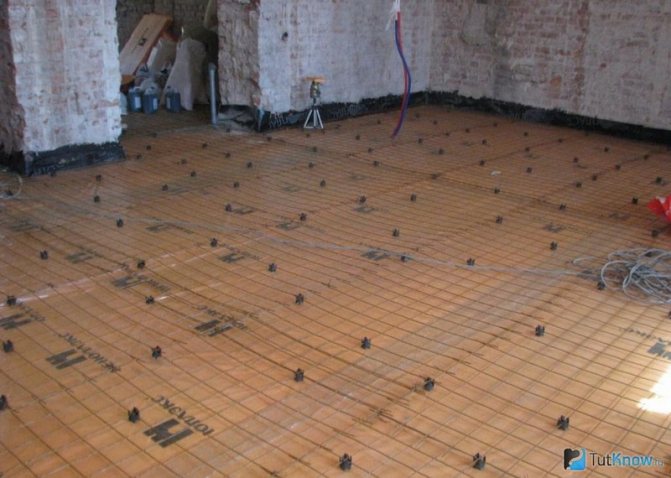
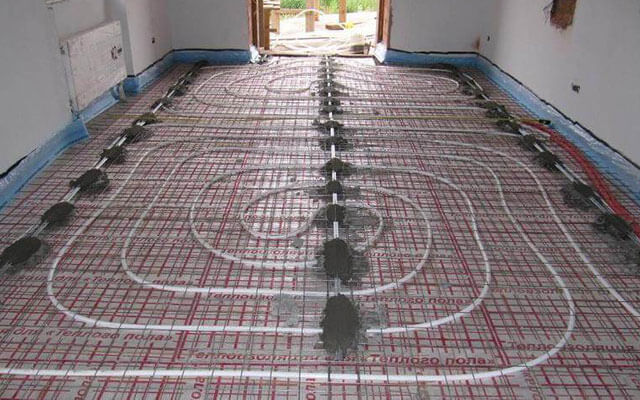
- An aluminum foil serving as a reflector is laid on the thermal insulation, and a reinforcing mesh on top of it.
- Hoses or cables are laid out along the grid, which are fixed to it with ties and then connected to the thermostat. In the case of a water floor, to the water supply and drainage system.
- The system is turned on and tested for operability.
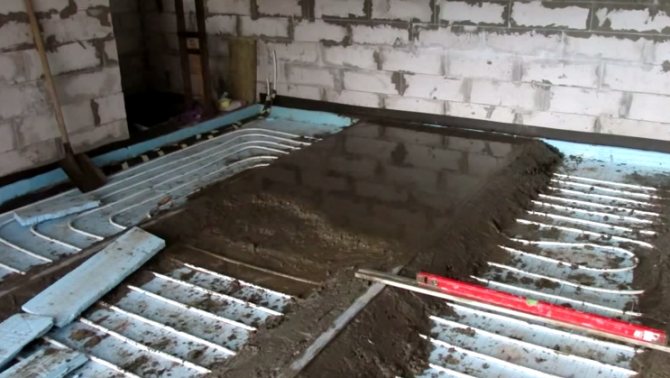
- After successfully passing the test, the entire floor is filled with concrete screed. Its thickness should be at least five centimeters from the top of the pipe or cable.
- The operability of the structure is checked again, the finishing coating is laid.
It is very important to have a floor plan before laying a warm floor.
Nuances of execution
If, during the construction of the floor, pipes are cut into the radiator heating system, then it should be understood that the temperature in it is too high for the floor. Therefore, it will be necessary to install a mixing unit, in which the heated water will be mixed and passed through the circuit.
For a separate water circuit, a switch cabinet should be installed, which will house the circulation pump, mixing and collector group. If the area of the garage exceeds fifteen squares, then the pipes are laid in a spiral, which ensures uniform heating.
All connections in the electric floor are made using couplings. For protection against currents, leakage and short circuit, an RCD and a circuit breaker are installed on the line of its connection.
After pouring the finishing screed, at least a week must pass before heating is switched on. If the floor temperature is maintained during the day, then the task can be considered completed.
Pipe laying
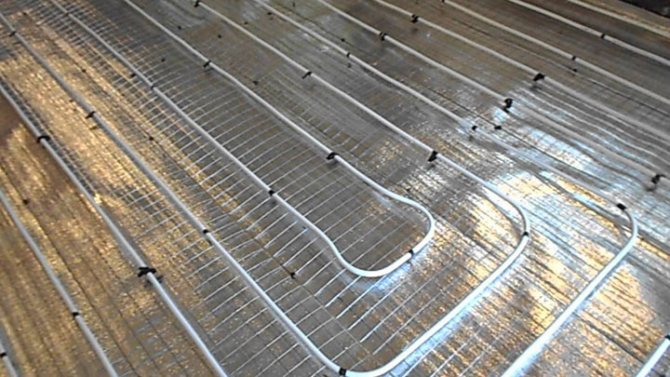
Pipes of a water-heated floor are most often laid using the "snake" method with a parallel distribution of turns over the entire area of the room. The pipes are fastened with clamps or wire.
With a large garage area, pipes are laid using the "spiral" method. In this case, the area warms up more evenly, although laying is considered more laborious.
In the process of laying pipes, it is forbidden to bend the pipes at an angle of less than 90 degrees by any method, so as not to damage the heating element. For the same reason, you must not step on the pipes and allow them to be damaged. If any section is damaged, the entire circulation circuit must be replaced.
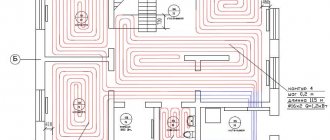
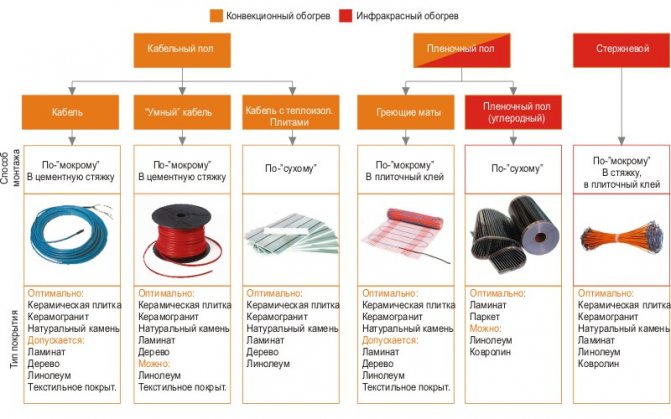
Types of underfloor heating for the garage
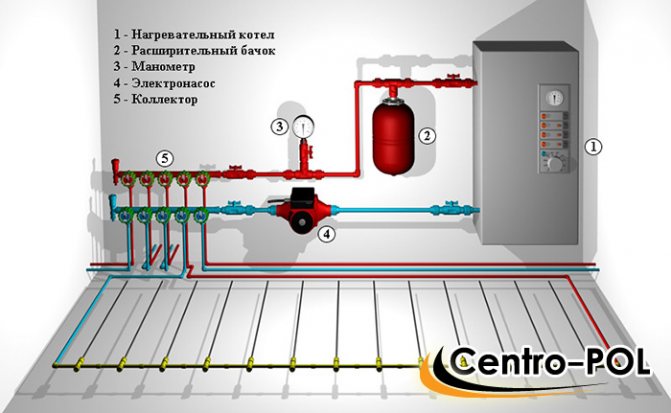
Connection diagram of the water floor heating system
To avoid freezing of car mechanisms, you can equip the floor in the garage with heating. This will allow you to forget about the problems of starting a car even in the most severe frosts. If the garage is used all year round for repairing a car or for other purposes, the installation of a warm floor is simply necessary, because with its help you can significantly save on heating the room.
Warm floor for a garage with a basement can be of two types:
- Water. This is a closed system; for its construction, metal-plastic pipes are most often used. Such a floor is walled up in a screed. In this case, a boiler is used to heat the room;
- Electric. The structure is also closed with a screed. According to the installation system, this type of floor can be cable and film. And the principle of heating is infrared or convection.
In the case of installing a cable underfloor heating, it is planned to install heating sections, cables on a coil, heating mats. In this case, the supply and regulation of electricity is carried out by a thermostat. Underfloor heating of the film type involves the use of a film as a heating element.
During the installation of a warm floor with your own hands, you must strictly follow the manufacturer's instructions. Consider the advantages and disadvantages of a water and electric floor heating. We suggest watching a video on this topic.
Water floor
If you need to choose which type of underfloor heating is best suited for a garage with a basement, you need to consider the advantages and disadvantages of each of them.
The advantages of a water floor include:
- the opportunity to save on electricity;
- uniform heating of the entire floor surface.
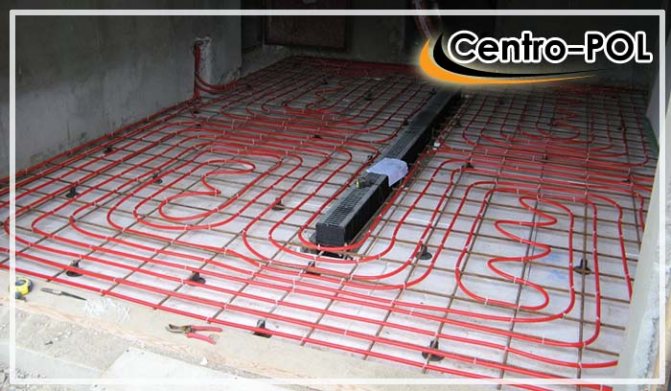
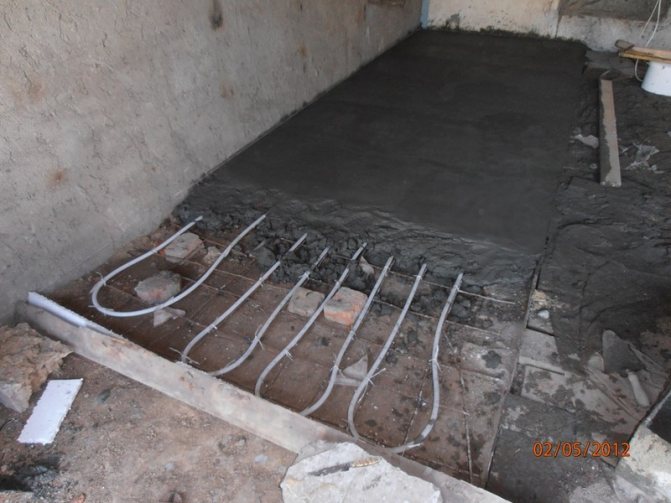
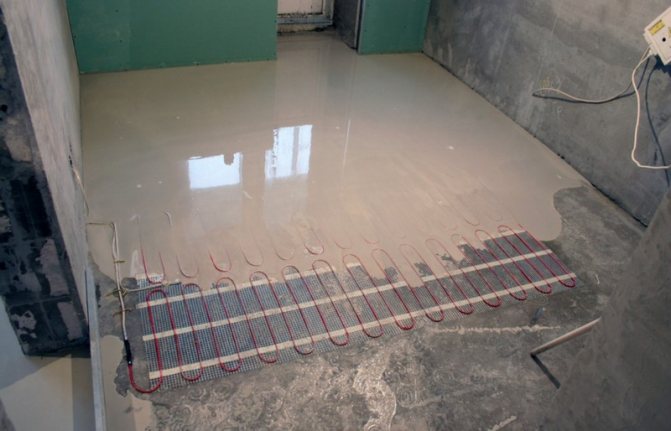
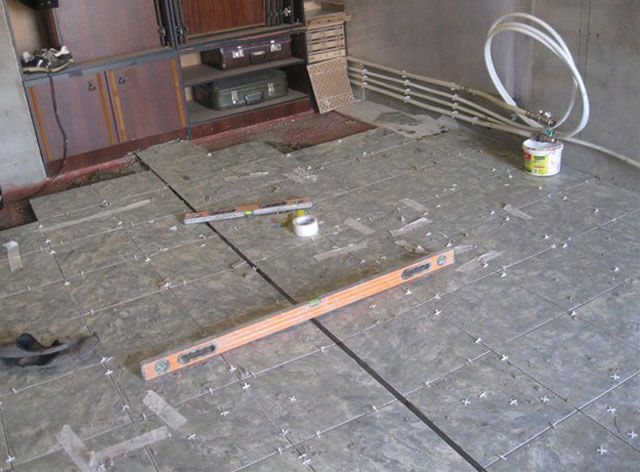
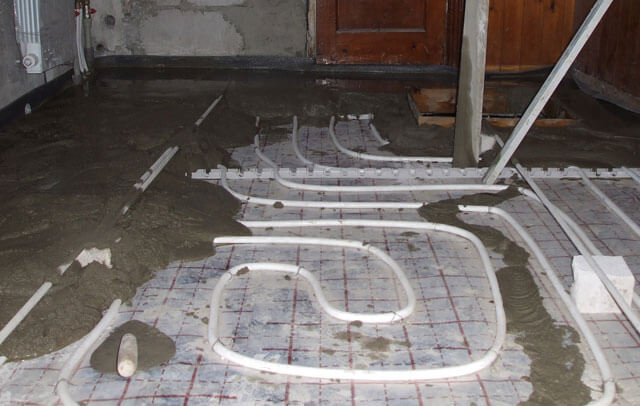
An example of laying a water floor before pouring a screed
The disadvantages of this floor are:
Paving slab garage floors
- The complexity of installation work;
- After arranging the floor, pipe leakage is possible, which is very difficult to detect. It will be necessary to dismantle the floor;
- If the room is detached, the supply of communications is required.
To bring communications and make a water-heated floor, you need to purchase a boiler and a circular pump. Also, for proper operation, you need to regularly service the system. Thus, this type of floor heating in a garage is costly. After watching the video material, you can find out more about the installation of a warm floor.
Electric underfloor heating
The design and installation of this type is simpler than with the arrangement of a water floor. In this case, the energy consumption for floor heating increases significantly. The advantages of such designs are:
- there is no need to supply communications (except for electricity);
- the whole system consists of a heating structure (for example, a cable) and a thermostat;
- there is no need to service the system.
The disadvantages include the cost of electricity, which can be reduced by using an insulating layer.
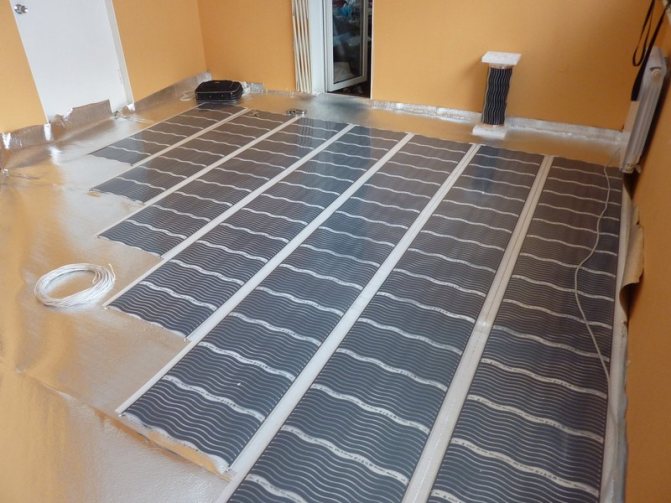
When installing an infrared floor, experts recommend placing it locally. It is impossible to equip the entire area of the room with an infrared film system, since some of its sections will have a serious load. Therefore, you can make several areas heated, for example, under the machine and on either side of it. More information on this can be found in the video.
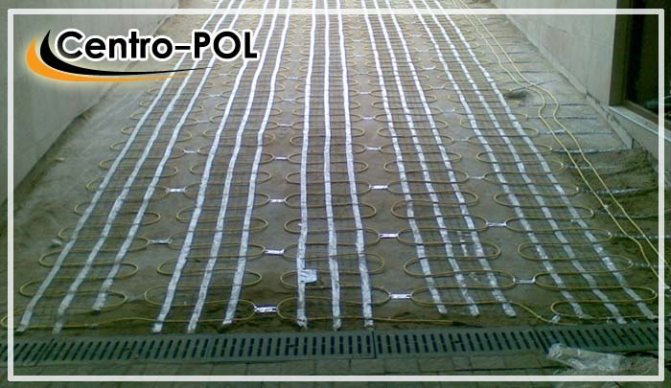
Example of laying an electric floor in a garage
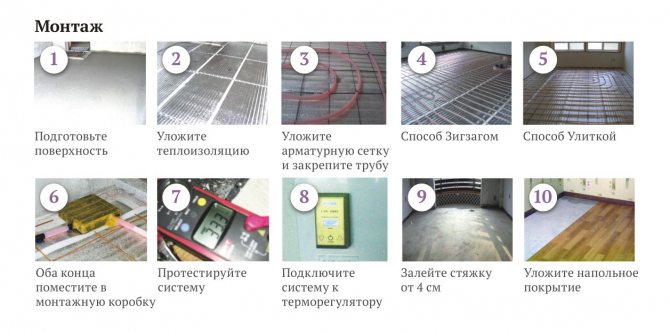
The whole process of laying an electric underfloor heating with your own hands is the following sequence of works:
- Insulation of the garage and basement from groundwater penetration. This can be done with a concrete screed;
- Laying a layer of thermal insulation;
- Installation of electric underfloor heating, insulation of all contacts and installation of a temperature sensor;
- Installation of waterproofing, testing of the floor heating system;
- After successful testing, the screed is poured. Its thickness should be less than that of a conventional floor without an electrical system.
In general, it is quite simple to lay an electric warm floor, all the work can be done by hand. The presented video material clearly demonstrates how this can be done.
Testing the water floor heating system
To identify problem areas in the water circuit, it is necessary to test the system. To do this, a coolant is supplied to it, and a pressure is set on the pump, which exceeds the operating values by 1.5-2 times. In most cases, this parameter is 5 bar. The test lasts about a day at a stable pressure, during this time no wet spots should appear on the floor. By the end of the test period, the pressure should be at operating values.
The maximum temperature value is set on the boiler or mixing unit. After a certain time, all parts of the underfloor heating system should warm up. After about a day, in a normally functioning circuit, the pressure and temperature should remain unchanged. Only under these conditions can you start pouring the screed.
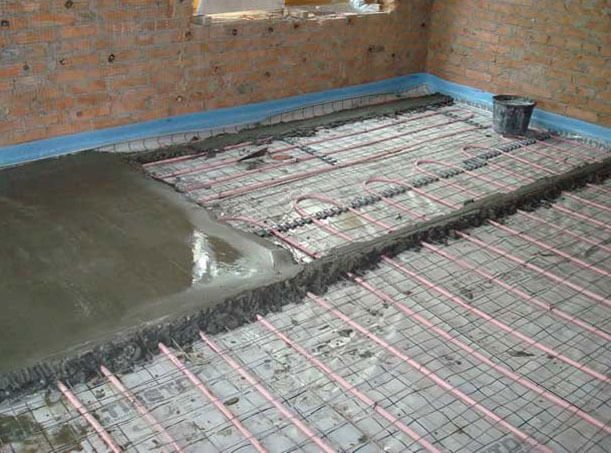
Pouring a fine screed
It is possible to fill in a finishing screed only if there are no defects in the system. Before direct filling, the circuit is filled with a coolant, but it is not heated. Experts recommend maintaining the temperature in the circuit at the same temperature as the room air. Filling the screed with a heated fluid in the system is a violation of safety rules.
Ready-made compounds for underfloor heating screed can most often be used at temperatures above 0 degrees. Therefore, you should purchase a screed that is optimal for certain conditions. You can find out about this on the packaging from the manufacturer. In addition, it is important to remember that you can increase the temperature in the room in any way, except for using the "warm floor" system.
The height of the screed is selected individually for each case, although its thickness may be the same for an electric underfloor heating or a water circuit. The system can be turned on only after the screed has completely solidified.