The construction of a cinder block bath has certain subtleties in construction, insulation and decoration.
To build a bathhouse from cinder blocks, you do not need large financial investments in this it differs from a bath from a log, a black bath or a bath on wheels. it differs from a log bath, a black bath or a bath on wheels. The process of erecting walls, together with finishing, both outside and inside, takes no more than three weeks. If you have a rest on weekends. One way or another, it is quite possible to build a bathhouse from cinder blocks in a month. The main thing is to choose a high-quality cinder block. This is a building material that can contain any impurities. In addition to the fact that the slag is different - sometimes such that the block falls apart at the slightest shock load, there are also blocks of high radioactivity. You should not save on building material, you need to take cinder blocks only from trusted sellers.
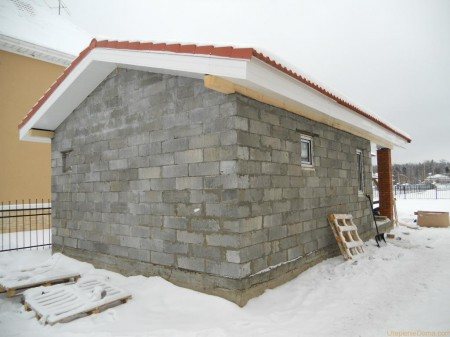
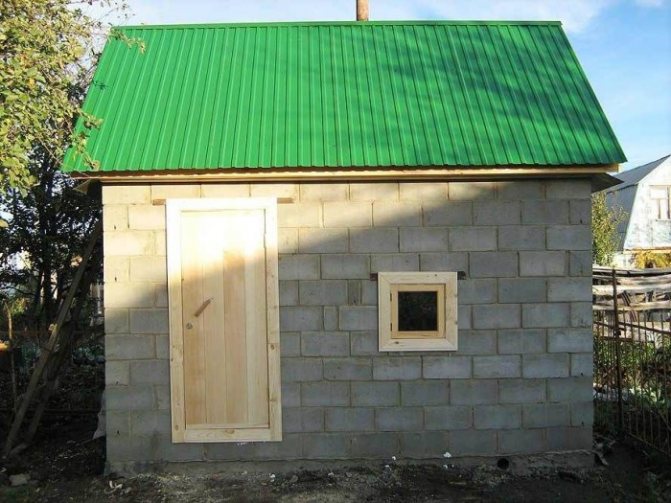
Cinder block bath
High-quality cinder blocks are still cheaper than other building materials, but this is not their only advantage. Positive characteristics of cinder blocks:
- have high thermal insulation performance;
- lightweight - the mass of cinder blocks is much lower than that of concrete and water;
- are not subject to organic decomposition - molds never appear in them;
- easily divided into shapes of any size;
- fireproof;
- due to the impressive size - the walls are being built in the shortest possible time.
The cinder block is, in fact, a silicate brick. Only instead of quartz sand, it contains porous slag, due to which it has less weight and price. The structure of the cinder block is porous. This quality improves the thermal insulation properties of the building material. For a bath, perhaps the most important quality.
Bath project from cinder blocks
Design is necessary to accurately count the number of cinder blocks. You can familiarize yourself with the projects of the baths on the Internet, or make them yourself: draw on paper, or using a special 3D program. To the result obtained, add ten percent of the material, to the stock. By the way, you can make cinder blocks yourself. This requires a special machine.
After preliminary calculations and the purchase of building materials, it's time to start construction.
Warming of saunas
After organizing the power supply in the room, they begin to insulate the inside of the bath. To improve the hydro and thermal insulation properties, you need to plaster the outer and inner walls. This is done after the building has settled.
Interior finishing work continues, strengthening the support beam for clapboard sheathing. The use of wood is necessary in the steam room and relaxation room. The washroom is covered with ceramic tiles if desired. Free spaces in the frame between the crate are filled with insulation material.
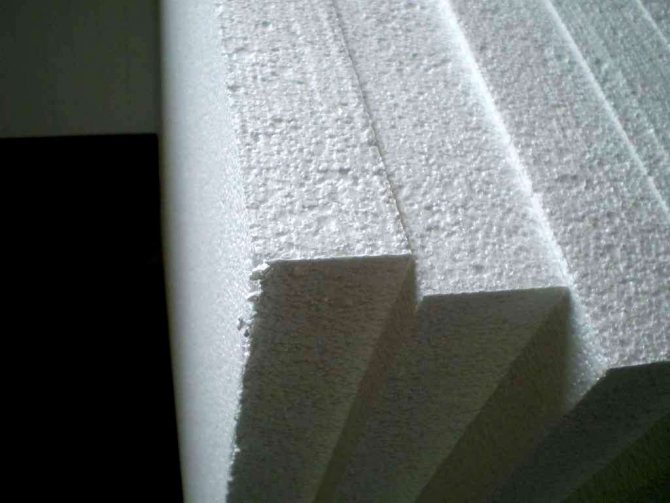
It is forbidden to use foam material due to the fact that the evaporated water will collect inside the lining and settle there for a long time. The insulation material must be vapor permeable. Glass wool and mineral wool are suitable for this purpose.
Aerated concrete is characterized by the fact that it crumbles very easily, as a result of which, when fixing the installation bar for the lining to the walls, metal dowels are used, intended for this material. The clapboard cladding inside is carried out so that the tree is fixed to the frame vertically, which will help the vapor to easily flow down, and then flow out through specially equipped drainage holes.
The lathing with insulating material is covered with a layer of film with vapor barrier properties, and then the lining is attached to the frame. Fastening the sheathing can be done with nails, but if you plan to further disassemble the structure, then you need to use self-tapping screws. In this way, the aerated concrete walls will be protected from the absorption of vapors inside the bath.
Laying the foundation
Zero setting depends on the composition of the soil. A stony-sand base does not imply a base. Due to its lightness, cinder blocks will not need it. If, however, the soil is clay or sandy, especially peaty, - strengthening the zero cycle
vital. For a bath of cinder blocks, both columnar and strip foundations are equally suitable.
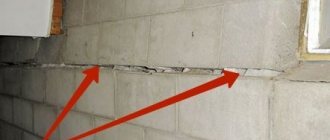
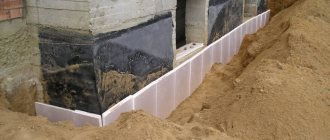
Since the cinder block, due to its porous structure, strongly absorbs moisture, the height of the foundation should be at least half a meter from ground level. On top of the foundation, before laying the masonry, it is necessary to lay a waterproofing material.
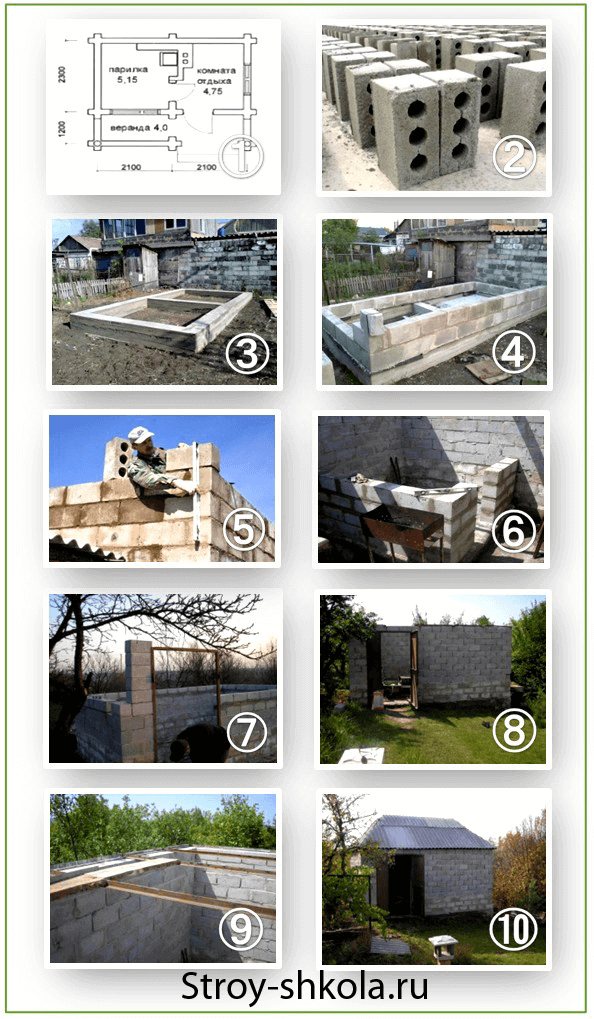
Stages of making a bath from cinder blocks
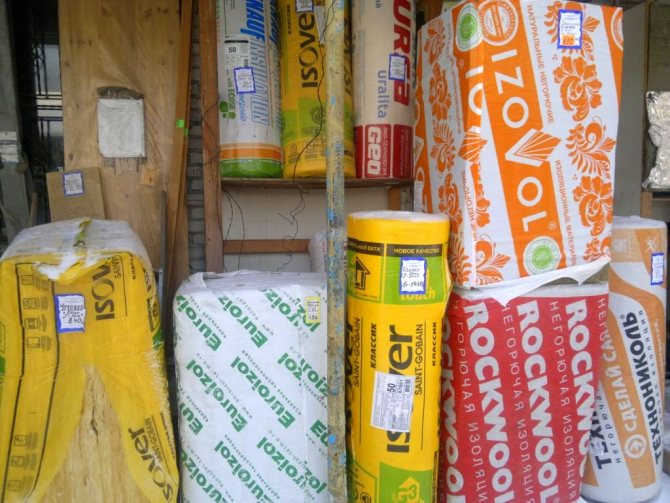
Selection of thermal insulation materials
Today, several types of insulation are used to insulate cinder block buildings (and baths as well):
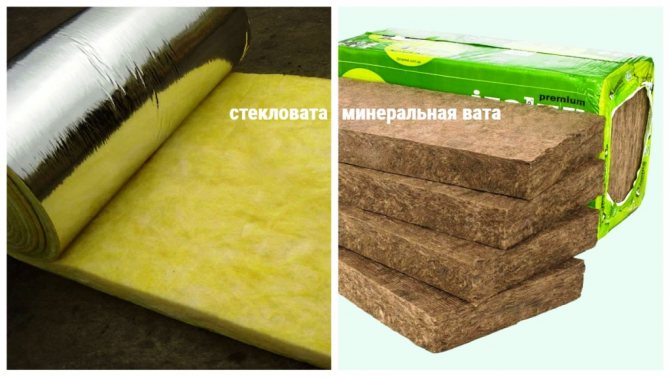
- Mineral insulation is a variety of wool, for example, stone, slag or basalt. They have excellent thermal stability and high thermal insulation properties. They are produced in soft rolls and pressed plates of various hardness.
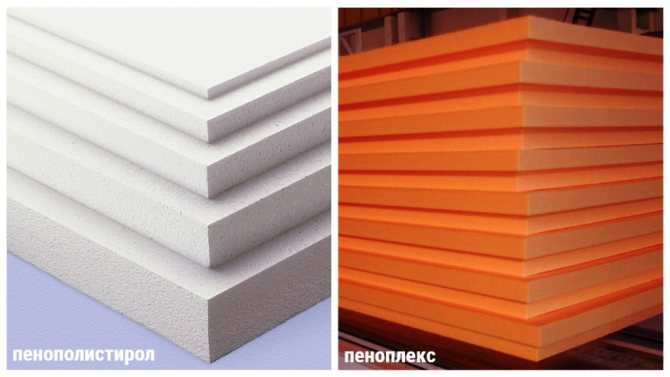
- Heaters based on plastics. This class includes almost all thermal insulation materials with the prefix "foam": polystyrene, polyurethane foam and other modern heaters. A distinctive feature of foam materials is their light weight, excellent moisture resistance and high thermal insulation properties.
- Organic materials are also popular for their environmental friendliness and excellent properties. The most popular are such natural insulation materials: jute felt, linen, linen tow, chipboards with the addition of special additives.
Advice! For insulation of horizontal surfaces (floor and ceiling), cinder block baths use bulk materials with high thermal insulation characteristics: expanded clay or sawdust.
Erection of the walls of the bath
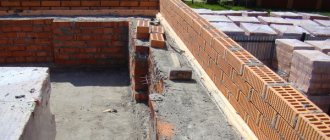
The technique of laying cinder block walls is no different from brick. The first layer is bonded, then three spoonfuls. Sticking masonry is done as follows: the blocks are folded in the direction of the wall across, one after the other. Laying in a spoon provides for the arrangement of cinder blocks along the direction of the wall - parallel. The distance between the ends of the blocks should not coincide either in the parallel row of the wall, or between the upper and lower layers of masonry. The blocks are folded using a trowel and a conventional mortar of sand and cement. Blocks are cut either with a trowel or with the back - with the sharp side of a hammer. A cement pad is applied to each next layer, and a cinder block is pressed into it. And so, up to the upper edge of the wall, under each bonded layer of cinder blocks, a mesh of metal reinforcement is laid - for the strength of the masonry. This mesh is cheap, but due to it the walls become stronger many times over. Cinder blocks are laid in such a way that there are no continuous seams, which represent a ready-made, man-made crack.
Internal insulation
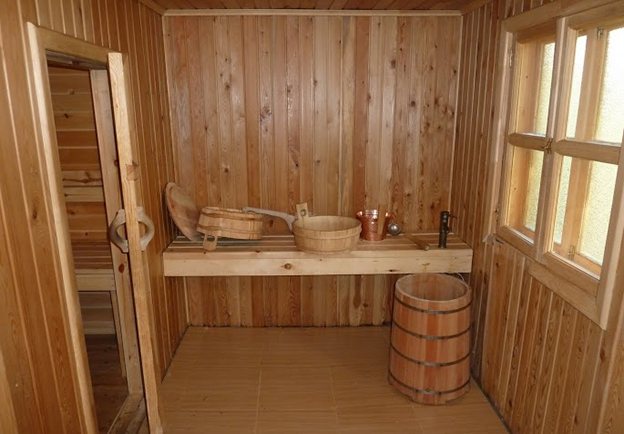
Preferences have always been on the side of wood. It is convenient, hygienic and can be easily replaced if necessary. Not to mention that different types of wood have different healing effects on the human body, and their very atmosphere is an integral part of the traditional sauna culture.
The tree should be such that it is not capable of overheating and causing burns to a person.For the interior decoration of the steam room, only deciduous varieties were initially used: ash, alder, birch, poplar, larch, aspen, linden. Resinous tree species and any conifers are unsuitable for interior decoration.
- The material must be in the required condition. The lining must spend at least a day in climatic conditions comparable to those of a bath. Otherwise, it may dry out to cracks (if too wet) or swell (if dry), which will greatly impair its appearance and performance.
- On the finished thermal insulation, nail thin strips with a step corresponding to the width of the finishing panels. Use stainless steel nails (bronze, copper). The best way is to assemble the panels into a groove.
- Always fix the lining horizontally in the steam room - this will allow you to easily change the lower beams as they wear out, which will prolong the operation of the bath for a long time.
- Wood is best for flooring. Any synthetic coating is poisonous at bath temperatures, and therefore is not suitable. It is inappropriate to use oak - it is slippery and therefore traumatic. In addition, it has a low heat capacity. In the dressing room and the rest room, it is possible to install a heated floor.
If you approach the construction and decoration of the bath creatively and wisely, then more than one generation of lovers of steam procedures will delight with its unique design and healing warmth.
Selecting materials and insulating a bath from a cinder block is not as easy as it might seem at first glance. There are a number of thermal insulation products that transform the bath and keep it warm.
The structure of cinder blocks is porous, which allows you to perfectly retain heat, but the same porous surface absorbs moisture. Therefore, the maximum protection of the walls eliminates the accumulation of moisture inside the blocks.
Before insulation, the lathing of the inner walls of the bath is performed with wooden slats at least 50 mm thick, on which a layer of mineral wool, basalt insulation, foam or any other material is laid. The thermal insulation layer is covered with foil or aluminum foil, which serves as a waterproofing. Particular attention should be paid to the tightness of the joints of all layers.
We offer you to familiarize yourself with: Impregnation of soup saunasuoy for a bath
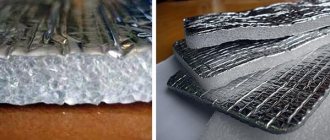
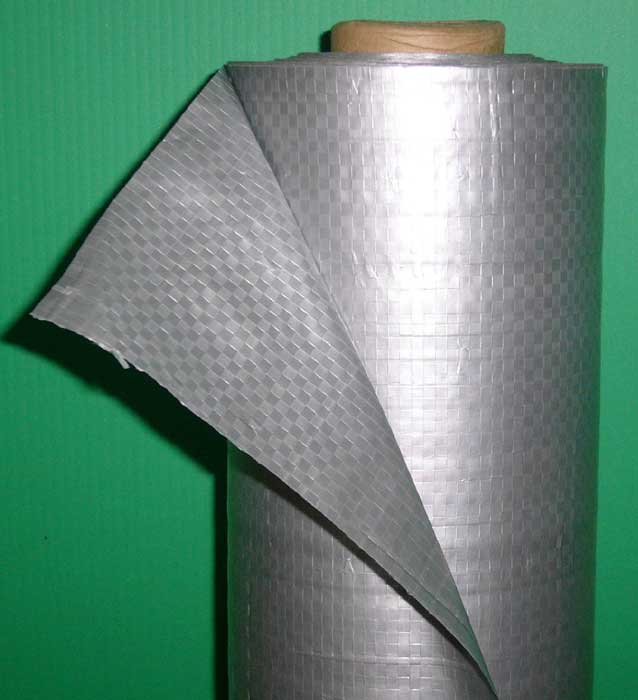
Aluminum foil is used as seam insulation material. If such insulation is insufficient, it is possible to lay one layer of non-combustible mineral wool between the wall and the vapor barrier.
Cinder blocks with a porous structure quickly lose their properties without proper facing, so you should not save on insulation. For external insulation, clapboard, siding or block house are often used, which are attached to wooden bars fixed directly to the walls of the bath.
In any case, special attention should be paid to creating an air gap. In this case, the layer of air between the materials will serve as a heat insulator. Some experts recommend warming the bath with plaster, but this method is labor intensive and less effective.
Interior decoration
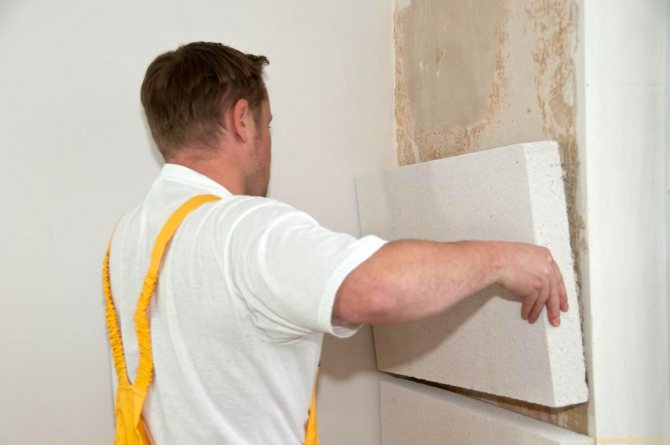
The interior decoration of the walls from the cinder block is started only after the masonry solution hardens. To speed up this process, the walls must be covered with plastic wrap. Excessive moisture does not contribute to the "setting" of the solution.
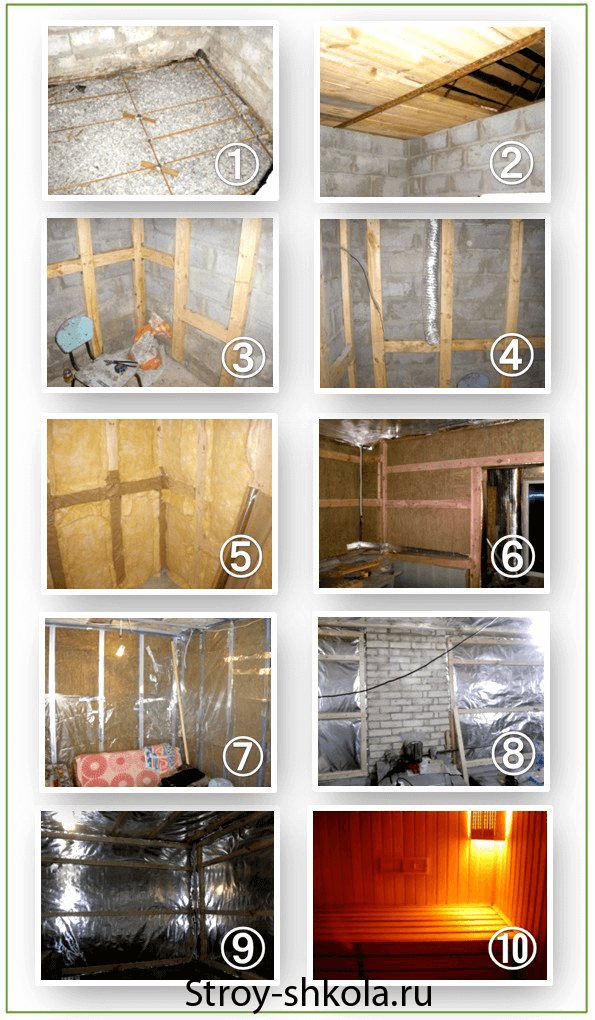
The process of interior decoration of a cinder block bath
The floors in the cinder block baths are best made concrete, calculating the slope for the water drain. Insulation of floors is carried out with foam glass, a material that is not afraid of moisture. A wooden floor is laid on top of the foam glass layer, or a removable grating made of a planed bar is applied. It is important to equip the sewerage system for water drainage, because dampness and cinder block are incompatible concepts.That is why you should not put on the back burner work on the insulation and waterproofing of the walls, do them as soon as the masonry solution dries out. The ceiling also needs insulation and waterproofing.
We build a bath
We pass directly to the arrangement of a bath from a cinder block.
There is a simple instruction for this:
- Preparation for work. First of all, you need to determine the qualitative composition of the soil on the site where the building will be located.
Advice! The most acceptable option for construction is considered to be a rocky-sandy base. A foundation built on such a soil will not need additional reinforcement. In the event that there is a peat bog, fine sandy or clay soil on the site, then you will have to additionally strengthen the foundation, since such a foundation can sooner or later cause a subsidence of the structure, bringing it to an emergency state.
- Since the building is relatively lightweight, both strip and columnar foundations are suitable for it.
- Projects of cinder block baths, providing for a columnar base, use pillars made of concrete or brick as supports, the dimensions of which are 0.5 by 0.5 meters. They must be installed in every corner, as well as in the node of the future building. The distance between such posts should not exceed one and a half meters. If it is larger, the design will be unreliable.
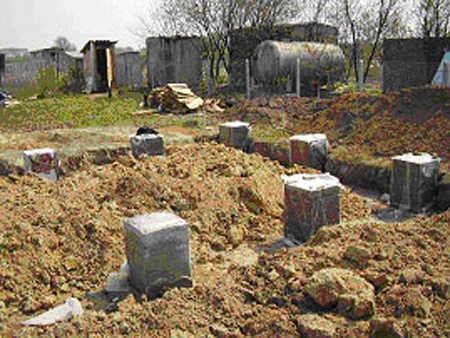
Brick columnar foundation.
On top of the installed pillars, a grillage is mounted - reinforced concrete crossbars that connect the supports into a single structure, after which the foundation is waterproofed.
Advice! If iron piles are used as supports, then it is advisable to treat them with bitumen mastic in order to protect them from corrosion.
- Projects of a bath from cinder blocks on a strip foundation are very common. Such a base is a concrete strip laid under the load-bearing structural elements. Sometimes brick or stone is also used to equip such bases, however, concrete is preferable.
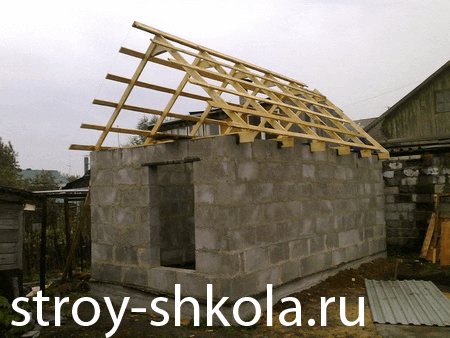
- Roof... You have two options here:
- In the event that you do not plan to use the attic space, the roof must be made single-pitched.
- If you want to equip an attic or an attic above the living area, make a gable roof.
- Floor... The best option for a bath is concrete floors. For water drainage, the base is poured at a slight angle.
- Warming... Cinder block bath projects involve the use of various thermal insulation materials. An excellent insulation for flooring is foam glass, since this material is absolutely not afraid of water.
Advice! In this case, foam plastic should not be used as a heater, since this material is flammable and, when heated, releases harmful substances into the atmosphere.
We equip the tape base

Marking for a strip foundation.
Before building a cinder block bath, it is necessary to lay a reliable foundation for this building.
The work is carried out in several stages:
- Surface marking. Using pegs and fishing line, it is necessary to establish the boundaries of the foundation along which the trenches will be dug.
- Regarding the marking by digging trenches, about 60 cm deep.
- We fill up the sand in the trench, with a layer of 10 cm, which should be well tamped.
- We mount the formwork. To do this, we drive in pegs along the perimeter of the trench. We lean the formwork boards on them.
- Insert the reinforcement cage into the formwork. It is knitted from reinforcing rods, which are fastened together with wire.
- Fill the formwork with concrete. The solution gains strength within a month. After this time, the formwork can be removed, and you can proceed directly to the construction of the walls.
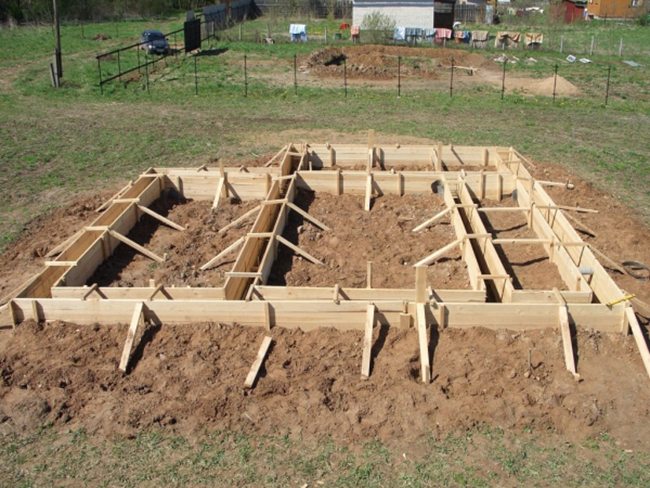
Formwork for the strip base under the bath.
Building walls
Building a bath from a cinder block is a fairly simple process, since this material is easy to work with. The walls are built by analogy with brickwork, and there are no special nuances here. (see also the article Features of building a bath from foam blocks with your own hands)
Advice! Professional builders, erecting the walls of the bath, lay every third layer of masonry with a reinforcing mesh, which gives the walls additional rigidity. Such a mesh is quite inexpensive, but it can significantly extend the durability of the building.
Internal work
Now let's look at the insulation of a cinder block bath. This building needs high-quality thermal insulation due to its purpose. And this stage is no less important than the erection of walls, because it depends on it whether your bathhouse will have a "branded" microclimate or not.
Since it is possible to insulate the bath from the cinder block from the inside only after the final hardening of the solution, you should wait about two weeks before carrying out these works.
Advice! It is recommended to cover the finished walls with foil while the solution hardens. This is done to prevent water from entering the solution.
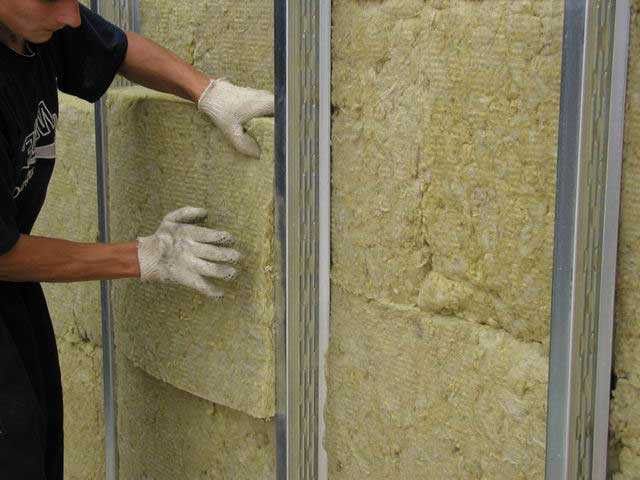
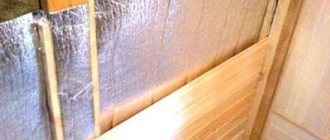
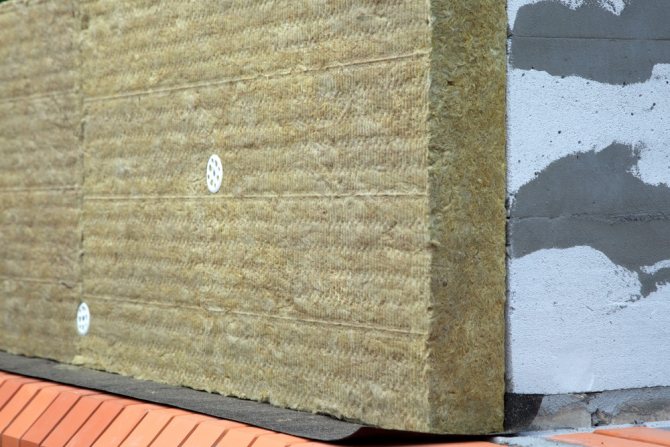
In the photo - the process of laying insulation between the profiles of the crate.
As mentioned above, cinder block walls keep heat well. However, if this material is in constant contact with moisture, it can lose a significant part of its unique properties. To avoid this, you should carefully consider the block waterproofing procedure, which will protect the material from excessive exposure to water and fumes. Such protection is most relevant in the steam room.
Waterproofing is carried out as follows:
- Finished walls must be upholstered with wooden slats, more than 5 cm thick. Our lathing will have a vertical direction. In order to reinforce the slats on block walls, metal hangers should be used, which are fixed with dowels.
- Any insulation, for example, mineral wool slabs, should be strengthened on top of the crate. For fastening, you can use both special adhesives and disc dowels.
- Foil or foil film is applied on top of the mineral wool as a waterproofing layer. Check the joints between the protective layers very carefully. You can also use Penofol as a waterproofing agent. This is a thin insulation with a foil layer, which will create additional thermal insulation protection.
Waterproofing membrane.
- Next, you need to finish the walls with lining or any other finishing material.
External cladding
Most often, siding is used as a facing material for such do-it-yourself cinder block baths. This material is represented by vinyl and metal panels, which can be of various colors and, in addition to their usual texture, imitate a wooden frame, masonry, brick, etc.
The siding is attached to the lathing, which can be either metal or wood.
Advice! Before installation, wooden battens of the battens should be treated with special protective compounds. This will significantly extend their service life.
Heat-insulating plates are laid between the frame profiles, which, following the example of internal insulation, are covered with a layer of waterproofing material. Siding panels can be attached on top of the waterproofer.
Cladding of cinder block walls with siding panels.
Ventilation and thermal insulation
Smaller bars are nailed onto the ceiling beam: 50X100 mm, at a distance of half a meter from each other. The same bars go to the walls, both vertically and horizontally. Penofol is applied to the frame made of beams - the most successful of the materials to date. This layer is mounted with washers, and is attached to the timber with a construction stapler.The joints are glued with aluminum tape. After that, urses and foil are sewn onto the walls to reflect heat. Only after these works, the walls from the inside of the bath are covered with wooden materials that are not afraid of moisture and withstand high temperatures. Aspen boards, for example. The distance between the cinder block wall and the interior upholstery acts as an air gap. Read more about ventilation here.
A false ceiling is installed under the roof. First, the logs are laid in a transverse position, then the board ceiling from the lining from the inside. After that, the space between the lags is filled with a 15 cm layer of insulation, which is covered from above with penoizol. Between the two ceilings, two plastic sewer pipes with a diameter of 10 cm should be thrown. They will provide ventilation. To prevent the ursa from sagging, it is tied up with a cord and nailed to the uneven bars with small nails. You can read about the sewage system in the bath here.
The choice of tools for thermal insulation of the bath
To carry out work on the insulation of the room, you should prepare the tools:
- measuring tape 5 m long;
- construction level;
- an electric saw;
- drill;
- screwdriver;
- a hammer;
- chisel;
- pliers.
The walls of the bath, made of slag, retain heat for a long time, but the cinder block absorbs moisture, as a result of which they collapse and the strength of the entire structure is lost. They begin to insulate the bath with the creation of protection of the walls from destruction. As a result of the work done, moisture will not concentrate inside the cinder block.
First, prepare the necessary materials:
- slats;
- aluminum foil;
- insulation (foam).
Insulation installation tools.
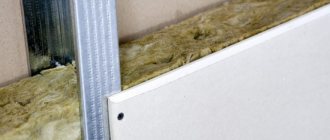
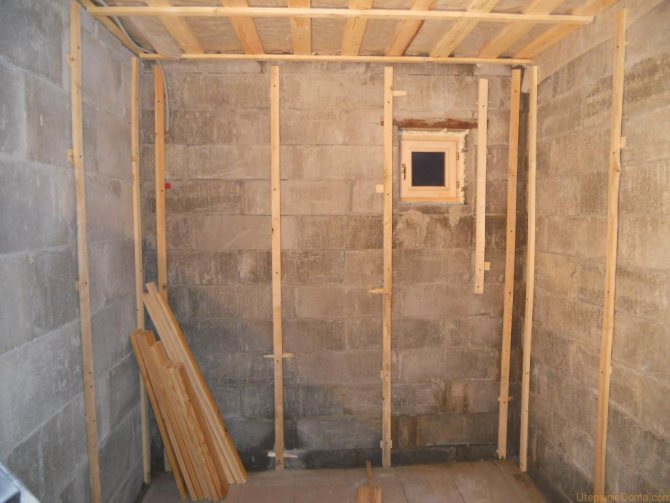
The first stage of work consists of creating a lathing for the surface of the inner walls. During the installation process, wooden slats with a thickness of 50 mm are used.
To insulate the walls of the steam room, an interlayer of mineral canvas or other heat-insulating insulation is mounted on top of the crate. The third layer covering its surface consists of aluminum foil. It is installed as part of a waterproofing system. All joints formed as a result of laying the layers are hermetically sealed.
A bath, equipped with a steam room, is insulated in a different way: steam insulation is mounted using polypropylene. It is covered with aluminum foil, and the seams are reliably sealed with a sealant. To create a lasting effect from insulation, mineral wool is mounted in the space between the wall and the vapor barrier.
To give the entire structure a complete aesthetic look, additional work is carried out: at the final stage of installation, finishing materials are used.
Attention should be paid to the creation of a special layer of air gap. The finishing material is mounted on wooden slats, which are covered with a layer of aluminum foil. Elements of wooden lining, intended for finishing the bath, are mounted in the horizontal direction.
Back to the table of contents
Outdoor decoration
To avoid heat loss, it is recommended to install a ventilated façade. For this, bars are nailed to the walls. Nails easily go into the seams of the masonry. After that, siding is stuffed onto the bars, the color and texture of which can be very diverse: from imitation of wood to marble slabs. Expanded polystyrene or mineral wool is laid between the outer layer of the upholstery and the cinder block wall.
Facade decoration completely depends on the owner's imagination, you can imitate anything you want. Here are the solutions that came to mind for the builders of their own baths from cinder blocks:
Cinder block baths - photo
An unpretentious, but warm cinder block bath will serve the owners for more than a dozen years. To do this, little is needed - to approach construction wisely.
How to insulate a bath outside
Not every material is suitable for bath insulation.Although it is similar to a dwelling and you can even live in it for some time, nevertheless, the bath has its own specifics in external isolation. The fact is that the walls are subject to periodic use and a special temperature regime. Basically, the bath is used several times a week, warming it up to a temperature of 80 ° C and above. The rest of the time, its walls can freeze through in winter to -30 ° C, depending on climatic conditions.
Different insulation materials are used for external and internal insulation. They also differ in cost and installation technology. For example, sprayed insulation (cellulose and polyurethane foam) requires special equipment and skills to work with it. In this way, the insulation of the walls of the bath outside with your own hands will not work.
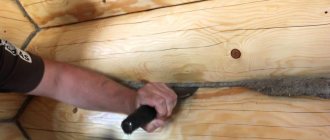
Log caulking
Heaters of natural origin, such as jute, felt, flax, and of inorganic origin - mineral glass wool, expanded clay and foam are used in both types of insulation.
Jute and linen wool are great for caulking a log bath. These modern natural insulation materials have a number of positive qualities. They are durable, resistant to decay and do not accumulate moisture, and also provide a favorable microclimate.
Features of ceiling insulation
The question of how you can make a bath insulation from the inside with your own hands is asked by some amateur builders. Having steamed for the first time in their own bathhouse, they come to the conclusion that the structure they have built has a number of design flaws that prevent them from heating the bathing rooms to the optimal temperature and contribute to their rapid cooling.
However, insulation with modern materials is not contraindicated in any bathhouse, including a wooden one, and it is absolutely impossible to neglect it when building a brick or cinder block. Many owners pay close attention to the installation of thermal insulation of the ceiling and walls, rightly believing that the greatest heat loss falls on these surfaces, but floors also need reliable heat protection. Only in this case an optimal microclimate will be created in the bath.
Floor insulation
It is necessary to carry out the insulation of the bath floor from the inside with your own hands if this operation was skipped even at the construction stage. When making the internal thermal insulation of the floor covering, it should be borne in mind that the height of the room will become smaller. It must be remembered that high-quality insulation of the floor, like other surfaces in a room with high humidity, is impossible without a good waterproofing device, which will protect the insulation and the structure itself from wetting and destruction.
https://www.youtube.com/watch?v=
You can insulate the concrete floor with expanded clay or expanded polystyrene (foam). In work, it is better to use extruded EPS, which can withstand higher loads than foamed. It will not pose any threat to health, since it will be covered with a layer of waterproofing and a concrete screed on top.
Before laying the insulation on a cleaned base treated with an antifungal agent and a primer, you need to put a waterproofer made of rolled bituminous material or dense polyethylene or coat the overlap with waterproofing mastic. It is necessary to insulate not only the floor, but also the walls of the room to a height corresponding to the total thickness of the insulation and screed.
Expanded clay is poured onto the membrane or expanded polystyrene plates are placed tightly. Bulk insulation is leveled, and the gaps between the plates are sealed with foam, scraps of PPP. Another waterproofing membrane is laid on the heat insulator. All its joints, as in the first layer, must be sealed. The edges of the waterproofer must be glued to the edges of the lower membrane, creating a waterproof "bag" for the thermal insulator.
A reinforced screed will be poured over the waterproofing. It can also improve the thermal insulation characteristics of the floor if the solution is prepared from expanded clay.After the concrete has set, the topcoat can be put on the screed.
Thermal insulation finishing of the ceiling of the bath
When installing the ceiling in a bath, it is necessary to take into account not only the fact that it accounts for up to a third of the heat loss, but also the fact that the accumulation of condensate on the surface reduces any insulation measures to naught. Therefore, vapor barrier from the inside is required here much stronger than for walls, actually going to first plan. This type of work in this case requires much more effort than similar work in the sauna.
Initially, the ceiling is recommended to be upholstered with hewn and dried boards 40 mm thick
The wider you can find the boards, the more beautiful they will look and no matter what kind they will be. Even with bitches, it will be even more beautiful
It is not advisable to use lining, it can lead. Thickness of the boards is not desirable due to the accumulation of a large amount of cold, in the absence of heat. This causes condensation to form on the ceiling when the steam room is heated. A layer of waterproofing must be placed on them, it can be an ordinary greenhouse film or other vapor barrier material.
Panels for such a ceiling are usually sold with all the necessary layers of waterproofing, insulation and moisture resistance. The standard width of a layer of mineral wool contained in ceiling tiles is about ten centimeters.
Since such panels have a solid weight, it is better to first lift them, and then connect them in parts at the top.
The basis for the insulation of the false ceiling is the attic frame. A waterproofing layer should be placed in these floor beams, which will eventually cover the entire inner surface. The next layer is the installation of wooden flooring. Then, in the gaps between the beams, you need to place the amount of insulation, for example, mineral wool.
After warming, it is necessary to ensure moisture isolation with foil-clad material. Now you can sheathe the ceiling with wood clapboard.
Floor ceilings are independent of the attic frame. Since they are mounted directly to the walls. For its construction, wooden boards about thirty centimeters wide are used.
Insulation is carried out from the side of the attic. All the necessary materials (vapor barrier, heat insulation, waterproofing, and plywood flooring) are placed over the floor ceiling. This method of ceiling insulation is the fastest, but is only suitable for a small bath area.
Wooden floors are often installed in timber baths.
Concrete can be poured if the walls are built of brick, cinder block, foam block or frame method.
Sometimes, according to the personal preference of the owner, a concrete floor is also made in a wooden bath.
Wherever concrete is used, it always needs special insulation, since cold and moisture affect it destructively, and also create discomfort.
Insulation of the floor in the bathhouse should be approached with special scrupulousness, because it is most exposed to moisture, and also must withstand the contrast between the temperature of the soil and the air in the room.
Before installing any floor in the bath, you need to clean the soil surface and cover it with a thick layer of expanded clay (medium size) or slag. The height of the embankment of this insulation must be at least double the width. If there is an opportunity to make the layer even thicker, you must definitely use it. In the case of a concrete foundation, expanded clay should be filled up to its entire height.
We invite you to familiarize yourself with: Siberian bath vat drawings
Concrete floor
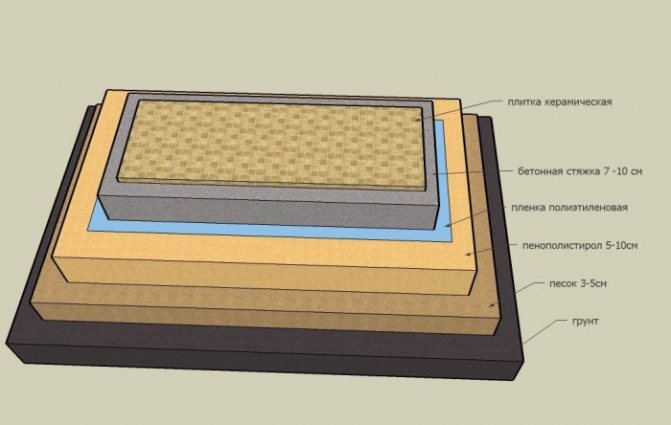
Before insulating and filling the floor in the bath room, a drain pipe should be laid. Then it must be attached to the level where the screed will be later. After that, you can start working with the floor:
- First you need to compact the soil.
- Then cover the walls with materials for.
- Sand (from eight to ten centimeters) is poured out on top of the soil, after which it must be moistened and tamped.
- The next layer is roofing felt, which should protrude 15 centimeters on the walls. The overlapped material canvases must be connected with moisture-resistant adhesive tape. You can also use tar mastic.
- Then a layer of expanded clay is poured onto the floor, the height of which should not reach the highest point of the foundation by 5 centimeters.
- After even distribution of expanded clay, it should be covered with plastic wrap. Then XPS slabs are laid on it (about five centimeters).
- Now you need to lay a reinforcing mesh, leaving cells from five to ten centimeters.
- Beacons can then be placed for alignment. They should be placed at a slight angle towards the drain so that the concrete floor has an inconspicuous slope so that all excess water can enter the drain.
- The next step is to attach the damper tape. This will ensure the safety of the screed and its evenness, even with sudden changes in temperature.
- Then you can pour the concrete mixture, distribute it evenly over the entire surface of the floor and level it with a rule.
- When the screed is completed and the concrete begins to acquire strength, it is covered with a special primer that penetrates into the depth of the concrete and has waterproofing properties.
After the concrete and the primer are completely dry, you can start laying the tiles. Also, a wooden flooring is often used in the bath.
Wood floor
A traditional wooden floor in a bath takes a lot of trouble. Special care should be taken to carry out waterproofing, good ventilation and heat preservation of the floor. For good ventilation, it is necessary to leave several channels in the foundation, which will serve as the ventilation system of the bath.
Step-by-step guide to work:
- First you need to attach the drain pipe and determine the location of the drain (often it should be in the center).
- Then the soil is rammed. A layer of roofing material is laid on it, rising to the surface of the walls up to twenty centimeters high.
- A large amount of expanded clay is poured over the waterproofing layer. But it should not reach the floor beams about 25 centimeters.
- Then the beams are installed. Before using a tree for building a floor in a bath, it must be treated with antiseptic agents.
- At the bottom of the beams, it is necessary to carry out the installation of cranial bars, to which a rough one will later be attached.
- After the subfloor is made, it should be covered with foil. Which does not allow steam and moisture to pass through.
- Then it is covered with insulation, such as mineral wool or expanded clay.
- Now the entire structure should be covered with a vapor insulating film again.
- The lags should be fixed so that they are perpendicular to the girder frame. A drain hole is cut in the center.
- Planks are attached to the flooring, cut at an angle of about seven degrees. They should increase the cut angle as they approach the drain.
- Insulation should be placed in the holes between these slats (with a layer equipped with foil towards the top). Webs of foil-clad material are connected with waterproof tape. Subsequently, the entire crate must be closed.
The flooring can now be laid on the wood floor. It must be new, of high quality and watertight.
It is possible to insulate the ceiling and roof of a bath from a cinder block with polystyrene foam, and it is even better to spray it with polyurethane foam. Thermal insulation of a bath structure is performed with a mandatory device for steam insulation, which is often confused with thermal insulation, but there is a difference, and it is quite significant. Vapor barrier is necessary to maintain normal humidity levels in combination with a certain temperature. Thermal insulation retains heat and nothing else. The differences between the processes become apparent when the sauna ceiling is insulated.