
Go directly to the conclusion.
Carrying out internal wall insulation during repairs, people make a huge mistake, since wall insulation from the inside is the most extreme and last way of warming rooms that can be used. Usually, the conclusion that it is necessary to insulate a room from the inside is due to complete ignorance or forced into apartment buildings, where each owner is only his own walls that form an apartment.
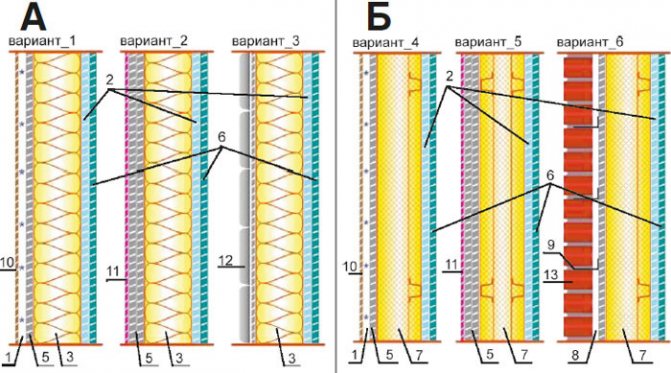
Internal wall insulation creates a number of problems that need to be solved, and at the same time, several sharply negative moments are formed:
1. The enclosing and supporting structures of the building are in the winter time in the zone of negative temperatures, since the heating of the structures is isolated from the heating system of the building. This means that the enclosing and supporting structures are subjected to alternate freezing and thawing, which shortens the service life of the building as a whole.
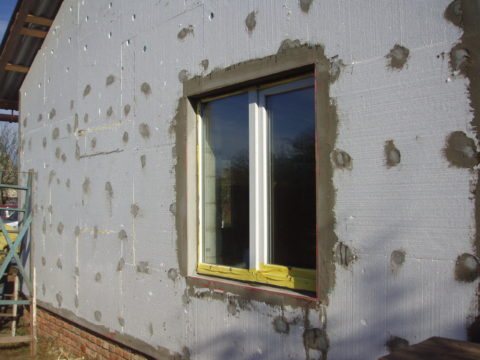
2. Thermal insulation from the inside takes out of service a significant part of the internal area of the premises, since there are no high-performance thin (10-20 mm) heat-insulating materials yet. Installation of modern insulation takes at least 50 mm from the space (this thickness is even insufficient according to regulatory requirements) on each insulated wall.
3. Insulation from the inside turns out to be very expensive - in addition to the direct costs of insulation and finishing, the costs of protection against the formation of condensation are necessary (“condensate flows onto the floor” - a real response from the person with whom we spoke), additional ventilation and expensive square meters are removed from circulation housing.
It is not recommended to carry out wall insulation from the inside and construction standards SP 23-101-2004 "Design of thermal protection".
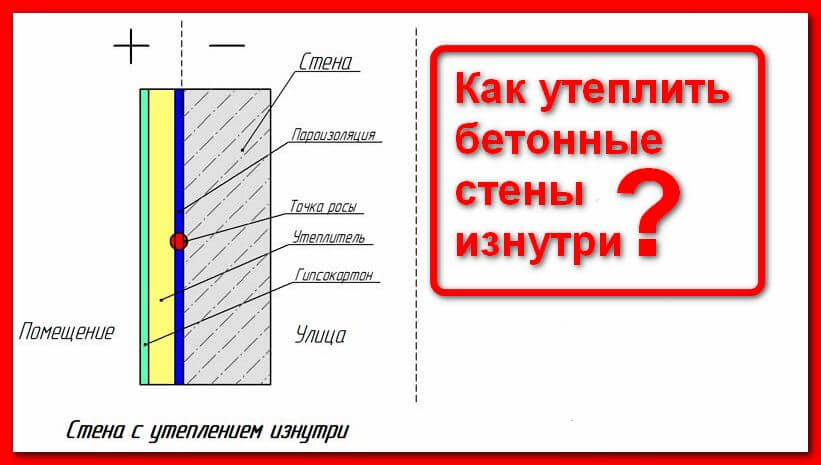
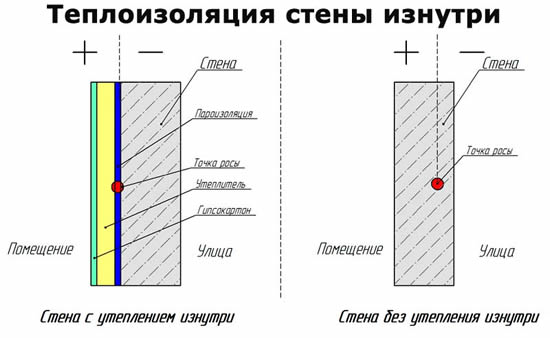
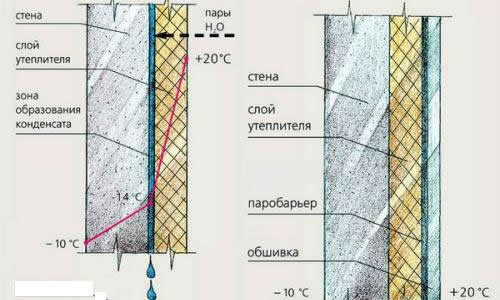
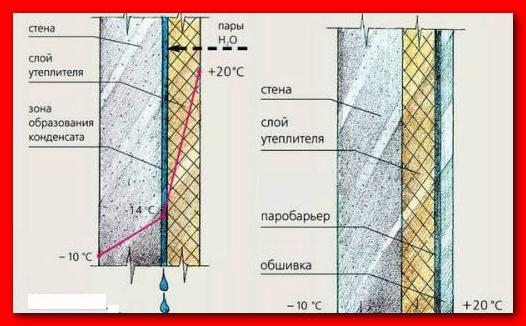
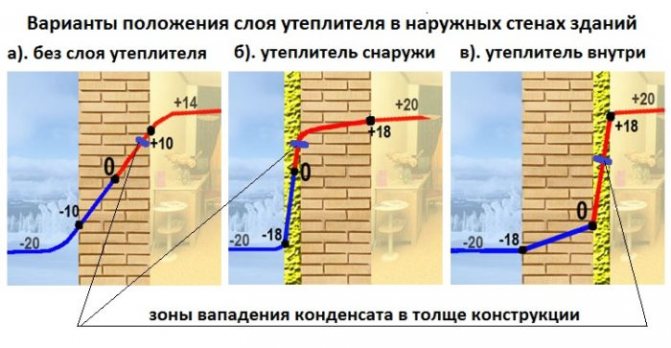
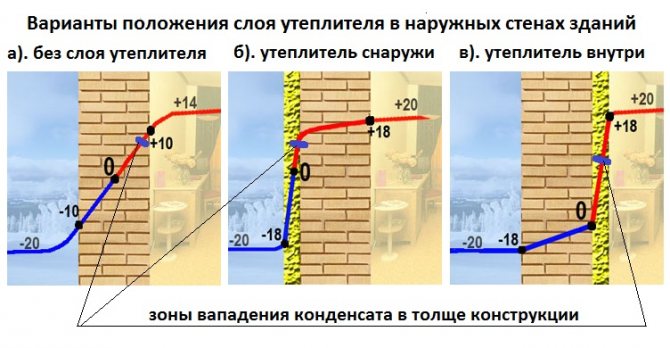
The main problem of wall insulation from the inside from the point of view of heat engineering is the formation and accumulation of condensation in the wall and insulation, since with internal wall insulation the "dew point" is either in the wall or in the insulation.
The dew point is the temperature at which water vapor reaches saturation or, as it is considered at the household level, the moment of condensation from the air. The dew point is taken from the calculated data on the sanitary rules for the operation of premises.
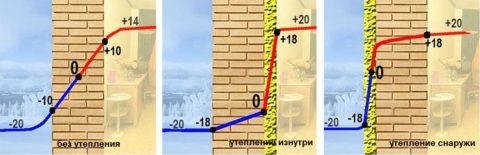
Thus, the location of the dew point at the outside temperature is:
-25 ° C - it turns out that the place of condensation of water vapor is located approximately in the middle of the installed insulation.
-25 ° C to 0 ° C - it turns out that the condensation zone from the middle of the insulation to the outside to the inner surface of the brickwork
(panels).
The zone of negative temperatures is located just directly at the place where the thermal insulation adjoins the wall and in the immediate vicinity on both sides.
Based on this:
1.
When insulated from the inside, the wall of the building is entirely in the negative temperature zone at an outside air temperature of about -18 .. -20 and below. That is, when the thermometer shows a temperature of -18 and below, the wall is completely frozen, and at the same time, in the case of condensation of water vapor between the insulation and the wall to be insulated from the inside, ice forms, which destroys the place of contact of the insulation with the wall and the insulation, and in the case of gluing it tears off the insulation from the wall.
2.
At temperatures from 0 degrees to +11, the wall gets wet due to condensation of water vapor in the thickness of the wall itself, and only at negative temperatures the dew point moves from the outer surface to the inside of the installed insulation.Temperatures from 0 to +11 in central Russia are 2-3 months in autumn and 2-3 months in spring. Hence it follows that the wall itself with a set of moisture loses its thermal resistance and the wall in winter can freeze completely even at temperatures from -5 ..- 10 and below.
3. Condensation of moisture and freezing of the wall significantly reduces the service life of the entire structure. At the same time, condensation forms between the insulation and the wall, which in the autumn-spring time (during the period of moisture accumulation at positive temperatures and the absence of ventilation - an air gap between the wall and the installed insulation) leads to the formation of mold and mildew on the entire inner surface of the wall, which leads to another type of structural destruction - biological corrosion of walls.
That is, there will be “eternal dampness” behind the insulation.
4.
If the thickness of the insulation is underestimated due to thoughtlessness or for reasons of financial economy, the condensation zone completely passes into the area of the connection between the insulation and the wall and then into the wall of the building, while condensation increases, and the freezing zone decreases, and destruction due to crystallization affects more on the outer part and the middle walls of the building. Therefore, it is advisable to overestimate the thickness of the insulation used. At the same time, the condensation zone almost entirely goes into the thickness of the insulation, and the wall itself is less susceptible to damage due to freezing - the transition from negative to positive temperatures occurs much less often at negative temperatures of the atmosphere and since moisture does not accumulate in the wall, crystallization does not occur, which destroys the material.
5. The above-mentioned "horror stories" in paragraphs 1-4 are very relevant in the case of wall insulation with mineral or glass wool, which often happens when installing drywall. In order to avoid the above-described consequences, it is necessary to install a material as a heater that is significantly less vapor permeable than mineral wool (for example, extruded polystyrene foam) or to take measures for vapor barrier of internal insulation, i.e.
That is, on the inner surface of the insulation, in contact with the insulated room, it is necessary to create a vapor-proof film, which is also required by construction standards: “It is not recommended to use thermal insulation from the inside because of the possible accumulation of moisture in the heat-insulating layer, however, if such an application is necessary, the surface is the premises must have a continuous and durable vapor barrier ”. (SP 23-101-2004 "Designing thermal protection")
With internal wall insulation, the main danger lies in the fact that when the insulation is installed, it will be vapor permeable enough to create a lot of problems for the building structure. In addition, if the insulation gets wet, then it significantly loses its heat-insulating properties.
Therefore, the main rule for internal insulation is a good and reliable vapor barrier or the installation of a heater that is less vapor-permeable than the enclosing structure of the wall - in this case, the heater will let less steam into the wall, and the wall will be able to remove this vapor well into the atmosphere. For example, to insulate a simple brickwork from the inside without a vapor barrier, ordinary foamed polystyrene foam is suitable (the vapor permeability coefficient of brickwork is 0.11-0.17, foamed polystyrene foam is 0.06). But for insulation of concrete walls (monolithic, panel houses), only extruded polystyrene foam or insulation with a vapor barrier film from the side of the room is suitable.
In any case, it will look the same as if you take cover with your “head under the covers” and breathe there.
A few more negative points. When insulating the wall from the inside, there is no opportunity to insulate the interfloor ceilings and there remains one more "bridge" of cold - the inner walls that are connected to the outer wall.
If you do not also insulate the inner walls in the room (and interfloor floors), then at the junctions of those with the outer wall, zones with a low temperature are also formed due to freezing. In these places, the temperature is close to the dew point, and the dew point itself is in the immediate vicinity of the corners formed by the junction of the inner walls (floors) and the outer wall. In the spring-autumn period, zones of high humidity may form in the corners, the corners will become damp, the finish will deteriorate and mold and mildew may appear.
This can only be avoided by also insulating the inner walls at a considerable distance along the plane from the insulated outer wall. There are only two important negative points left for internal insulation, this is, as described above, freezing of the corners formed by the outer wall. In these corners, the dampness was removed with the help of a vapor barrier, but their freezing did not go anywhere.
Due to the temperature difference, even in a completely sealed room, there is a movement of air masses - a draft, due to the pressure difference between warm and cold air. And the stronger the temperature difference, the stronger the movement (at the household level, such a draft can be felt when you are in a tightly closed room next to a hermetically sealed plastic window - as they say, "pulls from the window"). Freezing of corners creates discomfort for people in the room, because in the presence of internal drafts, the perceived comfort temperature is lower than in their absence, that is, it turns out that the temperature in the room should be higher than usual.
With the internal insulation of the walls and their vapor barrier, the withdrawal of water vapor from the room stops, which should have been provided for by the project before. It turns out that it feels humid and stuffy, because the relative humidity in the room increases, which again leads to the risk of condensation in the corners, only now the vapor barrier will no longer help - the condensate falls out from the side of the room due to the increased humidity in the room (it has shifted " Dew point"). Condensation is absorbed into the finish and at always a positive room temperature, a year-round breeding ground for fungi and mold is obtained.
To overcome the next attack of internal wall insulation, it is necessary to improve air exchange in the room (air conditioning), thereby reducing the humidity in the room. Due to the fact that with additional ventilation and due to internal drafts, more heating is required to compensate for the comfort temperature, then saving on the thickness of the insulation is unacceptable. Ventilation and drafts are factors for increasing the thickness of the insulation.
Conclusion: if you still want to insulate the walls from the inside: 1.
vapor barrier must be provided 2.the thickness of the insulation must be in excess, understating the thickness of the insulation is not allowed 3. internal drafts and discomfort for living are created
4.Vapor barrier of internal insulation creates high humidity, which requires additional ventilation
5.shortens the service life of the supporting and enclosing structures of the building 6.reduces the internal space of premises
7.is very expensive
But what will happen in the wall with internal insulation ...
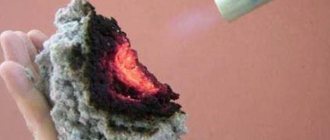
With internal wall insulation, the “dew point” is formed immediately after the insulation. In this place (behind the insulation) there will always be mold! If the insulation is mineral wool slabs, then it will absorb all the resulting moisture like a sponge. The humidity rises in the room.
Good luck!
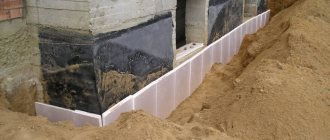
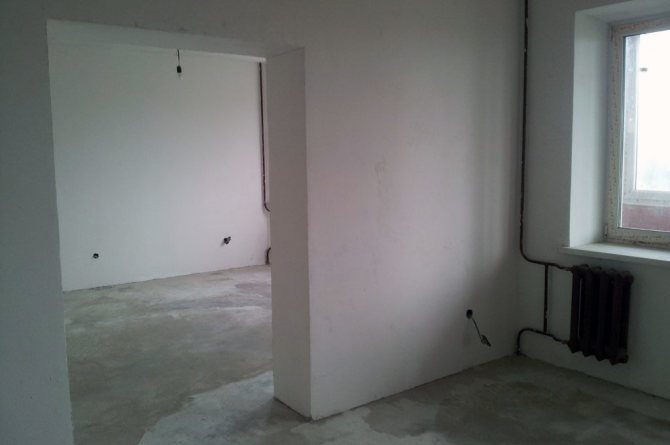
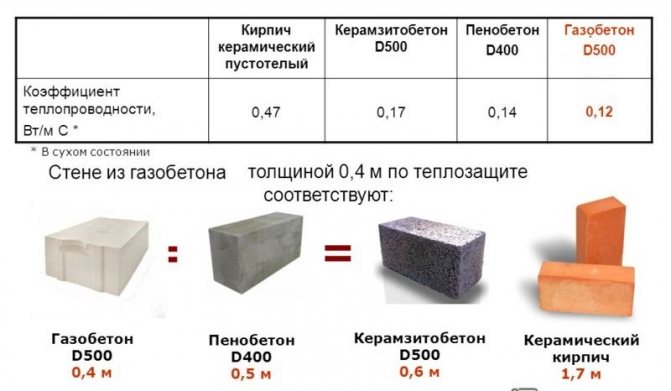
Concrete is considered a convenient and simple material from which various residential and capital structures are erected.
But how to insulate concrete walls from the inside? Concrete has quality characteristics, which makes it in demand in the construction market. Despite all its advantages, the composition also has disadvantages: the material conducts heat, which requires additional insulation of the structure.
How to insulate concrete walls from the inside?
You can use different materials for this. The main ones are:
Minvata. The material allows the walls to "breathe" and retains heat well. Expanded polystyrene.
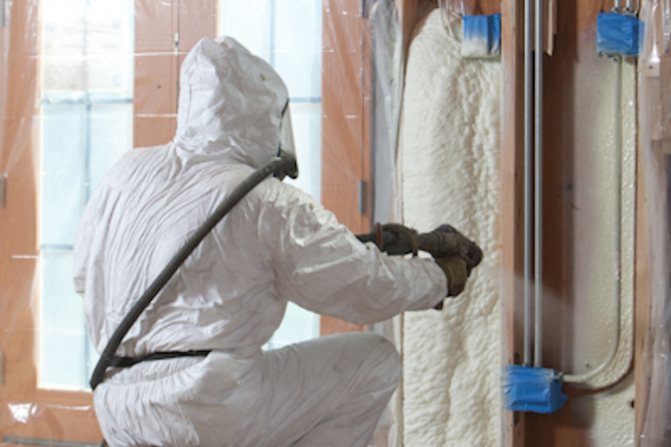
Does not absorb moisture, retains heat, resists stress and is easy to install. Does not get wet and keeps warm well. Easy to use and can be sprayed onto concrete.
There are also other tools that can be used for this kind of work. Among them are foamed polyethylene and warm plaster.


Expert opinion
The cheapest way is to apply an additional layer of plaster.
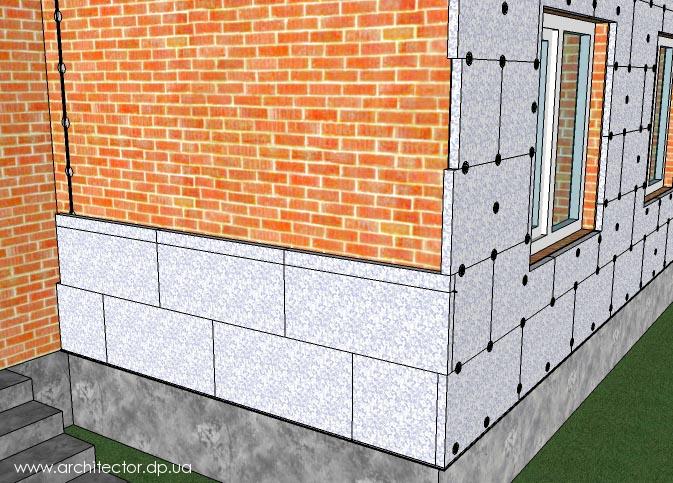
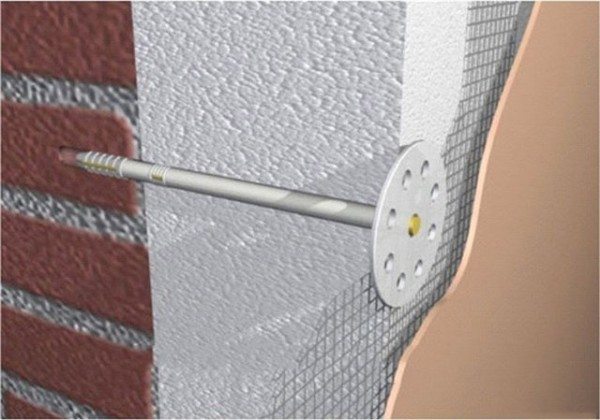
To do this, the surface must initially be primed and a mesh attached to it. Several layers of plaster are made. Reinforcement lies between them.
The layer thickness should be 0.5 mm. It is also important to put waterproofing under the plaster. You can use regular polyethylene.
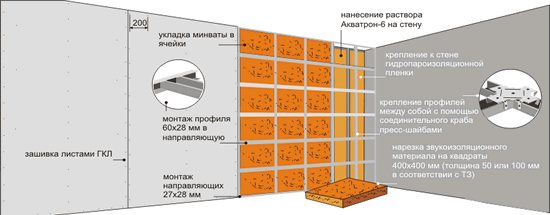
If mineral wool is used, then under it it is necessary to build a crate with cells. It is made from a bar or an aluminum profile. The tree must be treated with antiseptics so that it does not rot. Expanded polystyrene is a panel with a size usually 100x100 cm.
They will have to be cut and adjusted during work. The joints are treated with a sealant for tightness of the joint. It is important to press the sheets tightly against the base so that there are no pockets of air under them. Condensation may collect there and fungus will appear.
Polyurethane is the most reliable method of insulating concrete walls and will block moisture, but it is difficult to apply as it hardens quickly. This also requires a special installation.
A layer of vapor barrier should be put on top of the material. Experts recommend performing the whole process in the following sequence: Remove the old coating from the wall. Dry and wipe the base. Treat the wall with an antiseptic. Apply a primer. Fix the selected insulation material. Apply decorative finishing. It is recommended to insulate the concrete wall from the inside in summer. or in the spring, when there is little rainfall and the air humidity is not high. It is also important at the preparation stage to check all the communications that pass along the surface, and, if necessary, fix or change them. After finishing the base with insulation, such work will be difficult to do. The walls must be insulated throughout the apartment. rather than in the same room. This will give a greater effect and the ability to keep heat in the building. It is important to leave a small gap for ventilation between the layer of insulation and the decorative finish. This will prevent condensation from accumulating on the thermal insulator during temperature changes. In detail, how the insulation of concrete walls from the inside with your own hands is carried out, you can watch the video:
What you need to know about thermal insulation?
In order to effectively trap heat in the house, before the wall surfaces are covered with heat-insulating material, you must:
Thermal insulation materials have different thicknesses.
In order not to make the area of the room even smaller, it is better to choose a thinner insulation. wipe dry and level them; install heat protection and vapor barrier on the surface separating the walls from the interior volume of the room; materials that are highly moisture resistant and allow various vapors to pass through to a minimum, must be used to insulate the walls inside the apartment; the layer with insulation should not have joints , gaps or slots.To fulfill all of the above requirements and insulate the walls, you can build their analogue from inside the roomthat these works can reduce the usable area inside the apartment, therefore, to insulate the walls, it will be necessary to choose thermal insulation, which, with high efficiency, has the lowest possible thickness. Some tricks will also be described below that will help you better cope with the work of wall insulation from the inside.
Errors when insulating concrete walls
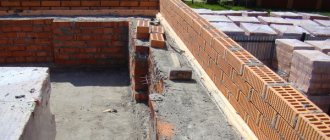
Take a look at what happens when you insulate walls built of concrete from the inside:
- Exterior walls are completely cut off from the heat coming from the room... Therefore, in cold weather, they freeze.
- Concrete, despite its density, absorbs moisture... Thawing and freezing, it gradually destroys it.
- The dew point for internal insulation is at the junction of walls with thermal insulation... Here warm air meets cold air and condensation forms.
- Mineral wool absorbs the resulting moisture, while losing its thermal insulation properties.
Conclusion: it is better to insulate any walls from the outside, and even better - from both sides. When choosing how to insulate concrete walls from the inside, preference should be given to moisture-resistant materials.
These conditions are not met in your case, so the heat in the house does not stay. What to do?
What can be used as thermal insulation?
There are many similar materials, namely:
The scheme of insulation of a concrete wall with foam.
- Expanded polystyrene or polyurethane. Styrofoam. Plaster. Drywall. ICE or fiberboard boards. PVC panels.
Consider how to use them for wall insulation.
The easiest and cheapest way is to apply a layer of additional plaster. To do this kind of work, you will need a metal construction mesh. The walls are first primed, and a liquid primer is “sprayed” on them for strengthening.
This is also done after laying each layer of plaster, which is applied evenly and has a thickness of up to 5 mm. There should be 4-5 such layers, and they cover all the walls of the apartment.
Before starting work, the old plaster must be removed and the rooms must be vaporized. It can be made of roofing material, bitumen mastic, waterproofing, etc.
Preparation of mortar and application of plaster on a concrete wall.
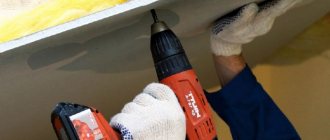
When using gypsum plasterboard boards, the crate is first made of metal profiles. Then, thermal insulation made of felt, mineral wool or foam is installed in the resulting cells and covered with sheets of drywall.
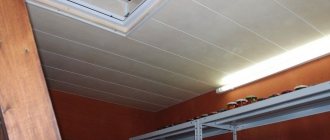
When using PVC, internal combustion engine or fiberboard panels for wall insulation, it is necessary to make a frame from slats. A vapor barrier and heat-insulating material are installed inside it.
Styrofoam can be directly glued to the wall, but this "cheap" option does not always give positive results.
The most reliable way is to use polyurethane for wall insulation. It is able to create a good moisture resistant barrier and has excellent thermal insulation properties.
The difficulty is that at the first stage it is a foamed liquid and hardens very quickly. To charge an even layer of heat insulator, it is necessary to use formwork, all the voids in which are gradually filled with polyurethane.
The scheme of insulation of a concrete wall from the inside with polyurethane foam.
After that, vapor protection and waterproofing are installed. It is made of plastic wrap, which must be fixed to adjacent walls, floor and ceiling.
This is done with laths and sealant. Since polyurethane has a relatively low mechanical strength and low density, an additional plasterboard wall is made from the inside of the apartment. This is a very effective thermal protection, but, in comparison with other types, it requires additional financial costs.
If you use polystyrene, then you need to pay attention to its installation. This material is 100 x 100 cm sheets, so many joints are formed. The sheets must be adjusted, and a layer of sealant must be applied to their ends.
When the walls are insulated from the inside of the room, air chambers may appear, in which fungi and mold or condensation will eventually appear. To fix the sheets, it is necessary to apply glue evenly over the entire surface. Before this, the material is perforated with a needle roller, which helps the adhesive better adhere to the sheets.
In any case, you must first align the walls. To do this, you need to purchase special mixtures that can form a layer of waterproofing.
Basic methods
Modern manufacturers delight buyers with a wide range of various thermal insulation materials that meet the main quality parameters of these products.
However, experts with sufficient experience in the construction industry give advice on how to insulate a concrete wall in an apartment, only in three main methods, which are considered the best:
- Thermal insulation using foam,
- Thermal insulation with mineral wool,
- Warming with the use of a warm plaster solution.
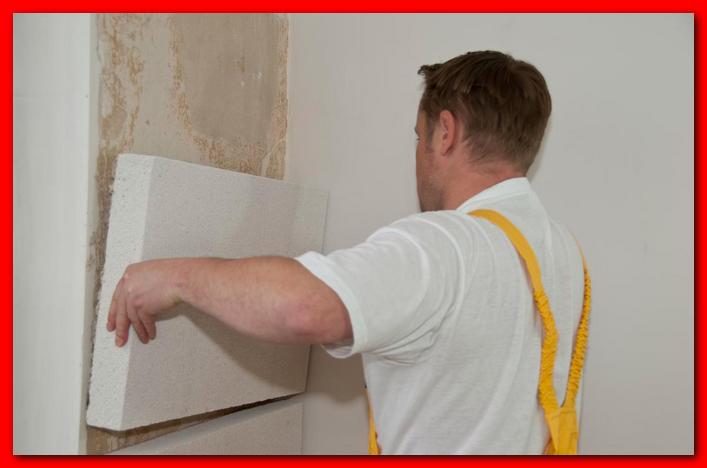
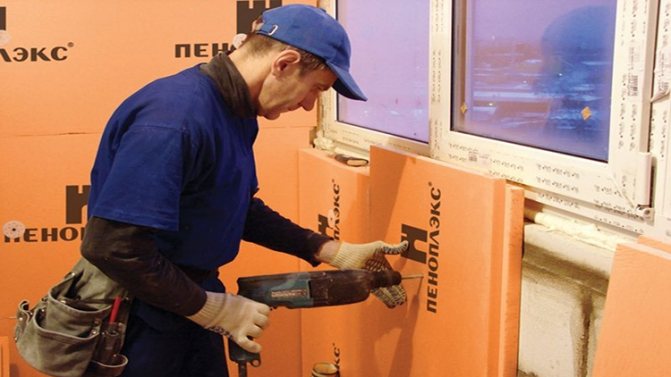
Foam application
Today, foam is considered a popular insulation (for example, Penoflex insulation). It is lightweight, easy to use and low cost make it the most common insulation material.

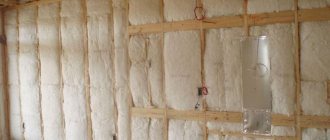
Insulation of premises from the inside with foam plastic
This method of thermal insulation is both the simplest and cheapest:
- We carefully plaster the concrete wall.
- Let the solution dry completely.
- We proceed to leveling the surface by applying one layer of putty.
- At the end of the puttying, we lay the waterproofing material around the entire perimeter.
Note! Neglect of this stage of thermal insulation work often causes condensation at the junction of the wall and insulation, as well as its further dampness. After all, it's no secret that even polystyrene is afraid of moisture and rots from its excess, losing its beneficial properties.
- Next, we proceed to the installation of the insulation layer:
- we process the walls with special glue,
- we lay the sheets of polystyrene butt to one another, avoiding the formation of cavities between them.
Advice! In order for the insulation to adhere well, in no case try to spread glue on the foam sheets themselves.
Internal foam insulation method
- We complete this stage of work by installing a vapor barrier material on a foam layer.
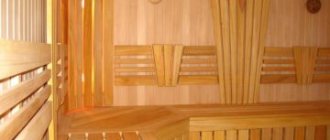
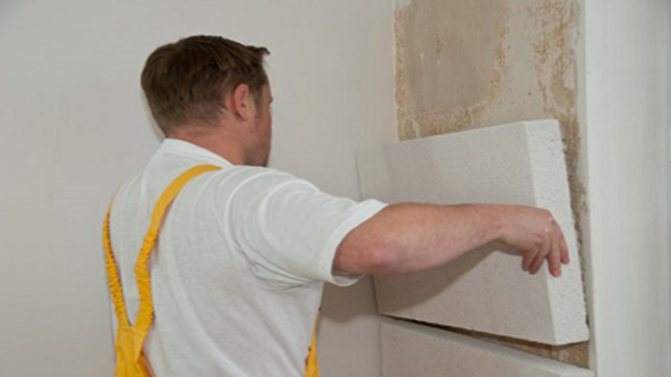
Mineral wool applications
The second method of warming concrete walls and increasing their thermal insulation capabilities is more difficult to perform. In addition, it is possible to insulate with mineral wool only if there are wooden slats. The lathing of slats "steals" some space of the room due to its thickness, so it is difficult to apply it if you want to insulate the loggia. Therefore, experts in thermal insulation advise against plastering the walls if this technique is used. However, no consensus on this issue has been found.
Related article: How to remove old putty from walls
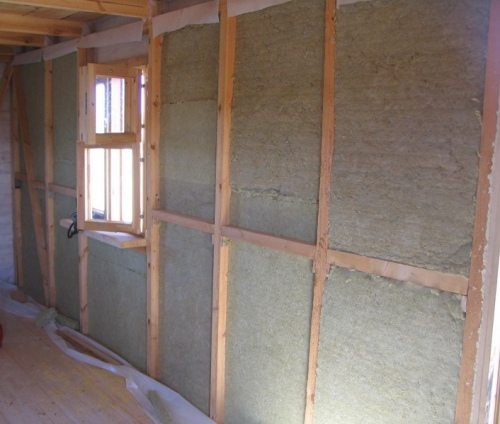
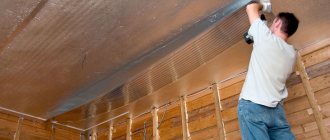
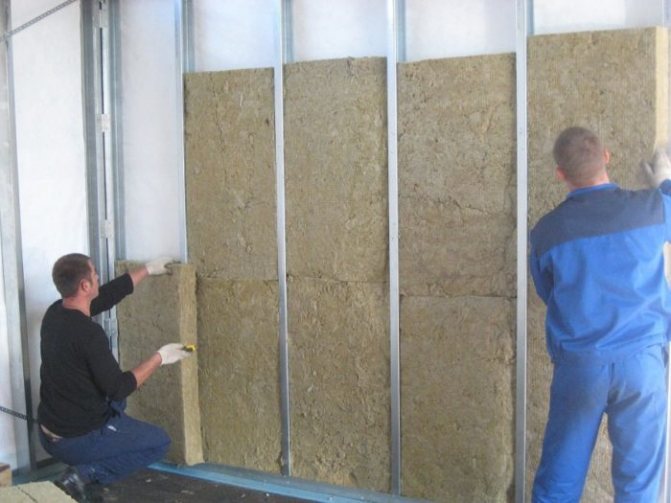
Photo insulation with mineral wool
The following is an instruction for wall insulation with mineral wool:
- we install wooden slats vertically on the wall, using a level for accuracy,
- we fill the distance between them with waterproofing material, fixing it directly on these slats.
- proceed to laying the insulation material on top of the waterproofing material. Watch the density of the insulation in the space between the slats. There should be no gaps between the slabs of the material and the wooden slats. For this, the distance between the slats is made less than the width of the insulation material.
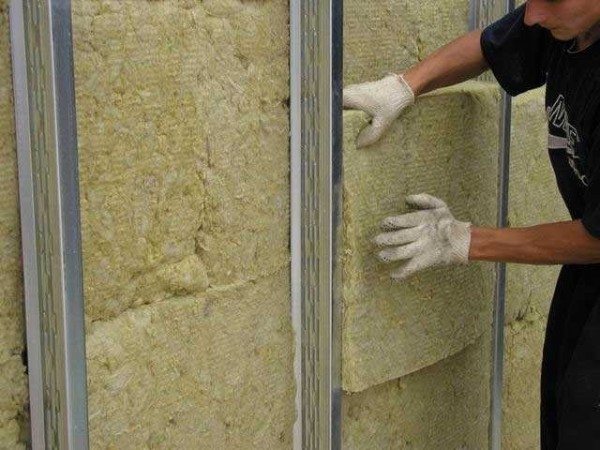
Laying without gaps between slabs and battens
Note! Remember the risk of the formation of "cold bridges" and, in order to avoid this phenomenon, fix the insulation joint to joint between the slats, that is, cut the material with allowances of one centimeter.
- All that is left is to put in the vapor barrier material. Fix it to the same wooden slats.
Advice! Experts, just in case, advise to lay mineral wool in 2 layers, if you are not going to make a plaster layer.
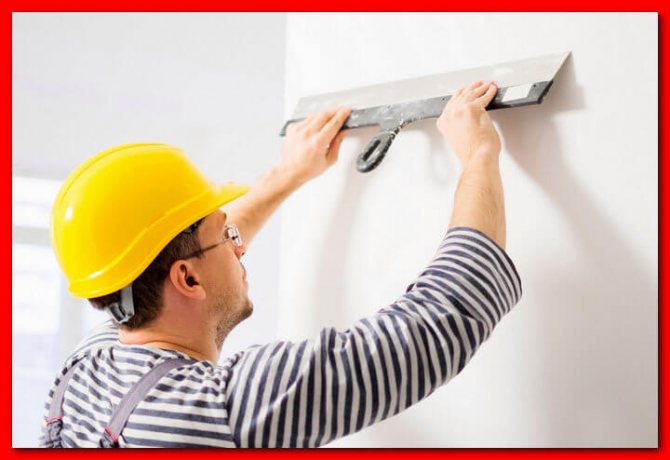
Application of plaster solution
The use of a plaster layer as an insulating material is not a new technology. However, even today it remains quite popular. At the same time, one should not think that this method of thermal insulation is too simple. It also has its own characteristics, among which one can name the three-layer plaster layer.
So, how is insulation done with plaster:
- Do-it-yourself application of the initial layer is carried out by uniformly spraying the surface with liquid plaster. This is done so that the solution penetrates as deeply as possible into the walls with microscopic cracks.
- The second layer, 50-60 mm thick, is laid with soil. Moreover, it is applied not in one, but in 2-3 layers. It takes time and patience.
Advice! Dry each layer thoroughly to prevent it from falling off the wall under its own gravity.
- And finally, the plastering of the wall is completed with a third layer, which is called "cover". This layer is done in order to finally level out all surface irregularities and increase its thermal insulation properties.
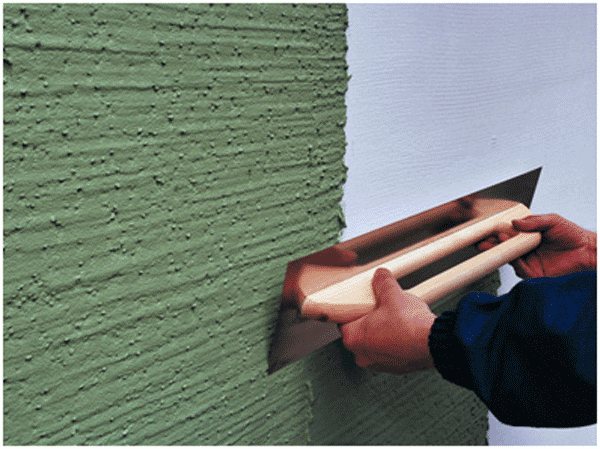
How to apply plaster
In what order should the work be carried out?
The technological process consists of such stages as:
The scheme of insulation of a concrete wall with plasterboard.
Wiping and drying walls. They are cleaned of dust and dried using heaters. Remove the old coating, paint, wallpaper and all other parts of the decor and cladding. Remove the plaster to the concrete slab. Then you need to vacuum or broom the surface of the walls.
With special care, it is necessary to wipe the places where fungus could have formed or there is a suspicion of dampness. The entire surface of the walls is treated with antiseptics. A layer of primer is applied. It must be deep penetration. After each operation, you must wait until the walls are dry. When using thermal elements or foam sheets, level the surface of the walls with plaster. In this case, ready-made mixtures are used that contain water repellents.
Such materials are usually used in the decoration of swimming pools and bathrooms. If the level of drops on the wall is more than 1 cm, then when plastering, beacons should be used. After finishing these work, the walls should be allowed to dry for several days. After that, a layer of primer must be applied again and repaired. All joints with sealant (you can also use moisture-resistant mastic). Fix or fill in the selected heat-insulating material. Allow it to dry for several days. After that, you need to build a second wall of plasterboard or brick. Finishing will be applied to it (wallpaper, paint, tiles) For this, a frame made of strips or a metal profile is installed and strengthened to the surface of the walls and ceiling. Drywall sheets are screwed on top. If expanded polystyrene is used as a heat-insulating material and it has an increased density, you can close it with a construction mesh and plaster. The joints between its sheets, which are fixed with glue, will need to be covered with mastic. When using polyurethane foam, special equipment is used.
Therefore, it is better not to skimp and call specialists who are engaged in pouring this material. You can try to do it yourself, but this requires at least minimal experience with this material. Polyurethane hardens quickly and forms a continuous coating without joints.
It is better to pour it into the cells of the frame made of strips or a metal profile and then cover it with sheets of drywall. Before that, the entire surface of the resulting insulation must be covered with plastic wrap. It is either glued with special glue, or fixed on the walls and ceiling with slats.
The production of works for wall insulation is necessary only in late spring or summer, when there is little rainfall and the air humidity is low.
You can not save on materials and skip the points of the above works.
Warming methods
Before listing these methods, we want to give a couple of tips:
- You need to insulate all the walls around the perimeter of the house. In your case, this is possible, but you need to convince the neighbors of this need. In apartment buildings, this operation is much more difficult. Partial thermal insulation of the walls of one apartment, if it gives any effect, is minimal, since the cold still penetrates into them from non-insulated areas.
- Insulation from the inside and outside should begin with sealing all seams and cracks and treating it with antiseptics - so that fungus does not appear in the apartment.
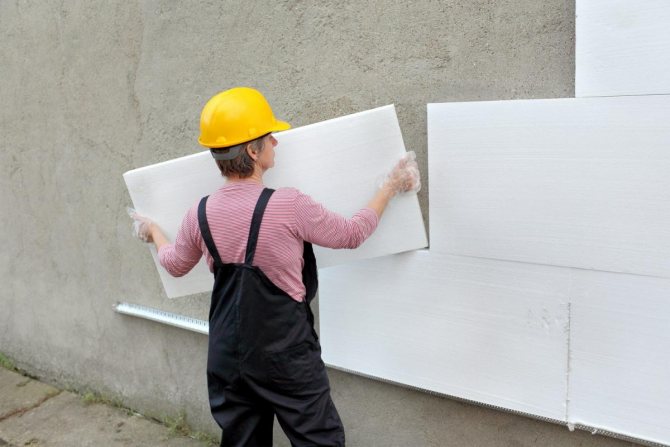
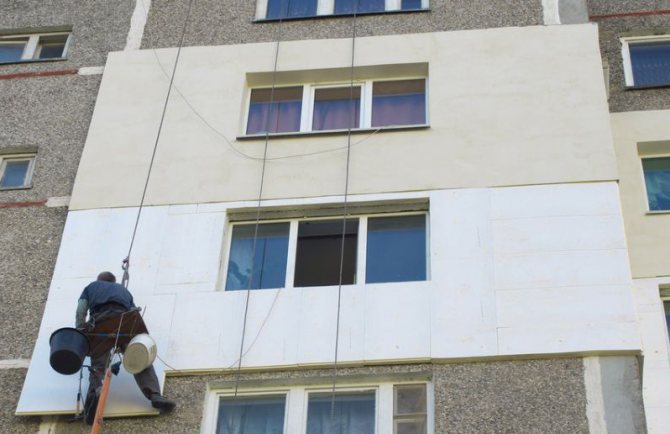
Method 1 - insulation with expanded polystyrene
If the financial issue is acute, you can take ordinary foam for insulation. The price of the material is cheap, and the thermal insulation properties are very good.
Advice. If quality and efficiency are more important, buy extruded polystyrene foam. It is not so fragile, it is not afraid of water at all, it is avoided by rodents, which can be important for a private house.
The work can be done with your own hands, which will also reduce the cost of repairs. The algorithm is as follows:
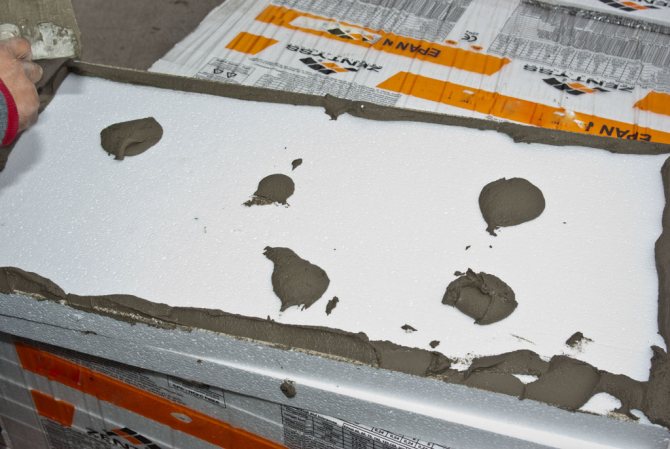
- On the back side of the insulation boards, we apply an adhesive composition at several points along the perimeter and in the middle;
- We glue the sheet to the wall, starting from any bottom corner;
- Additionally, we fasten it with plastic umbrella dowels in the corners and in the center;
- We mount the rest of the plates tightly to each other. Blow out the seams between them with polyurethane foam;
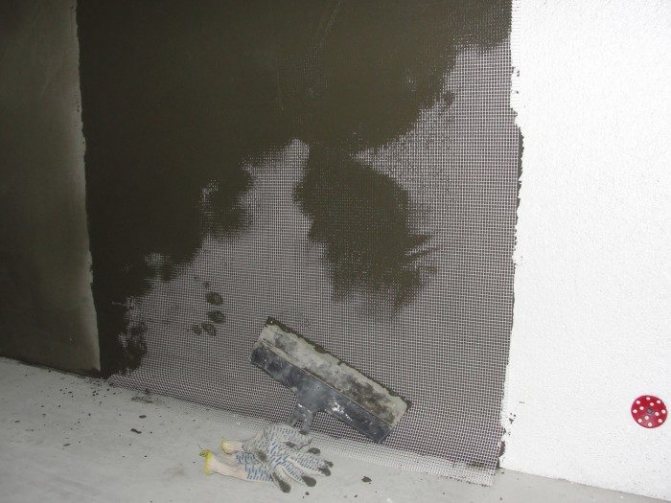
- After the glue dries, we fix a fiberglass reinforcing mesh over the insulation;
- We use the same composition as for gluing the boards, evenly applying it to the surface and pressing the mesh into the fresh mortar with a spatula;
- When this layer is dry, plaster the surface;
- The last stage is priming and painting. Or installation of a hinged ventilated facade. For example, siding.
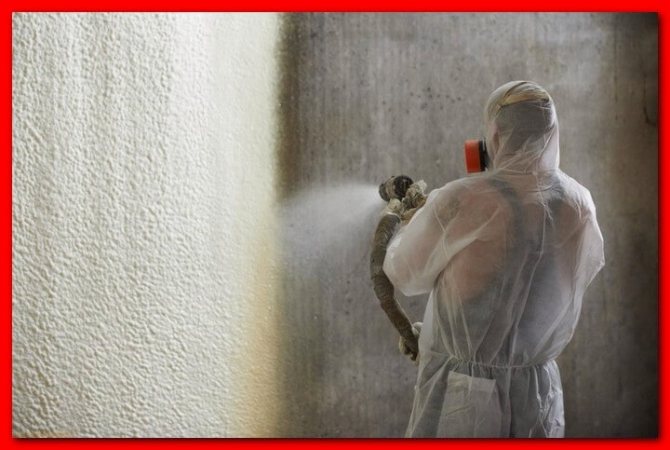
Method 2 - insulation with polyurethane foam
It is the most effective modern heat-insulating material that is not afraid of moisture. But it is quite expensive, as it is performed by spraying using special equipment. That is, you yourself will not mount it.
But: all the work will take a little time, and the frozen foam forms a continuous heat-insulating layer on the surface without seams and cold bridges.
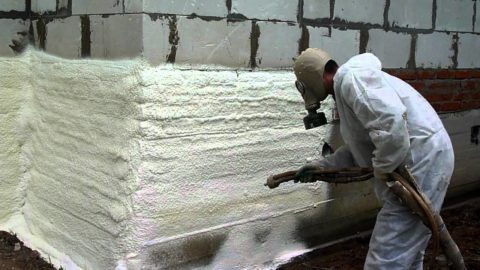
Polyurethane foam can also be used for internal insulation. Moreover, for a good effect, a very thin layer of this material is required, which will preserve the useful area of the house.
Note. The material is destroyed by sunlight, so insulated walls must be finished immediately. It is best to use ventilated facades.
Method 3 - thermal insulation plaster
This method is the fastest and cheapest, but its efficiency is also lower than that of the previous ones. To achieve high-quality insulation, the plaster must be applied in a thick layer in several passes.
Now on sale there are many dry mixes with heat-insulating additives. Each type is accompanied by instructions on the method of preparation and use. There is also information about the maximum thickness of one layer. As well as recommendations for subsequent finishing.
You can use this plaster both inside and outside. But in your case, it is easier to keep the existing frame and replace the non-moisture resistant insulation with expanded polystyrene or polyurethane foam. And then put the drywall back in place.
Some tips for self-insulating walls
House wall diagrams with and without insulation from the inside.
Thoroughly treat the walls with an antiseptic: the durability of the installed thermal insulation depends on this. The insulation must be installed so that there is a small gap between it and the wall. Before starting work, all communications and electrical wires going along the wall must be carefully fixed. After installing the thermal insulation, this will not be possible. Do not try to insulate the walls in any separate room: it will be a waste of money. If there are radiators of the heating system in the room, then it is very difficult to install something behind them. But there is a way out - foil plastic.
It is insulation consisting of a thin sheet of heat-insulating material covered with aluminum foil on one side. This layer should be turned towards the inside of the room. In this case, the foil serves to reflect heat into the room.