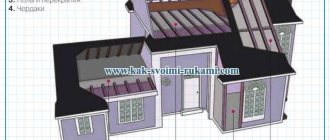
Interfloor ceilings are structures that separate the floors, as well as the 1st floor from the basement and the last floor from the attic.
Interfloor ceilings serve to separate floors from each other. For interfloor floors, temperature and humidity factors are not important.
There are certain requirements for ceilings, and they must be met in any case, since the strength of the house and, accordingly, a safe stay in it depends on their observance.
The overlap of the first floor and all the others, as well as the basement, requires a certain strength, since in the future these overlaps will have to withstand the serious weight of furniture, people, various equipment, and so on. The characteristic of the attic floor in terms of load may be less durable, provided that it is not planned to arrange a warehouse of furniture and other things in the attic. But the attic floor has an additional requirement in terms of providing the room with thermal insulation.
In addition to the fact that the interfloor partitions must withstand a certain weight, they should not bend, and for this they must be not only strong, but also rigid. In addition to these requirements, ceilings must have a sufficient degree of sound insulation, this is achieved by good sealing of gaps in interfloor structures.
It should be recalled that, like all the others, floors of the 1st floor can be made not only from non-combustible materials, but also from wood, and in this case, in case of a possible fire, the risk of fire going to the upper floors or the attic increases many times.
It doesn't matter what material the house is built from: brick, concrete blocks, cinder concrete or aerated concrete - in any case, the overlap of the first floor (second, third, and so on), as well as the attic floor, must be made strong and without vibrations. One of the materials suitable for this is a concrete monolith, which you can make yourself.
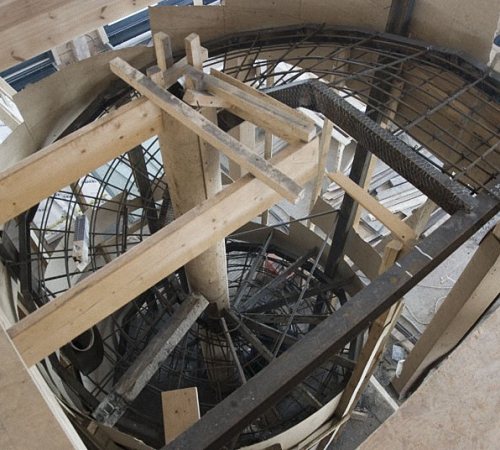
Monolithic overlap
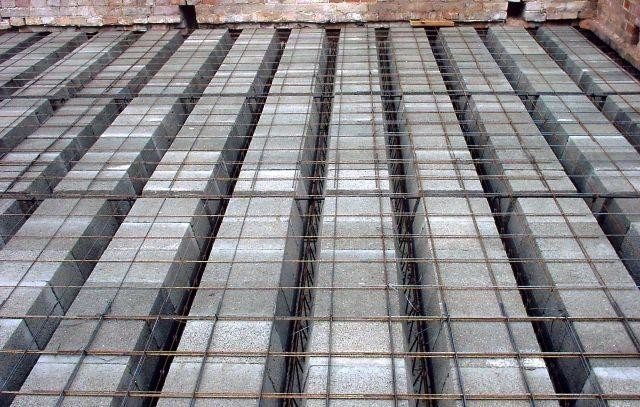
Monolithic flooring can be made by pouring concrete over corrugated board or horizontal formwork (removable and non-removable).
The monolithic design, like everyone else, has both advantages and disadvantages. Installation does not require additional equipment and sealing of seams, the surface is immediately flat, and it is indispensable for non-standard ceiling shapes. But this is a rather laborious process that takes quite a lot of time and requires a large formwork.
Required materials for this floor:
- cement, the grade of which should be higher than 400, and the higher the grade, the stronger the concrete monolith;
- crushed stone;
- sand;
- steel fittings with a diameter of 20-25 mm;
- reinforcing mesh;
- wooden boards with a thickness of at least 40 mm;
- wooden boards with a thickness of 50-70 mm or a beam of 80-100 mm for transverse supports;
- bearing supports required under the formwork platform: timber 120-150 mm thick;
- solid tree trunks under beams;
- channels or metal pipes with a diameter of 80-120 mm.
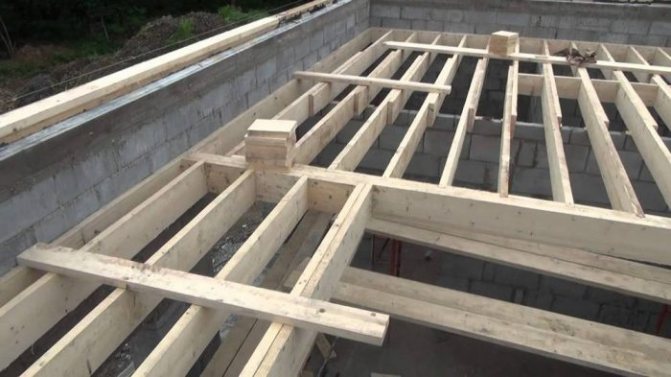
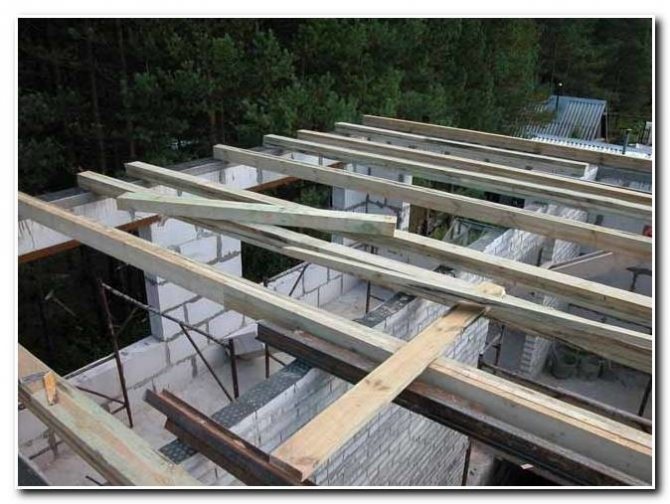
Beam structures
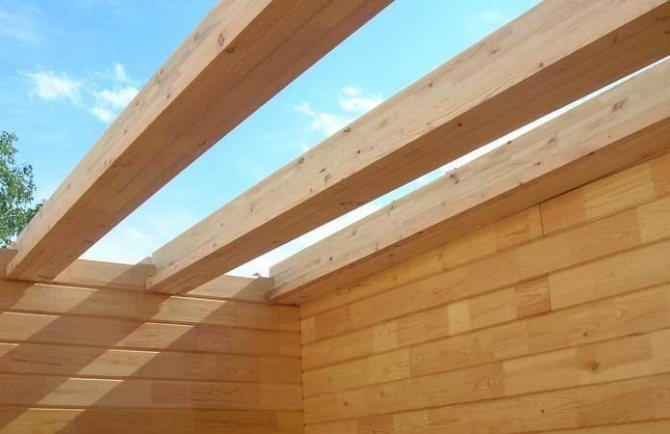
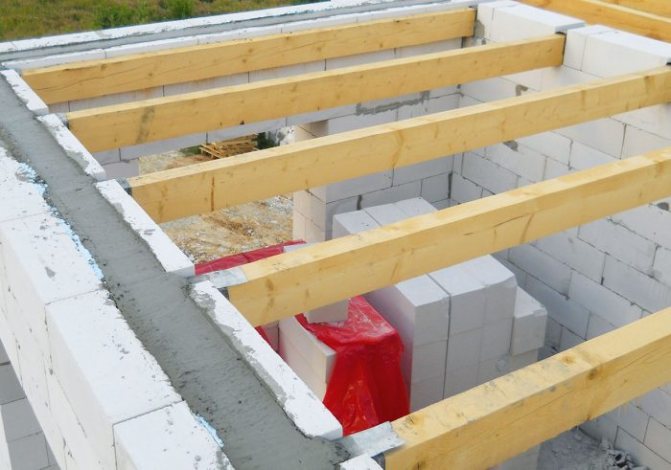
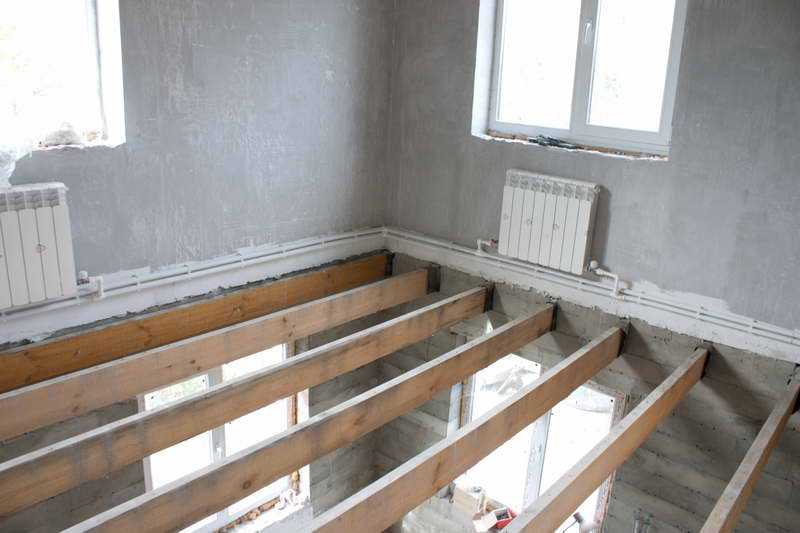
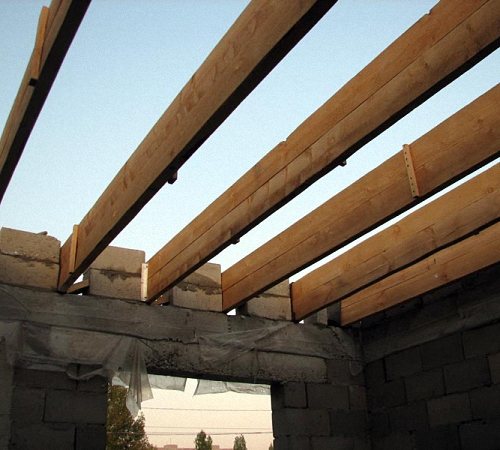
Beams can be metal (channel), wooden (softwood) and reinforced concrete.
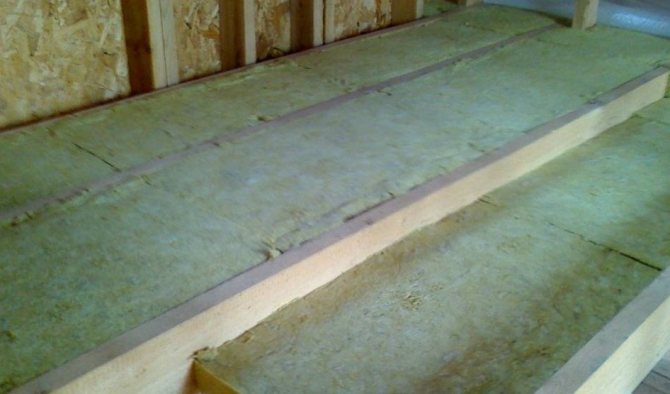
This type of floor slab can be made of metal, reinforced concrete and wood. For their denser arrangement (and to improve sound insulation and thermal insulation), a special filling is placed between the beams. For wooden partitions, it is recommended to take only conifers and at least 1 year old, and it will be ideal if the beams have been dried for 3 years.
To make a wooden interfloor partition, the following materials are taken:
- coniferous wooden beams (height from 140 to 240 mm and width from 50 to 160 mm);
- insulation (with attic overlap);
- antiseptic solution;
- roofing material.
For convenience, it is better to use rectangular beams, but an option with round beams - logs is possible, if the option of a village one-story house is conceived.
The material is treated with an antiseptic to prevent the appearance of rot and insect pests in the tree.
After processing, both ends of the beams are wrapped with roofing material, oiled or simply fired (you should know that the beams at the ends need to be made slightly beveled). If desired, such beams can be laid manually, due to their not very large weight.
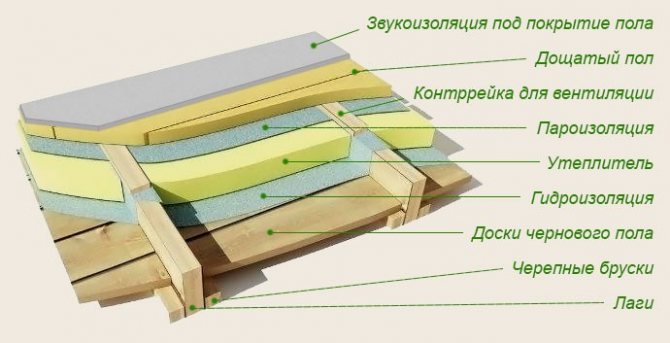
With the further construction of flooring for the floor, insulation is done, if this overlap is attic, if the floor is interfloor, the floor is not insulated.
Insulation of a log house: floor and overlap between the 1st and 2nd floors
Please help me with advice on insulating a log house.
House 5x5 m, 2 floors, 1st floor from timber 10x15 cm, 2nd floor of a board, was built 10-12 years ago. We made walls, a galvanized roof, a rough floor (not nailed) of the 1st floor on the logs, a rough staircase to the 2nd floor, on the second floor we threw not nailed tongue-and-groove boards on the logs as a temporary floor. Then the owners left, the house remained unfinished inside. This is how it stood all these years, until last year I bought a plot with this house.
The house is planned for summer residence only from April to October. Short-term (no more than a day or two) arrivals in winter are possible.
This year I would like to make an insulated (rockwool) floor on the 1st floor, insulated (also rockwool) interfloor overlap between the 1st and 2nd floors, insulate the walls of the 1st floor from the inside with a softboard (this is still only part of the planned insulation - just so as not to blow, in the future I plan to properly insulate the walls outside, but not this year). And sheathe the walls and ceilings inside with clapboard. And then the plans include the installation of a Buleryan stove (only the 1st floor will be heated), insulation of the roof and the 2nd floor.
1. This is how I imagine floor insulation.
The floor is above the ventilated underground (it is dry there, air vents along the entire perimeter of the basement, 80 cm to the ground, a layer of sand is poured on the ground). I now have rough boards (50 mm) on the logs, unbroken. I want to do this. On these logs in the lower part of them, fill 20x20 bars along them and nail sheets of moisture-resistant plywood coated with lime onto these bars. Drill holes in the plywood for ventilation. The meaning of this plywood is protection from mice, which, as I was told, do not like to gnaw birch plywood (they don’t like sharp splinters in their mouths, and even more so in lime). Will plywood help mice or should you put a fine metal mesh instead? If the mesh, then, probably, you need to paint it with something? In this case, will not the lags rot from contact with this mesh?
Then, over the plywood with a gap of 1-2 centimeters with a stapler, attach the Izospan A moisture-proof vapor-permeable membrane to the logs, and above the membrane, also with a small gap, insert 10 cm into the spacer of the Rockwool Light Butts insulation plate into the spacer. , then - my rough floor boards (perhaps through one, and not solid, so that the voids are above the vapor barrier), and then - the final floor (38 mm grooved board, treated with an antiseptic on the bottom and sides). So I sit and think: is it too heaped up? ))
2. Overlap between the 1st and 2nd floors. The 1st floor will be heated by Buleryan as needed, the 2nd floor will not be heated (but it may still be insulated from the outside, the roof and attic will also be insulated).
This is how I imagine it (from bottom to top): the antiseptic lining is nailed from below to the floor joists - then the Izospan V vapor barrier (on the logs from the bottom close to the lining, in the intervals - it is bent by 1 cm so as not to adjoin close to the lining, on the sides it enters the timber wall - just up or down?) - then with a gap of 10 cm Rockwool Light Butts - then either a vapor barrier, or a membrane, or nothing at all - then the floor of the 2nd floor is made of 38 mm grooved board.
The head is spinning from all these questions, and many masters, even good ones, are poorly versed in these technologies - they will do it, maybe well, but illiterately. So I'm looking for advice from competent craftsmen ...
Metal and reinforced concrete beams
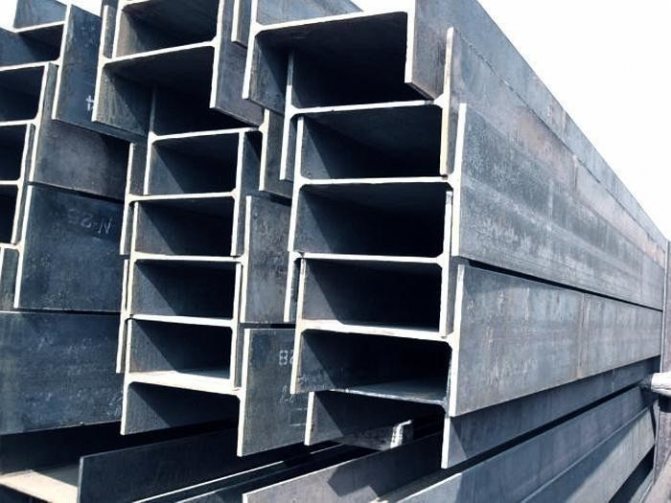
Metal beams are more reliable and durable than wooden beams. They are smaller in size, which saves space.
Floor slabs made with metal beams are much more reliable than wooden ones, and metal ones are thinner, which significantly saves space. Unlike wooden spans, which can cover only 4-4.5 meters, metal spans cover up to 8 meters, and besides, they are completely non-flammable. But they have reduced thermal insulation and soundproofing, there is a possibility of corrosion, and their installation can only be done with the help of a truck crane.
For the installation of a partition on metal beams, a rolled profile will be required, which in this case will be a supporting structure, as well as hollow reinforced concrete slabs that are laid between the beams. On top of all this, a layer of slag is placed and a concrete screed is made.
Overlap of the first floor
Important: the upper surface of the boards must be exactly in the same plane with the lower side of the prefabricated block slab. Then plastering or lining the ceiling for interior decoration will not present difficulties. Now proceed to the side formwork. The formwork of the straight edge is made quite simply from a solid solid board. If, as in our case, a rounding should be done, then the pieces of boards must be installed along the curving line and secured with clamps and a bar in order to prevent them from falling or shifting.
Formwork going through a corner is most easily stabilized with diagonal stiffeners. Even with increased static requirements, you do not need to give up the benefits of prefabrication. A possible problem when installing the first floor overlap: a load-bearing wall is required in the attic mezzanine, without the presence of a wall under it that can take the load.
Solution to the problem: a reinforced concrete beam, equal in length to the floor. Preparation for laying it begins when the wall of the first floor is erected. Where the beam will be laid, equal in length to the ceiling, a recess is made in the wall.
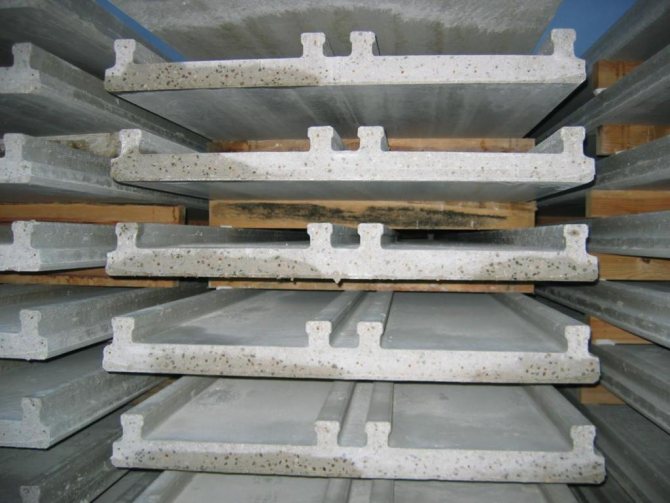
Reinforced concrete slabs
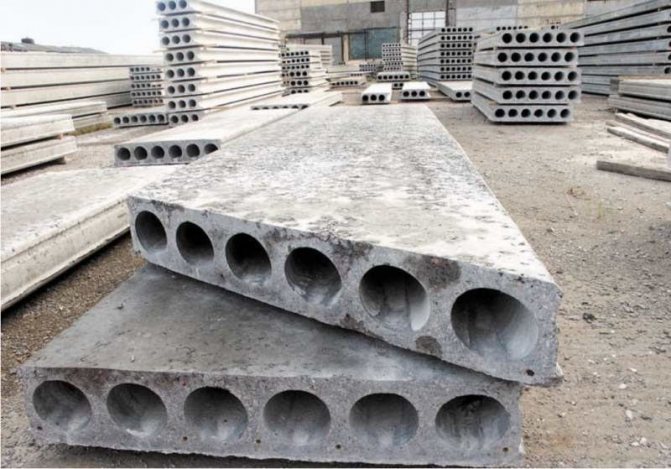
Reinforced concrete slabs are widely used in construction. With the help of them, you can build a building of any number of storeys.
Reinforced concrete slabs are often used for floor slabs. And for their installation, the following tools, materials and equipment will be required:
- hollow-core slabs made of reinforced concrete;
- cement mortar;
- 1 trowel;
- 1 sledgehammer;
- 1 scrap;
- 1 grinder;
- insulation for the floor;
- 1 truck crane.
The mortar for laying reinforced concrete slabs is made quite liquid. Sand for its preparation should be carefully sieved, since the slightest pebble can cause uneven laying of the slabs. The solution is applied to the walls only so that there is adhesion to them.
Such slabs can only be supported on load-bearing walls. And you should know and remember that all internal partitions are made after the floor slabs have been laid, and the walls under the slabs must be of the same level, otherwise the ceilings will be uneven.
The overlap of the second floor with slabs, like the first and all other floors, is carried out with the help of a truck crane, onto the main walls with a clutch solution laid on them. In this case, the support on the walls should be at least 15 cm. After such laying, all the gaps between the slabs are carefully sealed with cement mortar. The thermal insulation of the house depends on this.
In order to avoid freezing and additional thermal insulation, either mineral wool or cement mortar is laid in the floor slabs.
Floors
56 votes
+
Voice for!
—
Against!
During the construction of a multi-storey building, one of the main issues is the type of floor arrangement on the second floor. We will consider further how to calculate the correct load and how to make the floors of the second floor so that they have high performance characteristics.
Table of contents:
- Wooden floor of the second floor - recommendations for arrangement
- Underfloor heating on the second floor: installation features
- Second floor flooring - concrete slab
- Overlapping the floor of the second floor: additional recommendations
Wooden floor of the second floor - recommendations for arrangement
Installing a wooden floor on the second floor is appropriate both in a wooden building and in a brick building. Wooden floors make the room cozy, harmless to health and emit beautiful light.
The technical parameters of the construction of a wooden floor on the second floor differ in the following floor requirements:
- it must have maximum rigidity, and at the same time have a minimum amount of deflection;
- when installing a wooden floor, all technological requirements should be observed and at the same time, the design should be simplified;
- the functional side assumes the stability of the floor against moisture, abrasion, durability and reliability of operation;
- the wooden floor must be hygienic, fireproof;
- must provide heat and sound insulation;
- a mandatory criterion is the presence of hydro and vapor barrier;
- full compliance of the bearing capacity with the operational load on the building.
The aesthetic aspect of the construction of a wooden floor implies an attractive appearance and compatibility with the general style of the room.

A certain type of load is assigned to the floor of the second floor, furniture, people living in rooms, heating devices, etc.
We suggest that you familiarize yourself with the instructions for the construction of the floor on the second floor using wooden beams.
Among the varieties of wooden floors, there are only two of their options:
- lagged,
- bulk.
A floor built on the basis of beams implies a low cost, since these materials are less expensive than logs. In addition, the beams provide a high level of resistance to loads, which means that the floor will serve for a very long time.
The only drawback in the construction of a floor on beams is its low level of sound insulation. The beams are installed in the frame part of the building, and therefore the noise level increases several times.
Before starting work on the arrangement of the floor on the beams, it is necessary to accurately determine the number of beams that will be required in the process of performing the work. In addition, the interval between the beams to be laid should be correctly calculated.
There are two methods to help you do this:
- a computer program in which it is necessary to indicate the floor area and some parameters of the room;
- standard section size, which is 15x15 or 20x20 cm.
The best option for a tree that is suitable for arranging the floor on the second floor is pine. The materials based on it are lightweight and durable at the same time.
To install a beam in a building made of brick and wood, it is done in different ways.
When arranging a brick building, special recesses are provided in advance, into which the timber will be installed. After installing the beam, the joints between it and the wall should be tightly sealed.
In addition, certain rules should be followed that are mandatory when working with wooden beams:
- before installation, the beams are treated with fireproof and antiseptic agents;
- do not use resin to cover the entire area of the beams, since the tree will not be able to pass air on its own, which means that condensation will accumulate on the floor;
- the distance between the load-bearing wall and the timber is a maximum of five centimeters.
To install beams in a wooden house, you just need to cut down special cells in which the timber will be located. All the previous requirements regarding wood processing also apply.
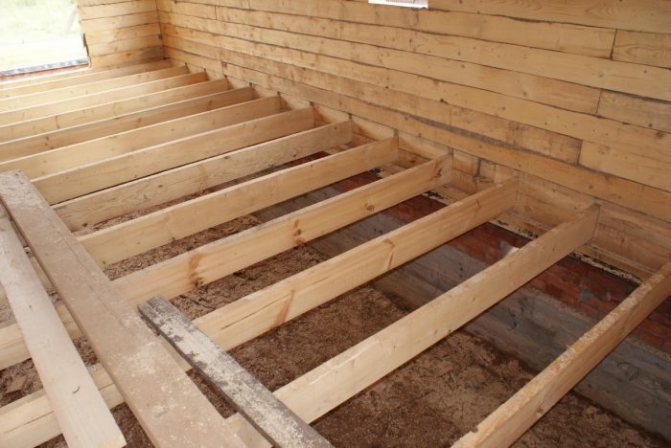
Instructions for the construction of wooden floors on the second floor beams:
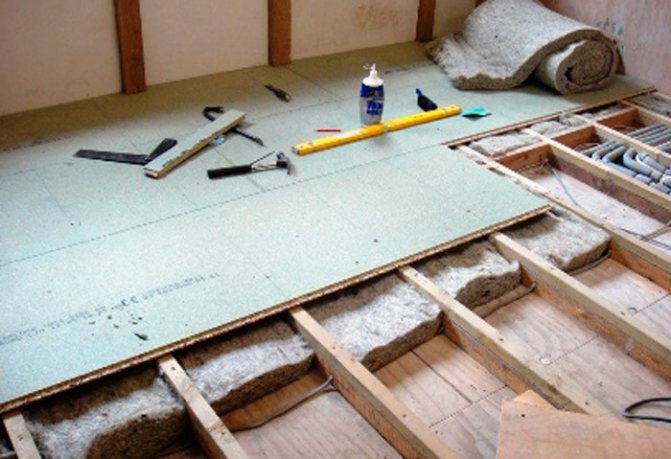
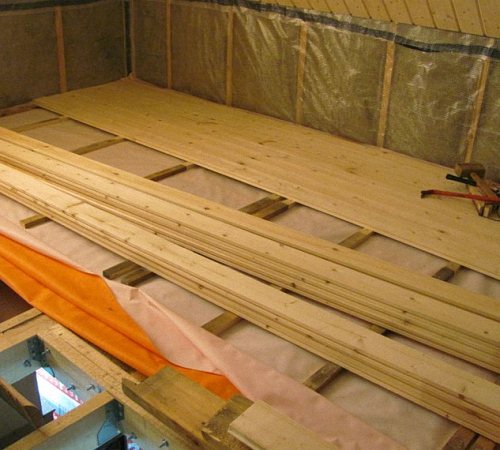
1. The first stage of work includes the installation of a subfloor from ordinary boards or bars. They should be adjusted to the size of the room or the entire floor. Pay attention to the evenness of the floor and the quality of the laying of the boards.
2. The next stage involves waterproofing the flooring; for this, modern roll materials are used. A simpler method of waterproofing, which does not require special investments, is the processing of the subfloor using a clay-sand mortar. A variant of laying roofing material is possible, the sheets of which should fit snugly to each other.
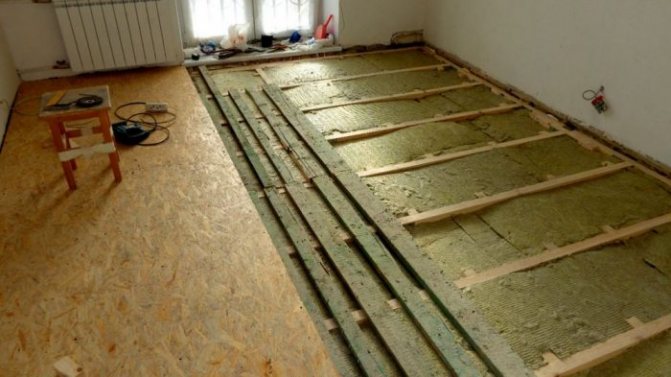
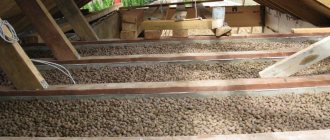
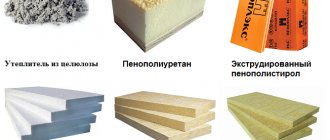
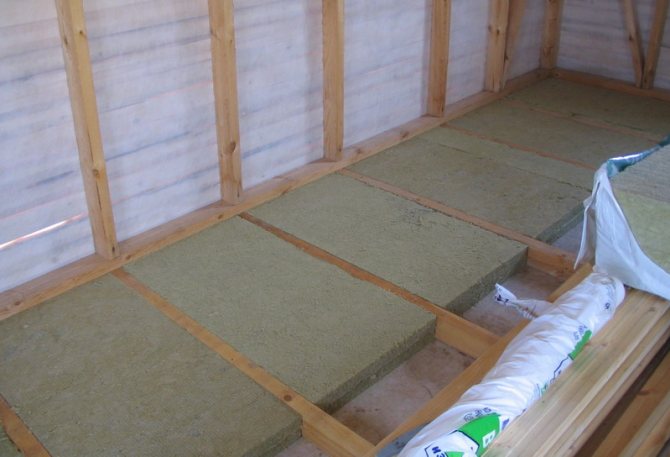
3. Next, it is necessary to carry out a number of works related to floor insulation. There are many options for insulating a wooden floor, among them it is worth highlighting:
- the use of simple slag, poured into the interbeam areas;
- mineral wool;
- sawdust;
- Styrofoam;
- expanded clay.
The most effective and common type of insulation is rock wool, which is laid in such a way as to ensure a snug fit to the boards. This type of installation will help prevent the formation of cold bridges and increase the energy efficiency of not only the floor, but the entire building as a whole.
4. After installing the insulation, proceed to the next stage - the installation of the vapor barrier. This option is not always installed when installing a wooden floor. Although it is better to take care of the presence of additional vapor barrier, which, firstly, will become an additional layer separating the floor and mineral wool, and in the event of flooding or ingress of a small amount of water, prevent its contact with the insulation, and secondly, it will become an additional protective layer of wood floor.
5. The final stage is the installation of the main floor. There are two options for carrying out this process:
- flooring,
- installation of a lagged floor.
To improve the quality of the installed floor, before installing the flooring, special boards are mounted in the form of a log. With their help, an additional ventilation underground space is equipped, and the noise level in the room is significantly reduced.
The option of constructing a floating floor is possible, which is freely fixed in the walls and creates the effect of floating in space. Physically, this aspect is practically imperceptible, but it helps to significantly improve the sound insulation characteristics of the building.
It is recommended to use planed floorboards or chipboard as a topcoat, and then carry out finishing work in accordance with the design of the room.
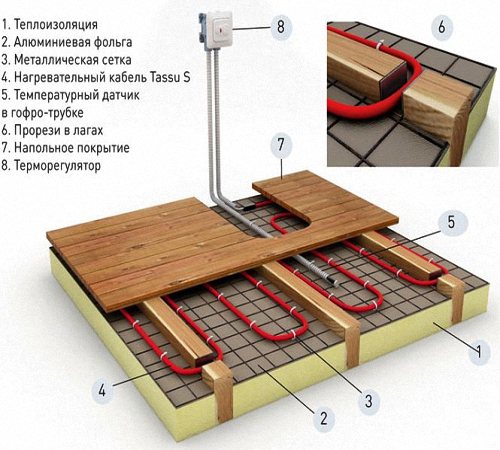
Underfloor heating on the second floor: installation features
Before learning about the technology of installing a water-heated floor on the second floor, we suggest that you familiarize yourself with its advantages and disadvantages.
The advantages of installing a water-heated floor include:
- uniformity in floor heating throughout its entire area;
- invisibility of all heating components used in the process of underfloor heating;
- the ability to heat a large area, with minimal expenditure of money;
- attractive appearance.
The main disadvantages in installing a water heated floor are:
- difficulties of a constructive nature during the installation of a structure;
- the presence of a water pump;
- the occurrence of difficulties in regulating the floor temperature;
- surges in water pressure in the system;
- the possibility of a leak and the difficulty in finding it.
It is not recommended to use metal pipes when arranging a warm water floor, as they are prone to corrosion and have a short service life.It is better to resort to an alternative option in the form of polyethylene, polybutylene or metal-plastic pipes. The service life of pipes of this type reaches forty-five years or more.
There are two types of systems for arranging water floors:
1. Technology of a concrete nature - consists in the arrangement of pipes on the floor, which is covered from above with a layer of concrete. When using this method, more material, labor and time investments will be required. Since the preparation of the solution will require the presence of cement and sand, and it will take at least three weeks for the screed to dry.
2. A flat type of arrangement of a water floor involves its installation using ready-made components that do not require time to dry. Although this method is more expensive than the previous one. This method is divided into three subtypes: polystyrene system, modular installation, rack mounting.
It is the last option that is used in the process of arranging a warm floor on the second floor.
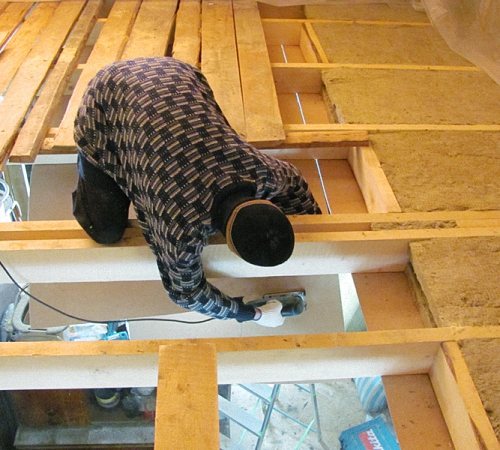
It involves the installation of heat-insulating material in the interlag space. In this case, mineral wool or polystyrene is used as a heat insulator. In the process of laying boards, at least 2.8 cm thick, a groove space is left, up to two centimeters wide. In this space, the components of the warm floor will be placed in the form of aluminum plates and pipes. The final stage includes the installation of the sub-surface and the finishing of the floor.
Another important stage in the installation of a warm floor is the installation of a collector group, which is sold in any of the construction markets. After assembling the manifold cabinet, the supply and return pipes are installed. The main function of the first of the pipes is to provide the system with hot water, since it is connected to a boiler or hot water source. The second pipe is responsible for transporting cooled water to the place where it is heated. Sediment is used to circulate this process.
Tip: When choosing a place for the manifold box, you should stick to the center of the room and install it at the bottom of the wall. This procedure will ensure uniformity in underfloor heating.
Do not forget to install special valves on each of the pipes. They will help, if necessary, to stop the operation of the system in order to carry out repair work in it or save money on floor heating.
The connection of the plastic pipe with the shut-off valve takes place using compression fittings. Then the collector is connected to the valve, a drain valve is installed at one end, and an air vent at the other. Installing a simple plug is less functional. When the collector cabinet is assembled, the work on the installation of the underfloor heating, described above, is performed.
Second floor flooring - concrete slab
The most durable option for constructing a floor on the second floor is a monolithic overlap.
The main stages of this process are:
- installation of formwork;
- reinforcement;
- the process of pouring concrete mixture;
- drying out the floor;
- finishing.
The formwork installation procedure is rather complicated, as it requires special attention and preliminary calculation. It is necessary to calculate the distance between the supports and the thickness of the layer itself. This value directly depends on the floor area and the power of the building itself.
Here is an approximate calculation of these indicators. With a concrete layer thickness of fifteen centimeters, the distance between the supports will be about 150 cm.
After completing the installation of the formwork, proceed to the next process called reinforcement. To do this, you will need a certain number of metal rods, the cross-section of which is 12 cm.Of these, it is necessary to build a grid, the size of each cell of which will be about twenty centimeters.
The preparation of a concrete screed must be taken with extreme caution, since the performance of the floor will depend on its quality. The advantage of the screed equipment is the ability to carry out almost any finishing work on it, such as the installation of ceramic tiles, parquet, laminate, linoleum, polymer floor, etc.
Due to the fact that the screed is evenly laid on the interfloor covering, it contributes to an even distribution of the load and an increase in the strength of the house.
The recommended grade of concrete for the preparation of concrete mortar is M400. The filler is sand or fine crushed stone. In this case, the ratio of concrete to sand is one to three. The screed is poured at one time, it is forbidden to fill the screed in the same room on different days, as it will lose strength.
The recommended time for using the solution is a maximum of two hours. When doing this, do not forget to use a concrete vibrator, which will help get rid of excess air and ensure a strong adhesion of concrete and reinforcement.
Overlapping the floor of the second floor: additional recommendations
When constructing the floor of the ceiling of the second floor, it is recommended to use beams that are installed on the floor area. Then, they are cut off with an electric planer, on the side that will be the ceiling of the first floor. This process will make the wood ceiling look more attractive. Next, you need to install the bars, which will form the rough covering of both the floor and the ceiling. For finishing the ceiling, wooden lining is best suited, which will create harmony with the beams. And, for the equipment of the floor, it is necessary to first lay a layer of waterproofing, thermal insulation, vapor barrier, and then proceed with the installation of the flooring and finishing.
Consider the option of finishing the floor of the second floor, for the work you will need:
- laminate,
- drywall,
- insulation.
The laminate flooring is laid on the finished surface of a wood or concrete floor. And the drywall is attached to the ceiling area.
Before installing the laminate, it is recommended to carry out a number of preparatory work to insulate the waterproofing and soundproofing of the floor.
Tips for arranging the floor on the second floor:
- when installing a warm water floor on the second floor, it is necessary to expand the roll-type insulation before installing the pipes, and fill the inter-tube sections with thick plasterboard, which will increase the rigidity of the structure, then another layer of insulation is installed and the laminate is mounted;
- when installing a real environmentally friendly wooden floor, you need to carefully select materials; as a sub floor, get ordinary boards with low humidity, for the main floor it is necessary that there are no knots, dark spots on the boards, and they must be completely dry;
- when constructing a panel house, use panel-type ceilings as a floor, which will be finished with a laminate, while it is necessary to install a lining based on expanded polyethylene, which will create a damping effect;
- adjustable floors will help increase sound insulation and provide a ventilated space under the floor, so there is no condensation, mildew or mildew.