The main item in all the homes of our ancestors was the oven. Most often, it was erected in the very center of the room in order to warm the house as evenly as possible. In addition, food was prepared on it and colds were treated, if there was a bed. But at present, a brick oven is only a heating structure. At the same time, making it with your own hands is not so difficult. The procedure does not require expensive specialized equipment, extensive experience and the involvement of a professional stove-operator. And if you use high-quality and outwardly beautiful brick, then you will not have to deal with finishing work. But despite all the ease, basic knowledge must be present.
Additional requirements for the selection of the furnace
Since we suggest doing everything yourself, and not buying a ready-made stove in a store, when choosing the required design, we recommend paying attention to the following parameters:
- Ease of operation... The heating process should be a pleasant and uncomplicated activity that every family member can handle.
- Profitability... This point is especially important if it is planned to use only this stove to heat the house on an ongoing basis (in winter). In this case, one unit of fuel will provide maximum heat transfer.
- Simplicity of design... If a person who does not have experience in masonry takes up the construction of a complex model of the device, then difficulties may arise that will subsequently lead to incorrect operation of the furnace.
- Appearance... The design of the structure should be pleasing to the eye and create coziness in the room, so it is worth paying special attention to the quality of the brick.
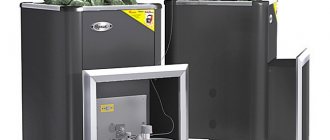
- Presence of a water circuit... It is known that even a small heating stove with a built-in heat exchanger for heating the coolant is much more efficient than other models without this device.
When choosing a heating stove, you should consult with a qualified stove-operator. He will tell you which configuration to choose and what to pay special attention to.
Subtleties of choice
For many years, the question of which stove is better - metal or brick - has been relevant for owners of suburban buildings. When erecting a structure of the second type, it will have to be equipped with heaters. With their help, at the beginning of kindling, the level of heat transfer will be maximum, which will allow you to quickly create a comfortable temperature in the room.

Placement of the stove under the stairs
For home owners who want to choose a stove for a summer residence with the condition that the premises are used only in the summer, you need to give preference to structures with thin walls. In them, the masonry is usually made in a quarter of the brick.
Recently, more and more you can find such a combination of a heating system for a country house, where the stove is equipped with a fireplace. In this case, first, the fireplace is kindled, warming up the rooms, and only then the stove is laid, which for 12 hours can maintain heat in a small house.
Good to know: How to choose the optimal insert for your fireplace
In order to clearly understand for yourself which oven is ideal for the requirements, it is worth considering a number of design features of all the models under consideration before purchasing.
That is why, in order to decide which stove to choose, you need to know the answers to a number of the following questions:
- Preferred product shape.
- The main material of the product.
- What type of fuel is the cheapest in a particular region.
- Will I have to cook food on the stove?
- Desired wall thickness for the structure.
- The preferred channel system inside the oven.
- How the chimney will be erected.

Stove and fireplace in one design
If you plan to purchase a wood-burning stove for summer cottages, then it must meet the following parameters:
- Lightness and simplicity in operation and maintenance.
- Distinguish in good heat dissipation among competitors.
- The structure must be made of quality materials, which will increase its strength and durability.
- The wood-burning stove should maintain a comfortable room temperature for as long as possible.
- With a high level of quality, the cost of construction should be minimal.
- A wood-burning stove should work not only on logs, but also on wood waste, fuel briquettes.
According to these criteria, you can make a really right choice, which the owner is unlikely to regret in the future.
Seat selection
Before proceeding closely with the construction, it is worth deciding where the furnace will be located. If there is only one small free area in the house, there is nothing to be done about it. But for maximum heat transfer, it is recommended to place the stove in the central part of the house or room. Thus, none of its elements will touch the street wall, respectively, warm air will not come out. In addition, in the vicinity of the supporting structure, temperature drops may occur, which negatively affects the durability of the heating device and the operation of the chimney.
Heating furnace schemes
Before choosing, you should familiarize yourself with the device options for each design.
Diagram of the heating furnace The device of the cooking furnace The device of the heating and cooking furnace
Immediately you need to think over the installation system. After all, each design has its own requirements. For heavy ones, a large foundation is required. For cooking, it will be possible to do with a small stovetop.

Preparatory work
First you need to decide on the place of construction of the future furnace. The first time the stove is erected when housing is being built, which means that the shape and dimensions of the stove have already been determined, as well as its location.
Photo of the foundation diagram for the furnace
- The location of the stove largely depends on the layout of the entire building, and its location should be such that it effectively heats the entire living space.
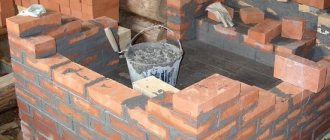
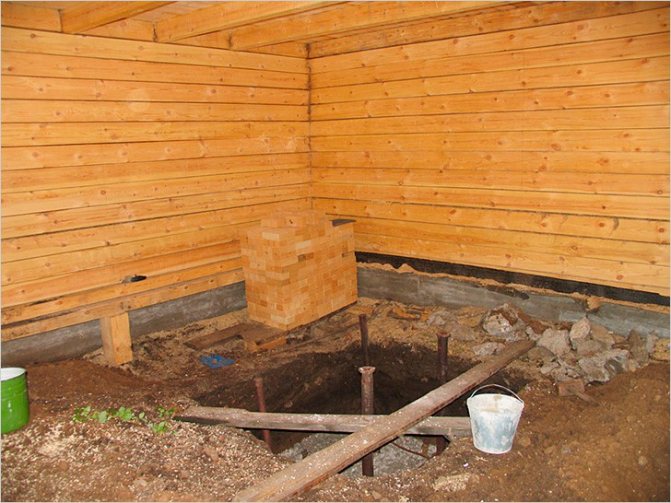
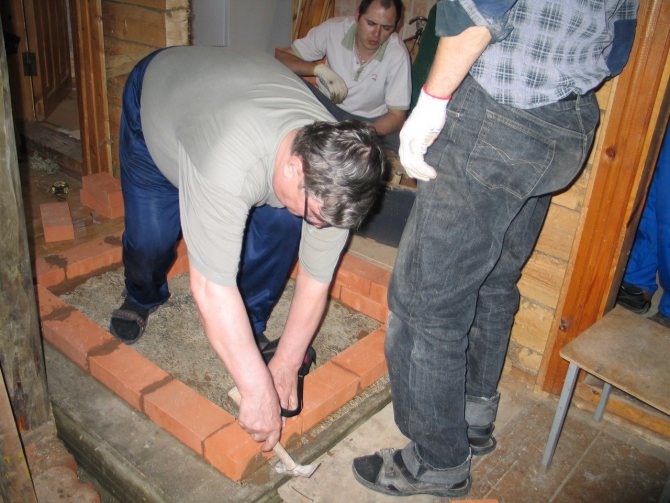
- If the place is determined, you can start building the foundation. Its dimensions should be somewhat larger than the geometric dimensions of the furnace. When building it, you need to put waterproofing.
- When laying, it should be remembered that the seams should be minimal, and the evenness should be maximal.
- When laying out the inner surfaces of the chimneys, there should be no overflow of mortar, and the surfaces should be flat. It is advisable to remove the excess solution that stands out from the seams. Both the side surfaces and the corners must be carefully laid out.
Attention: The foundation must support the weight of the structure. Therefore, it will need to be reinforced.This will give additional rigidity.
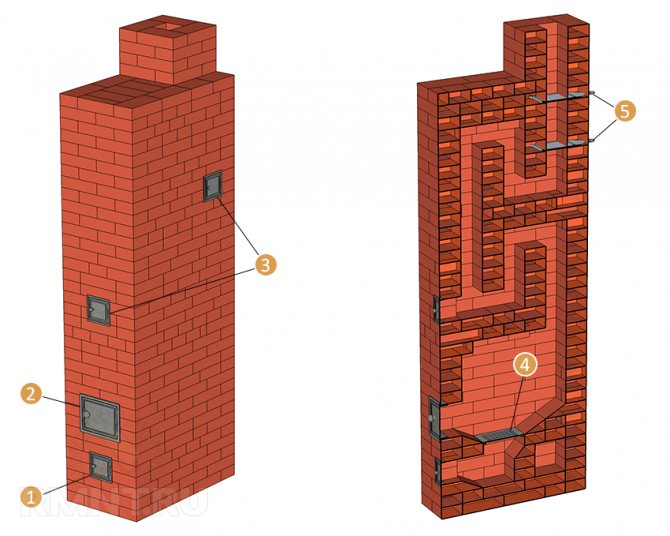
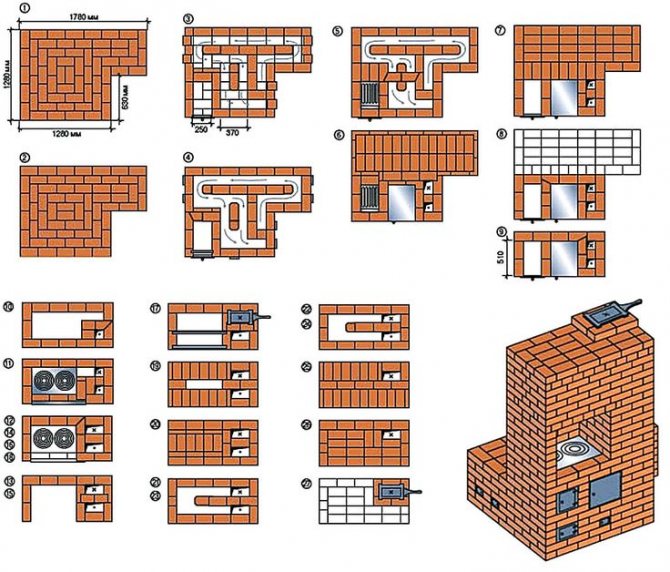
What are we going to build
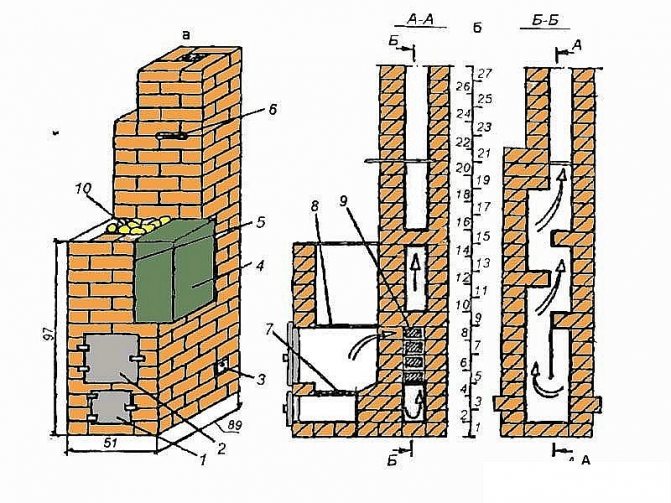
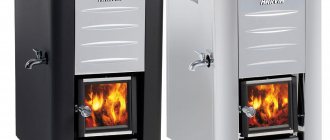
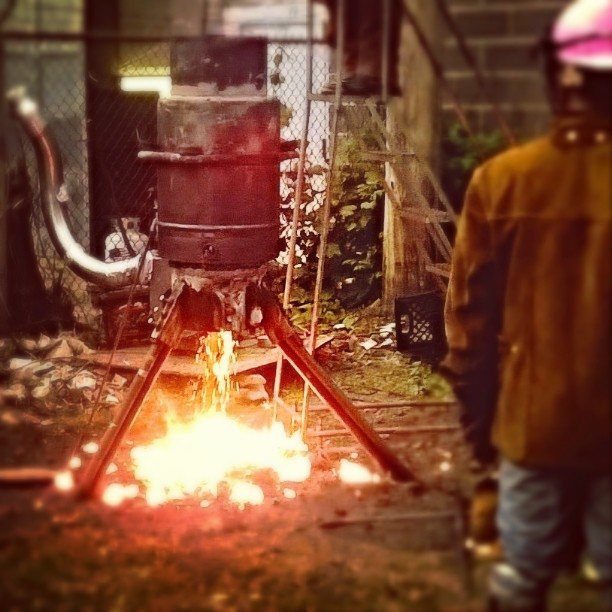
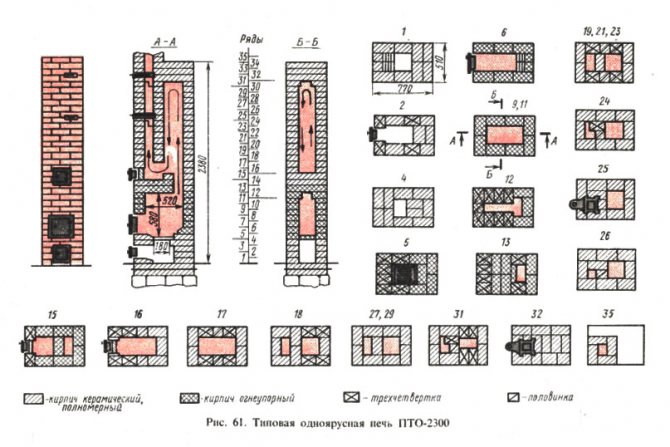
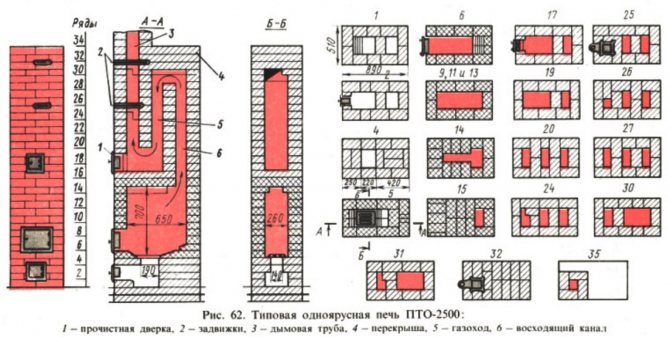
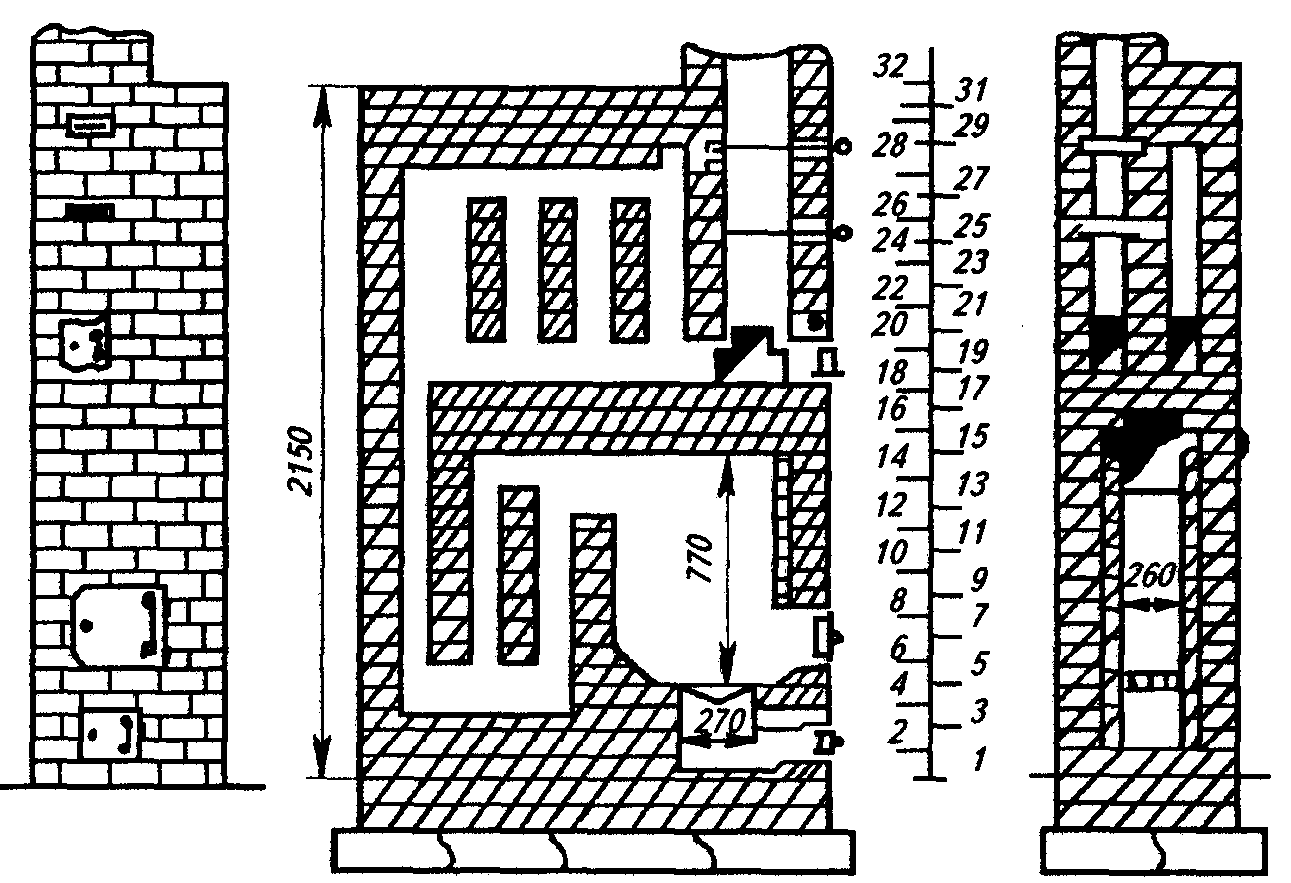
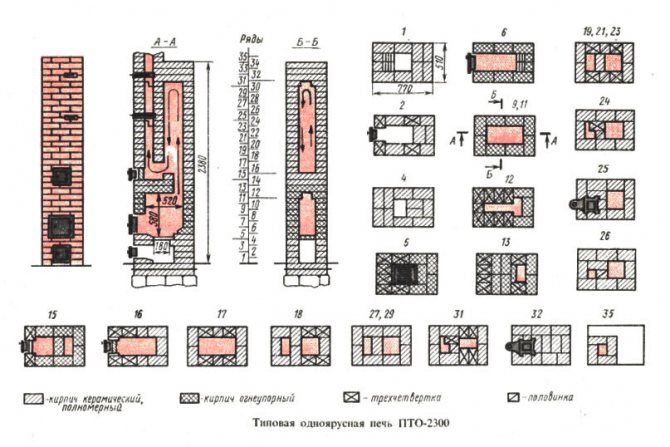
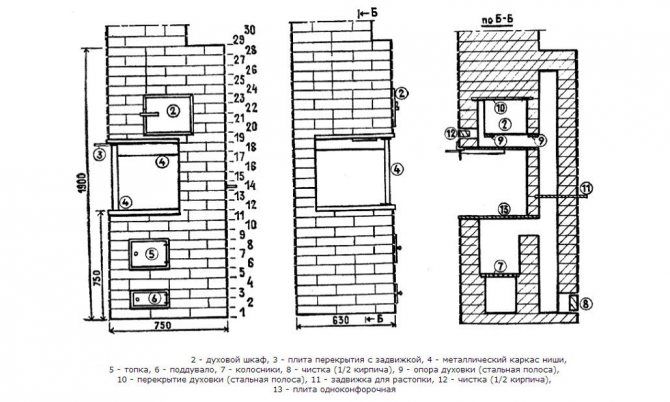
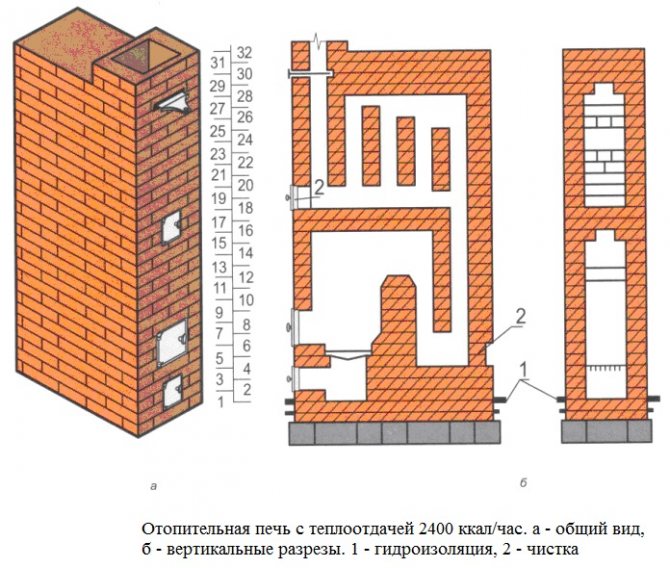
The stove, which we propose to fold with our own hands, has several names among the people: "Baby" or the PTO-2300 single-bell stove. Its dimensions are 770x510x2380 mm. This design is well suited for suburban construction. The firebox is made of refractory bricks. The device can operate on almost any solid fuel, namely wood, coal, peat, anthracite.
PTO-2300 is the most compact of all thick-walled models. Below you can see a 2x3 brick oven with a fairly simple design. The name itself speaks of its power, that is, the device can produce up to 2300 watts per hour. One firebox is enough to heat a 25 m² room or two adjacent 35 m² rooms.
Basically, a similar structure is installed in the central part of the house. Due to the shape of an elongated rectangle, it acts as a partition between rooms.
Device
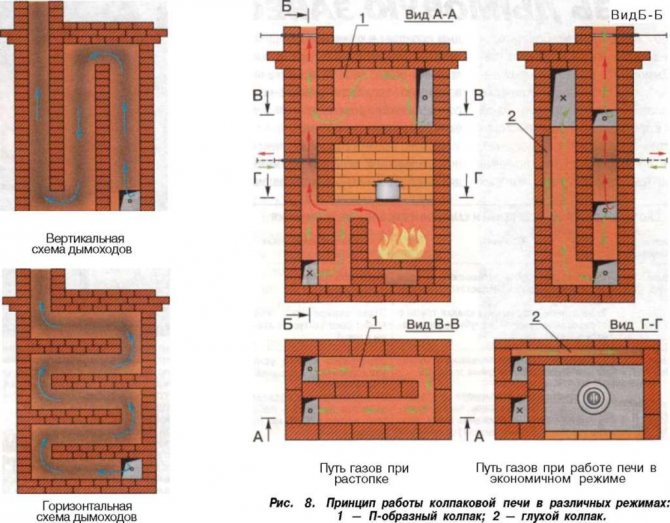
In the presented furnace, hot gases rise through the supra-furnace channel into the bell (their path is indicated by arrows in the diagram). Further, the gases descend, bend around the "curl", enter the vertical channel and rush into the chimney, where two valves are installed.
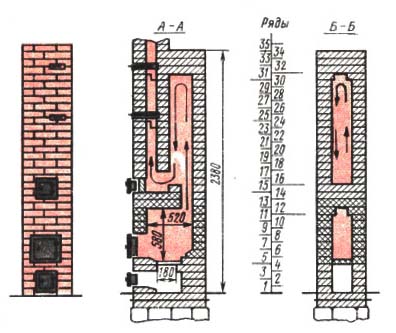
In the absence of a convective system, a solid fuel stove would not have time to heat up. The hood serves to slow down gases and increase their contact time with brick walls.
You can download the high quality drawing at this Link.
Advantages of the baby oven
Among the main advantages are the following:
- The simplest design allows even a non-professional to build a furnace on their own.
- The device covers an area of only 0.4 m². Thanks to such dimensions, this heater is popular in country houses.
- A strong foundation is not required because the weight of the structure is low.
- The efficiency of the stove allows you not to make large stocks of firewood. In addition, it can be fired with other types of fuel: coal, peat, anthracite.
- The device does not contain heating ducts. Their functions are performed by the fuel cap.
- It can heat a room up to 35 m². In spring and autumn, one firebox will be enough to heat the room, and in winter, two.
- The structure can be installed in a wall, thereby saving space and uniform heating of two rooms.
The popularity of brick ovens
Unlike many heating methods, a brick stove tends to maintain optimal air humidity in the room. It's all about the porous structure of the brick, which, when heated, emits moisture vapor, and when it cools down, it takes it back.
Therefore, in houses with brick stoves, optimal humidity is maintained, which means that such a stove can be safely called environmentally friendly. Needless to say, bricks, clay and other materials of the stove are natural materials that are safe for health.
Thanks to the breathable structure, in a house with stove heating you can feel comfortable already at 18-19 degrees, while with other types of heating devices 20-22. These are significant savings, but not all. The stove is inherently omnivorous and can work on anything that can burn - coal, wood, pellets, etc.
Some types of stoves, such as Kuznetsov's brick stoves, made according to the bell type, give such efficiency indicators (80–95%) that they can compete with the most economical Buleryans.
House layout
Initially, the plan of the house should take into account the stove - you can come up with many interesting masonry for different types of brick structures. What else should be considered when planning a house:
- For a stove with 500 or more bricks, with your own chimney, you need to lay an independent foundation, which should not be connected to the main foundation of the house - to have a certain distance from it.
- Some stoves, such as a low, large-width hob with a heating plate capable of withstanding 250 kg / sq. m (according to SNiP requirements) can be installed without a foundation. It is only necessary to provide thermal insulation and strengthen the flooring with additional joists.
- The ceiling beams should not touch the chimney, and the chimney should be half a meter or more higher than the roof ridge, and the distance between them should not be less than one and a half meters.
As a matter of fact, almost all stoves require from 1,000 to 1,500 bricks, so you need to rely on a separate foundation. There may be some exceptions to the foundation plan in the case of sectional strip foundations of the main building.
It is allowed to find a place in the plan of such a house and lay the foundation of the furnace at the intersection of the belts - under the inner walls. But before other fragments of the main foundation there should be no less than 1.2 m.

Foundation
The foundation should be free-standing, not connected to the house. Depending on the material, rubble, rubble concrete and brick foundations are distinguished. Usually cement or lime-cement mortar is used.
The size of the foundation must be laid 5-7 cm larger than the dimensions of the furnace itself. In depth, it should be 15-20 cm below the floor. A cement-sand screed is arranged on top of the masonry. It is recommended to use a level and check its levelness. Then you need to lay two layers of roofing material and lay out 2-3 rows of bricks to the floor mark.

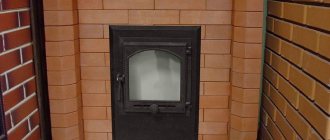
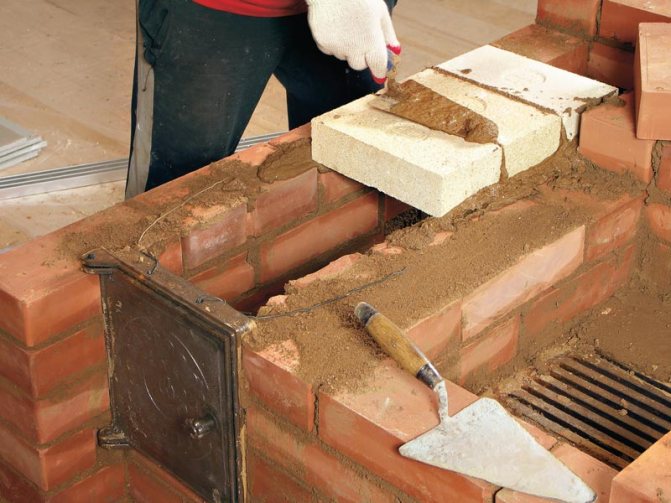
Installation of oven doors. Advice
Before installing the door, it should be checked for a good fit and free rotation on the hinges.
We do the installation of doors
- In the presence of distortions or lack of smoothness of rotation, such defects should be eliminated, and if this is not possible, then replaced with new ones. You should also determine if there are mounting holes available.
- For fastening, a soft (knitting) wire with a diameter of 2.5-3 mm and a length of about 50 cm is used. The wire is inserted into the hole and twisted.
- It is impossible to install the door after laying the masonry, therefore it is installed during the masonry. In order for the door to hold well, the wire must sit in the seams, between the rows of bricks. Since the masonry lies from bottom to top, the door is fastened in the same order. First, the lower ends of the wire are walled up, and then the upper ends.
- After laying the lower fixing ends, the door must be set strictly vertically and horizontally with subsequent fixation. After the door is exposed, you can continue with further work.
- This installation technique can be used to fix the combustion chamber doors, blower doors and other metal objects such as valves, carbon black, etc.
- A very important stage is the installation of the stove. It is installed on a clay mortar. The consistency of the mortar should be such that the excess mortar freely comes out from under the stove, as a result of the pressure of its own weight. Its amount should be such that it fills all the free space. It must not be allowed to be small. In the future, under the influence of high temperature, the clay is sintered and will reliably hold the slab on the surface.
We do the installation of the stove
- After finishing the work, the stove must be allowed to dry completely. This is not less than 14 days, after which the stove can be heated.
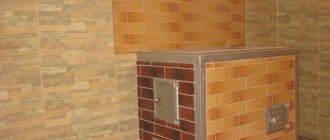
- To make the stove attractive, it can be covered with tiles. This is where the quality of the masonry can come in handy, especially if it was done by hand. It will be easy to lay tiles on a very flat surface, especially since high requirements are also imposed on its laying due to the presence of high temperatures.
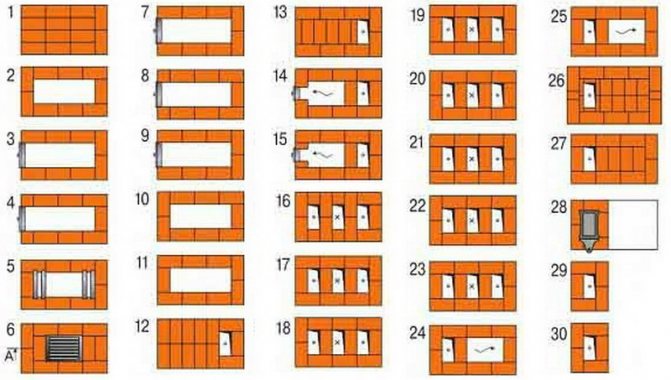
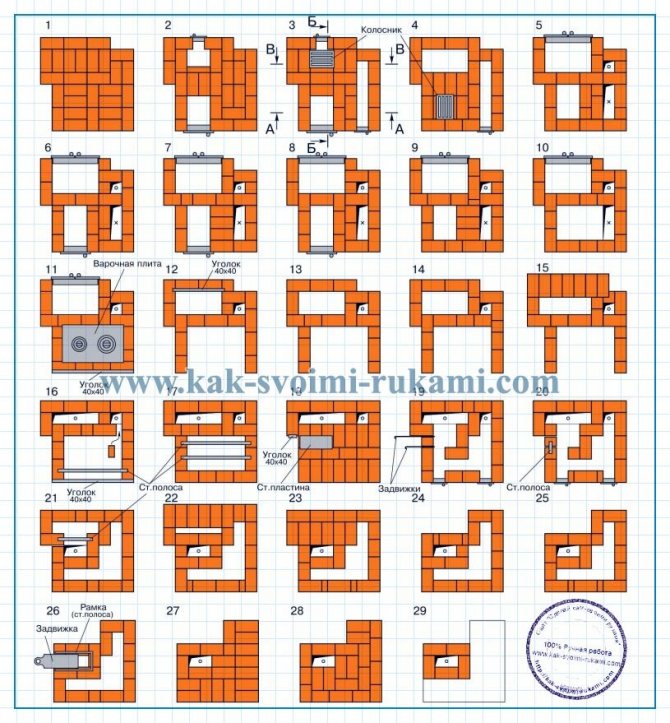
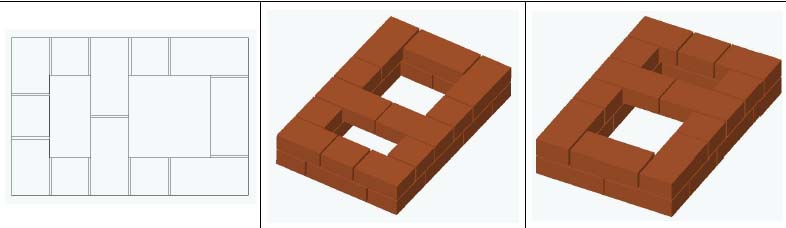
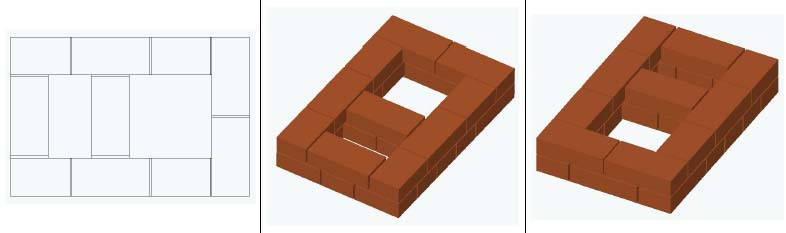
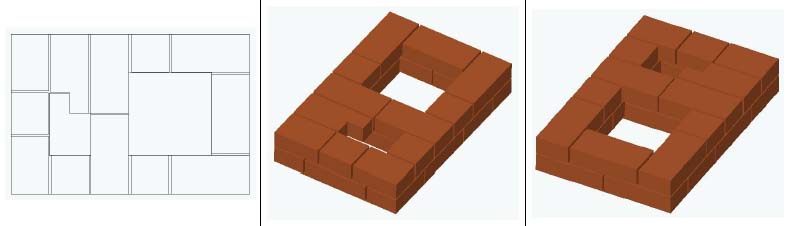
Brick heating stoves: we select the drawings depending on the chosen design. It is best to lay the working part with clay mortar. You have the instruction and, having chosen the desired model from the photo, you can get to work.
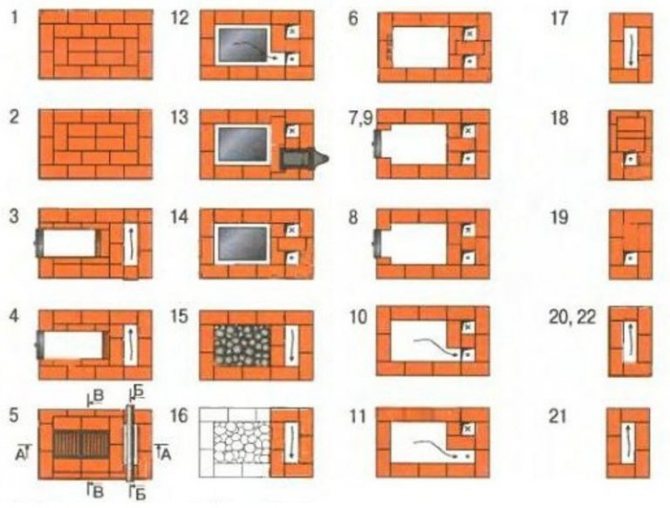
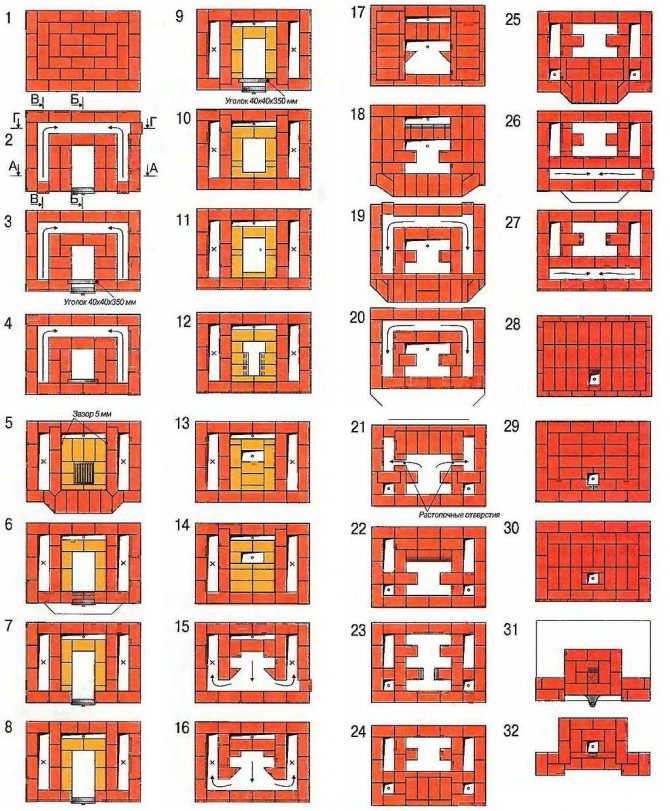
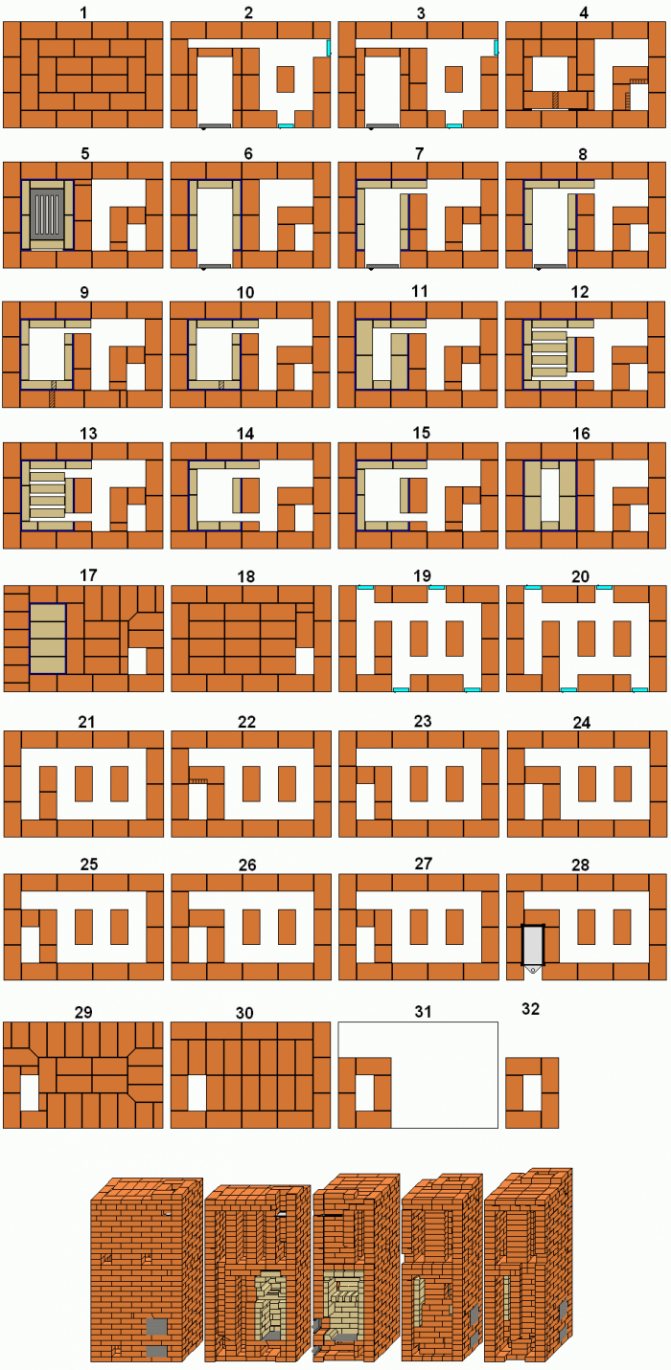
Furnace ordering
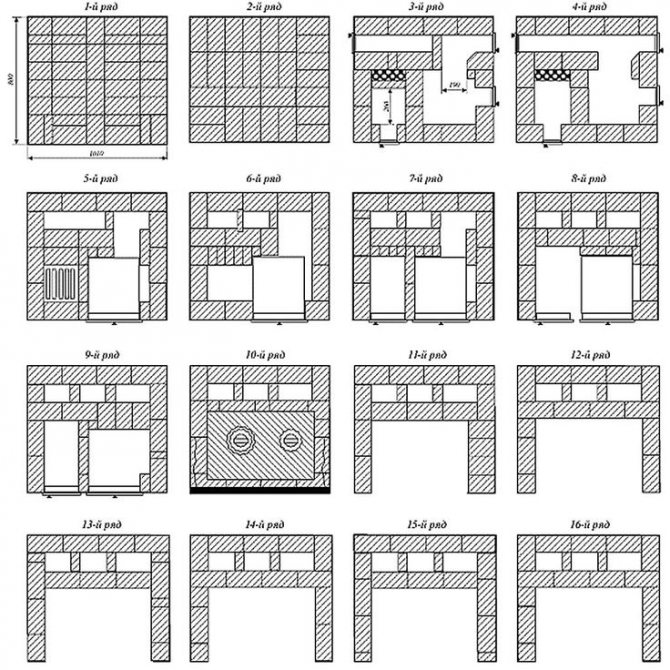
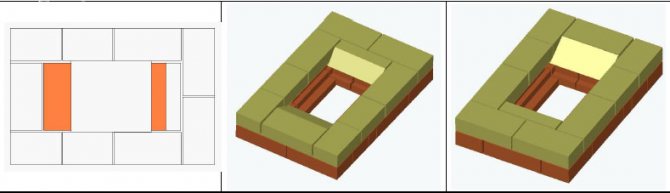
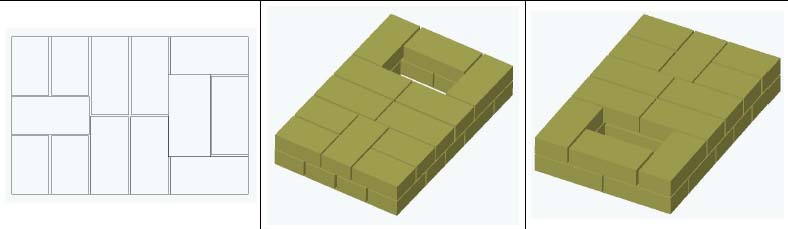
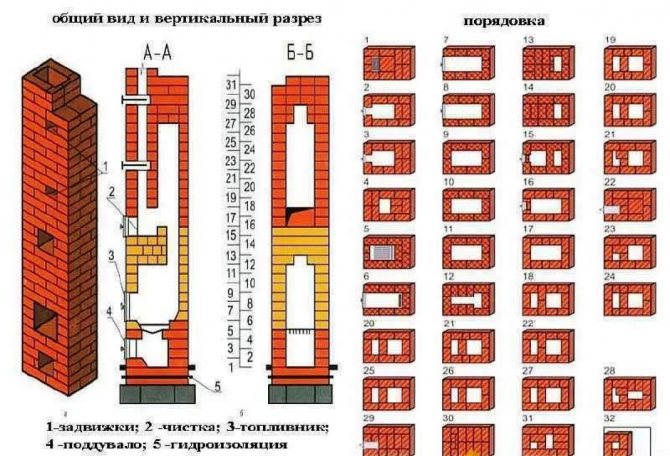
Below we will consider in detail the order of the heating furnace.
Row 0. As described above, you first need to lay out two levels up to the floor mark. They are placed on the waterproofing layer of the foundation. For this, roofing material is used.
0 (1) row - solid. The number of bricks in a row is 12 (red).
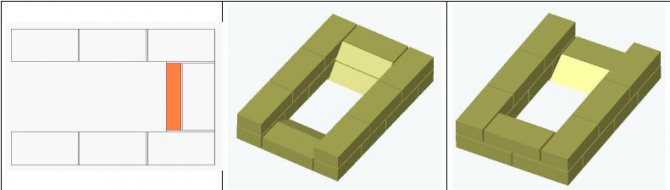
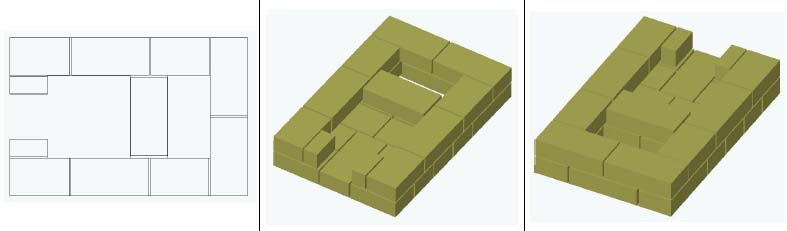
Row 1. An ash chamber is formed, where ash from products burnt in the furnace will be collected. To make it easier to remove the residue from the combustion, two bricks are cut in the front to the middle.
1 row. The number of bricks is 11 and ½ (red).
Row 2. We continue to form the ash chamber, for access to which a hole for the door is installed. Its size is 140x140 mm.
2 row. The number of bricks is 12 (red).
Row 3. Identical to the previous row and continues to form the ash chamber.
3 row. The number of bricks in a row is 10 and ½ (red).
Row 4. Here the ash chamber is overlapped and grooves are cut in the bricks for the installation of a grate with a size of 200x300 mm.It is recommended to do this in the following way: the existing grate is applied to the row without mortar, it is contoured with a margin (usually about 5 mm is left, which is necessary for thermal deformation of the metal). Next, each brick needs to be processed and cut. Then an estimate is made and everything is put on the solution. After that, the grate is immediately placed.
4 row. The number of bricks is 11 and ½ (red).
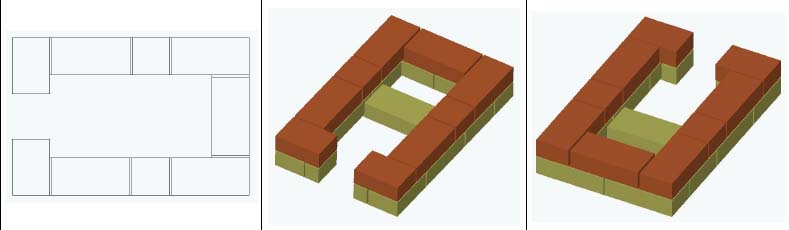
Row 5. Refractory bricks are laid, a fuel chamber is formed. Front and rear, it contains bevels of the inner surface towards the grate. This is necessary so that the combustion products can roll down to where there is sufficient air access.
5 row. Bricks set at the front and back of the chamber are cut at a 45 degree angle. The number of bricks is 11 (fireclay).
Row 6. Continuation of the fuel chamber. This is where the door for the combustion chamber begins to form. Its size is 250x210 mm. It should be noted that the rear brick has a slight bevel towards the burning area.
6 row. Cut the brick of the back wall of the chamber at an angle of 45 degrees. The number of bricks is 8 (fireclay).
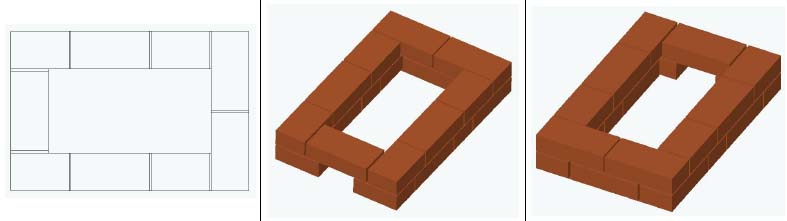
Rows 7 and 8. Continuation of the fuel chamber.
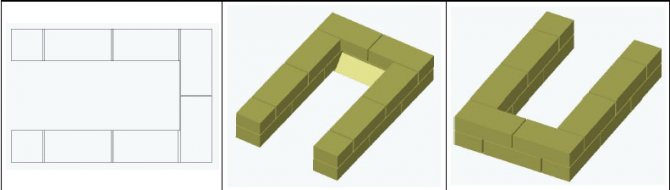
7 row. The number of bricks is 7 (fireclay).
8 row. The number of bricks is 7 (fireclay).
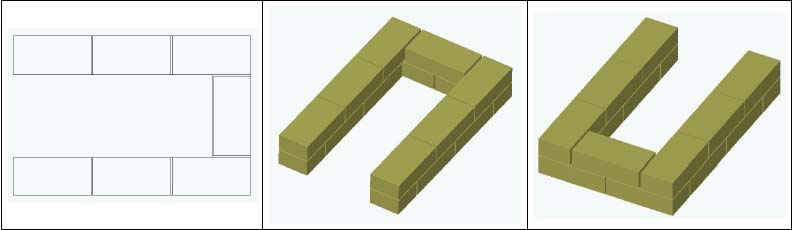
Row 9. The door of the fuel chamber is closed and its height continues to increase.
9 row. The number of bricks is 8 (fireclay).
Rows 10 and 11. A fuel chamber is being formed. It turns out to be quite voluminous. It is necessary to pay attention to the different arrangement of bricks at 10 and 11 levels.

10 row. The number of bricks is 8 (fireclay).
11 row. The number of bricks is 9 (fireclay).
Row 12. The camera starts to overlap. Three-quarter bricks with an edge are installed, while leaving a vertical channel that will be used for the exit of gases.
12 row. The number of bricks is 11 and ½ (fireclay).
Row 13. The complete overlap of the fuel chamber continues, leaving only the vertical channel. Its size is similar to that of a whole brick.
Row 13. The number of bricks is 13 (fireclay).
Row 14. The formation of the vertical channel continues. The chamber is covered by another level of fireclay bricks.
Row 14. The number of bricks is 12 (fireclay).
Row 15. A new vertical channel and a hole for installing the cleaning door begins to form. Its size is 140x140 mm.
15 row. The number of bricks is 9 (fireclay).
Row 16. A regular brick is used here. It should be noted that it is not placed in the center, since a connection is formed there between the first and second channels to ensure the passage of hot gases.
16 row. The number of bricks is 8 (red).
Row 17. The opening of the cleaning door is blocked. The channels are still connected to each other in the center, no brick is placed.
17 row. The number of bricks is 9 (red).
Row 18. The formation of the cap begins, which will continue to the very top. Subsequently, the front channel will go into the pipe.
Row 18. The number of bricks is 9 and ½ (red).
Rows 19, 20, 21, 22, 23. The configuration completely repeats the previous level.
19 row. The number of bricks is 10 (red).
Row 24. The opening of the vertical channel narrows in the shape of the letter G. A hole is formed for the valve.
24 row. The number of bricks is 10 (red).
Row 25. A hole is left equal to half the brick, and a seat for the smoke damper is cut out.
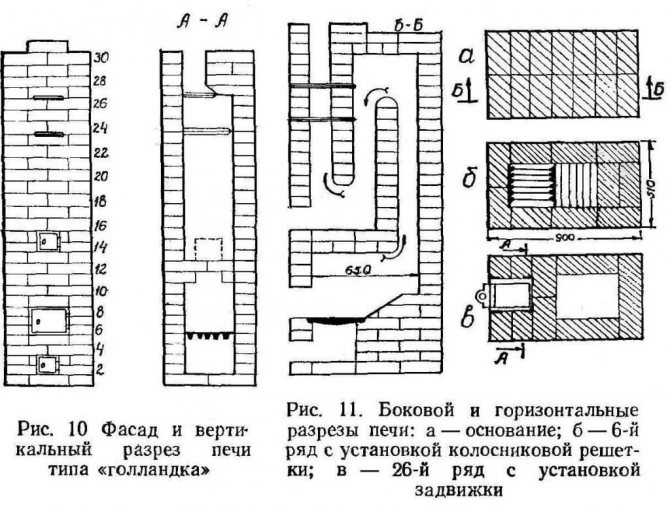
Masonry of the Russian stove
Before work, it is important to study the projects of Russian stoves. There are different options, because the masonry scheme may differ
The drawings cannot be changed - the specified order must be strictly observed.
For the safety of the structure, complete tightness is important. This is ensured by the following points:
- Use a quality stone. There should be no cracks.
- The seams in the aisles are 0.5-0.8 cm thick.
- Do not coat the inner walls with clay - soot will deposit on them, therefore the thermal conductivity will decrease.
- Different sections differ in masonry thickness from ¼ of the brick thickness to its full length.
- If the brick is ceramic, then soaking is required so that moisture does not take away from the solution.
Frequently asked Questions
Question: Is there enough chimney section 14x14 in this project? Answer: The power of the device is 1760 watts. With this parameter, the cross-section of the chimney is quite sufficient.
IN: On which solution is it better to put fireclay bricks? ABOUT: It is recommended to use a ready-mixed refractory masonry, which is sold in any specialty store. As a rule, the packaging contains instructions for its use. You can use a regular mortar, but it is recommended to add a refractory mortar to it in the amount indicated on the package. Pieces may come across in it, so you should either sift or additionally grind.
IN: The capacity of such a furnace will not be enough for a 6x6 m house, consisting of three rooms? The walls are made of adobe blocks or frame-panel. In winter, the average temperature is -10 ° C, however, there are frosts and up to 35-40 degrees below zero. ABOUT: For such conditions, this will not be enough. You need to use something the size of the Swede.
IN: If the stove is lengthened by four meters by extending the hood higher, will it function normally?
ABOUT: In practice, it has not been seen that the furnace was extended up to four meters. The design, of course, provides for a change in height due to the upper dome, but 4 m - this should be tried.
IN: Can a stove be made without a foundation by placing it on the floor? ABOUT: The weight of the structure, excluding the pipe, is almost 1.5 tons. Whether the floor can withstand this, see for yourself.
IN: Can the height be reduced? ABOUT: This can be done using rows 19-22 and 27-30. If you remove any two consecutive levels from the presented range, the construction will not be broken.
IN: Tell me, will this stove be enough to warm up two rooms (20 m² and 15 m²)? ABOUT: It all depends on how well the house is insulated and at what outside temperature you will heat it. If you intend to live in this house in the winter, it is better to choose a larger oven.
IN: What is the advantage of 2 dampers? Is it possible to leave only the top to simplify the design? ABOUT: The two valves keep the heat better. It is allowed to put one, but at the same time it must be tightly closed.
IN: Can these furnaces be made entirely of refractory? Will it be possible to underestimate the firebox and what will this affect? ABOUT: Refractory brick laying of the furnace is possible. The firebox should not be made lower. In this case, the fuel may not completely burn, soot will form.
IN: How is the issue with the difference in the size of ordinary and fireclay bricks solved? ABOUT: Due to the better geometry of the refractory material, the joints are thinner when laying. This hides the difference in brick size.
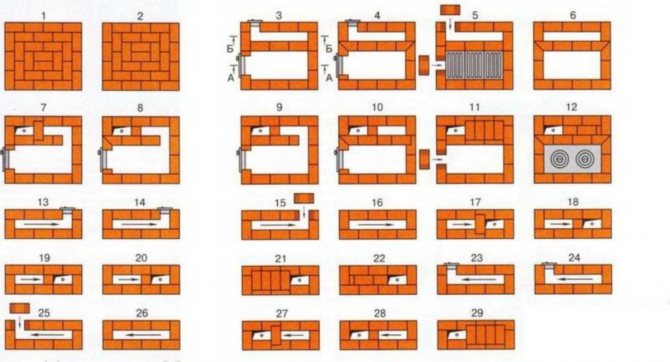
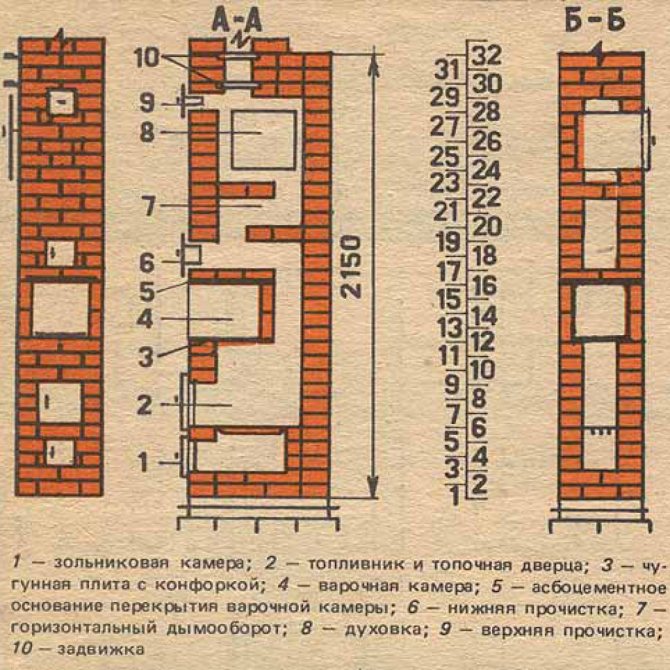
"Buslaevskaya" furnace: projects
The design has a built-in hood. The oven is small in size. It is ideal for any private home, as it allows you not only to heat the premises, but also to prepare food. Despite its compact size, the stove heats spacious rooms well, so there are ready-made house designs with a stove.
Special schemes for laying brick ovens will help you do the job without complicated calculations.
For styling, you will need the following materials:
- doors - furnaces (0.2x0.25 meters), VK (0.39x0.5 meters), blower (0.14x0.14 meters);
- refractory - 43 pieces;
- solid brick - 382 pieces;
- oven cabinet 28x33x50 centimeters;
- cast iron plate 0.7x0.4 meters with burners (removable rings of different diameters);
- valves - steam exhaust (12x13 centimeters) and smoke (12x25 centimeters);
- grate - grate 30x20 centimeters;
- corner - three blanks of equal-flange rolled stock 1 meter long and 45x45 mm in size;
- steel - a piece of 0.3x0.28 meters;
- strip - 4 pieces of meter (4-millimeter paper), 0.25 meters (2-millimeter paper), 0.35 meters (3-millimeter paper);
- cast iron plate - 0.4 x 0.25 meters; 40x15 centimeters.
Projects of brick ovens of this type are as follows:
- Complete row.
- Blower door.
- Window opening for cleaning.
- The bottom of the oven is laid out of refractory, three sides are covered with iron.
- Installation of a furnace door, grate, under the firebox - refractory, cleaning overlap, blower doors.
- Installing LH.
- Laying the refractory on the edge around the DS.
- Laying according to the scheme.
- The upper clay coating of the oven (1 centimeter) is performed, the diesel fuel is overlapped, a plate with burners is attached.
- Installation of smoke circulation with cleaning windows, the stove is not laid. In the future, the brick is placed on the edge.
- The cleaning is overlapped, channels are created, 25 cm strips are laid.
- The cleaning is finished, the fixing wire is embedded.
- The cap is laid.
- Installation of the VK overlap, while the hoods remain.
- Stoves are laid out according to the scheme.
- The small stove ends with sheet metal, the masonry is made in the order of the brick stove.
- The clean hole of the large stove is laid out, the edges of the side walls of the channels are constrained.
- Laying of ledges.
- The protrusions are duplicated and the corner is installed.
- The BP chimney overlaps in the same way as row 19.
- A three-row neck is made, the chimney size is reduced to a section of 26x13 centimeters for the upper valve.
- A chimney with grooves is created on this and subsequent rows.
The dimensions of the structure increase when using clinker facing bricks, therefore it is not recommended to use them instead of solid material. When finishing with tiles, durability is ensured (the material serves for tens of years), in addition, it can be dismantled for facing other heating structures.