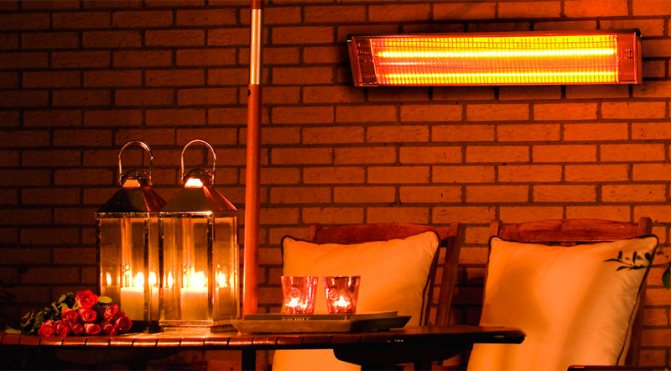
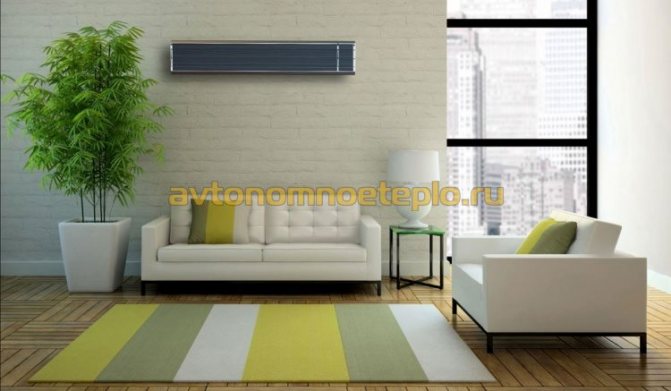
Infrared heater for ceiling and walls: pros and cons
To determine whether it is worth stopping your choice on infrared heaters, we will define all the pros and cons, which are presented in the table:
| Per | Vs |
| Rapid heating of the room. | When switched off, the room temperature drops rapidly. |
| High fire safety. | The possibility of overdrying solid objects. |
| Service life from 20 to 50 years. | Uneven heating due to directional IR action. |
| Precise temperature control. | Negative effect on a person with prolonged intense exposure (dry skin, dehydration). |
| Emitters destroy viruses harmful to humans. | Bright light that stands out strongly in dark rooms. |
| Quiet operation. | Strong heating of the bulb and reflector at high-temperature IR (dangerous for children and animals that can touch the device). |
| High efficiency. |

Types and characteristics of thermostats
A thermostat is a device that allows you to fix the temperature in a room at a certain time interval and at the same time adjust the device settings to the required values. For example, when the temperature reaches a certain figure, the heating is forced to end the work cycle. And, on the contrary, with its decrease, the device resumes its work.
The design characteristics and the principle of operation of thermostats can be different. There are two main types of thermostats for heaters:
- mechanical;
- electronic.
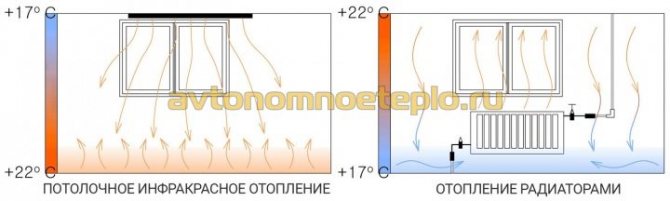
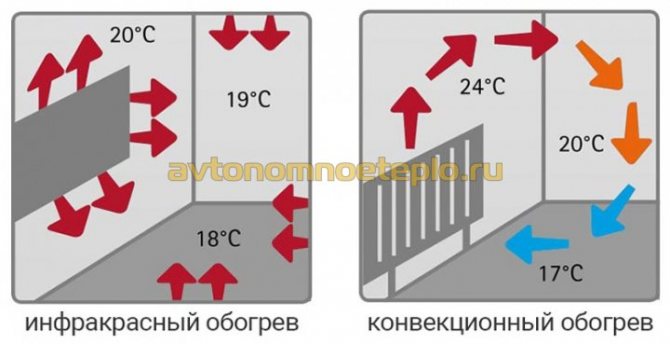
The classic heating system in the modern world has outlived its usefulness. And this happened due to the presence of a lot of shortcomings in it: significant heat loss, slow heating, stratification of air masses, and so on. It is these factors that influenced the emergence of a special interest of users in infrared heaters.
Detailed instructions for installing and connecting with your own hands
You can enjoy all of the above benefits only by properly installing the device. The work is carried out in 5 stages and requires strict adherence to the instructions.
Preparatory stage
First you need a set of tools so that you don't have to be distracted during installation. Must be present:
- Roulette.
- Pyrometer.
- Screwdriver.
- Schurovert.
- Drill (puncher).
- Pliers.
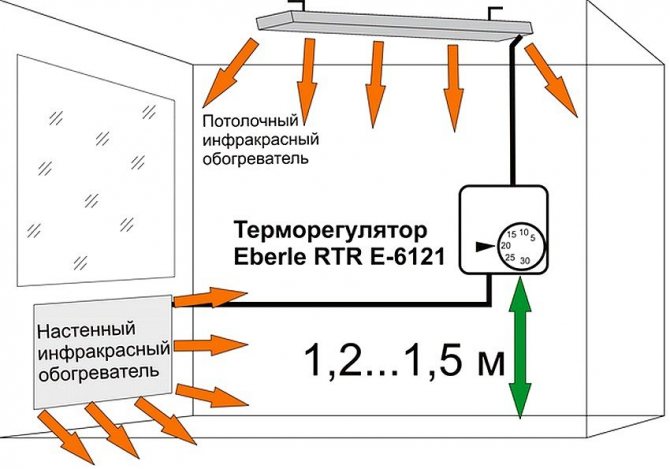
Where and how to install an IR heater?
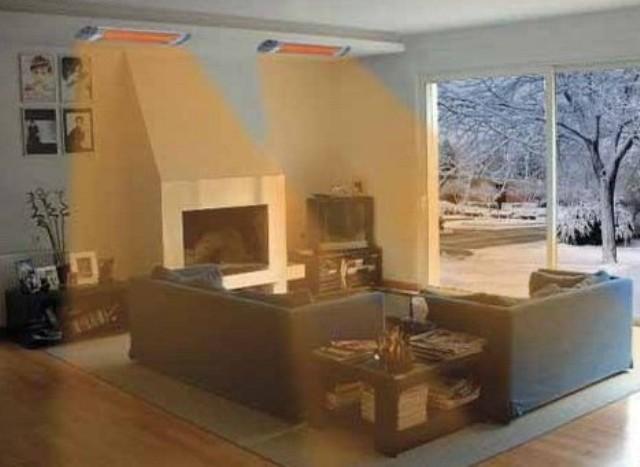
At this stage, it is determined with the place of attachment of the infrared heater. It can be installed on a wall, ceiling, or with a slope.
IR with a power of up to 800 W is installed in residential premises. If we are talking about public buildings, then the power starts from 1.5 kW.
The surface must be strong to support a load of 20-30 kg.
Location and height from the floor
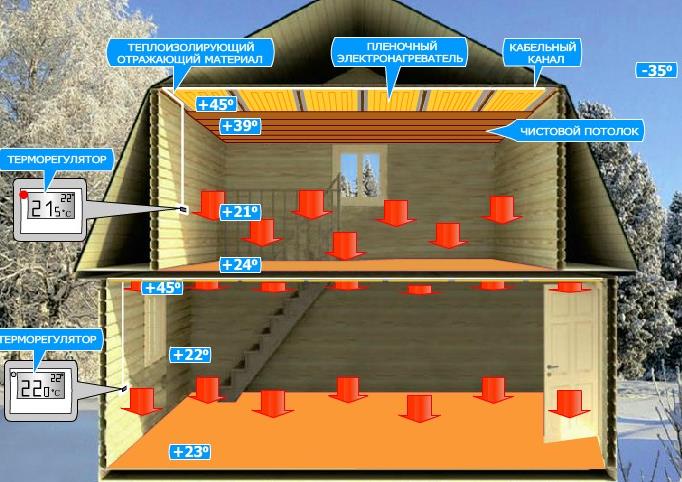
IR is recommended to be installed near surfaces that absorb heat. Wood, carpets, and stone surfaces work well. Reflective surfaces should be avoided, since when using the device, the owner will receive a minimal effect. the wiring must be routed over a non-combustible base.
The location of the heater largely depends on the specifics of the premises. There is an optimal scheme for placing IK in residential buildings. It looks like this:
- A pyrometer can measure the coldest place that requires heating. In the case of installing several heaters at once, it is required.
- The height from the floor should be 1.5 m in residential areas. In case a person spends a lot of time under the heater, the value should start from 1.8 m.
- If the installation of a high-temperature infrared heater is carried out in public buildings, offices, then the distance should be from 2 m.
Installation of the device
Installation can be done independently without spending a penny on it. The difficulty lies only in the fact that certain skills and knowledge are required, as well as knowledge of the installation process.
Progress:
- Determine the height of the mount from the ceiling and floor using a tape measure.
- Tighten the bolts or drill a hole with a drill (puncher) if the wall is concrete. It is important that the distance between the attachment points is the same.
- Insert the dowels into the drilled holes.
- Install the hardware.
- Fasten the device into the fixing holes.
Electrical connection
The infrared heater is installed together with a thermostat to save energy and a comfortable temperature. The device automatically turns off the IR when the room heats up to the specified temperature. As soon as the air in the room cools down, the thermostat turns on the IR.
Connecting to the network together with the thermostat takes place in 4 stages:
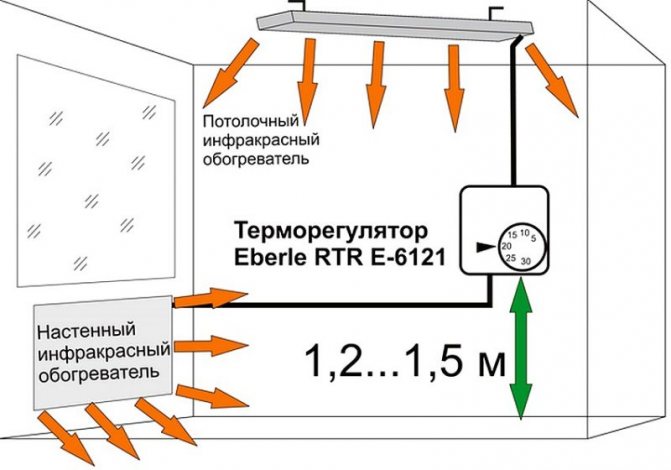
- The thermostat is fixed to the wall at a height of 1.4 m from the floor near the infrared heater.
- Select a wire that is resistant to heavy loads. It must be laid inside the walls and ceiling from the IR to the thermostat.
- The wire is masked with plaster or special boxes.
- Heater wiring is connected in parallel with the main line.
Wiring diagram for several heaters through a thermostat
The connection consists in finishing the cable of several devices to the thermostat. Next, the thermostat is connected to the junction box.
Installation diagrams
The infrared heater is connected according to the same standards as other electrical appliances - using a socket or a dedicated line from a separate machine on the electrical panel. Thus, neutral and phase conductors are used.
The regulator is installed between the vending machine and the heating equipment. The thermostat is installed in the network between the vending machine and the heater.
Simple circuit
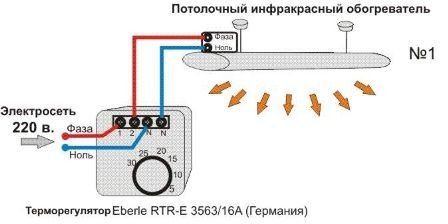
The thermostat has 4 terminals: two at the input (neutral and phase) and two at the output (plus and minus).
If one heater is installed:
- two conductors are taken from the electrical panel to the terminals of the thermostat;
- two wires are connected to the output terminals in accordance with the polarity - they are connected to the infrared heating equipment (serial connection).
If a pair of heaters is installed:
- 4 wires are taken from the thermostat (two for neutral and two for phase) and directed to IR heaters (parallel connection);
- from the regulator to one, and then 2 wires are diverted to the second heater (serial connection).
Sometimes it may be necessary to connect the phase from the machine to the heating device (directly), and connect the neutrals through the machine. The disadvantage of this option is the possibility of incorrect functioning of the thermostat.
Complicated scheme
A slightly more complex scheme for several heating devices provides for the following:
- the thermostat is connected to the machine on the electrical panel;
- the output terminals are connected with a magnetic starter;
- the contacts of the starter at the outlet are connected to the heating equipment.
The described connection option is ideal for high-power industrial systems or multiple infrared heaters. The magnetic starter works here in automatic mode.
It should be especially noted the need to pay attention to safety issues. In particular, we are talking about grounding. The grounding circuit of the heating equipment must have conductors of the required thickness and low resistance. The security system must guarantee the discharge of electricity, since the life and health of the residents of the house directly depends on this.
Connecting a thermostat is not easy.Special knowledge, skills and tools are required. Even if the thermostat is installed by hand, it is recommended to call a professional who can professionally check the work done.
Connecting the thermostat
Modern technologies for managing your own home allow you not only to get a "smart home", but also to save a lot. First of all, this concerns the consumption of fuel used for heating and the hot water system. It would seem, why save electricity using infrared heat sources? After all, they are economical in themselves. But why not take advantage of even more savings? To do this, you need to install a thermostat to the IR heaters. It will regulate the current consumption by reducing the indoor temperature. The modern electronic instrumentation market offers a wide range of such devices. Therefore, the question of how to choose the right scheme for connecting an infrared heater through a thermostat is one of the most relevant.
Ceiling device installation recommendations and basic mistakes
For fixing and hanging the heater on the ceiling, it is advisable to use the fittings that come with the device.
So that the wiring of the cable does not catch the eye, a U-shaped profile is used along the wall and ceiling.
Thermostat
When installing, the owners often make the same mistake, forgetting that when installing several devices at once in one room, the total power must be taken into account. This applies to units that are connected to one thermostat.
Failure to follow this rule will disable the devices and power outages.
How to securely connect to the network
To ensure safety, you can take care of the grounding of the device. For this, the yellow-green cable is connected to the corresponding terminal.
Ways to connect the thermostat to the heater
Connecting the thermostat
There are several methods for connecting the thermostat to an infrared heater. The first of them is the simplest, consists in connecting one thermostat and one electric heater.
The second indicates the possibility of parallel connection. That is, one thermostat can control several heaters in parallel. This happens as follows: from the machine, one pair of wires is connected to the thermostat, from which there are already two directions to the heating devices.
Operating one thermostat for multiple heaters is an ideal use case. In this case, the maximum practicality, convenience and economy can be traced. A magnetic starter should become an assistant in this matter. Mandatory in this case is the use of a specially developed, individual connection diagram. There is a variant of using a similar scheme, but this is only for those who, as they say, do not take care of themselves. Carefully thought-out work is the key to your own safety. It should be remembered that even a small inaccuracy and breakdown can cause a fire hazardous situation with disastrous consequences.
Some manufacturers provide a magnetic-type starter with the heater in the initial kit. Also, wires go to it to make the connection of the required connection scheme. You can start getting started if you have such knowledge, or you can turn to a specialist for advice.
So, we can summarize the above and note that any man can correctly install an infrared ceiling heater. There is nothing supernatural about this. You just need to properly and informatively prepare in order to do everything right.
A prerequisite for a good installation should be the use of a thermostat, which will help to carry out the maximum necessary control over the operation of the thermal heater. Infrared heater is energy saving. Connecting such a device through a thermostat is already double savings, which is never superfluous anywhere. This is especially true for summer cottages or agricultural premises.
Everyone decides for himself the level of comfort. Choosing to use an infrared heater means choosing the maximum comfort.
Electric underfloor heating has become very popular today. To control these heating systems, a thermostat is needed, the connection diagram of which is quite simple. Even a novice home craftsman will be able to do this work on his own. However, it is worth understanding the principle of operation of temperature sensors and their types. This will help you to choose the right device for solving specific tasks.
Before choosing a thermostat, you need to study what they are
Detailed instructions for installing and connecting an infrared heater to the ceiling and walls
Infrared heaters are gaining popularity due to their economy, safety and high performance. You can enjoy all the listed advantages only by correctly installing this device.
Preparatory stage
Infrared heaters can be used as the main heat source in a room. In this case, you cannot do without a careful calculation of heat losses. They depend on many factors, such as room size, materials, wall thickness, ventilation, and region, as each region has a minimum temperature rating.
List of required tools
At the preparatory stage, it is necessary to determine the place of fixing the heater and prepare the following tools:
- drill or hammer drill;
- screwdriver;
- screwdriver;
- pliers;
- roulette.
This is the required minimum of tools, without which it will not be possible to install the heater. In addition to them, you can use a pyrometer for calculations when installing several devices at once.
Where and how to install an IR heater?
The location of an infrared heater depends on its type and heating plan. It can be installed on the ceiling, on the wall, with or without a slope.

Safety engineering
Remember that installing IR heaters is an electrical operation. Therefore, it is important to maintain the utmost care and follow the safety rules:
- Never install the heater near flammable objects.
- Wiring must be routed over a non-combustible base.
- The fastening elements must not touch the heating element.
- Do not install devices with a power of more than 800 watts for a residential building or apartment.
- Do not connect the heater to the mains until installation is complete.
To use the heater more efficiently in your home, place it next to materials with high heat absorption rates, such as wood, carpets, stone walls. Have
The mounting surface must be strong enough as some heaters can weigh up to 28 kg, although many are of course lighter.
Location and height from the floor
One of the important requirements for installing an IR heater is the distance to a person's head, especially in work areas, where a person spends a lot of time almost motionless. This distance should be at least 1.5 - 2 meters. In fact, it is determined by the power of a particular heater. If its power is up to 800 W, then it is quite possible to place it at a distance of 70 cm from the human body. If the power is 1-1.5 kW, then the permissible distance starts from 1 meter.

The specificity of different rooms determines the features of the installation of the heater and the optimal arrangement of devices. Where to place the heater:
| Room | Recommended location |
| Bedroom | Above the headboard so that at least ⅔ of the bed is under IR. |
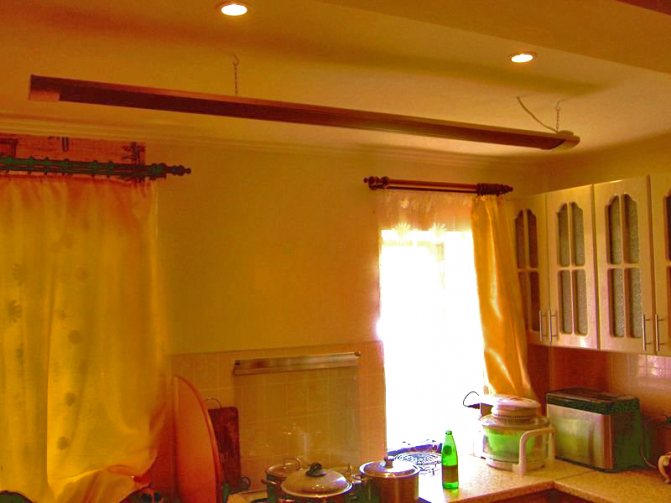
| Kitchen | It is recommended to install the heater so that its rays are directed towards the window, the place where cold air flows from the street into the room. |
| Bathroom | On the ceiling, if this is the only source of heat in the room, or opposite a small area where a person is most often, if the infrared heater is considered as an additional source of heat. |
| Hallway | On the ceiling facing down to the floor. It stays warm due to which it dries very quickly. The same applies to shoes - they also dry quickly and remain warm. However, it is important to remove it so as not to dry it out, thereby not spoiling it. |
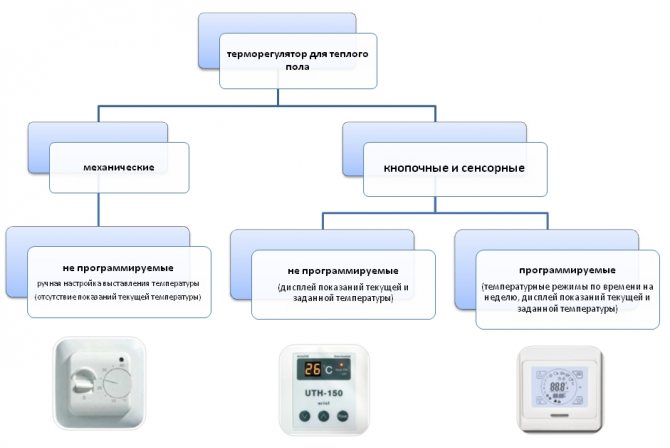
Types of thermostats
First, let's figure out what the manufacturers offer. There are only two thermostat categories:
- Mechanical.
- Electronic.
The first option is the simplest designs. They look like plastic boxes on the panel of which are displayed:
- Switch - with its help the required temperature is set.
- Button to turn on the device.
- Light diode showing whether the device is working or not.
There are models in this category equipped with a display, where the set and real air temperature parameters are displayed. Of course, such devices are more expensive. But in general, a mechanical thermostat is a manually operated device, so it cannot be set remotely. Mechanical counterparts can withstand amperage up to 16 A.
The second option is more complex devices, which provide for a remote control, an LCD screen and a system for the most accurate adjustment. It is convenient, effective, but expensive. Such devices can withstand amperage up to 8 A.
To connect an IR heater through a thermostat, it is necessary to set certain norms based on the power consumption of the electric current by the heater. Here, the only indicator is taken as a basis - 3 kW. Usually infrared heaters up to 3 kW of power are used for city apartments and small private houses. They will be discussed further. Let's take a look at their connection diagram.
Place of installation of the thermostat
This is a very important position that affects the correct operation of the device. What do you need to know?
- Installation height - 1.5 m.
- It is necessary to mount the device on the wall, while it is recommended to install insulation under it so that there is no reaction to the wall temperature.
- Do not cover the thermostat with curtains, furniture, blinds, etc.
- Only one thermostat is installed in each room.
Is it possible to heat an apartment with infrared heaters
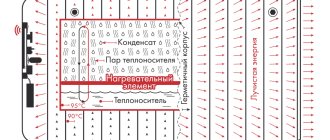
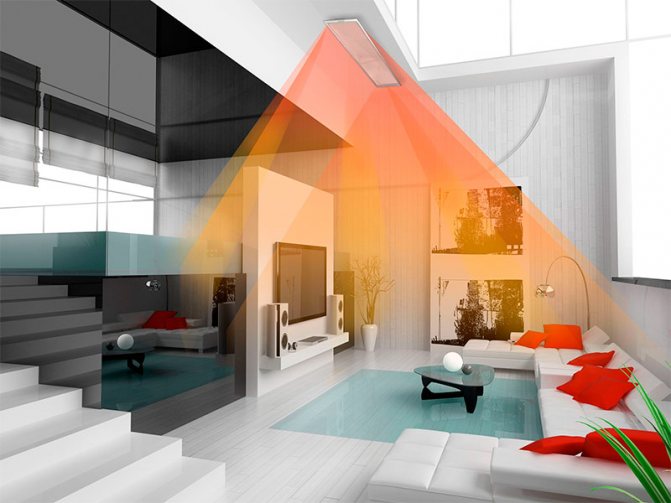
The principle of operation of an apartment IR heater is associated with the conversion of electricity into infrared radiation. The structural difference significantly affects the efficiency of the installation. Infrared rays affect furniture, floors, etc. They penetrate approximately 9 cm. Heated objects give off heat to the air in the room.
To heat an apartment to a comfortable temperature, you will need to select equipment with a capacity of 100 W per m². Therefore, for a room of 20 m², you need a 2 kW emitter, or 1-1.2 kW each.


Types of thermostats
Thermostats are subdivided according to the installation method: open or hidden. Another criterion for classifying devices is the device of the working fluid: solid, liquid or air.
Also, regulators differ in the temperature regime of activity. There are these types of thermostats:
- high temperature - 300-1200 ºC;
- medium temperature - 60-500 ºC;
- low temperature - less than 60 ºC.
Structurally, regulators are of two types:
Below we will dwell in more detail on the polar opposite types of regulators: mechanical and electronic.
Mechanical thermostats
Such devices are used much less often than electronic ones. They will not be connected to the mains, and the temperature is controlled by heating or cooling a special membrane.
Externally, a mechanical regulator is a small plastic box with a lever for adjusting the temperature. The device is equipped with a scale with markings.
A temperature-sensitive element is located inside the device. On average, such an element allows an error of no more than half a degree. Temperature limits are usually within 5-30 ºC. The principle of operation of the device is mechanics, so no power supply is needed.
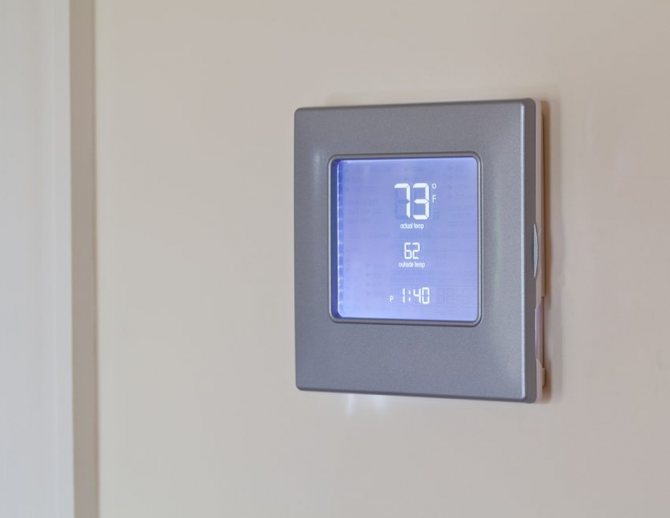
Electronic thermostats
One of the distinctive external features of electronic controllers is a display on which processes occurring in the heating system are displayed. Such devices are much more accurate than mechanical ones. The most expensive are programmable models, in which it is possible to set the time parameters of the heating operation, and the device can be programmed to the nearest minute for a week in advance. Thermostats can be integrated into Smart Home systems.
There are regulators with infrared sensors. The principle of their work is based on the perception of electromagnetic waves emanating from heated objects.
The information received by the device is analyzed and on this basis the device "makes a decision" - to turn off the heating or turn it on again.
Intelligent systems are capable of self-control. For example, if a sensor breaks down, the heating system automatically switches to work at a third of its capacity. This, on the one hand, prevents excessive cooling of the air in the room, and on the other hand, it avoids overheating of the air.
Most thermostats are versatile. For example, instead of an IR heater, you can connect a floor heating system, for which you only need to reconfigure the temperature sensors.
Note! The thermostats should not be placed in direct sunlight, in drafts, or on the outside of a building.
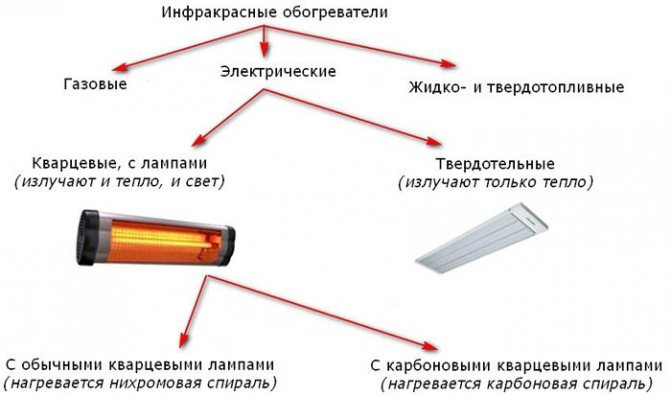
What are household IR heaters?
Modern modifications of household infrared heaters can be divided into several classes, according to the type of construction, method of attachment, and functionality.
Classification by type of attachment
Stationary units - they are mounted on the ceiling or wall and have maximum performance. Both local and general heating of the apartment with wall infrared heaters is allowed. The angle of inclination of the emitter for better heating of the room can be changed using a special bracket.
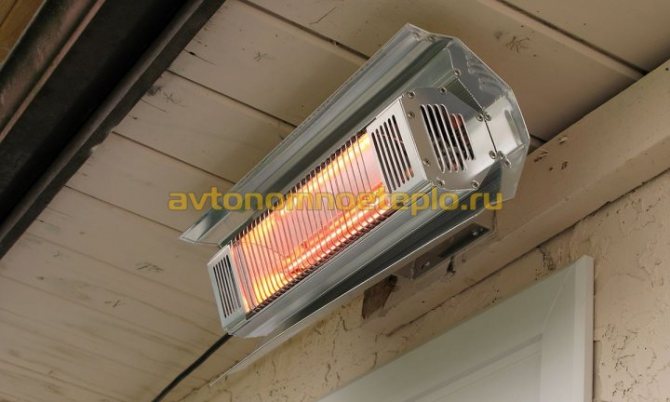
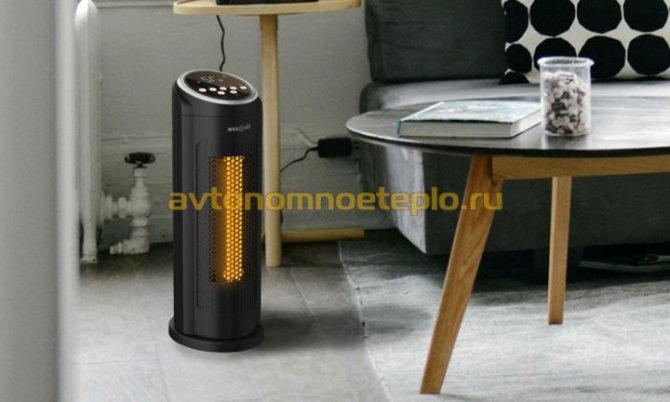
Mobile heating devices - this type of climatic equipment is installed on the floor or on a special tripod. The efficiency of portable heating devices is slightly lower than that of stationary radiators. There are a lot of obstacles on the path of radiation that prevent uniform heating.
Radiation source classification
Types of thermostats
With the help of a thermostat, it is easy to control the air temperature
The current construction market presents a large selection of various parts that serve to save energy. Among them are thermostats. Before connecting the thermostat to any type of infrared heater, you need to know what types there are. It is also necessary to take into account their feature and the method of fastening.
Main types:
- mechanical;
- electronic.
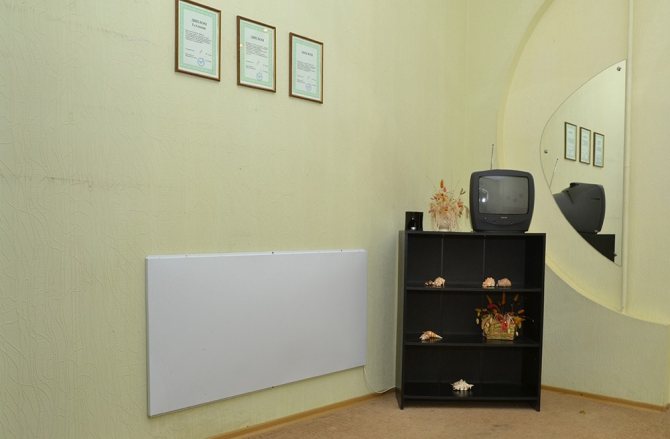
Mechanical thermostat
The mechanical thermostat is a box, the top of which is equipped with a special switching device. The body also has a light indicator of the activity of this device.
It should be noted that mechanical models are best not used unattended. Since there are no remote control functions in such a device. There are, of course, more modern models, but still they are not produced in huge quantities.
Electronic thermostat
Electronic thermostats have several advantages. First of all, their wide functionality and control ability are noted. Control can be carried out using buttons or by a touch method. There is a great variety of design and appearance. And even, despite a decent level of aesthetics, they are being improved further and further.
The considered option also makes it possible to control using a mobile phone, which is accordingly very convenient and practical. The only drawback is its high cost.
Both types require two installation rules: avoiding moisture that could harm the device and avoiding sunlight and heat. Otherwise, the operation of the thermostat will be incorrect and, of course, there is a possibility of damage to both devices.
Is it profitable to heat IR heaters
It may seem that the cost of heating with electric radiators is prohibitive. But this is true only in the case of operation of heaters without a thermostat, operating in a constant mode.
If you calculate the heating in an apartment, you can get the exact cost of expenses.
- If a thermostat is used, the heater will only run 60% of the time.
- For a 2 kW heating device, only 1.2 kW will be required to operate for an hour.
- The heater will consume 29 kW per day, 870 kW per month.
- You can calculate the consumption of electricity for heating your home for a month using the average cost of electricity set for the region of residence.

Main types
All modern thermostats work according to the same principle. However, there are quite a few differences between them that affect the setting of devices, control and the connection diagram of the temperature sensor.
Mechanical thermostats are characterized by ease of use and high reliability. They are a plastic box
equipped with a knob to control the room temperature. To simplify the tuning process, the devices have a scale with divisions, the standard step of which is 1 degree.
Whereas in the past, mechanical thermostats were often used to control electric underfloor heating, they are not very well suited for infrared heating systems. However, if you wish, you can easily connect them. Although many people prefer electronic devices, mechanical devices continue to be used. This is due to the simplicity of their design, as well as their long service life.
The peculiarity of electronic temperature sensors is the presence of a display for displaying all information important for setting. If the mechanical thermostat does not need electricity for operation, then the electronic one must be connected to the network. The control panel, depending on the model, can be touchscreen or push-button. Some devices provide the ability to program the temperature regime for a certain period of time, for example, a week.
Advanced models can even be controlled using a smartphone, if the corresponding application has been installed on it. The popularity of electronic temperature sensors is primarily due to the ease of use. However, they are more expensive than mechanical devices.
In order to increase the service life of the electronic thermal sensor, it is not recommended to install it in the area of drafts or in places of active exposure to direct sunlight.Thanks to the simple thermostat wiring diagram, almost any home craftsman can handle this job. However, first you need to decide on the connection method:
- Classical.
- Using a magnetic starter.
It is worth considering both options in detail.
Standard scheme
One of the important parameters of any thermostat is the power indicator. One device can be used to control several space heating devices. It is on the power of the thermostat that the number of heating devices that can be connected to it depends. At home, it is quite enough to use devices with a capacity of no more than 3 kW.
There are 2 ways to connect sensor data
Most often thermostats have four contacts
- two at the entrance and exit. To connect the device, it is necessary to stretch two conductors from the junction box and connect them to the input terminals. After that, the output contacts are connected to the heating system using two other wires.
If it becomes necessary to connect two heating devices to the thermostat at once, then you need to decide on the type of connection:
- Consistent.
- Parallel.
In the first case, it is necessary to stretch two conductors from the output terminals of the thermostat to the first heater, and from it two more to the next. When connected in parallel, four conductors should be drawn from the input contacts of the temperature sensor - two for each heating device.
Using a magnetic starter
This wiring diagram for a mechanical thermostat is most often used to control multiple heaters. The magnetic starter is an electromagnetic type switching device. It is intended for use in networks with high loads. There are quite a few options for connecting a thermostat through a magnetic starter, but a home craftsman only needs to know one.
At the first stage of the work, it is necessary to connect the regulator to the mains using two conductors, using the input terminals for this. Then the output contacts of the temperature sensor are connected to the starter, and it is already connected to the heater.
If everything was done correctly, then all that remains is to adjust the regulator to the desired operating mode. Connecting the thermostat should be straightforward if you follow the instructions. However, you should not overestimate your strengths, because the safety of family members depends on the quality of the connection.
How to choose a household IR heating device
First of all, it is necessary to select sufficient power of the climatic equipment. As already noted, for continuous heating of a room, it is required that the heater's performance is not less than 100 W for every 1 m² of the room.
When choosing a suitable installation, pay attention to the following features:
- Built-in thermostat - reduces energy consumption by 40-50%.
- Protection system - the safety of household infrared heaters for humans is provided by protection sensors against overheating and accidental fire, in the event of a heating panel falling.
- Remote control - included with all ceiling panels. Mobile heaters and wall-mounted units are completed with a remote control at the request of the customer.
- Radiation source. The climate in your apartment largely depends on the heating conditions. Tubular radiators are considered to be the most comfortable to work with.
Temperature sensors
Regardless of whether the temperature sensor is built-in or intended for remote installation, it can contain either a thermistor or a thermocouple. The first element changes the internal resistance with temperature fluctuations. The second contains a junction of two metals with different potentials. It generates an electric current, the magnitude of which is directly proportional to the heating force.Knowing the dependence of the change in the sensor parameters on temperature, it is easy to draw up an algorithm for the operation of the microprocessor.
Sensors of the second type (thermocouples) are more reliable and provide an accuracy of readings within 0.1-0.5 ° C.
In recent years, thermal sensors that transmit their parameters via a radio channel have become widespread. Their advantage is the ability to install anywhere without the need to lay wires, which is especially important if you need to switch a ceiling heater. Such devices are powered by batteries, which, given the low current consumption in standby mode, have to be changed no more than 1-2 times a year.
How to correctly place an IR heater in an apartment
During installation it is recommended:
- Position heaters in the center of the ceiling. This solution is only allowed when creating local heating.
The use of infrared heaters in residential premises helps to solve the heating issue in the best way. The advantage of emitters is that a person begins to feel warmth immediately after turning on the equipment. After warming up the room to a temperature of 20 -28 ° C, the devices automatically maintain the required climate in the room.
Connection diagrams
Sequencing
Let's start with the fact that a household infrared heater is powered by an alternating current, that is, from a regular outlet or from an automatic machine installed in a switchboard.
This means that it includes two wires - zero and phase. Hence the standard connection scheme, or rather, several schemes. The thermostat is built into this circuit, that is, it is installed between the machine and the heater.
Option number 1 - regular connection
Standard thermostats have four terminals - two input (zero and phase) and two output (zero and phase). To create a circuit, two wires are pulled from the shield through the machine, which connect zero and phase. And from the thermostat through the output terminals, two wires are drawn to the IR unit. In fact, a serial connection of all devices from the network is obtained.
If the connection diagram includes not one heating device, but several (usually two), then in any case one thermostat can be used. For this, the machine and the thermostat are connected by wires in the same way as in the previous case. But 4 wires are taken from the output terminals for each heater separately. So it turns out a parallel connection.
A serial connection can be used, though. In this case, one wire will go from the thermostat terminals to the first heater, and from it to the second. And so on in the same sequence.
There is another option for a simple connection, when the phase wire from the machine is pulled to the heating element, and the zero wire is connected through the thermostat. This is not the best way, since the thermostat may not work quite correctly. Although in some situations it is impossible to use anything other than this option.
Scheme No. 2
Thermostat diagram
This circuit allows you to control a large number of IR heating devices or one industrial type heater. It will require the installation of an additional element - a magnetic starter. This switching device works in automatic mode to turn on and off high-power electrical units.
In this case, there are a lot of connection schemes. Let's look at one of them - the simplest. For this, a magnetic starter is built into the junction No. 1 between the thermostat and the heating device.From the outgoing terminals on the thermal controller, two wires are taken to the starter, and from there to the infrared heating element.
Thermostats VMT 1 and VMT 2 how to connect
Unlike radiators, infrared heaters help to provide heating over a larger area at a much lower temperature. This makes it possible to economically heat modern homes. Controls should be used to provide thermal comfort for users and controlled operation of floor standing equipment. Below is information on how to connect the Ballu BMT 1 and BMT 2 thermostat, the features and benefits of these devices.
Control via TDC thermostat
Thermal comfort is a subjective feeling of every person. This is a condition in which people do normal household chores without excessive heat or hypothermia. Thermostats are needed to regulate the temperature, they help infrared heaters to function properly. TDC is a state-of-the-art electronic feedback device that maintains an accurate set temperature.
Its control system is very simple and at the same time effective - you should set the value that you want to achieve in the selected room. The sensors detect the temperature and then turn on the device to reach the desired value. After that, the heating devices are automatically turned off. The next turn on occurs when the temperature starts to drop. Such a control system saves energy - the heaters work only about 4-6 hours a day.
Before answering the question, the TDC thermostat 1: how to connect, you should know that the temperature in the apartment largely depends on the location of the heater. It is recommended to install it in an accessible place, away from drafts (windows, doors).
Main advantages
The main advantages of BMT thermostats include:
- ease of use (just use the dial to set the desired room temperature);
- low purchase and follow-up costs.
Thus, controlling the temperature inside the house maintains sufficient thermal comfort and reduces heating costs.
Before installation
You should know that the answer to the question: BMT 2 thermostat - how to connect, is directly related to the installation of Ballu BMT 1
To install them safely, it is recommended to follow these precautions: disconnect the heater from the mains before starting work; use wires with standard colors and a suitable cross-section
- disconnect the heater from the mains before starting work;
- use wires with standard colors and a suitable cross-section.
Meaning of wire colors:
- brown phase - control cable;
- blue phase - neutral wire N ("zero");
- red or black - phase conductor.
We recommend using wires with a cross section of 1.5 mm2.
Installing a thermostat
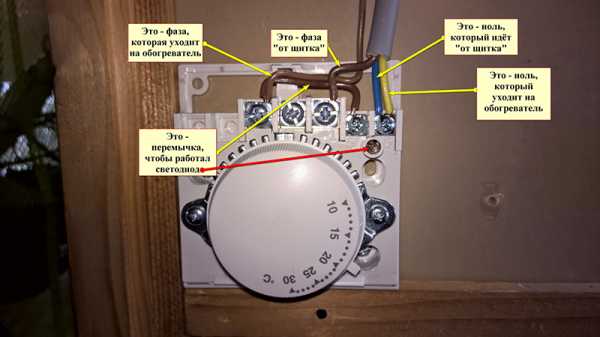
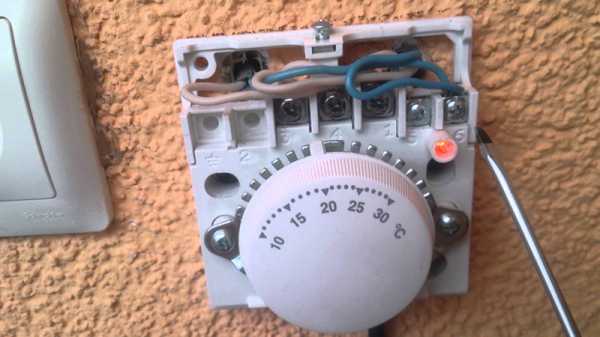
A few words about how to connect the BMT Ballu thermostat 1. The device must be installed in sequence:
- Slide off the cover of the thermostat and remove the screws and plugs.
- In the socket, using an indicator screwdriver, determine the phase.
- Connect the brown wire (phase) to the sensor.
- According to the diagram, connect one end of the heater to the third wire.
- Connect the blue wire to the remaining end.
- Place a jumper between the third and fifth wires.
- After an intermediate test in which the device is ringed to check if the thermostat is working, a plastic box is put on.
The figure below shows how to connect the Ballu BMT 1 thermostat according to the connection diagram. A wiring is laid to the location of the device, which is connected to zero or phase.
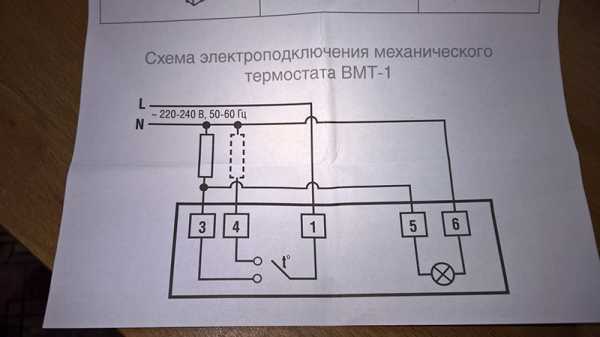
On the Ballu BMT 2 thermostat, the wiring diagram is similar to that given above, only the terminal numbers are different.After installation, the device is connected to an infrared heater with a separate line.