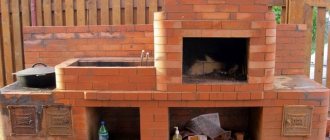
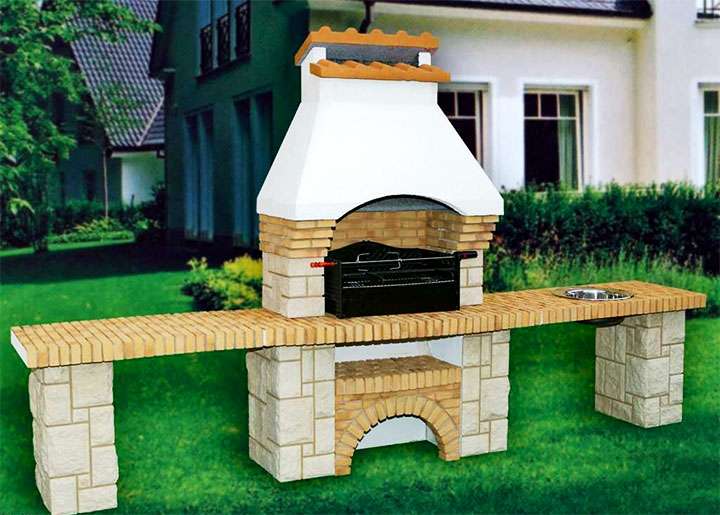
Design features
This design can have either one or two foci. It consists of:
- internal combustion chamber for fuel filling;
- countertops for cooking (optional);
- outer hob;
- firewood - a special compartment in which fuel is stored for drying (optional);
- places for the grate - can be combined with the internal combustion chamber.
Note! The larger the combustion chamber, the larger the dimensions of the structure itself and, accordingly, the greater the functionality will become. But remember that heating up an oven that is too large will take a long time, as will cooling it down.
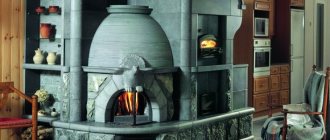
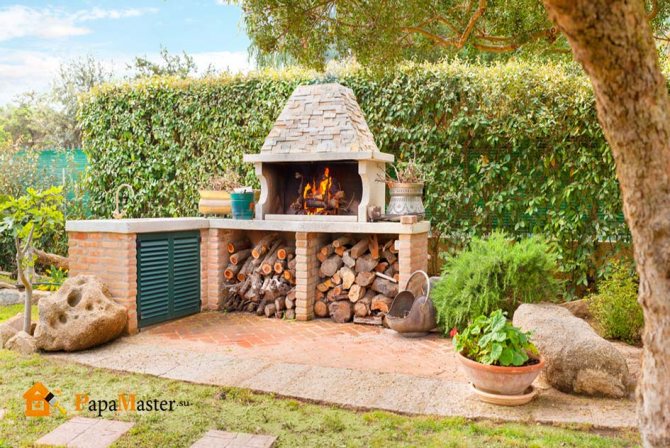
The advantages of a summer cottage
Even the simplest outdoor stove for a summer cottage is multifunctional. In addition to cooking, it will be useful during the harvesting season. You can dry and dry vegetables, fruits, herbs and mushrooms in it. At any time of the year, you can smoke a piece of meat, bacon or fish, thus obtaining the most natural product. The taste of homemade smoked meats cannot be compared to store-bought ones, if only because the technology of their production raises many questions. Homemade preparations are not only tasty, but also healthy. Any dish cooked over an open fire can be safely given even to small children.
Another positive aspect of outdoor cooking is its usefulness. When using a skewer, wire rack or skewers, there is no need to add oil and other fat. Often, any dish is prepared in its own juice, preserving almost all the useful elements. Saving resources cannot be ignored either. To light the stove, you will need an armful of brushwood, and a small bundle of firewood will be needed to prepare the dish.
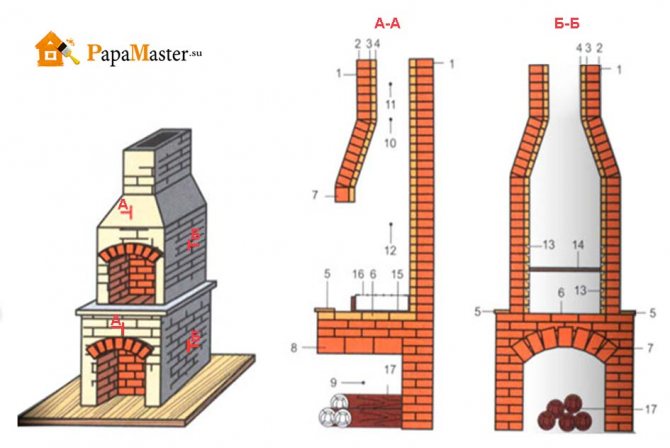
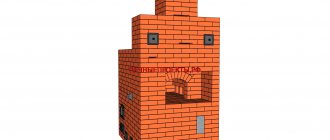
diagram of an outdoor stove for a summer residence
construction drawing of an outdoor stove for a summer residence
READ ON TOPIC:
How to build a brick brazier with your own hands without special skills in such work.
Stage 1. Selection of material for manufacturing
Despite the huge selection of building materials, there are not so many of them that can be used in our case.
- fireclay brick or aerated concrete - both materials are very resistant to high temperatures;
- finished metal or cast iron products are an expensive option, but installation times will be significantly reduced.
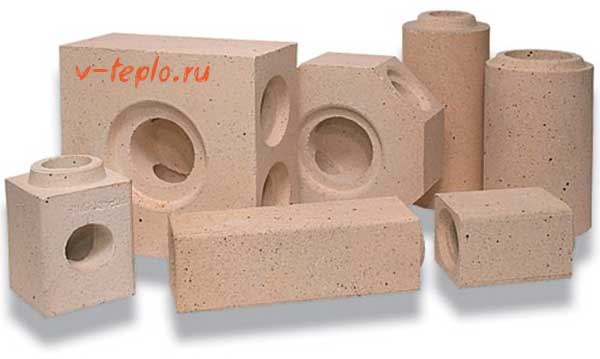
Let's look at the problem from a practical point of view. Aerated concrete blocks will cost less than bricks, but in terms of aesthetic indicators, they definitely lose. In addition, these blocks need additional cladding.
Note! Many people resort to buying ready-made stoves, and the reason for this is undeniable advantages: easy installation (using glue) from a set of parts according to the attached instructions.
If we talk about the combustion chamber, then everything is more complicated here, because it is extremely difficult to acquire a suitable option. Therefore, you need to do it yourself. And the structure itself, in theory, should be the way you want it to be - from the preferred design to the method of cladding.
Features of stove masonry
The main elements of any brick oven for a summer residence are:
- Foundation. For any stove, it is necessary to build a separate base that is not associated with the main foundation of the house.

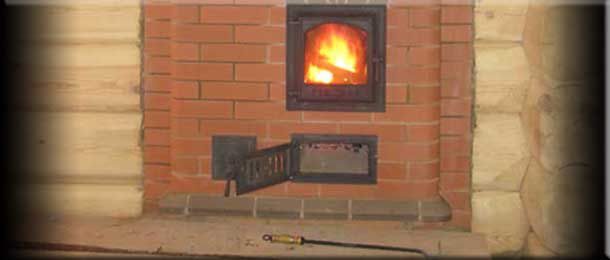
The foundation is built separately - Furnace body. Consists of a combustion chamber and a chimney. If the oven scheme involves additional elements, then a hob, an oven, and a hot water tank may be included.
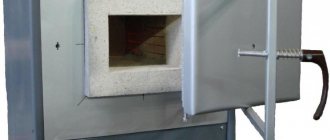
- Furnace chamber. The dimensions of the firebox depend on the area of the room and the required power.If the stove is planned to be heated with wood, then the height of the firebox must be at least 40 cm. The thickness of the firebox must be at least 1/2 brick. The firebox can be laid out of fireclay (heat-resistant) bricks or purchased in a ready-made form of their cast iron.
- Ash pan (ash chamber). This element of the furnace is designed to collect products in the process of fuel combustion. Oxygen is also taken through the ash pan, which is necessary for the combustion process.
Ash panThe ash pan is located below the combustion chamber and is always equipped with a metal door through which cleaning takes place. A grate is laid between the ash pan and the combustion chamber. As a standard, the ash chamber is 3 bricks high.
- Chimney. The main element of the furnace, through which the products of fuel combustion are discharged. The chimney can be made of bricks or made of steel pipes. This does not affect functionality and efficiency in any way. The chimney is led out from the stove either directly through the roof or through the wall to the street. When erecting a chimney, many branches and horizontal sections should be avoided, as this negatively affects the draft and can reduce the efficiency of heating the room.

We offer you to familiarize yourself with Build a house with a bay window
Stage 2. Choosing a suitable location
Let's make a reservation right away that the street stove should be located in the most convenient place. Ideally, its location should be determined at the initial stage of building a house. But if the house has already been built, then the choice of location will depend on specific conditions.
In this case, you should adhere to a number of mandatory requirements:
- the structure should be placed near a recreation area, terrace or veranda (otherwise, you will have to build a canopy and put several benches);
- there must be lighting;
- regarding the dimensions, we cannot advise anything specific, since they depend only on your personal preferences and needs;
- between the gazebo and the stove (if the distance is large enough) you need to lay a path;
- the structure should be located on the leeward side so that smoke does not enter the house;
- it is better not to build it next to plants and bushes, because they can suffer from high temperatures;
- the space around the stove must be laid with stone or tiles;
- and most importantly, there should be no flammable materials nearby!
Preparation for the construction of an outdoor oven
The first step is to draw up a phased work plan and prepare the necessary drawings, which will indicate all the elements of the building. You also need to correctly choose the location of the furnace and the type of the structure itself. This will reduce construction time and correctly calculate the required materials.
The quality of the material is especially important in the construction of open-fire furnace structures. Firstly, an even brick helps to save mortar, and secondly, it withstands high temperatures when burning fuel.
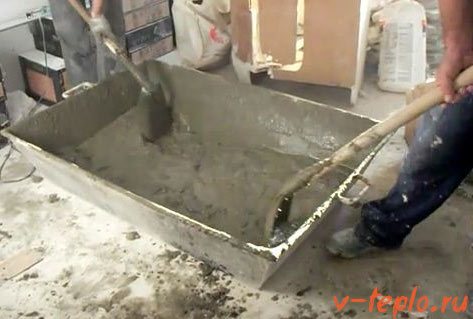
- The mortar for brickwork is prepared plastic, not liquid. This will allow you to fill the seams efficiently and avoid streaks on the face of the masonry.
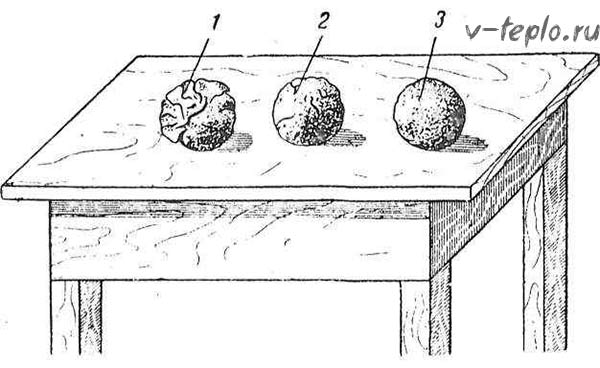
- Before preparing the building mixture, you need to check the clay for fat content. To do this, a small amount of clay-sand mortars of different proportions is harvested, from which balls with a diameter of 1 cm are made. When the clay dries up, the ball is thrown onto a solid base from a meter height. A surviving piece of clay will indicate a suitable mortar quality.
- Before preparing the solution, the clay is soaked in water for up to 5 days. This allows her to gain the necessary plasticity.
- The solution is thoroughly mixed until a homogeneous consistency. After kneading, the mass is probed by hand to remove lumps and remove unnecessary dirt. The resulting solution should turn out to be plastic.
Usually, the ingredients are still dry before preparing the sand-clay mortar. sifted through a fine sieve, which allows you to get rid of lumps and debris in advance.
Stage 3. Getting started
First, work out a plan of action and draw up a diagram, preferably in great detail. Think about where the stove should be located, how it will look, etc. This way the time spent on work will be significantly reduced, and the amount of materials required will be determined as accurately as possible.
Note! It is advisable to use only high-quality building materials - this will help avoid problems in the future. If, for example, the brick is of good quality, then when laying you use a minimum of mortar (at least, this is what experienced stove-makers say). You can, of course, use second-hand brick, but before using it for internal elements, thorough cleaning of the surfaces is required.
- The prepared solution should be plastic, but in no case liquid! So the seams will be completely filled, and the appearance of streaks will be excluded.
- It is recommended to sift the mixture through a fine mesh sieve (mesh diameter - maximum 1.5 mm).
- If the clay is used oily, then it must be mixed with sand.
- The solution is mixed with utmost care. Check the entire mixture with your hands at the end of the kneading, knead the lumps and remove unnecessary impurities. Remember - the solution should only be homogeneous!
- Before work, the clay should be checked for fat content. Do it as follows: take 1 liter of each composition of a solution of clay with sand, then roll up balls with a diameter of 0.5 centimeters. When the balls are dry, drop each ball on a hard surface from a height of one meter. A ball that won't break and will be the perfect mix.
- The clay should be soaked at least two days before starting work. During this period of time, it will “turn sour” enough and acquire the required plasticity.
Also, an outdoor oven provides for the use of tools and materials such as:
- brick (preferably fireclay), the amount of which is determined by a previously drawn up project;
- nylon rope;
- clay;
- shovel;
- cement;
- trowel;
- sand;
- mounting level;
- blower door;
- door for the furnace compartment.
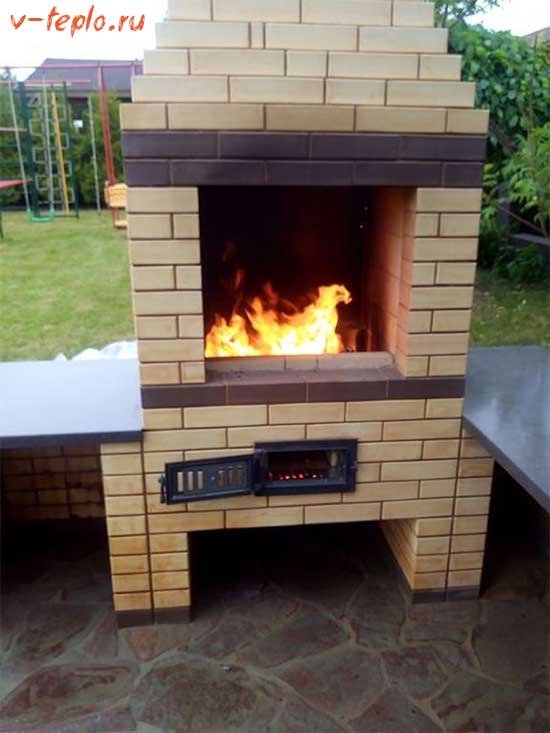
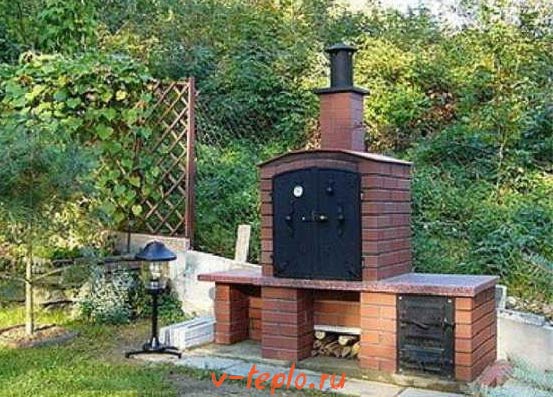
We build a brazier oven ourselves
Consider the construction of the simplest model - a barbecue, which even a non-professional can do.
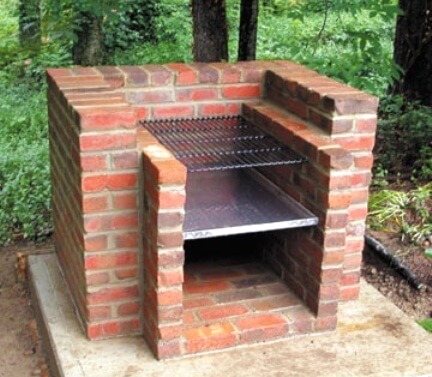
To work, you will need the following elements:
- steel corners;
- bricks;
- cast iron grate;
- firebox doors, blower doors;
- fireclay clay mixture.
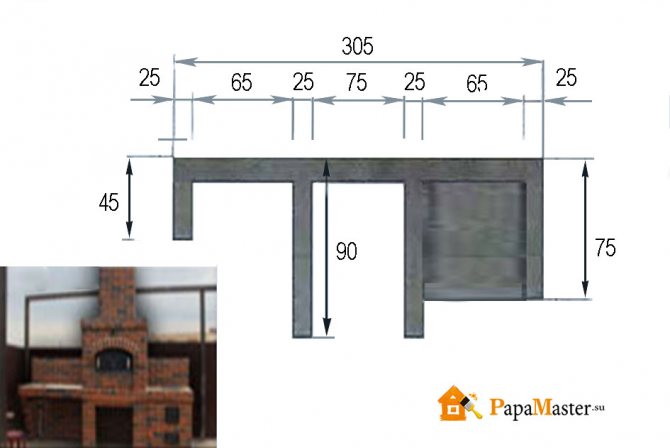
Below is the required amount of material for the construction of a brazier stove with dimensions of 1600x1565x830 mm (HxWxD):
- 200 kg of heat-resistant mortar;
- 300 pcs of refractory bricks;
- 20 pcs of fireclay bricks.
The main stages of work:
- Preparing a place for the stove. We select a site, we find a flat surface. It is advisable to install the foundation for the future garden oven at a depth of 40-50 mm, of which 20 cm will be a sand and gravel pillow. A reinforcing cage is required. When it is not possible to create such a site, it is necessary to thoroughly tamp the chosen place. If a gazebo for relaxation is built in the garden, the grill can be installed there. In the absence of a concrete base, the unit is built directly on the floor, then decorated with paving slabs around the structure. If there is a wooden floor covering in the gazebo, it is recommended to build a stove behind the structure.
- Determine the size of the barbecue. To do this, lay out a row of bricks and place a grate. You can take it from an old refrigerator or weld it yourself from steel wire 3-5 mm thick. It must be remembered that the metal grill expands when heated, so you need to leave space between it and the brick walls of the gaps (10 mm on each side).
- Now we install the rows of the barbecue. To make them even, you can stretch the ropes and use them to trim the structure. It is important to control the correctness of the horizontal and vertical rows, otherwise the brazier will either fall apart or look unattractive. It is necessary to coat the levels with a cement-sand mortar with clay.
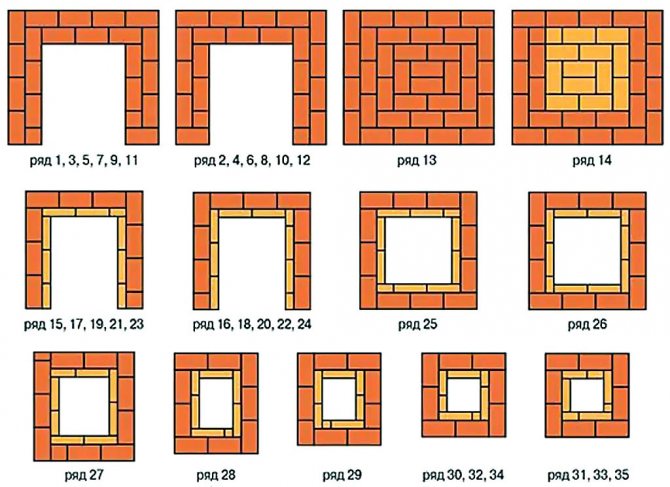
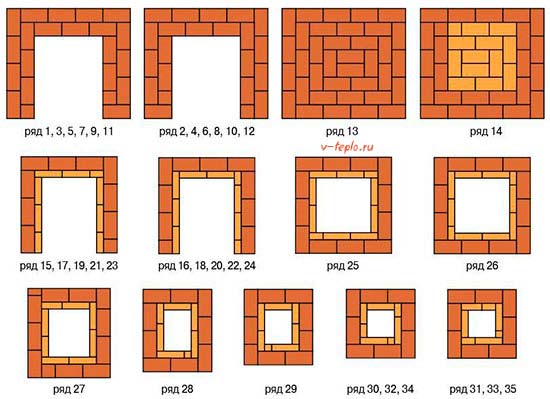
By adding clay and sand, cement consumption is halved. Such a solution should be used no longer than 2.5 hours, then its effectiveness decreases sharply. Before starting work, bricks must be soaked in water for a short time. If this is not done, when laying, they will absorb liquid from the solution, which is intended for the adhesion of the rows. - We begin to set the levels. The first is the most important. If it is done poorly, the garden stove will turn out to be crooked or completely fall apart. On the foundation we draw the outline of the masonry. Simultaneously with this process, jointing is done, which is necessary if there is no facing tile outside. Further, the work is repeated up to the sixth row. The seams should be 3 to 5 mm. The smoke outlet is made with a section of 25x25 cm.
- We carry out the laying of the seventh row brick and make the overlap. To do this, place steel corners (4-5 pcs.) Along the entire length of the future stove. The space between the bars must be filled with mortar. It is recommended to press the brick blocks, as if sealing them.
- Let's start decorating the brazier. We need to lay two more rows of bricks, then we begin to build a firebox and a brazier for the barbecue. Fireclay bricks are usually used for them. We put an asbestos coating on it, which will protect against accidental fire. In the brazier, move the second row inward so that a small compartment appears. It will be convenient to store skewers for meat and fish here.
- We carry out the ninth row. At this stage, you need to make a small arch. To make it look beautiful and neat, draw the desired shape on a sheet of plywood, cut it out. Using this template, we make a brick arch. A thin board must be fixed with something for a while so that there are no distortions of the masonry. We put the brick on both sides in a semicircle and close it in the center. The arch sketch can now be removed.
- At the next stage, we do overlapping, continuing the masonry with a chimney device.
- When all processes are completed, it is necessary to install the door, arrange the work surface and corners. To do this, you can use a board 150 mm wide and 15-20 cm thick.
- Now you need to give the grill time to dry.
Stage 4. Laying an outdoor stove
So, you have on hand a detailed design diagram, as well as all the necessary equipment and building materials. Therefore, you can prepare for the main work - remove all debris and completely level the place of future installation.
Foundation construction
Traditionally, you should first prepare the base for the future structure. It certainly needs to be strong enough to support the weight of the entire oven. The sequence of actions is as follows.
Step 1. First, using a nylon rope, mark the place for the future foundation. It is characteristic that the base should be about 10 centimeters wider than the main masonry.
Step 2. Dig a small pit 0.5 meters deep.
Step 3. Prepare the solution. To do this, mix the "three hundredth" cement with sand in a ratio of 1 to 3, mix and fill with the required amount of water. Bring the resulting mixture to a liquid state.
Step 4. Cover the bottom of the pit with a crushed stone "pillow", tamp it down, and then pour the liquid solution.
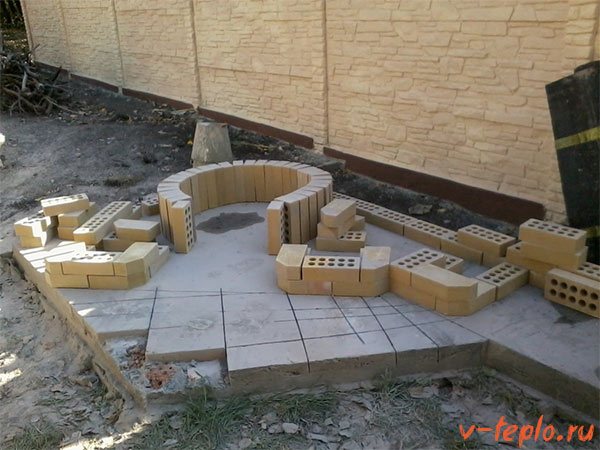
Masonry procedure
After the solution dries, cover the base with roofing material - it will serve as a waterproofing layer. Then you can lay bricks.
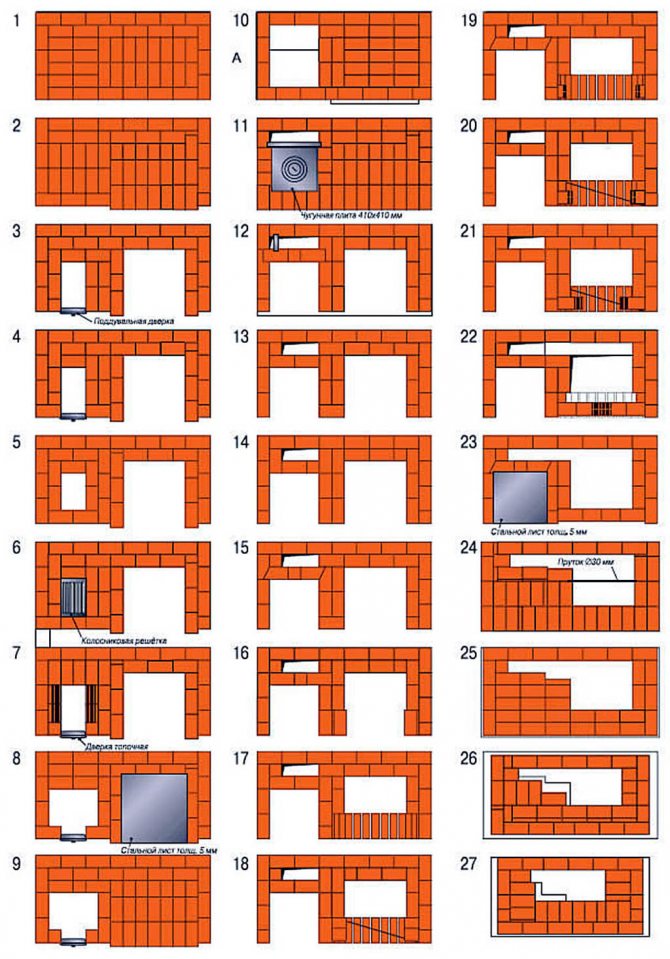
Step 1. First, use only a whole brick, then 3/4 and 1/2 of the product. Thanks to this, the order will be reliably connected. After the first row is completed, proceed to laying the second.At the end of each row, check the structure with a mounting level to ensure that it is parallel to the ground.
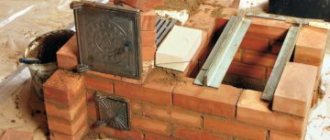
Step 2. Having finished the first row, install the blower door, having previously wrapped it around the contour with an asbestos cord for additional sealing.
Step 3. To secure the door, put in order a steel wire? 3 millimeters - it will help secure the door.
Note! Some people recommend installing steel plates and attaching the doors to them - in fact, this is fundamentally wrong! To fix such plates, you will need special welding, which only an experienced specialist can work with (after all, cast iron is quite difficult to weld to metal). And the quality of the seam in this case is not guaranteed in any way.
For this reason, we recommend using only wire.
Step 4. Using the grinder, make a small groove in the brick for the wire.
Step 5. The gap that should form between the brick and the door should be approximately 1 centimeter.
Step 6. After blocking the blower, install the grate. To this end, make cuts in the brick so that the lattice is located no higher than the brick row strictly along the gap. Under the influence of high temperatures, the metal heats up, but in no case should it touch the masonry.
Step 7. Continue laying until the installation of the second door is required. If the brick does not fit, then carefully cut it with the same grinder. Also remember about a centimeter gap between masonry and metal elements!
Step 8. Cover the upper part with a stone slab (although you can use metal as well) so that food can be heated on the stove.
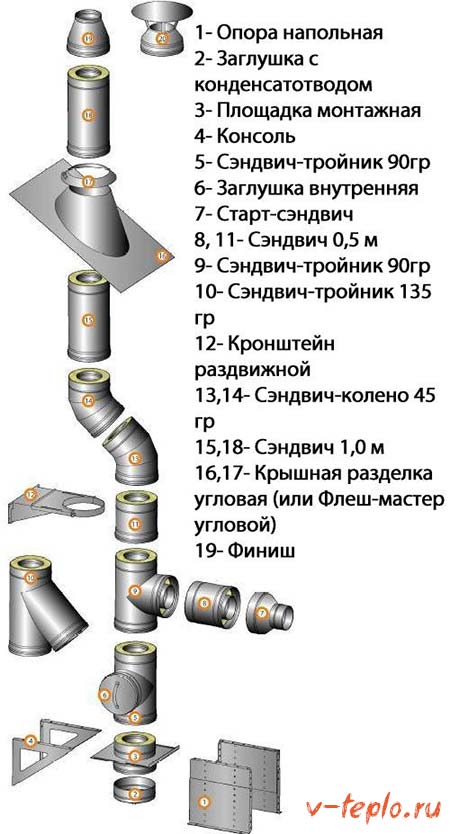
Chimney for an outdoor stove
When the street oven is installed with your own hands, start working with the chimney. The best option (especially in our design) may be to use only a modular chimney - it is durable enough to serve you for a long time. Moreover, it is very easy to install, and heat-resistant sealant or clamps can be used to isolate the joints.
Also note that there are a number of rules that must be followed during installation.
- The installation procedure should be started from the stove.
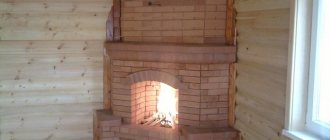
- If you are interested in the possibility of observing the fire, then you can purchase a door made of heat-resistant glass and put it on. But remember that the connections in this case should also be sealed with asbestos cord.
- The joints between the modules should be as tight as possible. When connecting, components of a smaller diameter must be inserted into adjacent ones by at least 50 centimeters.
- To make the joints as tight as possible, it is advisable to seal them with a heat-resistant sealant.
- All connections must have sufficient free access (this is necessary for cleaning).
- Brackets should be installed at least every two meters.
- No gaps in ceilings or walls should remain.
After all this, it remains only to put up a gazebo, as well as equip the surrounding area. A do-it-yourself outdoor stove can be finished with both tiles and decorative plaster. For a more detailed acquaintance with the construction procedure, we recommend watching a thematic video.
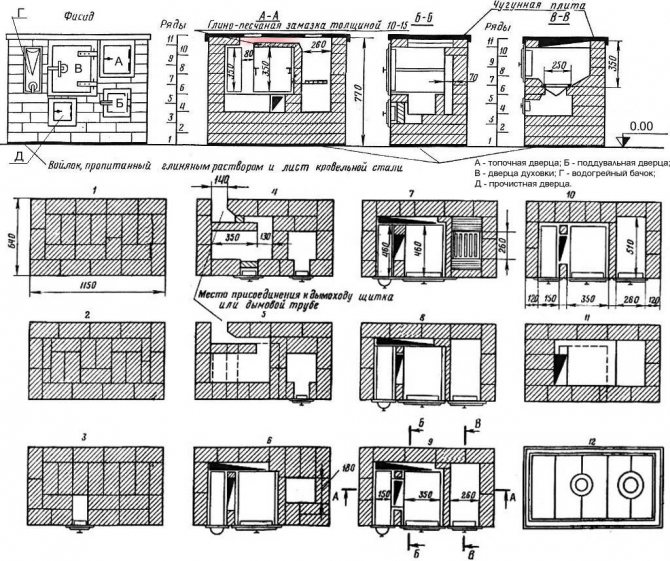
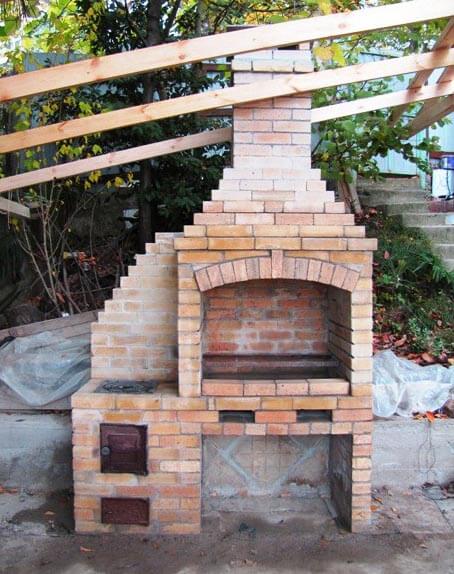
How to build a simple Russian stove on the street with your own hands from bricks
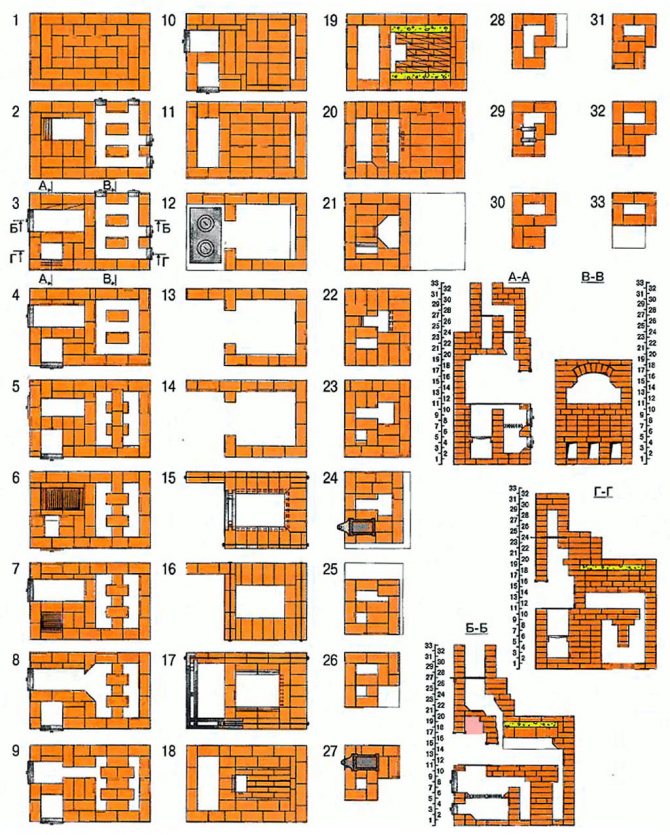
How to build the basic structures - figured out. It remains to devote time to the chimney system. When forming a brick oven on the street, it is recommended to cut the base plate of the chimney from a steel sheet with a thickness of 3 mm. Metal strips can be used instead of sheet. In order to make a base for a pipe out of them, you will need welding. To the base plate, as well as to the strapping, the lodgment of the overlapping plate and a steel cylindrical pipe with a diameter of 200 mm should be welded.Its length can vary from 40 cm to 1.2 m. In the absence of a suitable pipe, the chimney can be made welded by securely connecting all elements by welding to the corners of the strapping.
The only ready-made element of the Russian stove is a cast iron hob with burners. But you can also do it yourself if you find a suitable steel plate with a thickness of 4-6 mm. Two round holes for the burners should be cut in it. The cut out circles can then be used to make burner covers.
The hob must be placed on the cradle and brick side walls, and a grate must be installed inside the firebox. After that, you should carefully heat and thoroughly dry the masonry, and then use the summer cooking oven for its intended purpose.
To protect it from rain and in winter, it is recommended to cover the Russian stove from above with a sheet of flat slate with a cut-out hole for the pipe, and the pipe itself must be covered with a cut-out piece.
www.stroy-dom.net
Do-it-yourself oven masonry features
After arranging the base of it covered with roofing material, which will protect future masonry from moisture. Then you can go directly to the construction of the brick structure.
- The laying of the first row begins with a solid brick, and the next with a half. This allows you to achieve the necessary dressing between the rows. The masonry of each row should be checked against the water level.
- After the completion of the first row, a blower door is placed, pre-wrapped along the contour with an asbestos cord, which performs the function of an additional seal.
- To fasten the doors, a metal wire is laid in order. You can also use metal plates, but you will need a special welding machine to attach them to them, since you cannot weld cast iron to metal by simple welding.
- So that the wire does not break the seam between the bricks, in the last grinder a shallow cut is made.
- The gap between the doors and the brickwork should be no more than 1 cm.
- After the overlap of the blower is completed, the grates are installed. For this, the same grinder is done washed down in a brick. This will allow the grates to be drowned in it so that they do not protrude above the brick row.
- Further, the masonry continues in the usual way to the level of installation of the fire door. The furnace doors are also attached by analogy with the locking device for the blower, with the help of a wire embedded in the seams between the rows of bricks.
- The top row of masonry is covered with a metal or stone slab, depending on the functionality of the outdoor stove.
If the owner of the stove, as in the photo, wants to watch a live fire in the firebox, then the latter must be equipped with a door made of heat-resistant glass. It is important, after installing the door with your own hands, to close up the joints with an asbestos cord.
Preparatory work before construction
The construction of any objects, including a street barbecue or a stove, begins with drawing up a detailed plan for the upcoming work, therefore, a drawing is initially created with all the elements of the future construction. At this stage, it is important to choose a location, determine the design option and dimensions of the furnace, and draw up drawings. All this is necessary for the competent calculation of the necessary materials and reducing the time for the construction of the structure, otherwise an outdoor brick oven will be too expensive.
It is possible to avoid problems during the installation of the stove and its maintenance by choosing only high-quality materials and building mixtures, especially if it is a built-in stove for a cauldron or a wood-burning stove.
According to the experience of stove-makers, we can talk about the advisability of using a new brick that has not been previously used in work, which will help to significantly reduce the consumption of cement and increase the strength of the masonry of a stove with a barbecue or other structure as a whole.Used bricks can be used as an economical option, but only for arranging the internal structure of a stove or barbecue for a summer residence, having previously been thoroughly cleaned from soot, mortar and other old mixtures.