There are many ways to make underfloor heating in an apartment or private house, but using a heating cable is the simplest and most inexpensive option, so it is in great demand.
Electric cable underfloor heating
The heating cable is a copper wire that carries an electric current. To increase performance, it is placed in a special fiber winding and heat-resistant polyvinylethylene. Thanks to this design, the safety of its use is also ensured. Electric current, passing through the wire, releases thermal energy, due to which the surface is heated.
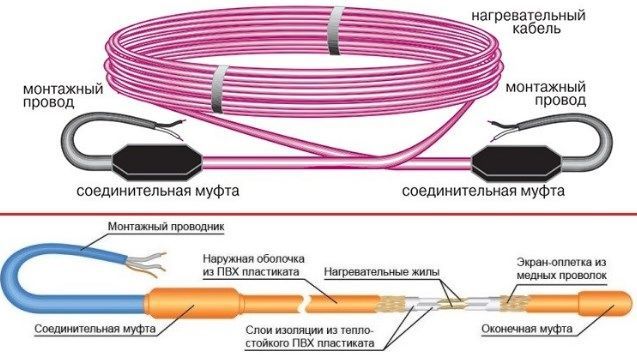
Heating cable device
Electric cables for concrete screed have different power: from 15 to 40 W / m, can be heated up to 90 ° C. Galvanized steel or copper acts as a conductor - cores. Any wire is designed for a traditional electrical network with a voltage of 220 V.
Resistive heating cable
An electrical wire of a resistive type for underfloor heating has one or two cores, which are placed in an insulating sheath, and couplings are installed at both ends, with the help of which it is connected to the electrical network. If a single-core wire is used for a tie, then a closed circuit must be provided. This means that the cable should be placed on the floor so that both ends fit into the back box.
Raychem T2BLUE resistive cable
If a two-wire wire is used, then the presence of a second conductor ensures the closure of the current circuit, therefore only one end is placed in the box, and a plug is mounted on the second.
A two-core cable has a more complex structure:
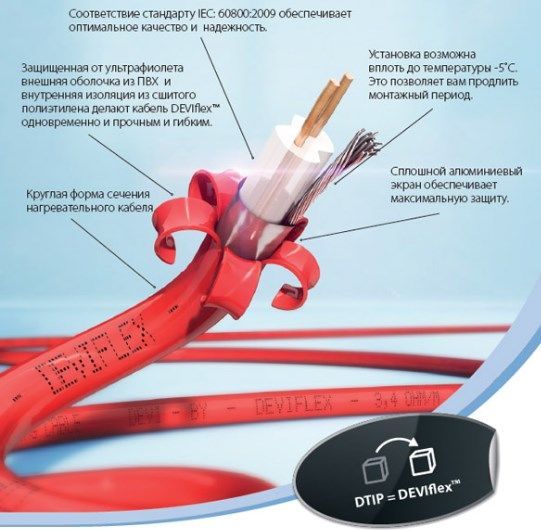

Two-core heating cable for underfloor heating
- both cores are enclosed in an insulating material such as silicone rubber;
- two wires are combined with fiberglass;
- tinned copper conductor is used for grounding;
- aluminum foil protects the conductor from local overheating;
- the whole structure is enclosed in an outer shell made of polyvinyl chloride.
A single-core cable has one significant advantage - the price, while a two-core cable is 20% more expensive. The two-core cable is simply laid under the screed - you can use any convenient method, without having to return the other end to the box.
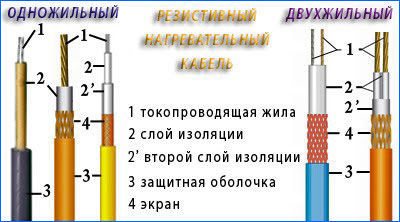

Single-core and double-core cable
The resistive wire constantly emits heat when connected to the mains - this is its main disadvantage. Because, if the heat energy is blocked off, it will contribute to overheating of the wire and a short circuit will occur. You cannot lay such wires in those places where you plan to arrange furniture.
Fill the screed and lay the topcoat
The screed is best done from a special ready-made mixture. The packaging of such a composition will indicate that it is specially designed for use in combination with a warm floor. Prepare the mixture according to the instructions. Sufficient layer thickness is 40-50 mm.
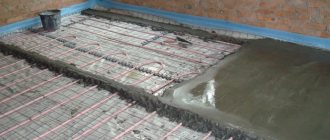
Spread the mixture evenly over the surface with a spatula. Make sure that there are no air pockets under the cable body. Because of them, the quality of heating will deteriorate markedly. Let the screed dry completely.
Important: infrared and warm floors require different "holding time" after installation. You can use the film floor in 2-3 days (if the screed has not been poured). The cable system must be allowed to stand for 3-4 weeks.
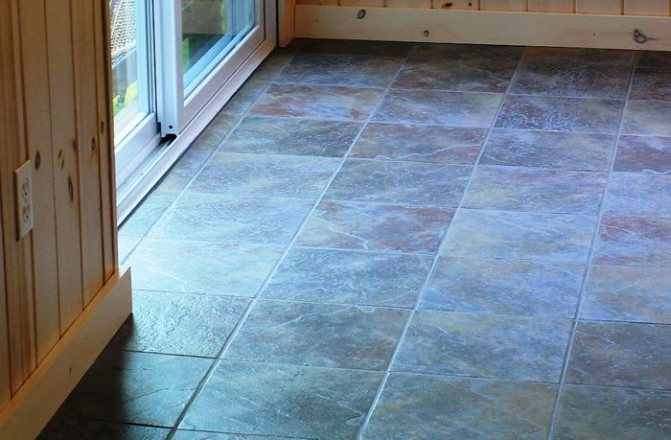
We lay the topcoat in accordance with the installation technology of the selected material. Most often, tiles and laminate are laid on top of a warm floor. You can also lay parquet and even linoleum. You can use another coating if you wish. Focus on your preferences, interior design and available budget.
Happy work!
stroyday.ru
Self-regulating cable
A shielded or self-regulating cable for underfloor heating is a matrix, inside which there are two conductors, and between them - a layer of polymer, which releases the necessary thermal energy. The peculiarity of this cable is that it regulates the heating due to the resistance of the polymer. As the temperature rises, the resistance also increases, which leads to a decrease in the current strength and, as a result, the amount of heat generated decreases.
Self-regulating heating cable braid
Thanks to this structure, the self-regulating cable is also quite economical, therefore, over time, it will justify the funds invested in its purchase.
Shielded wire composition:
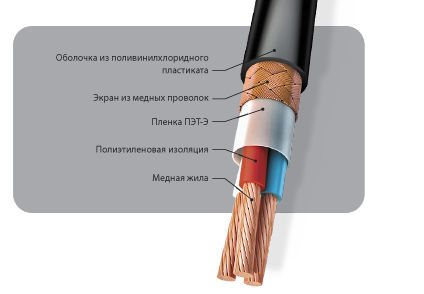

Shielded heating cable design
- carbon conductor;
- polymer;
- insulation;
- reinforcing braid;
- external PVC insulation.
Despite the ability to control overheating, such a cable is also not recommended to be laid under furniture, since this will increase electricity consumption, but will not provide the desired effect - it makes no sense to heat the cabinet.
Choosing a cable for underfloor heating
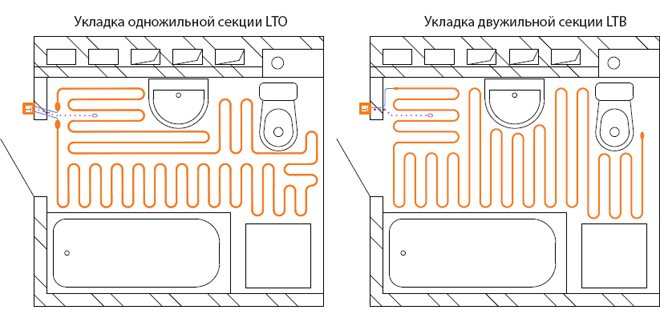

Cable routing options.
One of the most significant elements, without which it is impossible to make an electric floor heating with your own hands, is the cable. There are several types of cables: resistive and self-regulating. Cables are designed to convert energy into electrical current and conduct it. Resistive cables can be single-core or double-core. The cores are made of a special material with high resistance.
This provides a specific heat dissipation of 15-21 W / m. The difference between a single-core cable is that it is based on 1 wire through which the current flows. During its operation, one end of the cable must necessarily converge with the second, while in a two-core cable this condition is not necessary, which allows only 1 end to be used for heating. A two-core wire has a heating core and a conductor.
Self-regulating cables are more modern and effective. They are devoid of these drawbacks, therefore, they are more reliable and expensive. In this case, both cores are conductors. They may differ externally as well. In them, both cores are conductors, and there is a matrix for heating. Such cables are not afraid of overheating, which is of great importance when choosing this device.
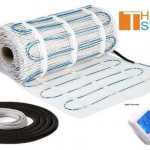
An electric underfloor heating can be organized with your own hands in the form of not a cable, but a mat laid on the floor surface. In the mats, the cable is laid in a certain order, which makes it easier to carry out its installation. But such a mat necessarily requires an even and correct configuration of the floor surface. It is more expensive.
Heating mats
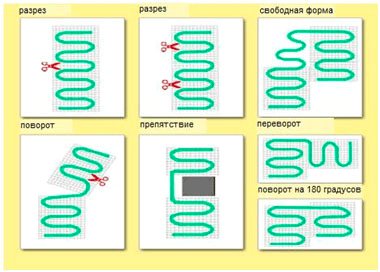

Methods for cutting and bending the heating mat
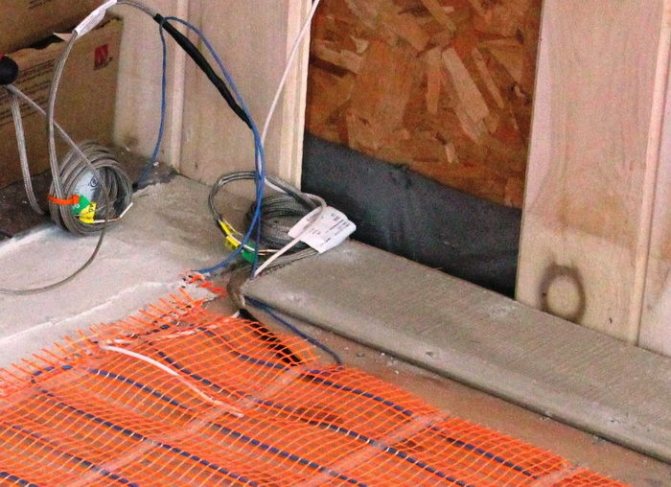
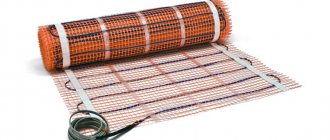
To simplify the installation of underfloor heating using a heating cable, special mats have been developed. They consist of a mesh base on which the heating elements are fixed.
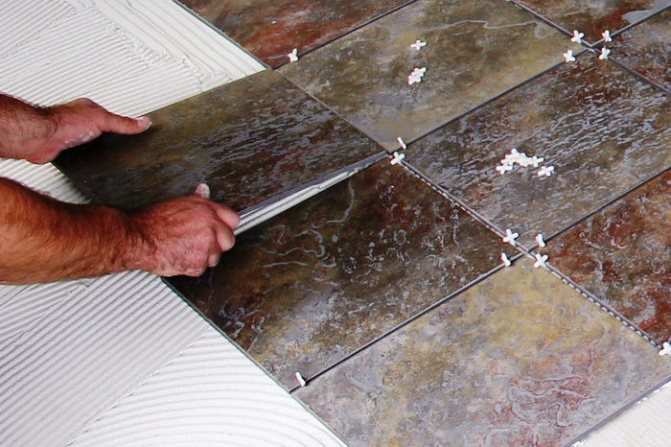
The main advantage of this design is that it is possible not to make a concrete screed, but it is allowed to immediately lay the finishing layer on top (tiles are most often used).
The installation of the mats is very convenient, since it is easy to change the direction, they can be laid in any order, bypassing the places where the furniture is located. Most often, a resistive two-wire cable is placed in the mats.
Laying the heating mat
Electric floor heating technology: methods and advice
This page contains information about underfloor heating based on electricity, as well as methods and technology for installing such floor systems.
Unlike a central heating system, a warm floor evenly heats the entire floor covering and, therefore, the air in the lower part of the room, which is most comfortable for a person. Otherwise, warm air immediately rises to the very ceiling.
Variety of electric underfloor heating
Underfloor heating from electricity is of three types:
- cable,
- thermomat (mesh with attached cable),
- film (the heating element is inside the film).
You need to choose a suitable system based on the characteristics of the premises, layout and operating conditions. Of the first two, it is better to buy the second one in order to save time. For the cable, you still have to take the mounting tape for fastening. And the mats can be cut along the grid to fit the layout. For a film floor, only "dry" installation is needed, and such a floor is undesirable, for example, for tiled flooring.
The technology of laying an electric underfloor heating directly depends on its type. Let's take a look at all of them.
Important!!! The base for any underfloor heating system must be level and clean.
Method 1. Installation of thermomats
This option is the simplest. The mesh of the thermomat is 50 cm wide, but it can be cut and rotated in the desired direction. The main thing is not to damage the cable. You can fix the thermomat to the floor in any way. Before this, it is recommended to prime the surface to ensure better adhesion. Above - a small layer of screed (3 cm) or tile adhesive, and then the floor covering.
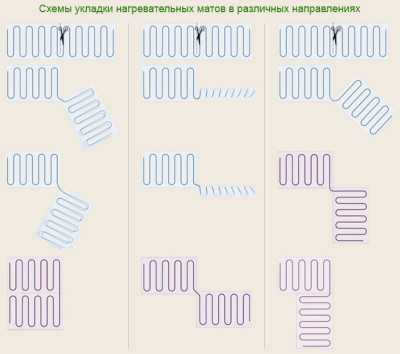

Thermomat stacking options
Method 2. Installation of the cable floor
This method involves preliminary leveling, thermal insulation and floor screed, which will increase its height. Then the cable of the required size is laid out with a "snake" or "snail" using a special mounting tape with fasteners that maintain the required distance between the cable, excluding the places where the pieces of furniture will be located. In addition, it is imperative to indent from walls and heating devices by at least 5-7 cm. You need to start laying from the place of connection to the thermostat. As in the case of thermomats, tile adhesive or a screed (5 cm thick) is placed under the floor covering.
Attention!!! Do not cut or stretch the cable! The cable lines must not touch!
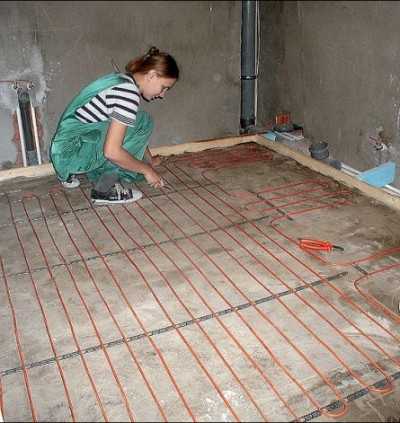

Cabling
The most common brands of heating cables and their characteristics
On the Russian market, there are both domestic manufacturers of electric cables for underfloor heating, and imported ones.
| Brand | Section length, m | Power, W / m | Maximum operating temperature, оС | Service life, years |
| Single core cable | ||||
| National comfort, NK-250 | 17 | 15 | 90 | 15 |
| Teplolux | 10 | 14 | 90 | 25 |
| Neoclima | 5 | 15,2 | 100 | 35 |
| Two-core cable | ||||
| Ceilhit | 8,1 | 18 | 100 | 25 |
| Teplolux Elite | 15 | 27 | 90 | 30 |
| Raychem t2 | 14 | 20 | 100 | 35 |
| Self-regulating cable | ||||
| Optiheat 15/30 | 15 | 30 | 100 | 40 |
| Devi-pipeguard 25 | 25 | 30 | 85 | 30 |
| Heating mat | ||||
| NeoClima | 0.65 m2 | 105 | 80 | 25 |
| Electrolux EEFM | 2 m2 | 150 | 80 | 35 |
| National comfort | 0,5 m2 | 130 | 90 | 25 |
Three main causes of malfunctioning underfloor heating
The heating design is a reliable system. The term of use of underfloor heating, according to the specified technological parameters, without major repairs is designed for at least 10 years. Although each electrical device that is constantly in operation has not only its own advantages, but also possible technological disadvantages. Reasons for a malfunction in the heating:
- thermostat;
- breakage of the electrical cable;
- malfunction in the temperature sensor.
Rules for installing a warm floor with an electric wire
For an electric underfloor heating, it is necessary to provide a perfectly flat surface of the rough base, since there may be air in the voids, which will lead to the burnout of the resistive element.On the subfloor, a thin screed from 3 to 5 cm is recommended.
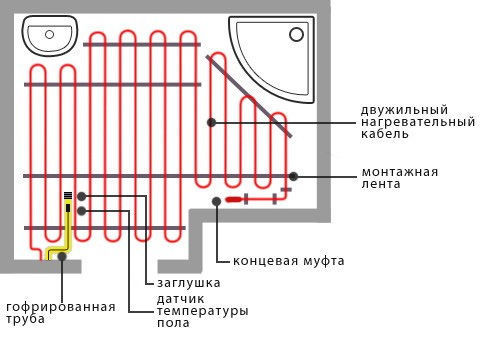

Installation diagram of the electric cable on the floor
Next comes thermal insulation. The thickness of the material should be at least 2 cm, but if this is an apartment on the ground floor, it is better to choose a thicker one. When choosing a material, you should pay attention to heat resistance - it must withstand heating up to 100 ° C. It is better not to use foil-coated material - the foil will quickly deteriorate under the influence of constantly high temperatures. An alternative is a metallized coating - it will reflect heat and direct it upward.
Self-installation of an electric underfloor heating
Both rolled insulation and slabs are used. One condition is that you must not allow cracks in honey with canvases. If underfloor heating is installed in a bathroom or kitchen, waterproofing materials should be used. They will prevent the penetration of unwanted moisture.
Thick plastic sheeting is most commonly used. The next stage is the installation of heating elements. It can be carried out on a special mounting tape, which has fasteners for the cable. You can replace it with a reinforcing mesh, the cells of which do not exceed 1.5 cm.
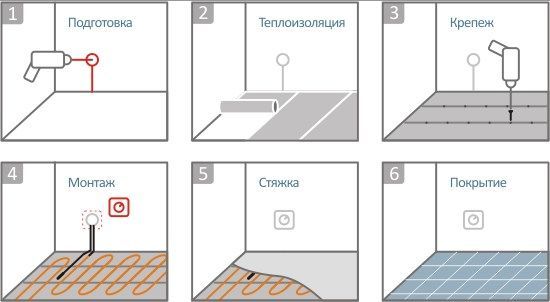

Stages of installing a warm floor with an electric wire
The next stage is the screed. Any material that can withstand high temperatures can be used. This is either a concrete composition with the addition of polymers, or ready-made dry mixes for a warm floor. Before pouring the screed, it is necessary to check the performance of the heating system. The test is carried out using a tester that measures the maximum resistance. Deviations are allowed within 10% of the data specified in the wire passport.
How to install warm floor | Pro Handmade
Which underfloor heating system is better to prefer?
They produce water and electric underfloor heating systems. Each type is quite popular and it is impossible to say for sure which one is the best. In order to choose, you need to study all the characteristics and find out which one is more suitable.
Water thermal coating
The main condition that should be taken into account when installing a warm floor is the ability to directly connect to the central heating system or the creation of a separate boiler room. In apartment buildings, such floors are used quite rarely and only if they were in the project. In an ordinary apartment, such floor heating is prohibited due to the fact that the water pressure is designed only for radiator heating.
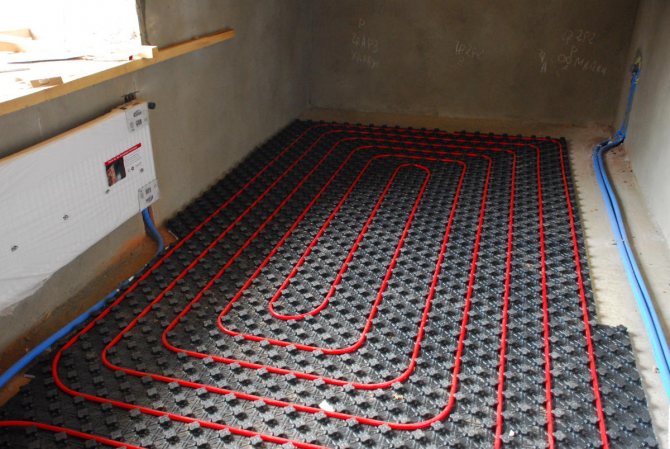
For such a warm floor, metal-plastic or polymer pipes are used, which are heat-resistant. Thus, the system has the ability to function smoothly for fifty years. This type of heating is low temperature and is used as auxiliary heating. If the room is small, this floor can serve as the main source of heating.
Advantages of a water floor:
- long operational period;
- low energy consumption;
- there are no restrictions on the installation of furniture.
Disadvantages of a water floor:
- complex design and installation;
- a large load on the base is carried out;
- if there is a leak, the flooring needs to be repaired and the contour replaced.
Features of the electric floor
Electric floor heating systems are very popular. They are equipped with various types of heating elements, including cable, film, thermomats.
The cable type is the most common as it is easy to install. Installation is carried out on a screed or tile adhesive and is very convenient for rooms with a small area. The cable is purchased ready for installation. For this reason, in no case should you cut it off or build it up.To avoid overheating, it is forbidden to install furniture over the cable.
The film type looks like a thin strip of heat-resistant film, inside which heating elements are sealed. Thanks to this device, fast and uniform heating is provided in the room. Such material must be collected from several parts right at the installation site. Polyester strips are laid under the flooring. It is not recommended to install them in the screed, since the alkali has the ability to destroy the film.
The cable system looks like a thin roll of fiberglass that holds the cable. If installation is carried out on a complex surface, it is allowed to cut the fiberglass. Thermomats greatly simplify the installation of the system.
Directly installing a warm floor is divided into the following stages:
- the working surface is initially prepared for laying the system;
- a reflective layer is laid;
- fasteners are installed;
- install a manifold and a control group;
- lay pipes;
- connect the system to a power source;
- preparatory work before pouring;
- coverage and commissioning of the system.
www.prohandmade.ru
Installing the thermostat
A thermostat should be used to save energy and make the floor heating more efficient. It must be installed before laying the heating elements. It is mounted in a convenient place, stepping back from the floor at least 30 cm. In the wall, you need to make a niche for installing the box and draw a strobe to the base of the floor, in which a corrugation or pipe is placed. The corrugation should pass another 0.5–1 m along the base of the floor; connecting wires from the heating elements are placed in it.
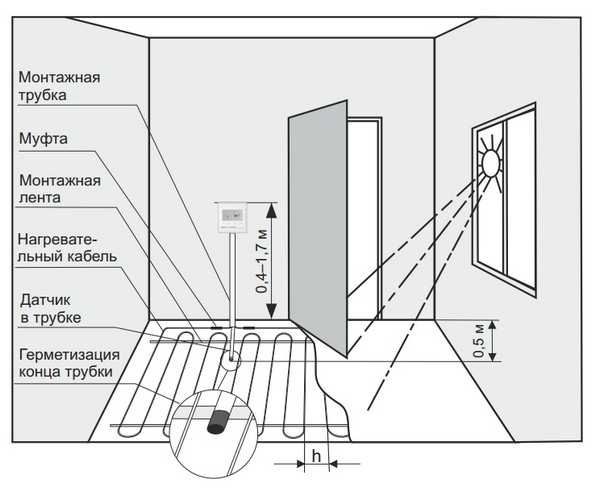

The right place to mount the thermostat
The cable ends must be brought into the thermostat in such a way that the sleeves remain in the tie.
What is needed for installation?
In order to lay a warm floor based on an electric cable, mat or infrared film, you must carefully prepare for work. To begin with, you need to correctly select the constituent elements of the system. For example, you need to pay attention to the type of cable. It can be self-regulating or resistive. Both of these types are successfully used in the installation of heating systems. But the second option must have good contact with the screed, and furniture should not be placed on it. As for the self-regulating cable, its only drawback is its high cost.
The thermostat is an important element of the economical and reliable operation of the warm floor
Another important element of the system is. This is a special device with which the system maintains a predetermined temperature. To choose it correctly, you need to take into account the following parameters:
- Product type. The thermostat can be mechanical or electronic. Newer models are equipped with an LCD screen. It is best to use a programmable device.
- Features of installation.
- Additional functions. Some models have built-in air temperature sensors, self-diagnostic function.
- Power limit.
- Manufacturer and cost of the device. Naturally, products from both domestic and foreign manufacturers can be purchased on the market. Priority should be given only to popular brands with a good reputation. The cost of the product ranges from 50-200 dollars.
Cabling
There are several options for routing cables:
- snail;
- snake;
- double or triple snake.

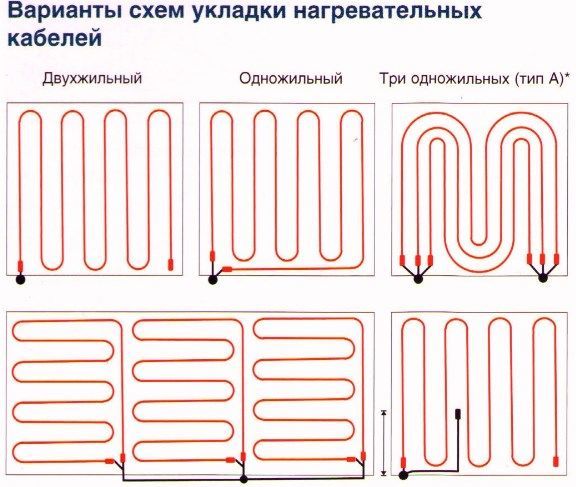
Heating cable routing options
The snail layout is less popular, especially if resistive elements are used. The step between the turns is chosen independently, depending on the required power per 1 m2. The minimum allowable distance is 5 cm, the maximum is 30 cm.
How can you calculate the required amount of wire per 1 m2?
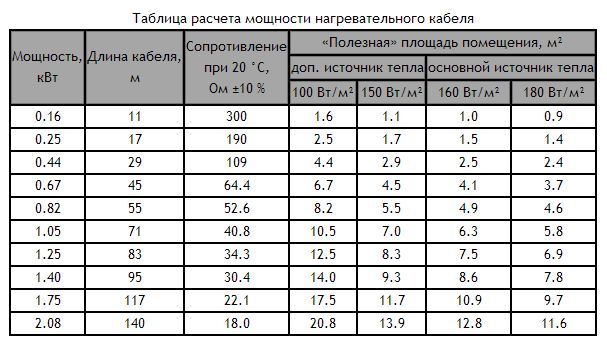

Heating cable power calculation table
- First, you need to decide whether it will be the main heating in the room or auxiliary. If the main one, then you need to provide a power of 150 W and higher, and when the warm floor is only an additional system, 110 W will be enough.
- Secondly, the degree of floor insulation is taken into account - if this is an apartment on the first floor, then you need to provide 140-150 W, even with additional heating. More powerful elements should be installed on the balcony or loggia - up to 180 watts.
- Thirdly, the definition of the heated area is about 70% of the floor, taking into account the location of the furniture (the wire does not fit under it).
The cable length can now be calculated. For example, the coverage area is 10m2, it is necessary to organize a power of 140 W per 1m2. There is a heating cable for underfloor heating with a power of 16 watts. We calculate the maximum consumption: 140 * 10 = 1400 W. Determine the length of the cable: 1400/16 = 87.5 m. Now you need to select such a number of coils or sections that are as close as possible to this value, since shortening the heating cable for a warm floor is very problematic.
Surface preparation
First step. We dismantle the old flooring and screed. When laying a film underfloor heating, the old screed, if it is in normal condition, can not be dismantled. In the case of installing the cable system, you will have to get rid of the tie. We thoroughly clean the surface from dust and dirt.
Second step. We lay a layer of waterproofing material. Plastic wrap is traditionally used, but you can choose other insulation if you wish. It is important that the moisture-proof material extends approximately 100-120 mm onto the walls.
Step three. Along the perimeter of the base, we fix the damper tape on the wall. Thanks to it, it will be provided to compensate for the thermal expansion of the system during heating. We carefully cut off the excess waterproofing and damper tape.
Fourth step. We lay the heat-insulating layer. Thanks to him, losses of thermal energy through the base will be excluded. Choose a heater taking into account the peculiarities of the location of the room, the type of base and the intended purpose of the heating system.
If you plan to use the system as a supplement to the main heating, the insulation can be done with polyethylene foam fitted with a reflective foil layer. Additionally, the material will take on the function of underfloor heating.
If there is a heated room on the lower floor, it is best to equip thermal insulation using expanded polystyrene sheet. The thickness of the material is 2-5 cm. Another insulator with the same thickness will do.
When installing a heating system in a previously unheated room, for example, on a veranda or balcony, the thermal insulation layer should be more solid. For example, a 10-centimeter insulation with expanded polystyrene or mineral wool of a similar thickness is well suited.
Fifth step. We put a reinforcing mesh on the insulation. If desired, you can add microfiber and a plasticizer to the screed solution. Such an improvement in the composition will make it possible to do without additional reinforcement.
How to shorten the cable?
The question of how to shorten the heating cable may arise in the event that the incorrect calculation of the footage is performed, and there is nowhere to put the excess (you must remember the minimum allowable distance between the turns - 5 cm). The wire is sold in coils that have several sections. Couplings are installed at the ends of the cable in the section. A certain resistance is created within each section. If you cut the wire yourself, the balance will be upset: the resistance will decrease, the current will increase.
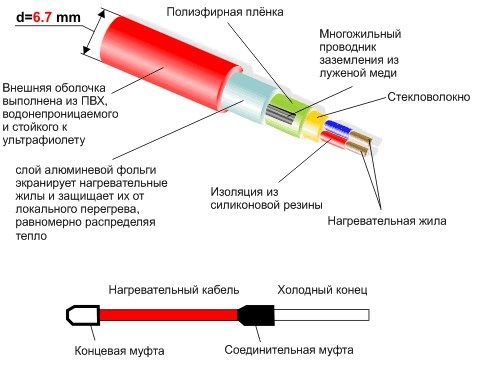

Heating cable information diagram
As a result, the cable will simply burn out, so you should use the entire footage for the coverage. But if, nevertheless, such a need arose, then it is better to entrust the pruning to a professional.It will determine how much resistance is lost and install a current limiting resistor to compensate.
Design of a warm electric floor
To determine how to correctly make a warm electric floor, you first need to make some simple calculations and develop a project.
First of all, the area on which the heating elements will be located is determined. To do this, on the plan of the room, the places occupied by stationary furniture, equipment, household appliances, etc. are marked. These areas are subtracted from the total area of the room, the result obtained will be the working area of the warm floor.
The main reason for this distinction lies in the lack of normal air movement under furniture and equipment, which makes it difficult for the cable to return heat normally and can cause damage to it. Underfloor heating installation in such places not allowed!
Limitations when installing a warm electric floor
When laying out the heating cable, in addition to prohibiting placement under solid elements, it must be borne in mind that:
but) the distance between the cable turns must be at least 75 mm;
b) the cable should not cross the communications laid in the floor (in such cases, several sections of cable or mats are used);
in) from the cable to the walls must be at least 50 mm;
d) from cable turns to other heating devices (including central heating risers) must be at least 100 mm;
e) one and the same heating section should not be located under coverings and on bases of different types (for example, on a concrete base and a cement-bonded concrete screed).
Laying scheme for a warm electric floor
Before making a warm electric floor, you need to draw a diagram of the heating wire laying with an indication of the connection point (Fig. 1). Such a scheme is necessary for accurate and high-quality installation.
When calculating the cable laying scheme, to determine the distance between the turns, you can use the formula: W = 100 * P / DK.
Where, Sh - step in cm, 100 counting set, P - the area occupied by the heater, DC - length of cable.
Preparatory work. Base
Before laying, the base is cleaned of dust and debris, leveled if necessary.
Next, the thermal insulation and the IR-reflecting screen are laid. The task of the thermal insulation and the screen is to ensure a rational energy consumption, that is, to eliminate the consumption of thermal energy for heating the building structures of the floor and the underlying space. Direct all generated heat into a heated room.
As thermal insulation, semi-rigid mineral wool boards, polyurethane foam (including sprayed) can be used. The IR screen is performed by laying a special film, and more often with the help of thermal insulation materials combined with such a screen (foiloizol, penofol, etc.).
The thickness of the insulation depends on the space under the floor. For example, if you need to make a warm electric floor under the tiles on a loggia, balcony or gallery, where there is an open space below the floor slab, the insulation layer can be tens of centimeters. Above heated rooms, a thin substrate with an IR screen is sufficient.
Thermoregulator and heat sensor
A critical stage in the installation of a warm floor is the installation of a thermostat.
Its task is to turn on the heating when the floor temperature drops below the set one and turn it off when the desired one is reached. For this, a heat sensor is used, placed in a protective cover made of a corrugated sleeve or (better) a metal-plastic tube with a diameter of 16 mm. The end of the cover must be tightly closed against the ingress of mortar when laying tiles or leveling screed.
The sensor is placed at an equal distance from the heating cable, as close as possible to the floor surface, avoiding sharp bends of the tube, so that, if necessary, it can be replaced without disassembling the coating.
The thermostat is located in any convenient place, the only location restriction is that the distance to the floor must be at least 30 cm. The thermostat is mounted in a standard socket box and connected to the mains supply.
Installation of heating elements
To begin with, let's consider how to make a warm floor under the tiles (for which, usually, mats are used).
The mats are laid in accordance with the scheme and fixed in small portions of tile adhesive, or in other ways that provide sufficient fixation for further operations.
After finishing the installation and checking, the tiles can be laid on the floor immediately on top of the mats.
Installation of a separate cable somewhat more complicated. To fix it in the desired position, a special tape made of thin metal is usually used. On the tape with a 2.5 cm pitch, bendable fasteners are made with a notch, allowing you to reliably clamp a cable with a diameter of up to 8 mm.
The tapes are attached to the base, perpendicular to the cable laying, 50-70 cm apart with the help of “quick assembly” nails.
Connecting the warm floor to the network
After completing the installation, we check the electrical resistance of the sensor and cable for compliance with the passport. The stripped ends of the cable are tinned.
The wire coming from the protective shield (usually yellow-green) is connected to ground, and in the absence of a ground line, to the zero terminal (which is undesirable).
Shielding of the underfloor heating cable is performed to eliminate electromagnetic radiation. And although its value is insignificant, and hardly even without an email screen. floors will cause some harm, but since prolonged exposure to increased el. the magnetic background on the body has not been studied enough, the requirements of the PUE such a measure is recognized as mandatory.
Having set the thermostat to minimum heating, the assembled floor is turned on for one or two minutes (the control lamp of the thermostat should light up, and the cable should become warm). Only after making sure that everything is in order, the power is turned off and proceeds to work on the further installation of the floor.

