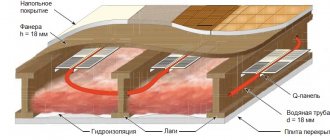

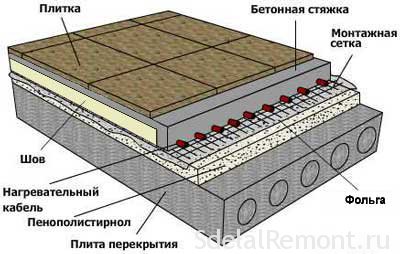
In recent years, technology has been very popular - warm floors. The organization of this type of heating in the room allows you to achieve a good microclimate and warmth throughout the entire heating season. It is worth noting that underfloor heating can be additional or basic. But regardless of its application, in order for it to be effective, it is necessary to observe a special technology for its manufacture. As you know, underfloor heating consists of several layers. Its main element is a heating circuit, which is filled with a screed. And it is the pouring of the warm floor that is the final stage of its creation. In this article, we will consider all the features of how to properly fill a warm floor.
Concept and necessity
A screed is a layer of mortar that is applied on top of the surface. But with regards to the warm floor, then the screed plays different functions each time, depending on the selected layer.
The first layer is carried out on the rough base. It is mainly used to create a flat surface for the subsequent laying of materials. In principle, this layer is suitable for all surfaces that have even minor effects. Instead of a rough layer for insulation, a floor slab or soil prepared according to all the rules can be used.
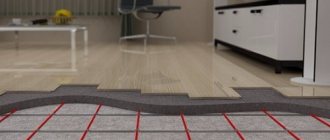
The second layer is poured over the thermal insulation layer. It will be designed for laying the underfloor heating cable on it. If everything is done according to the instructions and technology, then the installation of the cable floor will be much faster. As a result, the result will please everyone.
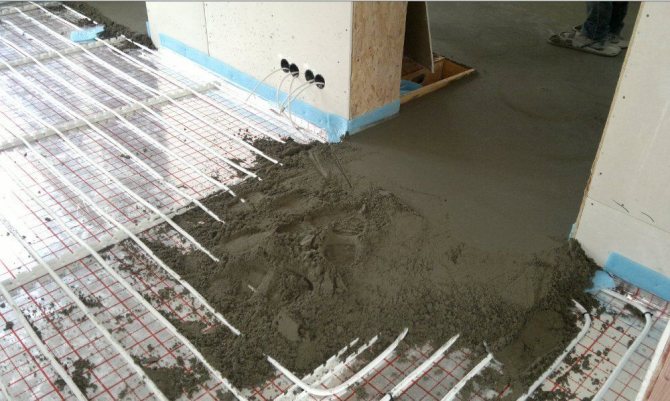
All that remains is to “close” the underfloor heating by filling in the underfloor heating. It will contribute to an even distribution of heat on the floor itself, as well as inside the room. This layer of pouring the underfloor heating screed will subsequently serve as a surface for the flooring of the selected floor covering.
The device of the final layer of the underfloor heating screed can be arranged only if the functionality of the entire system has been checked. The pressure in it must be kept at the required level. Otherwise, you will have to remove the screed and see what problems there are in the operation of the warm floor.
Only these points will already indicate how to properly fill in the warm floor so that it can warm the air in the room from the base to the ceiling. If you move away from technology and try to do everything at your discretion, then over time you will have to dismantle the surface and possibly even elements of the warm floor, electric or water.
Preparatory work
Before pouring underfloor heating, a number of preparatory work should be done. First of all, the base of the concrete floor should be plastered and primed, and then waterproofed.
Putty and primer
Putty on the joints of the floor slabs
The first step is to dismantle all floor coverings up to the subfloor or floor slab. Then you need to carefully examine the base for cracks and cracks. Particular attention should be paid to the joints of the floor slabs, as well as the areas where floors and walls join.
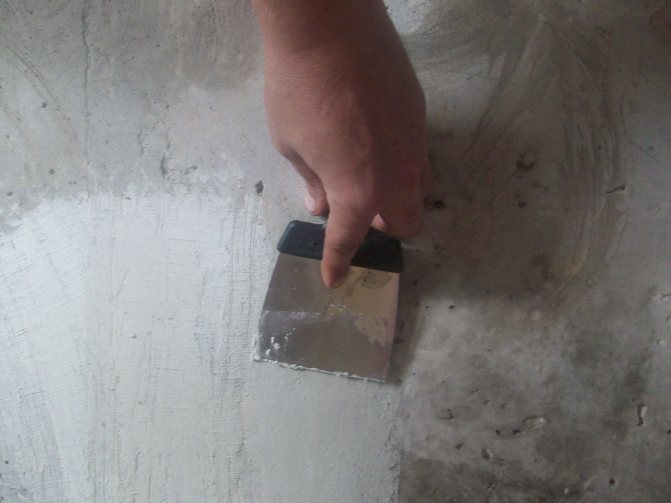
All gaps found should be repaired with putty or plaster. After that, the concrete base is carefully primed in order to increase the coefficient of adhesion of the waterproofing material to the concrete.
Waterproofing
Roll materials are stacked in two or three layers perpendicular to each other
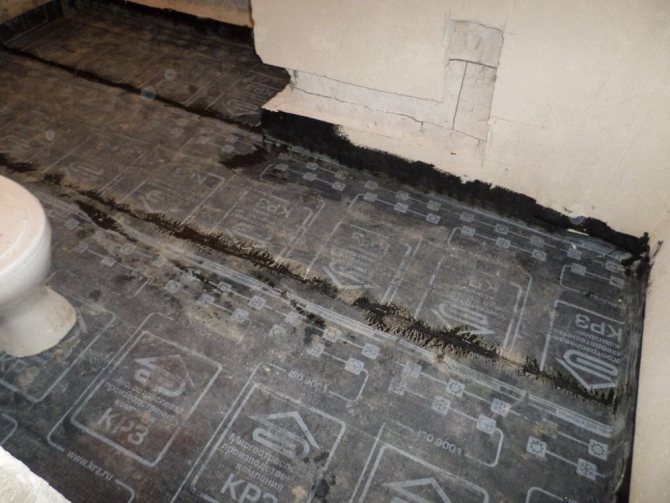
Waterproofing is installed on top of the base before pouring underfloor heating. To arrange a water-repellent layer before pouring concrete, you can use either a coating or roll waterproofing.
Rolled waterproofing is created on the basis of bitumen and is supplied to the market in the form of a waterproof material rolled into a roll, hence its name. It is applied to a concrete base using a sticking method using mastics on a bitumen or polymer base as an adhesive.

Rolled waterproofing can be applied in 2 - 3 layers crosswise to create more effective protection against steam and moisture penetration from the basement, or to protect the lower floors if the warm water floor suddenly leaks.
Lubricating waterproofing is liquid mastics that are applied to the surface of the substrate using brushes and rollers. The basis for water-repellent mastics are polymer or bituminous compounds with increased adhesion.
Thanks to this, they are able to penetrate into all the smallest cracks and pores inside concrete surfaces, blocking the access to the smallest particles of moisture.
Also, coating with mastics will help to strengthen weak concrete surfaces that are prone to staining.
Requirements for work execution
For underfloor heating screed, there are no regulatory documents that spell out the exact requirements that apply to it. But there are rules that cannot be deviated from. Among them, the most important requirement is a flat screed surface for the underfloor heating system. But this point can also be attributed to flooring to get a positive result. An even floor will serve as a good basis for all subsequent types of work. In addition to the classic floor screed, self-leveling mixtures can be used during installation. Everything will depend on the underfloor heating system itself, as well as on the installation possibilities.
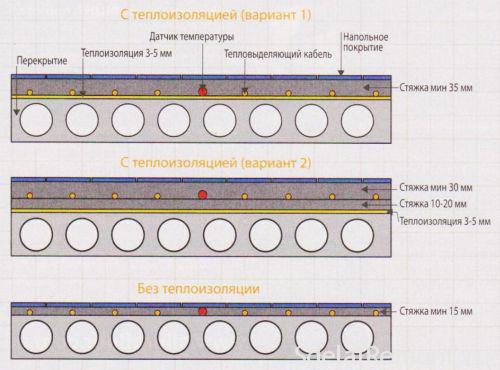
Another important requirement is the required level of thickness. The screed layer should normally be 30-50 mm. It is these indicators that will allow you to get the floor heating evenly over the entire area. In this case, the strength of the base will be sufficient to withstand external loads.
The optimal layer of the screed will allow it to dry equally over the entire area, without cracks and subsidence. If cracks are formed on the surface, then they will cause negative moments, which include:
- Uneven heating of the entire floor, as well as heating a room or, in general, an apartment.
- Separate areas with elevated temperatures will appear. In these places, the heating elements will warm up above the permissible rate, which will lead to reduced service life and failure.
If cracks have already formed, then all measures should be taken to carry out high-quality repairs. An important factor is the time delay until the cement screed is completely dry. Usually this period is up to 30 days. During this time, no work should be carried out, but wait until it is completely dry. It will not be superfluous to get rid of drafts and sunrays at first. The same temperature conditions must be created over the entire area in the room. Some resort to covering the screed with polyethylene film.
Drying the floor and starting it up
The main recommendation in the process of drying the floor is to exclude direct sunlight from falling on it, which will quickly dry the surface. It is best to completely curtain the windows for a while. After the filling of the solution is completed, you need to pierce the solution with a needle from time to time - due to this procedure, air bubbles accumulated at the bottom will come out.
The temperature in the room at which drying is carried out must not fall below 5 ° C.As soon as the drying process is completed, turn off the system and equalize the humidity level in the room.
Operating procedure
- Once the solution has completely hardened, the system can be activated. The return to normal operating power should be made only a few days after the first start-up at minimum power. In this case, the water temperature rises very smoothly.
- The main task after start-up is to remove air from the tubes. To this end, the pressure level exceeds the design standard by 15%.
- Already at the next stage, you can turn on the pump, shut off all pipe branches except one, and also wait until all the air is completely released.
Work on the installation of such a floor can be done independently. However, the process is quite laborious and time-consuming, and in some cases - the use of special tools. In addition, a rather important stage is planning a future floor project.
Rough fill
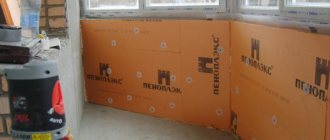
Experts recommend plastering the walls, installing windows and other elements of the room before carrying out the rough floor screed. The same applies to existing communications (sewage, electricity, etc.). The fact is that a warm floor can be laid exclusively on a flat base that does not have defects, pebbles, adhesion of a solution. This will only negatively affect the process of his work. If you do the opposite, then it is best to lay a plastic wrap on the surface, which is subsequently removed.
When it comes to insulation under a warm floor, then it should also lie down evenly, without flaws. So you should take all measures to conduct a high-quality preparatory stage, before pouring concrete underfloor heating.
The mortar should not be in the corners of the room, an angle of 90 degrees should always be maintained. Otherwise, it will not work to achieve a snug fit of the insulation.
There are tolerances for unevenness. They are usually + -5 mm. Otherwise, the pipes may bend during installation, which will lead to the appearance of air pockets. If they are to be overcome, then it is necessary to install a mixing unit with a pump.
Only when all these measures have been taken can the first layer of the subfloor be poured. As for the solution, everything will depend on which options for pouring the warm floor are selected.
When the rough version is poured, you should wait until it dries completely before laying the layer of thermal insulation. But even up to this point, all adhering parts of the solution must be removed from the surface, all debris and even dust must be removed. After that, do not forget to fix the damper tape around the perimeter in the room, which serves as a compensator for the thermal expansion of the floor screed itself.
Next, the insulation is laid, the next filling of the screed is made. This completes the filling of the floor under the warm floor.
Screed types
The most common is a wet screed, although a dry screed is beginning to be widely used, allowing you not to waste time drying the solution, during which you cannot turn on the heating.
With the apparent simplicity of the composition, the screed is performed in several versions:
- Sand-cement mortar with a mixing ratio of 3: 1 is suitable for electric underfloor heating.
- Fine aggregate concrete is used in water floor systems. The slab is durable and does not crack.
- Self-leveling compound is well suited for pouring electric underfloor heating when a thin layer is required.
- Mixes for warm floors, produced in a wide range.
- Tile adhesive is used as a thin screed for electric floor heating.
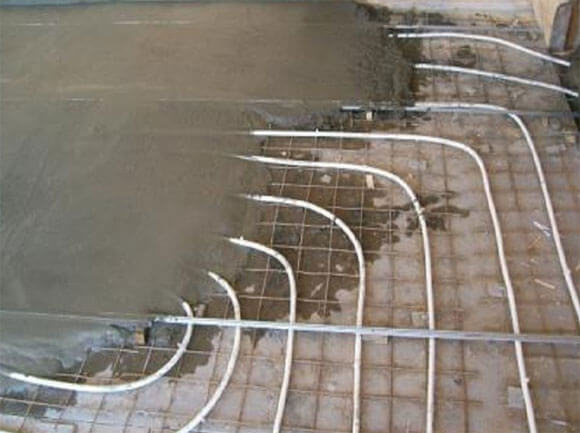
The strength of the screed increases significantly if you use a reinforcing mesh or microfiber.
Compositions are obtained with high durability and plasticity if plasticizers are added to them.
Preparation for pouring underfloor heating
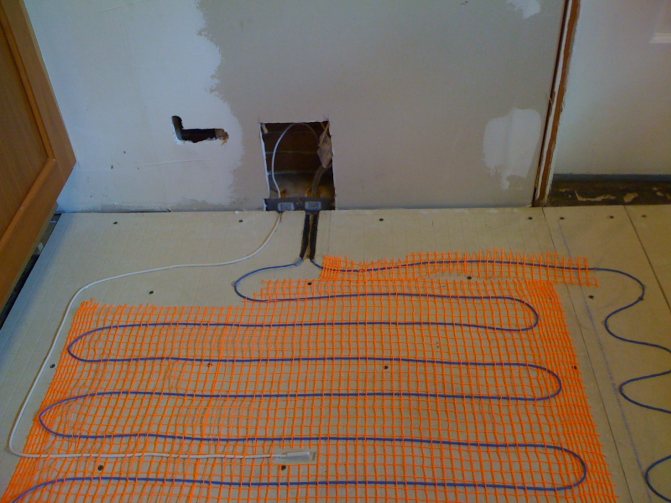
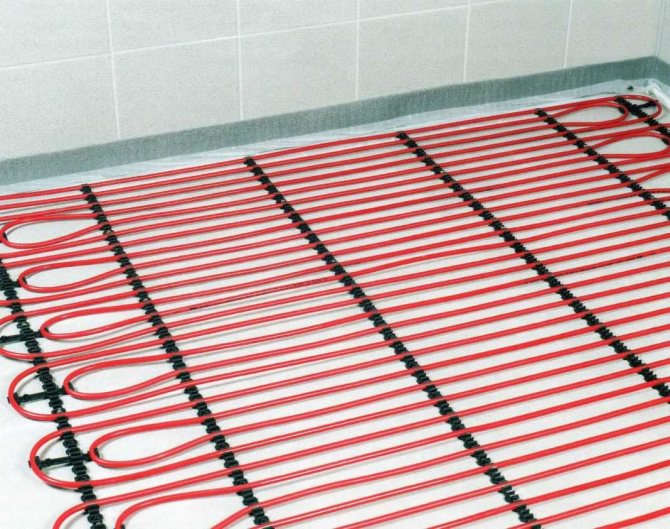
When the rough screed is mounted, you can start installing the underfloor heating. To do this, you should choose an electric or water option, which will practically not have any differences in the subsequent execution of the pouring. But not everyone knows how to fill in a warm floor. For this, the established technology should be followed evenly.
When the underfloor heating system is installed. You should check its performance. For this, it is exposed even within 1.5-2.0 atmospheres. It should remain in the process of pouring the screed. But the system should not warm up above 25 degrees.
Mixing the solution
The density of the future screed will depend on the selected cement grade. In this case, it is very important to understand how to fill the pipes of the warm floor. Basically, the recommended grades of concrete are 150-300. Everything will depend on the destination, whether it is residential or industrial construction. The composition of concrete can include various additives that give the mortar certain qualities.
There are features of pouring underfloor heating with a solution. A water heat-insulated floor cannot fully work with a cement-sand mortar. Here, we use concrete based on screening, which includes fractions with fine grains together with sand. A ready-made version is purchased, which is used for filling. This is due to the better strength of the concrete, fewer possible cracks and better heat dissipation. The solution for pouring water-heated floors must meet certain requirements.
If screening is used, then 1 portion of cement is poured into 4 portions of it. But sand and crushed stone has slightly different proportions - 1 to 4, as well as about 3.5 sand. In some cases, you should independently conduct preliminary experiments to create the ideal consistency. Only then can work be carried out on the pouring of pipes in the floor. It is also worth noting that in the implementation there are ready-made mixtures for the solution, into which it remains only to pour a certain amount of water, looking at the instructions from class = "aligncenter" width = "1024 ″ height =" 390 ″ [/ img]
For screed such a floor, instead of a reinforcing element, fiber is usually used, which has better performance and qualities, as well as having a slightly lower cost, if we take into account the consumption of material for each square meter of the room.
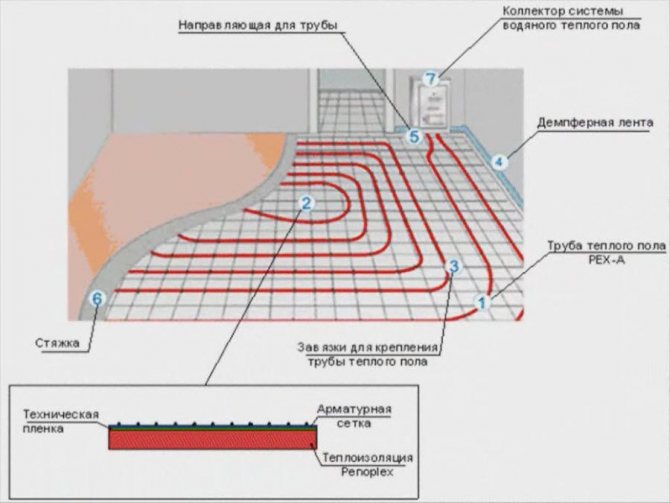
Features of laying screed when installing a water floor
To provide the floor with a reliable base that can withstand heavy loads from both furniture and movement of people, a warm screed should be applied. This element will provide a perfectly flat coating surface, which will ultimately increase the attractiveness of the interior.
To work, you will need the following tools:
- level;
- putty knife;
- mixer with attachment;
- bucket;
- Master OK.
Level
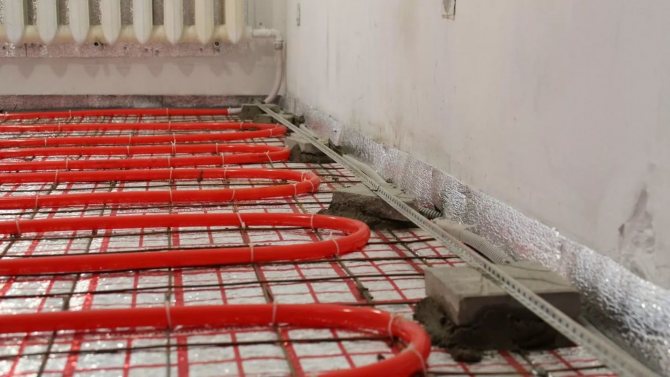
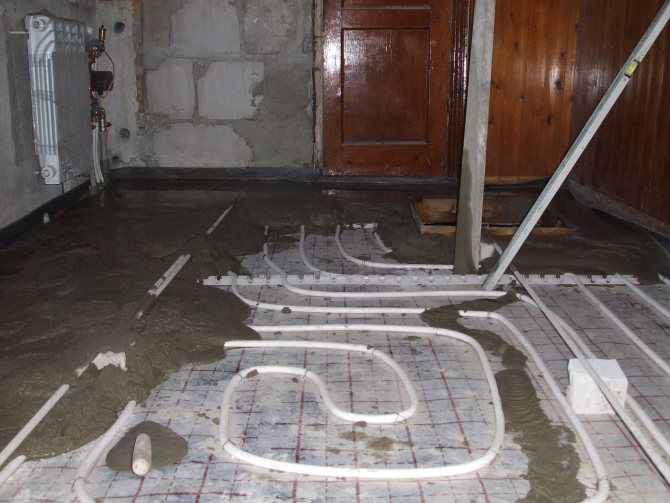
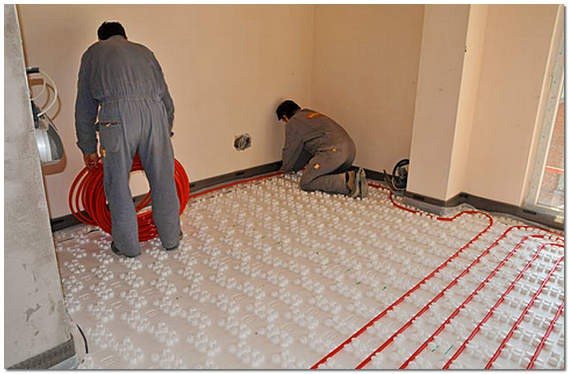
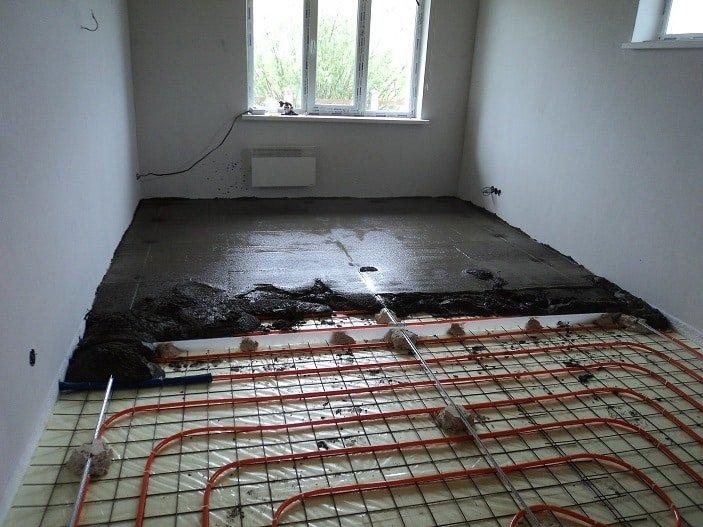
According to the standards, the installation of the screed is carried out after the installation of the pipes. At the same time, it is necessary to fulfill the main requirement - to lay the pipes in such a way that the outlet of each of them is located slightly higher than the expected level of the screed.
Laying a warm water floor
Upon completion of the installation of the pipes, the free space between them is filled with a solution. Most often, this is a standard mixture, thanks to which you can significantly reduce cement consumption. The filler can be ordinary sand. To obtain concrete, other, coarse fractions, such as gravel or crushed stone, are added to this mixture.
The standard mortar used to install the screed for this floor system consists of 3 parts sand and 1 part cement with added water.
cement m
You can use other reliable mixtures that have the same properties. Experts recommend purchasing a ready-made mixture if work is carried out in rooms with a very large area. The high quality of such compositions is ensured by the fact that they are mixed evenly and are completely ready for use.The only procedure required is periodic hydrogenation by means of a mixer.
Often, ready-made mixtures contain additional components, for example, plasticizers that increase the plasticity of the solution. This property allows the solution to penetrate into the most inaccessible places. At the same time, the risk of voids during pouring is eliminated. Self-leveling compounds are especially in demand. Such a mixture spreads independently over the area, which greatly facilitates the entire process of work.
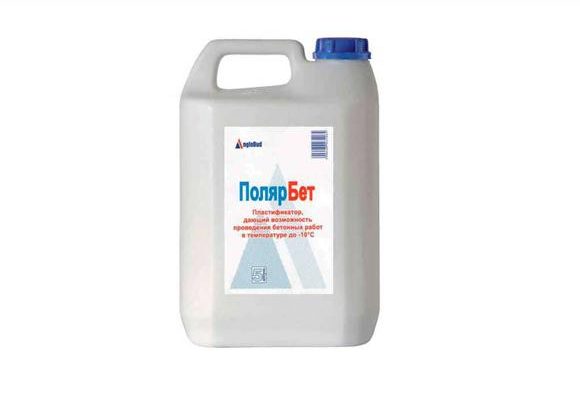
Plasticizer - a special additive designed to interact with cement mortar and increase its fluidity and plasticity
The main difference between the installation of the screed in this case is the need to create expansion joints. In turn, the work process is slightly complicated. The creation of additional expansion joints on the enclosing structures is necessary only when the room does not exceed 15 sq. M. In area. Moreover, along the entire lower area of the wall, an amortization strip is mounted, which compensates for the stretching of the screed if the temperature is too high.
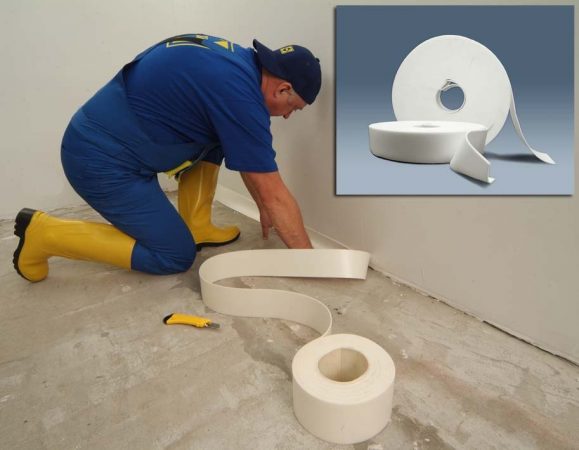
Damper tape
Installation of this system in a room with a large area requires additional seams. A damper tape is also used, due to which the corresponding stretch compensation occurs. At the same time, it is also heat-insulating, since it is thoroughly covered with foil, and therefore repels the incoming heat.
Damper tape
This is a natural question when the rough screed is ready.
But let's not rush:
- Let's start with the organizational aspect: ensuring the laid pipes from mechanical "bruises". Imagine the whole process: you will be moving around the working area, carrying mortar, etc., so you should think about shields and fixtures from the boards that would block the pipes.
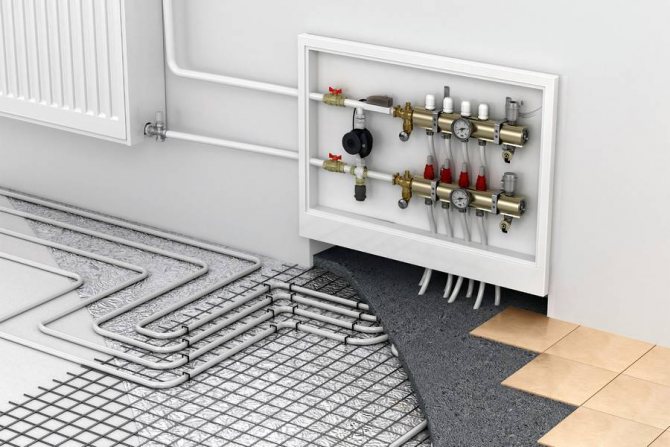
- Now about thermal insulation. It is characteristic of those pipes that supply the coolant to the collector, and has a thickness in the range of 6-9 mm. In most cases, we work with plastic pipes. It is recommended to hide this material, but there are plenty of places for this procedure: channels made in the thermal insulation of the floor, and shafts, and grooves, etc. However, open laying is possible, but only if there is a guarantee that there is no risk of mechanical or other damage in this area. Note - the sun's rays, which directly fall on the pipes, should also be avoided.
Attention! Before pouring the finishing layer, you should draw a diagram of your pipe mesh on the sheet. It is necessary to specify the placement of all axes as accurately as possible. This is important for the following work - after all, different elements can be installed in the screed - from dowels to plugs, etc. The scheme minimizes the risk of damaging the pipe.
We now turn to one of the most important questions - let's talk about the composition of concrete, its brand and all the nuances associated with this topic.
A solution for a warm water floor must be carefully prepared. It is known that concrete, first of all, characterizes its density. This parameter determines the brand.
As for the installation of a warm floor, then brands 150-300 are quite suitable here. Such a large range raises questions. After all, if brand 150 is clearly a housing option, then already 300 is an industrial one.
Another important issue is the need for additives. They can be neglected if we are dealing with quality concrete. You don't even need to resort to them if you want to save money. Nevertheless, it must be borne in mind that additives undoubtedly improve the reliability of the screed. Moreover, they have a beneficial effect on heating in general, because the heating rate increases, and this is energy savings.
A plasticizer is also often added to concrete, which is responsible for eliminating the risk of cracking during heating / cooling.
What is the best way to fill a warm water floor? Here is one of the main rules: a screed for a water floor is made by pouring concrete on the basis of dropout. Screening is sand with fine grained rubble. This mixture is sold separately. That is, a cement-sand mortar is not suitable here.
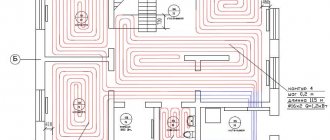
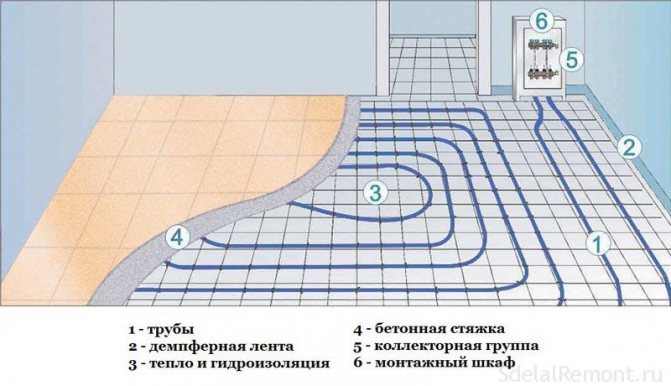
We offer you to familiarize yourself with the warm floor under the tiles installation diagram
The choice of concrete from screenings is associated with:
- better heat dissipation;
- less likely to crack;
- high strength.
The screed ratio is as follows - 1: 6, where the first number is cement, the second is screening.
There is another option - a mixture for pouring a warm water floor, which will seem very convenient to many. This is a dry "powder". Its plus is that this material was created specifically for work on laying a water floor.
We dilute the dry mixture without difficulty with an ordinary drill "mixer". It is very easy to work with it due to the plasticizers that are included in their composition.
Before starting work, it is recommended to remove all debris and dust from the surface with an industrial vacuum cleaner - this will improve adhesion. If the area of the room is small, then the solution can be mixed by hand. Otherwise, a concrete mixer must be used.
The solution is prepared as follows:
- mix cement grade M300 and above (1 part) and sifted sand (4 parts);
- add water until a homogeneous mixture is obtained, the solution must have such a consistency that it can be easily leveled with a rule;
- to increase the strength and elasticity, polypropylene fiber and a plasticizer are added to the solution.
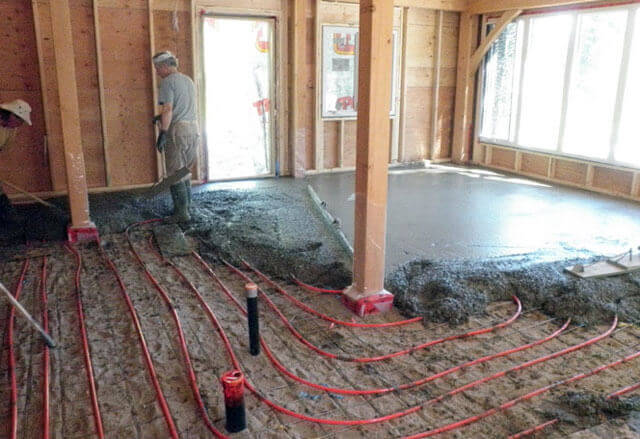
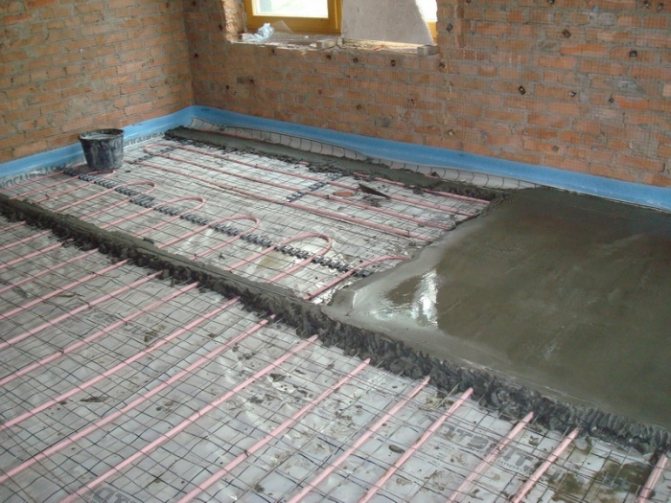
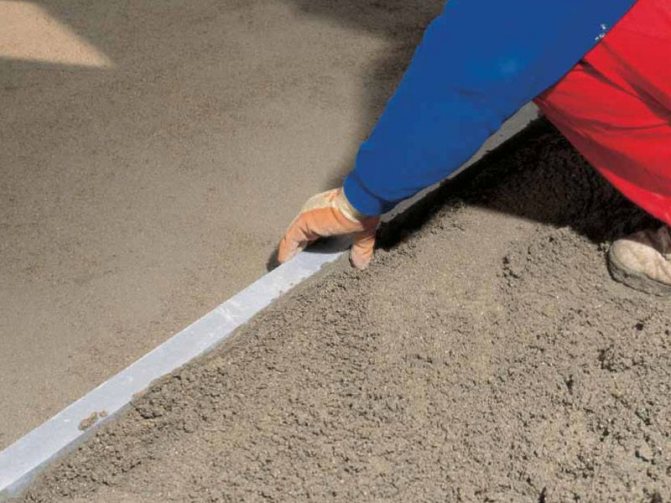
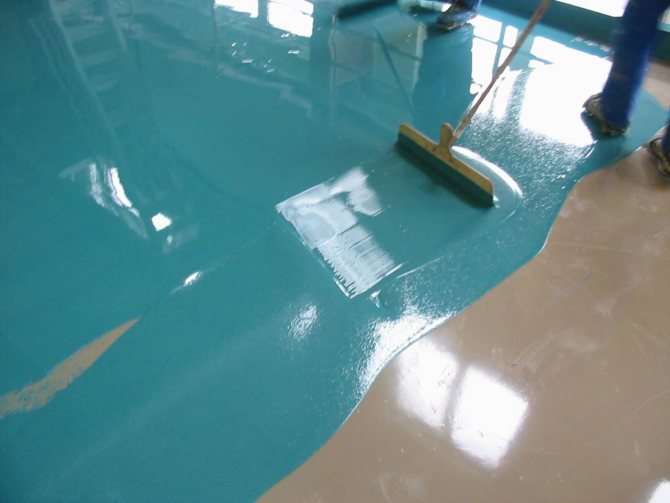
Pouring a warm floor with your own hands does not take much time. The finished solution is poured into one pile and leveled with a shovel. Then, using the rule, the surface is leveled, moving along the guide beacons. The work should be done quickly, until the solution begins to dry out, therefore, if a large area is poured, it is better to invite assistants. In just a few hours, the composition will become hard and it will be impossible to level it.
A clean fill of a warm floor is carried out when the system is checked, and for a water floor, filling with a coolant is also required. During final pouring, special temperature gaps are provided, but this is only required for large rooms. The seam is not so difficult to make, you just need to cut the grooves to a depth of 3-4 cm.
The fine filling of the warm floor is carried out with a concrete mixture, it must meet all the requirements for density. It is important to choose the right grade of concrete for work, in this case only M150-300 is suitable. At the same time, the M150 is used for residential premises, and the M300 is used for industrial premises.
Floor screed devices.
Many people believe that additives for the mixture will help increase strength, improve performance, but in fact, such ingredients are not always needed for pouring a warm floor. It is quite possible to do without them, this will save on the screed device, but it will not affect the quality in any way. Filling can also be done with a cement-sand composition, but this option is not the best.
For fine casting, it is best to use special concrete with fine screening, it turns out to be much stronger and more durable, the floor does not crack after drying.
To fill the floor, you must use special compounds for preparing the mixture:
- Screening-based concrete mortar: 1 part of cement for 6 parts of prepared crushed stone screening.
- Concrete mortar based on crushed stone and sand. To do this, you need to take 1 part of cement, 3.5 parts of sifted sand, 4 parts of crushed stone.
You can use ready-made mixtures that are sold in dry form, you just need to fill them with water. A construction mixer is used for mixing, plasticizers are included in the composition to facilitate mixing.
The first stage is the collection of all the necessary tools and materials. The mixture can be purchased or made yourself.
The composition of the screed for a water-heated floor:
- Cement;
- Sand;
- Crushed stone;
- Plasticizer.
You need to stock up on the following tools:
- reinforcing mesh;
- concrete mixer;
- putty knife;
- building level;
- container for concrete solution.
You will also need a plasticizer and a compound used to seal expansion joints. Works on waterproofing and insulation are being carried out, and only after them can one proceed directly to the pouring. To achieve maximum strength, it is necessary to correctly install the reinforcing structure.
The absence of a reinforcing structure or its improper installation will lead to expansion of the screed and its deformation.
The area for filling must be divided into several fields. Thanks to such actions, it will be possible to prevent the process of cracking. In addition, the solution will be optimally leveled and will not get into areas that have already been poured.
Expansion joints are filled with isoprene. Due to the special structure of this material, it is possible to completely compensate for the expansion. Now, using small pieces of sleeves, you need to create reliable protection for all pipes that fall into the seams.
Thickness selection
The floor screed layer under the warm floor or over it will depend on certain situations. Usually, for the rough version, a thickness of 50 mm will be enough, but the final screed is 50-100 mm. Everything will depend on the purpose for which the premises are used. In residential premises, a thickness of up to 70 mm is chosen, but industrial ones with heavy loads - up to 100 mm.
As for directly pouring a warm floor, then an optimal thickness is needed so that not only it retains heat, but also a certain time. Otherwise, the boiler will have to work more time, waste time and money. Therefore, it should not be too thin. The average indicators of such a screed should be kept in the region of 70-80 mm.
When building or carrying out repair work, you should understand how to properly fill in a warm water floor, choosing the optimal layer performance.
The pouring process and the creation of expansion joints
When the underfloor heating system is exposed, you should think about preparing for the subsequent pouring. This is why lighthouses are exhibited. For their correct location, a level is used. Usually they are made in the form of mounds of solution, which support the guide at the required level.
After that, you can start pouring the warm floor using the technology. After spreading the concrete over the surface, it must be compacted. For this, a vibrator is used, specially designed for such purposes, a rake, hoes or other improvised means. This is done to remove all possible air bubbles from the solution. If they are present, the level of thermal conductivity decreases, and, consequently, the efficiency of the warm floor after pouring the screed will be reduced.

Zone of passage of the heat separation seam
You can do without setting beacons, and use self-leveling mixtures in your work. The entire area of the room is filled at once. When you are not confident in your ability to fill, it is best to seek help from specialists who can complete the work from start to finish.
For large rooms, as well as after pouring just the final version of the underfloor heating screed, expansion joints should be arranged. For insurance purposes, they are also arranged in rooms with an area of up to 20 m2. The seams prevent cracks in the screed when expanding under the influence of temperature during the heating process. This suggests why there is no need for such a screed for a rough cut. After their installation, you can not worry about the quality of the entire screed during operation.
Temperature gaps
The use of expansion joints is advisable only in the case of large rooms. Used in the finishing layer.
A large screed area is at least 40 m2. True, experts in this field recommend reinsuring and using expansion joints for a working surface of 20 m2.
The purpose of expansion joints is to minimize the appearance of screed cracks, which can occur due to expansion of the layers due to heating.
Let's talk a little about the construction of expansion joints. The material of the seam is the damper tape already mentioned above, but now it is not laid along the perimeter, but closer to the middle. By the way, a pipe passes through the seam and is covered by a corrugation.
It is better to choose a corrugation one size larger than the pipe diameter, since, for example, it is often extremely difficult to put on a 16 mm corrugation on a 16th pipe.
The reason most often cracks appear on the surface of a concrete base is improperly positioned expansion gaps. The rules for arranging a warm floor do not provide for the installation of a monolithic slab in rooms with a complex layout or in large rooms.
In this case, the proposed heated area is divided into several zones, delimiting them with a damper tape having a width of 5-10 millimeters.
Arrangement of temperature gaps is performed taking into account the following nuances:
- The size of each zone should not exceed 30 "squares", and the length of the sides should be less than 8 meters. The ratio between the parameters of the walls of the room cannot but correspond to the ratio of 1: 2.
- When a room has a complex layout, it is divided into zones in the form of a square or rectangle.
- In some cases, dividing lines are drawn with a trowel to about a third of the depth of the solution.
- After the concrete has hardened, the seams are sealed.
According to the norms of SP 41-102-98:
- When the underfloor heating is poured, solid pipes should be used when installing the heating circuit.
- When laying a pipeline that crosses the expansion joint, the heat source must be protected with a corrugated sheath longer than one meter.
- The pipes must be fixed to the floor using special V-shaped brackets or wire with a soft lining.