Pros and cons
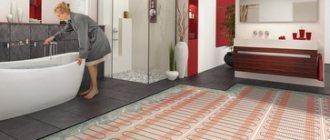
When choosing, you need to study the design of the system, since all existing options have individual characteristics. If you plan to lay tiles on a water-heated floor, take into account the positive qualities of such a combination:
- It is possible to operate the structure as a main and auxiliary heat source.
- Uniform heating of the entire floor surface.
- Homeowners can save money by eliminating the need to pay electricity bills, such as when installing an electrical heating system for warm flooring.
- Versatility.
- Hot water used as a heating medium does not heat the tile surface as intensely as in the case of similar systems. Thanks to this, the finishing material on the floor is less exposed to thermal effects, which means it does not lose its properties and does not deform.
- The system is characterized by high thermal conductivity.
- It is possible to equip warm water floors under the tiles with your own hands, since the most difficult work is considered to be the installation of plastic pipes. The rest of the steps are done effortlessly.

The floor-standing water system also has disadvantages. These include the need to obtain permission to carry out such work. In apartment buildings, such actions are considered illegal, since an increase and any change in the heating circuit entails a decrease in water pressure, and at the same time, a decrease in the temperature of the coolant and a loss of its heating capacity are noted.
The disadvantages include the increased complexity of installation and the need for large financial investments.
Operating costs are low, however, during installation, you will have to spend a significant amount on materials and equipment, especially if you need to equip an underfloor heating system in a large room.
You should take into account the additional costs of performing the installation in cases where you do not plan to carry out the installation yourself.
The disadvantages include the slow heating of the tile surface. If effective thermal insulation is installed, this measure will increase the rate of floor heating. In addition, the complexity of the repair is considered a disadvantage. If, for any reason, a violation of the integrity of communications occurs, the leak cannot be removed without dismantling the floor covering and the subfloor (screed). Another disadvantage is the lack of the possibility of local regulation of the hot water temperature. You can only reduce the intensity of heating the coolant in all circuits.
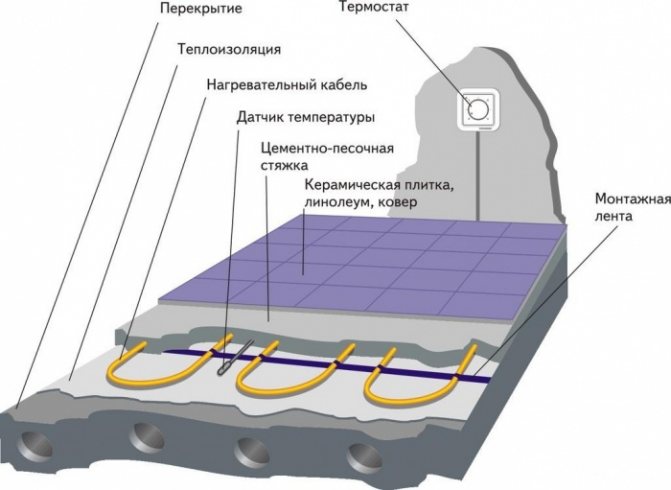
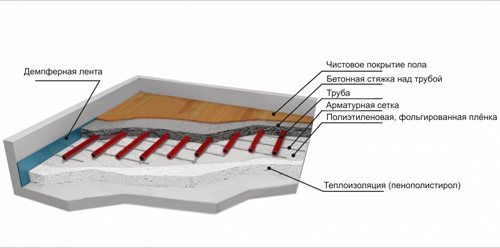
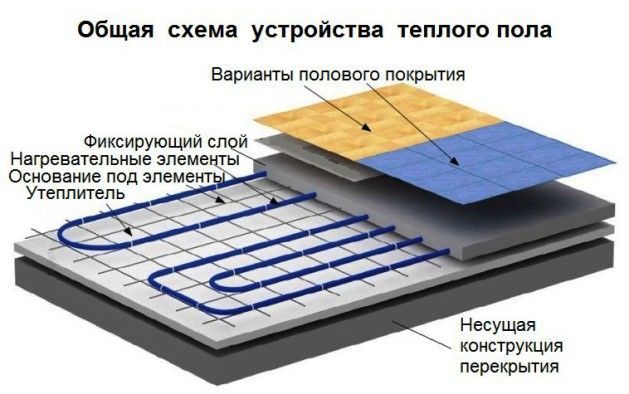
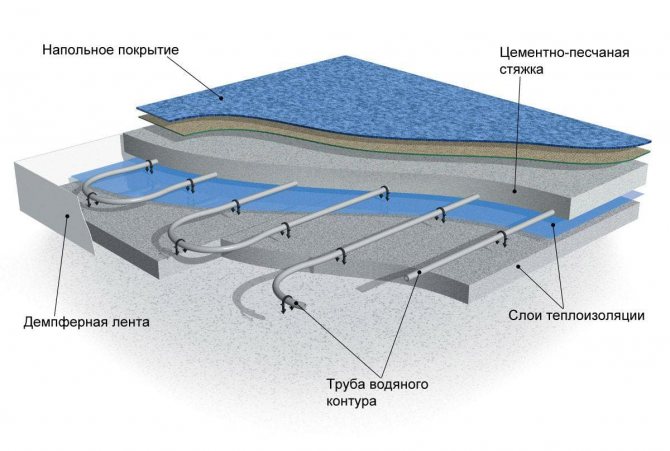
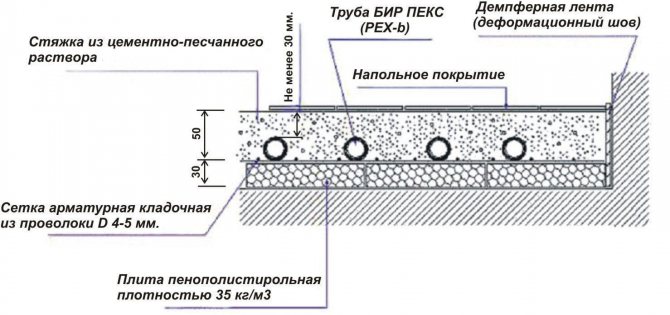
The main components of a water floor
The construction of a water underfloor heating is multi-layer, before we start studying the installation and installation scheme, we will consider each layer in the system separately.
Waterproofing
If there was only one material for everything, then there would be no need to study the building materials market, choosing something that is best and most suitable for your needs.
For waterproofing the floor under the tiles for heating, they use polyethylene or roofing material, if laying is done on the ground.
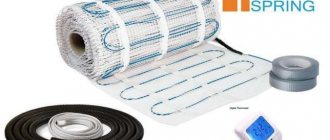
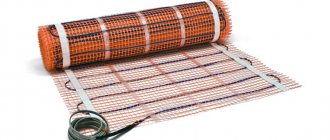
Heaters
For insulation, it is optimal to purchase extruded polystyrene foam, and not basalt wool. Mineral wool is highly hygroscopic in its properties, and since the underfloor heating system is water, any leak will spoil the insulation layer, which will result in a solid repair.
Reflectors
A reflector is called a foil layer or metal plates.If the latter option is purchased, it makes sense to immediately buy products with channels for pipes.
Pipes
Now we come to the main layer of the warm "cake" - pipes. Water moves along them, which will heat the floors under the tiles. Pipes can be made from a variety of materials. This affects their price, technical characteristics and conditions of their use.
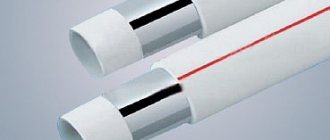
Pipes for underfloor heating
| Photo | Material |
| Polypropylene products are capable of significant expansion when exposed to high temperatures. It would be better to purchase pipes based on polypropylene with reinforced fiber. |
| Metal-plastic models for the warm system are durable. |
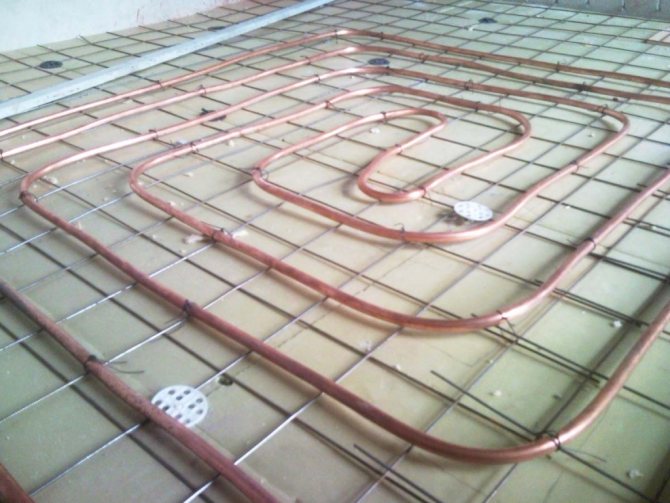
| Copper pipes are elastic and serve for a long time, although they are an order of magnitude higher. |
| Steel models are very durable and of excellent quality, although corrosion can damage them over time. |

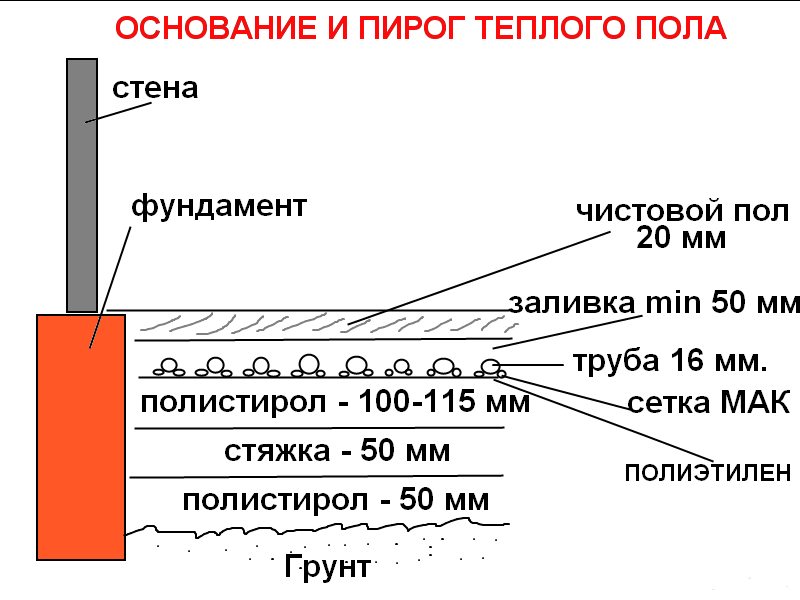
Base
Since we are talking about tiles, it must be taken into account that the base is made solid. If you do not use a screed, then you can use moisture resistant drywall, plywood and wood.
There are three main ways of installing a water-heated floor:
- under the screed;
- flooring system;
- on a wooden base (logs).
Laying under the screed
Laying a warm floor under a screed requires materials such as a polymer or plastic pipe, fasteners, a circulation pump, the presence of fittings and valves, as well as a collector.
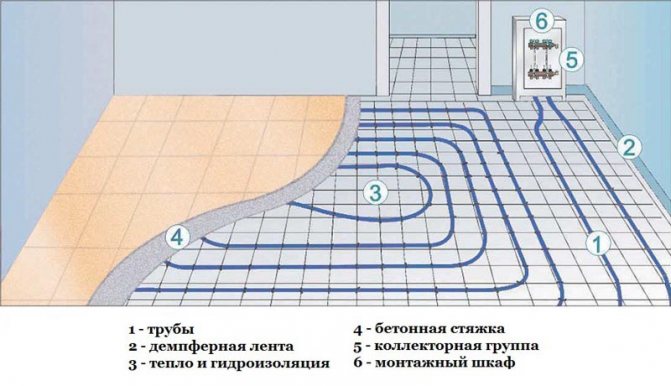
When the layer system is laid, everything is poured with cement mortar. It is very important in this case that the entire screed comes out perfect, no voids or defects should appear. This will provoke deformation of various elements of the laid system.
The tile should also be free from defects and flaws, then the heat will be distributed in the room optimally.
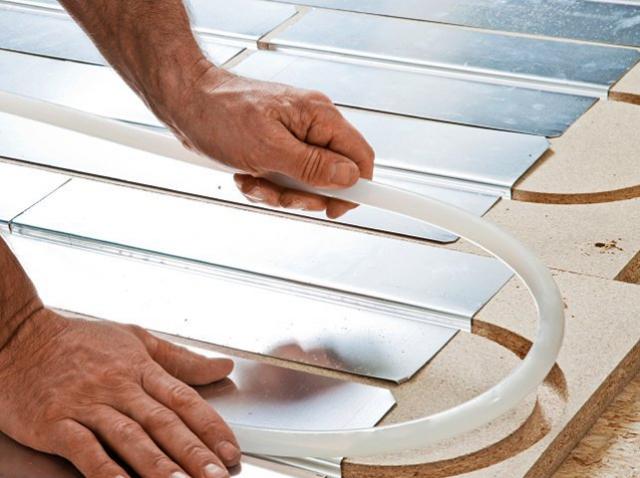
Laying system
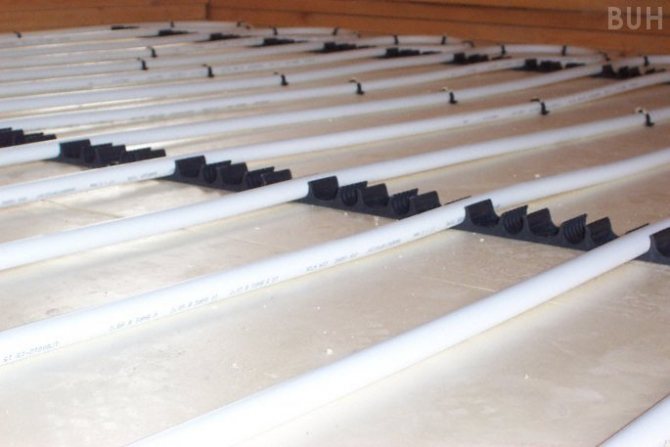
Polystyrene plates have special grooves in which pipes for heating are mounted. This method is good for its simplicity of laying a warm floor and is used in rooms with a low ceiling height or when it is technically impossible to fill the screed.
On the polystyrene boards, first lay out moisture-resistant gypsum fiber or drywall.
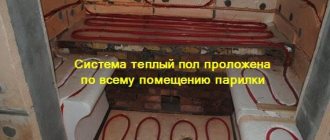
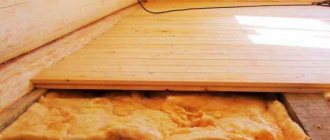
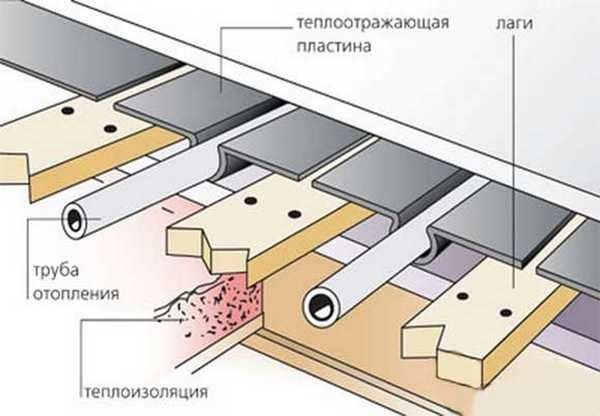
Warm floor on a wooden base
In wooden houses, everything adjusts to this material, therefore, a system for laying a warm floor on logs has been developed.
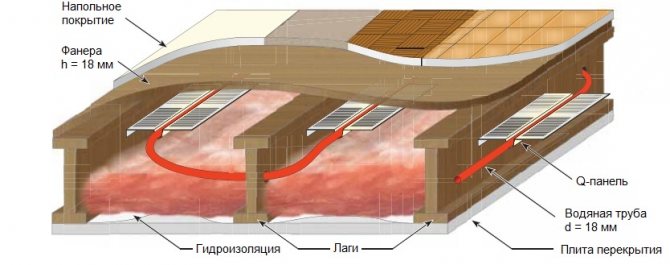
There are special large-format chipboard-based modules with ready-made channels for pipes.
Fixation is carried out with aluminum plates, in which special grooves are provided. Sheets of moisture-resistant drywall are laid on the laid out system, and only then they begin to lay out the tiles.
Equipment types
The main element of the system is communications. The recommended diameter is 20 mm. This is enough for normal circulation of the coolant in a private house. In addition, due to the small size of the pipes, the total thickness of the screed over the underfloor heating system will be minimal. It is recommended to use polyethylene (sewn material) or reinforced multilayer communications.
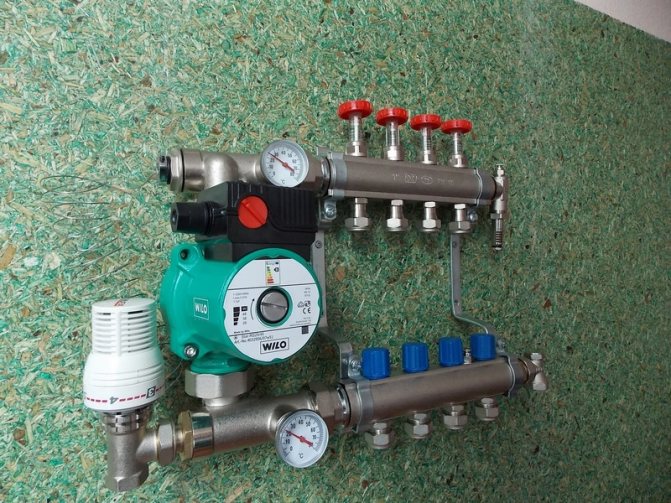
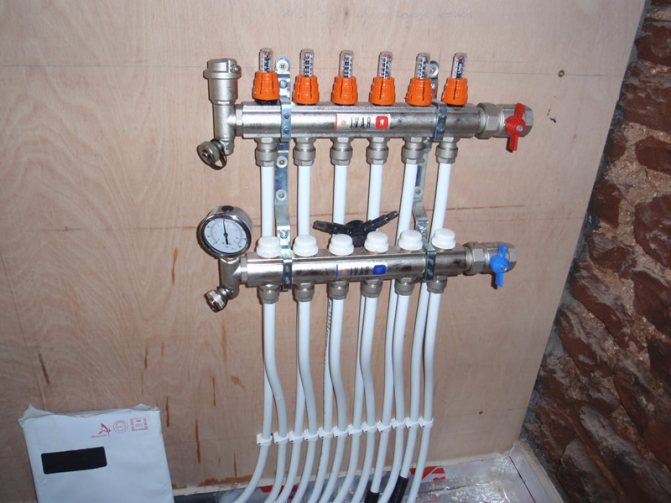
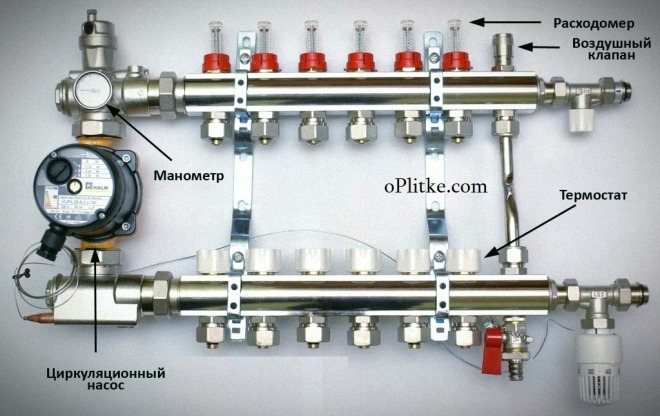
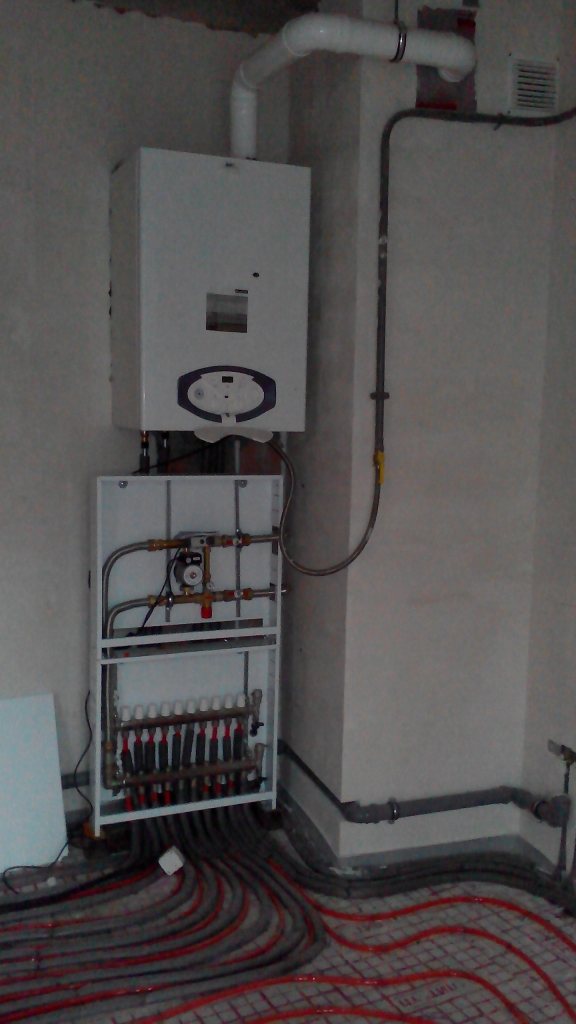
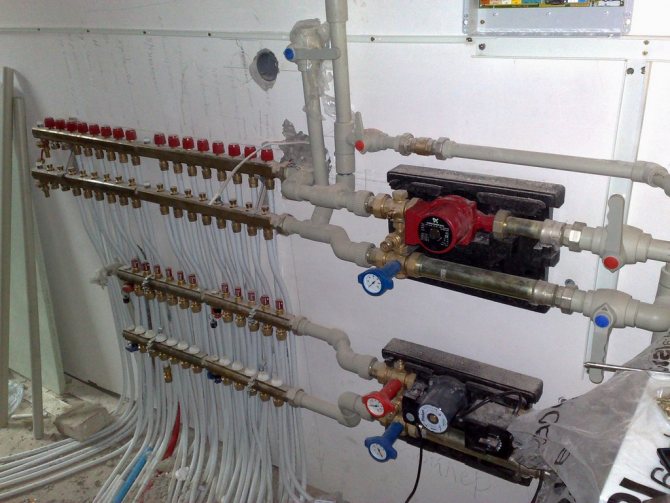
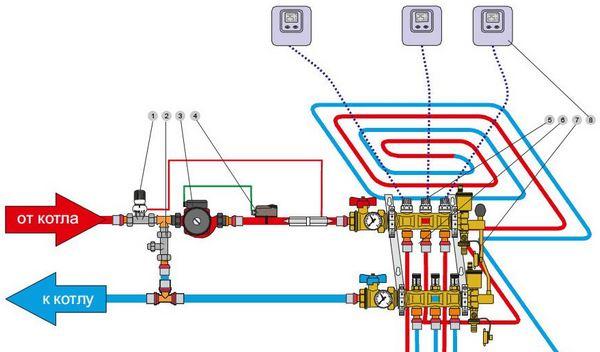
The second important element of the warm flooring system is the collector. This is a universal unit that performs the function of a distributor, and additionally with its help, the heating of the system circuits is regulated. The manifold often contains thermostats, pumps, and pressure stabilizers. In order for this node to function efficiently and smoothly, it is recommended that you determine a suitable location for its installation.
The manifold is often offered assembled, all units are combined in a cabinet. It is recommended to choose this option when arranging a warm floor covering if you plan to do the work yourself. It is advisable to install the most economical boiler, since the costs of operating the heating circuits will increase.It is allowed to use gas, electric, solid fuel and diesel boiler equipment.
Required equipment for underfloor heating installation
To ensure ideal conditions for heating a room, it is required to use high quality components for arranging the heating system:
- pipes made of modern high-tech material. It can be plastic or metal-plastic products. Their quality should guarantee complete tightness of the system, easy bending by hand. To assemble the heating system, it is necessary to exclude the joining of pipes; in this design, one-piece pipes of the required length must be used. The service life of pipes and buildings should be practically the same.
Special requirements for pipes intended for assembling a heating system of the "water underfloor heating" type are: resistance to the accumulation of deposits on their inner surface, affecting the state of the entire system, including the heating unit. The cost of these modern products matches their quality;
- The material for thermal insulation of the floor can be polystyrene, one of the types of insulation and its modifications. Specialized polyethylene foam, teramplen, with glued foil, with markings for even placement of pipes. The insulating layer should have a thickness exceeding 22 cm. Ease of work is ensured, but the high cost of the product should be taken into account.
Wall and heating elements must be insulated with damper tape;
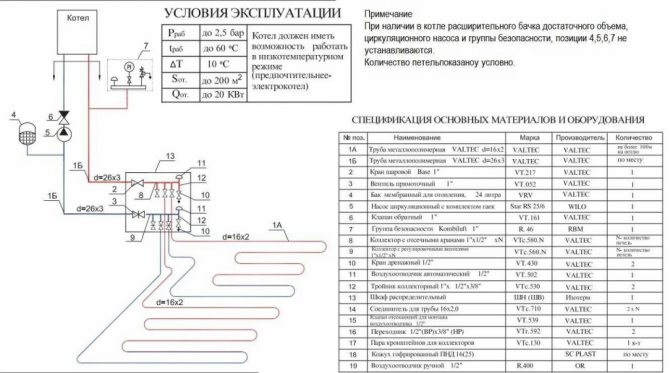
For the correct operation of a water heated floor, the circuit must be equipped with the necessary equipment:
- alloy steel manifold with a set of adjustable flow meters,
- ball valves,
- an electromechanical circuit, in a single housing of which an electric motor, a gearbox, a sensor, a control unit (or a servo drive) are located,
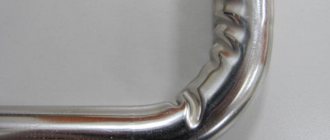
- connecting element "Eurocone", representing a system of union nut, ferrule and cone,
- a pump-mixing unit, to maintain a constant temperature in the heat carrier supply unit,
- a cabinet for placing a collector with a heating circuit distributor and a unit designed to maintain the desired temperature in each room.
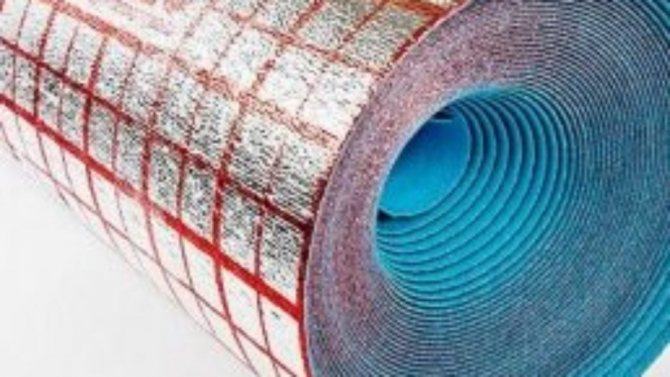
The choice of thermal insulation
Considering that it is advisable to mount such a structure in a private house, you need to protect it from moisture, and also help reduce heat loss through the rough base. For this purpose, thermal insulation is used as a way to contain the outflow of heat from the room. The most reliable types of coatings that are less susceptible to mechanical stress:
- Styrofoam;
- expanded polystyrene;
- foil-coated roll insulation (penofol).
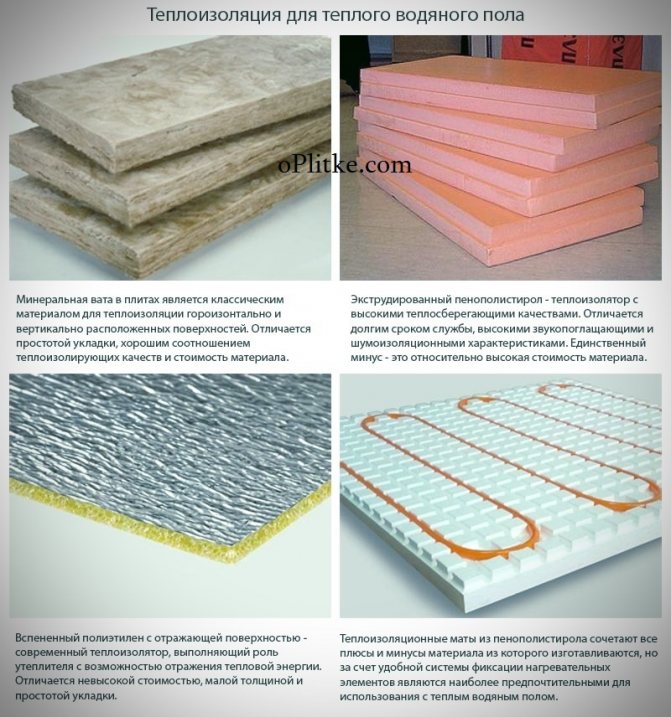
The latter of the options is recommended for use in the case when the installation of water-heated floors under the tiles is performed as an auxiliary heating source. At the same time, it is not necessary to lay a layer of thermal insulation of a large thickness, since heat loss will be minimal due to the connection of communications to the heating system. When there is a basement or ground under the subfloor, it is recommended to choose expanded clay or expanded polystyrene as insulation for a warm floor covering, while the layer thickness varies within 50-100 mm.
Insulation materials should be of increased rigidity, since the structure is covered with a concrete screed. If a soft material is used, the cement layer deforms under the influence of increased loads. In addition, the overall thickness of the "cake" of the warm floor covering should not be too large, so as not to visually reduce the height of the ceilings. The same applies to the thickness of the screed for a water-heated floor and the dimensions of the thermal insulation.
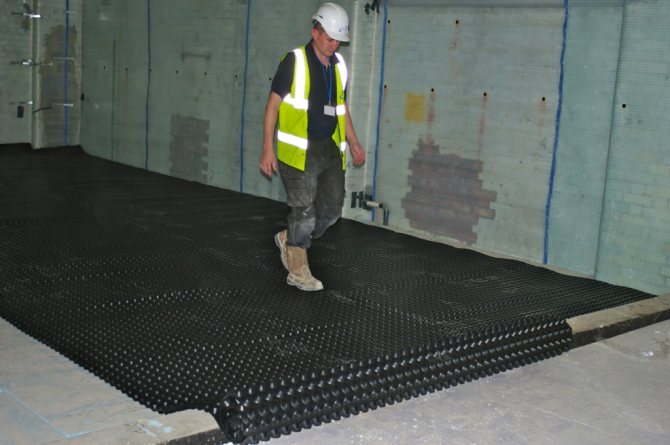
Preparation of the base
The flooring is dismantled with your own hands to the load-bearing concrete floor, after which, for the efficiency of the warm water floor system, you need:
- build a leveling screed on a concrete base (to avoid the formation of air pockets in the pipelines);
- perform waterproofing of the concrete floor (including to minimize the consequences of emergency depressurization of heating pipes);
- to arrange thermal insulation of the base (to reduce heat loss down and to the sides).
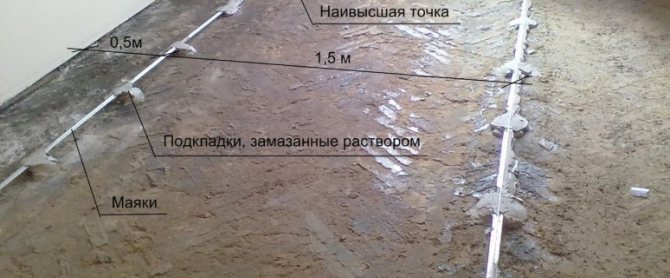
Leveling the concrete floor
If the height differences of the load-bearing floor exceed 10 mm, a leveling screed 2-3 cm thick is made with your own hands, which will prevent the formation of clogging air jams in the heat pipes and a disturbance in the circulation of the coolant. The screed is made of a cement-sand mortar prepared in a 1: 3 ratio.
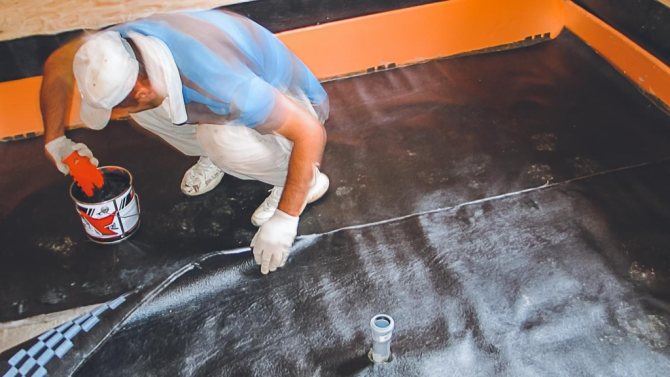
Hydro- and vapor barrier under a water-heated floor
A reliable sealed coating will provide roll bitulin with a thickness of 5 mm, but the surface for its laying should be dry, even and smooth, since the material is attached to the base with a bottom layer heated with a blowtorch. Sheets of bitulin must be laid end-to-end with each other and with an overlap on the walls equal to the total thickness of the floor covering over the concrete (10-15 cm), and coat the seams with bitumen mastic.
You can also arrange a high-quality hydro and vapor barrier by laying crosswise two layers of dense cellophane with 5 cm overlap of strips on top of each other, the overlaps are coated from the inside with bitumen mastic. On top of two layers of cellophane, 5 mm thick foamed polyethylene (foam phone) is laid, the strips of which are placed end-to-end, the joints are glued to the cellophane with bitumen mastic and coated with it from above.
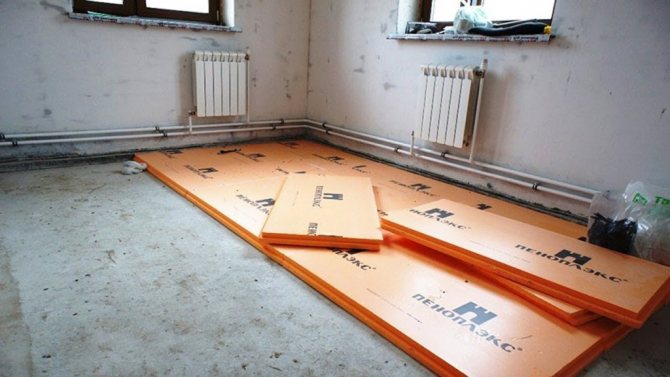
Thermal insulation of floor water heating system
Above the waterproofing, it is necessary to install the thermal insulation of the base in order to minimize heat loss.
Thermal insulation for a warm water floor is equally important
Extruded polystyrene foam possesses high insulating characteristics, which is also water-resistant and can withstand significant compressive loads. Sheets of expanded polystyrene with a thickness of 30-50 mm (for the floor of the first floor - 50-100 mm) are laid end-to-end on the waterproofing, the seams are filled with bituminous mastic, along the joints a reinforcing nylon mesh 10 cm wide is glued and coated with the same mastic.
When installing thermal insulation with your own hands, you can use ready-made heaters for warm floors, which have special channels on their surface for laying pipes, but their price is higher than traditional materials.
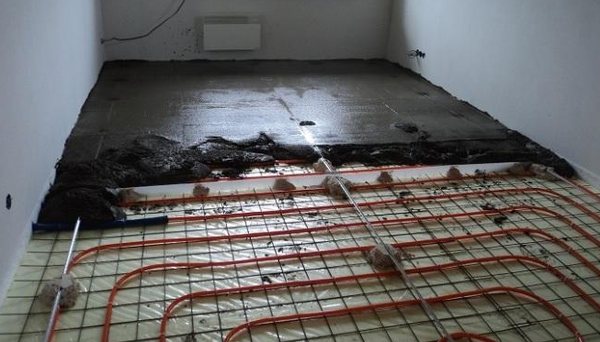
Base reinforcement
Along the perimeter of the room, above the thermal insulation, a strip of extruded polystyrene foam 5-10 mm thick and 10-15 cm wide is attached to the walls with PVA glue in a pointwise way, which will play the role of a damper (temperature) seam when the concrete layer expands from heating.
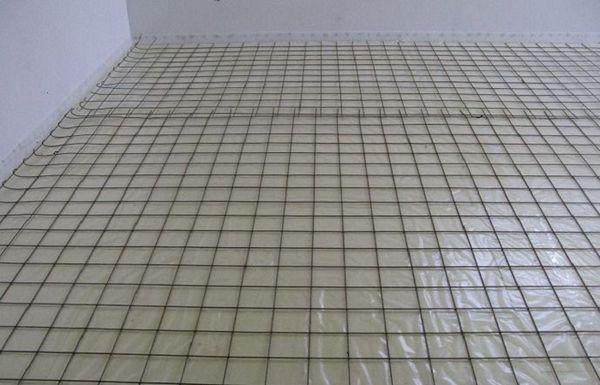
Reinforcement of the underfloor heating screed is recommended to prevent deformations and damage to the heating device
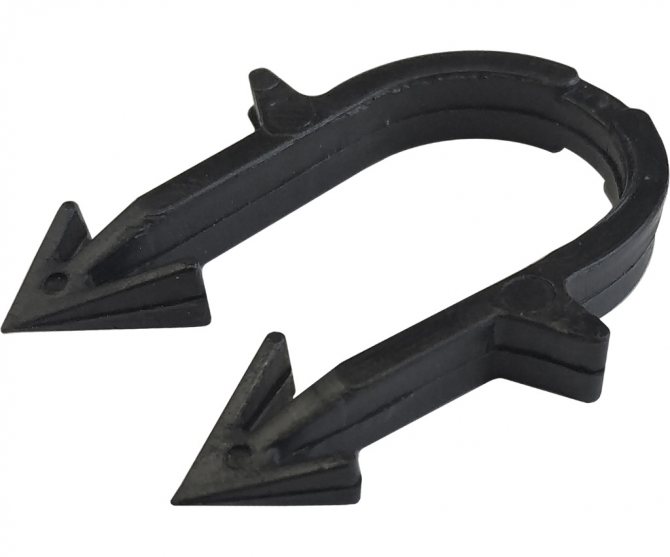
Reinforcement mesh must be laid on top of the thermal insulation to give strength to the concrete, which will be laid on heat pipes. For reinforcement, steel reinforcement of variable profile with a diameter of 8-10 mm is used, connected in a mesh with a 10x10 cm cell, or plastic reinforcement with a diameter of 6-8 mm with the same mesh size. Reinforcing mesh can also be used for fixing in place of pipelines - with your own hands you can attach heat pipes to it with nylon clamps-ties.
If the installation of several circuits of heat pipes is planned in the room, then a damper joint made of expanded polystyrene must also be arranged along all the boundaries of the circuits among themselves.
Underfloor heating screed
After the installation of the system is completed, a mandatory pressure test is performed - checking the tightness of the equipment under a water pressure of 5 bar. If no water leaks and blisters appear on the pipes within 24 hours, they proceed to the construction of the main concrete screed.
The screed is constructed at a water pressure in the pipes of 3 bar from a sand-cement mortar with the addition of a plasticizer, prepared in the proportions:
- cement M-400 - 100 kg;
- sifted sand - 1000 kg;
- water - 50 l;
- plasticizer - 8 l;
- fiber - 100 g (as a replacement for reinforcing mesh).
On top of the heat pipes, during the subsequent facing of warm floors with ceramics, you need to lay a reinforcing mesh with a 10x10 cm cell made of steel wire with a diameter of 3-5 mm. The laying of the reinforcing mesh can be replaced by adding polypropylene fiber to the solution at the stage of dry mixing.
In order for the screed for a warm water floor to be even and strong, you must strictly follow the sequence of actions
The thickness of the screed is carried out within 30-50 mm, the layer of concrete on top of the heating pipes should not exceed 2 cm. The screed should not be exposed to drafts, on the second day after laying it is covered with a film for a week to prevent premature evaporation of water. 28 days after the screed is installed, you can start laying ceramic tiles.
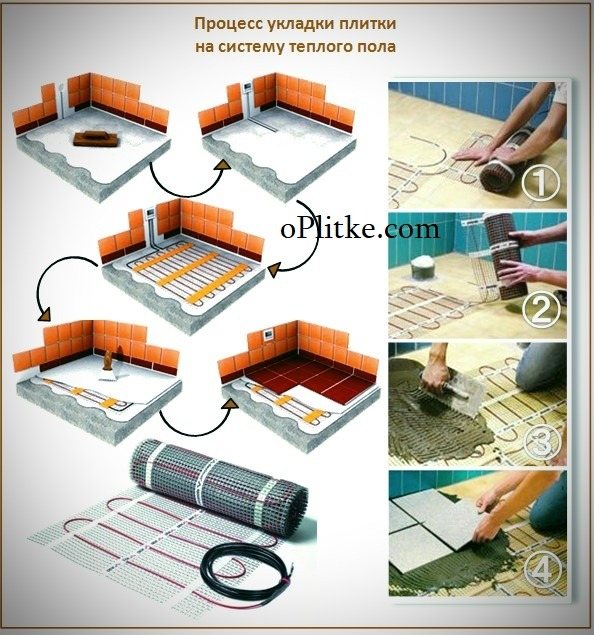
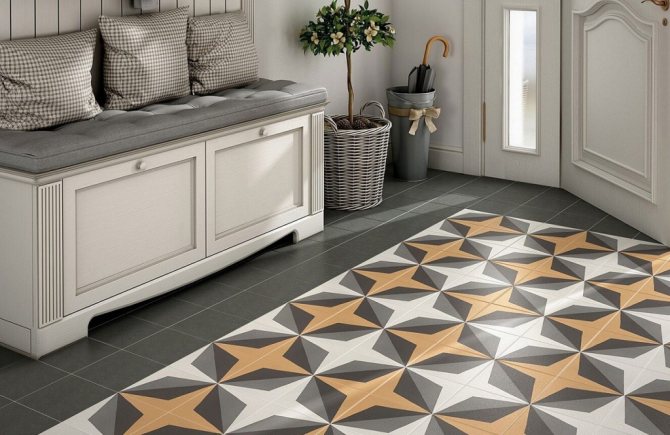
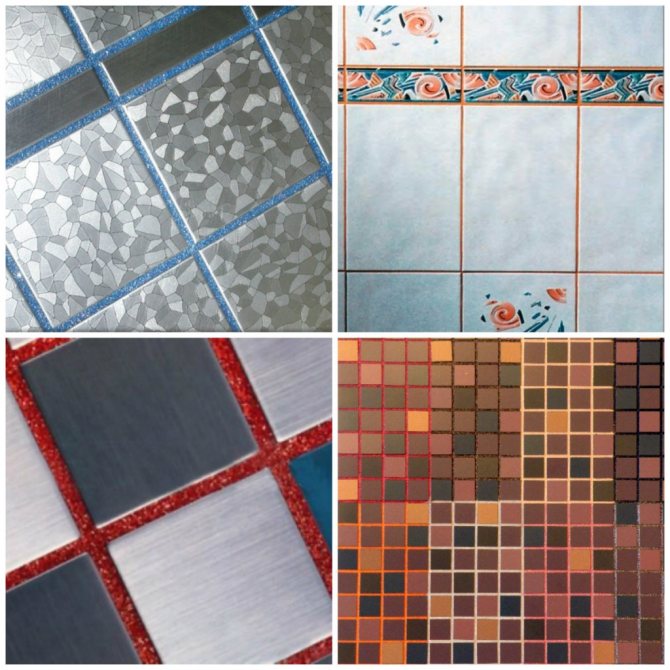
Laying tiles
After 28 days, you can proceed to the next stage. The principle of laying tiles on a warm floor and a rough base without heating is the same: ceramic products are laid on the finished surface, starting from the center (in the case of working with small-sized tiles) or the corner of the most visible part of the room (laying large products). When the adhesive dries up, proceed to grouting.
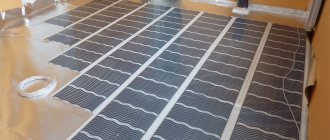
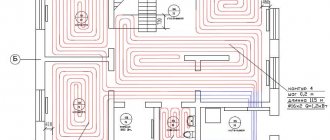
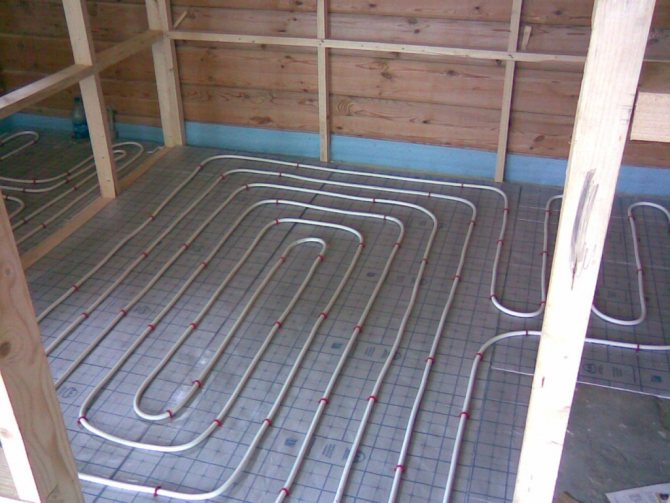
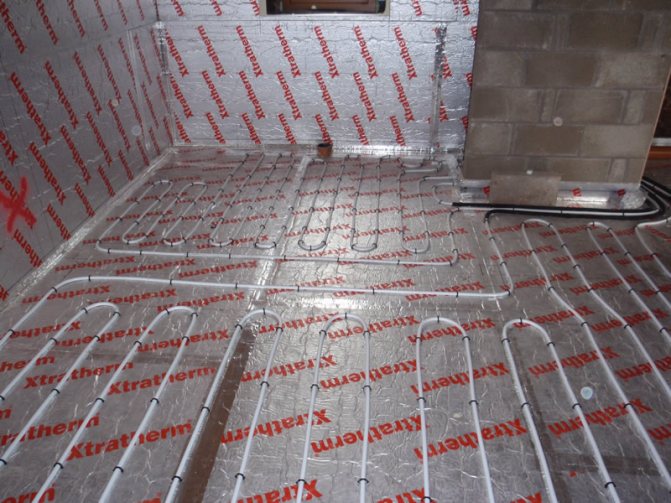
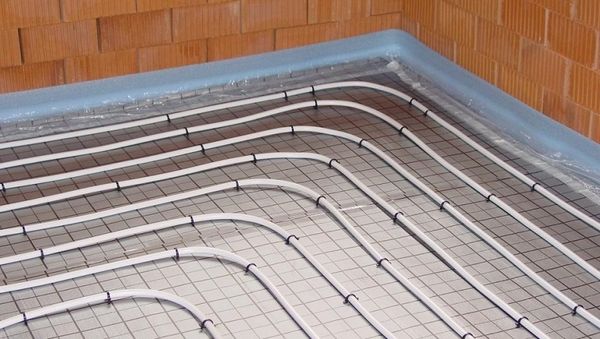
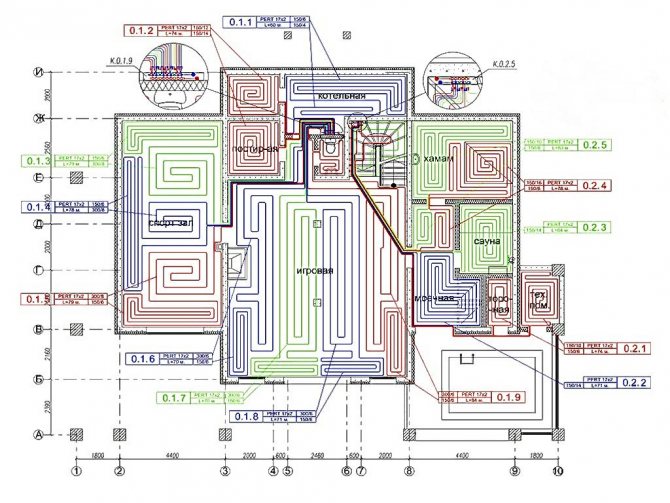
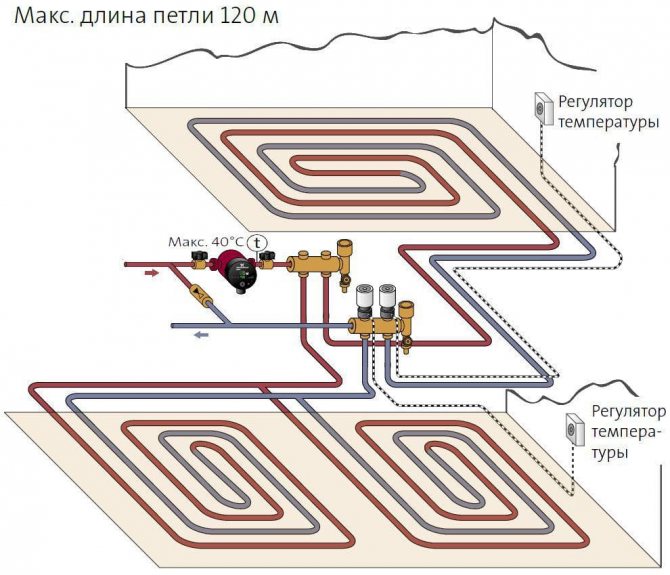
Laying schemes
The correct layout will allow hot water to circulate through the pipes, evenly heating the space.
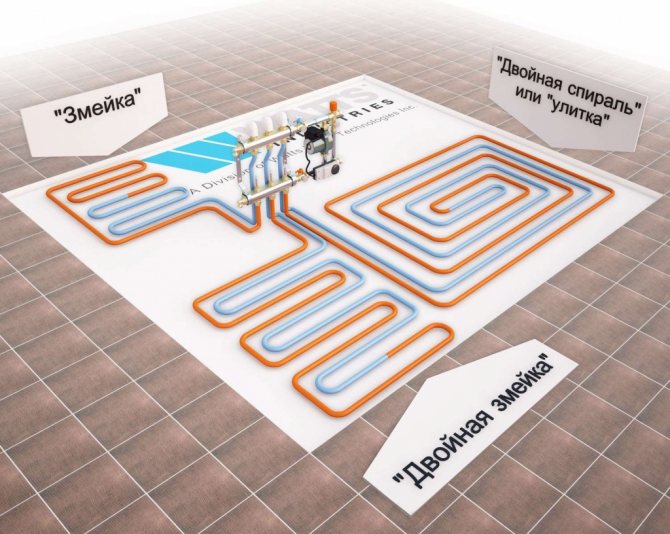
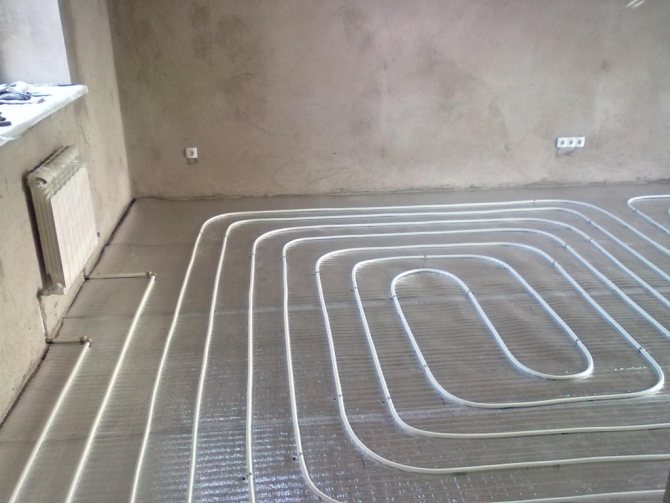
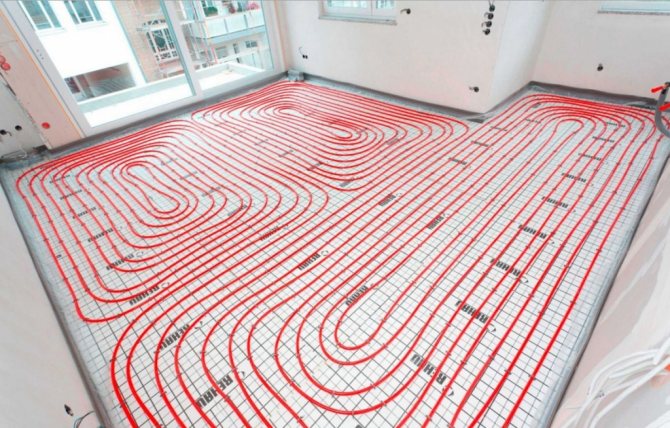
Laying of pipes of the water floor can be carried out according to the "snake" and "snail" scheme. More often, preference is given to the second option. To implement it, it is required to lay pipes with circulating hot water in parallel with pipes in which the coolant has already cooled down. This will ensure an even heat transfer throughout the room.
The "snake" scheme is used in small rooms, but it is possible to lay both schemes within the same apartment, choosing the type according to the area of the room.
Preliminary calculations
Installation of a water heated floor is a full-fledged construction work, so it's better to start with calculations. The easiest way is to get by with a notebook sheet in a cage - you can observe the scale on it, which will greatly facilitate the design.
The boundaries of the room are drawn on paper, indicating the places of door and window openings, protrusions. In a large room, you need to provide decompression seams and display them in the project.
The pipe of the underfloor heating system to be laid cannot in any way coincide with the specified line. When crossing it, the pipe is hidden in this place with a corrugated pipe. It fits over the pipe.
The plan should reflect the places where there are stationary objects that fit tightly to the floor. There is no need to lay heating, besides, it will be an additional and completely unnecessary load on the system.
The plan of a heated water floor cannot be thrown away, because it will be very useful when repairing or rearranging furniture!
The project also includes the placement of the manifold cabinet. After that, you can choose the scheme according to which the warm floor will be laid out, indicate its exact location according to the requirements:
- one circuit connected to the collector should not exceed 110-120 running meters;
- the lengths of all circuits that are connected to a common collector must practically coincide, a maximum difference of 15 m is permissible;
- the pitch between the pipes is 140-150 mm. The lower value is taken for houses located in harsh regions;
- laying pipes close to the walls is unacceptable; an indent of 160-300 mm is required.
The contour is a one-piece pipe and tie, twist, weld or any other connection is not allowed.
How to calculate the required number of pipes? First of all, you can turn to professionals in this matter: all requirements will be taken into account, as well as the characteristics and quality of heating equipment.
Another option, moreover, quite convenient and accurate, can be an online calculator developed for this purpose. It has already laid the standard for an ideally calculated water floor heating. The indicators are adjusted using the correction factors and other included parameters. You will need data on pipe diameter and material, expected pitch, preferred flooring and other information.
Required tool
The better you prepare for work, the better and more harmonious it will be. What is needed for installing a warm floor?
The list includes the following tools:
- pipes and clamps for them;
- you cannot do without a pump and valves;
- reinforcing mesh, damper tape;
- materials for waterproofing and insulation.
In the work, you will need construction tape, fasteners, screwdrivers, tape measure, open-end wrenches, a puncher. If a screed is being made, then you will need to use the rule.
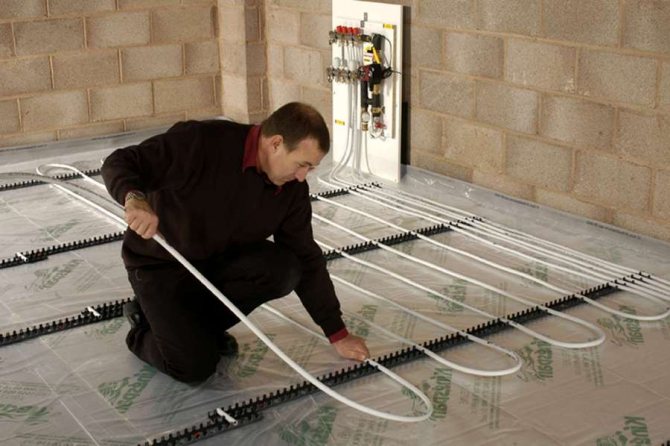
Underfloor heating installation
When the material and tools are prepared, it is time to start laying the water-heated floor.
You should be prepared for the fact that this is not the easiest job, therefore, strict adherence to the instructions when laying a warm water floor is imperative.
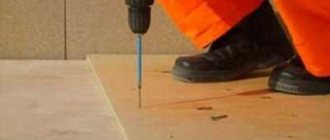
- The base is thoroughly cleaned of all debris.
- Waterproofing will be laid first, and foam or the selected type of insulation will need to be laid on it.
- A damper tape is fixed to the lower edge of the wall, it must be glued along all the walls, thus covering the perimeter of the room.
- Now spread polystyrene foam, completely covering the entire floor. If necessary, they are cut with a clerical knife.
- Now it is again necessary to clean the floor surface before the next stage of work: dust and debris are not needed.
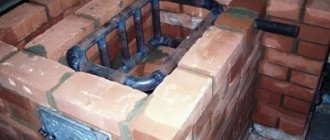
- The collector is usually located in another room, therefore it is necessary to bring pipes from it to a heated room. If the scheme is different, then this stage is skipped. If necessary, make holes in the wall with a puncher.
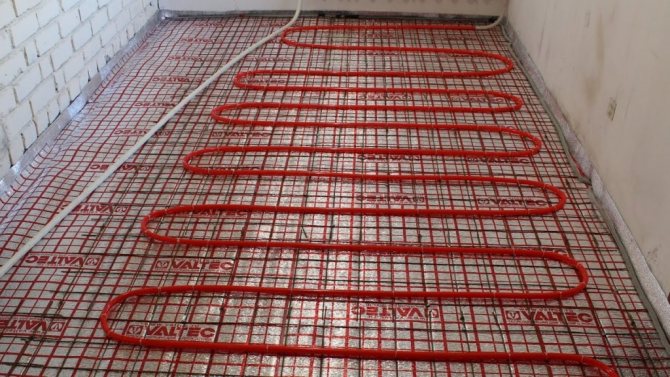
- The pipes are laid according to the chosen scheme.
- The end of the pipe is wrapped with adhesive tape, and, moreover, very firmly.
- The system is being tested by filling it with water. When everything is in order, you can start pouring the screed or continue the floor work.
- If a cement screed is chosen, a laser level helps in leveling it, and the leveling process itself is made a rule. The surface is as flat as possible. After hardening, the floor surface is trowelled. The screed dries about four weeks.
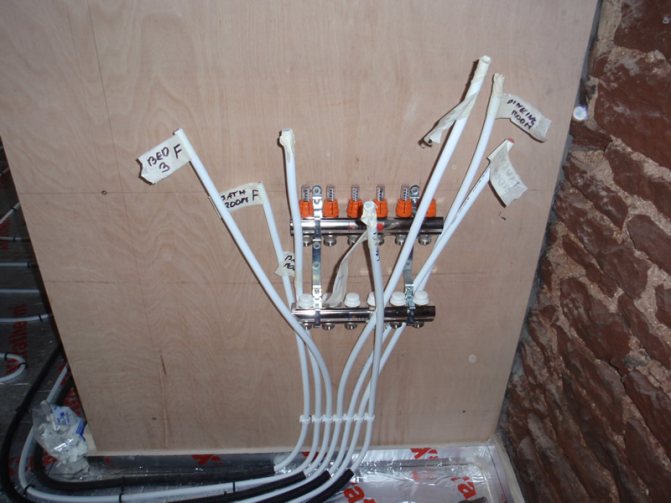
Connecting pipes to the system
Connecting the system is a very important step, which will show if everything is done correctly, and whether your floor will be warm.
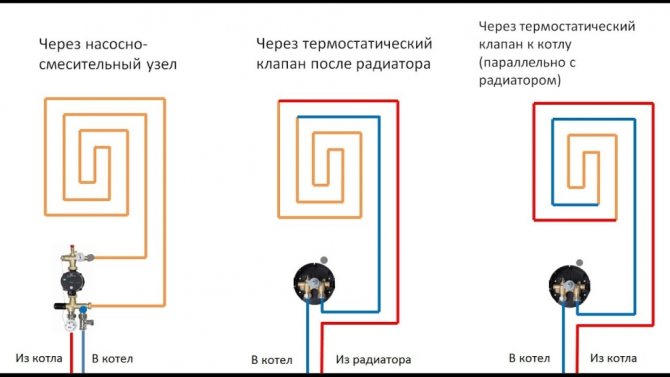
The heat will be responsible for the collector, which will distribute water throughout the system. It is not difficult to study the connection diagram: first, the pipe that goes from the boiler is connected, then the pipe going from the collector is already installed, and the return pipe is also connected to the return device.
If the apartment or house has several heating circuits, a collector with several inputs and outputs is selected. To distribute water evenly, pumps are included in the system.
It remains to proceed with the finishing and start enjoying the warmth.
Laying tiles
The operation of a water heated floor under the tiles will not bring problems if all points of the instructions are followed.
First, the floor surface should be primed. After that, building glue is diluted, which will be smeared with a comb spatula. The depth of the tooth should be 1 cm for both the floor and the tiles.
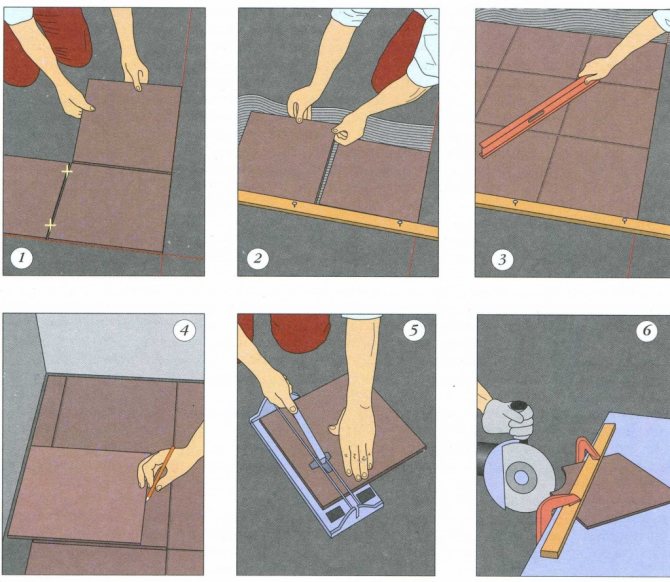
The tiles should be firmly pressed against the floor surface. Excess glue will crawl out from under it, which must be wiped off.
Excess glue must necessarily climb, this is an indicator that there will be no voids left under the tile. Any void is a potential weak spot on a warm floor, this tile will come off first.
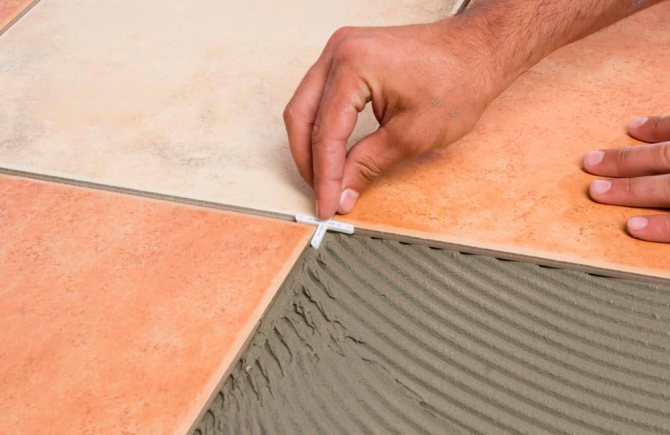
The glue is set on average per day, then the crosses can be removed and the grouting can be started.
Grouting
The aesthetic and operational quality of the tiled floor depends on which grout is chosen for a water-heated floor under the tiles. You can buy a grout of the desired color, composition and properties.
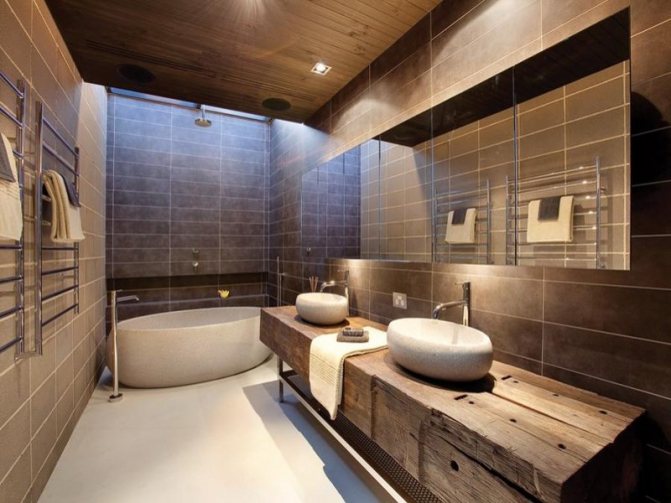
It matters in which room the tiles are laid: whether there is high humidity or increased load. If you need a grout for the bathroom floor, then there are compounds with water repellency.
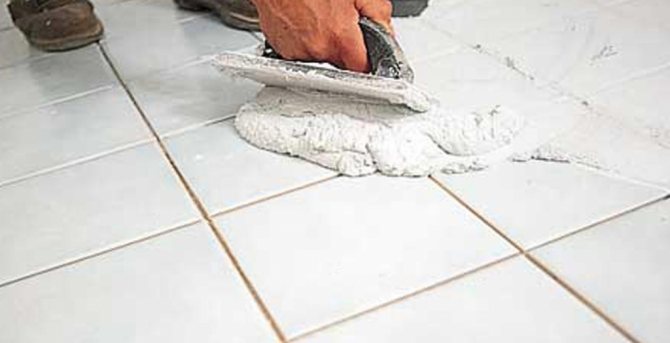
Grouting is done with a small rubber spatula, using a brush and a foam sponge. All joints between the tiles must be clean, it is better to degrease them and cover them with an antifungal compound. The seams are moistened with a brush with water, this will improve adhesion.
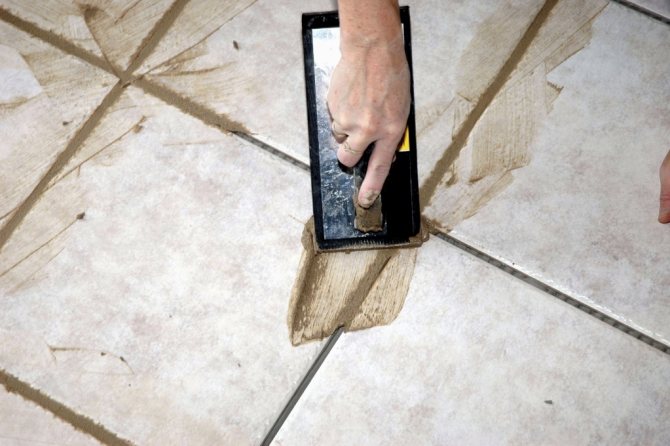
Voids are unacceptable. The spatula removes the excess by sending them to adjacent joints. When the grout dries slightly, it is better to moisten it with water. This will prevent cracking.
Functional check
A test run of the warm flooring system is carried out after installing the heating elements. If you do this at the last stages of work, when the structure has already been filled with a screed, it will be difficult to detect errors in the installation of communications, which means that the leak will remain invisible. To avoid flooding the premises, it is recommended to carry out a test run. To do this, the warm flooring system is turned on and the condition of the pipes is monitored for several hours, gradually increasing the heating temperature and pressure.
Assembling a water-heated floor
The installation of a water heating structure begins with the preparation of the base on which the scheme is being erected, laying of waterproofing and thermal insulation, laying of heating pipes:
- the quality of the structure depends on the condition of the foundation on which it is supposed to be installed. The main requirements are its strength, flat and dry surface;
- waterproofing should be laid with an overlap, with a large margin of overlap. It is also necessary to provide some allowance for the canvas on the walls. The entire structure must be fastened with construction tape.
- it is necessary to lay a damper tape around the perimeter of the entire installation area. This procedure is necessary to compensate for temperature differences during the pouring and drying of cement mixtures;
- for a higher heat preservation of the heating structure, heat-insulating materials are laid. Teraplen has a high efficiency of heat reflection to the floor surface.
Other options for heat insulators can be extruded profile plates with the design of special grooves for laying pipes. The optimal thickness of the thermal insulation is about 50 cm. The cost of the boards is much lower than the price of teraplen.
- pipes are laid in the prepared structure. For a high-quality warm water floor, high quality plastic and metal-plastic products are allowed. If the scheme involves a large number of pipe bends, it is necessary to give preference to plastic high-strength pipes.
Reinforced-plastic pipes have a high heat transfer coefficient. Floor heating with the help of such products is faster.
Basic rules for assembling a water-heated floor
When starting to assemble a structure with your own hands, you should follow the recommendations and advice of specialists. You can use the advice of masters on the websites of construction companies. Rules to follow when performing installation:
- the scheme for laying pipes in the locations of external walls, doors and other objects associated with the access of cold air should be made in a denser version than in the central part of the room. It is recommended to maintain a distance from the wall to the outermost pipe of the heating circuit of at least 12 cm;
- the pitch between the pipes must be at least 10 cm and no more than 30 cm.A gap smaller than e 10 cm will require an increase in the pumping length, which will result in poor circulation of the coolant. A distance of more than 30 cm can disturb the uniform heating of the floor surface. Cold and warm areas will be observed in the area covered by the floor;
- it is necessary to carry out the length of the circuit no more than 100 meters;
- pipe sections located under the joints of the thermal insulation plates are placed in metal sleeves;
- planning of several heating circuits in the warm water floor system will require the location of the cabinet with the control manifold in a place that does not impede easy access to all its adjustment and regulating elements;
- the installation scheme can be selected by the user based on the characteristics and purpose of the room, the type of pipes used. In any case, their obligatory fixation is performed. This can be the use of clamps, thermal insulation plates with specially equipped grooves for fastening the structure, or a combination of fixing options.