

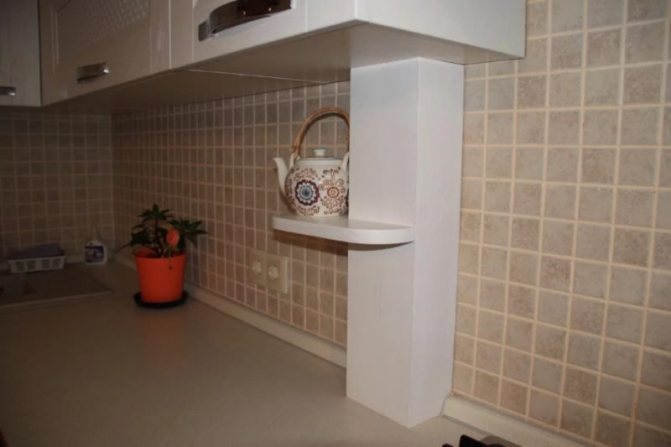
Installation of walkways for two-storey buildings
If the building is two-story, then in this case, after the installation on the first floor, it is necessary to tackle the second. How to run a sandwich pipe through the second floor? Consider the main points of wiring a chimney sandwich through the second floor:
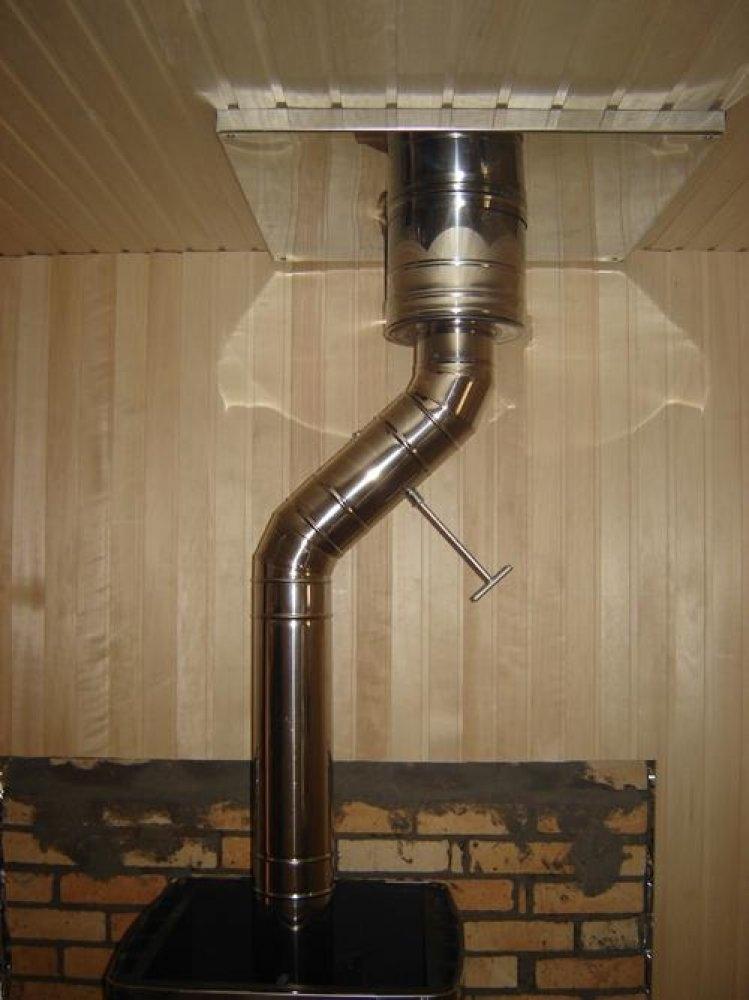
- As a rule, the second floor of the baths is set up as a relaxation room. Also, laying a sandwich chimney can take place in a private house. In such cases, a transition is made from a sandwich pipe to a single-wall pipe. This is done so that the heat from the chimney spreads and warms the premises. The transition to a single-wall pipe should be carried out at a height of 1 m from the floor of the second floor.
- In front of the attic passage unit, a transition is made back to the sandwich pipe.
- The attic walk-through is installed in the same way as the previous one.
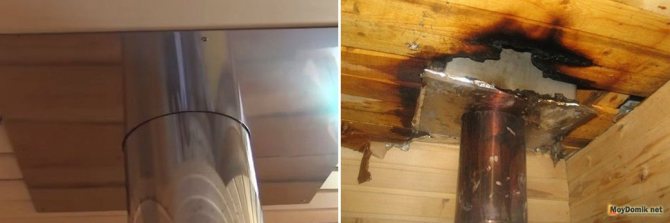
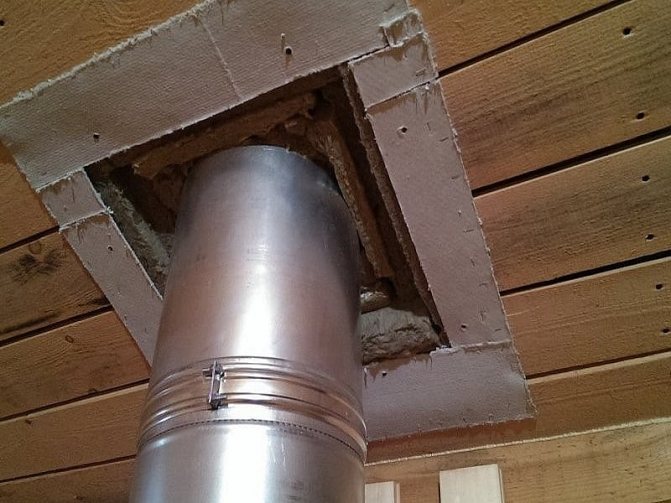
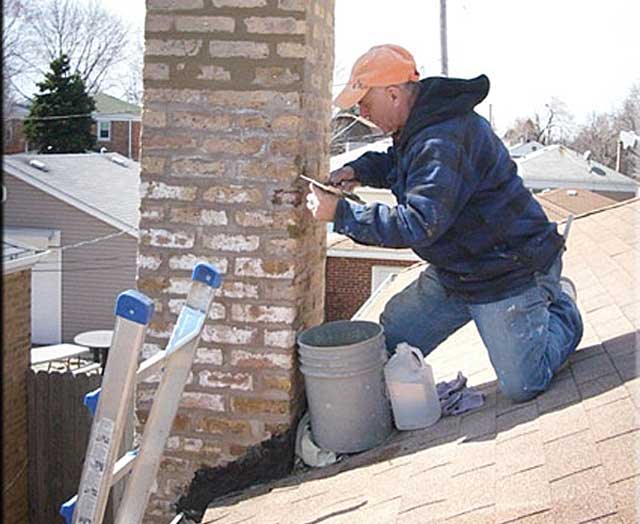
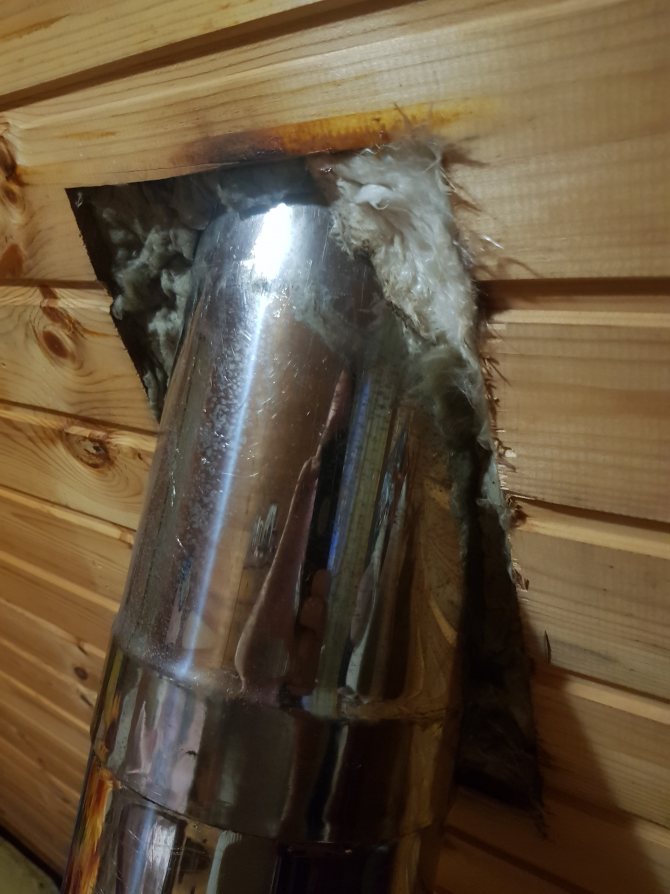
- It is necessary to run the chimney through the waterproofing coating and the roof. It is imperative to perform thermal insulation and equip a protective apron, which will serve as a waterproofing sandwich of the chimney. For these purposes, homemade aprons and heat-resistant sealant may be suitable.
Waterproofing after laying the pipe through the roof is necessary so that moisture does not penetrate into the attic and does not flow down through the structure. When sandwich pipes pass through the roof, it is also necessary to comply with the standards described in SNiP.
Types and installation of chimneys in a private house
Such a chimney does not require additional finishing.
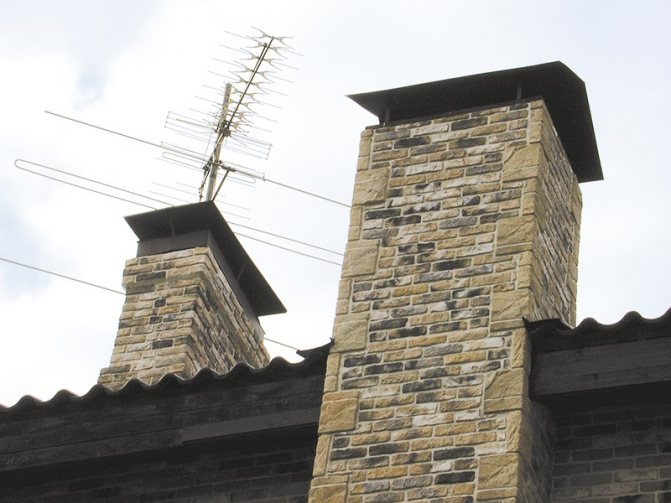
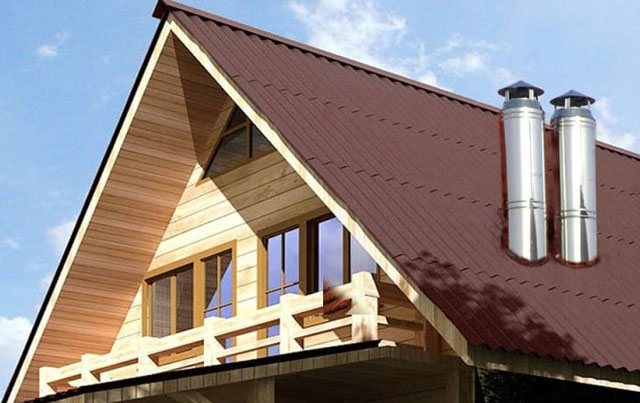
Where is the best place on the roof to place the pipe
The higher the better. The ideal place is the ridge, the highest point. Firstly, the traction is maximum, and secondly, the waterproofing is simpler and more reliable. You also need to take into account that the farther from the ridge the chimney is located, the higher it should be. This does not paint the roof and complicates its construction. The roof of the Renaissance masterpiece, the Château de Chambord on the Loire, is crowned with many intricate chimneys. Nowadays they don't even know how to do that, even in France.
DIY PPU installation
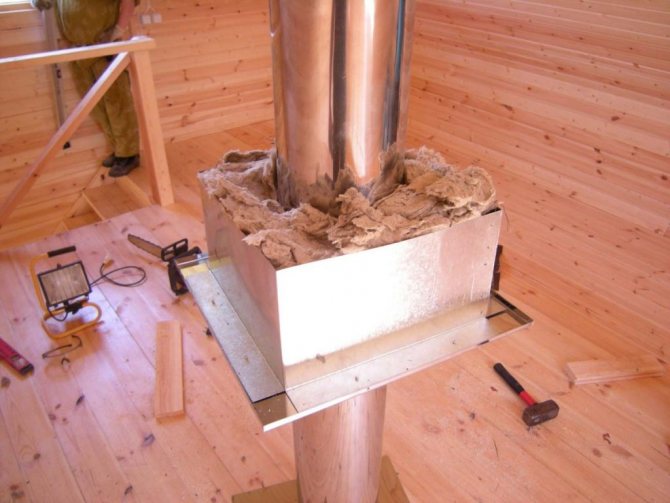
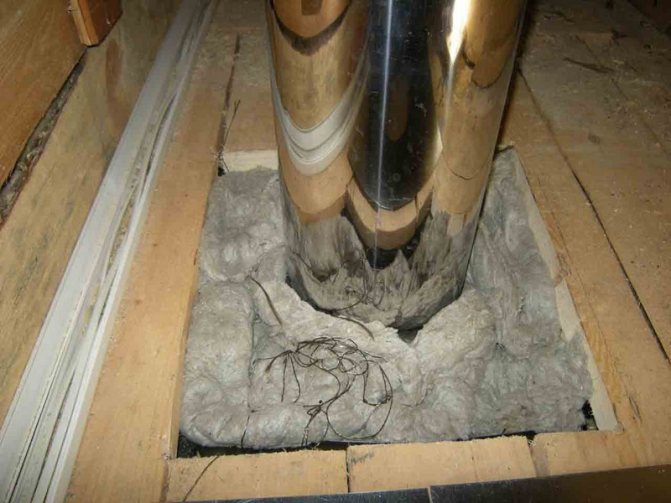
The hole should be about 0.5 mm thicker than the channel diameter. This will ensure easy insertion. Thermal insulation is packed along the outer and inner walls. The distance between them is 1-2 cm.
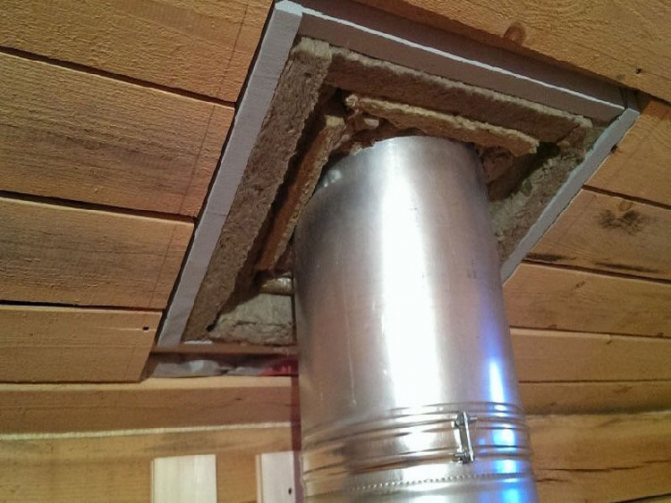
If you do not have a ready-made kit, you can perform high-quality stove heating in the house without it. For this, the free space in the ceiling is sealed with refractory thermal insulation, on top of which steel strips are installed. A plate of heat-resistant metals is installed on it, in which a suitable hole is cut. Such a plate is fastened with a bolt connection. It is most convenient to make it from metal.
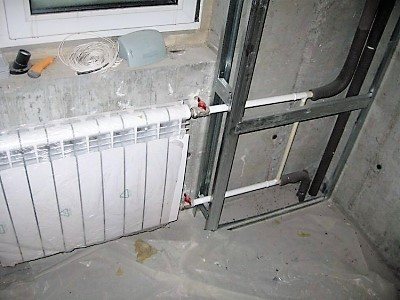
When installing it, we comply with all requirements, and maintain the established distances to fire hazardous objects. The resulting voids, from the side of the second floor or attic, should be covered with expanded clay or other non-combustible insulation.
Passage of a brick chimney through a hardwood floor
Laying out a stove chimney is a complex process where many nuances must be observed. Therefore, it is better to entrust this business to specialists. In addition, construction errors can lead to poor traction and fire.
An important point: a simple building brick for laying individual parts and the entire chimney is not suitable. A prerequisite for durable and trouble-free operation of a brick pipe is the use of ceramic heat-resistant bricks.
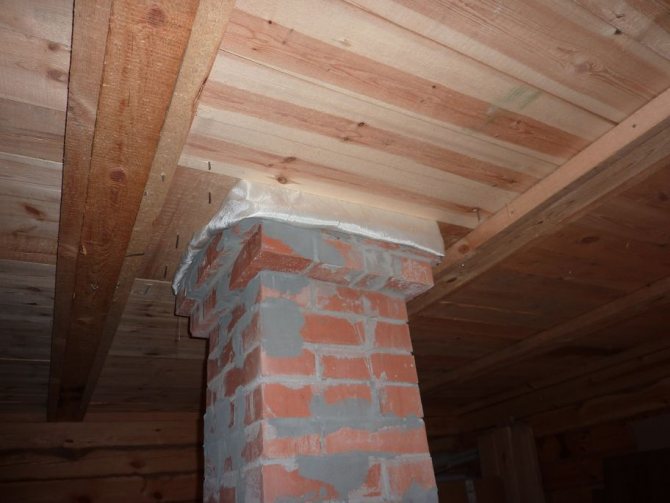
When constructing structures, it is necessary to lay them out in a special way in the places where the floors pass.The ideal option would be to cut the chimney on the ceiling. The height of this section of masonry should be at least three rows of bricks. The thickness of the walls of the chimney when passing through the roof or wall (partition) must be greater than the main height. The distance to combustible materials must be at least 25 cm.
Two passes of a brick chimney are possible. In the first version, the pass-through unit is mounted by increasing the thickness of the masonry, the so-called "fluff". The second variant of the passage of a brick pipe through the attic floor without laying out the "fluff" is carried out in almost the same way as a metal pipe. In this case, the chimney along its entire height has the same cross-sectional size, without increasing the thickness of the walls.
The hole in the ceiling is fixed with a stainless steel sheet or minerite slab. A window is cut out in the center of the sheet through which the chimney will pass. The length and width of this opening should exceed the similar parameters of the pipe by literally 3 ÷ 5 mm. When laying the chimney, about three to four rows to the ceiling, a sheet with a prepared opening is put on it, and then the laying is made further to the height of the clean floor of the attic. Wooden floors are laid with mineral wool to reduce heat transfer from the pipe. But a more reliable way would be a stainless steel box, into which a brick chimney will pass, the distance from the pipe to the walls is also laid with mineral or kaolin wool by 5-7 cm.
Sealing joints
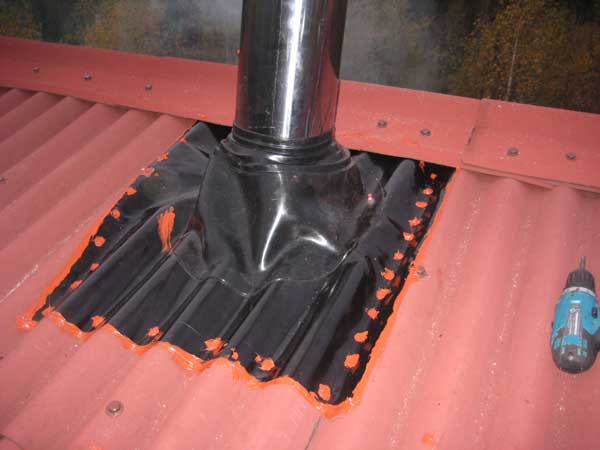
This stage is considered the most difficult when removing through the roof. For this, a lower apron made of sheet metal is installed.
A "tie" made of metal is laid under it, the purpose of which is to divert liquid into the drain. Outside, you can install a decorative apron, the purpose of which is to create an aesthetic appearance.

When using a flexible coating, the task of waterproofing is greatly simplified. It is fairly easy to fold such material onto a pre-impregnated pipe to create a better fit. It is also recommended to seal the joints of the wall and roof with a sealant.
Video tip - chimney passage through a wooden floor
From the following video, you can learn how to properly lay the structure, without spending extra effort.
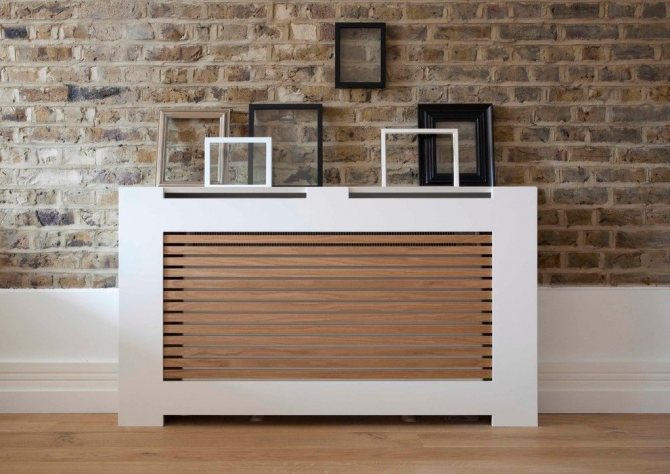

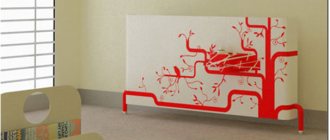
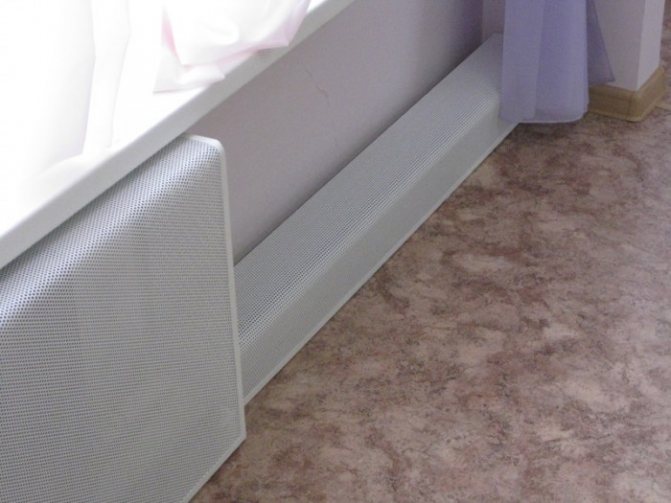
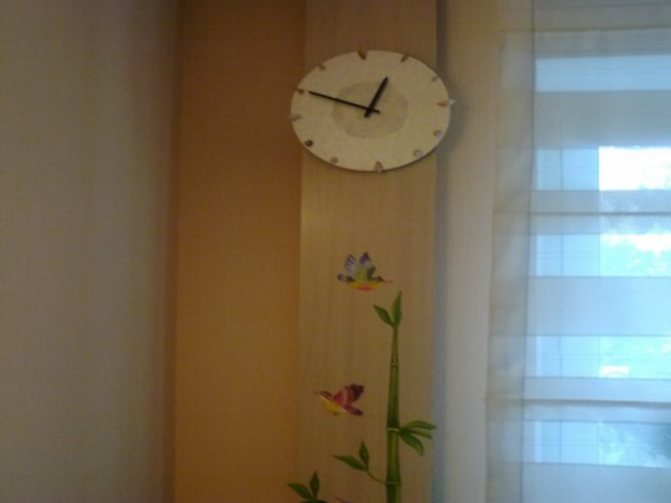
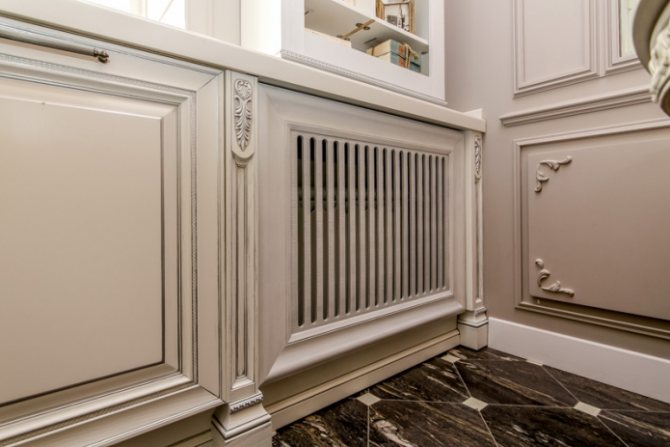
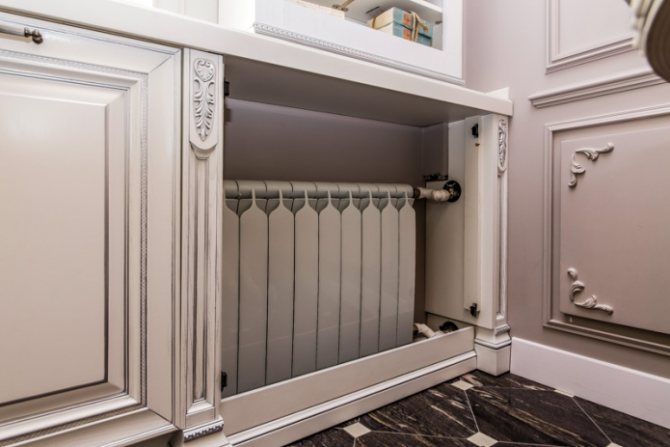
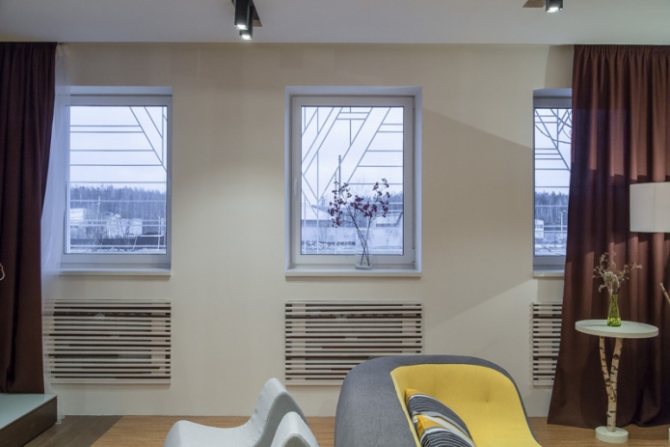
Decorative screens for heating pipes
This device is perfect for decorating. It successfully hides bulky radiators behind it and perfectly complements the interior. However, it is inconvenient in practical terms. The screen prevents free access to the battery, impairs heat transfer, and slows down the circulation of warm air masses. Therefore, if you decide to purchase something similar, then it is best to give preference to perforated panels - you will not have a problem of thermal conductivity with them.
A wooden screen with curly elements is perfect for a classic interior.
The wood panel is secured with magnetic clips
Important! The canopy must be removable or partially removable.
The appearance of the screen should be in harmony with the overall interior of the room.
A few tips for thermal insulation
Among the most reliable structures for the passage of a pipe through the roof, a specially made box is considered - according to the type of rafter system. Instead of wood, which is a flammable material, it can be made of galvanized roofing, but according to the same scheme.
The design of modular chimneys has ready-made thermal insulation, but they differ in configuration. For example, there is a double pipe with a layer of basalt wool or a special ceramic core and an outer shell made of concrete. The assembly of modular blocks is quite simple - the diagram is attached with the purchase.
It is possible to install an asbestos gasket, followed by sealing with an asbestos mortar.Each new block of the module is attached over the previous one with the same composition of the mixture. After completion of the installation, the pipe is isolated from a leak in the roof window in any way described.
Modern roofing with corrugated board has its own characteristics - here it is better to make the window for the chimney a little wider. All abutting surfaces are also filled with materials with thermal insulating properties. The chimney, before being wrapped with basalt wool, is placed in a steel box. Carefully cut the film layers of vapor and waterproofing, fix by the edges of the box. It is imperative to make a heat-resistant filling between it and the pipe.
Next, external waterproofing is carried out - a sealing cap material corresponding to the dimensions of the chimney pipe is put on from above, the edge is fastened with a clamp to glue. The lower edge fits tightly to the roofing material and is rigidly fixed with a sealant. A steel cap is often included with such a chimney. They are put on rounded pipes. Installation is recommended when the outlet smoke from the solid fuel boiler has a temperature of more than 100 ° C.
If you properly insulate the chimney pipe, then you will not be in danger of dampness and rotten ceiling.
Painting
When painting heating pipes, the following material requirements must be taken into account:
- moisture resistance,
- wear resistance,
- resistance to damage,
- endurance to temperature extremes,
- safety for human health.
To paint the pipes of the heating system, it is possible to use paints on a water-dispersion base, acrylic paints and alkyd enamels.
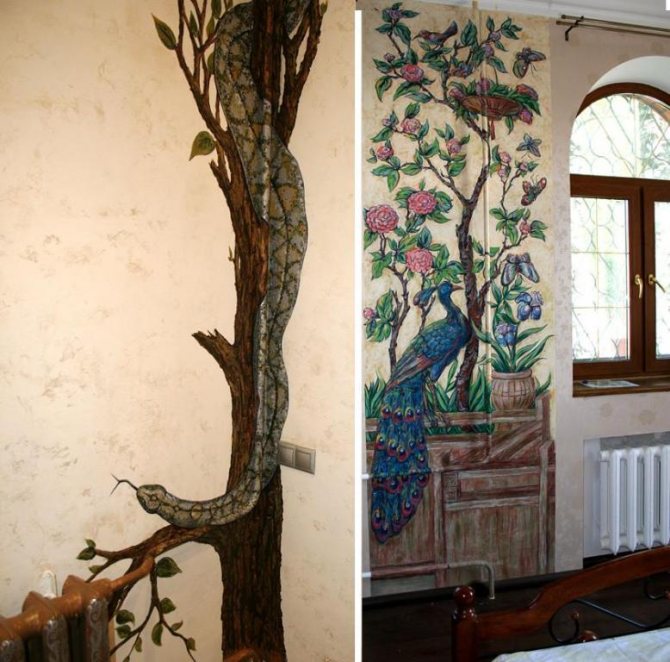
It is not necessary to paint the pipes in a solid color. A fascinating solution would be to apply a pattern and pattern to the pipe.
It is possible to decorate the heating pipe using any decorative materials.
An example of materials used for decoration:
- beads,
- buttons,
- ribbons,
- laces,
- rope,
- twine,
- threads,
- floss,
- knitting yarn,
- textile.
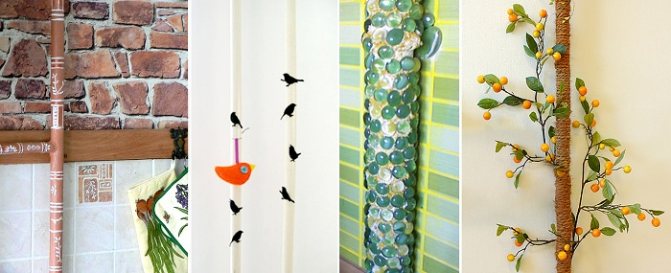
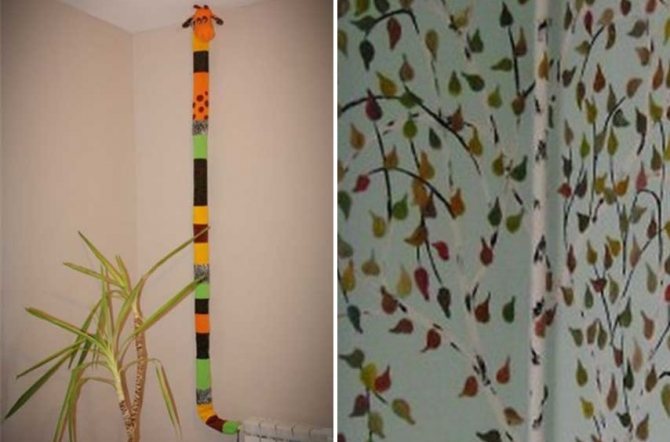
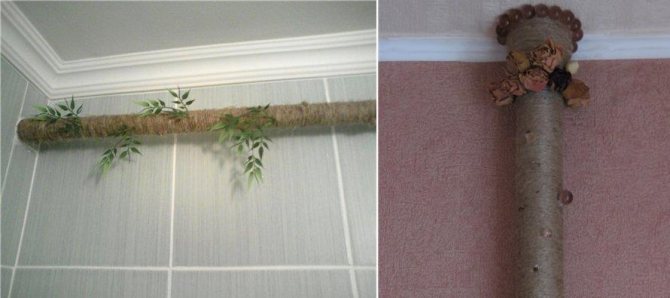
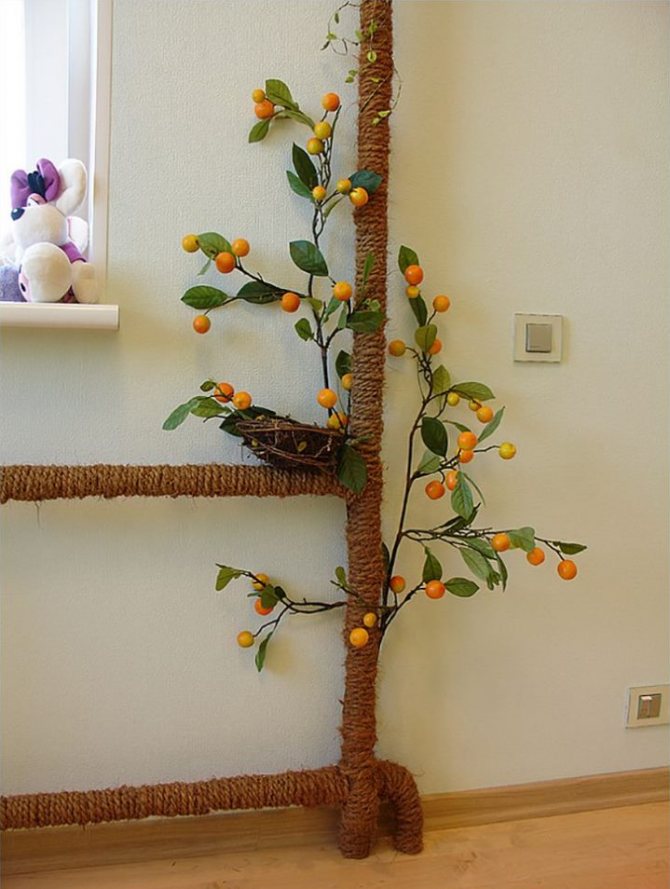
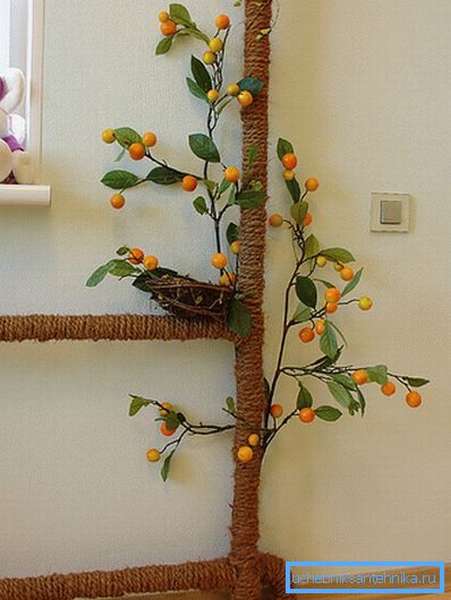
A simple example of a decorative solution is twine entwining. Its pleasant woody color will fit well into any interior and create a cozy atmosphere. In order to decorate with this method, it is enough just to wrap the pipe well with twine and fix it.
In addition, it is possible to use additional decorative elements in the design. So, on a pipe entwined with twine, it is possible to fix decorative foliage. So, the heating pipe will turn into wood.
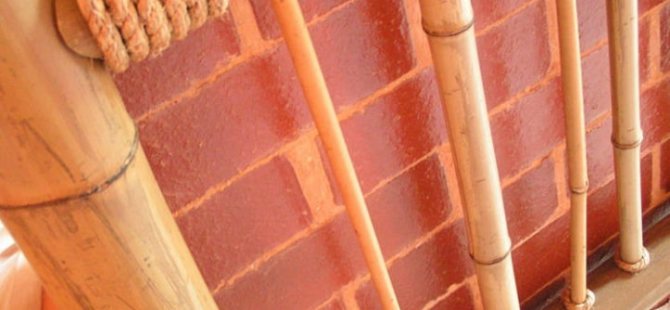
- Decorating with bamboo. This noble natural material will look great in any room. Its shape fits perfectly to the shape of the pipe
In addition, it is possible to decorate heating pipes with any materials at hand.
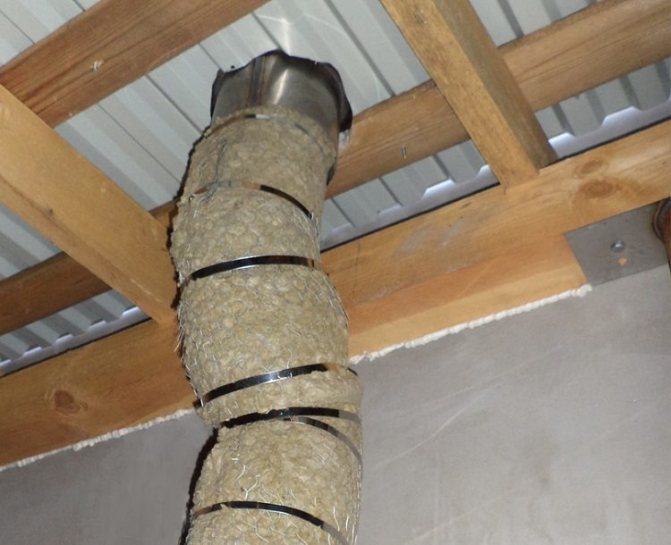
Fireproof insulation of the chimney
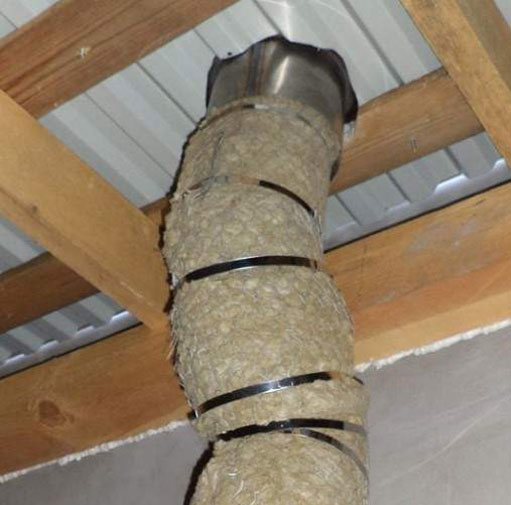
For this purpose, a wooden box is constructed between the pipe and the roof from the elements of the rafter system. The chimney must be located inside the duct at a distance of at least 15 cm from its walls. The space between the chimney and the duct walls is filled with a non-combustible material with low thermal conductivity (usually mineral wool).
Instead of a wooden one, you can make a welded box made of galvanized roofing steel, guided by the same principles.
The inner layers of the roof (vapor barrier, thermal insulation, waterproofing) at the pipe passage are cut and fixed with brackets or nails to the cross beams and rafters. The waterproofing layer is fixed around the roof passage with a frame. This ensures reliable insulation of the chimney from the combustible elements of the roof.
There are ready-made modular chimneys, the design of which provides for thermal insulation. The modules consist of a ceramic core, a layer of basalt wool and an outer casing made of lightweight concrete. The installation of a chimney from modular blocks is not complicated.First, an asbestos gasket is installed between the stove and the chimney, then a layer of mortar is applied to it, a module is placed and leveled. Each next modular block is fixed with a layer of mortar. After the construction of the modular chimney, it is necessary to isolate the chimney from leaks at the passage through the roof.
The next method of insulating chimneys is used mainly in the construction of baths. The metal chimney in the place of passage through the roof is wrapped in several layers of mineral wool and fixed with wire. Then the plaster is performed with a clay-sand mixture. The pipe prepared in this way is wrapped with a layer of galvanized roofing steel, fixed with self-tapping screws and the chimney is mounted on the roof.
How to decorate a heating pipe in a room?
Decorating heating pipes is choice of two options:
- hide them so that they are invisible in the apartment;
- make them a piece of furniture, decorating in an affordable way.
The decoration does not require special efforts, special training or knowledge, except that a little imagination and aesthetic taste.
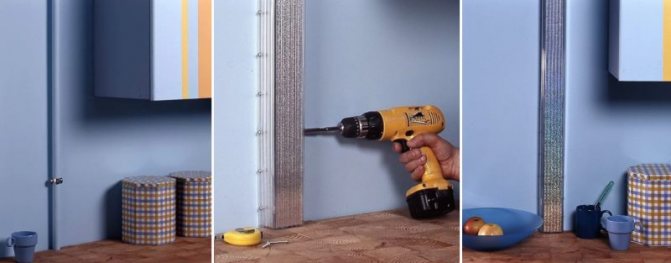
Plasterboard box
The technology for closing heating pipes with a plasterboard box is quite simple. Installed frame made of profiles that are attached to the wall with self-tapping screws... And then drywall sheets are fixed. You need to know that for the box it is worth choosing moisture resistant material.
Although the method is quite simple and does not require significant investment, main drawback his is that he restricts free access to the highway, and in the event of an unforeseen emergency, the box will have to be disassembled. But even here there is a secret. If you use self-tapping screws during installation, then dismantling will not be so difficult.
Important! Box it is impossible post directly near batteries heating.
Such designs can be not only from drywall. Instead, you can use any suitable material... The main condition is compliance with the interior design.
False wall
Usually erected when the heating element takes up a lot of space... First is set skeletonwhich then upholstered with appropriate material.
This method is similar to the previous one, but more difficult to implement... Here you can use various materials for upholstery, but if you need to close the radiators, then for this be sure to use perforated sheetsto prevent heat loss.
Before you build a false wall, you should make sure that everything is in order with the heating equipment (pipes, radiators). And you also need to pay attention that the use of this method of decoration leads to a decrease in free space rooms.
Painting
Refers to the most simple and popular ways to decorate heating pipes. Before using it, you need to take care of the base for painting, because the remaining or peeling old paint can spoil the idea. A hairdryer or putty knife will help clean the surface from the previous coating.
Important! But no need to try to heat up too much heating riser, as in the pipes, according to operational standards, water remains in the summer. And even with strong heating, the winding installed on the thread at the joints is destroyed. Therefore, you should simply get rid of most of the unnecessary paint, and clean the remains with an iron brush.
It is better to paint metal pipes alkyd enamel PF-115... There is no need to use a primer, the main thing is thorough cleaning. It is recommended to carry out the procedure twice.by applying a thin layer of enamel.
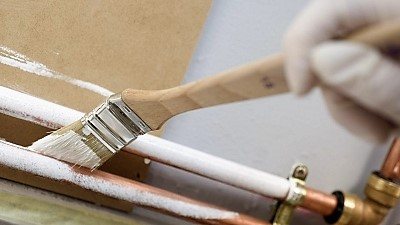
This work best done in summerwhen the heating system is not in use.
Winter option painting is not suitable for the reason that the enamel on hot pipes will dry very quickly, without giving the opportunity to grind it properly. In this case irregularities and smudges cannot be avoided.
The simplest masking of heating pipes in a room is painting them to match the walls or the color of the radiators... Any idea can be, the main thing is that it fits perfectly into the interior of the room.
Bamboo barrel and other linings
The pipes hidden in bamboo look extraordinary. His the trunk is sawn to length, cleanse from internal partitions and clean the cuts. Blanks apply and tighten with a rope of the appropriate color.
Moreover, bamboo is used not only when decorating a room, say, in japanese style... It looks good in other interior options... The main thing is that bamboo fits well into the overall design of the room. And so that the riser pipe framed by a bamboo trunk does not attract much attention, it is advisable to decorate other elements of the room with this material.
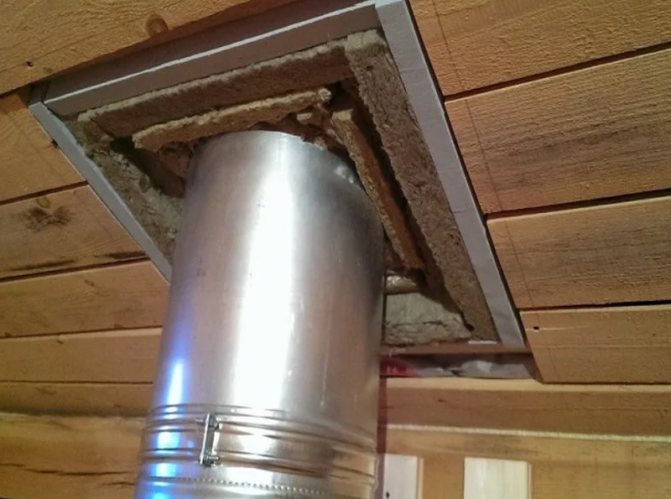
Manufacturing of boxes
About how to insulate the iron chimney pipe, it was said earlier. Now you can move on to the next step. It seems to many that making a chimney box is too difficult a task. In reality, this is not the case. It is enough to approach work responsibly, competently.
Required tools:
- Drill;
- Metal scissors;
- Compass;
- Metal sheets;
- Self-tapping screws.
Stages of work:
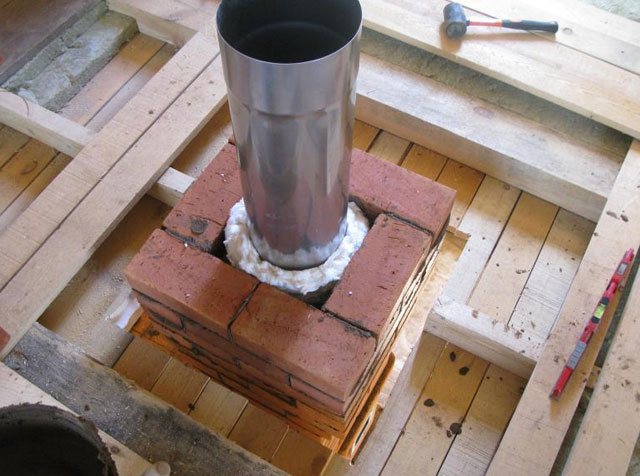
- Hole preparation. Along the edges, it is necessary to fix the bars, which will act as a support for the body.
- Two blanks are cut from a metal sheet. They are given a U-shape. Then the finished parts are screwed to the ceiling using self-tapping screws.
- Again, two blanks are made, but they are already fixed on the standing sheets with a small overhang. It turns out a one-piece frame in the ceiling.
- Now the bottom for the box is made of metal sheet. In the center of the workpiece there should be a hole for the chimney, here you need a compass.
- The box contains four fasteners of two centimeters. They are cut and folded perpendicular to the bottom.
- Walls are attached to the bottom. Now a chimney is inserted into the box, it is additionally secured with clamps. The voids are filled with an insulating layer.
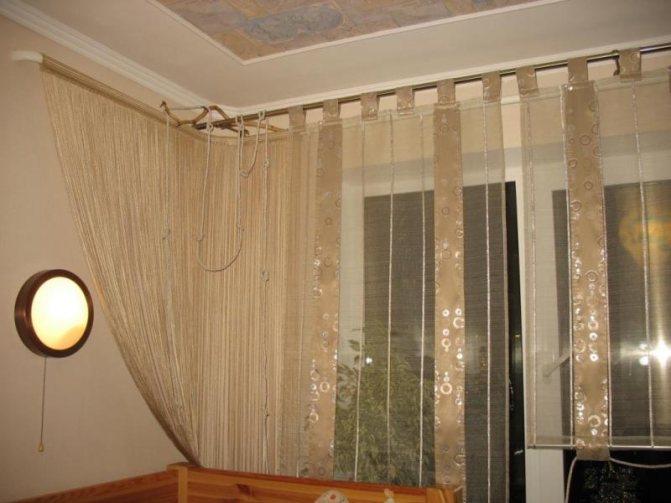
Application of curtains
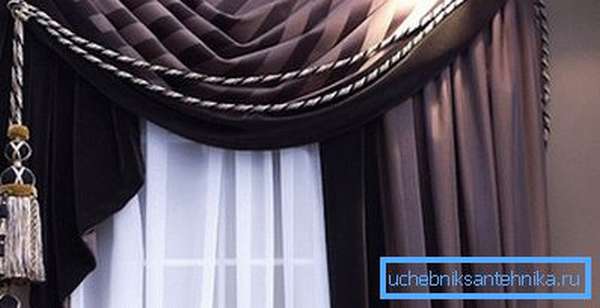
This method does not require any special building skills. It is contained in the fact that the heating system in the room is closed with curtains. This gives the room a cozy and unique design.
- A ceiling cornice must be installed over the entire width of the wall.
- Installation of dense curtains along the entire width of the wall. Drawn curtains close off the heating system. If necessary, they can be opened to allow sunlight to pass through.
Chimney fixing
The workpiece must be taken to the roof through the attic. All gaps, especially the voids between the roof and the branch pipe, are filled with waterproofing. When removing the workpiece, you must remember about safety.
28a68763ca5396a3ddd85de429ee95d8.jpe
A knee is used to secure the chimney pipe. It is designed to adjust the vertical position of the structure. To give everything reliability, the pipe is additionally attached to the wall, using suitable brackets. Usually they are included in a ready-made set. They can also be made by hand, it is best to use metal corners as a basis for them.
Use decorative elements
You can beat the riser in several ways:
- Perform it in a nautical style - wrap it with twine, glue it with shells, pebbles and other attributes accompanying the marine theme.
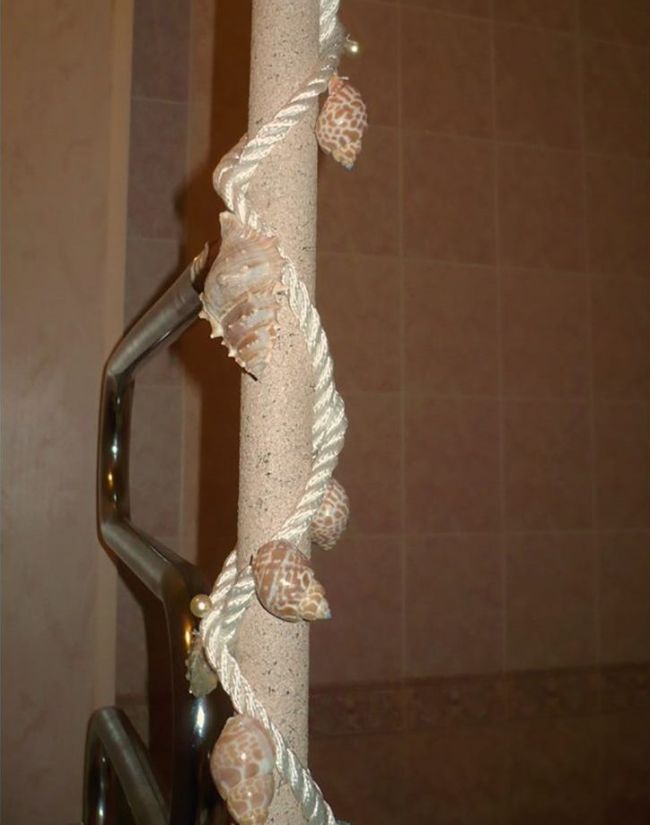
Pipe decor with shells

Just a few bamboo sticks and instead of a pipe, you get a piece of tropical landscape
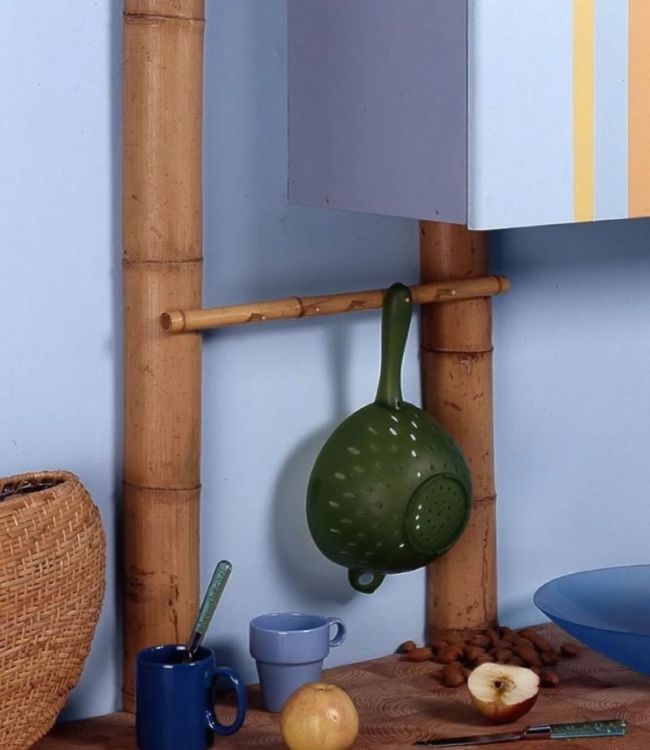
In the kitchen, pipes can be beaten with bamboo, making an original pendant for kitchen utensils
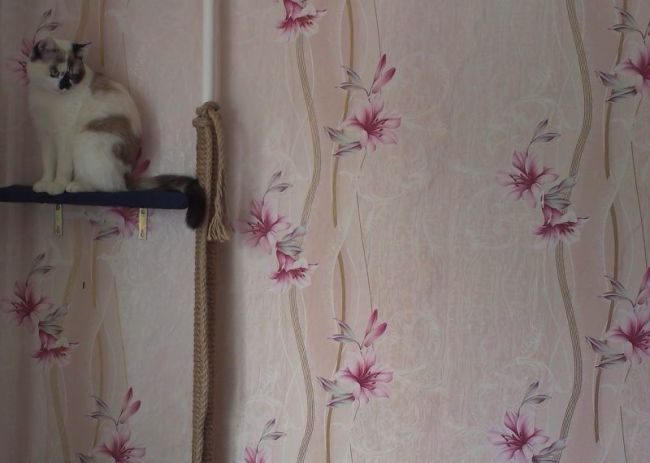
And the cat is happy and the pipe is covered
Each method is good in moderation. The main thing is not to overdo it with the decor, remember about the thermal conductivity of the batteries.
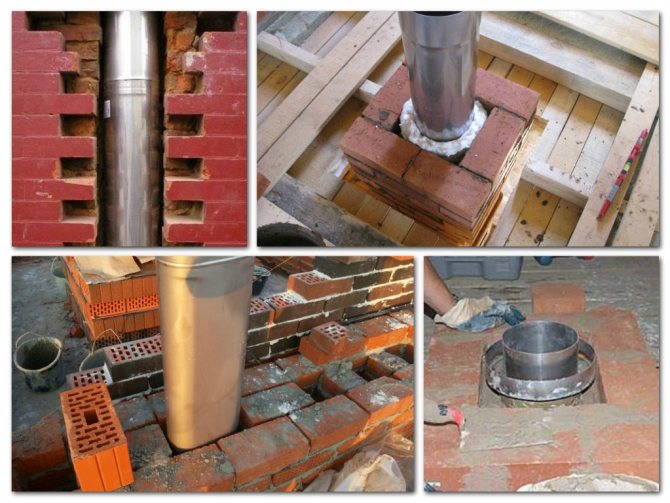
Replacing a brick pipe with a metal one
If the brick chimney is not enough, it can be further extended with a metal pipe. The task is laborious, but quite realizable
It is important to approach her responsibly.
To begin with, a flat steel platform with a branch pipe is made. Moreover, its diameter should be the same as the diameter of the metal pipe that you plan to use. The platform must be securely fixed. It is fixed with dowels and screws. Sealing will add additional reliability.
Work order:
- On the brickwork, you need to mark the points at which the mount will be installed. They must not be placed on a masonry seam. It is advisable to place them closer to the center of the brick, and not on its edge.
- Holes are drilled in the marked places to accommodate the dowels. At the same points, holes are made on a flat platform, self-tapping screws will go there.
- A refractory sealant is applied to the brick base, then a steel platform is placed there. Self-tapping screws are screwed into the dowels
- It is important to monitor the tightness and uniformity.
- Now it remains to wait for the sealant to dry completely and go directly to lengthening the chimney using a metal pipe.
Important nuances of installation:
The decision on how to insulate a metal chimney pipe should be made based on the budget, as well as the needs of the structure.
It is important to approach the task as responsibly as possible, performing work in full compliance with all norms and nuances. Then the insulation of the chimney will last a long time without any complaints.
Fire insulation options for smoke exhaust systems
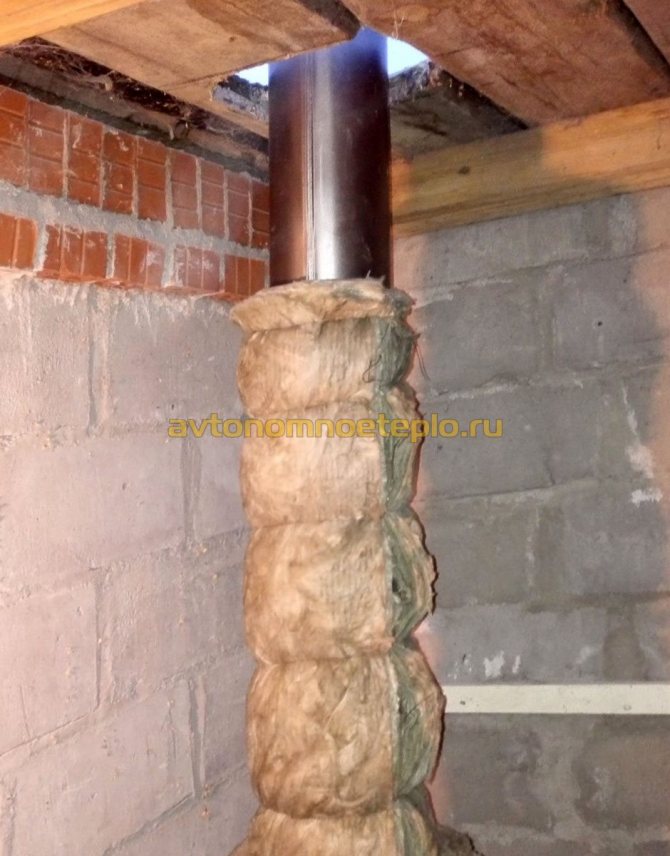
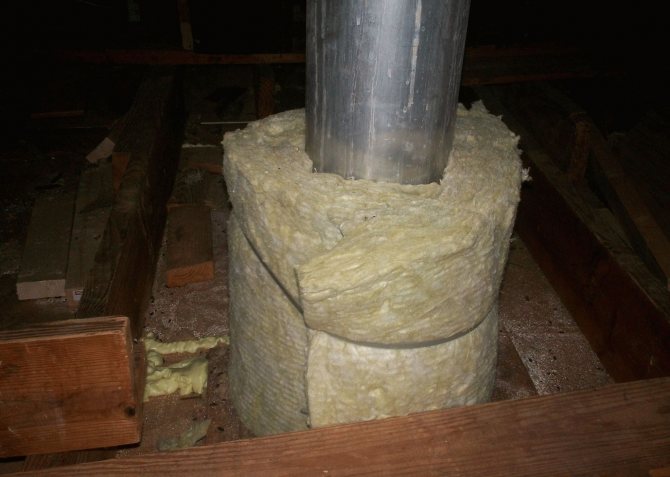
The insulation of the chimney is carried out in order to resist the heating of the adjacent materials. The passing part of the chimney through the ceiling or roof is placed in a box, the distance to it should be more than 10 cm. This free space is filled with refractory material with low thermal conductivity (basalt wool or fabric, asbestos fiber).
If the chimney has a prefabricated structure (steel, ceramic). then the kit must necessarily contain special elements that already have increased fire performance. Such modules are attached to the pipe, can have an additional reinforcing frame and a waterproofing apron for the roof. Sometimes round pipes are insulated with brickwork, for this they cut a window in the ceiling, brick it in one or several layers, the distance to the pipe is clogged with mineral wool.
The release of new building materials and the development of advanced technologies are a guarantee of effective thermal insulation. The choice of materials for this purpose is largely determined by the shape of the chimney, the way of wrapping the pipe that removes hot gaseous substances during fuel combustion.
The main difficulty is not to allow the materials adjacent to the chimney to heat up unnecessarily, so that they do not ignite in any type of building.
Most of the buildings in private households have a chimney coming from:
- solid fuel boiler;
- fireplace;
- ovens;
- cooking plates.
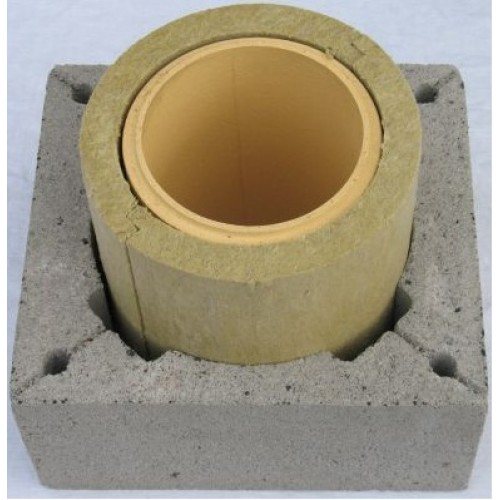
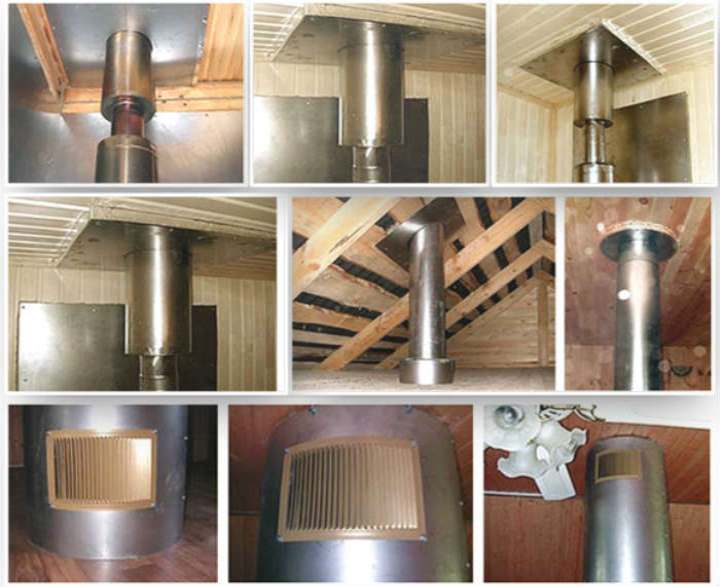
Ceramic chimney kit
Before insulating a pipe in a bathhouse or a residential building, you should choose the option most suitable for your design. The ceramic chimney is no less effective and durable; it is used for a fireplace or a bath. The assembly of the finished structure includes components made of fire-fighting materials. Some of them adjoin directly to the pipe or cover it, others are designed to seal the passage through the roof.
1af9b90d0956b0edcbe386ff1bdb0cc0.jpe
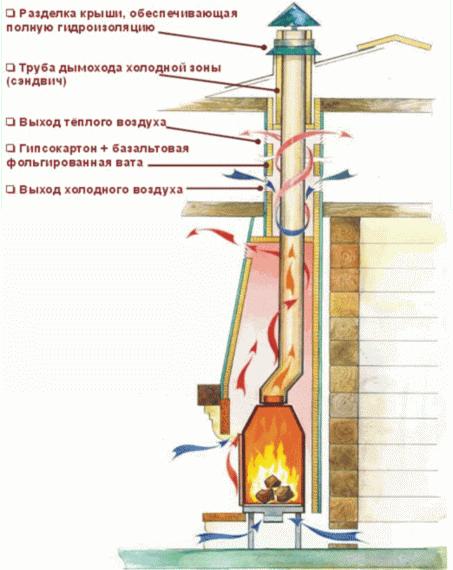
The separation of the chimney and the multilayer roofing cake (with insulation, hydro and vapor insulation) is carried out according to all modern standards:
for double metal pipes, internal insulation with mineral wool is provided; a single pipe is covered with a finished insulating shell of the required diameter and protected from the outside; in brickwork, it is important to increase the wall thickness of the order (38-40 cm) and protect the contact surfaces with special plaster.
The box for the outlet of the chimney is constructed from a cross beam and rafters, keeping the distance from the wooden structure to the metal chimney at least 15 cm. The gap between them is filled with basalt wool.
The membranes of the roofing cake cut at the exit of the pipe must be carefully cut and rolled up. Then they are pressed with a crate and fixed along the edges of the box with nails. For complete tightness of the roof, the pipe in this place must be wrapped with a special sealing tape.
When the chimney runs through an unheated attic, and not in a residential attic, the risk of overheating of the roofing elements is reduced. Complete tightness of the insulation is necessary in any case, but it is better to additionally wrap the pipe with a special tape. Competent installation of the inner waterproofing and the outer cap will ensure reliable sealing after the thermal insulation of the chimney is installed in the opening of the roof covering.
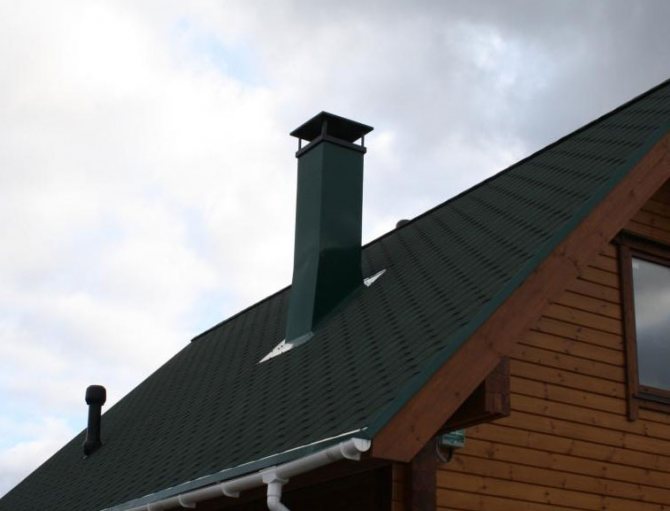
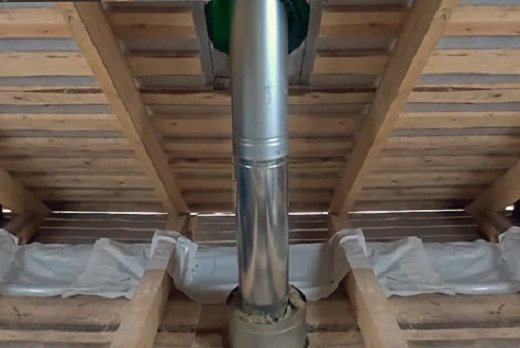
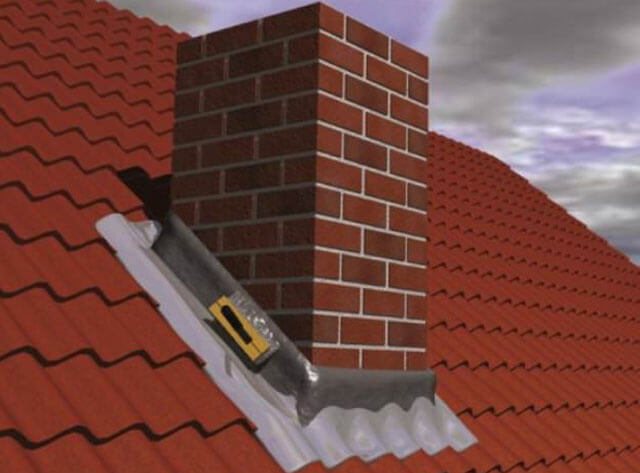
Exiting the pipe through the roof
Chimney pipe finishing: options and work progress
The final finishing of the flue duct is closely related to the work on the insulation of the roof and the laying of the pipe through it.
The passage of the pipe through the roof
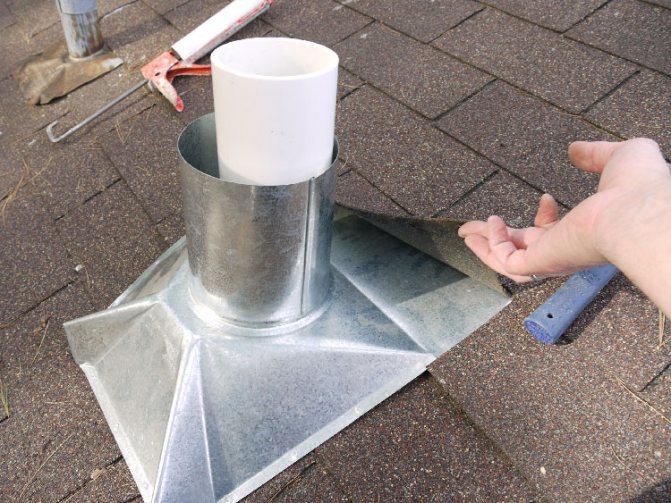
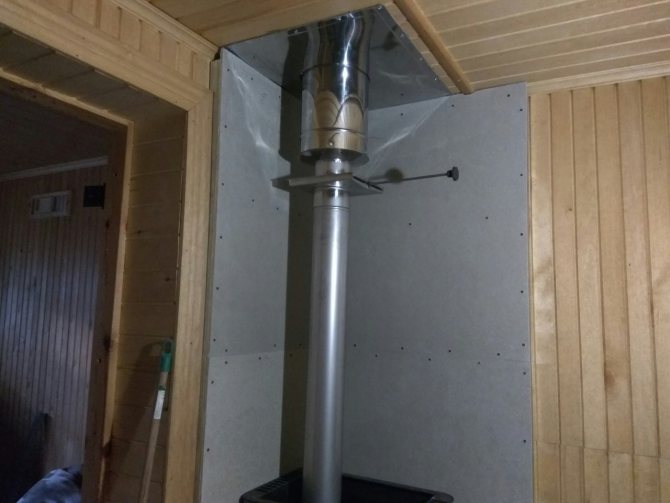
The outlet of the pipe to the roof depends on the modification of the pipe itself. The easiest way is to pull out a round metal sandwich pipe. No additional material is required for its insulation, since it has one layer of thermal protection inside the sandwich. Protective flanges can be purchased ready-made. They are flexible, making self-installation easy.

To remove the sandwich chimney through the roof, you should:
- Cut a hole for the pipe diameter. Why do we apply the markings from below and drill the contour marks. It is more convenient to cut from the side of the roof.
- Slide the inner protective flange onto the pipe. Install the structure. Lubricate the flange with a fireproof sealant, fix it with self-tapping screws to the roof from the attic side.
- Put a protective, flexible, tapered flange on the outside of the pipe. First, cut a hole in it, which is slightly smaller in diameter than the chimney. To make the tightening process go better, coat the flange and pipe with soapy foam.
- Coat the flange with sealant and fasten it with fastening screws over the roof.
It is somewhat more difficult to bring a classic chimney through the roof. For its wiring, you will need to purchase or build a protective box with a heat-insulating layer.

Algorithm for withdrawing a square pipe through the roof:
- In the roof and roofing pie, cut a hole 25 cm larger on all sides than the square of the pipe.
- Construct a protective box according to the size of the hole obtained. As a rule, galvanized sheet is used for the box. It is easy to work with it on your own, galvanized iron meets the requirements of building codes, you can buy it inexpensively. The resulting box should look like a box, in the center of which a pipe is inserted, and the remaining volume is filled with basalt wool.
- Install the box in the opening. Remove the pipe.
Related article: How to cover a garage roof cheap
Then comes the most difficult and important stage in the construction of the chimney - finishing the pipe and sealing the roof.
Cladding options
Sealing a brick or plastered pipe:
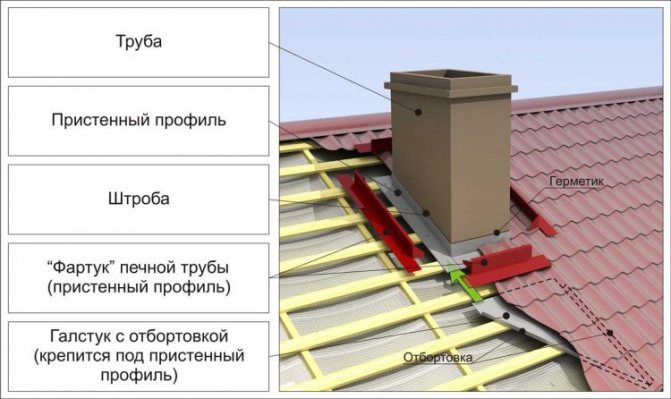
- Disassemble the roof by 70 cm around the perimeter, remove a little more at the bottom. This is necessary for the construction of a protective inner apron and tie. A tie is an additional protective structure made of metal, which is made in the form of a long sheet with curved edges.

- At a low height from the roof, grind the pipe along the perimeter to a depth of 2-3 cm. It is convenient to do this with a grinder.
- Drive a metal wall profile into the recess, the end of which is lowered onto the roof.
- Fix the profile to the roof on all sides with self-tapping screws with protective washers.
- In the lower part, the wall profile is attached to a tie. The lower part of the tie is brought out over the roofing material.
- Lay and secure the roofing material.
- Mount the upper protective and decorative apron on top.

Facing with corrugated board is used to protect both brick, plastered pipes, and to decorate a sandwich chimney, if required by the architectural solution of the house.
A common cladding option is a frame when pulling out a double sandwich pipe from two independent ovens (for example, a stove and a fireplace). In this case, one rectangular pipe, sewn up with siding, looks more presentable than two iron ones.
Algorithm for installing the frame finishing of the chimney pipe:
- Mount a metal profile frame around the pipe. The size of the frame is the same as the hole made to lead the pipe through the roof.
- Place rectangles of mineral refractory wool between the pipe and the frame.
- Sew up the frame with corrugated board from all sides using special self-tapping screws with protective press washers.
Note! When installing a protective box for a double sandwich pipe, an internal insulating partition must be used.
What is the insulation of chimneys for?
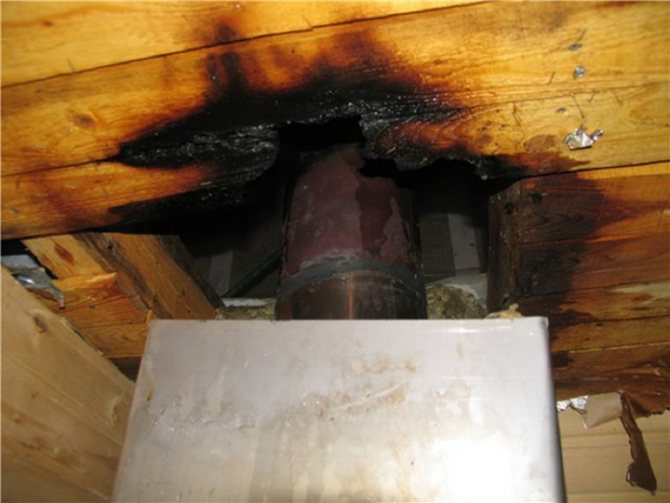
The flue gas system is constantly exposed to high temperatures. It is also influenced by chemically active substances and various external factors. As a result, the integrity of the chimney is threatened, the efficiency of its operation decreases, and the prerequisites for the shrinkage of the walls of the house appear.
Cracks or gaps on the surface can cause poor traction and possibly carbon monoxide poisoning. Soot fires are not uncommon.
In order to safely and efficiently operate the chimney, as well as extend its service life, several operations are necessary. One of them is chimney insulation.
It is recommended to insulate the chimney during the construction of the chimney, since it is more difficult to work with the finished one. This may require changes to the design of the roof slabs.
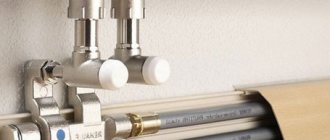
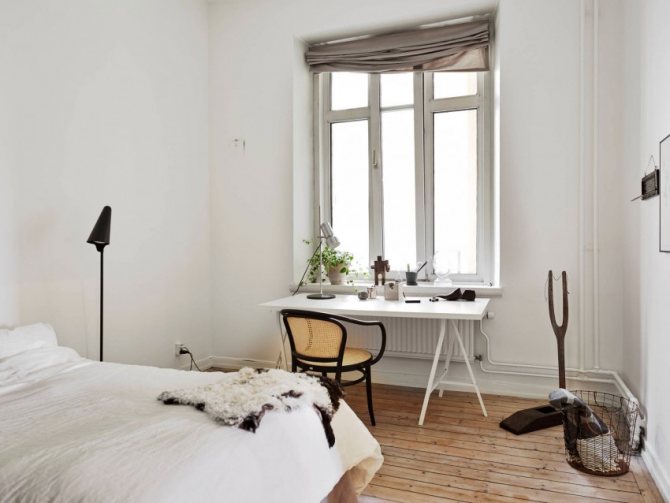
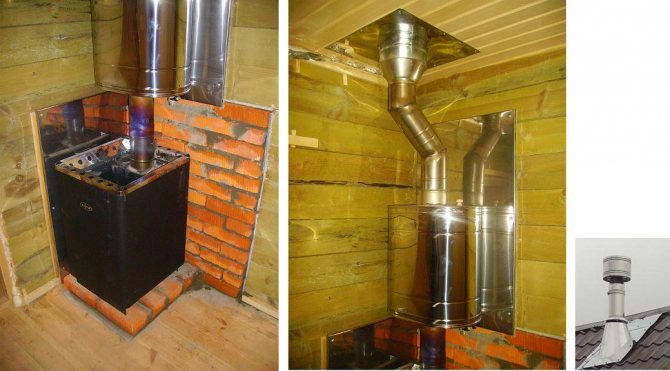
Chimney connection to the roof
The chimney pipe can be made of different materials - metal, brick or asbestos cement. The material from which the pipe will be made is influenced by the technical characteristics of the boiler and fuel used for heating. For example, regulatory documents prohibit the use of metal chimneys when burning coal and wood.
Materials for sealing a chimney on any roof are used depending on the material of the pipe itself and each have their own styling features.
The finishing of the round chimney on the roof is as follows:
- the box is mounted around the perimeter;
- a non-combustible and not exposed to high temperatures insulation is laid.
For safety reasons, according to SNiP norms, it is forbidden to lay any combustible roofing material at a distance of less than 15-25 cm.
In the upper part of the pipe, nets or metal rods are installed to protect against the entry of birds.
Bath chimney
When performing the insulation of the chimney in the bath, the safety of people should be paramount. The main threat in the room comes from open fire. Therefore, it must be protected, having previously made the overlap resistant to high temperatures.
Basically, baths are built from wood, a flammable material. A very common misconception is the opinion that sheathing the ceiling with metal sheets will be a sufficient measure. But in reality, such protection is not enough. After all, the upholstery will still heat up, which can lead to ignition.A popular solution to the problem is to insulate the chimney with red bricks. But this is not suitable for every bath design.
There are now two good options for chimney insulation:
- Folgoizol. A bath with such insulation will not lose heat, everything works like a thermos. At the same time, it warms up quite quickly, maintaining the temperature for a long time.
- Thermal insulation. The material is used for winding the chimney.
A popular solution is the use of sandwich pipes, which show a high degree of safety. The insulation structure consists of several sections that can be easily combined with each other. This option is also suitable for saunas with a metal stove.
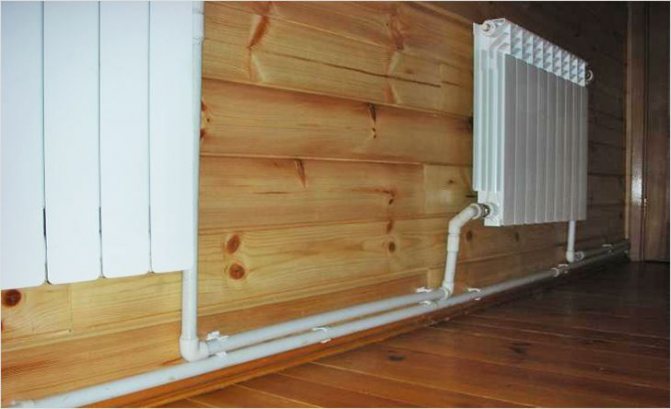
Application of plastic panels
Another available method for decorating a heating system. The method lies in the fact that the pipeline is not hidden in a special box, but with the help of drywall, false walls are made, behind which the heating system is completely hidden. This method is not good in that it takes away extra space in the room. This is not very advisable in a small living space.
The advantage of this method is that when the wall panel is installed, an unusual box is formed into it, the empty space of which can be used for economic purposes.
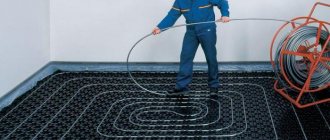
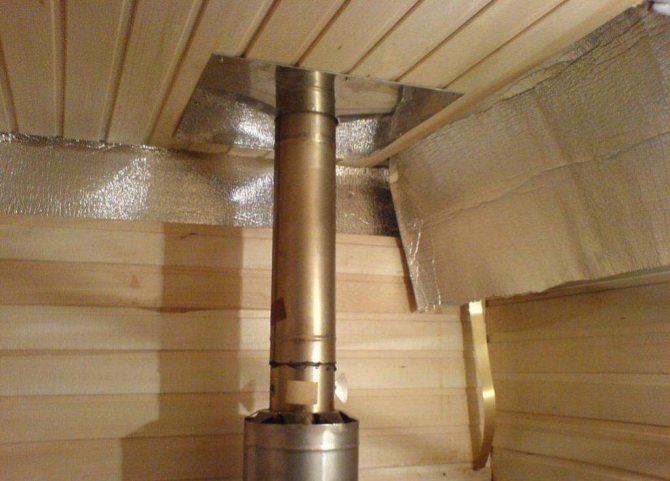
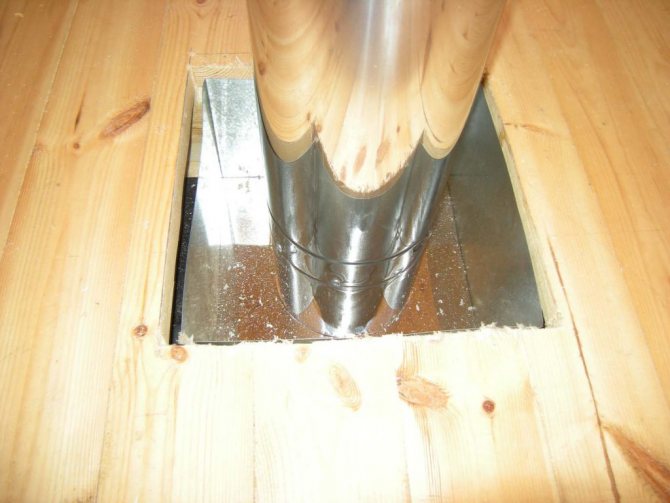
Preparing the site for the ceiling cut
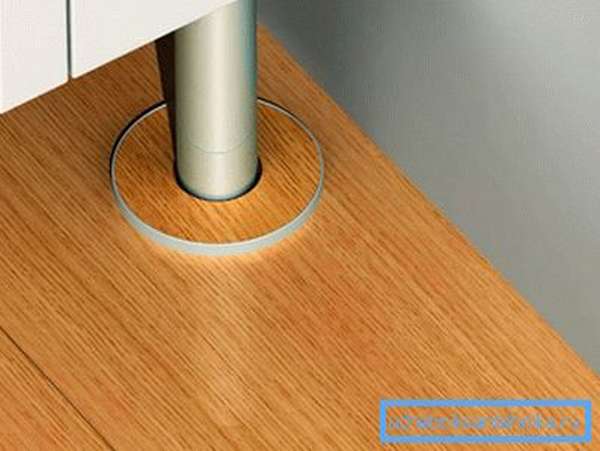
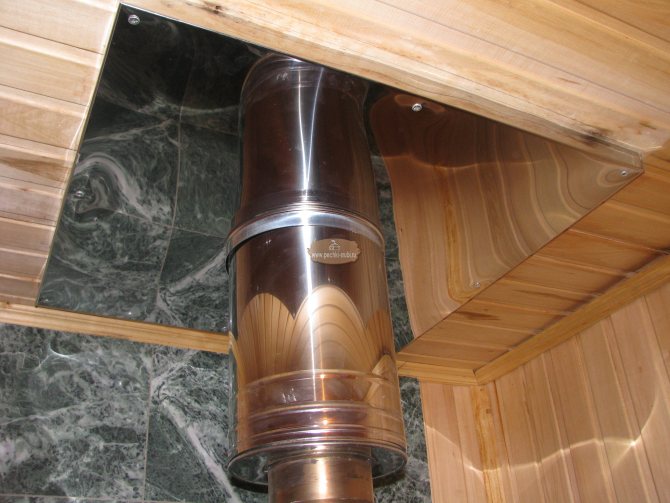
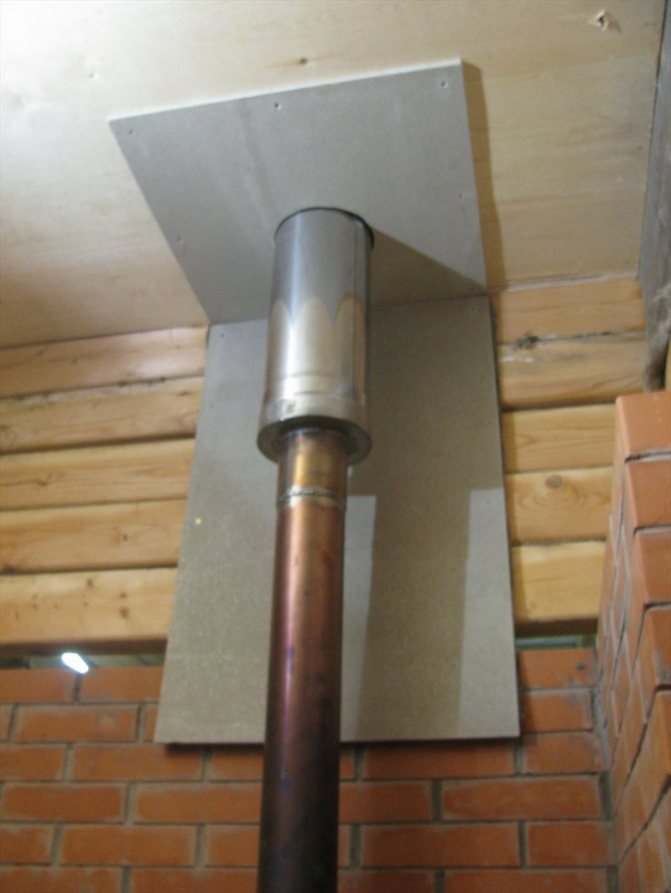
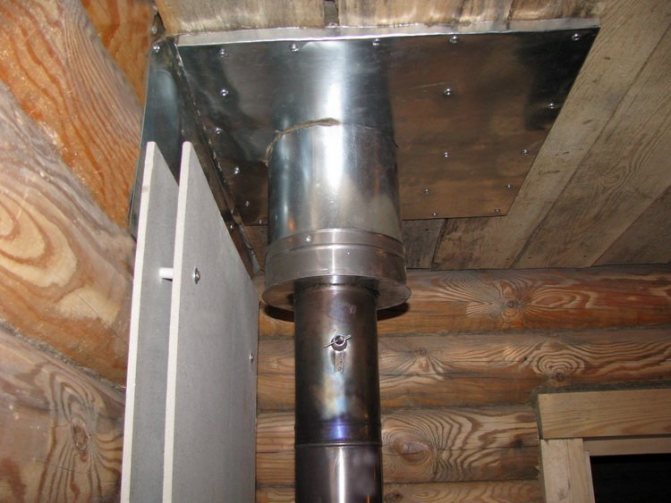
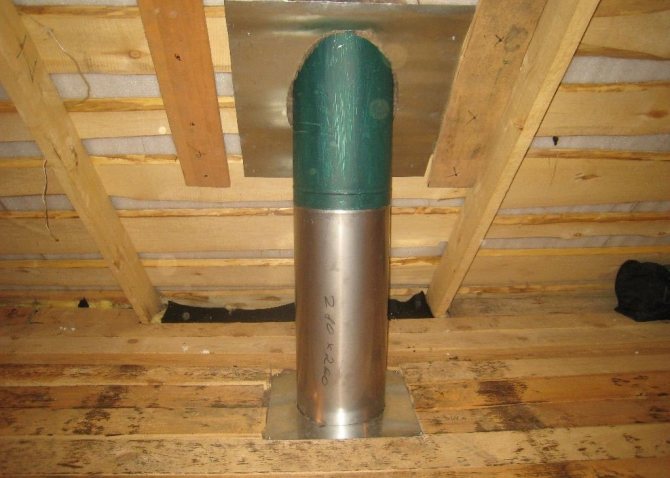
The center point at which the sandwich pipe will be held is found using a plumb line. The place that was chosen for the passage of the pipe is marked out, and then the hole is made. If it is done by hand, it is recommended to decorate it from the side of the steam room to preserve the aesthetics. To do this, you can use a sheet of stainless steel or galvanized. A sheet should be made in size that exceeds the size of the hole for the chimney.
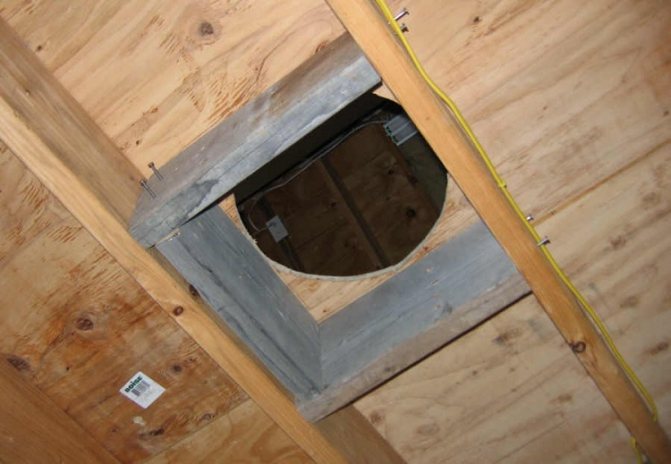
The chimney opening should be slightly wider than the pipe that will go through it
When preparing a site, it is worth paying attention to several important points:
- when installing a sandwich structure vertically, it is worth remembering that the holes are marked first at the top point, and then at the bottom points. That is, first of all, the marking must be carried out on the roof. When marking, it is imperative to use a plumb line to determine the center;
- when using production models of assemblies, it is recommended to carefully study the instructions, which usually indicate tips and preferences for installing a specific model of ceiling cut;
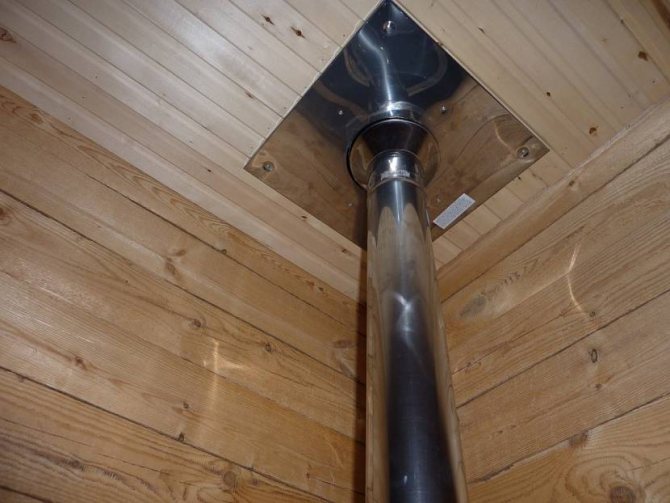
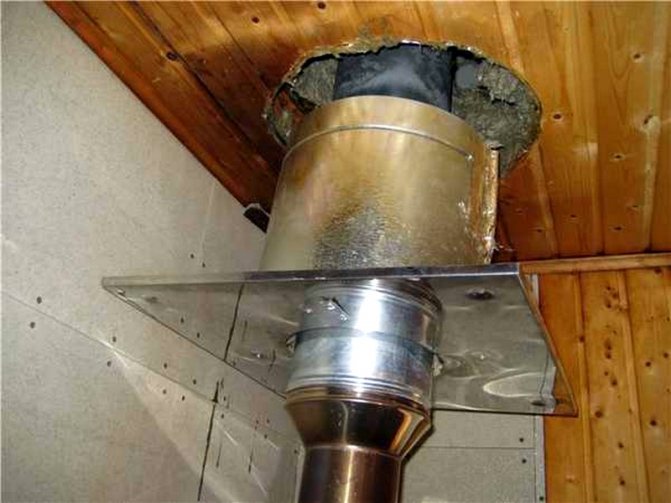
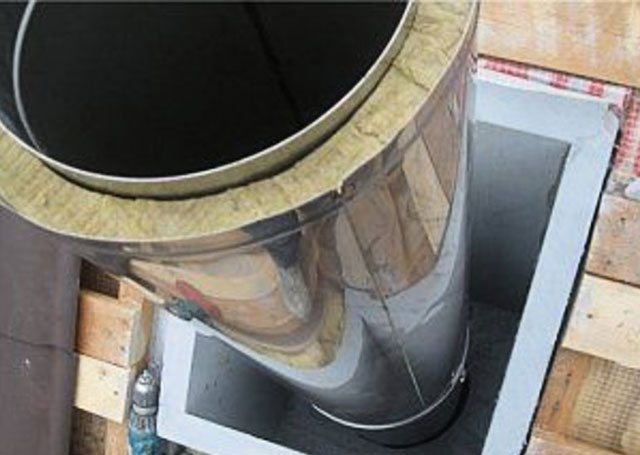
- do-it-yourself ceiling pass-through units for the chimney are made using stainless steel sheets. The hole in the sheet is made 1–2 mm larger than the sandwich pipe.
If the installation of the chimney will be carried out in an already finished building, then the necessary moment is to make changes to the design of the ceiling above the stove. Part of the beam (closest to the chimney) is cut out and reinforced with special bridges.
ebc073ba284c8310266528b9c80702f6.jpe
Wall decoration
Wall decoration by the fireplace should be made exclusively of non-flammable materials such as: gypsum, ceramic tiles, metal, natural stone.
The easiest to perform will be the use of metal sheets, which just need to be mounted to the wall. The most popular option today is the use of plaster.
Decorating the walls around the fireplace with plaster:
- Marking is done based on the corners;
- The glue is mixed using a drill and a special nozzle in the form of a mixer;
- Using a spatula, glue is applied to the primed surface and only after that each gypsum tile is fixed;
- If the tile resembles a brick in its shape, special attention should be paid to the seams into which putty of any color is applied;
- After applying the mortar, it is necessary to quickly and efficiently remove all excess building mixture with a simple sponge;
- After partial drying, the tiles must be trimmed in those places where they protrude strongly. This can be done using a simple hacksaw. You can also use a grinder.
Decorating the fireplace and walls around it
Decorating the fireplace and wall with stone
Decorating the fireplace and wall with stone
Important: at the last stage of finishing, the tiles are covered with a layer of special varnish. In the work, you can use both ready-made purchased material, and make it yourself, using special forms and a solution.
You can find detailed photos of the completed finishing of the portals in this article.
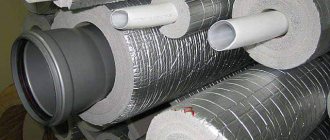
Insulation materials for bath pipes
Moisture and smoke generated during fuel combustion are aggressive factors affecting a brick chimney. The temperature difference in the cold season and the accumulated moisture deposited on the walls fills the microcracks with water, and the stone structure collapses from the inside. Small ice crystals crush from the inside and destroy it.
This is eliminated by the insulated chimney. In the process of combustion, condensate forms on the surface of the flue, which contains a chemical series of oxides. Interacting, the elements form weak acids (carbonic, sulfuric, etc.) that can destroy the metal surface. It is for this reason that the chimney must be insulated.
The main question of the owners of country houses with an autonomous heating system is how to insulate the chimney. In order to reliably insulate the outlets for the furnace or boiler, materials with a high degree of thermal insulation are used to ensure the heat balance of the chimney on the roof.
Relevant for insulating a chimney with mineral wool or basalt. Insulation is obtained from a molten volcanic rock - gabbo-basalt. It is converted into fibers, so that the insulating material has the following advantages:
- retains up to 95% of heat;
- characterized by good vapor permeability;
- differs in chemical and corrosion resistance;
- prevents the growth of fungus and mold on the surface of the chimney on the roof;
- vibration and heat resistant;
- made of ecological materials;
- does not undergo destruction under the influence of ultraviolet radiation.
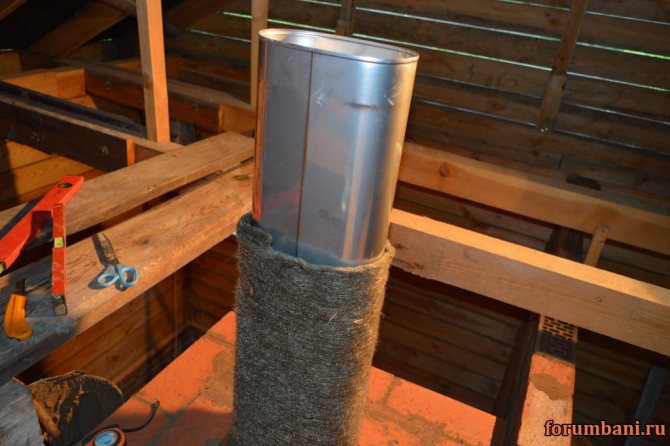
Metal "armor" in the form of a pipe made of stainless steel is used as an option for insulation. It is able to provide full protection against mechanical damage, moisture and other aggressive factors. The chimney cover is mounted on a pipe on the roof. The intertube space is filled with basalt wool, the outside is covered with insulation, 5 cm thick. An asbestos chimney can be wrapped with this insulation.
Wood shields
Wooden shields are considered one of the simplest options for insulating a chimney. Thermal insulation is made in the form of a timber frame made of plates of the appropriate size. On top of it, slate or other flooring is fixed, from which the roof of the dwelling is made. After the pipe is completely covered with wood, the empty cavity is filled with felt, slag, sand, mineral wool. Frame seams must be covered with a waterproofing compound.
Insulation of a chimney in a private house using iron and slag concrete slabs provides the smallest distance between the joints on the structure. The space inside and the corners are reinforced with mesh or wire, gypsum, clay and sand are poured in the form of a solution. Plaster is applied over the tile insulation.
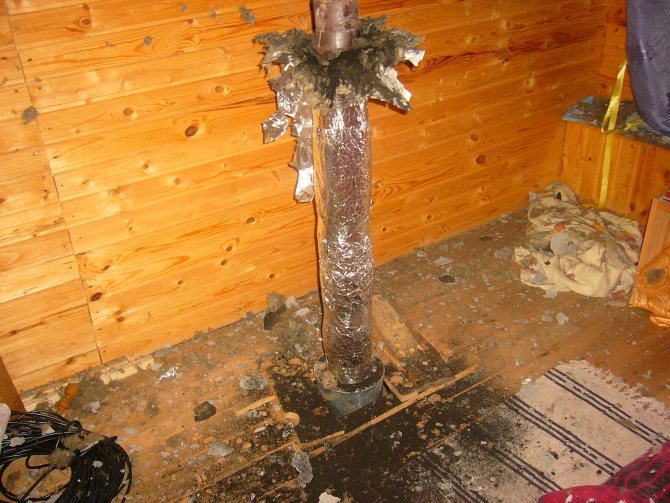
Since bath buildings are often built of wood, these objects need to be insulated for chimneys, stoves, ceilings, walls, since this material is highly flammable. You need to think about how to secure the pipe in the bath, making the thermal insulation of the smoke exhaust structure so that it cools down more slowly and condensation does not collect on it.
When solving the problem of how to wrap a metal chimney pipe in a bath, experts distinguish foil insulation and thermal insulation.
Chimney decoration - how to sheathe correctly
When performing finishing work, it is necessary to adhere to fire regulations. The gases escaping from chimney structures are at very high temperatures. It is imperative for all types of chimneys to provide sufficient draft force.
Related article: How to make snow guards on the roof yourself
One of the main requirements for finishing chimneys is the use of exclusively non-combustible materials. Therefore, such a solution, how to sheathe a pipe on the roof with a metal profile, is considered the best. When the chimney is installed next to the ventilation ducts, it must be brought out above the common hood.
Today, stainless steel chimneys with internal thermal insulation have become widespread. They are allowed to be taken out on the roof without brickwork, using a metal apron.
The finishing methods for canals opening onto the roof are varied and largely depend on the preferences of the homeowners. It is possible to sheathe the pipe with profiled sheet, clinker bricks, cement-fiber plates, lime-cement plaster, artificial or natural stone, a finished double-circuit structure. The last option is convenient and attractive.
Insulation of asbestos-cement pipes
To complete the entire cycle of work, you will need to perform several operations:
- we clean off the remnants of the solution, dirt, paint from the surfaces; we assemble the finished steel protective device (casing), which consists of several parts and is put on the pipeline as a simple clamp of 2 parts; put on the first part and fill the inner space with a layer of thermal insulation; Example of thermal insulation, install the following sections of the chimney , the work is carried out according to a similar scheme; at a certain distance, the pipes are fixed to the wall with self-tapping screws with dowels; after going to the roof and before installing the protective visor, it is necessary to close the inner space between the steel lining and the asbestos-cement pipe.
Stages of work
- Carrying out markings and layouts of the pipeline.
- Depressions are made in the wall in the places where the pipes run. When calculating the dimensions of the recesses, the thickness of the insulating material and the pipe embedding material must be taken into account.
- In order for the pipes to be securely attached to the wall, holes are made in the recesses with dowels and brackets.
- If pipes made of metal-plastic are used, a special casing must first be put on them. It will keep heat in the pipes and prevent heat loss.
- Removable fittings must not be bricked up in the wall.
- The pipes are placed in a special casing and mounted in the wall. It is needed to prevent heat loss.
- Checking the system operation. At the end of how the system has been tested, it is necessary to close the grooves with a special solution.
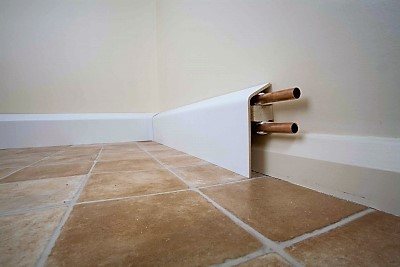
- In places where pipes enter the floor, you need to install decorative overlays.
They are shown in the photo: