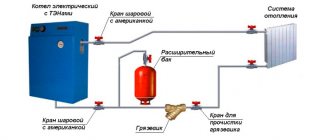
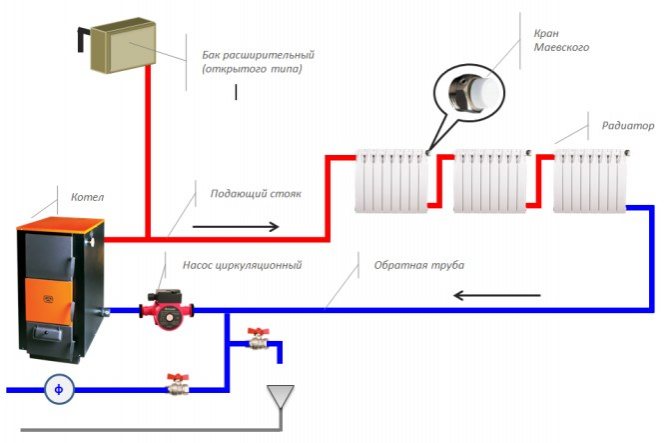
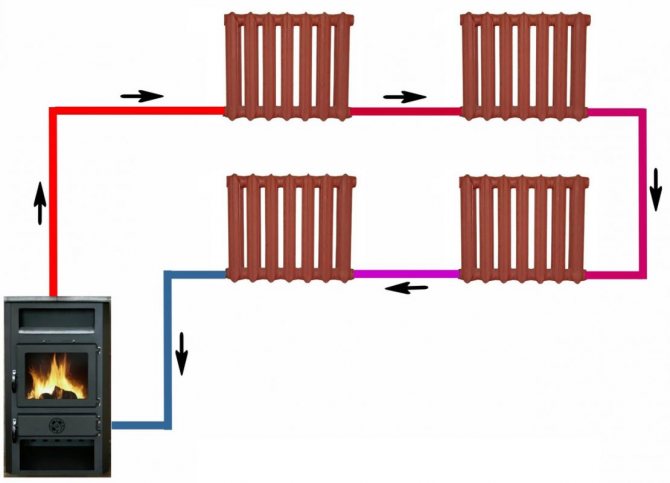
Principle of operation
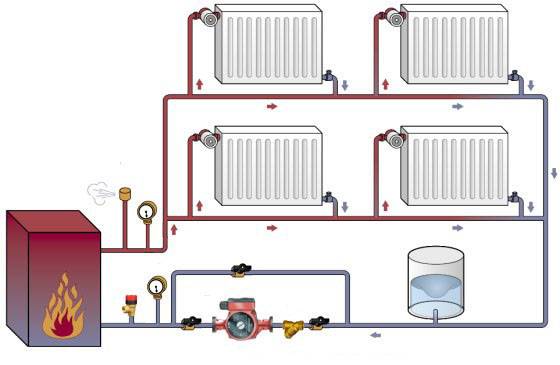
The central element of the entire system is the water heating boiler, from which the hot coolant flows into the radiators installed throughout the house. When moving through pipes and batteries, the heated water gradually cools down and in this state returns to the boiler through the return pipe.
In the boiler, it heats up again to the desired temperature and starts a new cycle through the pipes. The cycles are constantly repeated while the thermogenerator is running.
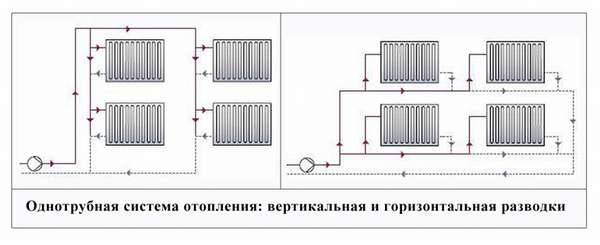
Single-pipe system diagram
This scheme has its own nuances. So, the lowest temperature of the coolant (40-50 ° C) before its return to the boiler is recorded on the most distant (last in the chain) radiator. This is not enough for normal room heating.
In order to prevent an undesirable temperature drop on the last radiators, it is necessary either to increase the heat capacity of the batteries, or to heat the water in the boiler even more. Both of these options are too expensive.
You can resort to another method of supplying hot water - to install a circulation pump in the pipe circuit, accelerating the coolant through the system. The efficiency of such a technology, of course, will be higher than the above two options. But in suburban conditions, the technology using a pump may be of little use due to possible problems with the power supply.
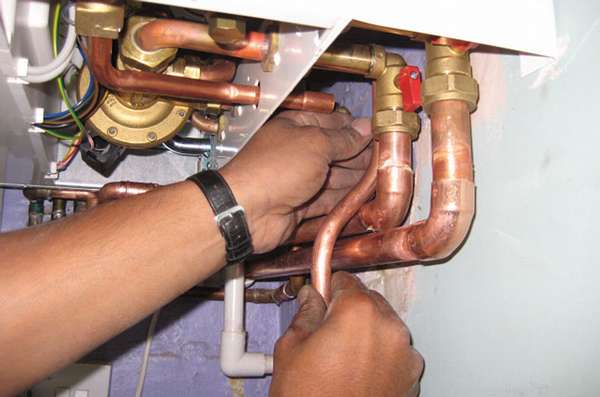
In such cases, the best option that solves the problem of delivering hot water to all radiators may be the installation of a boost manifold. This element is a straight high pipe through which the heated water leaving the boiler accelerates to such an extent that it does not have time to cool down in the intermediate radiators on the way to the last battery.
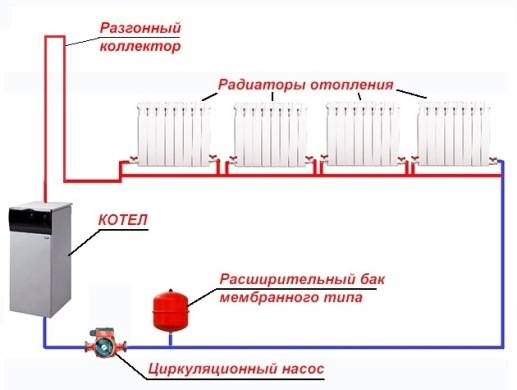
Boost manifold application
Thus, a feature of a one-pipe system is the absence of a return pipe in it, which serves to return cooled water from the radiators to the boiler. In this case, the reverse acting pipe is the second half of the only main pipe.
When choosing a heating scheme, it should be borne in mind that one-pipe technology does not work when the final radiator is located below 2.2 meters. It can be used in two-story houses, and the more the straight collector rises above the boiler, the faster the water will flow in it, and the system itself will be less noisy.
Pros and cons
Advantages of a one-pipe system:
- A single circuit can be mounted not only in the room, but also under the walls.
- The specified heating scheme allows to reduce the cost of the project.
- Thanks to the possibility of a phased connection of room heating devices, it is possible to connect all components of the heating circuit to a distribution pipe.
- The degree of heating of the radiators is regulated by serial or parallel connection of these elements to the system.
- When using the option with one main pipe, you can install a solid fuel, gas or electric boiler.
- The use of this scheme allows you to direct the flow of heated water wherever the owner of the house wants.
Some disadvantages:
- If the heating network is not used for a long time, it will take a long time to start it up.
- It is difficult to adjust the uniform distribution of heat between floors in a house consisting of two or more floors. To compensate for the drop in water temperature in the lower half of the pipe, it is possible to install more radiators on the lower floor, but this method makes the project more expensive.
- It is impossible to turn off one of the levels of a multi-level system if, for example, repairs are required on one of the floors of a building.
- Air pockets can appear in the chain if the slope is not maintained in it. Plugs, in turn, reduce heat transfer.
Installation of one-pipe heating
The correct design of a single-pipe heating system requires knowledge of a number of process features.
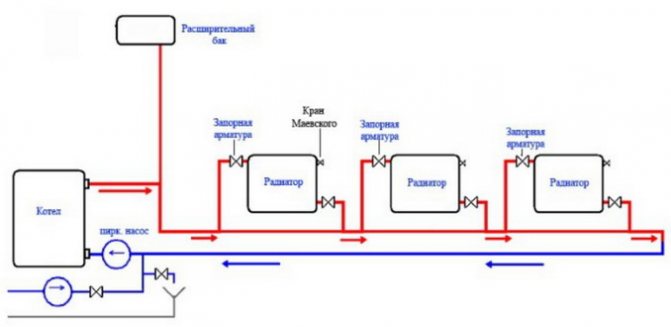
The first step is to install a heating boiler. The pipes must be installed so that a slope of at least 0.5 cm per one running meter of the pipe is maintained along the entire line. If this is not done, then air will concentrate on the raised area, creating plugs that are difficult to pass through for the coolant.
However, their occurrence cannot be completely ruled out. Therefore, when designing, it is necessary to plan the installation of special Mayevsky cranes in the system, designed to remove these obstacles.
In front of the heating elements that are connected to the circuit, shut-off valves must be installed. If they are available, it will not be necessary to drain the water from the system in the event of its repair.
The drain valve must be installed at the lowest point in the system. At the same time, an expansion tank must be connected to the uppermost point of the boost manifold to control and stabilize the volume of water when the coolant overheats.
The collector should rise 1.5 meters or more above the floor level. In this case, the pipe should be securely attached to the wall, avoiding unnecessary bends.
The system can be wired both horizontally and vertically. In the first case, the smallest number of pipes is used, and the devices are connected in series. True, with horizontal wiring, air locks can occur, and the heat flow cannot be adjusted.
In the case of vertical wiring, the pipe is laid in the attic. At the same time, pipes extending from the central pipe lead to the radiators.
www.domskotlom.com
Pros and cons of the system
A single-pipe heating system has its positive and negative sides. Knowing about these features, you can accurately answer which one-pipe or two-pipe system is better. So let's start with the pros:
- The biggest advantage is savings. With a one-pipe system, there is no need for jumpers at the batteries, return risers and other elements. This gives an almost two-fold reduction in pipe consumption compared to a two-pipe heating system.
- It is possible to regulate the supply of coolant to each heating device without significantly affecting the operation of the entire system. This is achieved by installing modern devices such as balancers, ball valves and bypasses, thermostatic valves, etc.
- Another plus is the aesthetics of the entire system. Since the number of pipes here is small, it is convenient to hide them behind false walls or panels.
All this makes the one-pipe system popular. But it is also worth remembering that the scheme of all communications will be quite simple. This makes it possible to install the heating yourself without much effort.
But here, too, there were some drawbacks and there are quite a few of them. Disadvantages of the system:
- In order for all heaters to work efficiently, it is necessary to ensure sufficient pressure in the system. This circumstance leads to the need to install more powerful pumps, which entails an increase in operating costs.
- The installation of the circulation pump itself may also be a disadvantage. The two-pipe system does not need such additional equipment, it is installed only to increase efficiency.
- When developing a diagram of a one-pipe heating system, it is necessary to provide for the location of the pipes so that the gravity of the coolant is ensured. In practice, this feature implies the installation of an expansion tank at the highest point of the system. As a rule, this additional detail is mounted in the attic.
But, despite such disadvantages, cheapness prevails, and one-pipe heating systems are most often found in private houses, especially with a small living space.
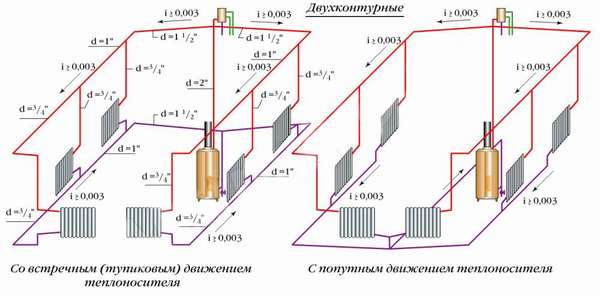
Combination of two-pipe and one-pipe options
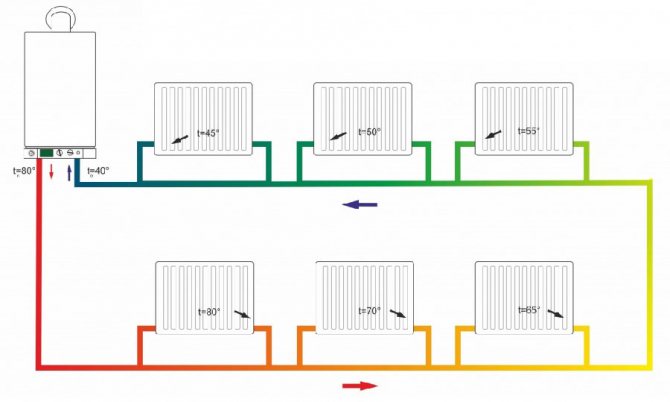
In private two-story (or higher) houses, both two-pipe and one-pipe vertical risers can be used, together with horizontal single-pipe wiring across rooms with a variety of ways to connect heating devices.
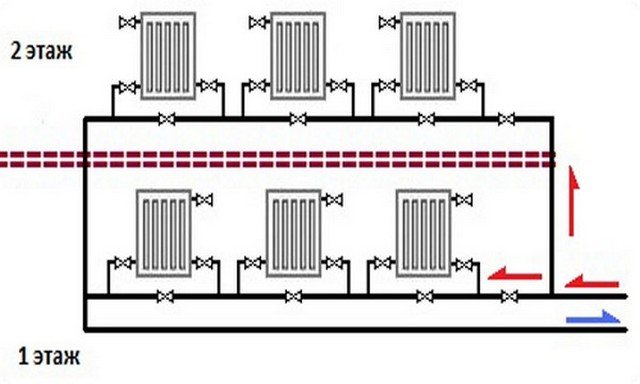
Diagram of a one-pipe heating system for a 2-storey building.
In this case, the temperature difference in room radiators is calculated by the formula ∆T_p = ∆T⁄P, where P is the number of heating devices connected in series (in this case, P = 3). A horizontal single-pipe line must flow P times more liquid than horizontal pipes with a two-pipe wiring. This will require an increase in the pump power for its forced circulation and high consumption of electricity, but the hydrostability of the circuit will be high.
Varieties of one-pipe systems
Despite its simplicity, a single pipe heating system has variations. In private homes, two types can be used:
- Sequential or unregulated system. In this case, the coolant enters each device in turn, the output is water with a lower temperature, which enters the next radiator.
- Regulated system, popularly nicknamed "Leningrad". This option allows you to regulate the flow of coolant into each radiator. The devices are connected to the line in parallel.
The first option is considered the simplest and cheapest to perform. But it does not allow regulating the supply of the coolant, so the batteries that are located farther from the boiler will have a lower temperature. For this reason, the sequential one-pipe system is used only for heating small houses or individual rooms.
The "Leningrad" system is better in terms of regulation and uniform heating of all devices. Here it is possible to regulate the flow of coolant into each device using shut-off valves. It is these systems that can be installed in houses with a large area.
In addition to the aforementioned principle, one-pipe systems are subdivided according to the method of circulation of the coolant. Three types can be distinguished here:
- With natural circulation. In this case, the coolant passes from one radiator to another under the influence of gravity.
- Forced circulation. Such systems are considered to be more efficient than the first option. For forced circulation of the coolant, a special pump is used.
- Combined option. Installation is carried out according to the scheme of a system with natural circulation, and to increase efficiency, a circulation pump is installed in it (through a bypass).
The first of the listed types of system works effectively only with a short route length, for this reason it is used only in houses with a small heated area. To improve circulation, it is advisable to install an acceleration collector immediately after the boiler. This design implies the rise of the supply pipe by a meter or one and a half above the level of the first radiator. It should also be provided for the installation of an open-type expansion tank located at the highest point of the system.
Despite its lower efficiency, the system with natural circulation of the coolant is quite popular. This is due to non-volatility. If an electrically independent floor-standing boiler is installed in the house, then the power outage will not affect the operation of the heating system in any way.
Note! More efficient, but at the same time dependent on electricity, a structure with forced circulation of the coolant is considered.Such systems can have a long circuit and more than one. In the latter case, several circulation pumps are installed, separate for each circuit.
If in your area there are frequent cases of power outages, and an electrically independent floor-standing boiler is installed, then it is advisable to install a combined one-pipe system. In this case, in the absence of electricity, your house will not freeze.
Options for single-pipe heating device schemes
One-pipe heating systems are subdivided into:
- By the type of coolant circulation - with natural and artificial circulation.
- Closed (sealed) and open.
- Vertical and horizontal.
- With top and bottom wiring.
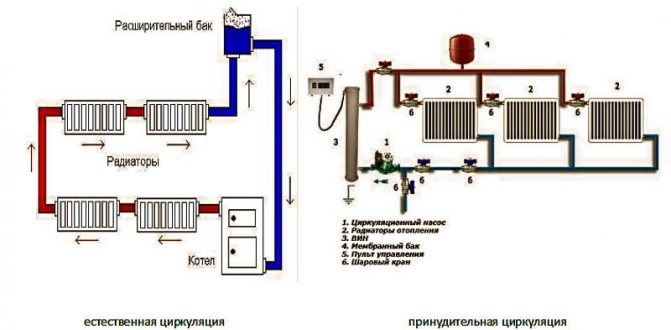
Systems with natural and forced circulation
Previously, the plan for single-pipe heating systems for private houses had an expansion tank under the ceiling, hot water entered it from a stove or other heating unit, and then it flowed by gravity through pipes into radiators. The system was quite simple and reliable and was successfully implemented by craftsmen in the modernization of the furnace heating system in small one-story houses with piping lengths within 30 m (and before, most houses had an area within 50-70 m² and had a shape close to a square).
To heat the water in the furnace, pipes were installed, which served as heat exchangers between the coolant and the fire in the furnace. But progress does not stand still, and stoves were replaced by coal, gas and wood-burning boilers. Houses began to grow over heated kitchens, verandas, bathrooms - the area began to increase, the systems became more complex, and the circuit stopped working.
Progress does not stand still, and modern automatic boilers are all produced with built-in circulation pumps. For heating units that are difficult to automate (solid fuel boilers), the pump is installed separately. The main reason is a strong overheating of the pump with strong fuel combustion. The forced circulation system allows you to implement the most complex heating schemes, including underfloor heating - with natural circulation, floor heating simply will not work.
Another reason for using forced circulation of the coolant is to increase the area and number of storeys of houses under construction (a two-story house or a house with an attic is cheaper than a one-story house of the same size).
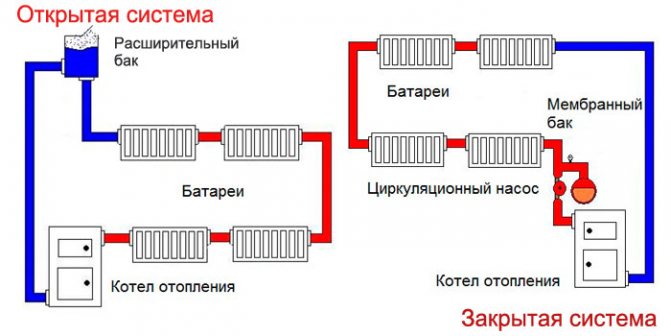
Open and closed heating system
Previously common systems with natural circulation were most often open, the water level in the tank increased with overheating, and decreased with cooling. A branch pipe was installed in the tank to release excess pressure and steam to the atmosphere (or sewer) in case of overheating of the system.
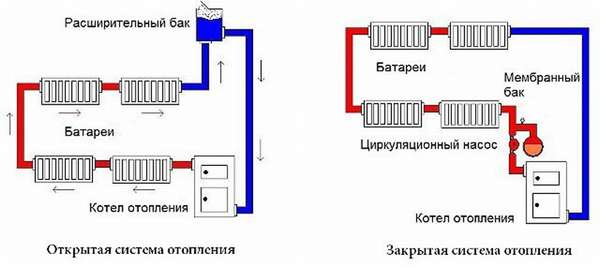
Fully automated modern boilers (fueled by gas, fuel oil, pellets) have a small expansion tank to compensate for a slight increase in the coolant pressure. But in principle, the pressure depends on the temperature, and in a working boiler, when the pressure rises, the boiler simply turns off, and the pressure drops.
The situation is much worse in boilers fired with coal, peat or wood - burning in them cannot be stopped quickly, and overheating of the water is possible. Therefore, when developing a project, the system necessarily includes a sufficiently large expansion tank, a valve for discharging steam into the sewer or into the atmosphere, and an automatic water make-up system. Even when installing modern solid fuel boilers, an open system is sometimes used.
Top and bottom wiring
The piping can be laid above or below the radiators. There is no fundamental difference, but in private houses, a scheme with a lower wiring is more often used - it is more beautiful. Overhead routing is rarely used in office or industrial buildings - less likely to hit the pipes with a load or feet.
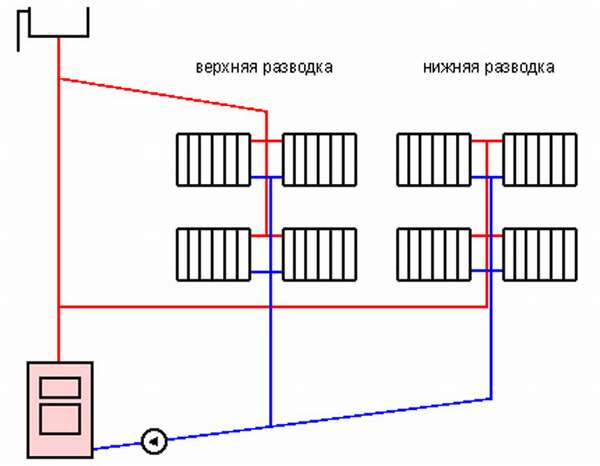
Vertical and horizontal
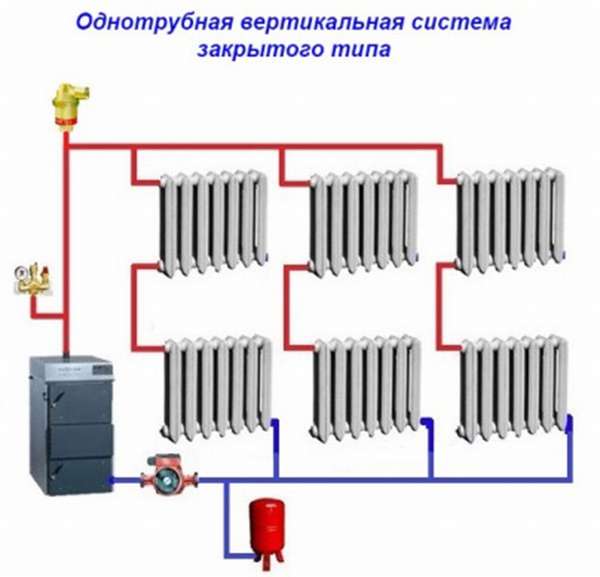
The vertical one-pipe heating system of a multi-storey building was often used in multi-storey buildings; water was supplied to the attic or to the upper floor and descended through separate risers, successively passing through the radiators. Such a system is called Leningrad or Leningrad.
Horizontal - when the pipe is laid horizontally, the heating devices are connected in series - used in one-story buildings.
The most efficient one-pipe system for houses with 2 rooms
In small houses, horizontal piping is always used.
The most efficient one-pipe system for houses with 3+ rooms or over 60m2
The choice of a wiring diagram for a medium-sized private house is reduced to horizontal for a one-story house and vertical one-pipe for two-story houses. Heating is supplied from the second floor from the top, lowered to the bottom and collected back to the boiler.
If the house is very large (more than 150 m²), it is worth ordering a project in a specialized organization - it is almost impossible to calculate all the parameters of the system yourself. In any case, you should choose a more progressive and economical scheme with forced circulation.
System installation
If you decide to make a one-pipe heating system in your house from scratch, then the primary task will be to draw up a diagram. It is necessary to clearly determine the place of installation of the boiler, expansion tank, circulation pump, radiators and other devices and devices.
The installation sequence for a one-pipe heating system will look like this:
- First, the boiler is mounted. It is better to install it at the bottom of the building, but not in the basement. At the same time, do not forget about fire safety measures (around the device, walls, floors and ceilings are trimmed with non-combustible material). Together with the boiler, a chimney is equipped.
- Next, we mount the branch pipe from the boiler. For this, it is better to use pipes with a diameter of at least 25 mm. A highway is pre-laid throughout the house, and heating radiators, valves and other devices are installed. When installing, do not forget about the required slope of the pipes. The coolant must move by gravity from the boiler, pass through all the batteries and return to the boiler again. This is very important if your system from natural circulation or combined type. If there is a pump, the slope can be omitted.
- When connecting the main pipe to the boiler, it is necessary to install an expansion tank, the type of which depends on the selected heating system.
- It is advisable to install filters on the return line before entering the boiler. This is to protect all equipment from debris and impurities.
If you are installing a combined type system or with forced circulation of the coolant, then you need to install the pump using a bypass. In the first option, such a combination is required, and in the second it is desirable. Installing the pump through the bypass will make it possible to turn it off in the event of repairs or power failure, while the heating system will continue to work.
Before starting operation, it is necessary to carry out a pressure test. This process is done using a special pump that raises the pressure in the system. If the pressure in the system is maintained during the pressure test, then there is no leakage and the heating season can begin.
Basic wiring diagrams
All types of wiring can be implemented, depending on the way the coolant moves along the contour.
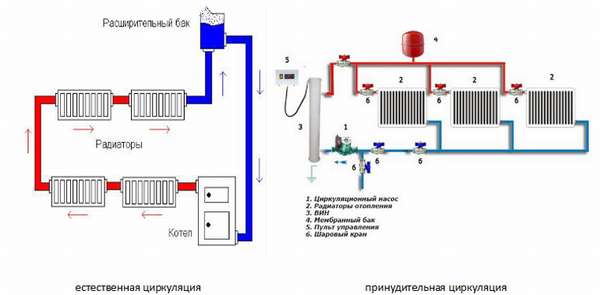
- Gravitational. In other words, the coolant moves along the contour by gravity.
- Forced circulation.
In order to understand the design, all the pros and cons of each method, it is necessary to consider the device and the principle of operation of the simplest gravitational CO.
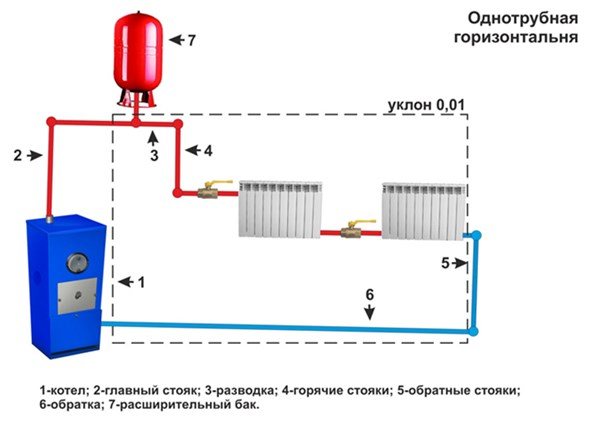
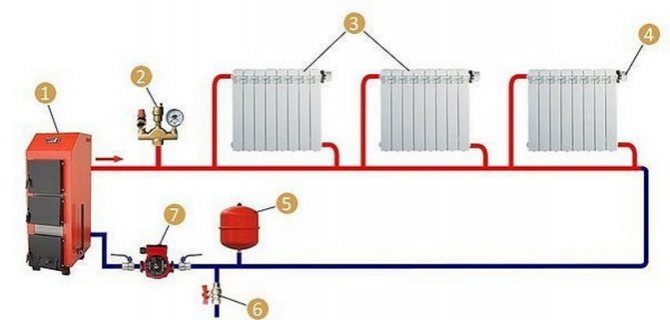
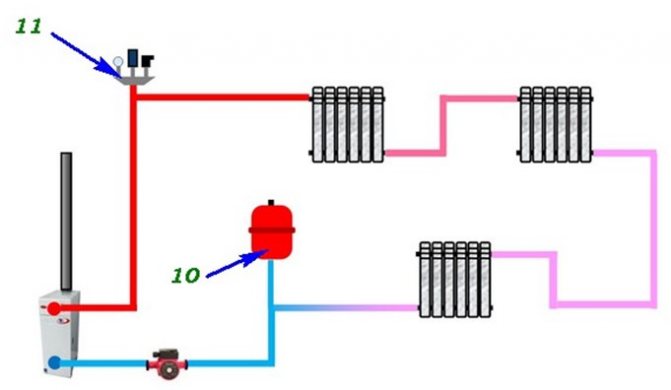
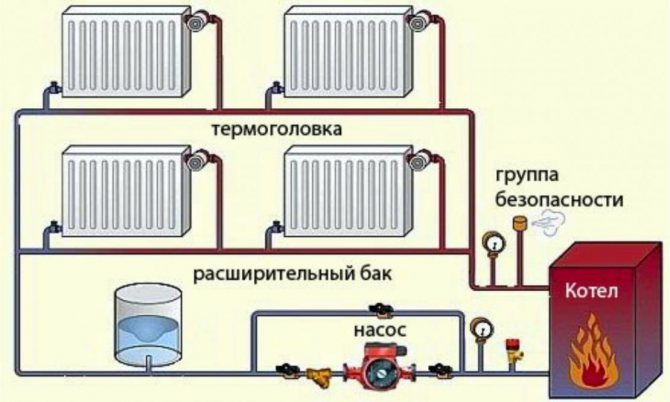
This CO consists of: a heat generator (1), a main pipeline (2; 3; 4; 5; 6), to which batteries are connected, and an atmospheric or membrane expansion tank (7), which compensates for the thermal expansion of the coolant.
The boiler heats up the water, which rises up the riser, and from there goes down to the radiators. The coolant cooled in the batteries is returned to the boiler unit for further use. As you can see, this embodiment does not provide any device for moving the coolant. In gravitational COs, a so-called booster manifold or riser is used to create pressure in the circuit. On the diagram, it is indicated by the number 4.
For proper operation, it is necessary that the height of the boost manifold above the first radiator in the circuit is at least one and a half meters.
In order for the coolant to move by gravity along the contour, one booster riser is not enough: the slope of the line is necessary. The normal slope should be 5 ° or 0.01 meter (10 mm) per 1 running meter of pipe. The condition for the last radiator in the circuit to rise above the heat generator must be met.
Advice! To avoid stagnation of the coolant, the following rule should be followed: the higher the last radiator in the circuit above the boiler, the better. Despite this, this value should not exceed 3 m.
What else affects the operation of such a CO: the length of the circuit, the diameter of the main pipeline and branches, and the method of connecting the radiators.

The figure shows four main methods of mounting radiators in a single-pipe circuit: "a" and "b" - serial connection; "And" and "g" - connection parallel to the main pipe. As is clear from the figure, normal gravity of the coolant can only be provided by a circuit with a lower series connection of radiators (a). In practice, this method has all the disadvantages that are inherent in one-pipe CO.
To improve heat transfer, the battery connection scheme was modernized (b): this method of installing radiators contributes to a more uniform heating of all sections of the batteries (radiators, registers, etc.). This method also has disadvantages: such a connection is practically ineffective when water moves by gravity; an even greater temperature difference of the coolant is created between the first and the last battery in the circuit. Installing a circulation pump in the circuit will help to solve the first problem.
In practice, it is not only the pump that needs to be installed. To release air from the batteries, it is necessary to install automatic air vents or Mayevsky taps on them.
This layout will no longer be gravity, so the slope of the pipeline can be disregarded.
If it is planned to install CO with a closed expansion tank (10), then the best place for its installation is the return branch of the main, in any place convenient for installation. When used in this scheme, a closed safety group (11) is used, consisting of an explosive valve, a device for pressure control and a device for venting.
Such a CO is fully functional and has the right to exist. Moreover, it is successfully used for heating small one-story rooms. Further, the modernized scheme of the one-pipe heating system "Leningradka" will be considered.
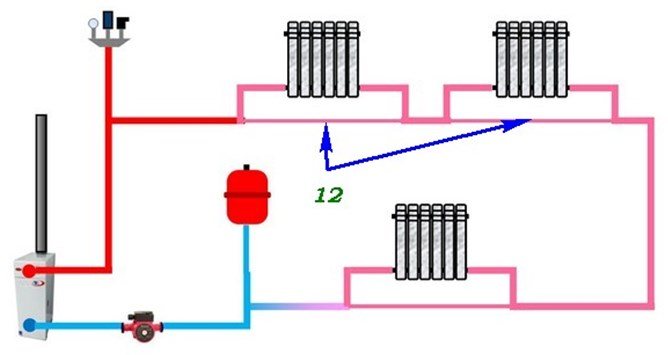
Why this CO was named "Leningradka" is impossible to know for sure. Some sources claim that this particular scheme was developed and tested in the "Northern Capital". Others, that the given name was received as confirmation of the economy of this heating system. "Leningradka" is successfully used in both mass and private construction.
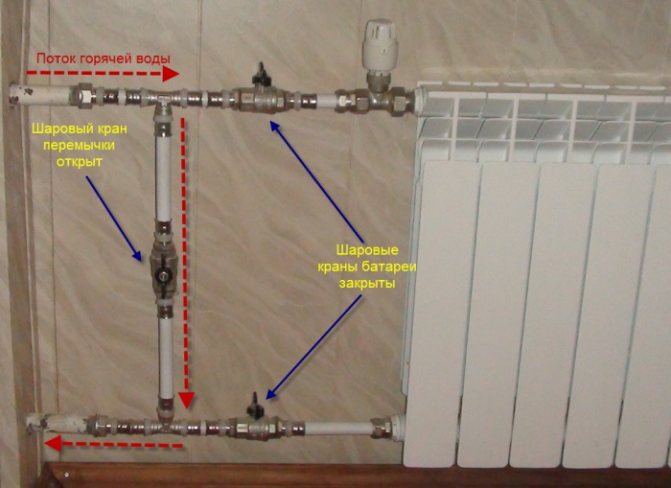
The main feature of this technology is the presence of a jumper between the radiators (12). It is this design that allows the heat to be more evenly distributed between the batteries. The disadvantages are the inability to cut off and the difficulty in temperature balancing each battery.
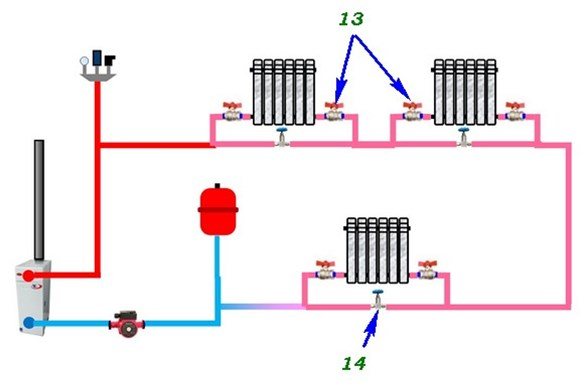
When installed on each radiator shut-off valves (13), and in each jumper of the balancing valve (14), the heating system loses these disadvantages. For better heat dissipation, you can use this wiring diagram with diagonal battery connections.
This modernized type of CO allows you to already make a branch for heating an additional room, or use it to implement heating of a small two-story building.
The problem with any one-pipe system is that, passing through all the batteries, the water cools down quite strongly, and this can lead to the formation of condensate on the heat exchanger of the boiler. The installation of a buffer tank, or as it is also called a heat accumulator, will help to solve this problem. A diagram of a one-pipe heating system with a heat accumulator is shown in the figure below.

Such a system will work as follows: After starting the boiler, water will circulate in a "small circle" boiler - heat accumulator - boiler, thanks to a thermostatic valve installed on the supply pipeline after the buffer tank. After the temperature reaches the desired value, the valve opens and supplies the heated coolant to the radiators.
The cooled water will enter the heat accumulator and mix with the heated coolant. This solves the problem of low return temperature and the appearance of condensate on the heat exchanger of the boiler unit.
What is a one-pipe system with a bottom wiring
From the name it is clear that all the batteries are connected to one pipe laid from below along the perimeter of the heated premises. The batteries are connected to the pipe in series, the input / output in the batteries can be bottom or diagonal (the second option has the best performance in terms of heating efficiency). All batteries can only work at the same time.
To expand the possibilities of temperature control in each room, a bypass system is used - the batteries are connected in parallel to one pipe, they can work separately and simultaneously, the heating temperature of each battery is additionally regulated.
By the type of contour, a one-pipe system is open and closed.
- In the open one there is an expansion tank for receiving an increased volume of water and draining excess water. The cistern is associated with the atmosphere, which gave the system the name open.
- In a closed system, the expansion tank is closed, the entire system is pressurized. To prevent emergencies in a closed version, a safety group is mounted on the system: a pressure gauge, an air vent and a safety valve.
A single-pipe system with a bottom wiring can only work with forced movement of the coolant (with a pump), and even then the length of the circuit is limited. Rather, not so much the length of the circuit as the number of connected batteries and their actual heat transfer.
This knowledge is needed in order to understand the principle of the system and know what can be achieved with its help. Such knowledge makes it possible to make installation more consciously, it will be clear why each pipe and each crane is needed. The bypass system significantly improves the characteristics of one-pipe heating, but it is more difficult to install, more expensive in terms of the number of components and cost. In addition, it can only be installed over floor coverings, otherwise the adjusting needle valves will be inaccessible.
Video - "Leningradka" - heating system
How to calculate the optimal number of radiator sections
The climatic indicators in the premises must meet the requirements of SNiP 41-01-2003, the calculation method is also given there. These are rather complex calculations; it is impossible to do them without serious knowledge of heat engineering. We list only a few initial data that are taken into account during calculations.
Download file - SNiP 41-01-2003
SNiP 41-01-2003 (Heating, ventilation and air conditioning)
- On the premises.Volume, thermal conductivity of walls, ceiling and floor, climatic zone of location, maximum temperature values, number and characteristics of window and door openings, frequency of air exchange by ventilation systems, spatial arrangement of the room, etc.
- Heating systems. The temperature of the heating medium at the inlet and outlet, the speed and type of the heating medium, the physical characteristics of the heat exchangers, the total power of the heating boiler, etc.
This means that you cannot do the exact calculations yourself. For such cases, there are general recommendations of practitioners, which are quite enough for the installation of heating. Moreover, today on each battery it is possible to adjust the heat transfer power, taking into account the actual conditions.
Although the volume of air heats the battery, for simplicity of calculations, square meters of the room are used, while the standard height of the rooms is taken. For buildings, the heat loss coefficient of which does not go beyond the requirements of existing regulatory enactments, it can be assumed that 100 watts is enough for heating 1 m2.
Taking into account the specific architectural characteristics of the premises, you can more accurately find out the costs of thermal energy by the formula
KT (amount of heat) = 100 W / m2 × P × K1 × K2 × K3 × K4 × K5 × K6 × K7where
- P is the area of the room in square meters;
- K1 - coefficient of glazing of window openings, can be in the range of 1.27 ÷ 0.85, depending on the characteristics of glass units. For single - 1.27, for double - 1.0, for triple - 0.85;
- K2 - coefficient of thermal insulation of external walls. From 1.27 for walls one and a half bricks thick to 0.85 with high thermal insulation. Determined "by eye";
- K3 is the ratio of the area of the windows to the area of the floor.
Further, the minimum temperature (K4), the quality of the outer walls (K5), the type of attic (K6) and the ceiling height coefficient (K7) are taken into account. The total heat demand must correspond to the power of the boiler, so that the boiler does not work constantly in critical modes - it is better to make a power reserve of approximately 20%.
Of course, none of the "amateurs" does such simplified calculations, and this is not necessary. Our advice - take about 120 W / m2, take into account the heat transfer of one section of the battery (given by the manufacturer), count the total number of sections for each room and correlate it with the power of the boiler. Do not be alarmed that the temperature will be too high and there will be large payments for heating fluids - each battery can be separately regulated.
Calculation and selection of equipment for one-pipe wiring
For the device of one-pipe wiring, you will need the following components:
- boiler;
- heating devices;
- pipelines;
- circulation pump;
- Mayevsky cranes;
- expansion tank (open or closed);
- coarse filter;
- security system (safety valve, air vent, pressure gauge);
- fittings and adapters.
When calculating a one-pipe heating system, the following parameters are taken into account:
- To select heating equipment in terms of power, you need to know the area of the house. For heating 10 squares of area, you will need a boiler power of 1 kW.
- The required number of radiators can be calculated in the following way: increase the area of the room by 100 times and divide by the heat transfer of one section of the battery. This parameter can be found in the data sheet for the heater.
- It is important to decide on the material and diameter of the pipelines.
- The choice of the expansion tank parameters depends on the volume of the circulating heat carrier and the type of system (closed or open).
- The pumping equipment is selected in terms of power, but for this it is necessary to carry out preliminary calculations.
Subject to the correct calculation and selection of components, as well as adherence to the installation technology, one-pipe wiring can be quite effective. It is also important to correctly configure the system at the first start so that in the future it will work without your intervention.
Installation of a one-pipe heating system
To carry out installation work, in addition to ordinary tools, you also need to have a special apparatus for welding propylene pipes, it is not very expensive, it will not be difficult to learn how to work with it. The standard set includes scissors for cutting pipes - it is very convenient to use them, the cut is smooth.
How to install the heating system? The work should be divided into several stages.
Stage 1
You need to make a sketch of the heating system, think over the location of the boiler on it, where and how the pipes will lie, how many, where and what kind of radiators need to be installed.
Do not expect that the sketch will work the first time, after the first attempts to markup, there is a high probability that you will have to make changes. It may be necessary to create several circuits for the removal of cold water, and this will require the purchase of additional plumbing fixtures and fittings. When sketching, take into account the power requirements of the boiler and the optimal physical characteristics of the heat exchangers.
Stage 2
Purchase of materials. Count the number of all turns, tees and transitions, couplings, ordinary ball and needle valves, monitoring and control systems, the length of polypropylene pipes.
An important note - if you have an open-type heating system, then you can buy ordinary pipes, if the heating system is closed (operates under a pressure of 1.5 atm.), Then the pipes must be reinforced with foil. If the contour is located under the floor, you need to purchase insulation.
When all calculations are made, increase the total number of pipes and fittings by 10%, this will cover non-productive waste and possible errors. In the end, it will be much cheaper to increase the amount of materials than the need to “freeze” them during the work and once again go to the store to buy the missing one.
Recommended pipe diameters depending on the expected capacity of the heating system.
| Nominal diameter in inches | Maximum throughput of the coolant | Maximum heat load |
| ½ | 5.7 l / min | 5.5kw |
| ¾ | 15 l / min | 14.6 kW |
| 1 | 30 l / min | 29.3 kW |
If the calculated pipe diameter is larger than the standard diameter on the radiator, purchase the appropriate adapters.
Stage 3
Make markings in place, stretch pipes, arrange batteries, fittings and taps, re-check all components. Do the markings carefully, use a level.
Everything has been prepared, checked and recalculated, a plan for the heating system has been drawn up, the ultimate goals are clear, you can proceed with installation. If you are installing a heating system during the construction of a building, it is better to lay pipes under the floor, if the building is already standing, you will have to fix them at the bottom of the wall. Pipes under the floor should be insulated, for this there are special insulators, they are very effective and easy to install.
One more thing - are you going to make an ordinary one-pipe insulation system or a bypass one? The second is somewhat more complicated and requires more reinforcement. But it allows you to adjust the temperature of each battery and, if necessary, repair or replace them without completely shutting down the system.
Our advice - for a small country bath with one or two rooms, you can use an ordinary system, for buildings with three or four rooms, it is better to mount a bypass system.
Start with the boiler, and when choosing the installation site, take into account the free space and the possibility of flue gas discharge. There is no single algorithm for installing boilers, much depends on its type and design features. Boilers can be floor-standing or wall-mounted, with different technical characteristics, dimensions, etc.The main rule is to strictly follow the manufacturer's recommendations for the installation and removal of exhaust gases, take into account the requirements of SNiP II-35-76 and SNiP 2.04.05-91.
BOILER ROOMS. Updated edition of SNiP II-35-76. BOILER PLANTS. Official edition
Updated edition of SNiP II-35-76
Design and preparation of materials
It is necessary to start by building a sketch of the future one-pipe heating system in the house: determine the installation site of the boiler, the laying of the pipeline, the location of the radiators. In the process, the required boiler power, the number of sections in the radiators are calculated. These calculations are painstaking and require taking into account many factors, in particular, heat loss in the house through walls, windows, doors, ceiling, roof, ventilation system parameters, location and area of rooms, climatic factors.
The calculations are unlikely to work the first time, so get ready to make repeated changes, but rather entrust this matter to professionals.
When everything is calculated, it's time to go shopping. Make a detailed list of the number of all elements (bends, tees, couplings, valves, etc.), as well as the length of the pipes. Please note that for a closed-type system, polypropylene pipes are taken with foil reinforcement. If the pipeline will be laid in the basement / basement / under the floor, then a heater must be used to eliminate unnecessary heat loss. Increase the resulting shopping list by 10-15% to compensate for possible errors, breakdowns and waste.
Heating boiler installation
Step 1. Choose a location. The boiler must be located as close as possible to the existing water supply system, problems with the chimney must be solved. Mount the boiler on the wall or place it on the floor, keeping it horizontal. When installing the chimney, follow basic fire safety rules.
STEEL GAS HEATING BOILERS "DANKO" TYPE. MANUAL
Boiler manual
Installation and service manual for VIESMANN specialists
VIESMANN - gas boiler installation instructions
Step 2. If the heating system is open, you need to make an expansion tank with a drain. It can be an ordinary metal square container for about ten liters. It is connected to the boiler at the hot water outlet, and the tank must be located above the boiler and batteries.
The system has forced circulation of water, so it makes no sense to put the tank very high. The tank must have a constantly open drain tube to drain excess water during heating and to prevent the formation of a vacuum during cooling of the coolant. The closed expander is mounted in the same way.
Video - Expansion tank of membrane type
Video - Connecting a membrane expansion tank to polypropylene
Step 3. Installing the security unit. It is installed only for closed-type heating systems in an accessible place, in most cases near the boiler. The control and safety unit consists of a pressure gauge (shows the actual pressure in the system), an air release valve and a safety valve. The safety valve automatically opens when the maximum permissible pressure values are exceeded.
Video - Security Group
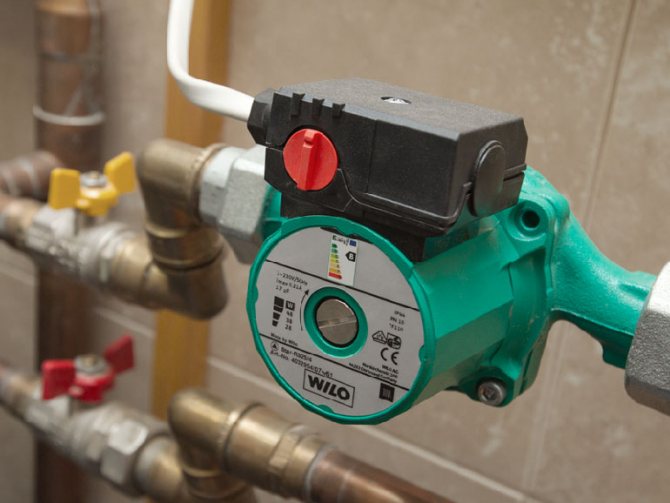
Step 4. Pump installation.
Pumps are sold together with boilers, in all modern gas and electric boilers they are mounted in the body, no additional action is needed. If the installed model does not have a built-in pump or you have a solid fuel boiler, you will have to purchase it separately. Installed in any convenient place at the inlet of cold water from the heating system to the boiler.
Video - Installation of a GRUNDFOS circulation pump in a heating system
Step 5. Filter installation. There are nuances here.The fact is that many heating boilers have two hot water circuits, one is used for heating, and the second is used for domestic needs: shower, washing dishes. If water is taken from the boiler frequently, then the likelihood of various mechanical impurities entering the boiler increases, it is recommended to install a filter. If the boiler works only for heating, then it is not necessary to install a filter, water is not taken from the system anywhere, no impurities will get into it. There is an option - water in the country is supplied by floating pumps from wells. In this case, a filter must be installed during the installation of the pumps. If this has not been done, put a filter at the water inlet to the boiler.
There is an axiom in mechanics - the more different equipment is installed, the more vulnerable the system, the greater the likelihood that any device will fail. Experienced engineers try to install only critical mechanisms and equipment, all others are not used. This also applies to the filter - there are no such in another place or the probability of impurities entering tends to zero - there is no need to install filters. These are extra connections, extra housings and filling, and each connection can leak. Keep this rule in mind when installing any system.
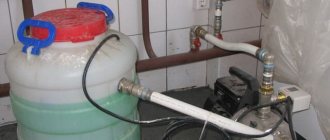
Practical advice. All existing filters (except for very expensive ones with molecular filters, the so-called osmosis type filters) purify water only from mechanical impurities. This is good, but they do not exist in the water from the pipeline. The boiler is afraid of deposits on the walls of calcium salts - heat transfer is significantly reduced, efficiency decreases. To prevent such phenomena, we recommend using ordinary liquid Calgon (used during washing). Pour it into the closed heating system during filling at the rate of about 1 liter per 100 liters of water - problems with calcium will be solved.
Step-by-step instructions and installation procedure
What tools and consumables will be needed
Instruments:
- Grinder with cutting discs.
- Electric drill, hammer drill, screwdriver.
- Adjustable wrenches.
- File.
- Welding machine for polypropylene pipes.
Consumables for the heating system:
- Radiators and installation kits (plugs, Mayevsky crane, cranes, American women, thermo valves, gaskets), brackets.
- Pipes, tees, bends, fasteners.
- Pump, three-way valve, taps, tank, filter, sump, pressure gauge, safety valve, automatic air vent.
Preparing a sketch or diagram
When installing even the simplest heating system, it is necessary to draw a drawing or diagram with an accurate indication of all dimensions, devices, fittings and components of the boiler piping. Without a diagram, it is impossible to accurately calculate the amount of materials, to provide for all the features of the system.
Boiler installation
The installation of a gas boiler can only be carried out by a specialized organization that has a license. The installation of other boilers, including solid fuel ones, can be done for a private house with your own hands.
Gas and electric boilers are often wall mounted. For a gas boiler at the installation site, a chimney is required - ordinary or coaxial (horizontally led out through the wall). All other heating units require vertical chimneys.
Heating units with a capacity of up to 60 kW can be installed in the kitchen, for more powerful heat generators, boiler rooms are required. Electric and gas boilers have built-in expansion tanks, all automation and pumps, and their installation in the kitchen does not create problems.
But solid-fuel and liquid-fuel units with all the piping and fuel take up a lot of space, create difficulties when cleaning (and often dust or litter the kitchen). Therefore, if possible, it is always worth taking them into a separate boiler room, ensuring sufficient air flow, installing a chimney.
The minimum distances from the boiler to walls, furniture and other equipment are usually specified in the instructions. If there is no information in the instructions, then the following requirements should be adhered to:
- There must be a passage of at least 1 m on the front side of the boiler.
- The passage to the side or rear is 0.7 m, if there is a need for servicing the unit, then at least 1.5 m.
- Distance to furniture or nearest equipment - 0.7 m.
- The distance between two boilers is 1 m, when placed opposite - at least 2 m.
When the boiler is connected to a system with natural circulation of the coolant, the return connection level must be below the level of the radiators on the first floor.
For piping of boilers, metal pipes must be used.
Installing the safety box
The safety unit is installed after the boiler and includes a pressure gauge, a safety valve, an automatic air vent. Solid fuel boilers (except for pellet ones) cannot be quickly extinguished, and a situation may arise with overheating, evaporation of water in the heat exchanger and a sharp increase in pressure - the valve will release pressure in this situation. If air accumulates in the coolant, the air vent will automatically release the collected air from the system.
It is desirable that the excess pressure be discharged into the atmosphere - water vapor mixed with boiling water cannot be discharged into a modern plastic sewer, chimney, general ventilation box - plastic is not designed for such temperatures, in the chimney or box the steam will quickly condense on the walls and will gradually destroy a pipe or box.
It is strictly forbidden to install a tap between the heat generator and the safety unit.
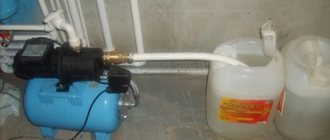
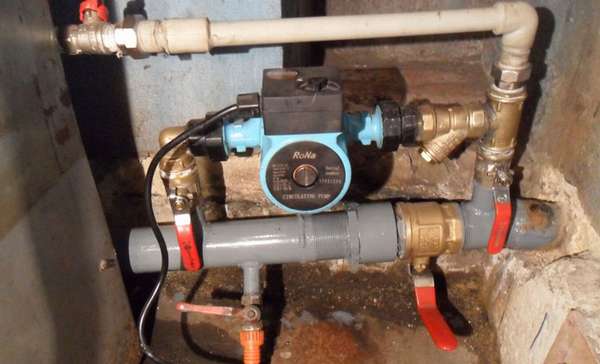
Installing the pump
The pump is installed in front of the boiler. Installing a bypass with a tap near the pump is mandatory - in case of a possible breakdown and removal of the pump. Ball valves are installed before and after the pump. The pump is installed so that the shaft is horizontal.
Filter installation
The filter and sump are installed in front of the pump (after the expansion tank). The sump is installed horizontally, the cleaning plug must be located at the bottom.
Expansion tank installation
If the boiler does not include a tank, it must be installed without fail. The volume of the expansion tank must be at least 10% of the amount of the coolant. Nowadays, it is becoming increasingly popular to connect a diaphragm expansion tank, which makes it possible to effectively smooth out pressure surges in the system.

An expansion tank is installed with a gravity open heating circuit, it is installed above the highest point of the system - under the ceiling of the second floor and even in the attic. In schemes with forced circulation of the coolant, the tank is installed in front of the pump, valve, filter and sump.
Connecting the heating system to the cold water supply system
When overheating and dumping steam, or for unexplained reasons, over time, the pressure in the system may drop. To do this, the water inlet from the water supply is cut into the system in front of the expansion tank. A tap or a special valve is installed that automatically feeds the system when the pressure drops.
Marking of places for laying pipes
Places of pipe laying are marked in advance, using a pencil and a ruler. It is advisable to lay pipes in both open and closed heating systems with a slight slope of 5 mm per m - in case of pump failure.
Drilling holes for fasteners and pipes
Drilling holes for fastening pipes is not particularly difficult. When laying pipelines through walls, insert a sleeve with a larger diameter into the wall (and close the holes with decorative strips).
Laying of highways
When laying lines, it should be borne in mind that the top routing (when the pipes are located on top of the radiators) reduce the efficiency of the radiators by 50%. The main pipelines must be firmly fixed in special clips located at 0.5-0.7 m intervals.
Layout of installation sites and assembly of radiators
Places of installation of radiators are marked out first. Radiators are usually installed in places of greatest heat loss - near the outer walls, in the window sill niches. The distance of the battery from the floor must be at least 200 mm, from the window sill - 100-150 mm, otherwise heat transfer by convection will not occur. For the same reason, it is undesirable to close the radiators with screens, especially deaf ones - the heat transfer from the heating batteries will come to zero.
Installation of radiators, Mayevsky taps, bends and plugs
Before installing the radiator, four plugs are screwed into it, taps at the inlet and outlet (or a tap and a thermostatic valve) are installed, a Mayevsky tap is installed in one of the upper plugs. All plugs are provided with gaskets. If necessary, using a special tool, twist the required number of radiator sections together (do not forget about the gaskets!). If the number of sections in the radiator is more than 12, it is worth mounting it on 3 brackets.
How to connect radiators to the main pipeline
There are three ways to connect radiators:
- Diagonal.
- Lateral one-sided.
- Lower (or upper) lateral bilateral.
- Bottom (in the presence of bottom branch pipes or a bottom connection unit - usually with panel radiators).
The most efficient way is diagonal, which allows you to use the entire surface of the battery. The most ineffective is the upper lateral double-sided.
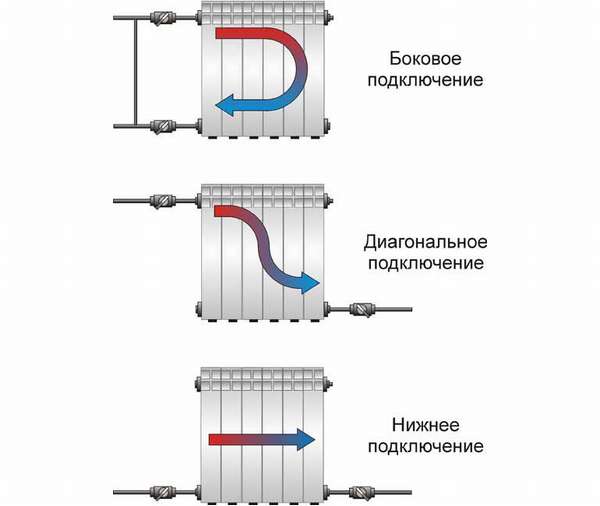
To connect radiators to taps or thermo-valves, an American union nut, MRN is screwed on and the branch is soldered, then soldered into the system. Connection to the main or riser must be done using tees - the radiator is connected in parallel to the main or riser, otherwise it is impossible to regulate the temperature of each battery. Now they produce cranes, combined into one unit with an American, MRV, sometimes with a bend.
System start
Before turning on the heat generator, it is necessary to fill the system with water and check for leaks, and only then turn on the boiler.
Useful video on the topic
It's better to see once - our videos show in detail all the subtleties of installing a heating system.
Expansion tank
Tank connection to polypropylene
Pump installation video
System startup video
Installation of heating pipes and markings for the installation of radiators
| Step, no. | Illustration | Description or explanation |
| Step 1. Drill holes for clips (pipe fasteners) and holes for pipes to pass through ceilings or walls. | Depending on the material for making the walls and floors, you need to use an ordinary drill or perforator. | |
| Step 2. Pull the pipes through the holes. | It is very important - while pulling pipes, you need to close their holes, otherwise there is a possibility of foreign objects getting inside. It is impossible to remove objects from the pipe later, and they can create many problems. Is the pipe very long and difficult to pull? Consider where you can install the couplings, measure the distance and cut the pipe into several pieces. Cut off the pipe with a margin, you will never be able to measure the optimal length of the pipes right away, then you will make a fit on the spot. | |
| Step. 3. Marking the place of installation of radiators. | All radiators should be located at the same height; carry out work on a level. Each type of radiator has its own differences, to make it easier and faster to mark, make a simple template from a piece of board or plywood. Mark the position of the upper and lower mounting brackets on it, drill holes in these places.Then just put the template on the floor, lean it against the wall and mark the attachment points for the brackets. Do all the marking work very carefully, the quality and speed of further work on the installation of the heating system largely depends on this. | |
| Step 4. Prepare radiators. | Nowadays they don't use cast-iron radiators, aluminum or bimetallic ones are in high esteem. Their advantage is that with a smaller size, a much larger heat exchange area. The same advantage is also a disadvantage, which the manufacturers do not indicate. Aluminum radiators have a lot of different jumpers (to increase the area), which are located in hard-to-reach places. It is impossible to remove dust from there. If the thickness of the dust reaches one millimeter, then the heat transfer efficiency is halved. Where has dignity gone? A rhetorical question, but the high price remains. Advertising is often used by manufacturers in order to sell products more expensive and faster, and not to do something useful for the consumer. This applies not only to radiators, remember this. Unscrew the factory fittings (some types of radiators may have plugs), seal the threads with sealant, tow or a modern tape seal. Attach valves and tees in the same way, if necessary according to the technological scheme. |
How to work with polypropylene pipes
We have already mentioned that these pipes have excellent characteristics and quite a reasonable price, it is these qualities that have become the reason for their high popularity. Soldering of pipes is carried out with a special soldering iron, the melting temperature of polypropylene is + 270 ° C, this temperature should be set on the thermostat of the device. The heating time of pipes depends on their diameter. The table shows the approximate values of the parameters.
Pipe heating time
| Diameter of the word passage of the pipe, mm | Approximate heating time, sec. |
| 20 | 5 |
| 25 | 7 |
| 32 | 8 |
| 40 | 12 |
| 50 | 18 |
| 63 | 24 |
| 75 | 30 |
The soldering iron has two nozzles, with the help of one the inner surface of the pipe is heated, with the help of the other the outer surface of the pipe is heated. You need to heat both surfaces at the same time, as soon as the specified time has passed, the pipe sections are removed and inserted into each other with little effort. It is very important - it is forbidden to rotate the pipe during joining, the efforts should be only axial. After connecting, you need to hold the connections for some time (ten seconds) to cool down.
With the acquisition of experience, a neat edging will be obtained. The strength of the joints almost does not differ from the strength of solid pipes, leakage and depressurization during operation are excluded. Do not forget to add one centimeter on each side when cutting pipes, this length will go to the connection. We do not get tired of repeating - any work requires intelligence and attentiveness.
Do not rush to glue everything in a row, think, foresee your actions a few steps ahead. There are times when you need to skip the area to be treated and glue the pipes in front, and then return to the original place. This is due to the fact that then it will not be possible to get to the workplace with a soldering iron. In a word, think over the soldering technology a few steps ahead - how which segment needs to be rotated for soldering, will there be such an opportunity later, etc.
Installation of radiators
One of the most difficult types of work when installing a heating system. We have already made markings on the wall, now we need to hang the batteries.
Step 1. Drill the holes for the dowels according to the marking. For drilling, you need to use a drill with victorious surfacing (for bricks and concrete). The drill should be set to perforation mode. Choose the diameter and length of the dowels taking into account the dimensions and weight of the batteries.
Step 2. Screw the Mayevsky tap, drain and plugs to the battery.
Please note that the plugs can be installed in different places, depending on where you installed them, the flow of the heating medium can be diagonal or horizontal.If you have a bypass heating system, then you need to solder the tees in the right place, make a branch for attaching a jumper, which allows you to completely disconnect the battery during repair or replacement.
One more thing - in order to be able to adjust the temperature of each battery in the bypass heating system, it is necessary to install a needle valve near each radiator, with the help of which the flow rate of the coolant will be regulated (in this way the temperature of the battery changes). Why exactly a needle faucet? Because it provides smooth and precise regulation of the flow rate of the heating medium.
When brazing, observe the direction of the tee with the direction of the radiator taps. In order not to be mistaken, before starting work, make special marks for yourself with a pencil, check their correctness and only after that start soldering. If you make a mistake, it’s unpleasant, but not fatal. Cut off the wrong section and repeat the operations in the correct order, it is for such situations that you bought all the elements with a margin.
Step 3. Make a battery strapping for the bypass sections. We have already mentioned that they increase the versatility of the system. This operation only applies to the bypass system.
System start
For your information, industrial heating projects for commissioning provide up to 10% of the total budget. This means that commissioning is very important and complex. To insure you against making mistakes, here are some practical tips.
- Open all valves and air vents before filling the system with water. Please note - not after filling, but before. Let the water spill a little on the floor, that's okay. Close them only after the appearance of water.
- Fill the system slowly, do not open the water tap completely. The fact is that fast filling can cause air jams to form in places from which they cannot be removed - you have to drain the water and start all over again. This does not always happen, it all depends on the correct installation of the system, but such an embarrassment happens for beginners.
Video - Starting and filling the heating system with a coolant
It is advisable to install a single-pipe heating system with lower wiring in small buildings, the further the battery is from the boiler, the lower its heating temperature. If permanent residence is not planned in the country house, then in winter, during the absence, the water must be drained and refilled upon arrival. Not everyone wants to do such things. The way out is to use antifreeze as a coolant, but this is expensive.
If desired, you can mount a one-pipe heating system in the bath. But why? The steam room does not need to be heated, the batteries are installed only in the dressing room. One or two radiators are enough for this room. The system will be used for several hours a week. Is it worth it to waste so much time and money? Perhaps, for a small bath, it is worth buying an ordinary heater. It is advisable and economically viable to install a heating system in a large bath complex or a bathhouse combined with a residential building.
banya-expert.com
Advantages and disadvantages of a one-pipe heating system
The advantages of such a heating circuit are especially pronounced if the installation and maintenance of the heating network is done by hand:
- ease of installation,
- small consumption of materials;
- low cost,
- fast warming up of batteries.
There are practically no drawbacks to this simple system if it is used to heat a small house.
We recommend that you familiarize yourself with: How to independently weld a gate from a profile pipe
With an increase in the total area of the premises, it becomes noticeable, and sometimes critical, the main disadvantage of the heating network - heat loss on each heat-transfer device - the further the battery is from the beginning of the circuit, the less it heats up.
Hence follows the second drawback - the complexity, and sometimes the impossibility of using such a thermal circuit for heating buildings with a large total area.