Heating system type
Single pipe systems can be routed vertically or horizontally. The latter option is most suitable for low-rise dwellings: usually we are talking about one- or two-story houses. Three-story buildings are rarely equipped with horizontal wiring. Vertical wiring is usually used in high-rise buildings. Such a scheme consists of a pipe coming out of the flow, following to the radiator, and then to the floor. This picture can be observed in all (or almost all) rooms. Sometimes there are cases when two radiators are powered from one riser at once. In this case, it is not at all necessary that they be in the same room.
The strong point of this scheme is the low cost of installation work and stability of work (it is rather difficult to unbalance it). However, if there are significant changes in the parameters of the batteries and pipes, this can significantly affect the hydraulic resistance. As a result, only the first two sections are warm, while the rest of the device remains cold.
For one-pipe wiring, a gradual decrease in the temperature of the coolant is characteristic as it moves away from the boiler. The efficiency of heating the battery from the neighbor on top (with the upper supply) is inversely proportional to the heating of the radiator on the floor below. To avoid such situations, a law was passed on the common ownership of the heating system. Now, in order to replace a pipe or a heating device, you need to obtain the appropriate permits. High-rise buildings are not often equipped with two-pipe wiring. This is explained by the high consumption of pipes for its organization. In addition, the large dimensions complicate the balancing of the circuit.
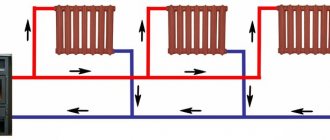
A two-pipe system in a multi-storey building has the following scheme:
- Two pipes are brought into the room.
- The hotter part serves to supply the coolant to the battery.
- The second takes the coolant cooled down after the radiator further.
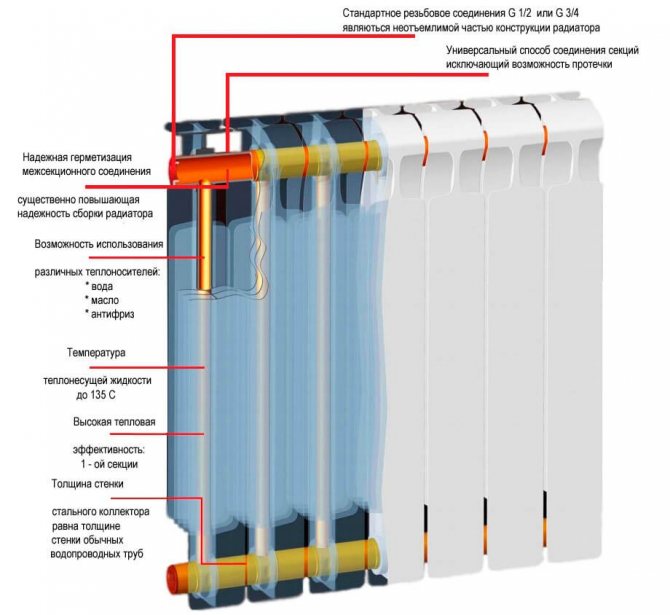
Thanks to this scheme, the identity of the temperature of the heating medium supplied to all heating devices is achieved. It is important to remember that if there is a change in hydraulic resistance in just one radiator, the entire system can be completely unbalanced. A very small resistance will provoke the passage of almost the entire volume of the coolant through this section. Therefore, in the presence of such a wiring, the installation of control valves is mandatory. Most often these are manual control valves or thermostats.
Stages of installing heating radiators with your own hands
1. Preparatory work includes the dismantling of old structures, if necessary. The water must be completely drained from the disconnected system beforehand. On the wall, you will need to install special fasteners for the batteries or check the strength and correct installation of existing hooks. You should also do a study of the wall surface for integrity. Often, cracks and gaps form under the windowsill over time. They must be sealed with cement mortar, and foil insulation should be fixed on a dry surface. Among other options for wall decoration: plaster with a special insulating compound, plasterboard cladding with an insulating layer, etc.
Coolant circulation direction
Bottom saddle connection of batteries with the use of a lower vertical collector makes it possible not to depend on the direction of the coolant supply.The same cannot be said about the lateral and diagonal leash, as well as when radiators with a lower connection point are used: here the supply must be clearly adjusted. Otherwise, the device may stop heating completely, or it will heat up very weakly. The lateral or diagonal connection provides for the use of an upper feed (in this case, the return pipe goes from the bottom).
When mounting a bimetallic radiator with a bottom connection, it is important to clarify in advance which of the inputs will be connected to the supply. Usually this information is indicated in the passport. It is important not to confuse the directions, because the supply in such heaters is equipped with a tube going up from the inlet assembly. With its help, the coolant is adjusted to the upper collector. After that, it spreads over the radiator.
The place of collection of the coolant is the lower collector, from where it is fed into the return pipeline. The connection unit is located on the left or right side of the radiator (it is recommended to choose the point closest to the riser). This makes it possible to save on pipes for bimetallic radiators and achieve a more aesthetic appearance.
Types and features of heating radiators
In the retail network, the buyer is offered a choice of a wide range of heat exchange radiators made of various materials of various shapes. According to the materials of manufacture, they are all divided into the following groups.
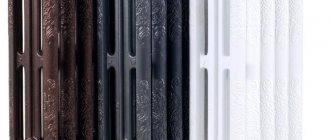
Cast iron
Cast iron batteries are classified as classical, unlike their predecessors, modern products are painted in various colors and give them an aesthetic appearance. Cast iron radiators received a second life as decorative elements to emphasize the design retro style.
The molded battery sections are patterned, mounted on legs and painted to match the color scheme of the room or style.
The peculiarities of cast iron radiators are their high weight, high thermal capacity, the ability to change the number of sections connected to each other by nipples. Cast iron has a fairly high corrosion resistance and can be operated for about 50 years, it can withstand pressures up to 50 bar (low-grade Chinese can break even at 20-30 bar) and high temperatures of liquid or vaporous coolant up to + 120 ° C. Due to the relatively low thermal conductivity, the thermal power of one cast-iron section is 140 - 150 watts.
The most famous manufacturers of cast iron batteries: the Russian company Nova (produces budget versions), the companies Viadrus, Konner, Bohemia with higher prices for their goods.
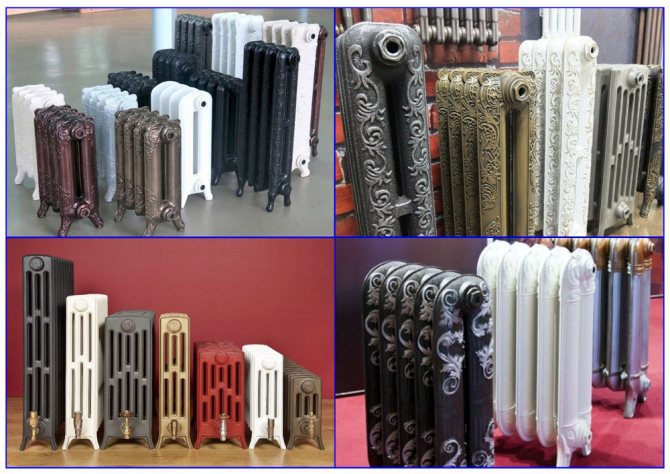
Fig. 2 Designer cast iron batteries
Aluminum
Heat exchangers made of aluminum, or rather its alloy with silicon (silumin), today occupy a leading position for use in any heating systems. They are made in the form of separate aluminum sections, inside of which there are passage channels for the circulation of the coolant.
Industrial production methods for aluminum radiators are casting and extrusion.
The main physical and operational characteristics of aluminum heat exchangers: light weight, heat transfer of one standard section 80 by 80 mm - about 180 W, the maximum coolant pressure 10 - 15 bar for cheap products and up to 50 bar for expensive Italian products, the temperature of the working environment is not more than 115 ° FROM. Due to their high thermal conductivity and low thermal capacity, they can quickly warm up the room.
The disadvantages of aluminum radiator heat exchangers include low strength characteristics for certain operating conditions (silumin, in contrast to pure aluminum, is a brittle alloy). Also, aluminum radiators have low corrosion resistance when used in a working environment with a high or too low pH.
If the pH of the coolant exceeds the range of 7 - 8 units in the direction of increasing or decreasing, the destruction of the protective oxide film Al2O3 on the metal surface, which gives it anticorrosive resistance, occurs.
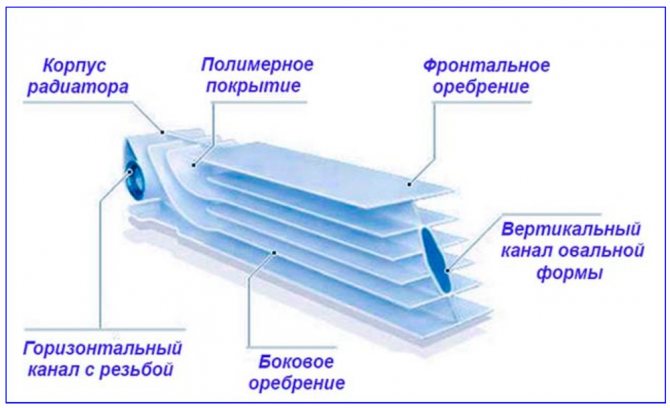
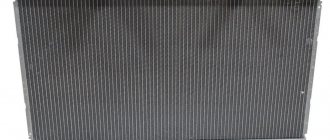
Fig. 3 Design of the aluminum radiator section
The metal is constantly forming a new protective film instead of the destroyed one, while its layer gradually becomes thinner until a fistula is formed. Also, the process of the appearance of a new oxide is accompanied by the release of hydrogen H2, which further accelerates the destruction of aluminum.
If the consumer left water in the radiators of the aluminum heat exchanger for the summer, the appearance of hydrogen from the formation of an oxide film and the vital activity of bacteria can even lead to rupture of sections of a closed battery.
It is not recommended to install aluminum heat exchangers in a centralized heating system due to the impossibility of controlling the pH.
The best manufacturers of such radiators are the Italian companies Green, Sira, Group, Fondital.
Bimetallic
As the name implies bimetals, two types of metals are used in radiators of this type - steel and aluminum.
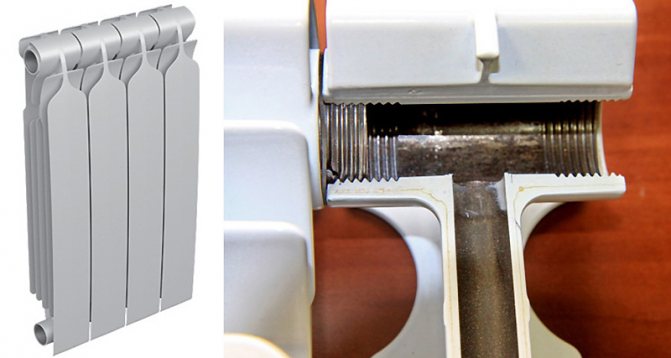
The bimetallic radiator consists of sections, each of which is a steel pipe channel placed in an aluminum heat exchanger.
Despite the heavier weight in comparison with aluminum ones, the introduction of an internal steel collector into the structure made it possible to increase the strength and temperature characteristics of bimetallic batteries. They can withstand a coolant pressure of 50 - 100 bar (depending on the manufacturer) at temperatures up to 135 ° C. In this case, the pH of the working medium does not play a significant role. The heat transfer of bimetallic radiators is of the order of 160 - 170 W.
It may be interesting to read about: Autonomous heating system of a private house - a complete guide
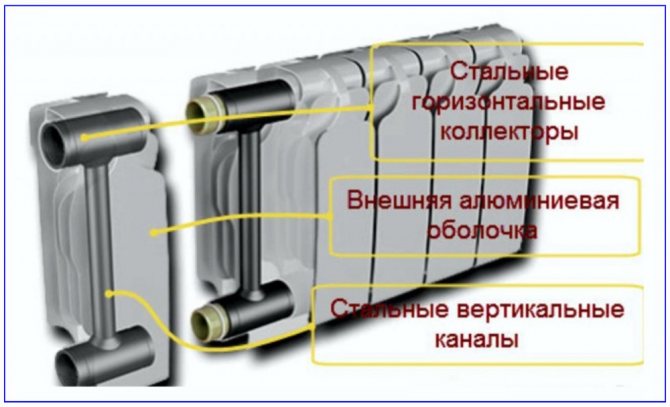
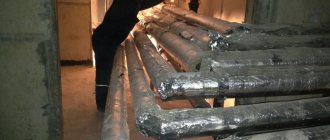
Fig. 4 Design of bimetallic heat exchangers
Steel
Inexpensive, simple and reliable steel radiators are of two types - panel (Fig. 5) and tubular.
The simplest tubular convection radiator consists of two front metal sheets, between which there is a pipeline with heat exchange plates, through which the coolant circulates. The rooms are heated by convection of air masses.
From above, the outer metal panels are covered with a protective layer of varnish, applied by high-temperature firing in ovens.
Steel heat exchangers are produced using spot welding technology, they are not sectional and collapsible.
The limiting pressure thresholds of the working medium for tubular products are 9 - 15 bar, for panel products 5 - 11 bar, the heat transfer of one battery lies in the range from 1200 to 1650 watts. Steel radiators can withstand temperatures up to 115 ° C. The hydrogen index is not significant for steel and can deviate from neutral by 7 units by several points in one direction or another.
However, for steel, the problem of corrosion is urgent, that is, a high oxygen content in water leads to its rapid destruction.
Therefore, it is not recommended to install steel radiators in communal apartments and supply the coolant to them through pipes that do not have protection against oxygen diffusion.
Also, steel panel heat exchangers are sensitive to pressure drops and often do not withstand water shocks, which in centralized heating networks reach values of the order of 35 - 40 bar.
Manufacturers of steel batteries are domestic firms “RS”, “Harmony”, German “Kermi”, “Zehnde”, Italian “Israp”, “Tesi”.
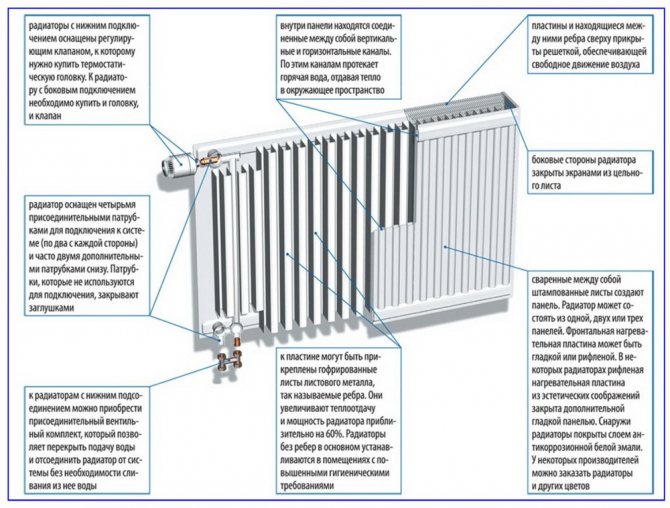
Fig. 5 Construction of steel panel batteries
Number of sections of bimetallic radiators
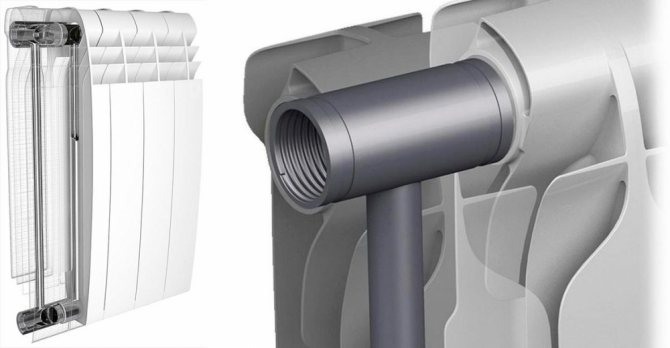
How many sections there will be on a bimetallic radiator has a direct impact on the choice of connection method.The battery up to 8 sections can be switched by side, bottom saddle or diagonal connection. If there are more than 8 sections, it is better to use a diagonal connection.
When using side switching, a flow extension will be required. This refers to the tube inserted into the supply manifold. It helps out in situations where the lateral connection provides heating of only the first sections. Thanks to the tube inserted inside, the coolant flows beyond the inlet, more evenly heating the surface of the device.
Flow extension length options:
- 2/3 batteries.
- To the center of the last section.
Various cases show the effectiveness of both the first and second options. The main thing is that a noticeable optimization of the heating of the radiator is achieved. Sometimes it happens that the installation to the middle of the last section provokes a decrease in the heating level of the first sections. In this case, it is recommended to shorten the tube. But such situations rarely occur, which is affected by the pressure in the riser and the cross-section of the liner.
As practical experience dictates, it is better to mount a long tube, because it can always be shortened (but it cannot be increased). Another way to distribute the coolant more evenly is to fit the flow extension tube with a series of holes. Thanks to this, the coolant enters the vertical collectors located nearby. However, in general, a solid tube is sufficient.
Radiator connection methods
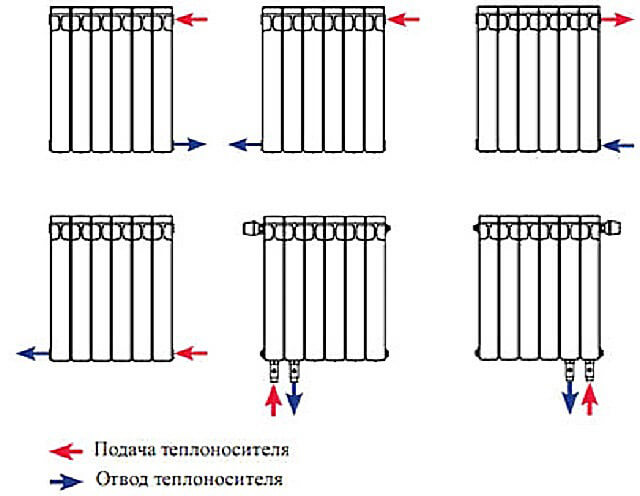
The connection diagram for bimetallic heating radiators is:
- Lateral type, in which the supply pipe, through which hot water flows, is supplied to the nozzle located at the top, and the return to the one below. This means that both pipes are on the same side of the battery. Side-connected bimetallic radiators will only be effective if they have no more than 15 sections. This is the most common type of pipe supply to batteries in high-rise buildings.
- The diagonal connection diagram of a bimetallic radiator involves the supply of a hot water supply pipe to the upper pipe from one side, and the return pipe to the lower pipe from the other. This method allows the coolant to spread evenly throughout the structure, thereby increasing the efficiency of its operation.
A diagonal circuit, in which hot water is supplied through the lower branch pipe, and the return flow through the upper one, loses its efficiency by 10%.
- The bottom connection is performed only if it is necessary to remove the pipes, as they say "out of sight". It looks good in any interior, but the heating efficiency is reduced by 10-20%. You can solve the problem by adding several sections to the bimetallic radiator.
If the question arises of how to connect a bimetallic heating radiator in an apartment, then you should adhere to the scheme to which the apartment building is connected. Changing the type of connection yourself is not only not recommended without proper permission, but also dangerous.
What kind of fittings are needed
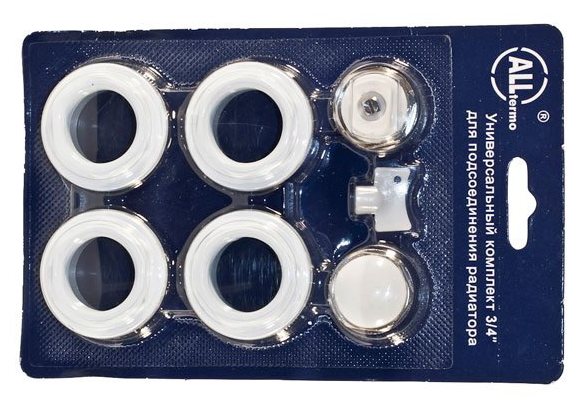
To connect a sectional bimetallic radiator, you will need a standard connection kit.
These are the following elements:
- Plugs.
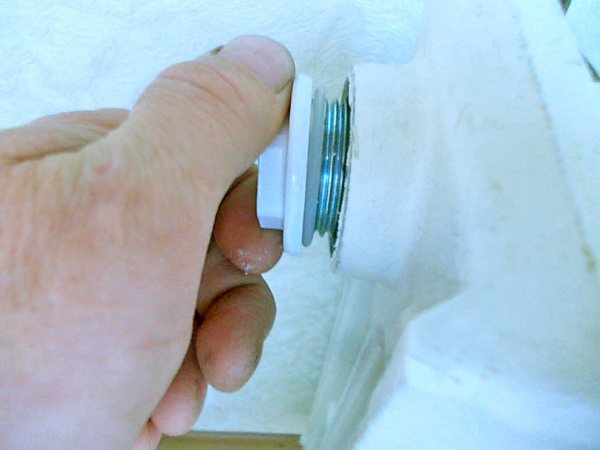
- Manual air vent ("Mayevsky" valve) and a key to it.
- Pair of adapters (with right-hand and left-hand threads).
The right and left sides of the radiator are supplied with adapters. They can be used to connect fittings or pipes. Their diameter (½ or ¾ inch) directly affects the diameter of the fittings and connections.
How does the location of the radiator on the wall affect its efficiency?
In addition to the correct connection of heating radiators, during installation, it is necessary to take into account their location. The rules for placing the battery on the wall must be observed, taking into account the structures and interior elements.
Under the window is the most typical location for the battery.The radiator gives off heat, the convection flow creates a heat curtain, which makes it difficult for cold air to penetrate from the windows. The maximum battery efficiency is observed provided that its length is equal to 75% of the width of the window opening.
The radiator must be installed directly in the center with a permissible deviation of 2 cm in both directions. A distance of 100 mm is maintained from the window sill, otherwise an obstacle to air flows is created, the efficiency of the battery decreases. The height of the lower edge from the floor is 10-12 cm. If the distance is less, it is difficult to remove under the radiator, convection becomes more difficult. If the height is higher, the floor will remain cold. The radiator is placed from the wall with brackets 20 mm. With a decrease in the clearance, convection is disturbed, a lot of dust appears.
A wide window sill, thick curtains, casings, decorative facade screens can reduce the efficiency of heating. They make the interior beautiful, but reduce heat transfer.
Heat loss depending on location:
- Installation on the wall is open, under the windowsill - the efficiency is equal to one.
- A window sill or shelf completely covers the radiator from above - a loss of 3-5%.
- The upper wall of the niche covers the battery from above - the loss is 7-8%.
- Covering the facade with a decorative screen, but there is sufficient clearance for convection - losses of 10-12%.
- The battery is completely covered with a facade - 20-25% power loss.
Pipes
When replacing radiators in a high-rise building, it is necessary to use the same pipes and with the same diameter. This is not just a whim. The fact is that in multi-storey buildings, systems with certain parameters are used. The main ones are hydraulic resistance and working pressure. A test (pressure test) pressure is specially organized for them, which is used during the start-up of the system. As a rule, it is an order of magnitude higher than the worker.
The use of polypropylene and metal-plastic pipes for connecting bimetallic radiators, despite all their advantages, is not recommended in such conditions. Their visual appeal in no way contributes to an increase in service life in conditions of centralized systems, which is fraught with the appearance of leaks with all the ensuing consequences.
The same applies to the diameter of the pipes. When changing the diameter of the line, the hydraulic resistance of the entire circuit changes greatly. And no one can guarantee that this will have favorable consequences. Therefore, when using half-inch pipes in the system, you do not need to experiment with other diameters. The same goes for battery fittings and adapters.
Types of heating systems
Today there are two main types of heating systems. One of them can be called economical, the other - efficient. Owners of apartments in apartment buildings do not have to choose, but residents of private houses can be determined between these two categories.
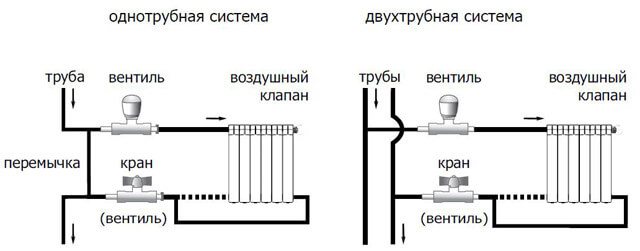
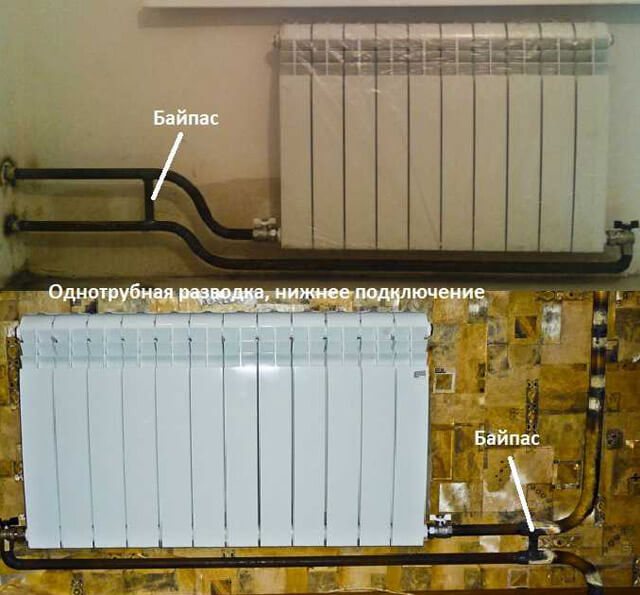
- The one-pipe system was used during the construction boom of the Soviet era, when it was required to warm apartments at a minimum cost. Its peculiarity is that the coolant spreads through one pipe, successively passing through the entire heating circuit of the building. Connecting bimetallic heating radiators with a one-pipe system allows you to save money on materials, but has a number of disadvantages:
- It is not possible to influence, and even more so, to correct the degree of heating of the batteries. This will not allow residents to independently regulate the room temperature and save energy costs.
- As a rule, in single-pipe systems, while the coolant from the upper floors, having passed along the entire circuit, reaches the lower ones, it is already cooled down. This means that even bimetallic radiators will be slightly warm for residents on the ground floor.
- In the event of an accident, the entire riser is turned off.
- The two-pipe heating system is not used in high-rise buildings, but is loved by the owners of private houses. There are two pipes in it, through one of which a hot medium flows, and along the other it leaves already cooled. This system has a number of advantages:
- Regardless of the distance at which the bimetallic radiator is located, the temperature of the coolant will be the same throughout the entire circuit.
- This system allows you to regulate the temperature in rooms using thermostats, creating a different microclimate in each of them.
- If the battery fails, the coolant supply to it can be shut off, without the need to shut down the entire system.
As practice shows, bimetallic radiators are the best option for a one-pipe heating system, since they heat the air using radiation and convection. This allows the room to be heated more efficiently.
Connecting a bimetallic radiator to a single pipe system will be effective only with a small number of sections, for example, 8-10.
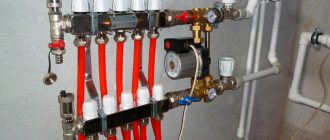
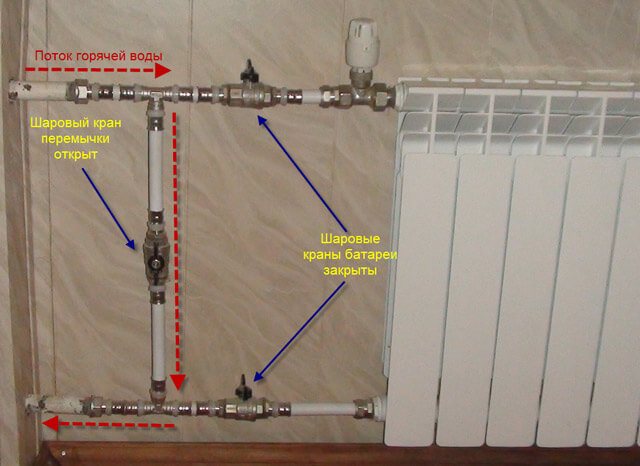
Bypass assignment and selection
When installing a bimetallic radiator in a one-pipe system, it is imperative to use a bypass. This is the name of the jumper between the supply and return pipes. It makes it possible for the excess coolant to bypass the battery. This scheme allows you to avoid blocking the drain and subsequent troubles with the control campaign. Most often, the bypass is made offset: the most optimal place for its location is between the radiator and the riser. If a tap is cut into the jumper, this will make it possible to adjust the temperature of the radiator. However, in this case, there is a possibility of blocking the riser.
A more effective solution is to use an unregulated bypass by equipping the radiator directly with control valves. This is mainly done in cases where the room is very hot. If there is no such problem, then it is better not to reduce the efficiency of the radiators, which inevitably happens when installing regulators.
The automatic fittings are designed for a pressure of 10 atm. Therefore, when the pressure drops below 15 atmospheres, the operation does not encounter any difficulties. Exceeding this limit is likely to lead to failure of the devices. If a thermostat cannot be dispensed with, and the test pressure is very high, it is better to dismantle the device before starting the circuit, replacing it with a squeegee. Upon completion of the pressure test, the device is mounted back, which makes it possible to clean the valve at the same time.
Replacement rules and regulations
According to the norms given in SNiP, you can easily navigate which batteries to buy for replacement, and how to change them.
To know how to properly install heating radiators in an apartment, you will need to take into account the following provisions:
- New batteries must be able to withstand the same or higher pressure loads as the old ones. If there is a centralized heating system, it is enough to call the organization supplying heat to the apartment building and find out the necessary indicators.
- The material from which they are made must be compatible with old pipes. If, for example, copper radiators are connected to steel risers, then soon you will have to face such a problem as corrosive leakage.
- The norms for the installation of heating radiators in an apartment require that the distance between them and the lower part of the window sill be at least 10 cm, otherwise the heat flux will not be able to be released at the required rate, and the rooms will either warm up longer, spending more time on it, or stay cool.
- The distance of the bottom of the battery from the floor should correspond to a minimum gap of 10 cm and a maximum of 15 cm. If these indicators are reduced or increased, this will also affect the quality of heat transfer in the apartment.
- The same applies to the distance between the radiator and the wall. It should be equal to 20 mm, and then everything will be normal with heat exchange in the premises.
All the rules for installing heating batteries in an apartment are taken into account in SNiP, so it is enough to familiarize yourself with them, check the indicators of the old system and make the right choice when buying new elements and connecting them.
How to properly install a heating battery in an apartment, read below.
Choice of valves
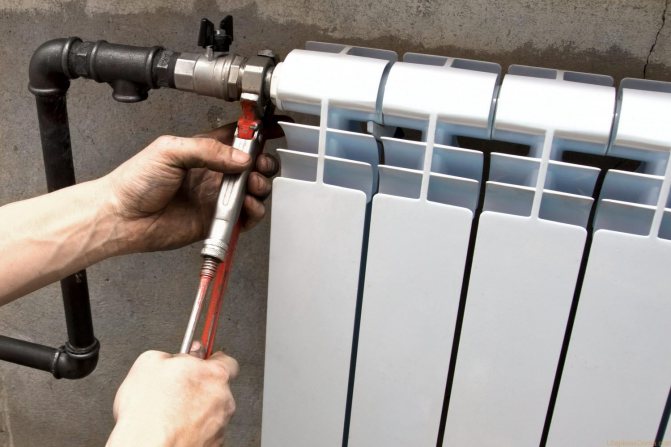
As some manufacturers recommend, the installation of bimetallic heating radiators with your own hands should be accompanied by the installation of shut-off valves at the inlet and outlet. These are ball valves. In order for the permeability of the coolant to be normal, it is better to use full bore products.

Thanks to the shut-off valves, the radiator can be dismantled at any time for repair and maintenance, without stopping the entire system. To do this, it is enough to turn off the taps and wait for the coolant to cool. Then the device can be removed. In such cases, the presence of a bypass helps out, through which the coolant will bypass the serviced battery. Otherwise, you will have to turn off the entire riser, which can only be done with the permission of the management campaign.
Installation. Specialist recommendations
The installation principle is the same for all types of radiators:
- Before installation in winter, it is necessary to obtain permission from the operating department. Usually, during the heating season, it is not allowed to replace radiators, however, in the event of a breakdown, problems with this should not arise. Especially if the room temperature is very low. The service will suspend the operation of the heating riser for about half a day, which is quite enough for the complete installation of the batteries.
- The procedure can be started after turning off the riser and opening the drain valve located in the basement. Fit the pipe connections with ball valves and the new radiator with foot nuts.
Equipping the battery with foot nuts
- Now we turn to the taps and wind the sealant on the threaded connections. It is very important that all connections come out reliable, so the masters recommend using tow. First of all, the thread must be thoroughly painted over (you can take any paint, just do not use water-based paint), and after painting, wind tow on the thread. It is necessary to wind the tow tightly, the direction is clockwise; the winding should extend from the edge of the threaded joint and be in the form of a cone. Color the coiled tow with plenty of color.
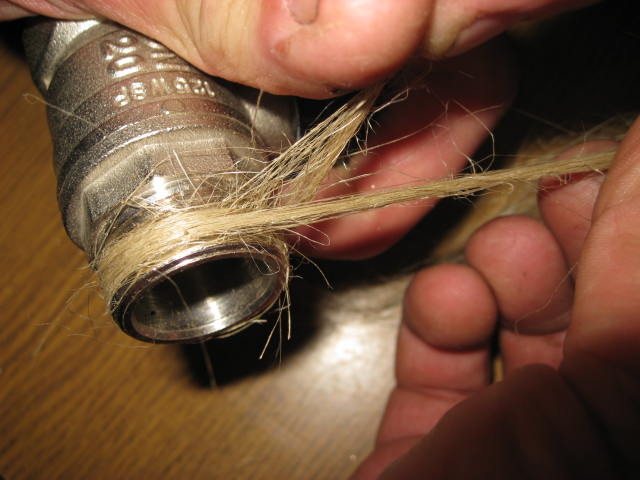
We wind the sealant on the thread of the taps
- The next step is to wind up the tap. An important point of this stage is that after twisting, there should be no threads left on the pipeline. Be sure to soak excess tow with paint. If done correctly, the connection will not leak in the future.
- On each side of the radiator there are two threaded connections allowing connection to the heating system. It is in them that the footwear should be screwed. Be careful, the connections are different on each side, so it's easy to get confused here. On one side of the radiator we put foot nuts with a left-hand thread, on the opposite side - with a right-hand thread. Most often, foot nuts are placed on paronite or rubber seals. You can make it easier: buy a special set of threaded nuts that will allow you to install the heating device in any position.
Threaded nut set
- Next, we will prepare additional parts for the nuts. In the places where the radiator is connected to the pipes, put the counterparts from the "American" (they must be screwed off the tap). On the opposite side, in the upper part, place the Mayevsky faucet, and in the lower part, put a plug.
- The battery is now ready for installation. Lift the radiator and connect the tap to the "American".
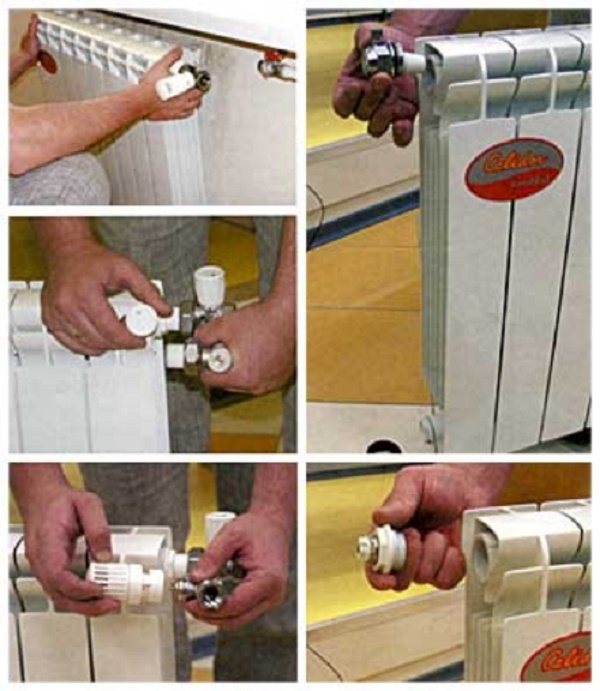
Preparing the battery for installation
- To make further installation safer, be sure to place some solid object under the battery (brick works well).This will prevent the instrument from falling.
- Mark the places where the brackets will be placed (in the amount of 4 pieces). The marking must be done using a building level - this way the radiator will be fixed in a straight position. Then remove the heatsink to drill holes to accommodate the hooks.
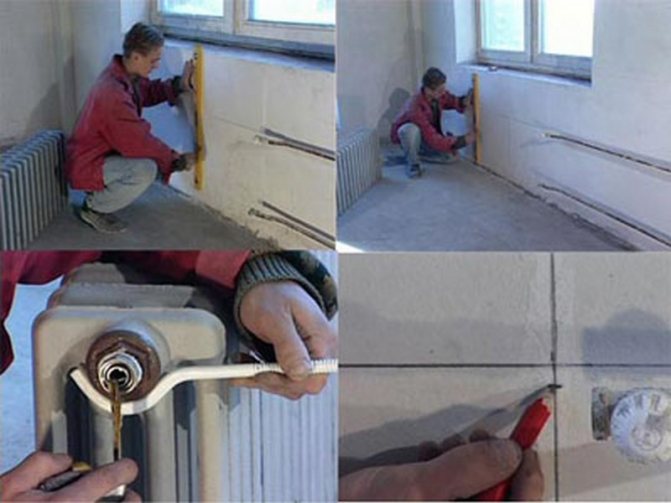
Installation of brackets for the heating battery
- After installing the brackets, you can hang a new battery on them. Use an adjustable wrench to tighten the split nuts securely.
Tighten the nuts with an adjustable wrench
Air Vents
The standard mounting kit includes a manual air vent ("Mayevsky" valve). The place of its installation is the free upper collector. The presence of an air vent is mandatory when connecting a bimetallic radiator. The fact is that the contact of the coolant with the collector materials provokes chemical reactions, as a result of which gases are formed.
Thanks to this small device, it becomes possible to remove air and gases that have accumulated inside the radiator. If this is neglected, overpressure will appear in the system, provoking a violation of circulation and uneven heating of the batteries. To release gases, you need to open and close the valve with a key.
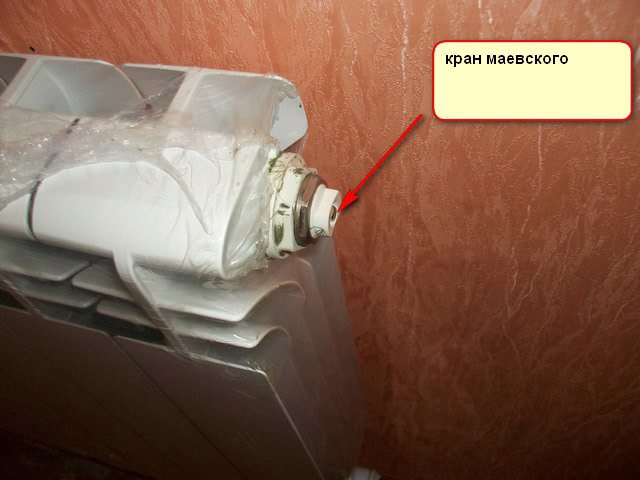
If there is no desire to manually vent the gases, there is an option with the installation of an automatic air vent. It is mounted in the same place as the Mayevsky crane. The device has a cylindrical shape and a height of 6-8 cm: during installation, strict verticality must be observed. To hide the automatic air vent from the eyes, a decorative screen for the radiator is usually used.
How to install correctly
Now how to hang a radiator. It is highly desirable that the wall behind the radiator is level - it is easier to work this way. The middle of the opening is marked on the wall, a horizontal line is drawn 10-12 cm below the window sill line. This is the line along which the upper edge of the heater is aligned. The brackets must be installed so that the top edge coincides with the drawn line, that is, it is horizontal.
Correct installation of heating radiators
Wall mount
This must be taken into account when installing hooks or brackets for heating radiators. Hooks are installed like dowels - a hole of a suitable diameter is drilled in the wall, a plastic dowel is installed in it, and the hook is screwed into it. The distance from the wall to the heater can be easily adjusted by twisting and unscrewing the hook body.
https://www.youtube.com/watch?v=sfkFcArxvXk
Cast iron battery hooks are thicker. This is a fastener for aluminum and bimetallic
When installing hooks under heating radiators, keep in mind that the main load falls on the upper fasteners. The lower one serves only for fixing in a given position relative to the wall and is installed 1-1.5 cm lower than the lower collector. Otherwise, you simply cannot hang the radiator.
One of the types of brackets
When installing the brackets, they are applied to the wall in the place where they will be mounted. To do this, first attach the battery to the installation site, look where the bracket will "fit", mark the place on the wall. With the battery down, you can attach the bracket to the wall and mark the location of the fasteners on it. In these places, holes are drilled, dowels are inserted, the bracket is screwed onto the screws. Having installed all the fasteners, the heater is hung on them.
Fixing to the floor
Not all walls can support even lightweight aluminum batteries. If the walls are made of lightweight concrete or plasterboard, a floor installation is required. Some types of cast iron and steel radiators come immediately on legs, but they do not suit everyone in appearance or characteristics.
Feet for installing aluminum and bimetallic radiators on the floor
Possible floor installation of aluminum and bimetallic radiators. There are special brackets for them. They are fixed to the floor, then the heating device is installed, the lower collector is fixed with an arc on the installed legs. There are similar legs with adjustable height, there are fixed ones. The method of fastening to the floor is standard - on nails or dowels, depending on the material.
The installation of each type of battery has its own nuances.
Cast iron
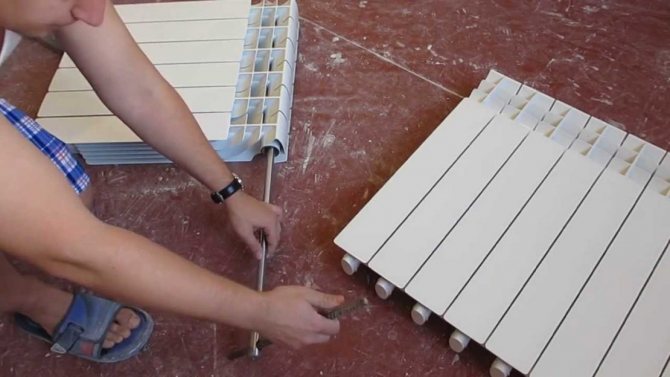
The difference from the standard scheme is that for batteries of this type, sections are initially formed using a radiator key.
The nipples are impregnated with linseed oil and manually fixed on 2 threads. In this case, a gasket must be used. Then the radiator keys are inserted into the nipple holes and tightened.
Important! The assembly of the sections must be carried out with an assistant, since the simultaneous rotation of the nipples can lead to skewing.
After crimping the battery, a layer of primer is applied to it and painted.
Aluminum

Passes according to the standard scheme of one of three connection options.
The only caveat is that aluminum batteries are fixed both on the wall and on the floor. For the latter option, use special clamping rings on the legs.
By adjusting the indentation of the radiator from the wall, floor and window sill, you can increase or decrease the level of heat transfer from the battery.
When installing aluminum heating sources, they are guided by the attached instructions. If the recommendations indicate the use of a coolant, then you need to use it exclusively.
Installing the shield in front of the radiator will increase the efficiency.
Such batteries are suitable for installation in private houses with autonomous heating.
Steel
An important point in connection is to check the horizontality of the battery. Any deviation will reduce work efficiency.
Read more: Corner toilet with a cistern: types, selection criteria, installation algorithm
In addition to wall brackets, floor stands are used for additional fixation.
Otherwise, standard connection schemes are used.
Bimetallic
In such batteries, it is allowed to build up or remove unnecessary sections. They are already painted. The sections are pulled together in stages from the bottom and from the top, without distortions.
Attention! In the place where the sealing gasket for the nipple is located, do not sandpaper or file.
As with the standard scheme, pre-treatment of the wall is required.
Installation nuances
There are two types of bimetallic radiators: partially or completely bimetallic. In the first case, aluminum is used for the manufacture of vertical collectors, which requires special care during installation.
There are the following requirements on how to properly connect a bimetallic battery:
- When connecting fittings and manifolds, it is necessary to keep from excessive forces. Typically, the accompanying documentation contains detailed installation instructions. A torque wrench is very convenient in this respect, allowing you to control the applied force.
- When using linen roll, it is important not to overdo it with the amount. Otherwise, part of the effort will go to it, which ultimately will lead to the appearance of microcracks. After the coolant enters them, the process of peeling off the paint will start. As a result, sooner or later, a leak will appear. It is best to apply a sealant and some flax. It is better to refuse the use of paint in systems where antifreeze acts as a heat carrier. This will quickly erode the seal and cause leakage.

- The battery must be installed in a strictly horizontal position. The exception is the cases of using an air vent, when, for greater efficiency of the gas release, some deviation of the angle forward along the circulation is allowed. It is forbidden to make a slope in the opposite direction, because this disrupts circulation.
- When hanging the radiator, three brackets must be used: two at the top and one at the bottom. The upper elements take all the load. Due to the lower fasteners, the desired direction is set.
- To ensure effective air exchange, the following parameters should be adhered to: the distance to the floor - from 60 mm, to the window sill - from 100 mm.
In some cases, the manufacturer may recommend other distances, depending on the design features (the differences usually concern a few centimeters). However, the gap between the rear surface of the battery and the wall remains unchanged - 30-50 mm.
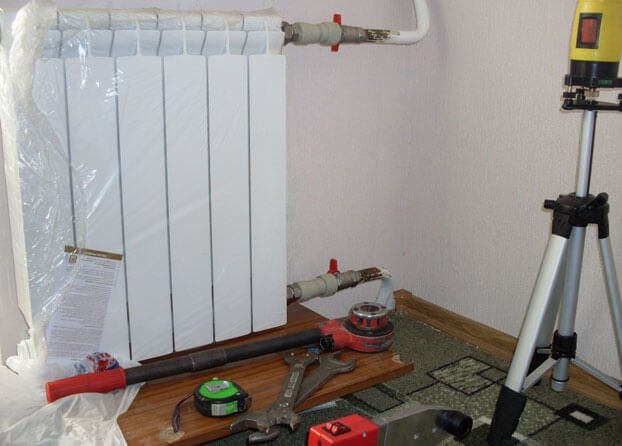
Additional tools and materials
The contractor of work on self-installation of heating batteries must have torque wrenches with them, having dimensions that allow observing the torque moment with a high degree of accuracy. Since the fluid circulates through the system under significant pressure, poor sealing results in jet leaks from the junction. In the case of excessive constriction, the likelihood of a similar problem is high.
No construction or installation process can be carried out without a certain set of tools and devices. In this case, you need to know what is needed to install a heating radiator. Most often, the same set is used with the exception of some cases.
For example, aluminum and bimetallic radiators are installed in the same way, and cast-iron batteries are installed according to a different scheme. They require the use of larger plugs, and the Mayevsky valve is replaced with an automatic air vent, installing it at the highest point of the system. Steel panel-type radiators have metal bows and are equipped with brackets for hanging.
For wall-mounted radiator models, you should purchase hooks or brackets, the number of which is selected depending on the number of sections of the heating device:
- If the number of sections does not exceed 8, and the length is less than 1.2 meters, then the device is mounted at three points, two at the top and one at the bottom.
- Each next 5-6 sections require additional fastening.