

Everyone who is going to start construction is wondering which pipes are best for the bath. Only if you choose the right materials, the construction will delight and benefit for a long time. This applies to even the smallest detail, since one ill-conceived element can cause the room to become uncomfortable, and the devices will not perform their functions normally.
For example, when building a bath, you need to pay great attention to safety. Here, the wiring must be specially protected, and the stove is built so as not to cause a fire. But other details, which at first glance seem not so important, also play a role. Even the wrong material for the chimney can lead to the fact that the use of the bath will not be very comfortable.
Attention! The ability to use the structure without risk to health largely depends on how well the smoke is removed from the room and what diameter the pipe is in the bath.
The chimney plays a huge role. If not installed correctly, people can be poisoned by carbon monoxide. The material itself can also affect the operation of the device, therefore it is necessary to choose a pipe for a bath carefully. It should be remembered that it can be very comfortable and pleasant to spend time in a steam room. But here you can get serious injuries and even poisoning if the bath is not properly built.
It is not difficult to build a chimney. This work is within the power of even those who do not consider themselves a master of construction. But you need to choose the right materials for removing smoke from the stove. The life and health of people who come to steam in the bathhouse largely depend on this.
What is a chimney
A traditional wood-burning stove is a combustion chamber made of metal or made of bricks, equipped with a system for removing combustion products outside. It is a vertical pipe through which smoke and hot gases from fuel combustion rise. This vertical pipe is called a chimney. The element is extremely important, only it allows you to ensure the safety of people in a room with a flooded wood-burning stove. The fact is that during combustion, a large amount of carbon monoxide is formed - CO, which is dangerous to human health. No less dangerous is smoke and other combustion products, of which quite a lot is formed. Stove chimneys are the only way to remove all these substances.... In parallel with the main functions, they are an element of ventilation, allow you to ventilate the bath, remove excess moisture from it.
In addition, the chimney provides the correct way of burning fuel, organizes air suction into the furnace, activating the combustion process. The device operates in a passive mode, without the use of additional devices. The use of mechanical means of increasing productivity is possible, but in practice it is rarely used. Understanding how to correctly make a chimney in a bath makes it possible to avoid undesirable and dangerous consequences for people or property.
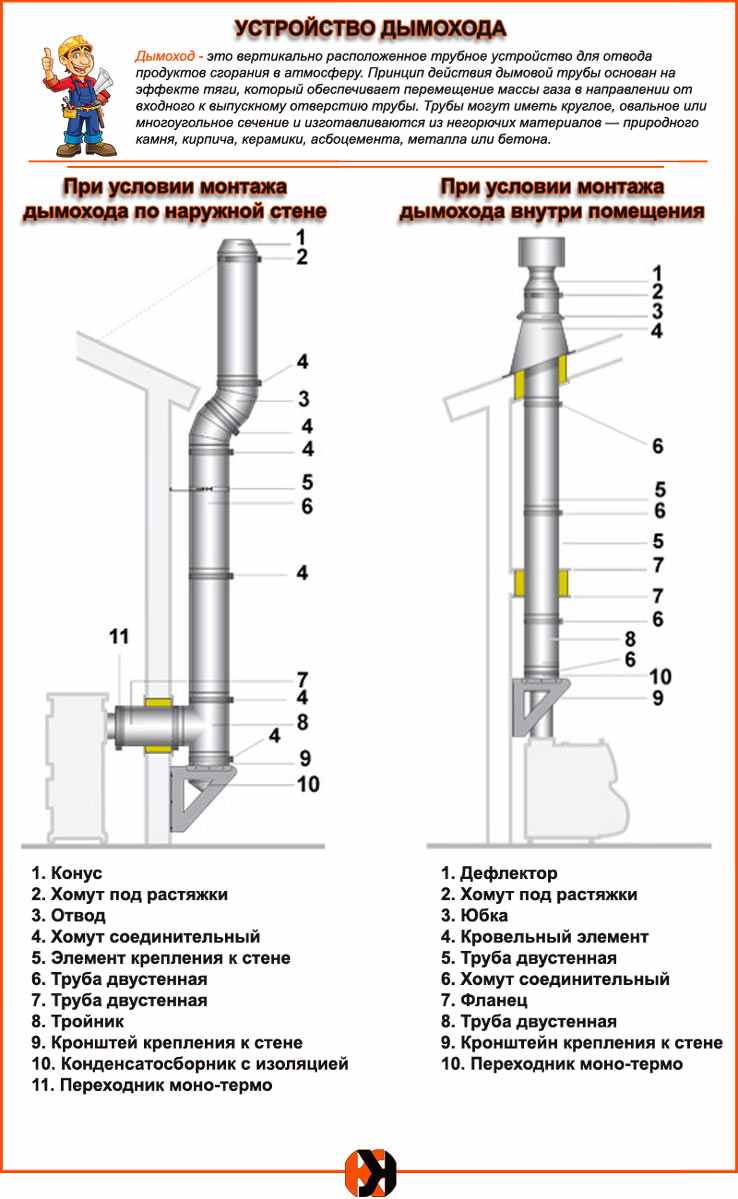
Externally, the chimney is an ordinary pipe, connected at one end to the stove, and the other is led out and rises to a certain height. This is the simplest design, in practice there are many more, additional elements and details are used:
- Gate valves (gates).
- Nodes of passage through the roof.
- Nodes of passage through the wall.
- Protective aprons.
- Heads (protective caps).
All elements serve to fulfill their own tasks, the main direction is to protect the bath and nearby buildings from fire.
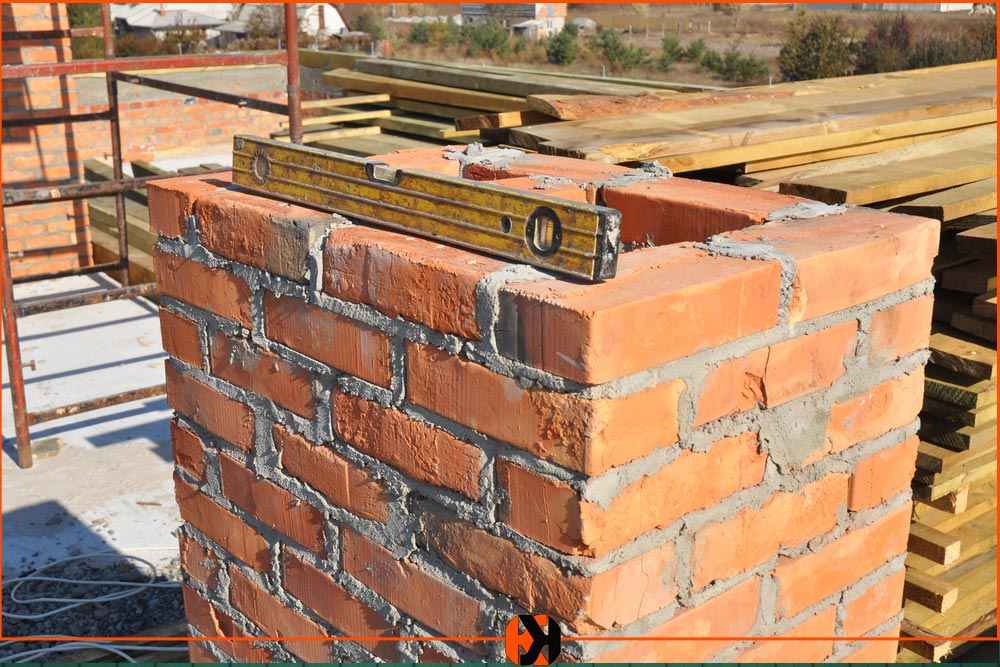
How to make a brick structure
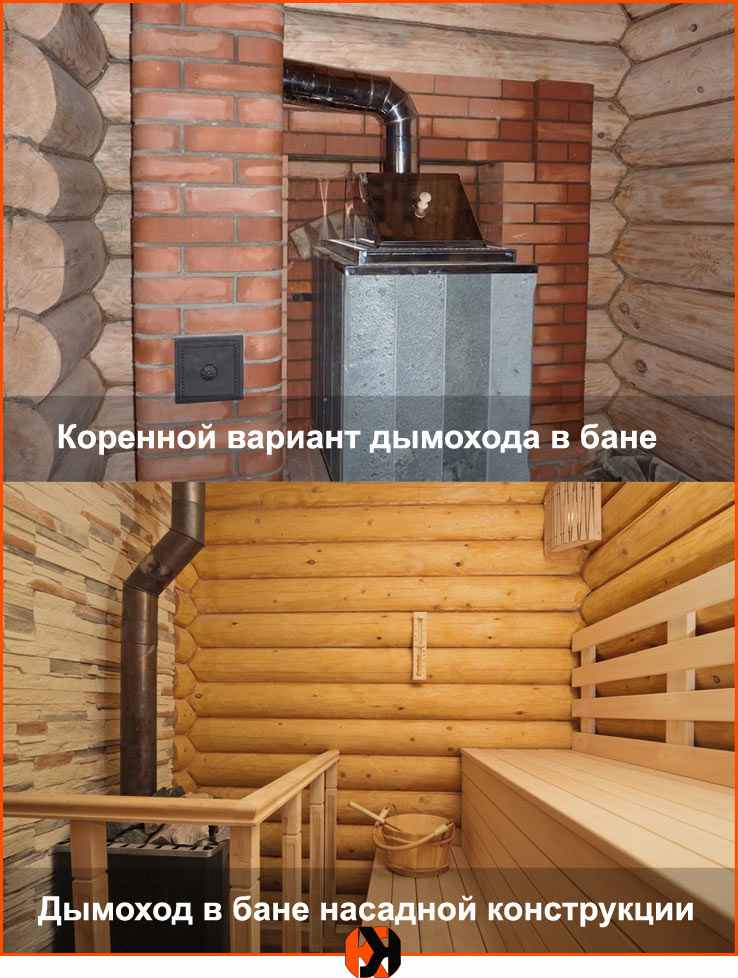
Brick chimneys can be indigenous and mounted. The first option is located next to the stove and is ideal for sauna stoves.
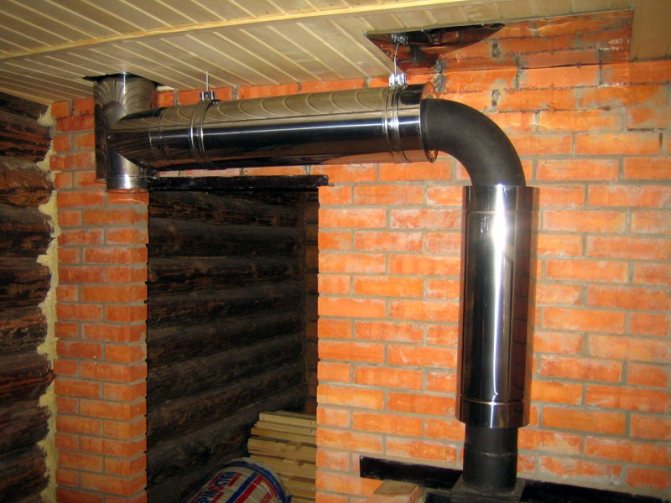
If the stove is initially made of bricks, then the chimney is added to the overall structure. If you have a metal stove, then the brick chimney is connected to it using a metal pipe.
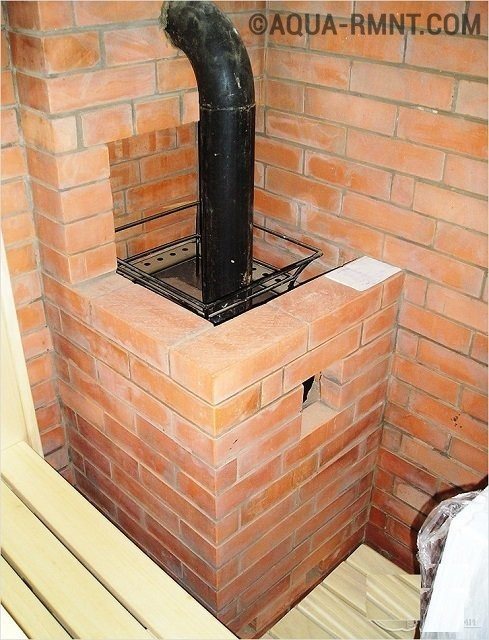
Connecting the chimney to the sauna stove with a metal pipe
Nuances
- A smoke damper is installed near the ceiling in the chimney, which is responsible for the draft in the stove. It also determines how intensively the fuel will burn and how long the stove will store heat.
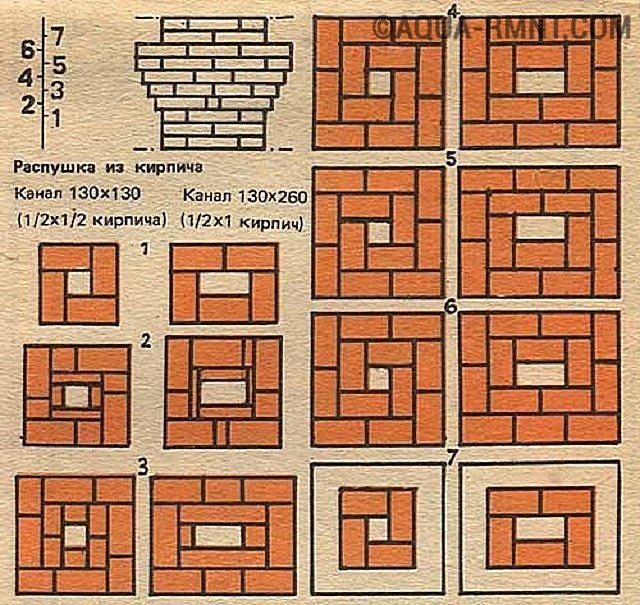
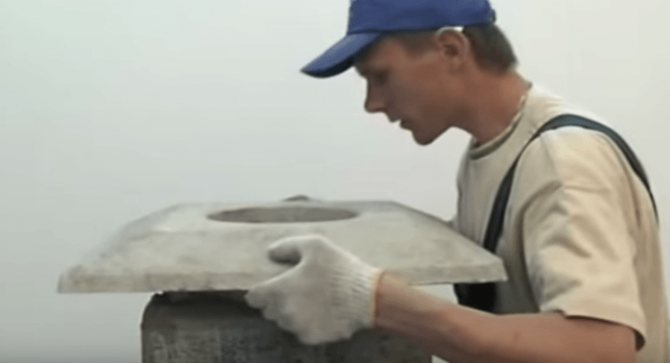
- To pass the pipe through the ceiling of the attic, it is necessary to fluff in the chimney.

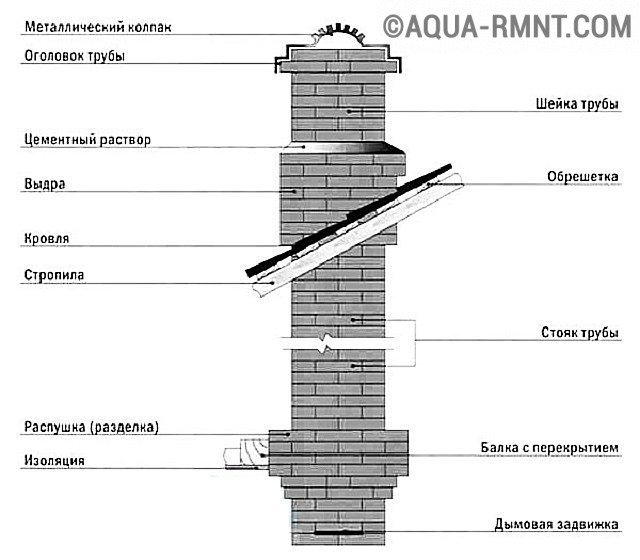
Brick chimney device diagram
Fluffing (cutting) is a thickening of the walls of the chimney part of the furnace while maintaining the internal section. Thus, the floor is insulated from the effects of high temperatures.
- A riser is being built over the fluff. It crosses the entire attic and has a straight and even shape.
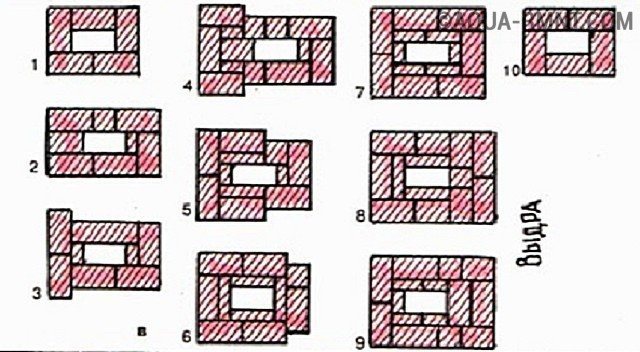
- At the point where the chimney meets the roof, an otter is constructed, which has the same functions as the fluff. But in addition to the function of protecting the roofing materials from temperatures, the "otter" closes the gaps that form between the roof and the chimney.
- The next element of the pipe is the neck. After expansion, it returns to its original form.
- After the neck comes the head. Its bricks protrude outward and provide additional protection against moisture penetration.
- To prevent precipitation, dirt and dust from entering the pipe, a metal cap is put on it.
Step by step construction
From the fundamental part, the chimney is laid using one ordering scheme.
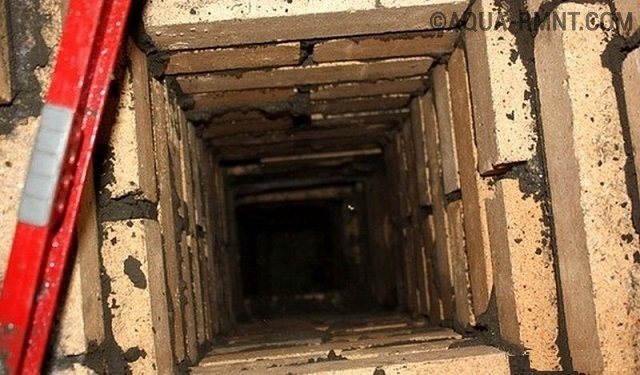
Chimney well
The building must be level, without ledges and windows. An exception is the ledge where the metal pipe from the stove is embedded. The chimney is a square pillar with a well-shaped section inside. The size of this section, depending on the power of the sauna stove, is 13x13 centimeters (0.5 bricks), 13x26 centimeters (1 brick) or 26x26 centimeters (2 bricks).
- The foundation is the base of the chimney. Its thickness is the same as that of the sauna stove. They are one.
- The chimney rises to the point where the valve is installed. Then the chimney is put in order.
Chimney and fluff ordering
- Row 1 completes the chimney neck.
- From the 2nd row, the construction of the fluff begins. In this case, the bricks must be shifted 1/3 outward. At this stage, solid bricks and parts are used. Parts of the required size are made with a pickaxe.
- The internal section of the chimney is unchanged throughout the entire masonry. The shifting of the fluff occurs only outward. If you break this rule, you can greatly reduce the thrust of the stove.
- The fluff moves from rows 3 to 5.
- The 6th row is laid in the same way as the 5th, without a shift.
- Rows 7 and 8 are the same as row 1.
Finished fluff steps
- Once the cut is laid out, construction of the otter begins.
Otter ordering
Its erection is not an easy task. Each row should protrude 1/3 above the previous one. The bottom one is glad of the same shape and size as the top row of cutting. From the second row of the "otter", the laying of steps begins, expanding the chimney outward by 1/3 of the brick. The ordering diagram clearly shows how many rows need to be made to build an otter like.
- After the otter, the chimney neck is laid out in accordance with the diagram.
- Then comes the head. It consists of 2 rows, with the lower one protruding slightly outward.
- The last stage is the installation of the cover-cap.

Waterproofing
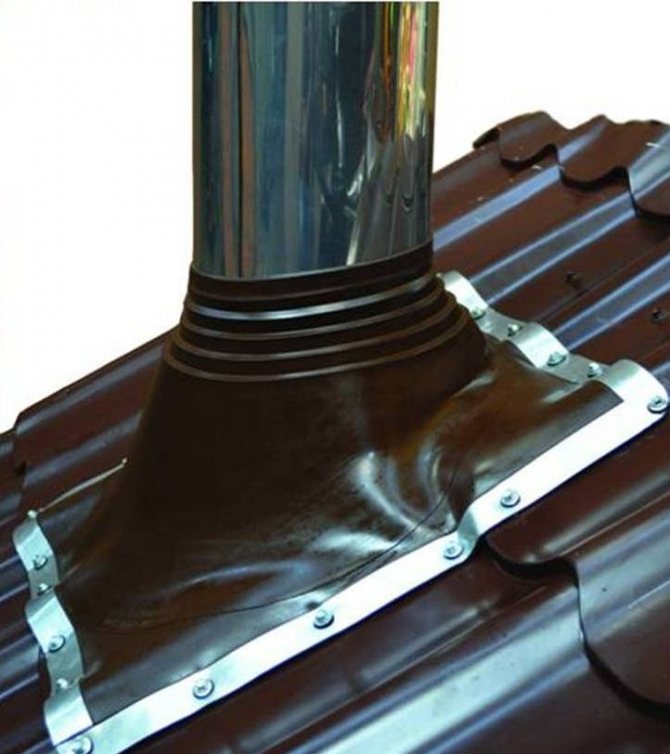
Of course, fluff and otter protect the floors from high temperatures. But nobody canceled the waterproofing on the roof. The brick chimney must be waterproofed before the roofing material is laid on the roof. Usually, roofing material and mastic are used for this. First, apply mastic to the lower part of the chimney, heat it up with a burner and glue the roofing felt to it, pressing it firmly.
Then you can lay the roofing material, which should fit tightly to the pipe. After that, a decorative finish (apron) goes over the roof. All gaps must be carefully filled with sealant. Otherwise, moisture may leak through them.
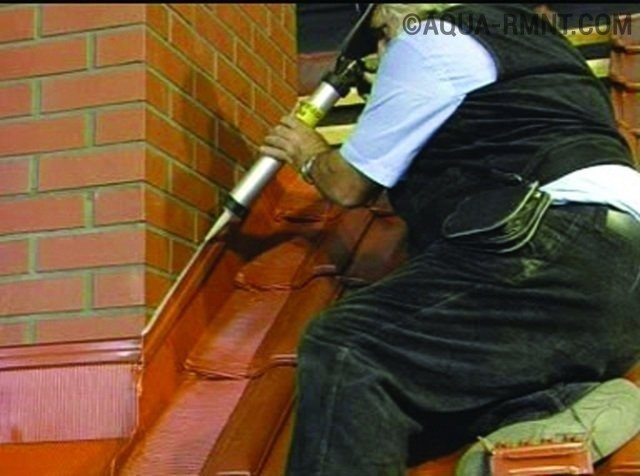
Sealing gaps
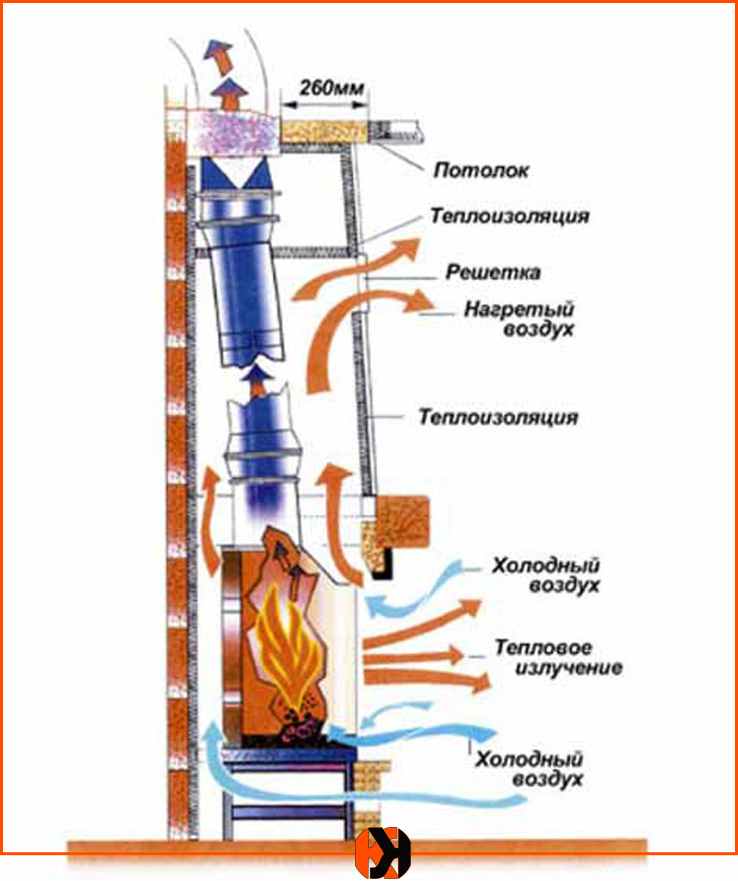
Operating principle
Consider the device of the chimney in the bath. Burning wood in a firebox gives off a large amount of heat energy and generates many different types of waste. Hot gases, smoke and other combustion products rise. This physical phenomenon is called cravings. When smoke is removed in the furnace, a vacuum is formed, which causes air to leak from below, for which a special hole is made during the manufacture of the furnace - a blower. The principle of operation is simple, but in practice everything is much more complicated.
Not every chimney is capable of providing high-quality draft. Various factors affect the operation of the combustion product removal system:
- a strong wind outside is able to drive the smoke out back;
- chimney installation too low;
- raw wood, unable to give the desired combustion temperature;
- a complex configuration of a chimney for a bath, which has sharp bends;
- the diameter (or dimensions of a rectangular pipe) does not correspond to the parameters of the furnace, does not allow organizing the correct mode of smoke extraction.
You may feel that it is extremely difficult to make a chimney for a bath with your own hands; you cannot do without the help of specialists. This is an erroneous opinion, independent installation of a chimney for a sauna stove is quite possible. It only takes some theoretical training.
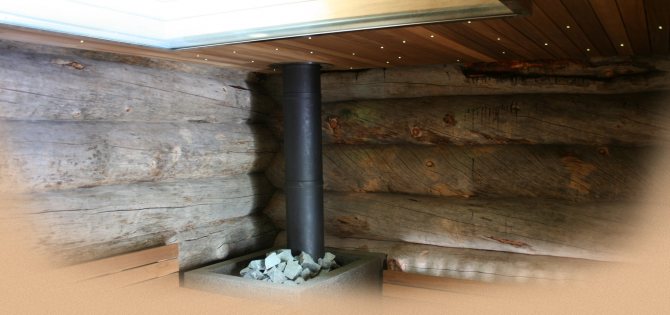
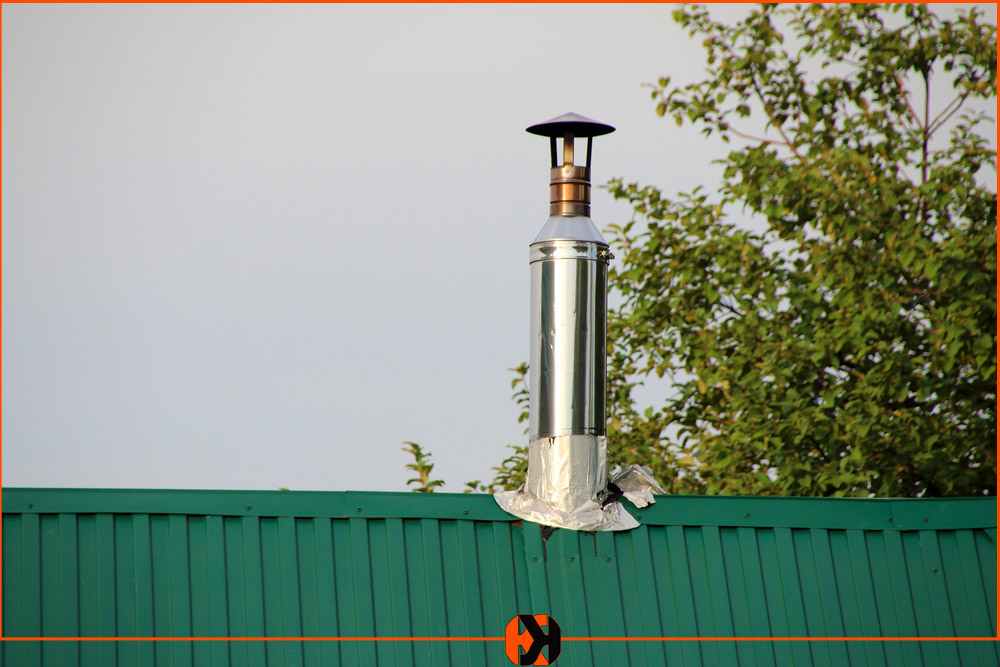
The passage of the pipe through the roof: brick and round
Today, one of the most popular, practical, aesthetic and functional chimney designs is the sandwich pipe assembly. The article will focus on how a sandwich pipe for a bath is laid, what materials are used in this case, and what nuances this procedure has.
The chimney is being installed in a sandwich pipe bath according to the standard scheme. In fact, the chimney turns out to be segmented, since it is assembled from several pipes about 1 meter long. Let's take a closer look at the procedure on how to properly install a sandwich pipe in a bath and the main materials used in this.
Quite often, especially in rural areas, an iron chimney is used for a bath. That is, an ordinary iron pipe with a diameter of 100-110 mm is used. The option is not entirely the best, but it has a right to exist. Here, the ceiling pass-through unit (PPU) is performed differently. The distance from the metal pipe to wooden structures should be 40-50 centimeters.
The chimney itself in the area of the ceiling passage and in the attic is wrapped in sheet asbestos. It is pre-wetted with water so that it does not crack when bent. From above, such a wrapped pipe can be wrapped with wire. It will prevent asbestos from sliding down.
From the side of the steam room, the hole made is closed with a sheet of stainless steel or ordinary thin metal. But under this sheet it is also necessary to put asbestos or paronite. The goal is to reduce heat transfer between this metal and the finish, such as clapboard. From above, expanded clay is poured onto a metal sheet or basalt insulation is laid.
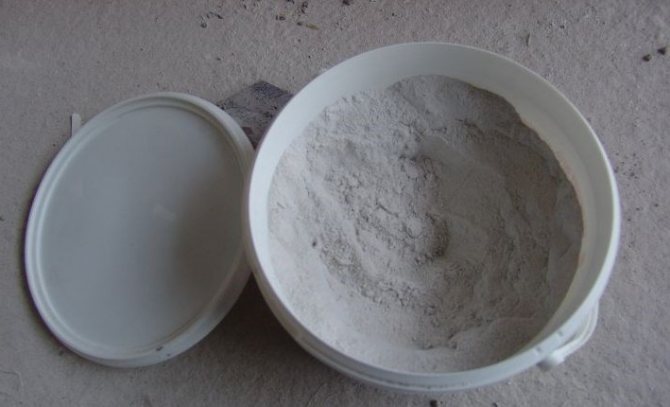
In order to close the roof, a flash seal for this pipe is no longer suitable. Rubber simply won't withstand the heat.They proceed as follows: the cut hole is closed with a sheet of metal, and the gaps between the pipe are sealed with rope asbestos, which is abundantly moistened in a thick cement mortar (just wrapped around the pipe). As they say: cheap and cheerful.
Paronite under the screen Installation of the ceiling box Thermal insulation of the ceiling duct
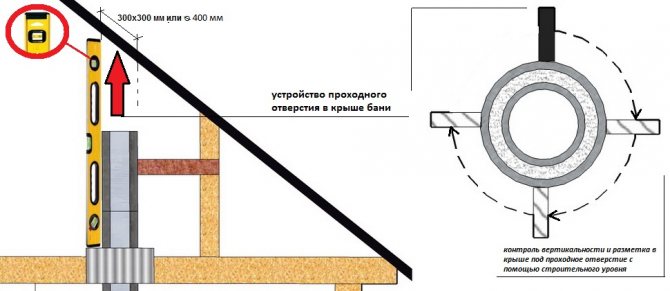
One of the most important tasks in the construction of a bath is the correct conclusion and termination of the chimney. Moreover, two problems need to be solved simultaneously: to ensure fire safety and to isolate the pipe joint from the flow of atmospheric precipitation and condensate.
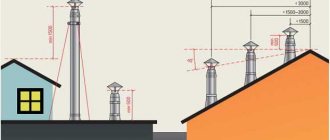
First of all, before solving the problem of water passage, it is necessary to determine the place where the pipe exits on the roof. The height of the pipe must meet certain standards. The height depends on where in the pitched roof the pipe will come out.
When installing the pipe, the rule applies: "The closer to the ridge, the higher the pipe must be raised."
The rise of the chimney above the roof plane
- If the distance from the center of the chimney to the ridge of the roof does not exceed 1500 mm, the chimney must be raised above the ridge by at least 500 mm;
- With a distance from the center of the pipe to the ridge from 1500 to 3000 mm, the top of the pipe can be flush with the ridge of the roof;
- At a distance of more than 3 meters, the top of the pipe must not be lower than a line drawn down from the ridge at an angle of 10 degrees to the horizon.
The most convenient option for bringing the pipe through the roof is to pass it through the ridge. In this case, the installation is easiest to carry out, there are rarely snow pockets on the ridge, moreover, thanks to this arrangement, it is easy to carry out insulation work. But this method has a drawback: the rafter system should not have a ridge beam.
The most unfortunate option for the location of the chimney is in the valley (the valley is a roof element made of a kind of tray that forms an internal angle between the joints of the pitched roof elements). Large masses of snow usually accumulate here, during rain water flows down from two slopes, so that even with the most careful isolation, the appearance of a leak is only a matter of time.
The most convenient way to lead the pipe through the roof is not far from the ridge
Based on this, the most acceptable option for pitched roofs is not far from the ridge, but below it:
- easy to install,
- snow usually accumulates a little, which means there is no need to set snow retention,
- installation is not the most difficult,
- due to the not very high height of the pipe, it does not need to be reinforced with guy wires.
If it turns out that the chimney passes near the floor beams, or close to them (the minimum distance should be 13-25 cm, depending on the type of pipe), comes out in the valley or close to the slope, an additional knee can be a way out, with the help of which you can bring the pipe to the desired location.
If the roof of the bath is pitched. the most reasonable solution would be to arrange the pipe outlet through the roof near the top of the roof.
Baths' roofs have, as a rule, solid insulation. which solves the problem of keeping warm. To ensure good heat and moisture protection properties of the roofing cake, it is necessary that the membranes and heat and moisture protection films are continuous.
Leaving the pipe through the roof, we will certainly violate their integrity. Moreover, according to fire regulations, the distance from the pipe to combustible materials (which are vapor barrier and waterproofing films) should be at least 13-25 cm. How to get out of the situation? The best option is to separate the zone where the pipe passes through the roof.
It often happens that "the pipe hits the rafters." In this case, the rafter leg is cut, additional rafter legs are installed, as well as cross beams. Thus, a duct is formed for the safe passage of the chimney through the roof.
The space between the pipe and the truss structure is filled with mineral wool.Only not with fiberglass - it does not tolerate high temperatures, but with basalt wool, which tolerates temperatures normally, and does not lose its heat-insulating properties when moisture enters.
At the same time, to ensure the tightness of the roofing pie within the box in which the pipe will be located, the materials are cut with an "envelope", the edges are wrapped up to the beams and rafters, fixing with staples or nails (you can use counter battens). To prevent the ingress of moisture, the places where materials adhere to the wood must be additionally insulated with adhesive tapes or sealants.
The roofing pie in the place of the passage is cut with an "envelope" and fixed to the lathing and rafters
But there is another option. If the temperature of the pipe in the area of its passage through the roof does not exceed 50-60 ° C, you can simply glue the films of the roofing pie using the same sealants and adhesive tapes. This is possible if, for example, a tank for heating water is installed on the chimney after leaving the furnace or an additional heater is installed, etc. and it is not a sandwich that comes out on the roof.
In any case, a drainage groove will need to be attached to drain the condensate in the waterproofing layer. You can buy it (usually it is made of stainless steel), or you can make it yourself from a film of sufficient thickness. The groove is fixed around the pipe and its end is brought out to the side. Thus, the condensate flows into this groove and is discharged onto the roof slope.
Features of the chimney for a bath
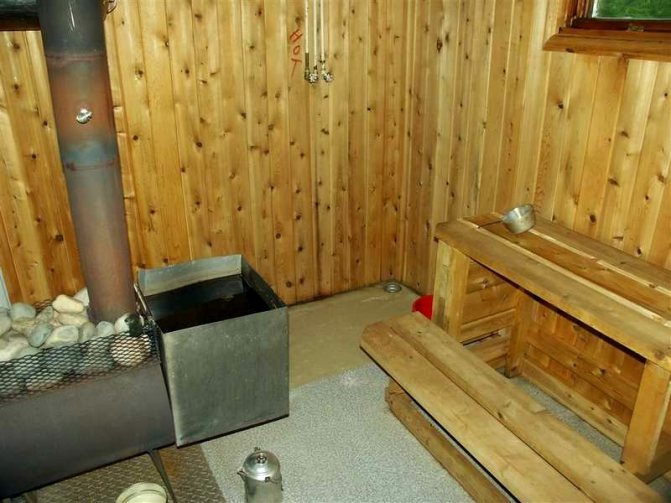
Initially, Russian baths were heated "in black". Bath chimneys were simply absent. The stove was loaded with wood, after a while they completely burned out. Smoke and other combustion products were partially discharged outside through the doors, and partially settled on the walls. The entire bathhouse was smoked from the inside and covered with a layer of soot, hence the name - in black. If the firewood in the firebox did not completely burn out, then the smoldering coals continued to emit carbon monoxide, which created the danger of poisoning with various consequences, up to and including death. It is noteworthy that even today there are lovers of this type of baths, who consider them the most correct and useful.
Modern designs of stoves have a smoke exhaust system that allows you to stay inside during the kindling of the stove and ensure high-quality finishing of the premises in the bath. Sauna chimneys work in conjunction with stoves of smaller volumes, so they have a relatively small size and length of the smoke channel. They warm up faster, which avoids the formation of a large amount of condensation. At the same time, the low height of the pipe creates a threat of reverse thrust when turbulent wind currents create high pressure, squeezing out the smoke into the room. In order to avoid the danger of combustion products entering the room, you need to know how to properly make a chimney in the bath, how the stoves and smoke exhaust ducts are connected.
This is also important to know: What are the advantages of stainless steel chimneys

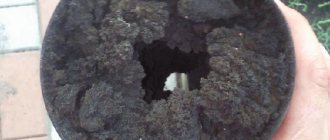
Clogged chimney cleaning technology
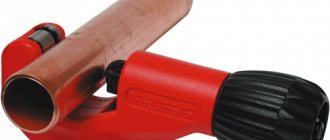
Finally, it is important to take care of the regular cleaning of the chimney. The most proven and oldest method, for example, is mechanical. To do this, they take in the hands of ruffs, special weights, and sometimes even a sledgehammer with a crowbar. True, this work is so dirty that you will have to take everything out of the bath in advance and cover the remaining surfaces with layers of newspapers.
The easiest way to clean from the above is with a brush - for this, it is enough to insert it into the chimney and gently push it up until the resistance of the accumulated soot weakens. You don't just need to twirl it - otherwise you will have to get this instrument in parts later.
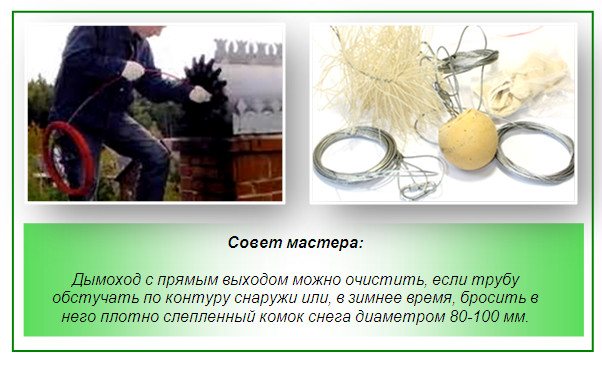
If small growths become noticeable in the pipe, you can use aspen wood - when they burn, an excellent draft is created, which carries ash out of the pipe.In addition, the aspen has a dry and strong heat, in which resinous substances in the pipe from the firebox are immediately burned by conifers. By the way, potato peelings have the same properties, if they can be prepared in the right amount.
But modern methods of chimney cleaning are becoming more and more popular - these are chemicals that contain special substances that can take out soot when burned with them, or they loosen it so that it falls off by itself.
And it is best to clean the sauna chimney after rain. Simple maintenance and regular care of the cleanliness of the pipes - and the firewood in the bath will burn for "five"!
Types and design options
The chimney device in the bath has different design options. First of all, they should be divided according to the type of connection to the furnace:
- Indigenous chimneys. They represent a pipe installed separately from the furnace itself and connected to it with a special channel. They are able to remove combustion products simultaneously from several furnaces, but this requires an appropriate size of the internal section of the channel.
- Mounted structures. Installed directly on the oven. For the chimney to the bath, the option is considered the most convenient and effective, allowing you to get the optimal mode for removing smoke and combustion gases.
The second sign by which the smoke channels can be divided are:
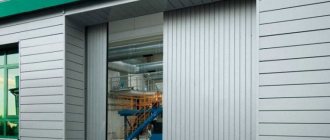
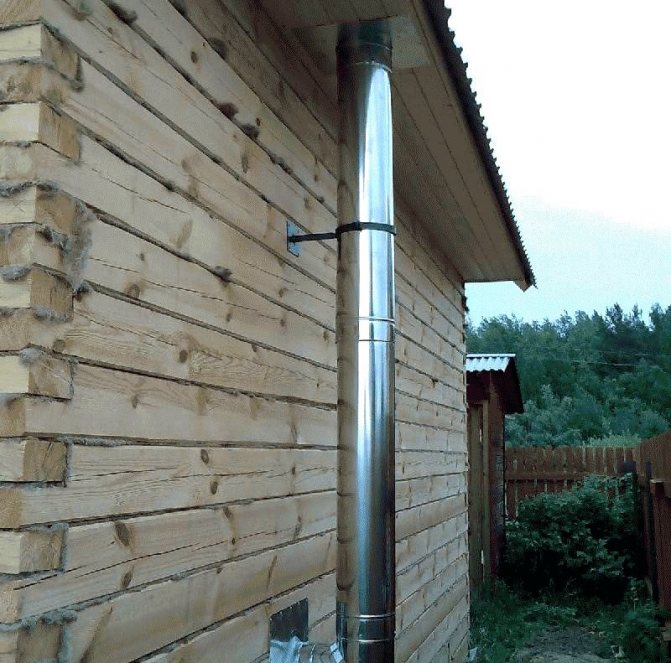
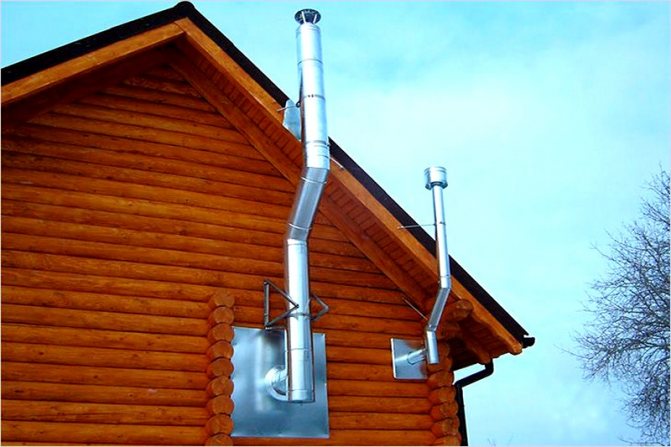
- Outdoor chimneys. They are located outside the building, lead out through the wall and are fixed on the end (usually) wall.
- Internal ducts are installed directly above the furnace outlet and pass through the roof of the building.
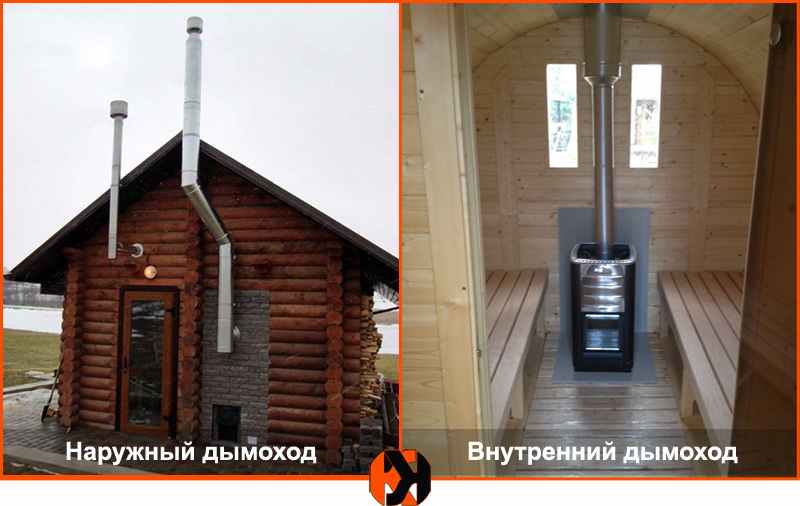
For the bath, mainly internal chimneys are used, they have a more suitable configuration and are more efficient in operation. Outdoor options are used on large buildings with several floors, and often provide smoke from several stoves. The advantage of external structures is the ability to drain condensate into specially equipped pockets, which reduces the rate of soot fouling on the inner surface of the pipe..
Chimneys for a bath also differ in material:
- metal;
- brick (stone);
- concrete, aerated concrete, ceramic blocks.
Let's consider them in more detail.
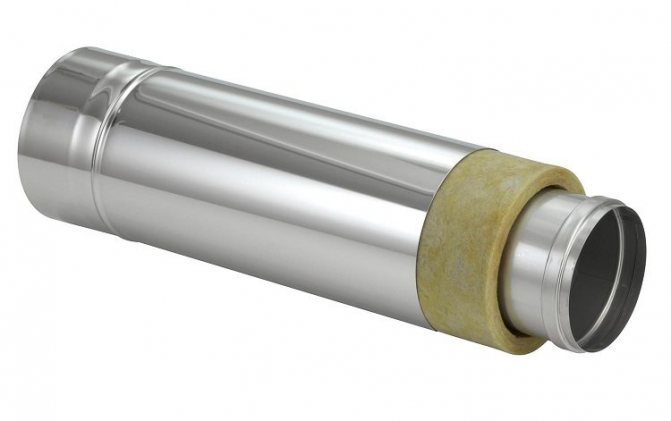
Metal chimneys
Reliable and practical metal chimney for a bath
The use of steel pipes for the chimney in the bath somewhat simplifies the manufacturing process, but requires an understanding of the features of its operation. The metal heats up or cools down quickly, which contributes to the formation of condensation. Flowing down the vertical pipe, moisture enters the firebox, where it boils, releasing corrosive gases from the distillation of tar and other substances dissolved in it. In order to exclude or reduce the scale of this phenomenon, it is customary to equip chimneys for a bath with double or sandwich pipes that have an inner layer of thermal insulation and do not heat up from the outside. Such pipes are less dangerous in terms of fire, they remain heated inside for a long time, which reduces the possibility of condensation formation. The sandwich chimney is distinguished by its durability, unpretentiousness in maintenance, but the basic requirements for it are the same as for any other type.
Brick chimneys
Not so long ago, exclusively brick chimneys were used in the construction of the bath.
Refractory bricks for chimneys have been used since time immemorial. It does not heat up so much, does not corrode. Brick pipes are used in conjunction with brick ovens and have recently been made less often due to the complexity of their manufacture. A pipe of this design has a rather complex configuration, since it is required to ensure the retention of heat in the furnace. In addition, they are usually made rectangular in cross section, which reduces the aerodynamic properties of the removed medium. Another drawback is the large weight and, as a result, the fragility of the brick pipe.The bathhouse is a relatively low structure, and the length of the chimney (recommended) is 5 m. A high brick chimney experiences significant thermal and mechanical (wind) loads, which quickly puts the structure out of action.
Ceramic and other types
Currently, specialized blocks are produced for the assembly of chimneys. They are intended for use in large smoke extraction systems; they are not suitable for installation in small rooms due to their size and high weight. The fact is that an excessively massive pipe will take away a large amount of heat from the exhaust gases. To ensure high-quality draft at the exit from the chimney, the temperature must be at least 120 °, therefore the use of such materials with small stoves is irrational. Thin ceramic pipes combine the positive qualities of brick and metal chimneys, but their cost is high. In addition, it is not always possible to find additional elements to them.
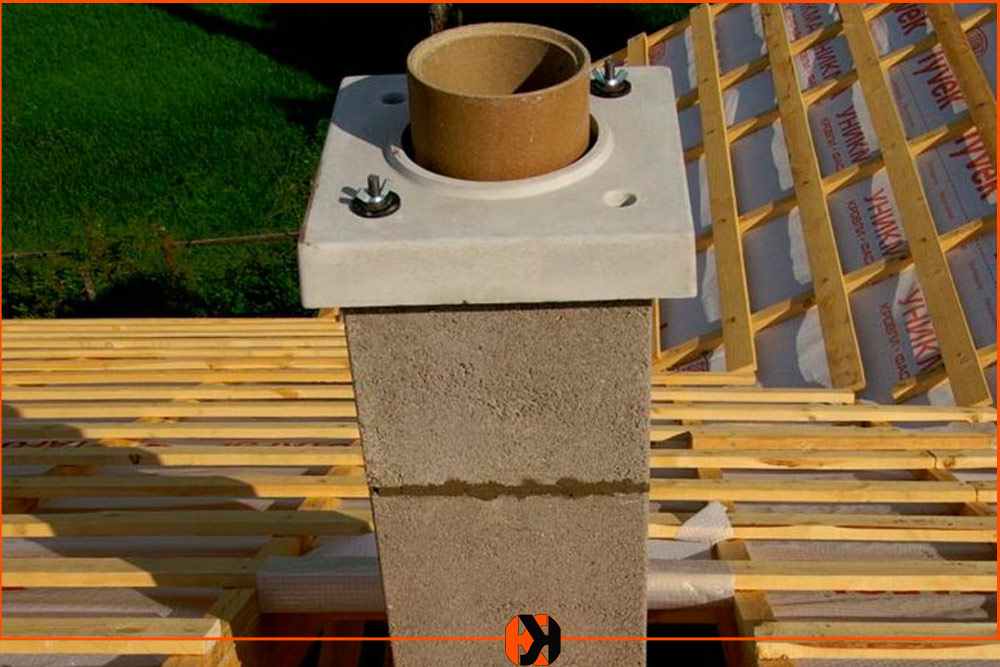
Important! Sauna chimneys are not recommended to be made of asbestos-cement pipes, as they are hygroscopic and quickly deteriorate, under certain circumstances they can explode. The use of concrete or ceramic blocks requires a solid foundation, and not every oven is capable of supporting significant weight.
Smoke and condensate installation
In practice, two options are used for the passage of the pipe from the room to the street: through the wall and through the ceiling. The choice always remains with the owner of the stove, and we will tell you about the features of both schemes.
The advantages of the through-the-wall construction include:
- Saving useful space. If the bath is located on the basement of the house, it is not necessary for the pipe to pass through the living quarters located above. It will not only "eat up" the usable area, but also require compliance with a whole range of fire safety measures. Also, if you accidentally touch the pipe, you can get serious burns.
- Easy to install. Most of the work is done outdoors. The weight of the vertical structure is practically unlimited, and it is protected from wind loads: the pipe rests on a bracket, "tied" with clamps to the wall. Installation through the wall means the arrangement of only one fire section.
- Maintainability. If necessary, you can always extend the pipe with additional sections. Replacing the elements of the external chimney does not require any work in the room.
Obvious design flaw - low
Efficiency
... Part of the flue gas energy that could be used to heat the room is released into the atmosphere. Outdoor chimneys often disrupt the design of buildings, and soot accumulates in their horizontal sections and at bends. Such structures need to be cleaned much more often than vertical internal smoke extraction systems.
The advantages of leaving the chimney of the bath through the roof are:
- high efficiency, since more heat remains in the room;
- less deposits and condensation;
- stable traction.
The disadvantages of this scheme include the increased complexity of installation work. All internal flammable structures must be shielded from heat radiation by specialized materials. It is also necessary to check the weight of the structure with the bearing capacity of the furnace and, if necessary, unload the roof using brackets. The relative position of the chimney and rafters must be taken into account even when designing a building, so as not to weaken the ceiling or roof.
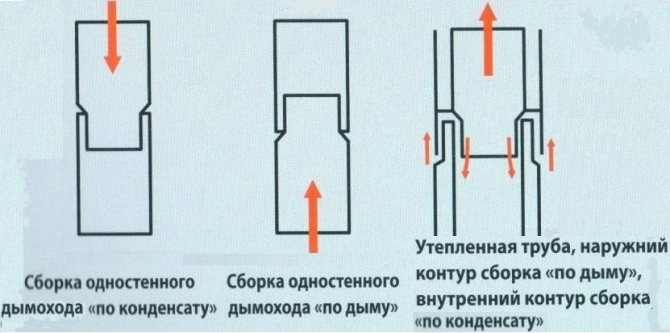
There are two schemes for assembling a chimney system from sandwich pipes:
- Through smoke, or flare down. Such a scheme excludes the exit of flue gases in case of violation of the tightness of the joint, but may be accompanied by the release of condensate to the outside. This scheme is used for indoor installation. This eliminates the danger of carbon monoxide poisoning, and the appearance of a small amount of moisture is not critical.
- On condensate, or flare up. This scheme is used when assembling street chimneys, where the release of gas is not dangerous.At the bottom of the chimney, a condensate collector is made, into which all the moisture enters.
Sandwich pipes from different manufacturers may differ in the design of the socket joint. When choosing an assembly scheme, read the instructions. Manufacturers provide detailed step-by-step installation guides.
The installation technique depends on what material is planned to be used for the production of the chimney. There are some rules that must be taken into account when making a chimney yourself:
- The device must not be docked with other pipes.
- The smoke evacuation structure should not have horizontal sections longer than 1 m.
- During the heating season, the chimney of the bathhouse must be cleaned at least 2 times.
- The structure must extend at least 0.5 m beyond the roof.
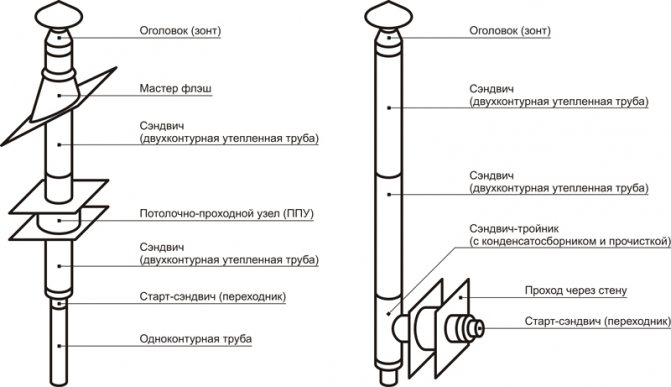
The first thing to consider is a sandwich chimney. Manufacturers supply products along with a set of additional parts, which include:
- knee;
- tees;
- clamps;
- stubs;
- ceiling and walk-through units;
- headbands;
- protective screens.
We offer you to familiarize yourself with: Wall vapor barrier from the inside of a wooden house: functions, photo, video, which side to glue, tools, vapor barrier outside
The diagram will allow you to understand the technology of installing a stainless steel chimney
A step-by-step guide to assembling a steel chimney:
- First of all, using a plumb line, you need to mark the points of exit of the branch pipe through the roof and ceiling structure. Next, you need to prepare a recess for the size of the pipe. It is worth remembering that a distance of about 10 cm should be left between the sandwich pipe and the wooden ceiling parts along the perimeter of the recess. The dimensions of the opening should be approximately 10 cm larger than the dimensions of the chimney
- Thermal insulation can be done with mineral wool. It will be necessary to close the place where the pipe passes through the ceiling. Do not worry about cotton wool becoming damp, as the high temperature dries it out quickly.
- It will be necessary to remove all dimensions and determine the installation site for the unloading unit. It is recommended to do it in the attic. It will take on the loads of the pipe that comes out of the ceiling. In addition, the unloading unit is able to eliminate lateral vibrations. The unloading unit takes the load of the pipe coming out of the ceiling
- If the distance between the floor base and the attic is large, then an unloading unit should be installed. If the distance is less than 1.5 m, then auxiliary props are not required. The unloading unit can be constructed from steel corners and fasteners. The corners must be fixed to the rafters. The fixation should be as reliable as possible.
- You will need to mount an initial pipe on the outlet of the stove. It should fit into a large pipe with an interference fit; during the purchase process, you need to choose the right dimensions. An initial sandwich tube must be installed on the furnace outlet.
- The narrow pipe should enter the outlet at the furnace outlet without covering it. Pipe sections must be inserted into each other. Places of transition and bending should be additionally secured with clamps. Places of passages and bends of pipes must be fixed with clamps
- In the place where the branch pipe passes through the ceiling structure, it is necessary to put a groove to cover the outlet recess. This will also make the chimney more stable. A larger diameter pipe must be welded to the cutting, which will be used as an adapter. This will increase the area of the stop and eliminate deformation in the event of heavy loads in the lateral part. The adapter will allow the chimney to move freely up and down. To avoid heat loss due to loose parts, it is recommended to use mineral wool. It must be placed under the cutting piece and carefully tightened to the ceiling with nails or self-tapping screws. To close the outlet in the ceiling, you need to install a cut
- Holes must be prepared in the lathing and roofing. Next, seal the exit point of the smoke exhaust device. This requires an adapter. The joints must be coated with sealant. It is recommended to put another sheet on the coating and fix it with self-tapping screws with rubber washers. The remaining gaps are sealed with a sealant. The pipe outlet must be 55 cm above the roof level. The vertical position must be controlled by the building level
- A fungus should be mounted at the top of the chimney.
Construction requirements
Chimneys for sauna stoves obey all the requirements that exist for any type of smoke exhaust ducts:
- The channel cross-section must ensure complete removal of flue gases.
- The height of the outer part of the chimney opening onto the roof must be at least 50 cm above the roof.
- If the chimney outlet to the pitched roof is at a distance of 1.5 m or less from the ridge, its height should exceed the ridge level by 50 cm.
- At a distance of 1.5-3 m from the ridge, the chimney height should not be lower than the ridge level.
- If the distance to the ridge is more than 3 m, the chimney height can be 10% lower than the ridge level.
- If the bath is attached to a higher building, then the height of the chimney must exceed its highest point.
- The thickness of metal chimneys must exceed 0.5 mm, provided that they are made from special corrosion-resistant and heat-resistant steel grades.
- In rooms with operating ovens, normal air exchange must be ensured. It is forbidden to use exhaust systems separately from supply air systems, so as not to reduce the draft in the oven.
- To create a normal draft, the chimney length must be at least 5 m.
- The total length of the horizontal and inclined parts should not exceed 1 m.
This is also important to know: What is the best way to protect the place where the pipe exits to the roof from moisture?
The requirements for the height of the smoke channel are determined by the physics of the movement of wind flows. Turbulence near the surface often drives flue gases back into the chimney. The same reason forces us to make the upper point above the level of the roof ridge - the eddies arising from the intersection of transversely directed flows affect the outgoing smoke, creating a reverse thrust.
DIY chimney installation
Before work, you need to buy all the necessary materials and components. All work goes through the stages: preparation of the holes for the pipe outlet, installation of the protective box, assembly of the pipe.
Preparing the holes for the pipe outlet
Avoid installing a pipe with too many bends.
It is better to make holes in a new bathhouse under construction at the stage of assembly of floors and roofs. In an already assembled structure, you will have to do it from scratch. If laying inside the bath is chosen, then the holes are cut out in the ceiling and roof, the outer one provides one in the wall near the bath stove.
Places of holes must be sheathed on both sides with metal sheets 0.5 mm thick. They will protect the surface from fire. The holes are made with a square section of 450x450 mm. dimensions depend on the sandwich pipe adapter. For a brick chimney, the size of the hole must be equal to the specified width of the chimney masonry. For more information on how to make a hole in the ceiling of the bath correctly, see the video:
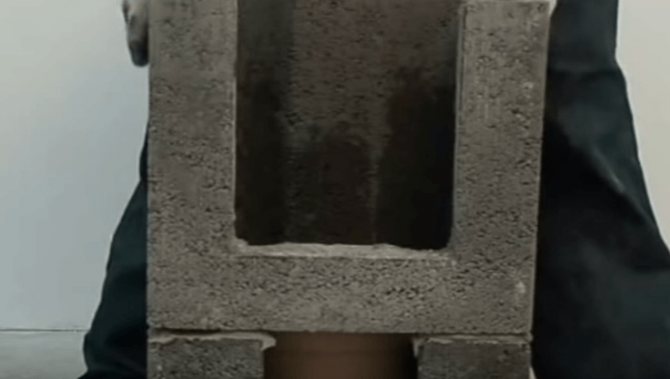
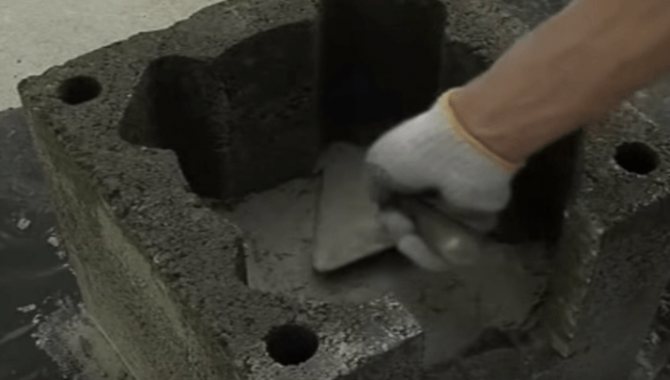
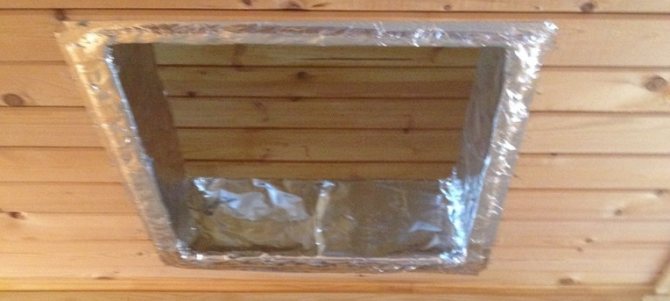
Manufacturing and installation of a protective box
A protective box for a prefabricated sandwich pipe.
You can make an adapter for metal and sandwich pipes with your own hands: Take 2 metal sheets 50x50 cm in size and cut out an outlet for the pipe in the middle. A box is made of 4 sheets, which is connected by welding. The box is insulated with stone or basalt mineral wool and covered with metal foil. A pipe will be inserted into it, it will protect the floors from heating.
Next, attach a metal protective apron to the roof. You can buy it ready-made "Flash Master". The box is installed in place between the transitions of the ceiling and screwed with screws. There is no need to make a metal protective box for a brick pipe. Further, the chimney is mounted.
How to install a chimney for a bath
Installation of a chimney in a bath is directly related to the design of the stove, material, dimensions and other parameters. For an unprepared person who wants to create a chimney in a bath with his own hands, a step-by-step guide is required. At the same time, it is impossible to outline the general procedure for actions, since there can be a lot of design options and materials used or their combinations. Consider how to install a chimney in a bath with your own hands of medium size, the most common type.
Most often, metal furnaces are used, for which a two-layer sandwich pipe is the best option. The outer layer maintains a relatively low temperature, which eliminates the risk of ignition of the ceiling at the point of passage through the ceiling. Single-layer metal chimneys are dangerous due to heating, they are often lined with bricks, thereby increasing the load on the furnace or supporting structures. In addition, a dedicated passage assembly should be used to avoid overheating and reduce the risk of leaks. Actually, the installation of the passage unit is the greatest complexity of the whole procedure; to mount the chimney for the bath with your own hands means that you correctly position and fix the passage unit.

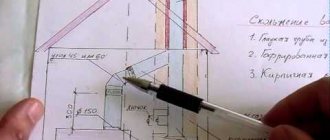
Before starting work, you should draw a diagram of the location of all structural elements, calculate their length and diameter. For the calculation, the formula is used:
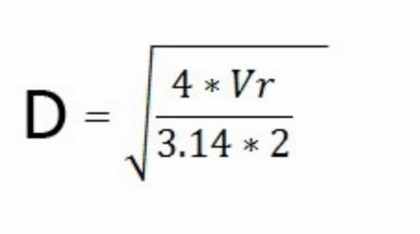
Where D is the pipe diameter (internal),
Vr is the volume of air.
The resulting value will become the main value from which you should build on in the selection of all other elements. When choosing a sandwich pipe, you must immediately select a node for passing through the ceiling and roof covering to it.
The process of collecting chimneys inside the bath
Step-by-step installation instructions for vertical (internal) chimneys:
- Ceiling markings.
- Installation of the passage assembly.
- Layout and installation of the roof passage.
- Installation and connection of the chimney.
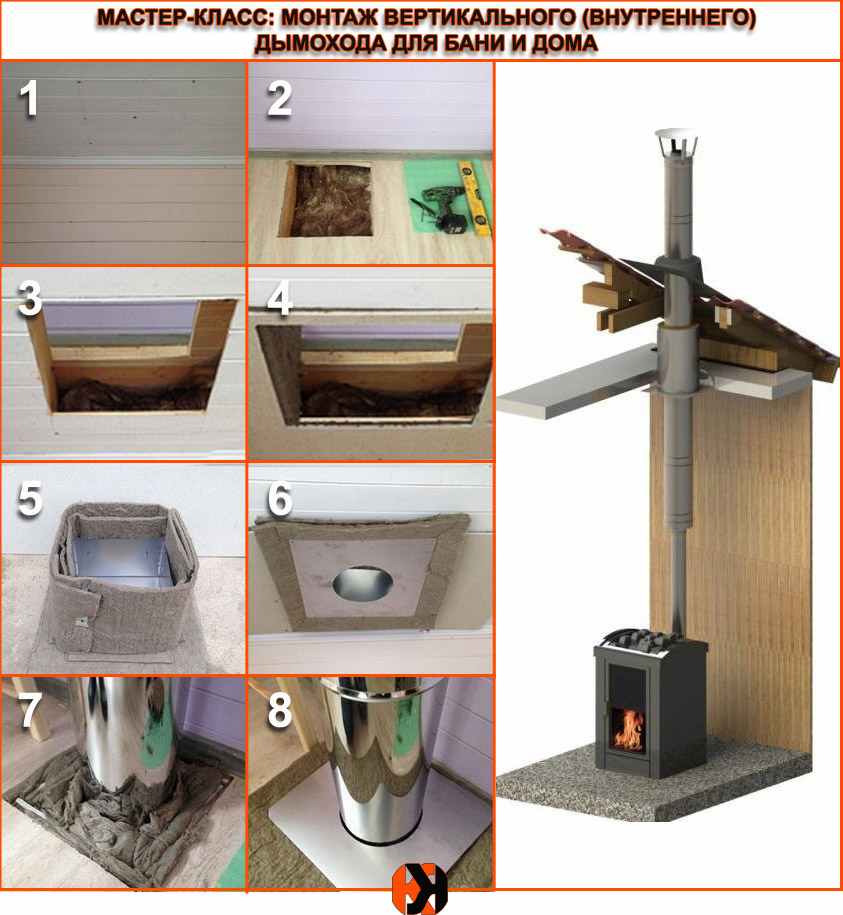
All operations are performed in the specified sequence, special attention should be paid to sealing the roof passage, since it is the boundary between the interior and the outdoor atmosphere. Installation is carried out in strict accordance with the manual for the passage unit, no changes in technology are allowed.
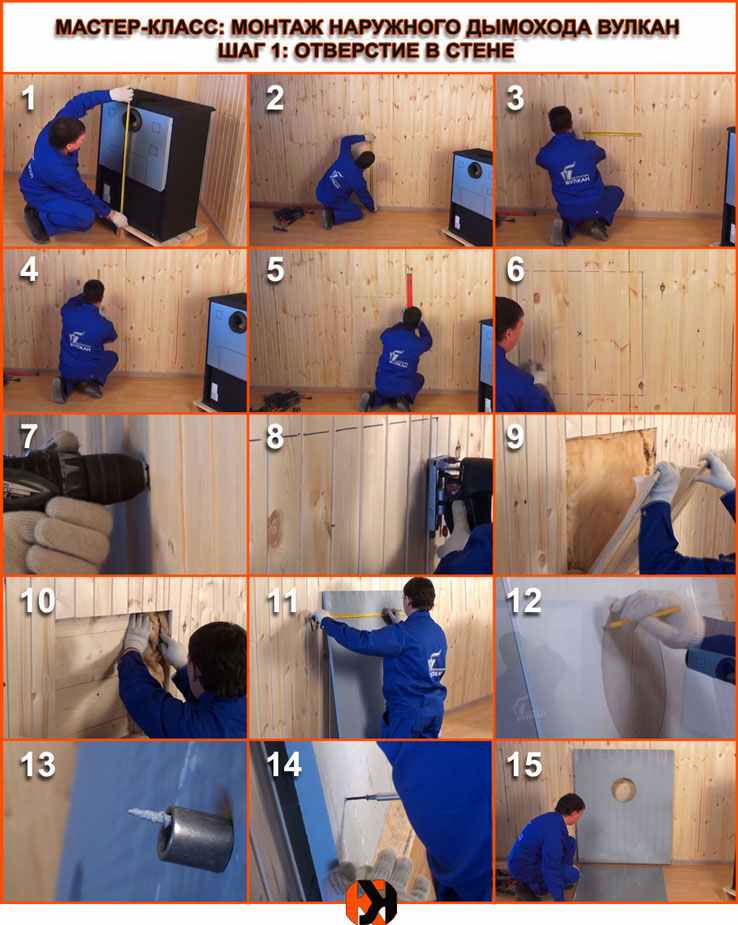
Installation of chimneys on an external wall
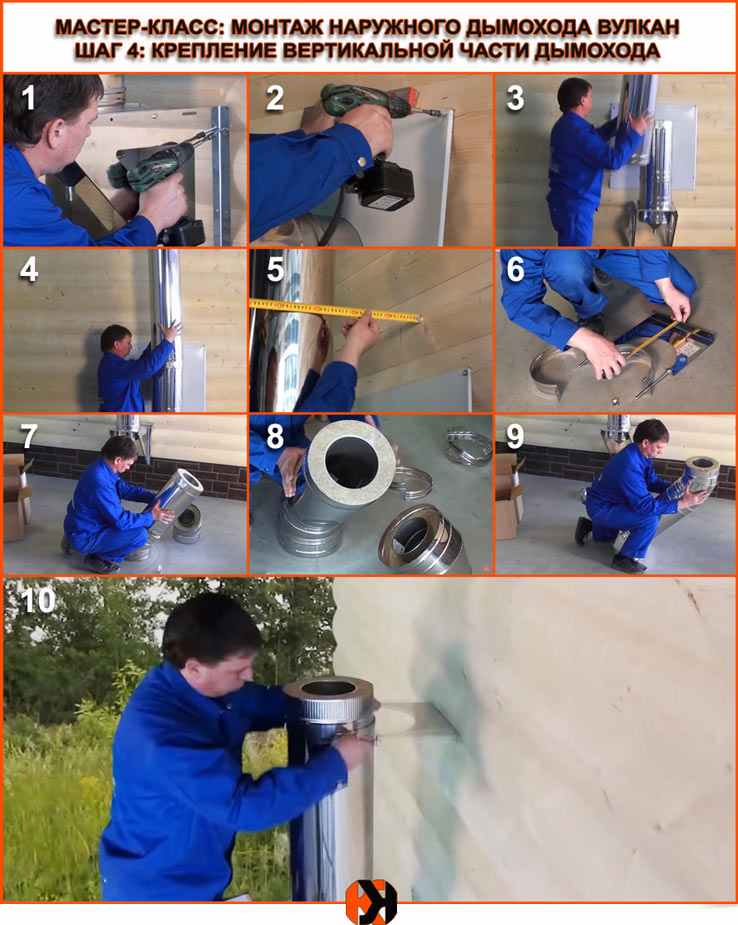
External chimneys are easier to install. Let us consider the installation process in more detail using the example of assembling and installing a Vulcan chimney sandwich:
- A hole is made in the wall opposite the furnace outlet.
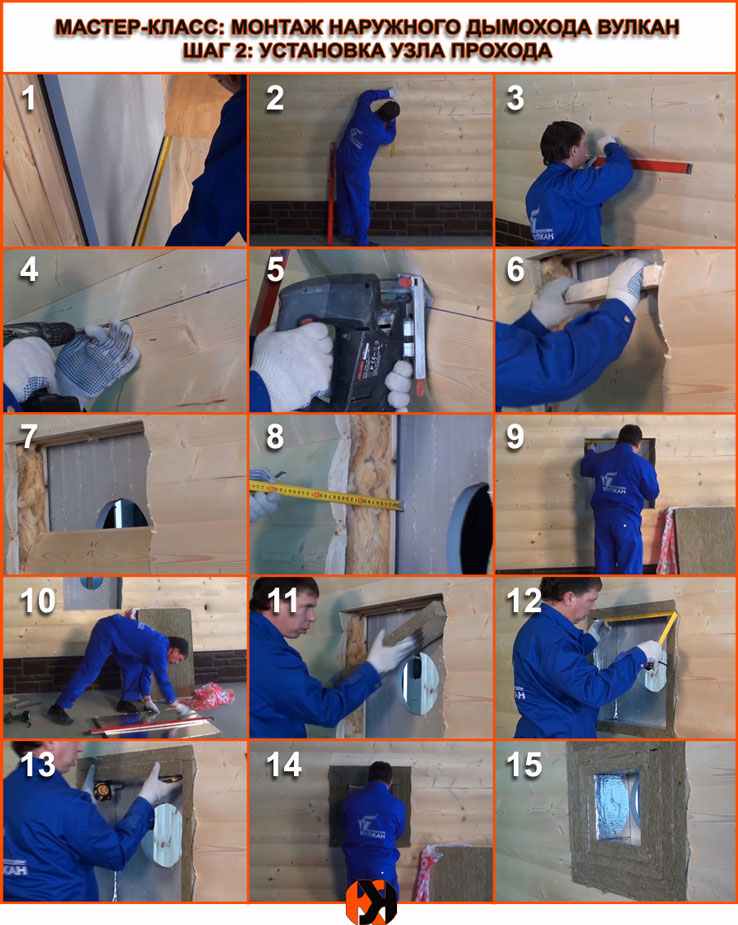
- The node of passage through the wall is installed.
- A horizontal section of the Vulcan chimney is mounted through the passage unit, connected to the outlet of the furnace.
- Outside, a knee is mounted to it and a vertical section of the chimney is installed.
- The pipe is attached to the wall using special brackets. Do not attach tightly to the wall.
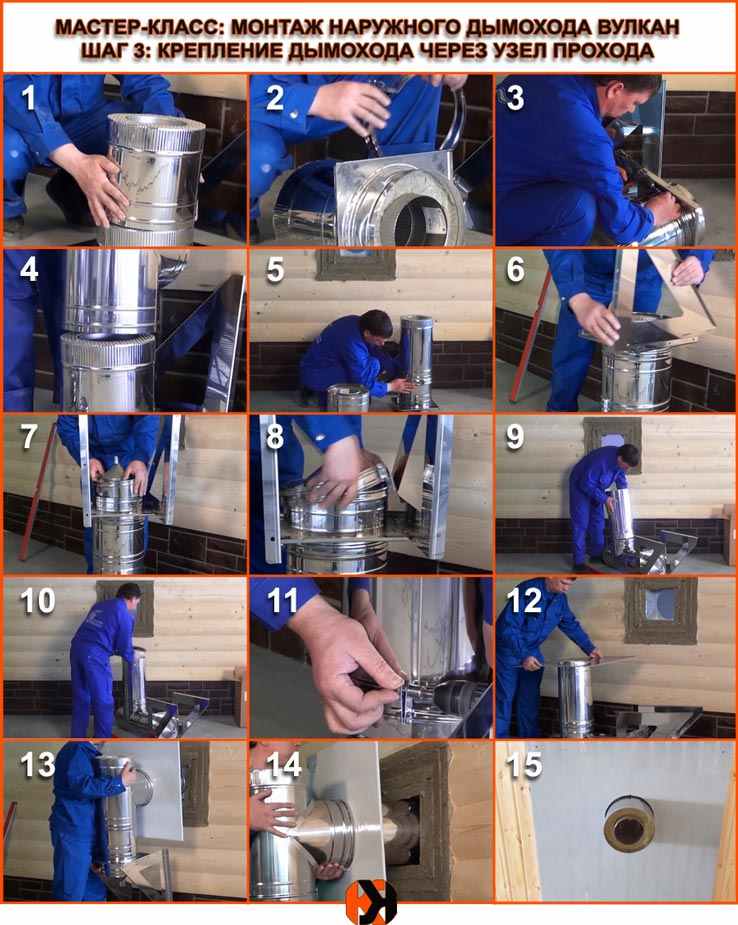
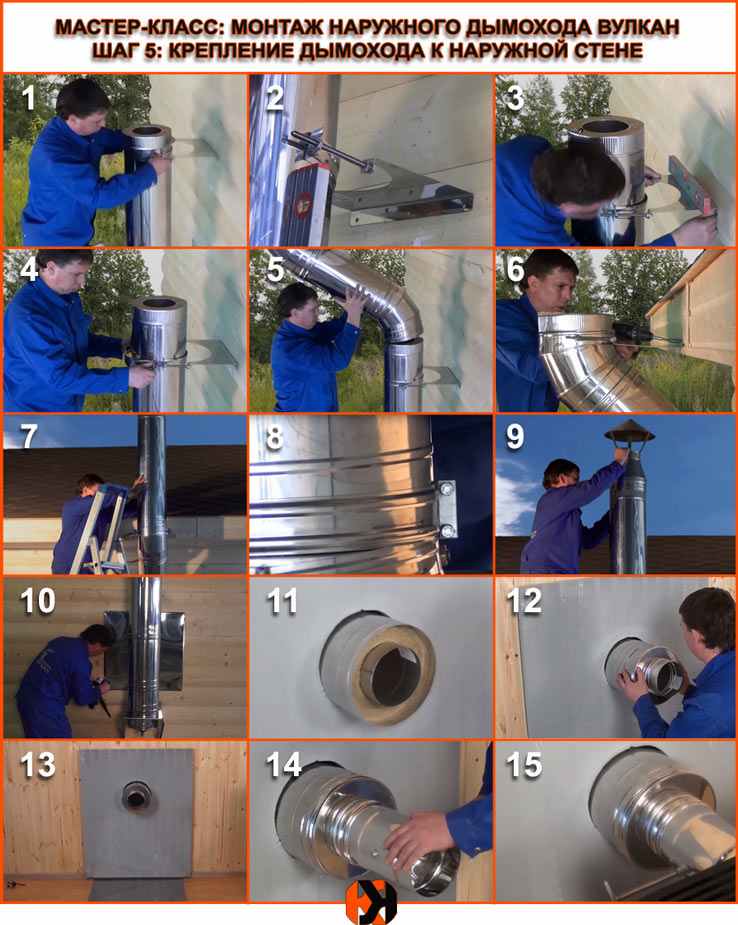
The joints of the pipe segments are sealed with a heat-resistant sealant. Installation is carried out from bottom to top, in the direction of movement of flue gases and smoke. The optimum overlap size is a quarter of the diameter (internal). The upper part (exit) is protected by an umbrella (head). The assembled chimney sandwich should be checked for operability, any defects found should be eliminated immediately. The main condition for the correct performance of work is the accuracy of adherence to the user's instructions for all used components and accuracy. This will ensure the achievement of the most successful result.
Chimney device for a sauna stove
The chimney for the stove in the bath will need to be made regardless of the type of fuel or the size of the steam room. The principle of operation of any device is based on the ability of heated air to rise upward. Exhaust gases, leaving the furnace outlet, enter the chimney. They can be installed inside the building and on the outside wall.
Each type has a number of advantages, but the most common way to run pipes indoors. When passing through ceilings and access to the roof, it is recommended to equip such places with an additional layer of heat and waterproofing. It is recommended to use heat-insulating sleeves, or wrap the parts with mineral wool or other material.

Furnace chimney device in the bath
The gases pass through the channels and exit into the atmosphere. The second job of the chimney is to provide reliable and sufficient draft for normal fuel combustion. And if at first, when kindling firewood, you can provide additional traction by opening the ash pan and gate, then when the bookmark burns, the ash pan must be closed. Ventilation of the furnace is the concern of the chimney.
Docking the chimney to the wall
There are two main options for arranging:
- When it comes to the fact that the chimney will go out through the wall. then it is necessary to analyze a certain section of it (according to the diameter of the pipe) and strengthen the places for installing the bracket. Then the bracket itself with corners is assembled and installed, along which the tee will move freely when installing the chimney. It is necessary to close the wall with a centimeter plywood sheet, fix the asbestos sheets on top of it with screws, and then fix the galvanized metal sheet even higher - 2 * 1.2 centimeters. In the created structure, a square piece is cut through which the chimney will pass. In this case, the bracket is coated with an anti-corrosion varnish. In the end, the sandwich pipe is put on the inner one.Also, during installation, you can create a concession - the space from the chimney to the wall.
- If the sandwich pipe is led out through the roof. then, first, a galvanized sheet is applied to the section through which the pipe will be led out. After this, the pipe is removed. Then the sheet is fixed to the roof. It is best to fix it by bringing the edges under the sheets of roofing material.
Chimney system elements
Standard kits include:
- cylindrical pipes or panels;
- adapters;
- tees;
- fastening elements (brackets and clamps);
- branch pipes;
- end pieces of various shapes;
- branch elements.
In some cases, additional components are applicable. When assembling any chimney, it is important to be guided by building regulations and fire safety requirements. All pipe components that come into contact with flames or exhaust gases must be made of sheet steel with refractory characteristics. Equivalent similar materials are acceptable for use.
In production, the elements of the chimney structure are usually divided into two groups. The first one includes double pipes, sandwich panels. Elements include an outer and inner tube with different diameters. Between themselves they are insulated with thermal insulation with non-combustible characteristics. This design provides faster and better heating. This causes the temperature to rise in a short time above the dew point, which reduces the amount of condensate, which is often the cause of corrosion.
Elements of the first group are used in the construction of ventilation and smoke ducts that pass through unheated parts of the bath (for example, through the attic). This design is applicable for the external arrangement of the chimney. Verticals of the second order, which are not in contact with flames and gases, are permissible from a galvanized base or stainless steel. The second group of chimney elements is usually single-circuit, it has a diameter of 80 to 400 mm.
Usually, stainless steel is acceptable for chimneys in the absence of insulation. It has a smooth surface to the touch.
Special elements allow you to assemble structures that are unlimited in height, place and method of installation, these include:
- wall supports;
- installation sites;
- gates;
- bends;
- telescopic brackets;
- clamps, spark arrestor, heat exchanger.
The initial part, installed on the outlet of the stove, should be a single pipe with an allowable length of up to a meter and a metal thickness of 1.0 mm. An exception may be a stove with a container for water. To switch from one type of element to another, start sandwiches are used.