What is the outside temperature or any other climatic factors? If it rains, maybe earlier, so as not to increase the humidity in the cellar?
Dampness or rain is not at all a reason to close the vents in the cellar. If your ventilation is done correctly, the humidity will not increase significantly. Sometimes, when installing an exhaust or supply air duct, the necessary requirements are not met, and then moisture can enter the passages. Raise the outlet (if water leaks) or cover it with an umbrella (cap).
If the thermometer on the street does not drop below zero during the day, and there are minor frosts at night, then you should not worry during this period either. But if both day and night "minus", then the vents must be closed. If it is possible to monitor the thermometer in the cellar every day, then you need to close the passages at + 7 ° С in the presence of vegetables, and at + 5 ° С if there are only pickles in the basement.
It is necessary to open the vents as soon as the thermometer on the street starts to show "plus" during the day. It is important to do this in time so that dampness and mold do not attack your basement.
First of all, it should be noted that there are different cellars and ventilation systems. The fact is that with the onset of cold weather and damp weather, both insects and rodents seek refuge.
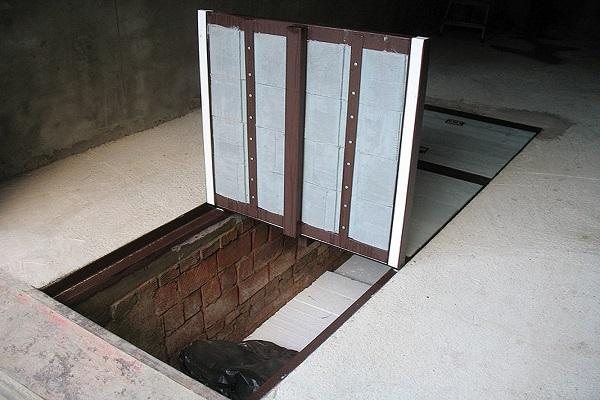
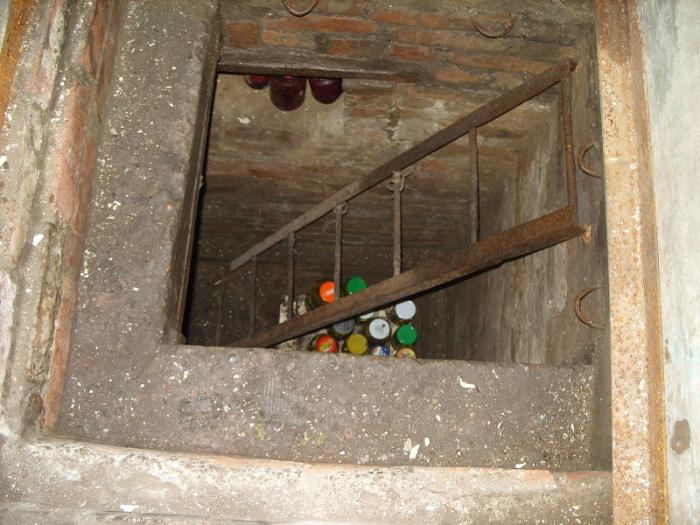
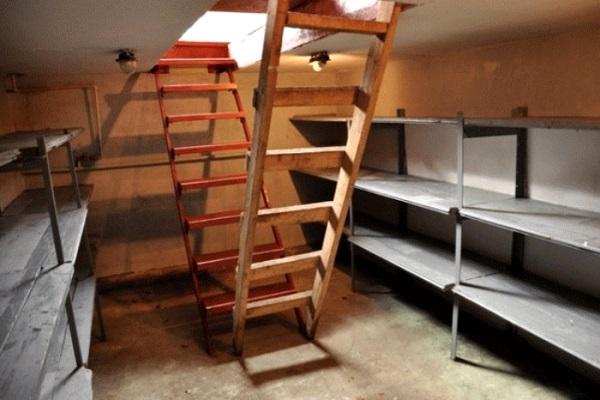
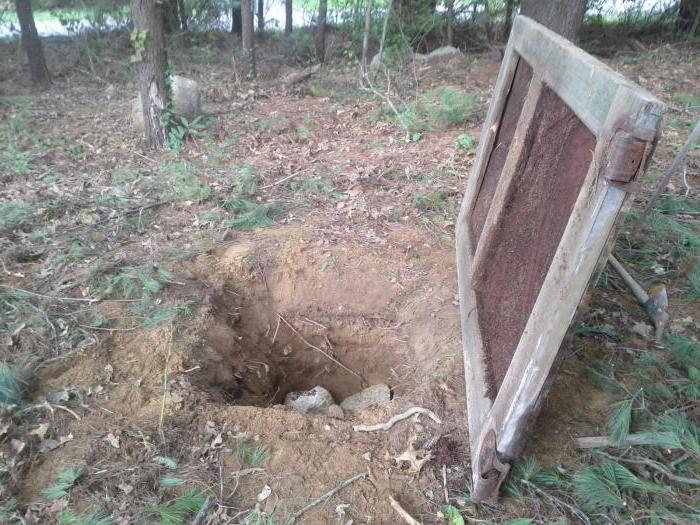
This is how our cellar looks like in winter.
So as they say there is something to feast on and rodents and harmful insects.
And therefore, starting from a temperature of 5-10 degrees, we try to completely close the vents.
But we have one advantage: one of them is removed by a pipe 2 meters above the cellar. And we can ventilate the cellar even at subzero temperatures in winter.
So 5 minutes is enough.
But of course this is done in sunny dry weather.
And this allows us to close the vents already in September.
So to summarize the closure time is perfumed depends.
- weather.
- basement depth.
- ventilation devices.
- And of course, what kind of food you store in the cellar. (For example, earlier in the cellar we had barrels with pickled tomatoes and cucumbers. And this forced us to close the vents later.).
First, you need to figure out what a cellar vent is as a whole, so that the owners of the cellars do not confuse all the recommendations and do not make it even worse for these premises, since both vents and cellars are quite different and perform a versatile function.
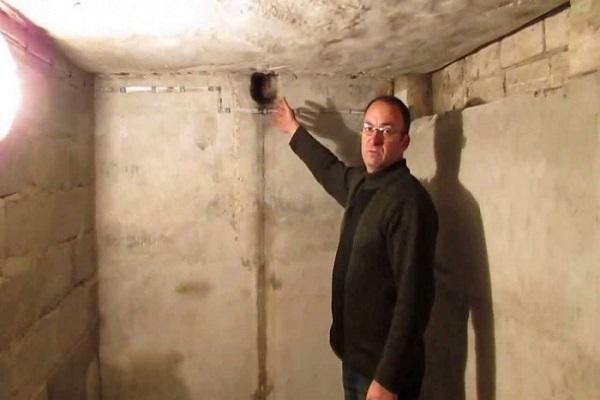
An outlet is some kind of hole or pipe that serves to drain air. Note - for outflow, i.e. in the modern understanding, an outlet is a part of a ventilation system that serves to remove air from a room.
The outlet ends with a hole, and it is about this hole that we are talking about, namely, when it needs to be closed (meaning two factors, such as weather conditions with changing humidity and air temperature).
Each cellar has its own ventilation system and it is necessary to consider closing the vent based on the internal climatic conditions in the basement.
So, during wet weather, and this is rain or fog, the vent cannot be closed, since humidity will rise in the basement opposite, but you must cover the air flow.
If there is no air flow, then the vent is covered.
It is best when the vent is regulated and it can be closed, since by closing it completely, there will be no ventilation in the basement, which means that its own humidity will spread and mold will form (pay attention to this article for those who have encountered such a problem - mold)
It is better to put such a cover.
So, the flaps should be covered in humid weather by about 50%, but watch out for the humidity in the basement, it may be more reasonable for your room to find a middle ground.
What is the risk of excess moisture in the soil
You can see the results of this phenomenon yourself - trees and shrubs perish. Why is this happening?
- the content of oxygen in the soil decreases and the content of carbon dioxide increases, which leads to a violation of the processes of air exchange, water regime and diet in the soil;
- oxygen starvation of the root-forming layer occurs, which leads to the death of plant roots;
- the intake of macro and microelements by plants (nitrogen, phosphorus, potassium, etc.) is disturbed, because excess water washes away mobile forms of elements from the soil, and they become inaccessible for assimilation;
- there is an intensive breakdown of proteins and, accordingly, putrefaction processes are activated.
Plants can tell you what level the groundwater is at
Take a closer look at the flora of your site. The species inhabiting it will tell you at what depth the groundwater layers are located:
- top water - in this place it is best to dig a reservoir;
- at a depth of up to 0.5 m - marigold, horsetails, varieties of sedges - bubbly, holly, fox, Langsdorf reed grass grow;
- at a depth of 0.5 m to 1 m - meadowsweet, canary grass,;
- from 1 m to 1.5 m - favorable conditions for meadow fescue, bluegrass, mouse peas, ranks;
- from 1.5 m - wheatgrass, clover, wormwood, plantain.
What is important to know when planning the drainage of the site
Each group of plants has its own moisture needs:
- at a depth of groundwater from 0.5 to 1 m, vegetables and annual flowers can grow in high beds;
- the depth of the water layer up to 1.5 m is well tolerated by vegetables, cereals, annuals and perennials (flowers), ornamental and fruit and berry shrubs, trees on a dwarf rootstock;
- if the groundwater is at a depth of more than 2 m, fruit trees can be grown;
- the optimum depth of groundwater for agriculture is from 3.5 m.
Do you need drainage of the site
Write down your observations at least for a while. You yourself can understand how much drainage is needed.
Maybe it makes sense to simply redirect melt and sedimentary water along a bypass channel, rather than letting them flow through your site?
Perhaps it is necessary to design and equip a storm drain and improve the composition of the soil and this will be enough?
Or is it worth making a drainage system only for fruit and ornamental trees?
The exact answer will be given to you by a specialist, whom we strongly recommend calling. But after reading this article, you will gain some awareness of this issue.
At the end of the technological and production tasks related to the arrangement of the sewer system in an apartment building, industrial building, as well as in a private household, it is required to test the involved system by the forced spill method. This task was applied to identify possible defects or improper installation of the entire sewer part involved, and the test report for internal sewerage systems and gutters will be material evidence of the acceptance of the facility.
Visual inspection should be accompanied by the introduction into the certificate of testing of internal sewage systems and gutters according to SNIP, which is currently represented by the current regulations of the series "D" appendix, which corresponds to SP 73.13330.2012 "Internal sanitary-technical systems of the building", recently a new one has been applied updated working edition for SNiP 3.05.01-85.
The vegetable pit is for storing vegetables and fruits. It is not difficult to build it with your own hands.Dryness and good air exchange are important criteria for saving crops. When creating conditions for a good microclimate, one must be wary of sudden temperature changes. Ventilation in the vegetable pit will help to avoid unpleasant odors and stale air, as well as mold.
What is it intended for and what characteristics it should have
Fruit and vegetable products purchased or grown with their own hands must be stored somewhere in the winter. Refrigerators are used to store winter preparations and fresh vegetables in small quantities. However, a bag of potatoes and a few boxes of garlic and onions won't fit in the refrigerator. Therefore, you have to independently build a special room where you can place the twists with vegetables. The microclimate in such cellars allows keeping the harvest fresh for 4-5 months.
The constructed storage facility must have the following features and characteristics:
- temperature indicators should not exceed four degrees Celsius;
- the humidity level inside the cellar should be in the range of 90-95%;
- it should always be dark inside the vegetable pit, and therefore the lighting is turned on only when a person is inside;
- the cellar is equipped with a high-quality ventilation system that will ensure normal air circulation.
Sizing
Before equipping the garage space with a vegetable pit, you need to decide on its size.
When determining the area of the cellar, the thickness of the base with the walls is taken into account. Also, when calculating the optimal area, it is taken into account that the dimensions of the room for the preservation of vegetables should be comfortable for the person inside. Therefore, experts advise to dig a pit, the width of which will be 70-80 centimeters.
Since the pit must be located under the garage, its length directly depends on the length of the garage space, as well as on the amount of food that will be stored in it. For example, if a cellar is built for a small amount of salting, then its length may be 2-3 meters.
The minimum depth of the cellar for storing pickles is one and a half meters. However, if the owner of the premises is too tall, a pit is dug out with a depth of 160-170 centimeters.

Necessary tools and materials for the arrangement
Before arranging the cellar under the garage, prepare the necessary materials with tools.
Among the tools that will be used in the performance of construction work, the following are distinguished:
- Bayonet shovel. It is used to dig a pit in which the cellar will be equipped.
- Scoop shovel. Used to clean the excavated pit from excess soil.
- Hacksaw. An irreplaceable tool used for sawing wood beams, from which the walls of the basement will be sheathed when insulating.
- Fastening components. For fastening wooden and metal structural elements, nails and screws are used.

You will also need the following materials:
- bricks for creating walls;
- cement mortar;
- insulating materials that will protect the cellar from freezing;
- iron corners;
- wooden beams.
Seat selection
The facility for storing stocks of vegetables and fruits should serve for more than one year. For a high-quality building, you need to choose a suitable place. When carrying out such work, it is necessary to take into account some peculiarities. For example, the site should be on a hill so that groundwater does not fall into the pit, therefore, the level of their occurrence is determined in advance.
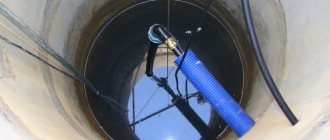
The check can be done independently by drilling a well with a depth of about 2.5 meters. In this form, it is left for several days and then it is checked whether water has appeared there. If the place is dry, then you can safely start arranging the storage. Another test option is to measure the depth in adjacent wells.
Experienced craftsmen advise you to make a plan for yourself before starting construction. It will allow you to better navigate the work.
Basement insulation
It does not matter what kind of vegetable storage you have, even if it is a glacier cellar, observing the temperature regime is an important factor for storing fresh vegetables and fruits in winter. In the basement, the air temperature should remain within 0 ... + 2 ° С. Downward changes lead to freezing of fruits, and this affects their taste and shelf life. If the temperature is higher than the specified one, then it will increase the development and spread of bacteria, lead to premature rotting and germination of vegetables.
To maintain a stable room temperature, it is necessary to insulate the basement floor and walls. For this, it is recommended to use roll materials, for example, roofing material or glass insulation. From above they are sheathed with fiberboard or chipboard panels.
More: wall insulation and basement floor of a private house.
After that, the walls must be plastered and treated with an antiseptic (for example, they are whitened with slaked lime or painted with antifungal paint). Also, antiseptic treatment is needed directly by the walls themselves, and it is done before installing the insulation.
Wall insulation often becomes ineffective if the floor is not additionally insulated. It is through it that cold air will leak, which will also lead to a change in the temperature in the room. The floor can be insulated with the same roll materials or even covered with a thick plastic wrap (it is laid with an overlap), and ordinary boards can be laid on top.
Site selection and subsequent planning
First, you need to decide on the choice of the place where you plan to equip the vegetable pit. Traditionally, it is arranged under a storage room in a private house or under a garden house. For residents of apartment buildings, it is possible to organize a convenient storage place by equipping a vegetable pit in the garage.
It is important to note that despite the seeming simplicity of the design, just digging a pit is not enough to equip this kind of cellar.
If you are interested in the information on how to make a vegetable pit, you must take into account the following information
When planning construction, a number of points must be taken into account:
in order not to damage an electrical cable or pipes that accidentally lie in the ground, you will need to make sure that there are no engineering communications in this place
From this point of view, it is more convenient to equip a pit in the basement or garage; it is necessary to determine the features of the soil - it is important to collect information on the level of placement of groundwater at the planned construction site (for this you may need to contact a specialist for help). In order for the structure to be sufficiently durable, it is necessary to select a place with a groundwater level below the bottom of the planned storage facility - at least half a meter
If they are placed close enough, you should not ignore this problem - in this case, you will need to equip a reliable waterproofing system (otherwise you can get a vegetable pit, regularly heated with water). Such an arrangement will entail tangible financial and labor costs, and water can still find a loophole and seep inside over time; in a vegetable store, you will need to provide a suitable temperature and humidity regime. To prevent the fruits from wrinkling and drying out, a humidity of 85-95% is optimal, as well as a temperature regime slightly above zero (from 2 to 5 ° C). Storage in these conditions will protect products from spoilage and will allow you to preserve a maximum of useful substances in them. A thermometer placed there will help monitor the temperature in the vegetable pit; to ensure the flow of fresh air into the storage,it is necessary to equip ventilation in it - bring out the supply and exhaust pipes; in addition, in order to exclude the germination of vegetables during storage, it will be required that this room be dark.
Balance temperature and humidity
Maintaining normal temperature and humidity indicators in the cellar is very important, since they affect each other. It is important to understand that condensation will only form when a certain moisture level is combined with a comfortable temperature. This indicator is called the dew point.
The balance fluctuates very much if only natural ventilation is installed in the room in the form of holes or two pipes. In winter, the hood practically stops, which leads to an average increase in temperature by several degrees. Therefore, the normal option for a good cellar would be a forced draft with a fan that will create air flows.
In addition, modern microclimate systems can be installed. To control moisture and heat, you need to have a thermometer and a barometer. There are barometer options that monitor both humidity and temperature at the same time.
Arrangement of a vegetable pit make the cellar perfect
The storage pit in the garage, as we said, must be waterproofed. You may even need to make a circular drainage system in the cellar. Such measures are carried out in cases where groundwater is close to the bottom of the vegetable store.

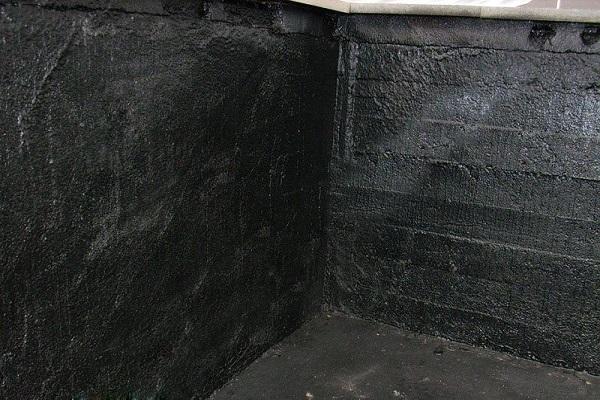
Waterproofing the crop storage pit
The easiest way to protect the floor surface of a vegetable pit from moisture is as follows:
- you process the floor with a bituminous solution (for reliability - twice);
- lay sheets of roofing material on bitumen;
- reapply the solution;
- make a filling on roofing material using coarse sand.
The walls of the storage can also be coated with bitumen or a more expensive penetrating type waterproofing can be used.
The final touch is the installation of ventilation in the basement. The easiest way is to make a natural supply and exhaust system. To do this, you need to place two pipes (for exhaust and fresh air supply) at a certain height from the floor. The installation of forced ventilation will require more costs. You will need to buy a special electric fan and put it in a pipe with two flaps. Your vegetable cellar is ready!
This is interesting: How many bricks do you need for the garage - we will write in all the details
Storage in a garage without a cellar and with a cellar: what is the difference
Fully recessed storage is optimal for harvest storage. After all, the temperature in the garage cellar is more constant throughout the year.
Benefits:
- Lack of costs for the construction of additional structures.
- Direct sunlight does not enter, which means that solanine, a poisonous substance chemically equal to steroids, will not be produced in the tubers.
There are also disadvantages:
- Before placing potatoes in the cellar, they must be carefully sorted out and dried.
- If your cellar is not equipped with a temperature sensor, then it will be impossible to adjust the temperature.
Forced ventilation of the vegetable pit
If the vegetable pit is in the garage, forced air exchange should be preferred. The arrangement of such ventilation involves the installation of not only air ducts, but also fans.
Device Algorithm
- An air duct is installed near the pit ceiling to remove air. The end of this pipe should be 0.5 m higher than the roof of the garage.
- At the very bottom of the vegetable pit, at a distance of 10 cm from the floor, a supply branch duct is installed. It extends 0.25 cm outwards, connects to the elbow at a 90 ° angle and exits through the wall at the bottom of the building to the street.
- With forced ventilation, this circuit is amplified by fans. The performance of mechanical devices must correspond to the volume of the ventilated room.
- A good option may be a combination of natural and forced air exchange systems.For this, an exhaust fan is mounted in the ventilation duct intended for air removal. It creates an air vortex, forcibly expelling air currents from the vegetable pit. Therefore, while ensuring the flow of fresh air from the supply ventilation duct.
How to store vegetables and fruits correctly
What is stored in the cellar and how? The condition of the fruits themselves can also affect the safety of the crop. That is why you need to know the basic rules for storing fresh vegetables and fruits in winter. They are as follows:
- The fruits and vegetables themselves must be suitable for storage. This means that they must be prepared before being sent to the basement: they are cleaned of the remnants of the earth, dried and sorted out. Each fruit must be whole, firm and ripe.
- A basement for storing fruits and vegetables must be provided with an admissible level of air humidity (no more than 90%), and a stable air temperature must be guaranteed.
- To store potatoes, it must be sorted in advance by size (in the process, remove all damaged tubers). Small and large are the worst stored and should be used first. Medium potatoes will last longer. Potatoes are placed in a special pit with a layer of 1 m or laid out in boxes with special ventilation holes on the sides.
More: what to consider when storing potatoes in the cellar.
Important! If the potatoes are stored in a box, it should not be close to the floor or wall. Any container with vegetables or fruits in the basement must be placed at least 10 cm above the floor to ensure air circulation.
- Carrots and beets are also sorted out. It is recommended to store them in wooden boxes or cover them with sand or ash. Pre-cut off the tops, peel off the thin roots and dry for several days in the sun. The boxes must also be installed on a raised platform. It is not recommended to place them on the floor.
More: what to consider when storing carrots in the cellar.
- Cabbage should only be stored hanging. This vegetable is very picky in terms of storage, it requires a high level of humidity (90-98%), therefore, before the onset of cold weather, each head of cabbage is hung in a well-ventilated room with a draft by the root. After the onset of frost, the fruits are transferred to the basement, but stored by weight.
Read more: how to properly store cabbage in the cellar until spring.
- Onions and garlic are also kept hanging dry. They are cleaned of tops, woven into braids, and often stored in nets or stockings.
The most important thing for the safety of the crop is a suitable indoor microclimate. To do this, periodically the basement must be dried, especially if it is necessary to reduce the humidity of the air. There are several ways to do this:
- Grandma's method with a candle. For this, a lighted candle is placed under the supply pipe in order to increase traction, and at the same time air circulation. The method is quite old, but it is effective only in basements with a small area. It will take 1-2 weeks to dry the room this way.
- Coarse table salt and quicklime are good at eliminating dampness. The box with this product just needs to be brought into the basement and left there for a few days.
- You can also resort to the use of technology: heat gun, electric heater, fan, etc. But this method requires financial costs, at least for electricity.
But sometimes it happens that the humidity of the air, on the contrary, is low. Then other methods come to the rescue:
- You can increase the humidity by spraying water from a spray bottle over the surface. Repeat the procedure periodically.
- The second option is to bring a box of wet sand into the room.
- You can also spread sawdust on the floor in the basement and moisten them with water every couple of days.
Natural ventilation in the vegetable pit
A vegetable pit can be built in a garage or outdoors.If it is located in the garage, then it will probably be divided by a partition with a viewing hole. However, wherever it is built, it is necessary to think over the ventilation system. An important point is the material from which it was equipped. This could be:
- wood;
- concrete plates;
- brick.
High-quality natural ventilation of vegetable pits largely depends on the insulation of the room.
The simplest option, if the pit is located on the street, may be the installation of two air ducts of the same cross-sectional diameter. They must be fitted in opposite corners. The ventilation duct for the air supply is mounted at a distance of 0.2 m from the floor. This duct will run through the ceiling. Outside, the chimney must rise above the ground by at least 0.2 m. The chimney is mounted under the ceiling in the ceiling. It is brought out as high as possible from the ceiling surface.
Due to the inflow and outflow of air through the ventilation ducts, natural air circulation will be carried out. It is based on the difference in pressure inside and outside the room. If there are severe frosts outside in winter, then the ventilation is shut off with the help of dampers.
The only drawback of natural air exchange is the dependence on weather conditions. In the warm season, the air can stagnate due to the lack of normal draft. Another important point is the protection of ventilation pipes from pests and precipitation. In the first version, you can use a mesh, in the second, a special umbrella made of metal or plastic.
Ventilation types
Ventilation in the pit is organized according to the same laws of aerodynamics as in all other cases. Accordingly, it can be natural and mechanical (forced).
The natural method of air exchange is most often used, since it is the most acceptable in terms of price-quality ratio. Circulation occurs due to the difference in pressure between the cold and warm air streams, when the fresh supply displaces the warm exhaust air. The greater the difference in pressure, the stronger the thrust and, accordingly, the more intense circulation.
In the summer, the ventilation of the cellar deteriorates due to the slight temperature difference between the external and internal air. in this case, a system with forced induction of the movement of air masses should be provided.
For the inspection pit in the garage, natural ventilation is installed and this is enough to dry out a small compartment.
The forced ventilation system is installed less often. It involves the use of mechanical incentives. Small fans (often axial) are placed inside the ventilation opening in front of the exhaust or supply pipe. This requires an electrical supply. They can be equipped with timers for self-switching on and off.
A forced ventilation system can be equipped with a vegetable store, if necessary. It is impractical to equip the inspection pit with mechanical ventilation if there is no reason for this.
A popular method of ventilation is a combined system, in which the hood of a garage or cellar is equipped with mechanics, and the inflow functions naturally. The fan, drawing out the exhaust air, creates a rarefied pressure zone and the fresh flow enters the room much faster.
Pit construction
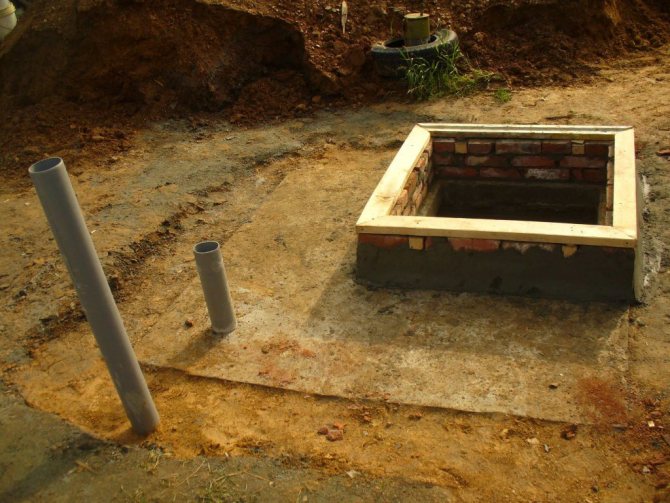
After careful planning, you can start building your own vegetable pit. The first step is to dig a pit for the future cellar. Then you need to dig a trench in it, in which the foundation will be installed. Crushed stone is poured at the bottom (the thickness of its layer should be at least ten centimeters), and on top of it - building sand with a layer of fifteen centimeters. Both levels need to be properly tamped and leveled.
Then you can fill the base with heated bitumen or other similar composition.If you want to make the storage very reliable, you can put a waterproofing material right on the sand - for example, roofing material - and cover it with reinforced concrete on top. However, such work will be more time consuming and cost much more. Not in all cases such a powerful waterproofing is needed. Sometimes wooden planks are placed on the floor on top of the concrete.
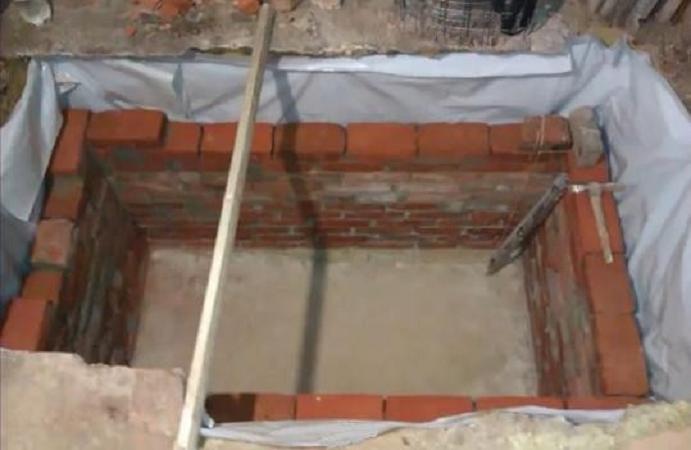
After the floor in the vegetable pit of the garage or private house is poured, you can move on to the walls. They are most often built from concrete or brick. The following requirements are established for them:
- for strength, concrete must be tied with rods of steel reinforcement;
- brickwork should be at least half a brick thick, but better - a whole or even one and a half.
The strength of the ceiling is especially important if there is a building above the cellar. Having made a vegetable pit in the garage, it is worth remembering that there will be a car over it. In the case of a private house, it is even more serious. If the section at the top is empty, then the requirements for the structure are somewhat reduced - the main thing is that it is reliable and does not collapse downward.
The ceiling can be laid out either from bricks laid on boards, or from concrete - in this case, you will need a frame made of reinforcement. At this stage, it is necessary to provide for all the required openings: the entrance, where the ladder and hatch will be installed, and the ventilation passage places. The most convenient place for a manhole is in the center of the subfloor. In this case, all walls will remain free, along which it will be possible to install many racks. The final stage is ceiling insulation. To do this, it is coated with bitumen and insulated with foam or expanded clay.
Do-it-yourself water heating in a private house and its installation
Ventilation system design
Ventilation in a garage vegetable store can be natural and forced. The first option is cheaper, while the second is more efficient. Another nuance - in the second case, the garage must be electrified without fail, the fan for blowing air works from the mains.
If everything is done according to SNiPs, then when preparing a project for a ventilation system in a vegetable pit, it is necessary to take into account:
- Winter and summer temperature readings for the region.
- Groundwater level and the level of soil freezing.
- The presence of underground utilities next to the garage building (especially heating mains and water pipes).
- Types of vegetables and root crops that are supposed to be stored in the cellar.
- The volume of the stored supplies and the storage capacity.
- Presence / absence of insulation and concrete floor in the pit.
To keep potatoes, cabbage in forks, carrots, radishes and beets in the vegetable store for as long as possible, they should be kept in different compartments, if possible with a different microclimate.
But in a small personal garage, such conditions cannot be created due to the limited space available. Therefore, in the case under consideration, natural ventilation is usually organized. It is cheaper, easier to install with your own hands and does not require electricity.
Natural ventilation is simpler and cheaper in a building. The main thing here is to correctly position the inlets and exhaust pipes. Mechanical ventilation with automation guarantees the safety of vegetables, but many times more expensive than a simpler version with natural air exchange
When organizing ventilation in a vegetable storehouse under the garage, the following points should be considered:
- The air from the garage with the exhaust from the car should not enter the vegetable pit.
- The air from the cellar, saturated with moisture from vegetables, should not enter the inspection hole and rise under the car.
- The forced ventilation system needs electricity and constant supervision.
- The system with natural air exchange in summer in the heat practically stops working, and in winter in severe frosts (if the inflow is not blocked) it can freeze the cellar.
The vegetable pit is a constant source of moisture.But the descent into it in a private garage is usually organized through a viewing pit.
If there is no maximally airtight door between these two rooms, then moist air from the bottom of the vegetables will rise under the bottom of the machine. As a result, the car from such a microclimate will begin to rust and rot.
The ventilation systems in the garage and the vegetable store must be separate, otherwise the exhaust from the car will harm the products in the pit, and excess moisture from vegetables will lead to corrosion of the body
Cold air descends to the floor, and warm air rises to the ceiling. This is pure physics. And the higher the temperature difference, the faster such a circulation of air masses occurs.
If the supply pipe from the street is brought to the floor of the vegetable pit, and the exhaust pipe is mounted outside under the ceiling or connected to the general exhaust hood of the garage, then a natural draft is formed in such a duct system.
And if the ventilation ducts are calculated correctly, then the air exchange will be more than sufficient to remove excess heat and moisture from the vegetable storehouse to the street.
When the intake and exhaust pipes are narrowed, the air exchange rate in the garage cellar will be low. And if you set them too wide, then the circulation will be excessive. In the first case, it will be too warm and humid in the pit, and in the second vegetable store, it may freeze during the winter.
The optimal version of the duct diameter for a natural ventilation system in a garage cellar with an area of 3–6 m2 is 100–150 mm.
The choice of pipes for air ducts in the garage
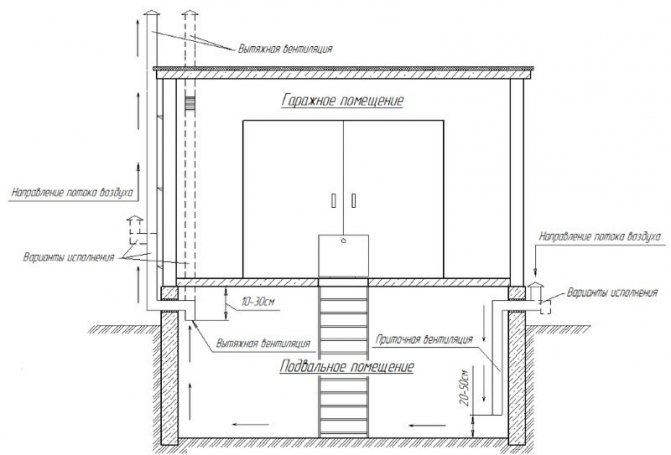
To organize natural ventilation in the garage box itself, it is enough to build one ventilation duct in it for the exhaust through the roof of the building. In this case, the air supply will be carried out through an open door and air vents on both sides of it at the bottom of the wall.
To ventilate the garage vegetable pit, it is necessary to mount two ventilation pipes with a diameter of 100-150 mm - supply from the street to the floor of the cellar and exhaust from its ceiling upwards with an outlet to the roof
For the ventilation device for vegetable storage in the garage, the following types of air ducts are used:
- plastic (PVC or polyethylene);
- iron galvanized;
- asbestos;
- aluminum.
The cheapest option will be the asbestos and PVC options. Moreover, if the first is non-combustible, then the second does not absorb moisture. Metal pipes are more expensive, but they are more durable and tolerate frost more calmly.
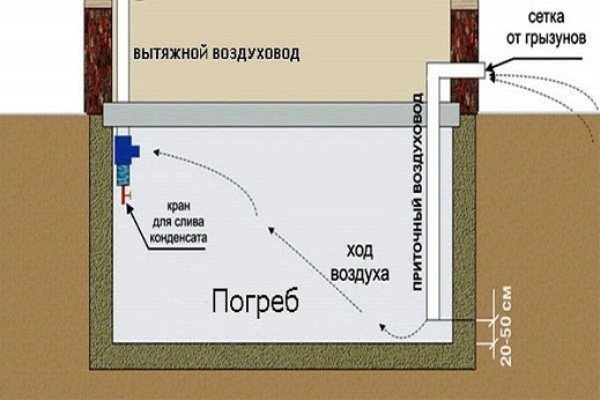
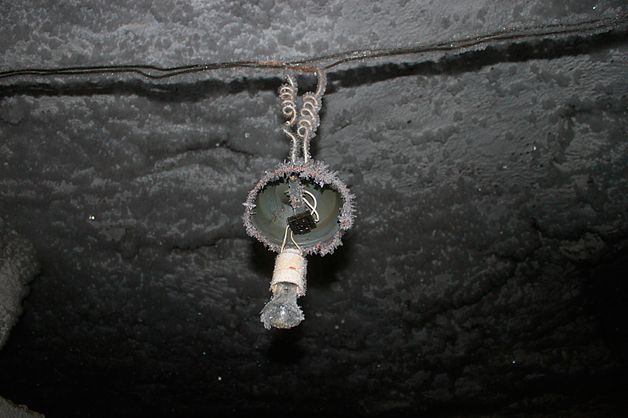
Condensation and ice control
It is impossible to completely get rid of the constantly forming moisture in the vegetable store. It comes from vegetables, ground underfoot and condensation from the walls in the pit. At the same time, it is also not recommended to dry the air in the cellar unnecessarily. This is harmful to stored supplies.
One of the main tasks of ventilation in the vegetable pit is to remove excess moisture from the underground room under the garage and keep the air humidity inside at the level of 85-90%
When warm air enters a cold cellar, condensation instantly falls on the walls and everything in the vegetable store. If the hood does not work well, then the latter will remain inside and contribute to the development of mold on the vegetables. And with a sharp cold snap, it will instantly turn into ice, which is also unpleasant.
The wider the ventilation pipes, the stronger the air exchange takes place. However, this is good in summer, but completely unnecessary in winter. In winter, the air flow, on the contrary, must be reduced as much as possible so as not to unnecessarily lower the temperature inside.
To provide yourself with maximum control over what is happening in the vegetable pit, you should provide:
- control valve on the supply pipe;
- the ability to completely shut off the inflow and exhaust air in case of severe frosts;
- insulation of both air ducts;
- the possibility of installing an electric exhaust fan for forced drying of the cellar.
Also, if there is lighting in the basement, condensation can lead to a short circuit.Therefore, the better the vegetable pit itself is insulated, the garage above it and the ventilation pipe, the better.
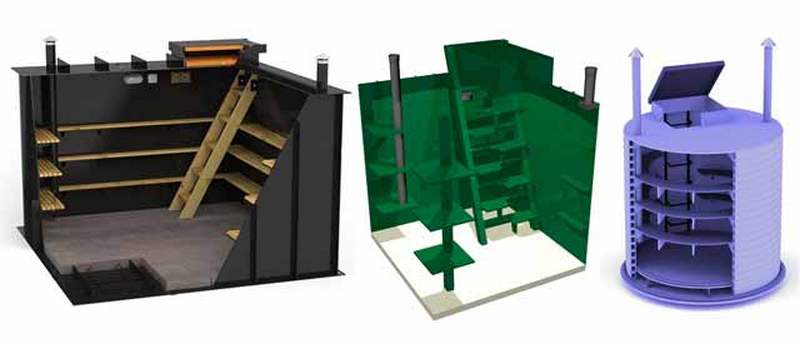
How to design a vegetable pit in the garage with your own hands
To build a vegetable pit correctly, you will have to deal with the main stages of construction.
We build a pit
The cellar begins to be created by digging a pit, in which a basement will be built for storing preserved vegetables. After that, they carry out the arrangement of the floor. To make the flooring reliable, it is made of several layers. First, the bottom is covered with a small layer of gravel, which is tamped with a vibrating plate. Then the compacted crushed stone is filled with construction sand and poured with concrete.
When the flooring hardens, the walls are finished. For this, a solid brick is suitable, which is resistant to high humidity. The walls are laid out in such a way that the seams of each subsequent row of bricks do not coincide with the previous one.
After creating the walls, a reliable ceiling is made that can withstand any load. In the manufacture of the ceiling, boards are laid at the top of the pit, on which reinforcement is laid and concrete is poured. Having finished with the ceiling, you can make a staircase, which is installed near the entrance to the inside.
Dehumidification
Before operating the vegetable pit, the room is dried so that the walls with the ceiling and floor are completely dry. There are several methods that help dry out the cellar:
- Place a metal bucket in the center of the basement, fill it with wood and make a fire. Using this method will have to keep the fire going for an hour and a half.
- Take a metal pipe outside and install a burning candle under it, which will provide natural draft.
Waterproofing
Sometimes vegetable pits are made in an area with a high level of groundwater, due to which the humidity increases. In this case, waterproofing should be installed inside the basement, which will help keep the humidity level within normal limits.
The choice of insulation
In order to maintain the optimal temperature inside the cellar, additional thermal insulation will be required. The selected thermal insulation material must have the following properties:
- environmental friendliness;
- chemical safety;
- reliability;
- moisture protection.
To insulate a storage for vegetables, use polystyrene or expanded polystyrene.
Ventilation device
In any cellar there should be ventilation, since it is she who is responsible for the circulation of oxygen inside. When organizing the ventilation system, they are installing the supply and exhaust pipes. The supply air is located near the floor, and the exhaust is led out through the roof.
Thermal insulation
The better the insulation, the easier it is to maintain a normal temperature for storing vegetables and pickles. It is precisely the correctly selected and installed thermal insulation that will not allow critical temperature fluctuations. To preserve heat and prevent freezing, you can choose foam, as well as use glass wool and mineral wool.
Insulation can be either internal or external. In doing so, it is applied to the ceiling, walls and floor. In order to keep warm in winter, snow is often thrown directly onto the cellar. It retains heat, but if the temperature starts to rise, then the snow is thrown back.
In order for the balance between moisture and temperature not to be disturbed, it is necessary to apply waterproofing under the thermal insulation, which will resist the formation of excess condensation on the walls and ceiling of the basement. In addition, it is necessary to install a vapor barrier material on the ceiling. This is especially important for cellars that are located under living quarters.
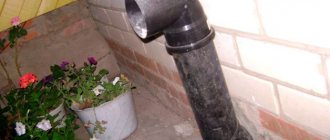
Supply pipe device
The correct location of the pipe is close, but not close to the cellar wall. The end of the channel will be about 20-50 centimeters from the floor. The end of the pipe must be brought out through the foundation block of the garage.To protect the room from the penetration of rodents and other pests, a fine-mesh mesh must be installed at the ventilation outlet. The exit should be located just above the foundation blocks, a little further than the main walls of the building. In this way, an optimal flow of fresh air into the cellar can be obtained. This scheme is used when organizing forced and natural ventilation.
Important tips when installing fresh air ventilation:
- The air intake should take place outside the walls of the garage and other premises, preferably away from the gate, so that exhaust gases do not enter the chimney when entering the chimney. You can think of an option for the supply pipe to be located farther from the walls of the garage, but you need to think about placement without bends and right angles.
- You can make such a ventilation duct even at the stage of building the cellar. To do this, the space in the brickwork is limited in the wall, with dimensions of about half a brick. The masonry must be done according to all the rules, using the same mortar, but at the bottom have a sufficiently large hole, the end of which will be brought out into the street through the garage block.
- The hole in the masonry wall or pipe must be at least 25 centimeters from the garage walls. Thus, normal air exchange is ensured.
- Pipe diameter also matters. Too small will not provide a normal air flow, and a large diameter will make operation ineffective due to heat loss. The calculation can be taken as follows: for each cubic meter of the room, there must be at least 15 mm of pipe. Simple calculations will allow you to get a more or less correct section size. The same rules apply to the design of the chimney, so it is better that they are the same. This will additionally help to properly organize air exchange without unnecessary problems.
- For winter time, it is necessary to provide for insulation of the outer part of the pipe. For these purposes, you can use any insulation material, up to rags. With regular freezing, you can consider a quick defrosting system, for example, insulate the end with non-combustible materials and make a fire under it.
- A damper must be provided from the inside of the supply ventilation to prevent food from freezing at negative outside temperatures. It is advisable not to completely close the hole, even in severe frost, fresh air should get into the cellar.
- In order to prevent snow from covering the hole in winter, you need to periodically clean the area or use a large plywood box. It will provide the necessary protection, and the air will not be so cold compared to the other option.
The plastic version can be used as a suitable material for installing the supply pipe. The cross-section of the pipe should be from 8 centimeters, depending on the size of the cellar, you can take more. Plastic pipes have proven to be excellent for such work. They do not corrode, mold or rot. Even if fungus or mold appears on the surface, it is quite easy to process them with the annual disinfection of the basement.
The simplest design of the chimney: in the foundation block of the garage, you need to make a hole with a diameter of at least 8 - 10 cm. Then bring out a pipe of a suitable section, and also install a pest net. Such a scheme will not help to ensure a good air flow, but in the absence of another, basement ventilation will be provided.
Installation diagram

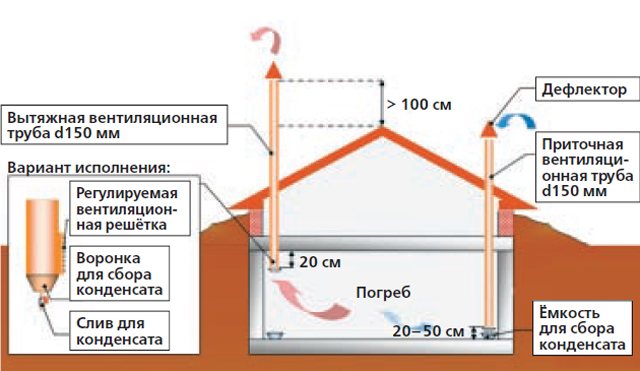
- A visor is installed at the end of the exhaust duct.
- To ensure proper ventilation, the top end of the exhaust duct must be positioned higher above ground level.
- The radius of the ducts must be the same.
- When calculating the diameter of the pipe, you need to use the formula: for every 1 m3 of the cellar located below ground level, there should be 20 cm2 of the diameter of the ventilation pipe.
This approach is used for both natural ventilation and forced ventilation. In order to properly install ventilation, you must first make a calculation, namely, establish the area of the cellar and the rate of air consumption. This ensures correct air exchange and will allow in the future to completely renew the air in the cellar every 30 minutes. This level of circulation can be achieved by laying 25 cm of a canal for every 1 m2 of space.
Important! After installation of any type of ventilation, there should be no extra holes in the pipes through which air will enter the room. Slots significantly reduce ventilation, so damp air can enter the garage. Therefore, condensation can settle on car parts, which is very undesirable.
In principle, the ventilation device in the cellar is a job that the homeowner can do on his own with great desire and ordinary non-professional tools. Start with the design - elementary schematic drawings, material calculations, determination of the features of the ventilation system operation under various temperature conditions.
Condensation of cause and effect
Condensation in a vegetable pit is a danger to humans
How to make ventilation in a vegetable pit so that condensation does not occur in the room during demi-season periods. Indeed, due to its formation, not only air ducts can collapse, but also the wet walls of the vegetable pit can collapse. To protect yourself, you need to insulate the ventilation pipe. Ideally along the entire length. If this is not possible, thermal insulation is carried out only in the area from the ceiling to the umbrella installed at the end of the duct. With proper insulation, the service life of the ventilation duct will increase, plus condensate will also be removed.
Do not forget about the insulation of the walls of the vegetable pit, because this factor also prevents the formation of condensation. This can be done with polyurethane foam. It helps to achieve complete sealing of the pit. It has a foamed consistency. When it hits the surface, it solidifies. Does not form seams and joints, retains its properties for up to 50 years.
Proper ventilation contributes to the preservation of vegetables in the autumn-spring period. In order for the air exchange to be carried out as expected, you need to know that its frequency in the garage and other outbuildings must comply with SNiP standards and be equal to 180 m3 / per hour.
n is the rate of air exchange in a given room
V is the volume of the vegetable pit, expressed in m3.
L is the air flow.
After all the work done, it is worth testing the ventilation system - check the traction with a piece of paper.
At the end of the gardening period, the problem arises of long-term storage of vitamin preparations. Getting a suitable place to place your crops is not difficult by equipping a vegetable pit - it can be placed under a house, in a basement, a garage, and even under a loggia. Your supplies will stay fresh for a long time without the need for any energy costs. It is quite possible to equip such a storage for vegetables yourself, while you can use the simplest tools and materials.
Do-it-yourself or fruit and vegetable products purchased for the winter will need to be stored somewhere. No refrigerator can hold several boxes of onions and carrots or sacks of potatoes. It is possible to make your life easier by arranging a convenient cellar for placing vegetables - in a similar way, you can organize a storage space in natural conditions, with a certain microclimate. In such a storage, the crop will remain fresh for a long time.
The most convenient to use is the so-called underfloor - a vegetable pit in the house or in the garage, because it will not take up additional space on the site, moreover, it will be much more convenient to use such a storage for vitamin preparations, including in the cold, than a cellar on the street ...
Possible types of ventilation
To create the necessary microclimate in a vegetable pit, it is necessary to take into account all factors and properly equip ventilation. There are several types of ventilation that are perfectly acceptable in this situation:
- With the use of a pipeline system, which is additionally supplied with a valve. This is one of the easiest ways. With its help, it is possible to provide not only ventilation, but also air conditioning of the structure for storing vegetables.
- Providing ventilation based on the supply and exhaust system. This option has been improved and is able to guarantee the quality of ventilation of the container and the long-term preservation of the contents.
Basic requirements for construction technology
There are several key requirements for a vegetable pit
When executing a project, it is necessary to indicate in it the dimensions of the future pit. Its depth, ideally, should be approximately 2-2.2 meters, width - 1.5. It will be quite comfortable to be in it, and the temperature can be easily maintained at the level of +5 degrees.
This is optimal for storing vegetables - they will not deteriorate and retain a maximum of nutrients. Humidity must be maintained at 90% - vegetables will not wrinkle and dry out.
If the groundwater level fluctuates at around 1-1.5 meters from the surface, and it is difficult to choose another place for the pit, you can try to arrange a drainage system. In some cases, good waterproofing may also be required.
Of course, this will result in some costs, both in terms of finance and labor. But if you neglect this stage, you should prepare for the fact that sooner or later the water will find a loophole for itself and penetrate inside.
It is recommended to insulate the walls - any heat-insulating material in the form of plates that resists moisture well, for example, expanded polystyrene, is suitable for this.
At the bottom, sand and gravel are laid, then bitumen or other similar material is poured onto this pillow. It is best to arrange the flooring in the form of a reinforced concrete slab. If it is impossible to provide such an option, strong boards are laid on the base.
The simplest option is the construction of natural ventilation, for which two pipes are used, placing them at different heights from the floor surface in the garage. One pipe is inlet, the other is exhaust, and their outer ends should be brought out as high as possible.
This ensures a constant supply of fresh air. This helps keep the vegetables fit for consumption longer.
Preparatory stage
Before the construction of the described structure, it is necessary to make sure that engineering communications such as electrical cables, pipes and gas pipelines are not laid in the ground. Builders should examine the soil to determine the level of the groundwater. The latter should be located below the bottom of the cellar. Otherwise, the structure may be flooded. As practice shows, you should not create too wide vegetable pits. It is necessary to keep within 2.5 meters. The depth is usually 1.7 meters.
It is desirable that such a cellar be located at some distance from the wall. It is necessary to retreat about 0.6 meters from the surface, this will subsequently allow reliable waterproofing of the pit. When a vegetable pit is made with your own hands, it is insulated. The procedure for arranging the ventilation system and carrying out work to protect against moisture is mandatory.
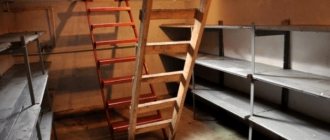
You can develop the technology for interior arrangement yourself, everything will depend on individual requirements.The descent into the structure should be made in the form of a wooden staircase with solid rungs. It should be covered with a hatch that will act as an entrance to the cellar.
Characteristics and types
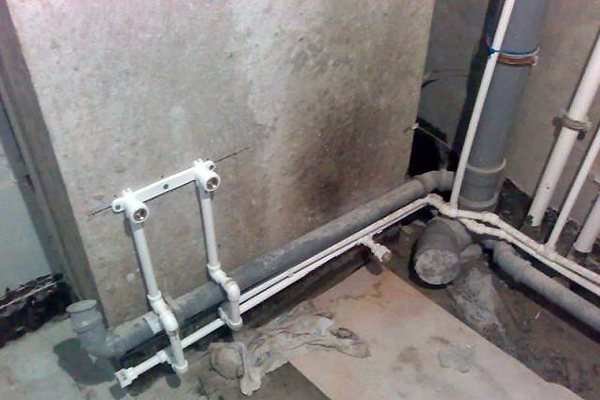
Flexible hose for connecting plumbing is a hose of different lengths made of non-toxic synthetic rubber. Due to the elasticity and softness of the material, it easily takes the desired position and allows installation in hard-to-reach places. To protect the flexible hose, there is an upper reinforcing layer in the form of a braid, which is made of the following materials:
- Aluminum. Such models can withstand no more than +80 ° C and remain functional for 3 years. At high humidity, the aluminum braid is prone to rust.
- Of stainless steel. Thanks to this reinforcing layer, the service life of the flexible water hose is at least 10 years, and the maximum temperature of the transported medium is +95 ° C.
- Nylon. This braid is used for the manufacture of reinforced models that can withstand temperatures up to +110 ° C and are designed for intensive use for 15 years.
As fasteners, nut-nut and nut-union pairs are used, which are made of brass or stainless steel. Devices with different permissible temperatures differ in the color of the braid. The blue ones are used to connect to the cold water pipeline, and the red ones are used with hot water.
When choosing an eyeliner for water, you need to pay attention to its elasticity, reliability of fasteners and purpose. It is also mandatory to have a certificate that excludes the emission of toxic components by rubber during operation.
Fall asleep, ram and level the floor
If several types of backfill are used, each backfilled layer must be compacted with a manual rammer. Consider a situation when crushed stone with sand is used. First, gravel is poured onto the bottom of the pit, tamping is carried out. The thickness of the compacted layer must be at least one hundred millimeters.
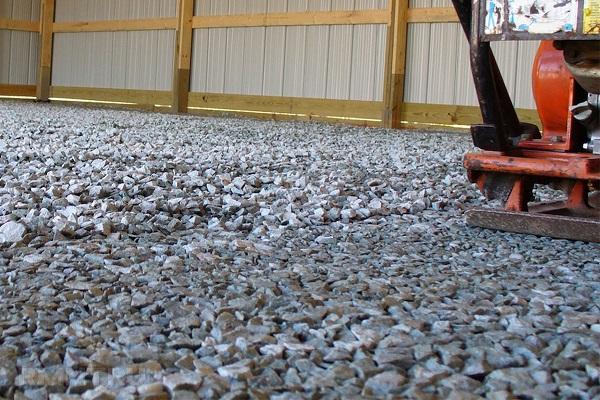
Then sand is poured and rammed (layer thickness - fifty millimeters). After that, crushed stone is poured (layer thickness - five centimeters). You can only make 2 layers of one hundred millimeters. It all depends on how wet the soil is. After filling and tamping, the floor is leveled, for which you can use the same manual tamping.
Share link:
Technical features of ventilation ducts
When designing ventilation, it is necessary to decide from which material to install the ventilation pipe. It can be:
- metal pipes;
- PVC pipes;
- asbestos pipes.
The options for metal ventilation ducts are varied. It can be stainless steel, galvanized steel, aluminum.
Stainless steel channels
Stainless steel pipes withstand temperature extremes well, do not corrode, are durable, fire-resistant. Therefore, by installing such an air duct, you can protect the ventilation system from the growth of fungi and mold in it.
Galvanized pipes
Air ducts made of galvanized steel can withstand temperatures up to +85 C °, are resistant to moderate air humidity - up to 60%. Relatively light in weight, so no additional effort is required when installing the ventilation duct. They are often installed in dry rooms with ventilation equipment.
Aluminum pipes
They are semi-rigid and flexible. They are made of aluminum foil with a thickness of 0.08-012 mm. They can bend easily. They are heat-resistant, withstand + 135 ° C, flexible, and rigid air ducts can withstand temperatures up to + 300 ° C. According to all characteristics, semi-rigid air ducts can be installed outdoors.
Asbestos air ducts
An asbestos-cement pipe can be up to 5 m in length. Section diameters ranging from 100 to 500 mm. They are classified into pressure and non-pressure. The pipes can withstand temperatures of + 300 ° C.Condensation is absorbed into them. These ducts are not subject to corrosion, but they are very fragile. There is a version that asbestos is harmful to health (directive 1999/77 / EC on the prohibition of the use of asbestos).
PVC pipes
PVC ventilation ducts are often used for arranging ventilation in residential and business premises. The pipes can withstand temperatures from -30 ° C to + 70 ° C. The smooth inner surface of the inner part creates low dynamic resistance during the passage of air currents. The pipes are resistant to moisture. The range of cross-sectional diameters and lengths of air ducts is very wide.