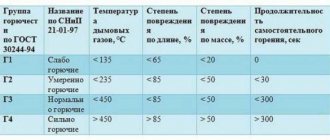
Important points of thermal insulation
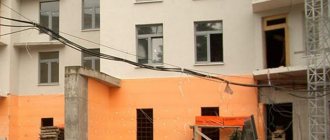
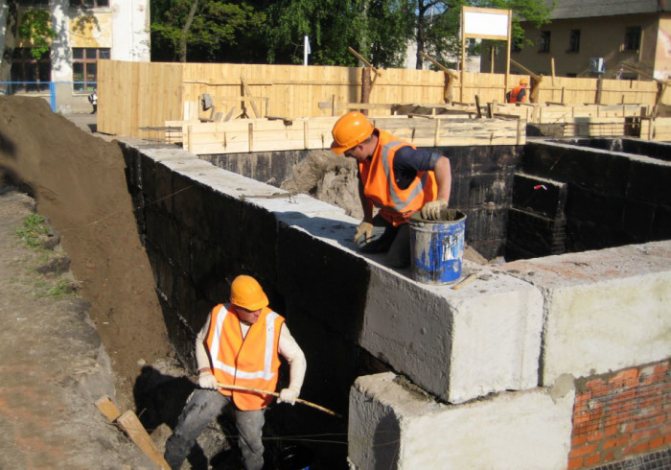
Basement outdoor insulation
First of all, when building a house, you need to decide whether there will be a house with a basement or not. In the case of a house with a basement, which will be used as a living space, it becomes necessary to insulate it to prevent heat from escaping through its walls.
In this case, the total heat loss can reach up to 15% of the heat loss of the entire building. To reduce the cost of insulation work and to avoid errors associated with the installation of insulation, it is necessary to solve many factors at the design stage.
Pay attention to:
- the functional purpose of the basement;
- the original building materials used for the construction of the walls;
- climatic zone of residence.
Finishing
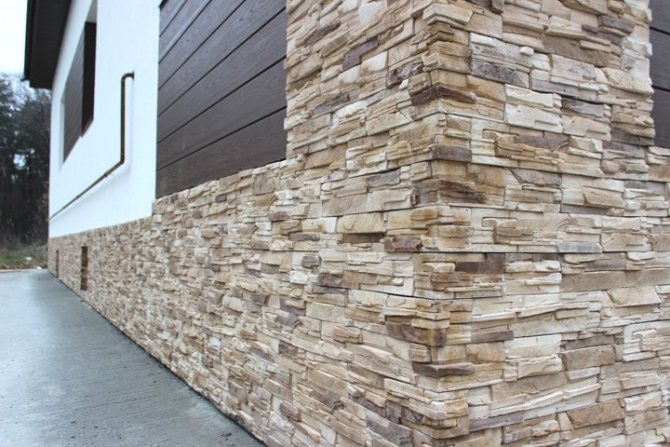
Often, insulation and cladding of the basement of a house are carried out at the same stage, since the thermal insulation system cannot be left unprotected. Cladding with decorative materials, for example, clinker tiles or stone, will cope well with such functions.
The advantage of clinker tiles is their high resistance to moisture. The material does not need to be treated with additional waterproofing compounds. It is beautiful, durable, easy to apply to the finished surface.
The stone has a presentable appearance. Suitable for decoration granite, marble, limestone and others. Different sizes, shapes, textures, colors of the stone open up wide perspectives in terms of design. When it is not possible to buy a natural one, you can purchase an artificial stone.
There are other materials for finishing the basement floor. The choice of a product depends on your design tasks and capabilities.
Warming methods
Internal insulation of the base
To date, there are many options for warming the basement. First of all, the foundation should be divided into 2 parts, one of which (underground) is in constant contact with a humid environment (rain, melt water, dampness).
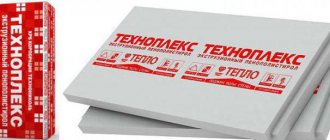
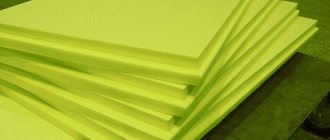
So that moisture does not damage the insulation and it, in turn, does not lose its thermal characteristics, it is necessary to use a moisture-resistant insulation, for example, penoplex.
An analogue of penoplex - polystyrene - also has a high moisture resistance (a comparative analysis of heaters is given in this article).
When insulating a basement, two methods are used:
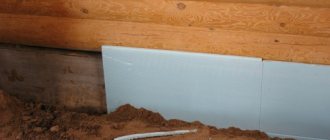
- External insulation. With this type of insulation, it is preferable to use a material that has zero water absorption. Penoplex has similar properties. This work can be done with your own hands, without the help of specialists. Additionally, you will need to make a good waterproofing of the foundation, for example, from roofing material, or treat the surface with bitumen mastic.
- Internal insulation. The procedure for warming is similar to the actions in the first method. The only difference is that the plinth is cladding on the outside. The advantage of interior design is that:
- there is protection from groundwater;
the microclimate is improving.
Note: a great advantage of outside insulation is to extend the life of materials by protecting it from atmospheric influences.
However, there is also a drawback: the appearance of condensation between the insulation and the wall.
You may also be interested in an article about wall insulation with ecowool. And in the next article there is information about the types and characteristics of mineral wool.

Technology of insulation of the basement with penoplex
Before insulating the basement with penoplex, it is necessary to carry out some preparatory work. The constructive reliability of the thermally insulated surface and the maintenance of a comfortable temperature on the lower floor will largely depend on the thoroughness of their implementation. In addition, you need to pay due attention to the selection of high-quality materials and installation of a profile for insulation. Let's talk about everything in more detail.
Preparatory work
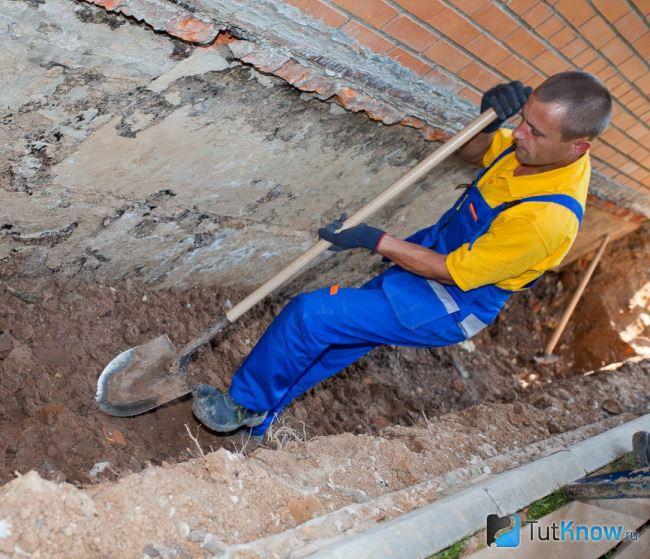
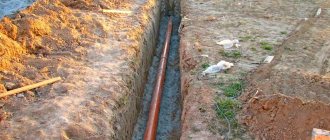
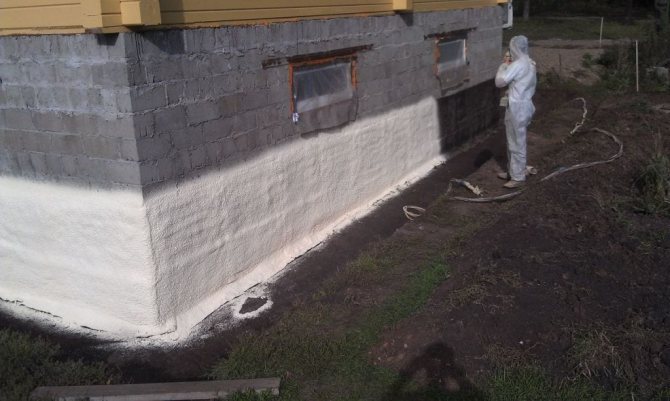
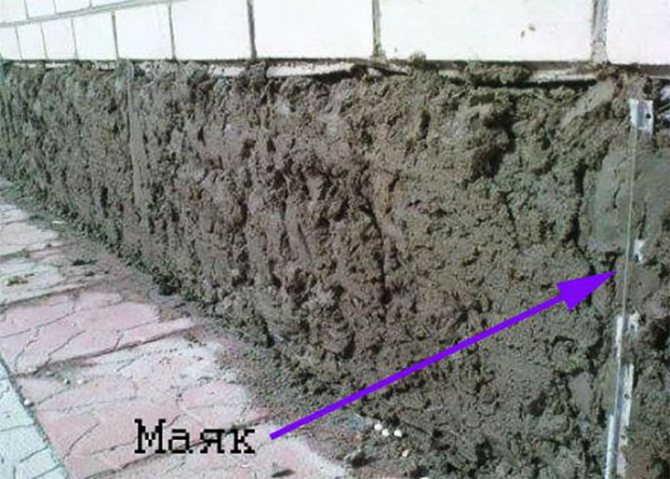
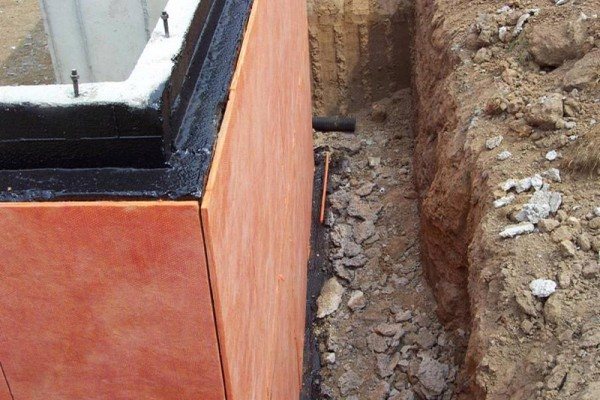
Preparation consists of several steps - cleaning the work surface and waterproofing. The first step is to dig a trench around the structure. She digs to a depth of 60 centimeters from the concrete base. The surfaces are cleaned of dust and debris, treated with a deep penetration primer.
If there are irregularities of more than 2 centimeters, they are leveled with a solution. After plastering and grouting, the walls must dry out. In the presence of a large number of irregularities, an additional primer is carried out.
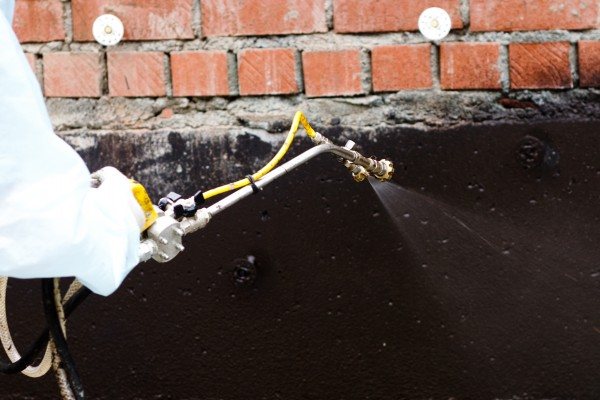
At the next stage, waterproofing is performed. First, a bitumen-based mastic is applied, then heated sheets of techno-nicol are laid with an overlap, the formed joints are treated with mastic. After that, the part of the basement that is in contact with the ground is filled up with a solution based on cement, expanded clay and sand, and the aboveground part is insulated directly with penoplex.
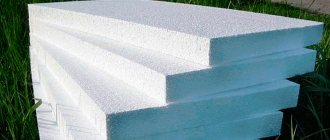
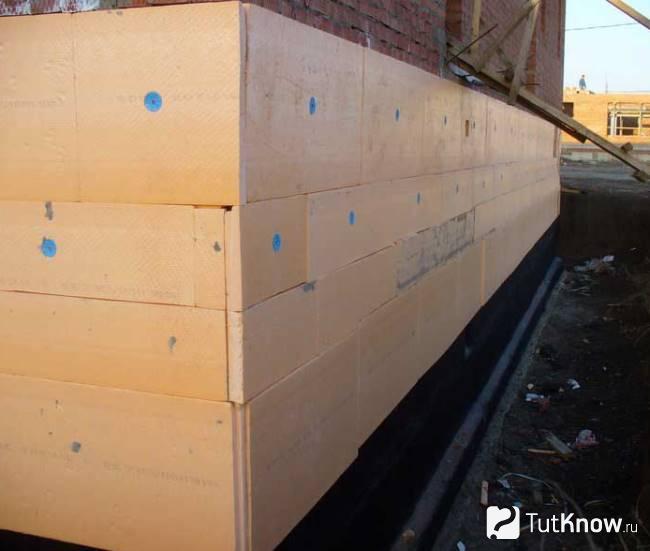
The choice of the thickness of the foam boards depends on the climatic zone in which the material will be used. For the middle strip, 50 mm products are enough, and for areas with a colder climate, thicker foam is chosen. Thermal insulation sheets range from 20 to 120 millimeters in thickness.
For the purpose of ease of installation, as well as to exclude the appearance of so-called "cold bridges", you should choose penoplex plates with a "lock". In addition to the adhesive base, it must be attached additionally to 5 dowels - four along the perimeter and one in the center.
To prevent the destruction of the structure of the insulation, it is recommended to use glue that does not contain solvents; adhesives based on acrylic are perfect. For fixing, you can use polyurethane foam, liquid nails or ready-made dry adhesive mixtures.
For finishing work, it is advised to use a fiberglass mesh, but with a layer of plaster more than 3 millimeters, a metal product must be used.
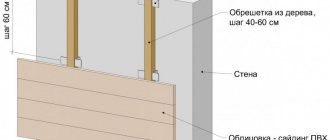
Installation of a metal profile
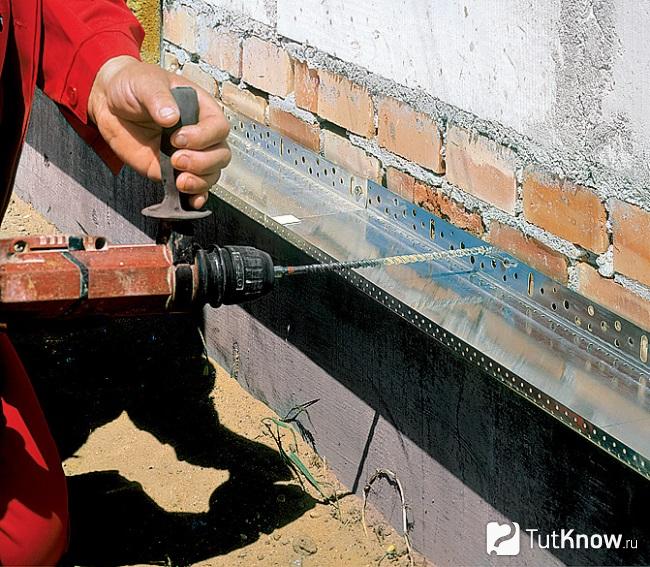
Installation of foam boards begins with the installation of a metal frame necessary to fix the products. Aluminum profiles are installed at a height of 50 centimeters from the ground level, thereby protecting the insulation from moisture. The guides are mounted every 30 centimeters.
There are certain rules for installing such a profile, the implementation of which will help to obtain a high-quality and durable structure:
- Metal guides should be fixed at a minimum of three points. This will exclude deformation of the profile from the effects of temperature extremes.
- Aluminum slats are fixed with dowels.
- If the unevenness is large enough, it is necessary to use leveling shims.
- The gaps between the guides and the wall are filled with polyurethane foam.
- During installation, the corner rails are cut in such a way that a gap of three millimeters is formed at the joints, this is necessary to prevent deformation of the structure.
After installing the aluminum profile, they begin the process of installing foam boards.
Penoplex installation instructions
To carry out high-quality insulation of the basement with penoplex with your own hands, there are some features: work should be carried out at an air temperature of at least 5 degrees Celsius.
Compliance with the following insulation instructions is mandatory:
- The working surface is cleaned, degreased and primed to improve adhesion. It is also necessary to make holes for ventilation.
- Next, prepare foam plates. The material is trimmed to match the location of the drain, plumbing, and other pipes.
- An adhesive (polyurethane foam or glue) is applied to the surface of the prepared products along the entire perimeter of the plate. Better fastening is provided by liquid nails, but this method is quite costly.
- Installation of foam boards begins from the corner of the house. This is necessary for the rational use and cutting of the material. After applying the glue mixture, the products are tightly applied to the wall, after the glue has set, the seams are sealed with a sealant.
- Fastening of thermal insulation boards with dowels is used only in the ground part. Dowels are not used on the foundation, as they can damage the waterproofing layer.
To ensure the maximum thermal insulation effect, the foam boards are laid in two layers so that the joints of the lower layer do not coincide with the joints of the upper one. For example, when calculating thermal insulation with a thickness of 10 centimeters, they take products of 5 centimeters and lay them in two layers. - All joints of the slabs are recommended to be glued with bitumen tape, this will provide additional insulation and improve the quality of installation.
- After installing the slope corner, using glue, the reinforcing mesh is glued to the surface of the slabs.
- After drying, everything must be primed. Next, a layer of putty is applied.
There are disagreements among insulation specialists about laying foam in two layers. On the one hand, this method increases thermal insulation, better protects the basement of the building from external factors - temperature, moisture, which in turn increases the comfort inside. On the other hand, with different displacements of the soil, there is a possibility of slab delamination, which will entail the accumulation of moisture inside the layers, as a result, heat loss will increase, over time, the structure may deform and collapse. But, as many builders assure, with proper installation, adherence to technology, correct selection of sheet thickness, depending on the climatic zone of the work, such damage is unlikely. As a result, you will get one reliable strong layer.
Note! Since the corners of the building are most susceptible to low temperatures, slabs with a thickness of 6 to 10 centimeters should be used in these places.
Finish of the insulated base

This completes the insulation of the basement outside with penoplex. This is followed by finishing work. Siding, artificial or natural stone, plaster coatings are used as decorative materials. When finishing, it is better to abandon decorative tiles and silicate bricks, since at low ambient temperatures, chips and cracks may form at the edges.
Facing works not only give a more aesthetic appearance to the building, but also protect the thermal insulation material from external influences, such as moisture, temperature drops, ultraviolet radiation. But when facing the basement with a stone or tile, an additional load is created, therefore, the choice of facing material should be taken into account at the stage of installing a profile for insulation.
How to insulate the foundation with penoplex - watch the video:
Due to its high technical characteristics, moisture resistance, strength and durability, penoplex is perfect for insulating a basement. This article examined the features of installation, the technology of carrying out work on insulation, as well as the positive and negative characteristics of extruded polystyrene foam.
Preparatory work
Having examined the advantages and disadvantages, we will consider the stages of preparatory work for external insulation:
- Around the house, soil is selected, the depth of which should be equal to the depth of the foundation. Further, for ease of installation, a trench about a meter wide is pulled out.

- The base is cleaned from dust and dirt.
- If necessary, the surface of the base is leveled using a cement mixture.
- Next, waterproofing with roofing material is performed. However, you can get by with a less costly method, namely, a primer with bituminous mastic. The mastic is applied in 2 layers, and the second layer is applied only after the first has completely solidified.
Keep in mind: a more reliable option would be to use a deep penetration waterproofing, such as a penetron.
Painting
After the putty dried, I painted the stones with brown paint with the addition of white color. I tinted the protruding texture with a lighter shade and after about 5 minutes rubbed it with a damp sponge to even out the color and give the stone a more natural look (photo 2)
... Dried it out. Covered with varnish in two layers with intermediate drying.
I designed the corner under the ceiling in the same way. (photoZ)
... After painting and varnishing, such a decorative stone became very hard and is in no way inferior to gypsum counterparts.
Installation work
Thermal insulation of the foundation and plinth with Penoplex plates
Starting to install the penoplex, we need the following tools:
- plastic dowels;
- slope corner;
- construction knife;
- a hammer;
- notched trowel;
- trowel (trowel);
- building level.
It is important: materials and tools should be of high quality.
The final stage
Complemented the given style of the room, decorating the opposite wall with a stone from a mixture of tile glue and starting putty (1: 1), diluted with water until smooth. Knead the mass well in small portions. The previously prepared area was covered with soil and dried. Wearing gloves, I applied a layer of solution about 1 cm to the wall with my hands.
I crumpled a sheet of paper and walked it over the area with the solution, imitating the texture of the stone. After 20 minutes, I drew the outline of the stones with the pen of a teaspoon. Dried it out. Primed. Painted by analogy with penoplex sandstone (photo 4)
.
* Penoplex (extruded polystyrene foam) is an environmentally friendly heat-insulating material that does not rot, with low thermal conductivity, minimal water absorption and high strength.
Installation of artificial stone: the experience of professionals
Installation of artificial stone is much easier if you compare it with laying natural stone.
It does not require serious physical efforts, however, in order for the cladding to serve for a long time and does not require repair, certain technologies will have to be followed during installation.
Their violation is fraught with the fact that the surface will be uneven, unaesthetic, warp after a while, and cause other unpleasant phenomena.
Artificial stone laying
Apply with a trowel the adhesive layer to the back of the cladding element for installation of masonry with a thickness of 0.5-1 cm. The mortar should cover the entire surface.
Press the cladding firmly against the wall. To get the best fit, gently move it from side to side. After such manipulation, the solution should protrude along the sides of the installed element.
For seamless masonry, pay special attention to the fact that the end connections of the cladding elements must be filled with mortar in the form of a thin layer.
It is necessary for thism:
- completely cover the reverse side of the cladding element with a solution so that when installed along the edges its excess is squeezed out;
- remove excess mortar with a trowel immediately after installation, leaving only a thin layer of it on the ends of the tiles, in addition, you can apply a thin layer of mortar to the ends using a bag filled with mortar.
When installing the cladding on a very dry surface, as well as when installing in hot and dry weather, it is recommended to pre-moisten the installation elements and the base surface with a paint brush or spray. Lay, as in other situations, from top to bottom, in small areas from 0.3 to 0.6 square meters. With this method of installation, smudges of adhesive solution will hardly stain the decorative surface.
Embroidery
One of the most crucial stages of decorative stone laying is joining. Carrying out it, achieve a thorough sealing of the surface. This will prevent moisture from getting under the cladding. Thus, you will protect the cladding from cracking elements in the cold season and the destruction of all masonry in the future.
Joining is carried out using a construction syringe-gun. You can also use a special bag (bag), which allows you to fill the seams with mortar.
It is not difficult to make it yourself: it is enough to cut off the corner of a medium-sized dense plastic bag so that the diameter of the outlet is slightly less than the width of the seams, i.e.
spaces between cladding elements.
Fill the bag with the solution and, slowly squeezing it through the hole, fill the seams with it. You will have to be extremely careful and careful, since the solution should not get on the cladding. If this does happen, the grout should be removed from the stone surface immediately.
After the mortar has set, smooth out the joining seams by pressing with a spatula, then remove the excess. Do not process the seams immediately after filling them. The mortar that has not yet set will leave dirty marks on the cladding. You can finally clean the surface with a hard, but not a metal brush.
Water repellent for protection
It is required to treat the masonry with a hydrophobizing compound after it dries for special protection. Thanks to the water repellent agent, a silicone, elastic, vapor-permeable film is formed, which will completely protect the stone:
- from exposure to moisture and dirt,
- acid rain
- the appearance of efflorescence,
- exposure to solar radiation,
- damage to the stone by fungi and mold.
Observing all these rules, you can avoid unpleasant mistakes when creating cladding surfaces.