Owners of wooden houses under construction or during operation often come to the idea of insulating a wooden house, although wood itself is a natural material with good thermal insulation properties.
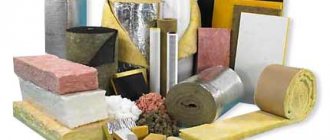
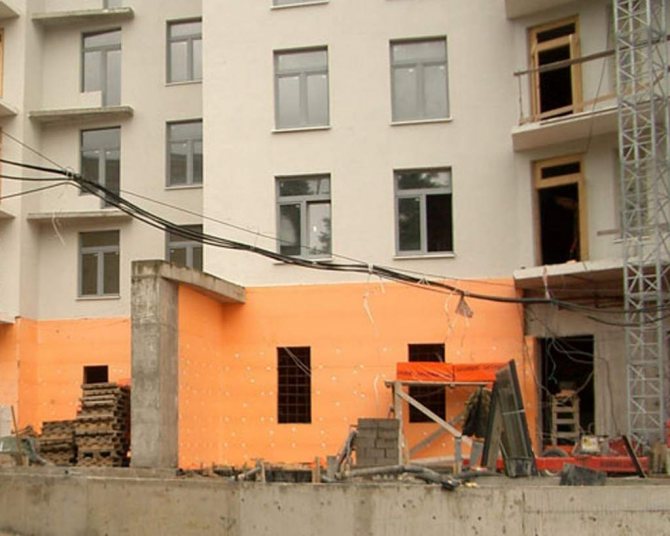
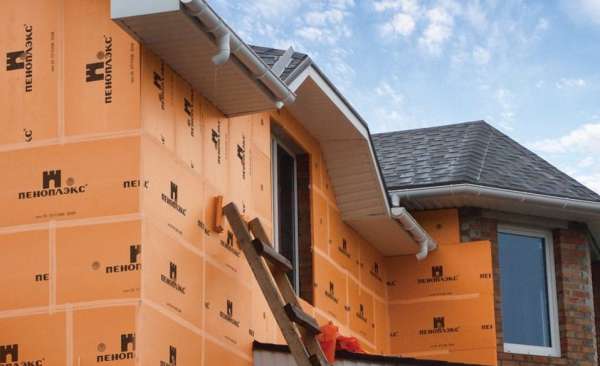
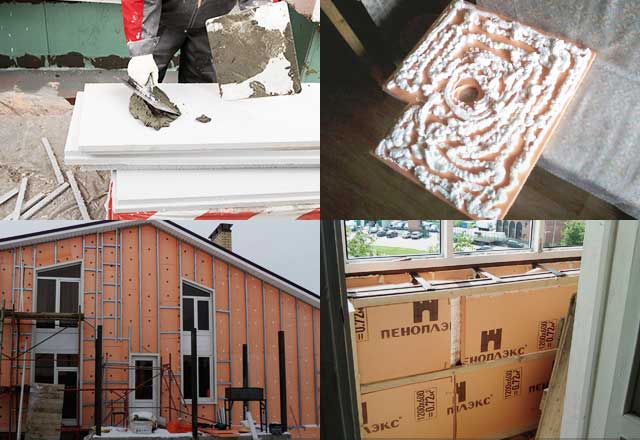
The modern construction market suggests using mineral wool, foam plastic, ecowool for thermal insulation, but penoplex has become the undoubted leader among the materials. Subject to the fastening technology, modern insulation will provide a comfortable climate for any home.
Penoplex - modern heat insulator
The choice of penoplex among heat insulators is considered optimal because of its undeniable advantages:
- durability of the material;
- low thermal conductivity;
- environmental friendliness and safety;
- moisture resistance;
- fire resistance.
You can learn more about the technical characteristics of penoplex from this article.
Why do you need insulation
Insulation of new houses is carried out in connection with the desire to optimize energy costs, that is, to do without turning on heating devices and air conditioners.
Those who have settled in wooden houses for a long time, over time, find cracks and cracks in the frame at the joints or corners. This is due to the partial shrinkage of the house due to weather factors.
The violation of the tightness leads to the fact that, despite the general favorable climate, the heat gradually leaves outside.
How to insulate the floor in a private house with your own hands, read here.
Warming methods
Insulation of the house outside
The solution to the issue of warming a wooden house is possible without the invitation of specialists; basic skills in working with building materials are enough. It is important that thermal insulation with foam is possible both from the inside of the building and from the outside.
But practice shows that external or external insulation of the house is preferable for a number of reasons:
- Insulation on the outer walls will last longer as it will be better ventilated.
- The external structure will not only serve as insulation, but also to protect the walls from negative natural factors.
- External thermal insulation will not reduce the internal living space.
- Work can be carried out in a populated house without disturbing the internal order.
Features of the installation of penoplex outside
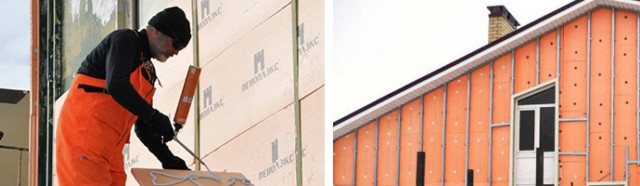
Penoplex is also successfully used for external insulation, which is important for multi-storey buildings of old buildings, especially for corner rooms. Self-insulation of apartments from the outside is hardly possible, the only exception is the apartment located on the ground floor. But knowing the basic rules for installing a penoplex outside, you can control the work of hired professionals.
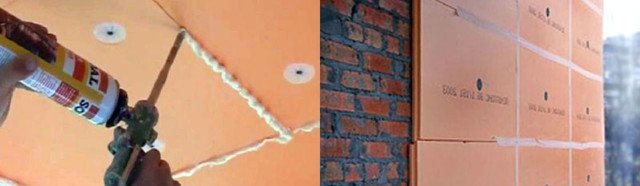
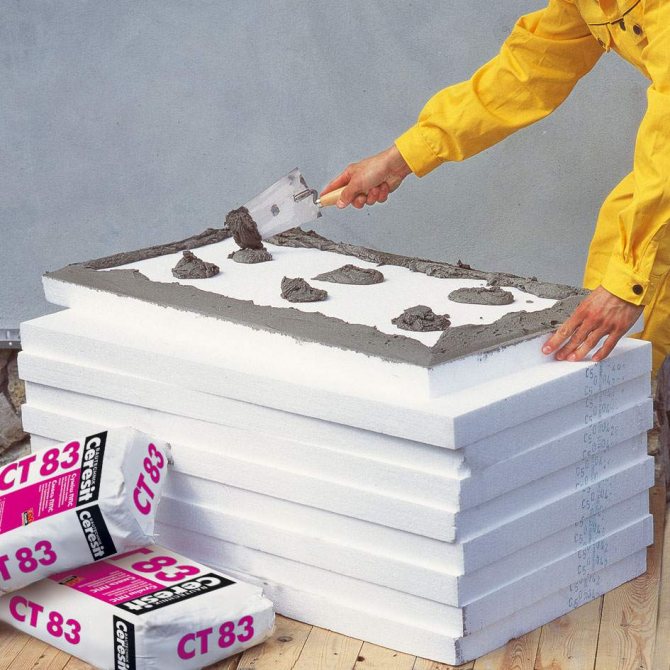
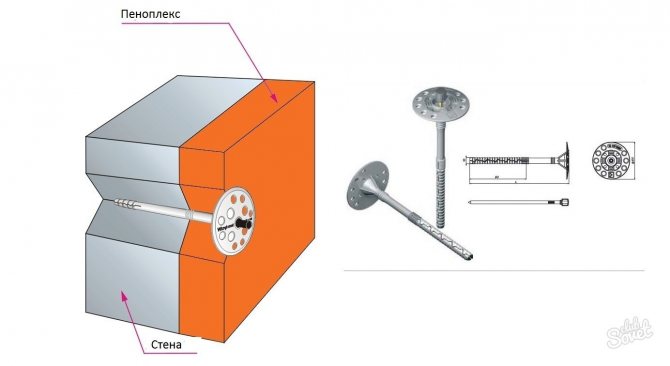
- During installation, it is imperative to combine a special adhesive for attaching foam to concrete, and plastic dowels. The adhesive is applied to the board evenly rather than in individual spots.
- In order for the insulation not to slip during installation, a starting plinth is attached around the entire perimeter. It can be made of a bar or a metal profile and is attached strictly horizontally, for which a level is used.
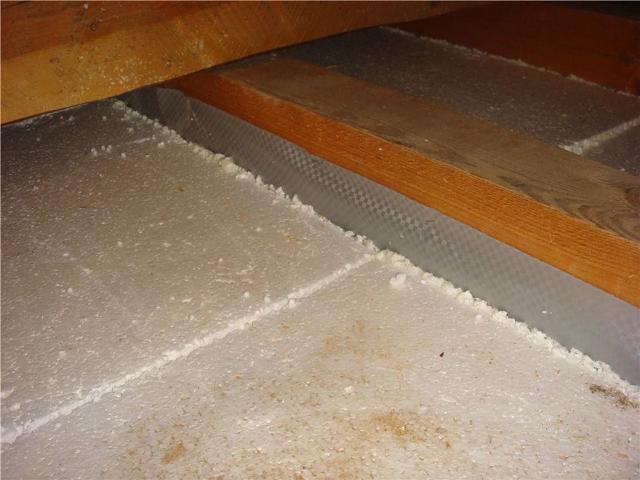
- A layer of insulation 30–40 cm should extend beyond the surface to be insulated to prevent heat outflow along the edges.
USEFUL INFORMATION: Features of the dry screed device
Features of thermal insulation of wooden surfaces
It is known from the school curriculum that wood has the ability to "breathe", and in conditions of air isolation, after a while, the process of decay will begin.If you provide the wood with an air flow, then the quality characteristics of the tree will remain for decades.
This means that there must be an air space, or ventilation gap, between the wall of the house and the insulation. If you do not follow this rule, then over time, moisture condensation will lead to rotting of wood and insulation.
The main stages of external fastening
When working with penoplex, it is recommended to maintain the technological process and observe the sequence of the main types of work:
- Surface preparation. The walls of the house must be cleaned of dirt and dust. Then treat the wood with an antifungal compound. In the presence of mold, especially thoroughly saturate the affected area with antibacterial agents.
- Installation of the lathing. The lathing is made from wooden blocks. Ensuring clearance is an important part of the process. If the wall is a log, then the natural shape of the logs creates the necessary ventilation. With a smooth wall surface, you need to fill the slats up to 2.5 cm, providing the desired gap. It is optimal to leave a distance of no more than 1 meter between the slats. If the surface of the wall is not even enough, you need to use underlays under the bars to level the plane. If necessary, the protruding parts of the logs are cut off. Check the geometry of the battens around the perimeter with a level. Doorways and windows are upholstered with a bar in order to fix the edges of the future cladding along these boundaries. The trim is installed with the expectation that the foam boards will be placed tightly between the beams. The height of the lathing, or frame, should correspond to the thickness of the plates, and the distance between the vertical beams should be made 0.5 cm less than the width of the foam, to ensure a tight fit.
- Laying a vapor barrier layer. For protection against condensation, you can use foil or dense polyethylene film. Its fixing is done with construction tape.
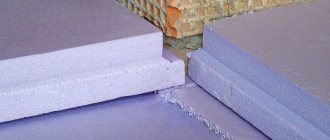
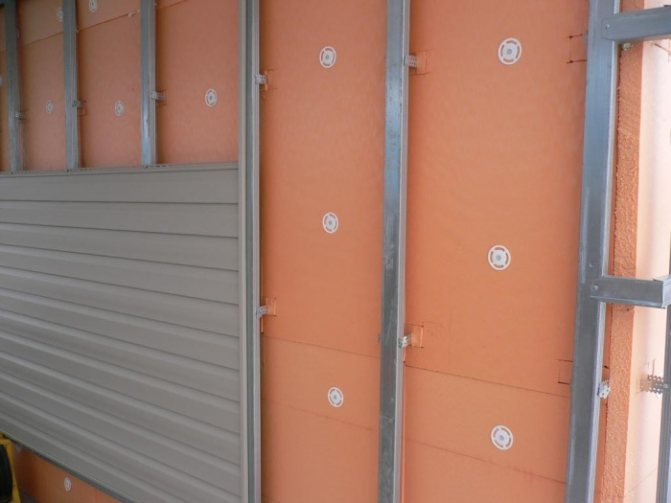
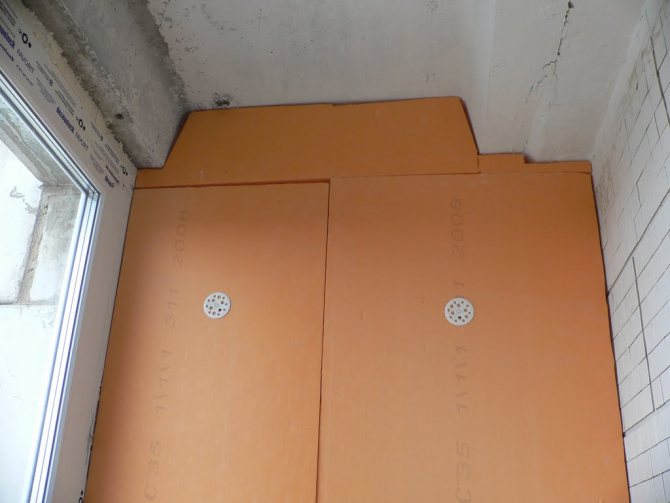
- Fastening of the penoplex. A clear geometry and a special edge make it easy to mount foam boards like a children's designer. The insulation is laid end-to-end, in rows from bottom to top. If necessary, the penoplex slab can be easily cut with a knife, despite the fact that the average thickness of the slabs for outdoor decoration is 8–12 cm. The slabs should be held due to a tight fit, but if necessary, they can be fixed with wedges or nails. Insulation joints must be glued with metallized tape.
- Securing the waterproof layer. A moisture protective film is stretched over the foam to ensure waterproofing. It must be overlapped and secured with a construction stapler or tape.
- The final stage. At the end, a wooden frame is attached to the layer of protected insulation for finishing the house with siding or other type of cladding.
Read about which glue to choose for penoplex here.
Penoplex fastening methods
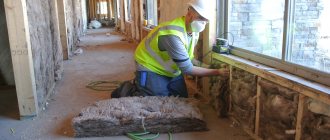
Due to its excellent characteristics, penoplex is increasingly used to insulate buildings from the inside. With its help, thermal insulation of walls made of brick, concrete, wood or drywall is carried out.
Before fixing the insulation on the wall, it is necessary to carry out preparatory work. Using a spatula, scraper, sandpaper or any other tool, the surface is cleaned of dirt, dust and old coatings. If the wall is uneven, then it should be brought into the plane with a putty, and then primed using a deep penetration primer. Treatment with antiseptics will not hurt to prevent the appearance of fungus.
What methods can be used to fix the penoplex from the inside of the apartment?
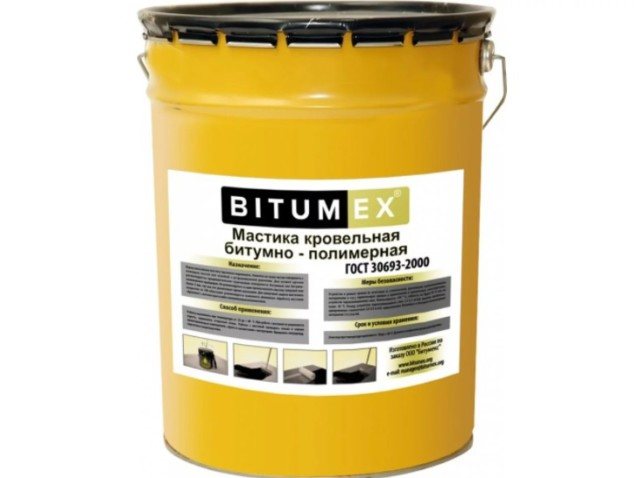
- When insulating an apartment from the inside, glue bitumen mastic is often used. It is usually sold ready-made.The mastic is applied to the insulation plate in separate points, after which the penoplex is pressed against the wall for a while.
- When using cement-based adhesive dry mixes, the solution is applied to the entire surface of the board with a notched trowel. Indoors, where the wall will not experience heavy loads, spot application of the mixture is allowed: on the edge of the slab and on several points in its center. First, you need to prepare the solution by diluting the mixture with the required amount of water and mixing thoroughly with a mixer.
USEFUL INFORMATION: How to make a plasterboard partition with a door with your own hands
- To fix the foam on plasterboard or plastic surfaces, it is advisable to use a special adhesive foam. It, like ordinary polyurethane foam, is produced in cylinders. After applying it to the insulation, it is necessary to wait 10-15 minutes, then press it firmly against the wall.
- When insulating a concrete or brick wall from the inside, fungal dowels can be used to fix the foam. Each plate will need at least five of them. Four of them are located at the edges, and one fixes the slab in the center.
- Liquid nails are rarely used primarily because of their high cost. It is advisable to use them with a very small area of the insulated surface.
For best results, it is recommended to combine disc dowels with other fastening methods. But you can also limit yourself to the application of an adhesive solution: the foam plates from the inside of the apartment practically do not bear any load.
Internal mounting features
Experts pay attention to the following factors:
- internal insulation with foam boards is carried out only if there is no opportunity to do work from the inside;
- in the house, insulation can be done only after final shrinkage, as practice shows, in a year.
- the thickness of the foam should not exceed 30 mm, and its density is needed the smallest to avoid the formation of condensation on the wall;
- it is necessary to fix a foil film on the insulation to prevent the appearance of dampness and deterioration of the microclimate. The algorithm of actions as a whole remains the same as for the exterior decoration of the house, taking into account the above factors.
Fastening insulation
Methods for fixing the penoplex depend on the type of surface on which the insulation is applied, as well as the conditions of its operation.
To properly fix the penoplex on the wall, two conditions must be met:
- choose an adequate fastening material for this situation;
- set the starting bar on the horizontal level for the first row of insulation.
The most common fasteners are:
- dry cement mortar;
- bituminous mastic;
- polyurethane foam;
- liquid Nails;
- plastic dowel fasteners.
The following can be used as a starting bar:
- wooden beam;
- wall profile for drywall;
- special perforated profile for foam with external and internal corners (the width is selected according to the width of the insulation).
Fastening the penoplex to the wall of the room inside should be based on a certain technology.
Installation stages
Installation of panels is carried out in several stages:
- The wall surface is leveled horizontally and vertically by applying plaster, putty and cutting the protruding places with a perforator;
- After the leveling layer has dried, the wall is primed;
- Glue is applied to each mounted board "Penoplex Comfort", then the product is installed on the wall according to the previously applied markings and fastened with dowel nails at the rate of 4 per one board. Corner panels, if necessary, are trimmed with a knife, saw or jigsaw;
- The next line of panels in relation to the previous one must be installed in a checkerboard pattern, avoiding the coincidence of the seams;
- After completion of the installation, all joints should be filled with mounting foam, glue the joints with tape and close the insulated wall with foil vapor barrier polyethylene;
- Finishing materials are not attached directly to the penoplex. To install plastic panels or MDF on them, wooden or metal guides are pre-mounted. Wallpaper can only be glued onto pre-installed drywall.
It is necessary to fasten the penoplex to the wall of the room from the outside in compliance with the same requirements as for internal installation: materials can be fixed only on a leveled surface. Taking into account the presence of external climatic influences on the wall to be insulated, affecting the adhesive adhesion, the alignment is also added:
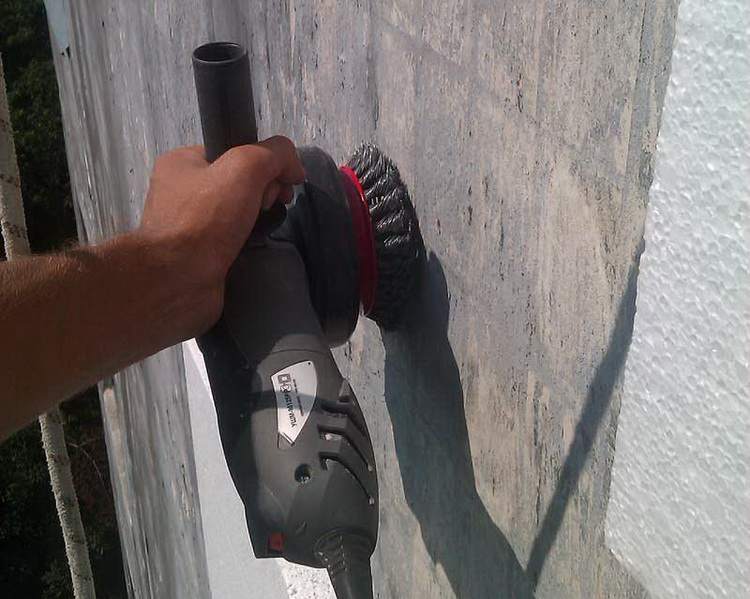
- removal of dust, dirt, salt deposits, particles of exfoliated facade plaster from the wall surface;
- washing away oil and paint stains with solvents that prevent glue from absorbing into the wall;
- destruction of mold and fungal deposits with construction antiseptics;
- anti-corrosion protection of metal parts on the wall;
- corrugation of perfectly smooth surfaces, which improves the adhesion of the adhesive.
In addition, before installing the penoplex, the lighting devices, air conditioner, satellite dish, house address plate and other external attributes are installed with guide profiles on the wall.
Recommendations
The main recommendation of specialists is strict adherence to foam insulation technology. Deviations from them can lead to the formation of cold poles, condensation or fungal infections.
Internal insulation procedure
Knowledge of the features of external and internal insulation of the walls of the building, taking into account the requirements for the installation of penoplex, will make the atmosphere at home comfortable at any time of the year.
How to insulate a wooden (frame) house with penoplex, see the video:
When the question arose of paying for energy carriers - it doesn't matter if it was gas, electricity, coal or firewood, a lot of homeowners thought about wall insulation to reduce heat loss and save on heating.
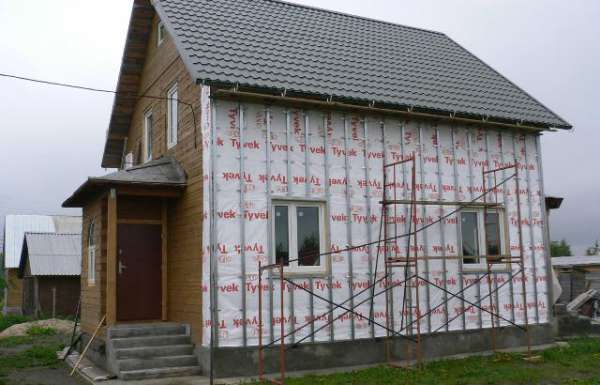
Warming of wooden houses causes especially heated debate, here there are discussions on how to insulate - from the outside or from the inside, which insulation to choose, which insulation system to choose. Do-it-yourself insulation of a wooden house outside with penoplex is the answer of an economical owner.
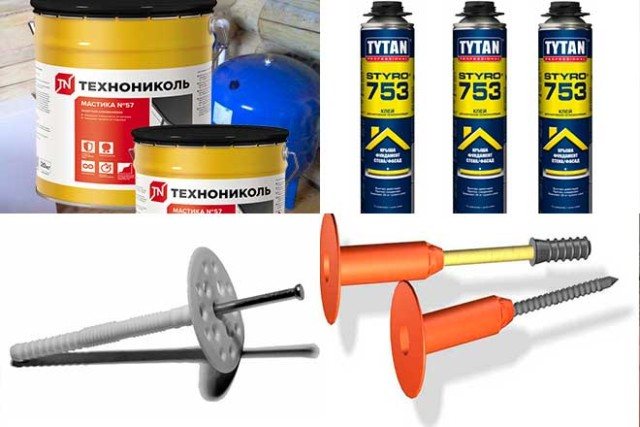
Fastening materials
To fix the foam to the wall or ceiling, various adhesives can be used, as well as fastening equipment in the form of self-tapping screws with dowels or umbrellas. To understand which of these is the most convenient, you need to evaluate the pros and cons of each.
Mastic

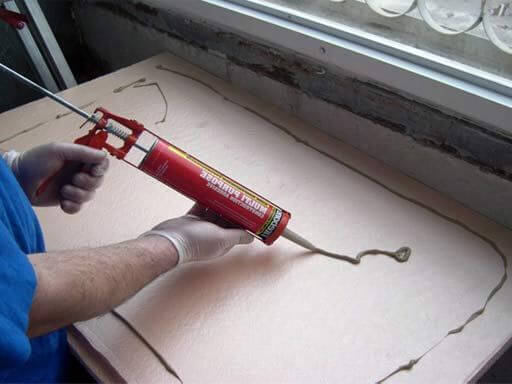
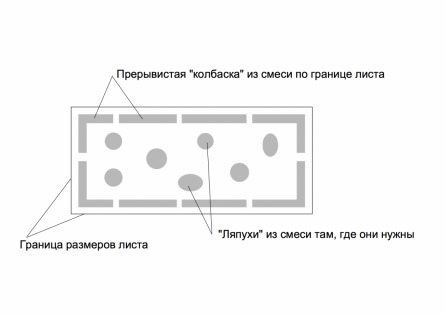
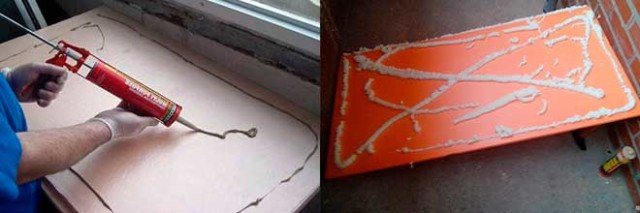
Mastic is a composition that includes petroleum products and solvents that allow it not to solidify. Before using mastic for penoplex, it is necessary to find out whether the solvent will react with the insulation, simply destroying it. Mastics are most often used to provide waterproofing of surfaces. They are especially useful for basements and foundations. They can be used in tandem with Penoplex "Foundation". Especially for ease of application of mastic to penoplex, it is packed in tubes for which it is easy to use a gun. When using this method, it is worth remembering that the surface of the wall must be flat so that the penoplex can lie with its entire plane. The mastic is applied evenly over the entire foam sheet. Additionally, a few drops are made in the middle. After that, the penoplex sheet is tightly pressed against the wall. It can be repositioned until fully set.
Note! It is also important to apply mastic to the seams between individual sheets, which will not only increase adhesion, but also eliminate cold bridges.
Concrete mix
Cement-based dry mixes are used for various purposes. They are often used for laying tiles.They also occupied their niche among the compositions with which the penoplex is glued. It is possible to use such dry mixtures for penoplex when it comes to insulating a brick house or the like. Stir the adhesive strictly in the proportions indicated by the manufacturer. Mixing the components is most convenient with an electric construction mixer. Thanks to him, lumps will not appear that would interfere with the installation. It is necessary to apply the mixture to the penoplex evenly. To achieve this, a notched trowel is helpful. After applying the glue, it is necessary to press the penoplex well and hold it for some time to set.
Note! If you add too much water to the mixture, then it will turn out to be floating and the foam sheets will not stay in place.
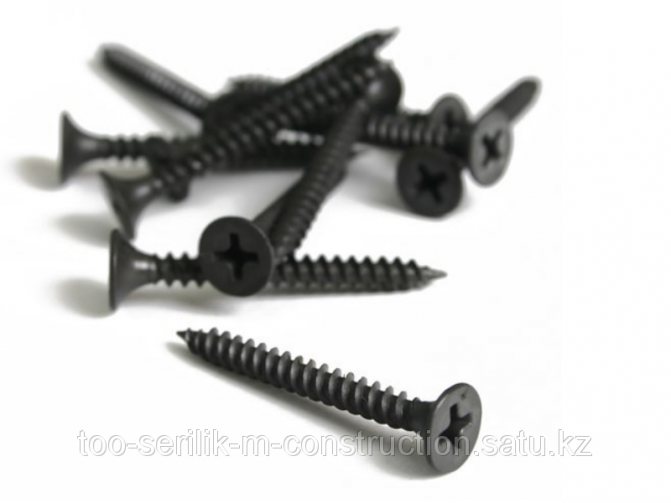
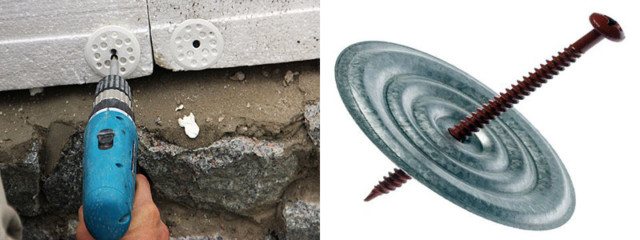
Self-tapping screws
Self-tapping screws are the ideal solution when you have to insulate a wooden house. For greater reliability, an additional crate is mounted, between the racks of which the penoplex is laid. Self-tapping screws should be selected of sufficient length so that they go into the wooden plane by at least 10 mm. In this case, you will have to put washers under the caps. If this is not done, then the self-tapping screw simply will not press the insulation sheet against the wall. For greater reliability, you can use the adhesives mentioned above. They will create an additional layer.
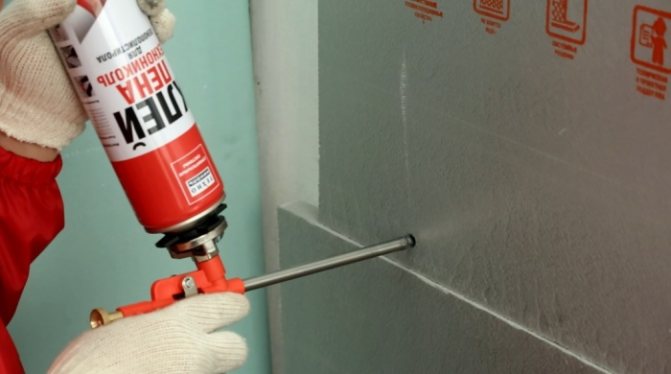
Foam
Polyurethane foam can act as an adhesive. It perfectly fixes foam sheets even to concrete walls. But with regard to penoplex, you should be careful when using foam. It is less reliable than any of the other options. It is necessary to apply it on the penoplex evenly, with a slight thickening in the middle. When pressing a sheet of insulation, you need to be careful, because during the polymerization of the foam, it expands, which can affect the configuration of the insulation. In this case, it is better to purchase foam with a minimum expansion coefficient.
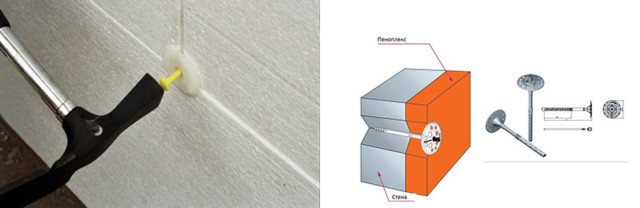
Fungi
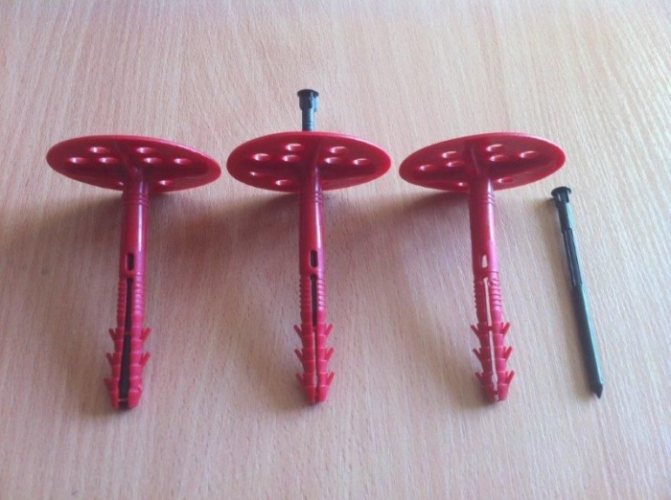
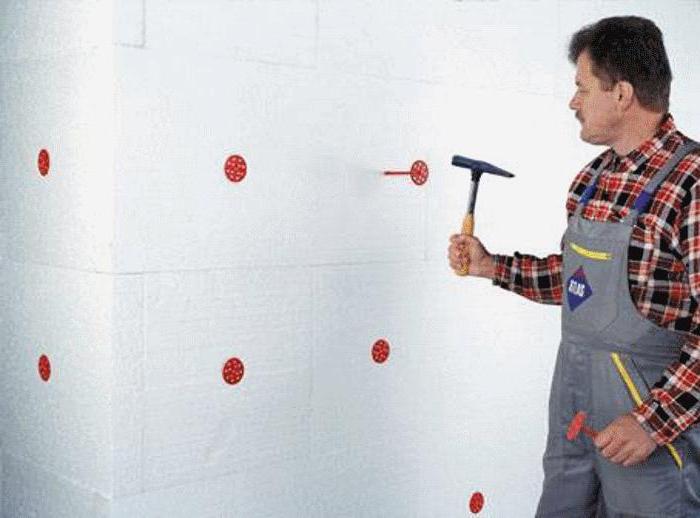
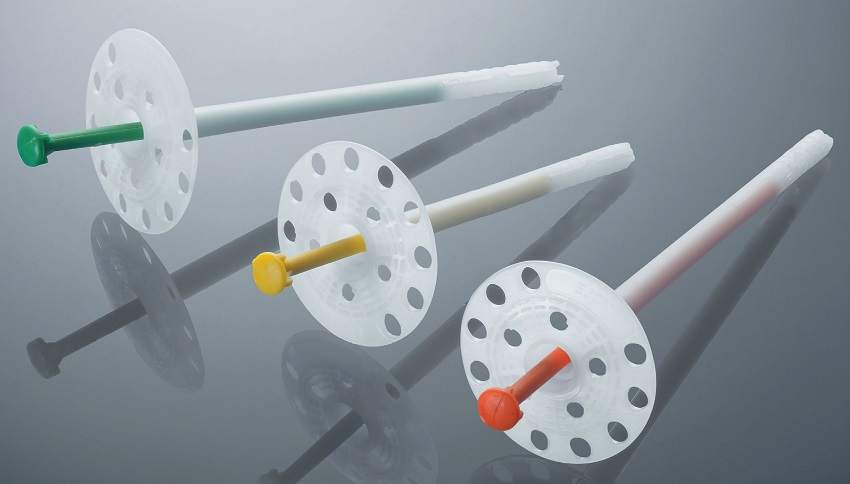
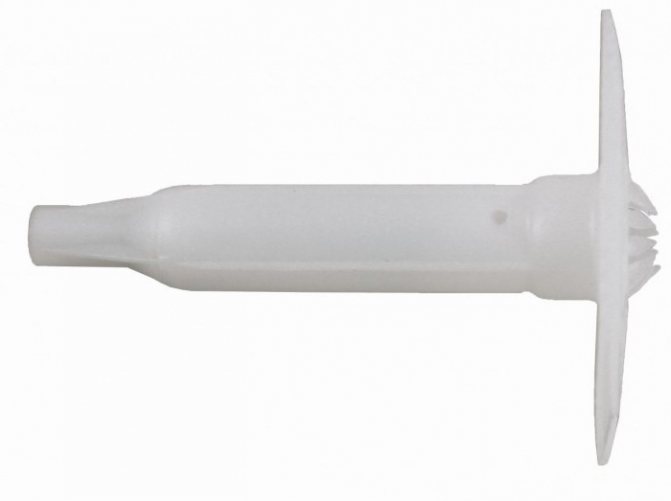
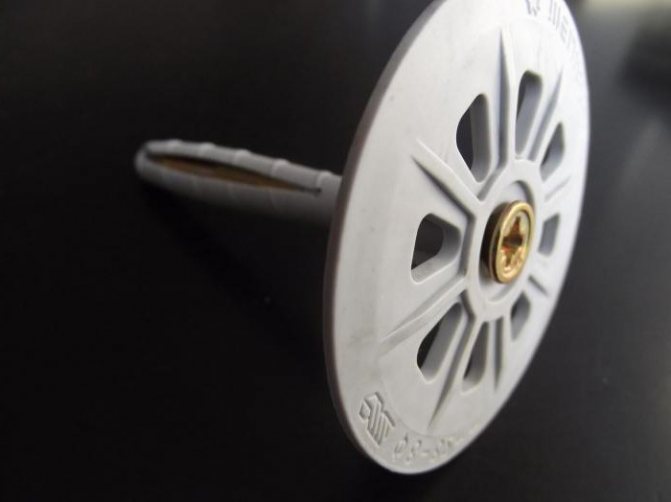
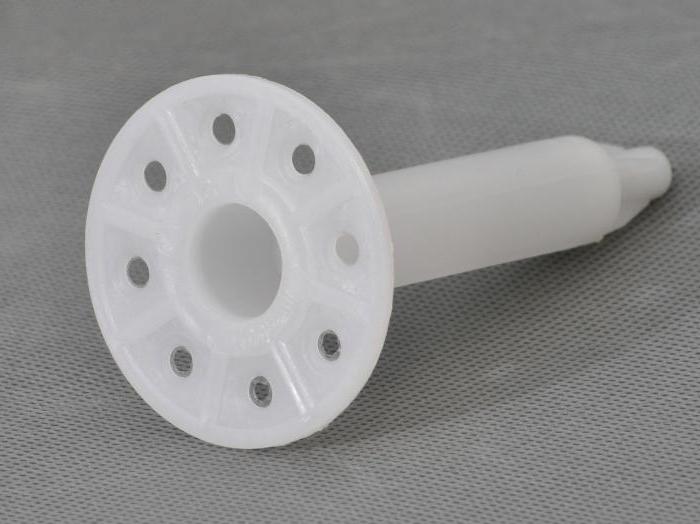
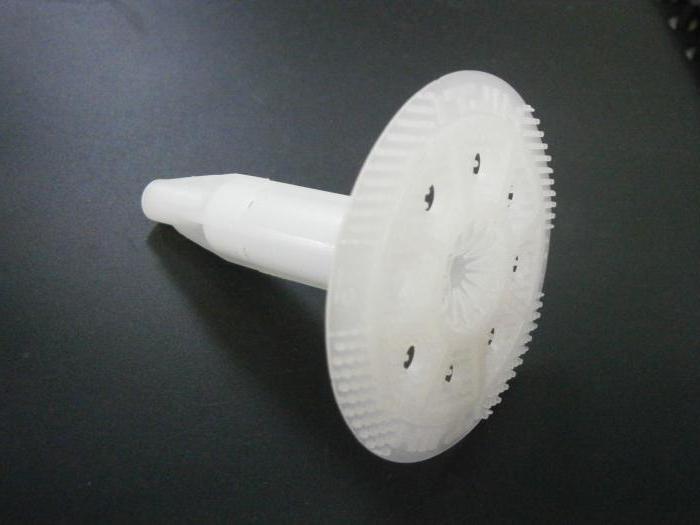
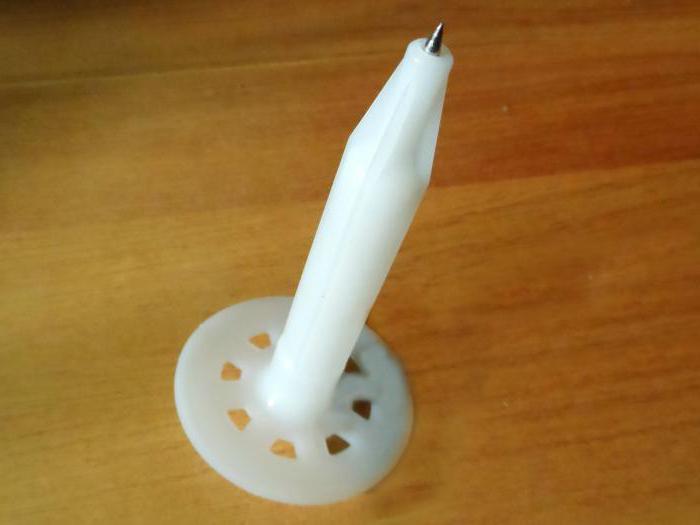
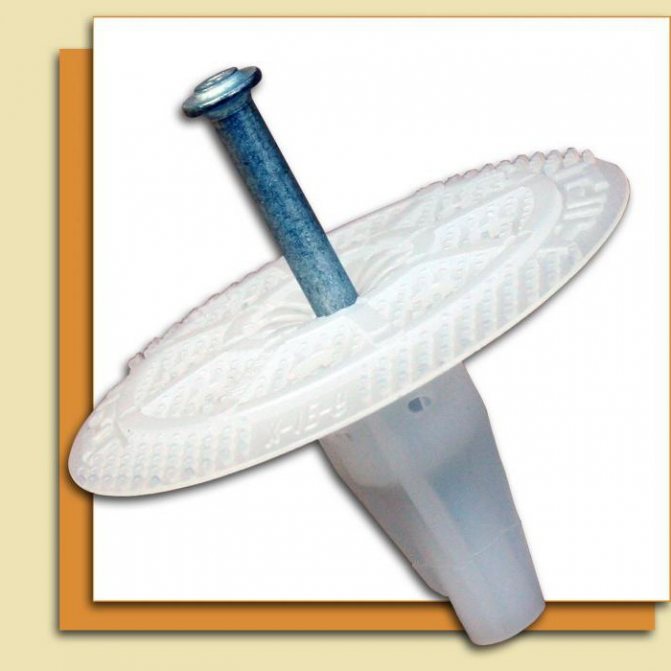
One of the best options for attaching penoplex is fungi. The fastening element is a plastic dowel with a wide head. A plastic nail is inserted and hammered into it. With such fungi, the question of how to fix the penoplex to the ceiling disappears. The wide part of the fungus just won't let it fall. It is necessary to acquire fungi more than the width of the foam, so that they can enter the concrete to the required depth. For installation, it is necessary to attach the insulation to the wall and drill a hole in the wall through it. After that, it is filled with polyurethane foam and a dowel is inserted into it. It is tapped with a hammer until it merges with the plane of the insulation. The fungus should not protrude from the common plane. The nail is mounted last. 5 dowels are required to fix one sheet. Four will go to the corners and one will stay in the middle. For adjacent sheets, two adjacent dowels will be sufficient, which will be inserted into the seam.
Liquid Nails
Liquid nails are a versatile adhesive used for wood and metal. They are also suitable for penoplex. But there is a small caveat: the surface must be flat and well finished. Liquid nails are sold in the same tubes as silicone. You can use a skeleton gun for application. It is necessary to apply the composition along the edges and diagonals in the middle. Liquid nails will be relevant when insulating small areas. Their cost is high, therefore it is economically unjustified to use them on the entire area of the walls of the house.
Special glue
On sale you can also find special glue in the form of foam for penoplex. It is applied in the same way as with conventional polyurethane foam. The same pistol is used for these purposes. Such foam glue will be relevant for new flat concrete surfaces.It is necessary to apply the composition to the sheet evenly. After that, the penoplex is pressed against the plane of the wall for 30 seconds. Full setting occurs after 20 minutes. It is undesirable to shift the sheets after applying the composition. After 2 hours, you can start further work on the exterior wall decoration.
Note! Most often, penoplex is mounted under a facing material such as siding. In order to later be convenient to attach the siding to the penoplex, it is necessary to observe the vertical level of the wall so that the insulation does not bend or protrude. After warming the entire plane, a crate for siding is mounted on the penoplex. The step between the lathing for siding is 50 cm. The starting bar is fixed to the lathing and the installation of siding begins from it. You can watch a video about this below.
A bit of theory
Regardless of the material of the walls, in the house, external enclosing structures that provide the heat transfer resistance required by the norms, there are drafts, and in the absence of proper ventilation, mold forms, walls and ceilings are affected by fungus.
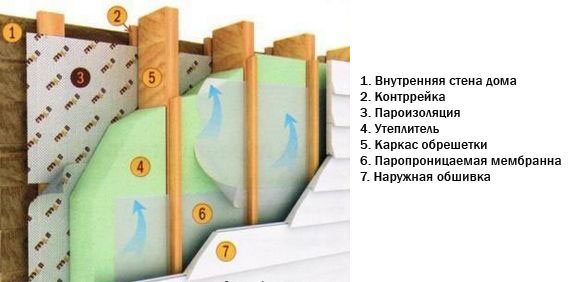
In the case of a wooden house, the walls of which "breathe" - they release water vapor through the natural pores of the wood, improper insulation without ventilation will lead to the formation of mold. In order for such a misfortune not to happen, the insulation structure must freely release steam, which means that each subsequent layer in the direction of the street must have greater vapor permeability.
For wood, this indicator is 0.06 mg / (m * h * Pa), for penoplex - 0.018 mg / m * h * Pa. That is, when the house is insulated from the outside with penoplex, water vapor will settle on the surface of the wooden wall, which will gradually lead to its rotting. You can avoid this trouble by laying a vapor-permeable film and an air gap between the insulation and the wall.
Such a solution will allow the steam to be removed to the outside, accumulate condensate on the vapor barrier, and then ventilate it through the air gap. Since penoplex has a minimum water absorption (from 1 to 4%, depending on the brand), water vapor coming from the house will not be able to significantly affect its thermal conductivity, and low vapor permeability will not allow water vapor to penetrate from the atmosphere to a wooden wall.
Insulation systems
You can insulate a house with penoplex using two systems:
- "Wet" - plastering system;
- "ventilated facade".
The plastering system of insulation involves fixing the insulation directly to the outer wall, but since it is necessary to create a ventilation gap between the wall and the insulation, the use of this system in the case of a wooden house is structurally not justified.
The ventilated facade system will allow meeting all the requirements of heating technology, and will provide comfortable conditions and a healthy microclimate in the house, without additional costs for forced ventilation.
Any slab or slatted facing material can be used as a finish.
Insulation
Performing work will require care and accuracy. At the initial stage, it is necessary to inspect the walls, dig in the seams, repair cracks, impregnate the wood with a fire retardant and antiseptic to protect it from burning and decay.
Insulation of a wooden house with penoplex can be divided into several stages:
- Preparatory stage - fastening the starting bar around the perimeter of the house, making ventilation holes in the wall for air flow into the ventilation gap.
- The device of the frame from a bar of 40x40 mm to create an air gap, fastening a vapor barrier film.
- The device of a frame for fastening thermal insulation from a bar of 40x100 mm (depends on the required thickness of the insulation), fastening the insulation.
- Fastening a moisture-windproof film or a superdiffusion membrane with a 40x40 mm bar, with the creation of a ventilation gap.
- Fastening the curtain wall.
The crate is attached to the prepared base, adjusting the horizontal and vertical planes according to the building level. The evenness of the finishing planes depends on the accuracy of this stage. Minor irregularities of the timber or log facade can be leveled with wood gaskets, significant irregularities must be planed. A vapor barrier film is attached to the crate with a construction stapler. The film is overlapped with an overlap of 15 cm, the edges are sealed with a special vapor-permeable tape.
The main supporting frame is built and attached. When laying insulation in two layers, the frame is made double, fixing the bars in the perpendicular direction. Accordingly, the insulation is laid in one or two layers, by surprise. The distance between the frame beams is equal to the slab width minus 5 mm. Fastening to the insulation bar is carried out in two ways: first, on elastic foam glue, after it dries - with self-tapping screws.
With the help of a bar, a moisture-windproof film is attached, creating another ventilated gap.
The hinged facade is attached. The exterior insulation of the house with penoplex is completed.
Insulation of a house from a bar with penoplex will cost more than insulation with expanded polystyrene, but cheaper than a mineral wool board. All work is relatively simple, but requires accuracy and the ability to use a drill and a level. Subject to the requirements of material manufacturers and the technological sequence of work, the result of labor will delight you for many years
Any house needs to be insulated. This also applies to wooden houses, although wood itself perfectly retains heat. The wooden base of the house will last much longer if it is insulated from the outside. External treatment is a kind of protective function of the frame of a wooden house. In any room, mainly walls need thermal insulation. It is through the walls that almost a third of all heat from the house is lost.
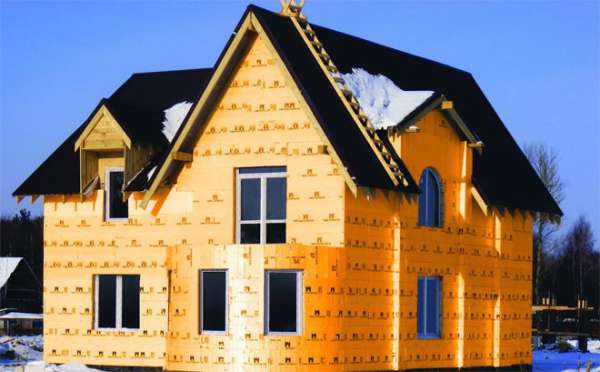
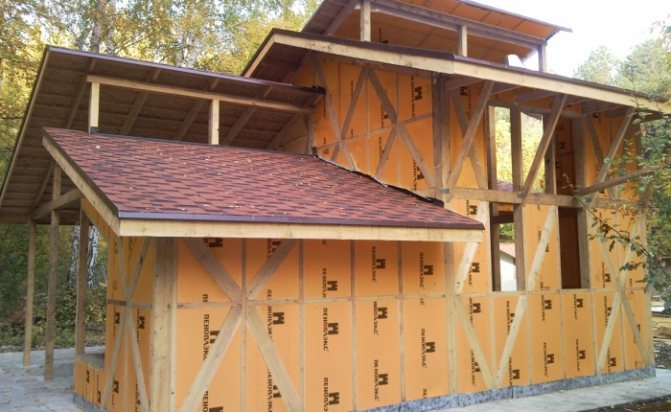
Wall insulation can be carried out both inside the house and outside, but most often external insulation is used using "Penoplex" - extruded polystyrene foam. This building material has become especially popular and widely used in recent years due to a number of its characteristics. Insulating a wooden house with Penoplex from the outside with your own hands is actually not as difficult as it seems at first glance. It only takes time and patience.
How to fix penoplex to the wall
Before you start attaching the penoplex to the wall, you must draw a diagram with the exact location of the insulation sheets and indicate the dimensions, as well as perform the markup. This helps to calculate the required number of sheets, fasteners, glue.
Inside
In the room, work on insulation with penoplex is carried out sequentially:
- preparation of the surface of the walls (dismantling of old finishes, priming, sealing of cracks);
- the plates are fastened in rows (with a shift placed along the perimeter) or with a pyramid (the first row is along the perimeter, then the corners are laid out);
- glue protruding from the seams is removed with a spatula;
- a mounting mesh is laid on the surface of the heat insulator, finishing work is carried out.
Outside
Insulation on the outside should be purchased with a front foam. It is necessary to mount the insulation using dowel-umbrellas. Next, you need to act in the following sequence:
- preparatory work (all decorative elements are removed, cracks are putty, primed);
- installation of the frame if you plan to clad the ventilated facade;
- installation of a starting bar;
- sheets are placed in the cells of the frame;
- if the sheets are attached to glue (without lathing), then it is applied with a notched trowel;
- penoplex is fixed with umbrella dowels;
- Reinforce the surface with a mesh, plaster it, and after complete drying, it can be painted with weather-resistant facade paint.
For external insulation, polyurethane foam should not be used.
Where to buy PENOPLEX® thermal insulation?
is a manufacturer of thermal insulation, the products are sold by distributors. On the website, in the "Where to buy" section, you can choose: country, city, partner status and choose the supplier closest to you. You can also order PENOPLEX® products in the online store
How to fix PENOPLEX® thermal insulation?
The method of PENOPLEX® fastening directly depends on the structure in which the thermal insulation is used.
- When insulating structures located below ground level, such as: foundation, plinth, blind area, preliminary adhesive fixation and weights are sufficient by means of backfilling of the soil.
- In case of thermal insulation of the floor under the screed, PENOPLEX®, in principle, does not require any fastening.
- As for the walls, preliminary glue is required, as well as mandatory mechanical fixation, for which disc dowels are usually used. In some special cases, it is possible to mechanically fix the PENOPLEX® boards using a lathing.
Basic recommendations for the installation of PENOPLEX® boards with PENOPLEX® FASTFIX® glue
1. It is advisable to make notches on the surface of the slab or to process it so that it becomes rough.
2. Special glue PENOPLEX® FASTFIX® is intended for installation of PENOPLEX® thermal insulation. Recommended application method: even stripes around the perimeter at a distance of 1-3 cm from the edge and along the middle of the board.
3. For fixing PENOPLEX on the facade, in addition to adhesive, it is imperative to also use mechanical fixation.

The advantages of outdoor insulation
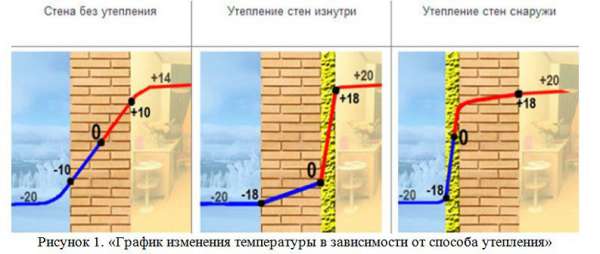
If we insulate a house, including a wooden one, from the inside, then the dew point shifts. Thanks to this indicator, the required temperature level is determined. If the temperature falls below the required level, then condensation will form. The dew point in this case will be located inside the building. As a result, the humidity will rise, the walls of the room will "sweat" and various mold will appear.
In addition, if you carry out the interior decoration of the building, it visually reduces the room. Another negative factor of internal insulation is the general deterioration of the indoor climate. If the house is insulated from the inside, but the tree will not be able to "breathe", and this also negatively affects its properties.
Insulation of a wooden house with Penoplex eliminates all these negative aspects.
Ceiling insulation
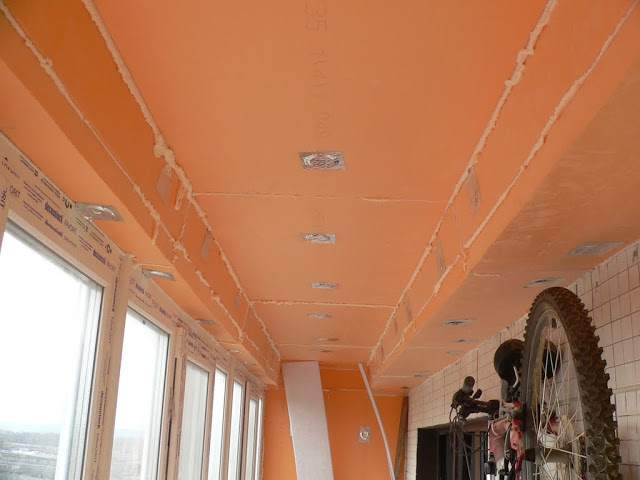
When insulating the ceiling in an apartment or on a balcony, penoplex is attached to the surface with special glue prepared according to the manufacturer's recommendations. After it dries, which usually takes about a day, the plates are attracted to the surface with plastic dowels. Then you can lay a reinforcing mesh, plaster and carry out a fine finish.
The main characteristic features of "Penoplex"
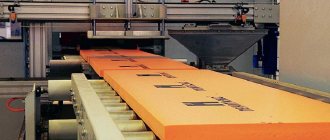
Penoplex is a brand of extruded polystyrene foam. This building material has a number of positive qualities, thanks to which it is considered one of the best heat insulators. It should also be noted that it is a very light material because it contains micro-granules of air.
The main distinguishing features of this material
- Penoplex does not absorb moisture;
- Effective heat insulator, due to which, when insulating, you can use not too thick layers of material;
- Fire resistance. This building material is almost not subject to combustion and does not produce any harmful substances arising from combustion;
- Relative ease of installation;
- Reliability, strength, invulnerability to various types of impact;
- Mold and mildew do not develop on the penoplex.
- Penoplex can be used in a wide temperature range: from -50 to +75 degrees;
- The service life is over 50 years.
Types of "Penoplex"
The material is divided into several types depending on its density:
- density 28.0–33.0 kg / m³ - used for roofing;
- density 29 kg / m³ - for foundation treatment;
- density 25 kg / m³ - for working with walls;
- density 25.0–35.0 kg / m³ - universal penoplex;
- density 45.0 kg / m³ - for industrial use.
Most often, universal polystyrene foam is used in the work, because it is in it that all the best qualities are combined, and it can be used to work with any part of a wooden house.
Features of insulation in the apartment
Often, this technology is used to insulate a balcony, loggia and veranda in order to create the most comfortable conditions for staying indoors.
It provides for laying the thermal insulation material in a double layer on the surface that cannot be glazed - the load-bearing wall and the parapet. Side walls, floor and ceiling are covered with one layer of insulation.
For double insulation, it is recommended to use penofol and penoplex, which provide reliable thermal insulation and reduce heat loss.
First, penoplex is installed using one of the methods presented above, on top of which penofol is mounted on metal staples or an adhesive composition.
The high performance characteristics of polystyrene foam as a heater allow it to be widely used for internal and external thermal insulation of buildings. The availability of material processing and the choice of the most suitable installation method allows you to effectively insulate various types of surfaces with your own hands, without attracting expensive specialists.
In many respects, concrete is superior to such common building materials as brick or wood, but it has its own characteristics that must be taken into account before thermal insulation of walls:
- Although concrete has high strength, it allows moisture to pass through, and this is bad not only for it, but also for insulation, so the material used must be moisture resistant.
- To prevent the formation of mold and mildew, before installing the insulation, concrete walls must be painted with an antiseptic.
- It is not necessary to insulate individual parts of the facade, but the whole building at once.
- The thinner the wall, the thicker the insulation should be.
- After cutting the opening for laying communications, the holes are sealed with mounting foam to exclude heat loss
Outside
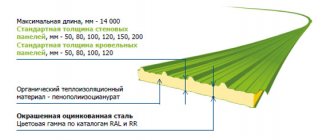
For insulation of concrete walls outside, use Penoplex "Facade". The size of foam sheets is 120x60 cm, and its thickness can be from 20 to 150 mm in 10 mm increments. The insulation can be fastened with either a special glue or a dowel-fungus.
From within
It is easier and cheaper to insulate an apartment from the inside, but it must be borne in mind that the wall remains unprotected, and therefore, at low air temperatures, it will cool even more, since heat does not come to it from inside the room.
The decision to insulate the walls only from the inside is taken in the most extreme cases, if this cannot be done outside the building.
Here, the order of work will be the same as when performing insulation from the outside of the house.
To insulate the room from the inside, various materials are used, ranging from wallpapering (heat-insulating) to "Comfort" penoplex.
The process of wall insulation with the help of "Penoplex" outside
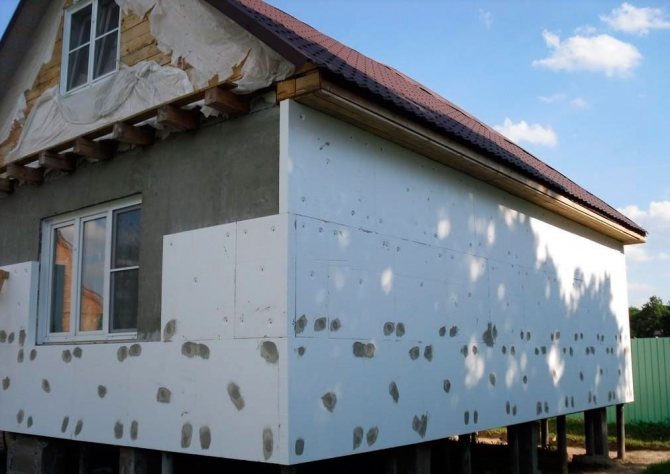
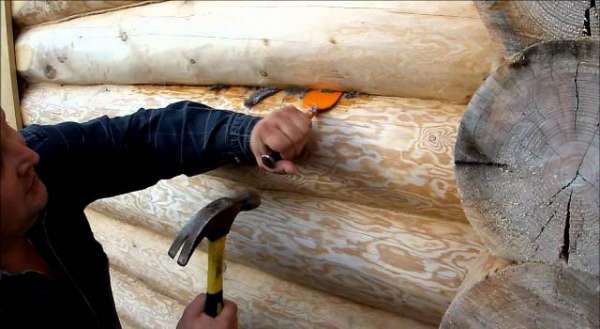
- To insulate a wooden house with Penoplex with your own hands from the outside you need start from the preparatory stage... First, you need to align all the walls, get rid of the bulges and roughness on them, otherwise, later, when pressed on the insulation, it may break.

- Then it follows necessarily treat the walls with a primer... Insulation boards have a smooth surface, therefore, in order for the mixture to adhere well to them, their surface must be treated with a special drywall roller. You can also use a brush or knife for this. Before starting work, all slopes and window sills must be firmly fixed.
- When insulating a log house with your own hands outside "Penoplex", it is necessary install the crate... You need to equip it with wooden bars (25x50, 50x50), or you can also use metal profiles. This stage is very important when insulating a wooden building from the outside with Penoplex and is necessary for fixing a heat insulator. In order for Penoplex to be firmly established in the openings, the size between the beams or profiles must be made five centimeters smaller.
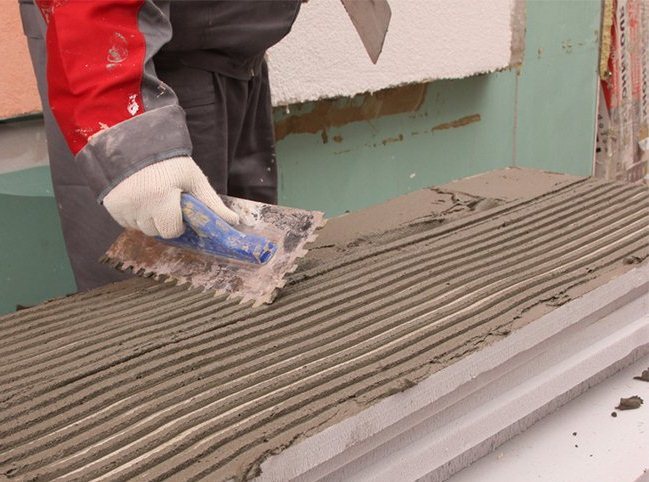
- When the preparatory stage is over, you should proceed to insulation sticker... To work, you need two spatulas: the small one applies the mixture to a large spatula, and the large one - we process the wall surface. If the walls are even, then you can apply a thin layer, if not very even, then it is better to apply the mixture in small piles, as in the photo.
Glue application process
The glue can be applied both to the walls and to the Penoplex sheets themselves. But it is better, of course, on the walls, because their surface has more roughness, and this will help the expanded polystyrene sheets to anchor well. After applying the glue, firmly applies and presses the heat insulator to the wall. After the penoplex is glued, you must wait at least three days for the glue to set as best as possible.
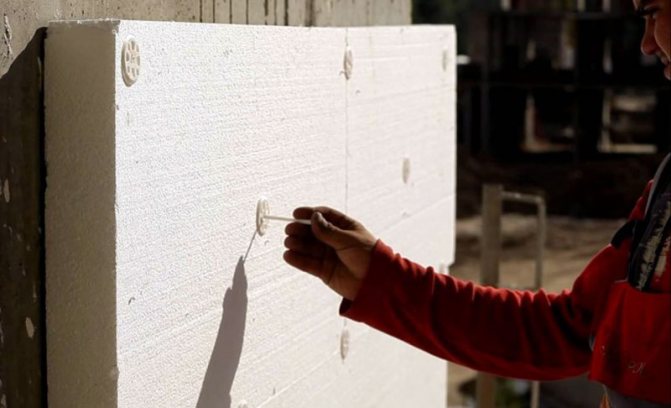
The process of attaching the "umbrellas"
After gluing, the insulation must be nailed. You need to nail on special dowels - dish-shaped umbrellas. These are plastic or metal dowels with large caps. It is better to use plastic ones, they will not attract cold like metal ones, and they cost less. However, you do not need to purchase very cheap ones - they will bend when used.
- So you need drill a hole for the dowel... The depth of this hole should be two centimeters more than the fungus. To calculate the required length of the fungi, you need to add five centimeters to the wall and one centimeter per layer of glue to the thickness of the heat insulator. Most often, 6 dowels - umbrellas need to be used on one sheet of penoplex, but if necessary, you can use more. There are several ways to arrange them (shown in the photo). But it is better to use the second option. Next, you need to insert the dowels into the prepared holes and hammer them. The hat should be flush with the foam.
- Further, when all the sheets are nailed, it is necessary check and process joints... The slots at the joints larger than five millimeters in size must be filled with construction foam. If the gaps are rather large (more than two centimeters), then additional pieces of foam must be inserted into them. Then you need to wait until the foam dries. This usually takes about five hours. Cut off any unnecessary dried foam.
- After all the work done, you need to carry out finishing the walls... First you need to carefully treat the walls with a primer, and then carefully rub with an emery float. The leveling layer should be approximately three millimeters long.
All work, painted in stages, is carried out to the leveling layer. This layer is already the last stage, after which the walls are primed and rubbed. After that, the insulation is considered complete. Following the advice described above, you can do it yourself, without the involvement of specialists, to insulate a wooden house with penoplex from the outside. The main thing is to have the desire to do it yourself and add a little patience.
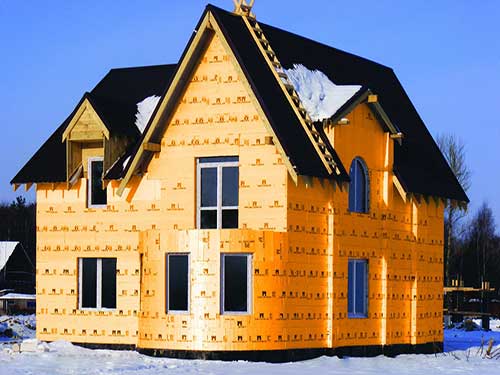
Penoplex occupies one of the leading positions among modern insulation materials. It is used in both industrial and private construction, due to its excellent performance characteristics. The material also demonstrates good results when used in wooden houses.Today, the question practically does not arise whether it is possible to insulate a wooden house with penoplex, since most of the owners of log buildings have already tested this insulation in practice, and were very satisfied. In the article, we will analyze in detail the characteristics of the material, and also dwell on its types. In addition, you will learn how to properly perform foam insulation with your own hands.
Mounting types
We figured out whether it is possible to sheathe a wooden house with foam, and came to the conclusion that this option is advisable when installing a high-quality ventilation system. Now let's look at how to attach the sheets to the surface.
Lathing
Instructions for doing work with your own hands are as follows:
- First of all, a frame is attached to the surface, in which the insulation will be located, the width of the spans should be 5 mm less than the width of the sheets in order to insert them tightly.
- Sheets are placed from bottom to top, if we are talking about walls, or from any convenient side, if the ceiling is being processed. After finishing work, it is necessary to check the surface for joints and cracks. If they are, then you need to seal them up with polyurethane foam.
If a rough wooden floor is insulated, then a special vapor-permeable membrane is laid along the base
Using special mounts
Consider how to attach foam to a wooden wall using special fasteners, which are hats with a diameter of 5 centimeters or more and self-tapping screws, the length of which should be sufficient to securely fix the insulation to the wall.
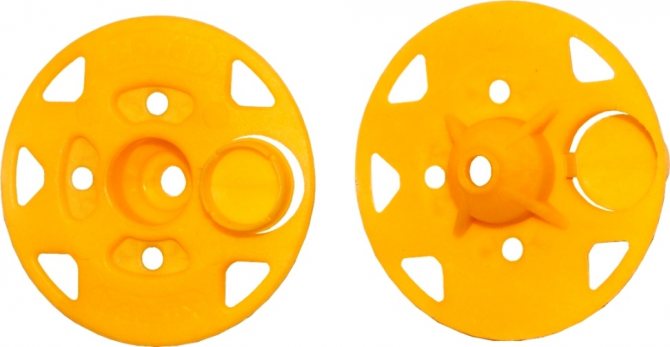
A special hold-down washer is called a rondole and has a special cover in the design that covers the screw head
The work technology is as follows:
- First of all, the base should be prepared - if there are gaps or significant irregularities in it, then they must be repaired to ensure the best effect.
- The working process is carried out as follows: fastening is made from bottom to top, each sheet is fixed with several fasteners. The diagram below shows an option for saving fasteners, you do not need to hammer all five rondoles into one sheet, you can fix the element in the middle, and use the rest in the corners, that is, they will hold several sheets at once, which several times reduces the consumption of materials.
The correct arrangement of the clamping elements allows you to use one squeegee for four sheets at once
- After completing the work, it is necessary to carefully inspect the surface and, if there are gaps, they must be filled with foam.
Gluing
A very reliable option, and its only drawback is the high price of the compositions, which is especially noticeable with large volumes of work.
The technology is simple, but it requires accuracy:
- Before gluing the foam to the wood, it is necessary to level the surface, otherwise, with drops, the consumption of the adhesive will increase significantly, and the reliability of the connections may decrease.
- Next, you need to decide how to glue the foam to the wood, there are two main options: polyurethane foam or a special adhesive, which is produced in the same cylinders as the foam, but has improved properties and increased yield. The second option is preferable, so try to use it.

For glue, the same guns are used as for polyurethane foam
- The surface must be free of dust and free from wet areas, as this negatively affects the adhesion of the composition. The composition itself is applied to the sheets by any option convenient for you - a snake, along the perimeter, dots. The most important thing is reliability, and the rest of the nuances do not matter.
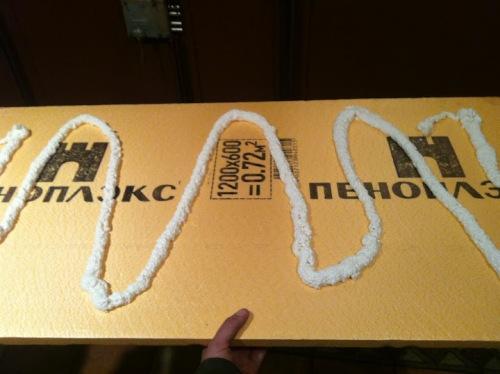
The composition is applied to the foam sheet just before it is attached
- Then the element is pressed tightly for a few seconds, after which it can be released, the glue begins to set within half an hour, complete solidification occurs in 24 hours.
Remember! The final stage is the sealing of cracks at the joints, it can be carried out either with the same adhesive composition or with polyurethane foam, there is no fundamental importance here.
Material features
Penoplex is an extruded polystyrene foam - a heater produced using a special technology, thanks to which a material with improved strength characteristics is obtained at the output. You can read about the characteristics and advantages of EPSP in the article "Step-by-step instructions for thermal insulation of a log house with expanded polystyrene".
Insulation characteristics
- Water absorption. The material shows the minimum values for the volume of absorbed liquid. At the same time, if water penetrates, then only into the upper layers, inside the structure consisting of closed cells, the access of the liquid is completely closed;
- thermal conductivity. Penoplex indicators are very low - 0.03 W / m-K, and the values remain unchanged, regardless of operating conditions. Therefore, the material can be used for thermal insulation of the roof, foundation, basement, as well as the floor and basement;
- environmental friendliness. The insulation complies with environmental standards, which is confirmed by the relevant certificates;
- vapor permeability. This indicator also has low values. The material does not allow steam to pass through itself, which on the one hand can be called a positive property, since condensation does not accumulate in the insulation, which, at critical values, passes to wooden walls and causes rotting. But on the other hand, the material does not allow the wood to breathe, which contributes to the creation of a greenhouse effect in the room;
- strength. As a result of applying the extrusion method, a homogeneous material is obtained, consisting of tiny cells. This structure provides high compressive strength;
- chemical resistance. The insulation interacts well with a large number of substances used in construction: alcohol-based and water-based paints, acids, alkalis, oils, concrete mixtures, etc .;
- life time. The material retains its properties for 50 years;
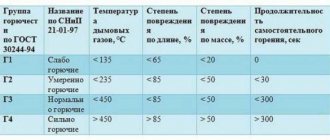
- fire safety. Penoplex has a G4 flammability class, which indicates a fairly high degree of flammability. Therefore, when using the material, it is necessary to use fire retardants;
- working temperatures: from -50 to + 75 degrees.
Penoplex types
The manufacturer manufactures several types of foam, which have different densities and differ in some technical characteristics. The following types are intended for insulating houses from timber and logs:
- Thermal insulation boards for insulation of external and internal vertical structures: walls and partitions. The insulation has a milled surface, which improves adhesion to adhesive and plaster solutions. Density 22 kg / m3.
- Universal insulation of the Comfort series. Suitable for finishing floors, including on the ground, plinths, foundations, roofs, walls. The material withstands high humidity well, so it can be used for thermal insulation of a bathroom, washing rooms, baths and saunas. Density from 22 kg / m3.
- Heat insulator for pitched roof. The material has a U-shaped edge on all its sides, thanks to which the plates are conveniently and easily joined. As a result, a flat surface is created, due to which the thickness of the thermal insulation is significantly reduced. Density 26-34 kg / m3;
- Slabs for foundation sheathing. The material is characterized by increased strength and wear resistance and can withstand increased loads. It is used to insulate the foundation, floor, basement. Perfect for finishing garden paths. Density 27-35 kg / m3.
What is penoplex
Penoplex is a heat-insulating material, which is one of the brands of extruded polystyrene foam. This material can be used for external or internal insulation of concrete walls, as well as for insulation of hollow walls.
This insulation surpasses many roll and plate materials in its characteristics, its main advantages are as follows:
- low thermal conductivity;
- it practically does not absorb moisture, that is, it has low hydrophobicity, which cannot be said about mineral insulation;
- vapor permeability, this indicator is important when performing insulation from the inside of the house, if it is low, then condensation will form between the wall and the material, from which the humidity in the room rises, and fungus and mold form on the walls;
- good strength indicators are provided due to the uniform distribution of cells, this characteristic is especially important when carrying out outdoor work;
- affordable cost.
The disadvantages of this material include a small temperature range of its use, therefore, it cannot be used to insulate industrial premises, baths or saunas.
Another disadvantage of penoplex is that rodents love it, so you need to take care of their destruction.
Insulation installation recommendations
In most cases, external insulation is practiced in private houses, which, with competent work and accurate calculations, provides effective thermal protection of the entire structure. External thermal insulation allows you to move the dew point towards the insulation, and thereby protect the walls from the formation of condensation.
In addition, penoplex has low vapor permeability, which is why it is not recommended to use it inside the house. It is possible to neutralize the negative consequences if you equip a high-quality ventilation system.
Thermal insulation of walls outside and inside the house
Over time, the fastening will loosen, causing the slabs and finishing cladding to settle, leading to cold bridges and loss of appearance. The same can happen with the frame finish.
Therefore, many people have a question: how to fix penoplex to a vertical surface? Experts say that one cannot be limited only to gluing or laying insulation in the cells of the frame. In both cases, it is also necessary to fix the heat insulator with special fasteners-mushrooms with wide covers.
In frame houses, penoplex is placed inside the frame, where it is glued and additionally fastened with dowels.
Thermal insulation of a log house from the outside can be done in both ways. For thermal insulation of a house made of 150x150 timber and internal structures, it is better to choose a frame option. There should be a small space between the insulation and the walls of the house, in this case the air will circulate freely and prevent moisture from the wood.
Thermal insulation scheme for the outer walls of the house
Due to the roundness of the logs, log walls have gaps where air enters, the surface of a log house is even, which makes natural ventilation impossible.
For the lathing, a bar with a section of 25x50 or 50x50 mm is used. The installation of the frame must be done in such a way that you get squares, where the insulation plates will then be laid.
To give greater rigidity to the insulated structure and prevent the entry of cold into the house, it is better to lay the penoplex in two layers. Sheets are installed offset or in perpendicular directions. In the second case, a counter-lattice is made for laying the top layer, the slats are placed perpendicular to the guides of the main frame.
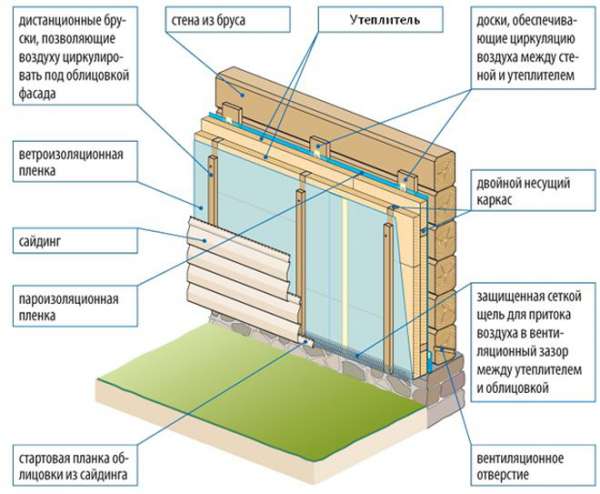
The facade insulation scheme for siding is as follows:
- vapor barrier film;
- wooden crate;
- thermal insulation;
- hydro-windproof film;
- finishing material.
When insulating inside the house, the same scheme is used, but the waterproofing will be located between the wall and the insulation, and the vapor barrier should be under the decorative cladding.
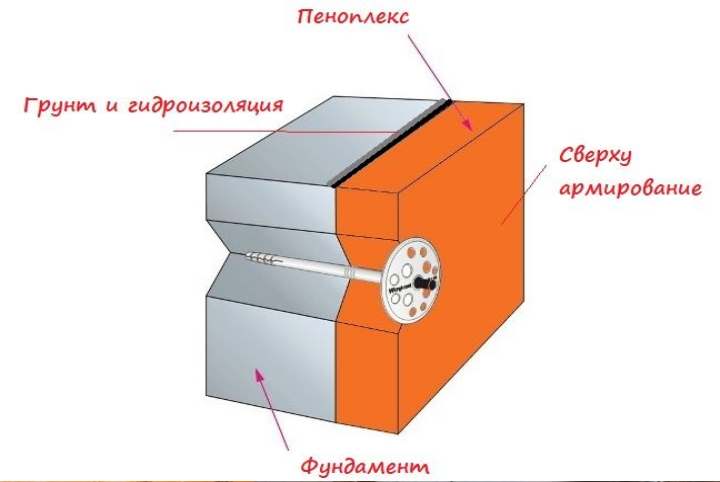
Insulation of the foundation
- To improve the adhesion of the base with the adhesive, it is necessary to carefully prepare the insulated surface: clean it of debris, dust, dirt.This is best done with a grinder.
- Bituminous waterproofing mastic is applied in a thick layer to the prepared base.
- Roofing material is glued, first the lower part of the foundation is glued, then the upper one. The strips of material should overlap each other on a horizontal surface - by 10 cm, at the corners of the house - by 15 cm. For reliability, it is recommended to close the foundation with another continuous layer of roofing material.
- Penoplex plates are glued to the waterproofing. To do this, you should use either a water-based bitumen mastic or an adhesive specially designed for working with expanded polystyrene. The glue is applied to the boards in 5-6 places pointwise, when gluing it must cover at least 40% of the surface area.
- The installation of the insulation begins from the bottom, the sheets are tightly pressed against the surface and the adjacent panel, while it is necessary to combine the groove-ridge joints. Plates located above ground level are additionally fixed with mushroom dowels.
How to insulate a wooden floor
Thermal insulation of a wooden floor with penoplex is usually performed along logs. Warming is done in the following order:
- Installation of a rough floor.
- Laying the waterproofing layer.
- Installation of foam boards.
- Fixing the insulation with self-tapping screws.
- Filling the gaps between the boards with foam.
- Laying a vapor barrier film.
- Placing the finished floor on the beams.
- Installation of finishing coating.
In more detail, the technology of floor insulation in a wooden house from below along the logs, as well as the rules for installing insulation under a concrete base, are described in the article "How to properly insulate the floor from below - rules and nuances."
Penoplex differs in that it can be laid directly on open, dry and well-compacted soil. This type of insulation is usually used under a concrete screed.
In this case, the following laying pattern applies:
- A layer of compacted gravel 30 cm is laid below.
- This is followed by a layer of sand, compacted to a thickness of 10 cm.
- Then they put penoplex 100 mm thick (thinner sheets can be laid in two layers perpendicular to each other). The plates are glued together with a special metallized tape.
- Next, a waterproof film is laid.
- A fiberglass mesh is laid on top.
- A 5 cm thick screed is poured from above.
Penoplex fixation methods
The choice of a suitable method of installing insulation is determined by the quality and type of surface, as well as the level of load that is created by the material.
Fastening of the penoplex to the wall is performed:
- Mastics.
- Dry mixes.
- We glue.
- Dowels.
- Liquid nails.
- Self-tapping screws.
- Polyurethane foam.
Regardless of the method chosen, the installation of the insulation is carried out from the bottom up.
Polymer and bituminous mastics
Mastics are widely used for thermal insulation of plinths, foundations, exterior walls and balcony screens. They provide easy and safe wall mounting in the presence of adverse external factors.
Mastics are special viscous mixtures in tubes, ready to use. The tubes are installed in a construction gun, after which the mastic is evenly applied to the prepared insulation. Next, installation is carried out and the material is pressed to the surface for a minute.
Modern mastics contain a small amount of petroleum products, so all installation work is carried out in compliance with safety rules and in well-ventilated areas.
Dry mixes
Laying foam using dry cement-based mixtures is the most affordable option. Most often it is used to fix insulation to a concrete wall. The dry mixture is diluted according to the instructions to obtain a viscous solution. To simplify mixing, a special attachment for an electric drill is used.
The ready-made solution is applied to the surface of the insulation with a notched trowel to evenly fill the existing grooves. Next, the installation of insulation is carried out in the same way as in the previous method.

Adhesives
Penoplex can be glued to each other using special adhesives, presented in the form of foam. The adhesive is used in the same way as the polyurethane foam. High adhesion of the material allows you to fix penoplex on smooth concrete and stone surfaces.
The composition is applied along the perimeter of the insulation with a construction gun for sealant or polyurethane foam. Then he is pressed against the treated surface for 40 seconds. It will take at least half an hour for the material to fully set.
Two hours later, the surface finishing works are carried out.
Dowel-shaped dowels
Fastener with a wide head, which is used for large areas of thermal insulation and for uneven surfaces, such as a brick wall.
For work, plastic or metal fasteners can be used, capable of withstanding heavy finishing materials and resistant to damage.
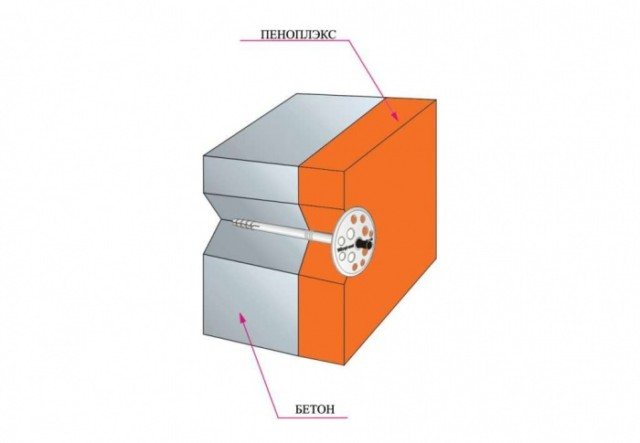
The disc dowels are attached as follows: a puncher makes holes up to 6 cm deep, which are filled with foam. Next, a dowel is inserted so that the cap does not rise above the surface of the insulation. Up to 5 dowels are used for one sheet of insulation. Adjacent sheets are connected to each other with a single dowel, which is inserted into the connecting seam.
Liquid Nails
You can glue the insulation on a leveled and primed base using liquid nails. The adhesive is applied with a gun in the center and along the perimeter of the foam board. Fixation is carried out by quickly pressing the material against the surface to be treated.
Liquid nails are a versatile, expensive compound that is suitable for wood and metal surfaces. Due to the high cost of the material, such insulation technology is advisable for small areas.
Self-tapping screws
The simplest and cheapest option for thermal insulation of surfaces is using self-tapping screws and a screwdriver. Suitable for fixing foam to a wooden wall on a pre-installed lathing.
Despite the simplicity and availability, this method of installing insulation has significant drawbacks. Unlike dowels, self-tapping screws have small caps, so their consumption is higher - up to 8 pieces per plate. Accordingly, this becomes the reason for the appearance of cold bridges and a decrease in the thermal insulation characteristics of the surface.

Mounting foam
The method of fixing the insulation with the help of polyurethane foam is of an auxiliary nature if the main fastening is performed on dowels or self-tapping screws. In this case, the surface is glued with foam to increase the adhesion of the material to the surface. This method is used for cladding plastic and plaster surfaces.
The foam is applied with a gun in the center and perimeter of the foam sheet. Next, the insulation is applied to the surface and held for some time for quick setting.