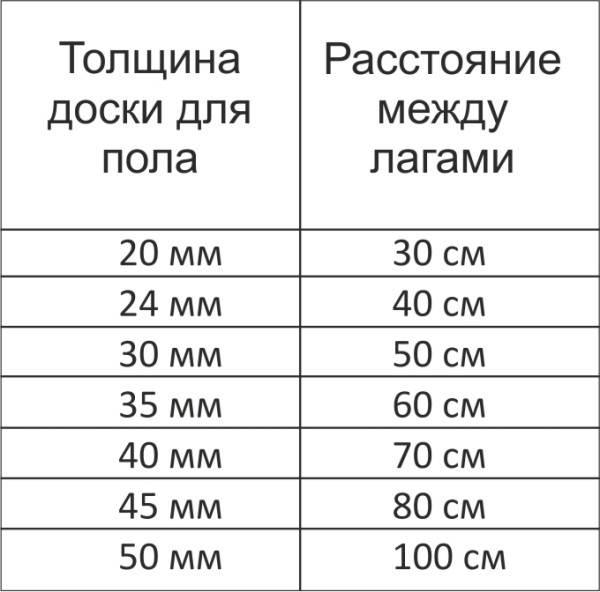
Wood covering
Using planks is the best answer to the question of how to make a floor in a private house. The wooden covering looks very impressive, is practical, highly maintainable and lasts a long time. For the installation of such a floor, first of all, you will need to prepare the following materials:
- Edged board at least 2.5 cm thick.
- Waterproofing agent. You can take a very thick plastic wrap or roofing felt.
- Heat insulator. Rigid mineral wool slabs are considered the most suitable option for floor insulation. However, you can take more expensive polystyrene foam. Also, the floors in country houses are often insulated with sawdust or expanded clay.
- Beams for logs are bought only if these elements have not been installed during the construction of the house. In any case, their thickness should be at least 15 cm.
- Steam insulator. This material will prevent the insulation from getting wet due to condensation from the side of the room.
You will also need to prepare a hammer or screwdriver, nails and screws, steel corners.

General Provisions
First of all: no matter what the floor material is, it must meet the following established norms and requirements:
- sanitary and hygienic;
- operational;
- constructive;
- decorative.
Then: when thinking about what can be used to cover the floor in a wooden house, keep in mind that its coatings are divided according to the level of heat retention into subspecies presented in the lower table.
| Insulation level | Recommended building areas | Materials and schemes |
| Warm floor | Living rooms. | Underfloor heating system, finished wood and cork floor, carpets. |
| Medium floors | Bathroom, kitchen, hallway, corridor. | Ceramic tiles without floor heating, self-leveling floors, linoleum, laminate, plastic tiles. |
| Cold floors | Utility rooms, balcony. | Concrete, stone. |
Insulation and related design features of floors
Thinking about the better to cover the floor in a wooden house, keep in mind that it is extremely important to choose the right method of thermal insulation. Here you should take into account the design of the base floors: multi-layer (screed, logs, subfloor, topcoat), single-layer (screed or boards on logs).
It is necessary to take into account the presence of a basement or basement.
Thermal insulation of the "pie" with mineral wool slabs.
If there is no plinth, a multi-layer cake should be mounted.
- First, a roll waterproofing (roofing felt and its taxes) is placed on a concrete screed or on a dense soil.
- Next, logs are placed from a wooden bar.
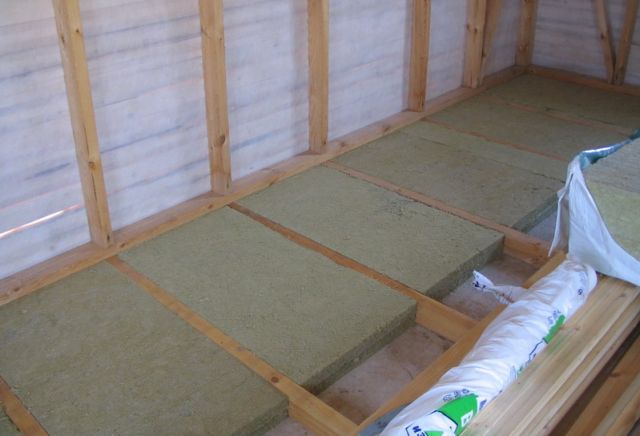
- Between them, a slab insulation is mounted or a loose one is laid.
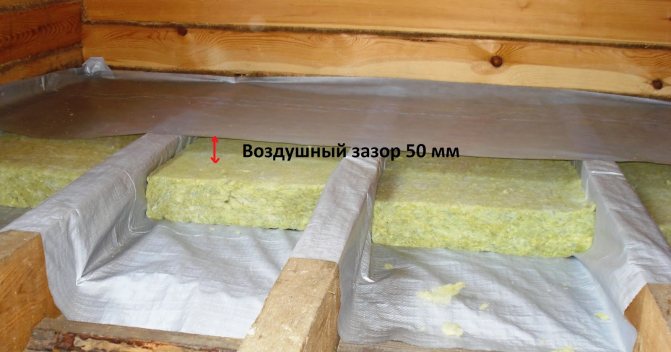
- Further, the thermal insulation is covered with a vapor barrier film. To improve the tightness of the coating, the film sheets should be laid with an overlap of 10-15 cm. The edges of the insulation are brought onto the walls to a height of about 10 cm. Subsequently, they are fixed with a plinth.
Note! The instruction notes that an excellent solution would be to choose penoplex as insulation. It can be laid without using a vapor barrier.
In fact, it is a roll of expanded polystyrene. The material has low thermal conductivity, moisture resistance and sound insulation properties.
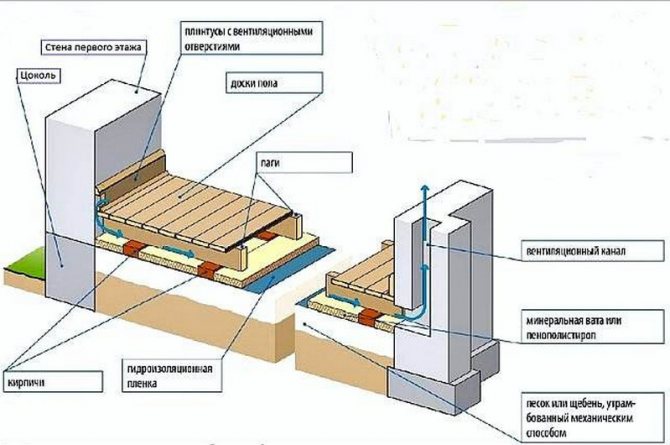
Basement, basement
In the photo - arrangement of a covering in a house with a basement.
If the house has a basement, the floor should be insulated from below. Foam insulation is best suited for this, it will clog all joints and crevices.
Double plank floors are required to achieve the maximum stability effect.
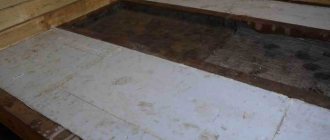
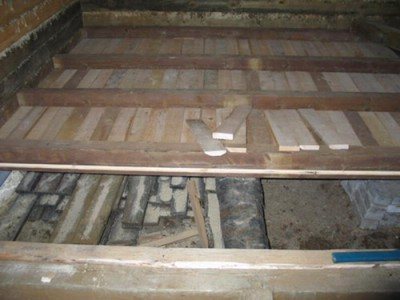
- The base (base, subfloors) is made of untreated (slab, unedged, non-planed) boards 5-5 cm thick.It maintains a clean floor if the entire structure shifts slightly. The base is laid on the floor beams and is not fixed with nails, but inserted into the grooves in them, as an option - it fits on the cranial bars stuffed on the sides of the beams. Usually coniferous wood is used for the base, the price of which is low.
Finished plywood finish.
- For the second layer (final floor), a flat edged board, OSB, chipboard, waterproof plywood is used. Its thickness is from 2 to 4.5 cm.
Insulation of floors on logs
- A moisture-proof film is laid between the lags.
- A slab insulation (mineral wool, expanded polystyrene) is placed on it in a checkerboard pattern.
- Seams and joints are sealed with construction foam.
- A floor covering is nailed on top of the insulation.
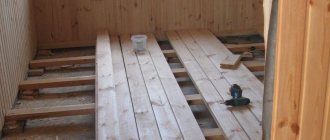
Assembling wood flooring
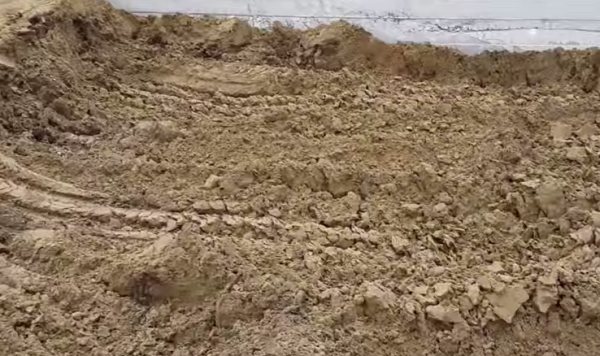
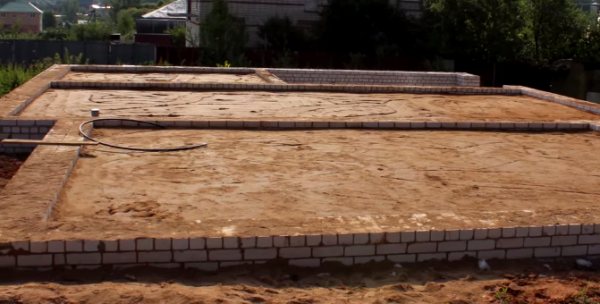
So, let's see how to properly make a floor in a private house from planks. In order to arrange a wooden covering, the first step is to carefully level the ground. Next, a thin layer of sand is poured. You can skip this step if you wish. Then the roofing material is laid. The overlaps between the stripes must be at least 15 cm.
Next, the lags are mounted. To do this, first, a bar is laid along the perimeter of the room. Then the actual lags themselves are installed. You can attach them to the strapping beam by means of corners.
The distance between the lags should be equal to the width of the insulation. Mineral wool slabs set up a spur. A vapor barrier is pulled over it. In this case, too, the overlaps should be at least 15 cm. The vapor barrier can be fastened with rails (two per lag on the sides on both sides).
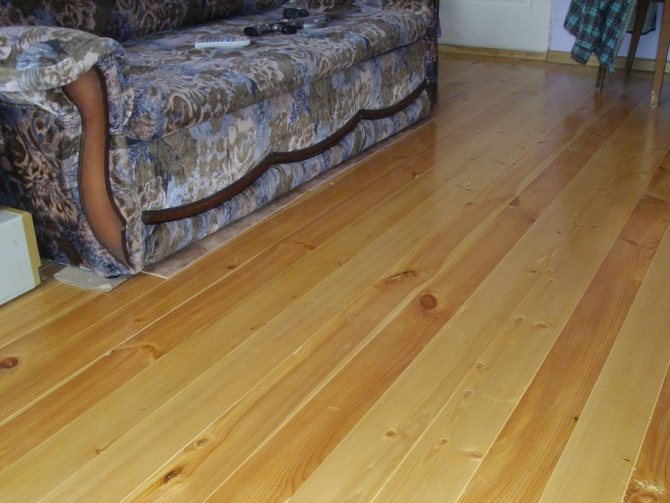
At the final stage, the boards are mounted. They should be well dried and trimmed on top. In addition, they must be treated with an anti-fungal composition. When assembling, the boards should be fitted as tightly as possible to each other. Otherwise, during operation, gaps may form between them, the floor will begin to creak, etc.
Finished wood floors can be varnished or painted. Sometimes linoleum is also laid on top.
How to properly reinforce the screed
Be sure to reinforce thin screeds with a thickness of 4.5-5 cm on a separating film layer. Floating screeds, the base of which is a layer of insulation (sound insulation) or compacted soil, are reinforced with a screed thickness of 7-8 cm or less.
If the screed has a thickness greater than that indicated above, then the need for reinforcement is determined depending on the operating load. For example, it is recommended to reinforce the floor screed in a garage for a car or on an open terrace on compacted soil with a screed thickness of up to 10 cm.
Screeds made of ready-made dry mix containing microfiber reinforcing fibers do not require additional reinforcement in many cases.
Usually the tie is reinforced with a mesh of steel wire with a diameter of 3-4 mm. The mesh should have cells of 100x100 or 150x150 mm.
The steel mesh is laid on the spacers so that it is approximately in the middle of the screed layer. The protective layer of concrete to the mesh must be at least 2 cm in rooms, and at least 4 cm when the concrete screed comes into contact with the ground.
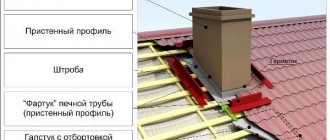
We invite you to familiarize yourself with How to lead a pipe through a roof made of metal tiles?
On top of the grid, as usual, beacons are installed on the cakes from the solution and leveled.
What varnish to choose for wood
Plank floors can be trimmed with almost any means. Polyurethane varnishes are very popular, for example. Their advantages include, first of all, environmental friendliness and the fact that they are not afraid of even very serious loads. Also, quite often the floors are covered with acrylic-based products. They are not too resistant to all kinds of mechanical stress, but they are easy to apply and are very inexpensive.Can be used for wood flooring and alkyd, quick-drying varnish or very durable epoxy.
Design features of insulated wooden floors
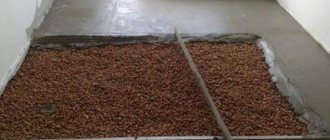
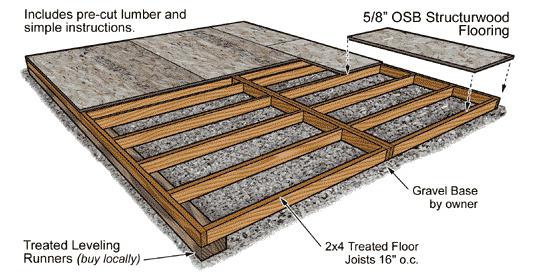
In most cases, a wooden floor from a board is mounted on logs. There are two main ways to create such structures: on the ground or on the foundation with the arrangement of the subfloor. The first option is cheaper and preferable for small technical structures or temporary residence buildings. These can be sheds, workshops, saunas, summer cottages, etc. They often use bulk materials for floor insulation: expanded clay, perlite, expanded polystyrene balls, ecowool, tyrsa, straw, derivatives or woodworking waste (sawdust, shavings, wood pellets).
In the second version, support posts or strips made of bricks (concrete, rolled steel, foam concrete blocks with an average density of at least 400-600 kg / m3) on a previously prepared sand cushion can act as a base. Insulation for the floor in a wooden house is placed at some distance from the ground surface, forming a ventilated space (subfloor) to remove moisture. The device of a heat-insulating barrier in this case is more convenient to carry out by laying slab (expanded polystyrene, wood concrete blocks, mineral wool) or roll (felt, penofol, mineral wool) target materials, however, the use of bulk materials is not excluded.
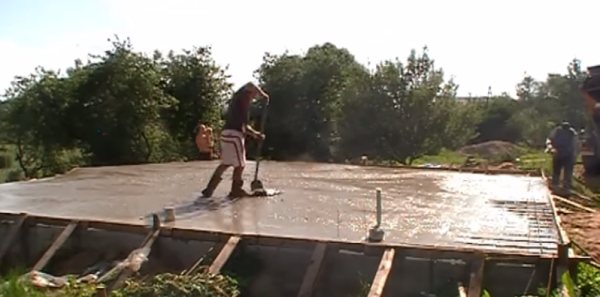
How to make a concrete floor in a private house
This option can also be used in a country building. Most often, concrete floors are made in the utility rooms of the house. They are filled in as follows:
- A shallow pit (10 cm) is dug in the room.
- Its bottom is leveled and compacted with a hand roller.
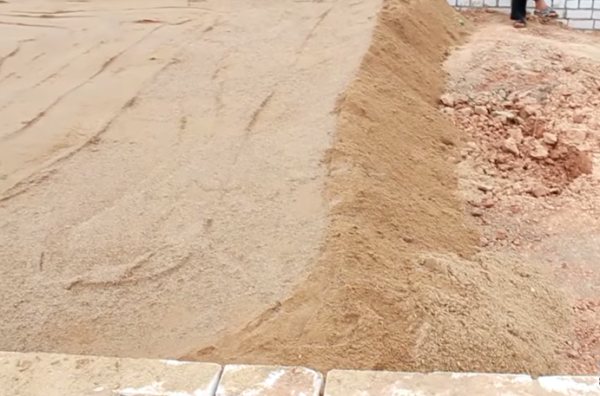
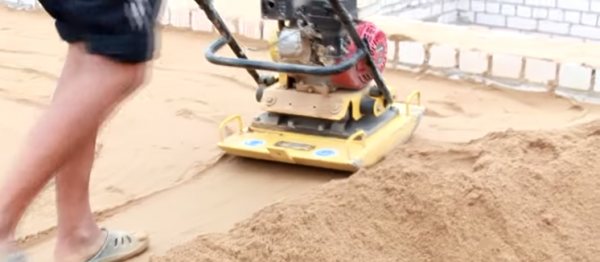
- Sand is poured in a layer of 5 cm. It also needs to be tamped.
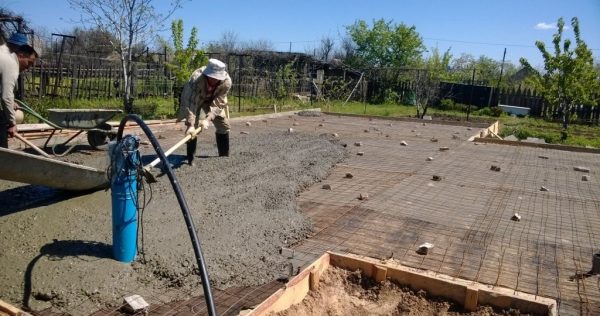
- Reinforcing mesh is laid on wooden blocks.
- Lighthouses are exhibited.
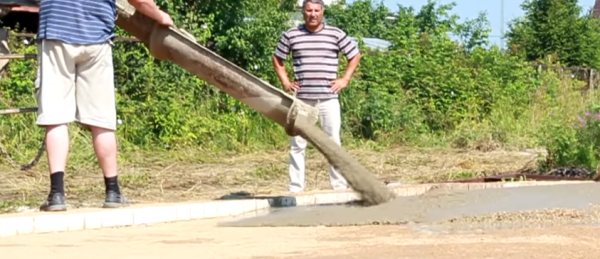
- Concrete is being poured.
It is better to start laying the mortar from the corner farthest from the door. It is advisable to fill in one step.
The strength of the poured concrete floors will gain strength not earlier than in two weeks. After this period, you can start walking on them. However, it is worth bringing heavy furniture or household appliances into the room no earlier than in a month.
Installation of concrete floors
The construction of concrete floors is slightly different. The first stage involves preparing the soil. The topsoil is removed so that the sand and gravel pad is 10 cm below the original level.
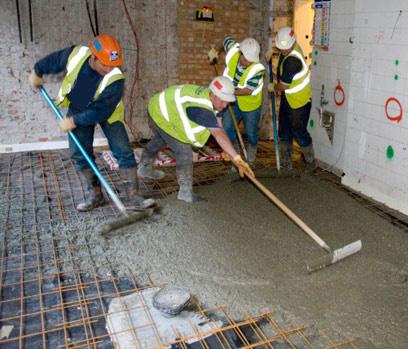
The soil is compacted and covered with gravel, a layer of sand is applied on top. Everything is carefully compacted. The resulting building pad is covered with a 200 micron thick film. A concrete screed is poured onto the waterproofing.
It is desirable to add plasticizers to the solution that improve the quality and characteristics of the solution. If the floor area is large, a reinforced mesh should be used. Otherwise, the screed will crack very quickly. If the area is small, you can do without a grid. The mixture is poured according to the level. Beacons are set in advance. They are already guided by them when filling. Setting horizontally is an important point, as it directly affects the durability and appearance of the floor.
After finishing the work, the base is left to dry. The area must be covered with a film and periodically moisten the floor with water. So the screed will gain strength and not crack. In order to check the readiness of the floor, you can attach a piece of plastic to the base and leave it on for 24 hours. If after the expiration of the time, condensation forms under the film, then the floor is not ready. Usually they wait at least a month.
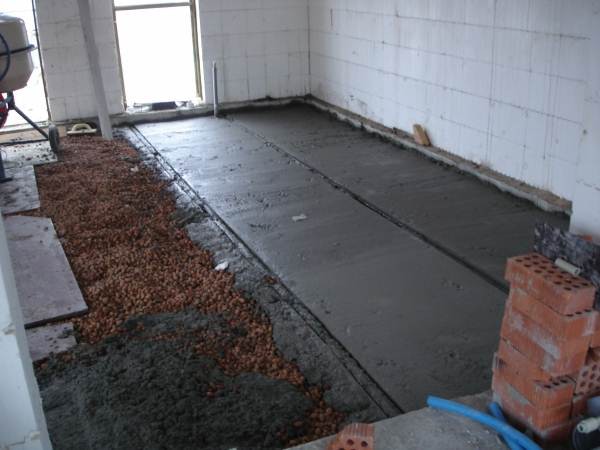
A lightweight version of wooden floors is already mounted on the finished base or the finishing flooring is immediately laid.The first option allows additional insulation. Logs are mounted on a concrete base, waterproofing and insulation are laid between them.
After, the structure is closed with plywood or board. This combined method is considered the most reliable and durable. First, the base is protected from moisture and cold with a concrete screed. Secondly, the primary concrete layer is isolated from the final coating by layers of insulation and waterproofing. Thirdly, thanks to this "cake" the floor will be warm and will last for several decades.
Fine finishing
Of course, just a concrete surface is not only ugly, but also not very comfortable. Therefore, such floors are usually finished with tiles or thick linoleum on top. The second option is used, including in living rooms, if, for some reason, concrete floors are still poured into them. Tiles, as in a city apartment, are used to decorate the toilet, shower room, hallway and kitchen. Attach it with special glue.
It is better to lay linoleum on a concrete floor with a special one - with a warm substrate. It will, of course, be quite difficult to fix it on the cement coating. Sticky tape will definitely not work in this case. Therefore, the canvases can simply be laid loosely, fixing them with baseboards around the perimeter. Sometimes linoleum is also glued to concrete using a special mastic.
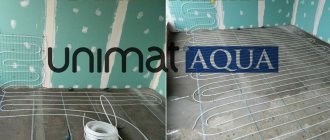
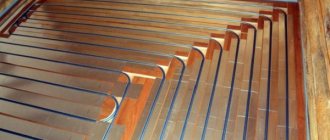
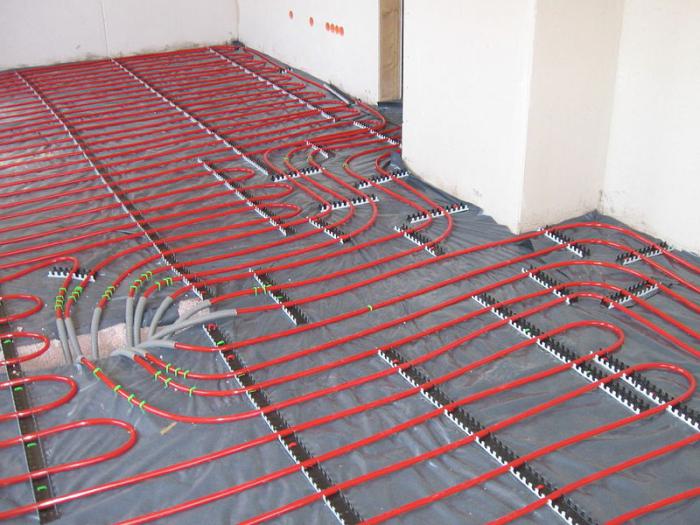
Warm floor
"What is the best way to make a floor in a private house?" - the answer to this question is, of course, ambiguous. Using planks or concrete mix is a great solution. However, the so-called "warm floors" are still considered the most comfortable and practical. The concrete screed in the living quarters of a country building is often made precisely during their arrangement. In this case, dense slabs of insulation specially designed for such systems are installed on the sand. Then pipes are laid on them according to the scheme. Then everything is poured with concrete mixture.
Floor construction
The floor in a private wooden house can have a different design. Structural solutions are chosen based on the characteristics of the operation of the future building. For small private houses, it is enough to equip a single plank floor. In a major wooden house, it is necessary to make a double insulated base.
Single floor
This construction is the simplest. It can be done very quickly, but it should be borne in mind that it is suitable only for summer houses. In this case, the floorboards are laid on logs or beams.
Lags are stacked with a step of about 50 cm from each other. The thicker the board, the greater the distance between the lags can be. They must be leveled so that the floor is level. The logs are attached to the beams with nails, then floorboards are nailed to them. The single floor is ready.
Double floor
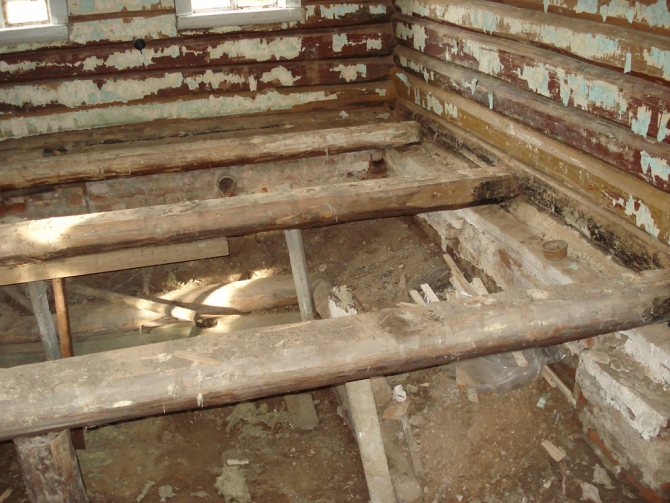
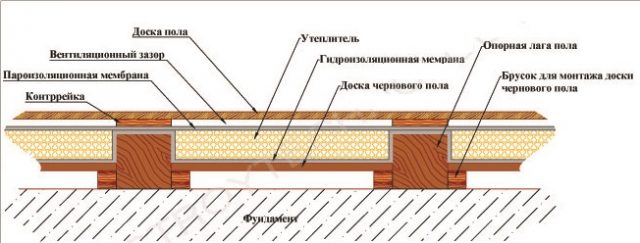
The double floor is warm and suitable for year-round homes. At the same time, it significantly reduces heat loss. The design includes a rough and a final floor, between which several layers are laid - heat, hydro and vapor barrier. A rough floor in a wooden private house can be equipped with unedged boards or sheet lumber can be used for this.
It is not recommended to use a slab or a waste board for arranging the subfloor, since this material can significantly reduce the quality of the entire structure.
Thermal insulation can be made both from materials presented in building stores, and from sawdust, expanded clay or straw. The finishing floor can be laid after the thermal insulation has been completed, using a tongue-and-groove floorboard.
Concrete floor
Making the floor in the house
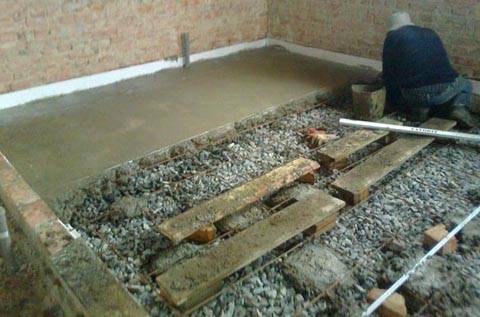
The concrete floor in a wooden private house is set up in several stages. First, markings are made according to the level, which determines the height of the future coverage. In accordance with the markings, a thin lace or rope is pulled, serving as a kind of reference point.
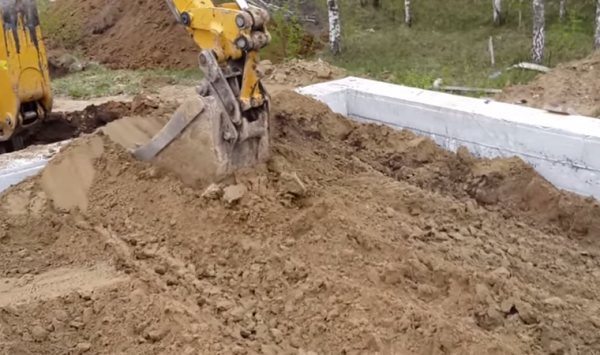
The next step is to perform gravel bedding, which is an insulating layer in concrete floors.The gravel bed is set up on carefully leveled ground. The height of this layer is regulated by lighthouses - small pegs driven into the ground. Their level should be 10 cm below the concrete screed. The gravel is carefully compacted and the beacon pegs are removed. The surface of the gravel is covered with a layer of sand.
The main enemy of any floor is moisture, so it is necessary to waterproof the surface. It is best to use special plastic films for this purpose. Then you can make a screed. First, beacons are installed and leveled. It is better to use elements from rails, and remove the previously stretched ropes. The floor space is poured from the far wall along the slats. The surface is leveled by the rule. The length of the rule should be slightly longer than the distance between the guide rails. You can watch the video how to pour the screed along the rails.
After the screed has set, the slats are removed, and the voids left in their place are filled with mortar, leveling the seams. The surface should be covered with plastic wrap and left to dry for 3-4 weeks. During this time, you need to wet the surface several times to prevent cracking and allow the concrete to gain maximum strength.

How to pour a concrete floor on a basement floor
So, with how to make a floor in a private house, we figured it out. Now let's see how you can arrange the coverage in the basement. In this case, it is very important to pay maximum attention to waterproofing. Instead of sand, it is better to lay out the bottom of the pit with crushed stone.
Otherwise, the answer to the question of how to make the floor in the basement of a private house is extremely simple. Filling is done in the same way as in rooms. In the event that it is supposed to drive into the basement, for example, a car, the fittings must be tied as strong as possible. The rods for it are taken with a thickness of at least 12 mm.
Double floor
As already mentioned, the double floor consists of rough, final and thermal insulation between them. The algorithm for arranging a double floor looks like this step by step:
- Lags are mounted on the supporting structure;
- Additional bars are nailed to the lags, they are called cranial;
- A rough floor is laid on the bars, the boards treated with an antiseptic are placed as close as possible to each other, an unedged board with a thickness of 15mm to 45mm is used;
- A vapor barrier is laid on top, connecting the ends with an overlap of 5-7 cm;
- Logs with a height of 50 mm are placed on top;
- Thermal insulation materials are laid between the logs;
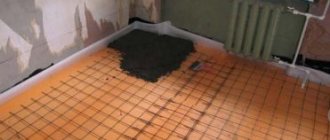
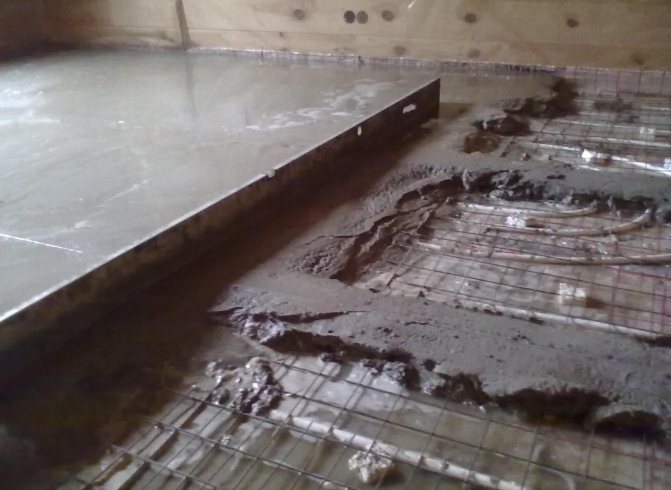
- Install a water-heated floor;
- Laying waterproofing, the water floor does not imply waterproofing;
- The flooring is mounted from a grooved board;
- The corners are 4-5cm ventilation holes;
Important! In the underground, it is necessary to equip ventilation windows with closed gratings. If there is no active thermal insulation in the double floor layer, a water floor, a gap of 1 cm is left.
Many developers are looking to insulate more wood flooring. For this, cranial bars are stuffed on the underside of the beams and the subfloor is laid on them.
Then the option of laying the floor of the log on the beams in cross section will look as shown in the figure.
For the subfloor, boards with a thickness of 1.5 to 5 cm are used. Often, slab and boards of low grade are used for the subfloor, but only of conifers.
The boards should fit tightly together. The ideal material for subfloors is tongue and groove boards. Boards must be treated with an antiseptic.
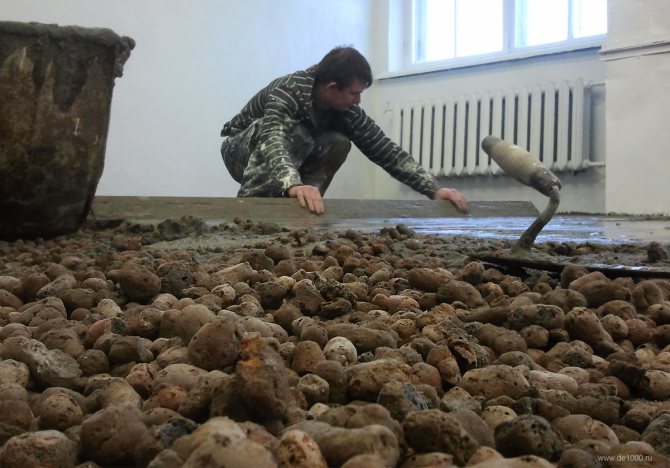
Rough flooring can be covered with a sheet of insulation. In its absence - a layer of a mixture of clay and sawdust 3-5 cm thick. For this, the clay is soaked in water and sawdust is added. Planking is carried out only after the mixture has completely dried. It is also possible to perform bulk insulation of a wooden floor, for example, expanded clay backfill with a layer thickness of 4-8 cm.In this case, the load of the fill on the rough layer and boards should be taken into account.
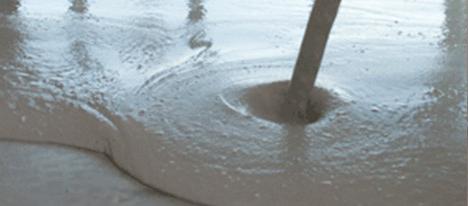
Self-leveling coating in a private house
Next, let's see how to make a floor in a private house using a special self-leveling mixture. This method of installing coatings in suburban buildings has recently become very popular. It is easier to make such a floor than even concrete. In addition, self-leveling coatings, unlike cement screeds, can be very beautiful.
So, how to make a jellied floor in a private house correctly. This operation is performed as follows:
- A concrete base is made. The method of filling it is no different from the above.
- The surface of the finished screed is dust-free. If the concrete floor has been poured long ago, it will most likely need to be touched up.
- The surface is primed.
- Using a perforator, the bulk mixture is diluted with water.
- The solution is applied to the primed base in small portions and carefully leveled.
- Immediately after pouring each portion, the solution must be passed with a needle roller to remove bubbles.
The finished floor should be covered with plastic wrap. In this case, it will gain strength better.
As you can see, using a self-leveling mixture is a very good answer to the question of how to make a floor in a private house. A photo of such a coating with a 3D pattern, presented a little below, clearly demonstrates its attractiveness and reliability. You can make such a coating, including with your own hands.
How to build a single plank floor in a wooden house
Floor scheme in a house made of wood on pillars
The construction of a floor of such a structure is advisable if you do not intend to lay support or load-bearing beams into the walls of your house for building the floor. In this case, the floor will be constructed according to a free "floating" scheme and will not be connected in any way with the external walls of the building. Also, such a floor structure is used in the construction of floors in wooden buildings on soils with a high level of soil water.
The flooring in a house made of wood of this design can be divided into two types.
- Single flooring made of wooden planks. This type of floor is the easiest to build and further use and repair. It is recommended to use this structure in small houses in summer cottages built for seasonal use.
- Double floor. This type of floor is built in buildings intended for year-round use. When using this technology, two decks are built: black and fine, in the gap between them, insulation is placed against heat loss and moisture penetration.
We suggest that you familiarize yourself with Making a concrete floor screed on a wooden floor in a private house - How to pour it correctly? Instruction Video
The main types of wooden floors
Step 1. Dig in the space of your subfloor. The pit should be dug more than half a meter deep from the lower level of the planned floor. Place a cushion of rubble, gravel or river sand cleaned from organic matter in the excavated pit. It is recommended that the top edge of the pillow rises above the ground level in the area near the foundation by about 20 centimeters.
Step 2. Floor pillars can be formed from red fired bricks. So, if you plan to lay the floor on supports 25 centimeters high, then its optimal width will be 1.5 bricks. With a support height of more than 25 centimeters, the post is placed in two bricks.
Support pillars for floor construction
There are other technologies for installing supports. For example, you can place monolithic concrete pillars in the underground. In this case, the concrete solution is poured into a pre-built wooden formwork, inside which a metal frame made of reinforcement is mounted.
Concrete mortar can also be poured into vertically installed and deepened into the gravel bed sections of asbestos-cement pipes, inside which a frame made of reinforcement is also placed.
Support pillars made of pipes
In any case, when choosing a technology for erecting support pillars, it is necessary to pay attention to their uniform upper level. The best control device is a laser level or level. The distance between the support posts horizontally and vertically is about one meter.
Step 3. A layer of waterproofing is laid on each pillar-support. The easiest way to do this is to use two combined layers of sheet insulation, such as roofing material.
We waterproof the pillars with sheet roofing material
Step 4. A wooden plate 30 mm thick is placed on the waterproofing layer.
Supports with dies
Step 5. Beams-lags are laid on the support posts. Usually they are built from a thick wooden bar, cut from coniferous wood and treated with an antiseptic. The joints of the lags should fall on the pillars. When building, control the horizontal position of the upper surface of the log.
Laying wooden logs
Step 6 A plank flooring is laid on the laid logs. To create an aesthetic appearance, it is better to lay wooden boards parallel to the directions of the light falling from the windows of the room. The first board is laid with a gap from the wall up to 15 mm. Then this space will be closed with a plinth, but the gap will ensure the movement of air into the underfloor space.
Single plank flooring
Step 7 Solid wood boards are fastened to the logs with nails. The minimum length of the connecting nail should be twice the thickness of the board. Nails are hammered at a slope so that the axis of rotation of the nail does not coincide with the interface plane of the board and the support log. The optimal tilt angle is 30-45 degrees to the vertical.
We nail the boards with nails at an acute angle
Step 8 A plinth strip is nailed on top of the boards along the perimeter of the walls. A temporary plinth is mounted near two opposite walls of the room, which is fixed a couple of centimeters from the walls. The slots will provide ventilation until the final drying of the array of boards, and then they will be closed with a permanent skirting board.
We nail down a wooden plinth
Please note that in the event that a room with a floor on concrete or brick supports-pillars will not be heated in winter, the supports can "lead" and the geometry of the wooden floor structure will be disturbed. Additional thermal insulation to the underground space can be provided by a layer of slag, but in the gap between its upper edge and the wooden floor there must be a space of at least 5 centimeters to ensure ventilation.
If, when building walls in a house made of wood, you provided for the laying of beams, then the most affordable way to build a floor would be to lay a single plank floor. Usually the gap between the support beams is at least one meter.
Single structure wooden floor
- Logs are mounted on top of the support bars for laying the floor. For their construction, wooden beams with a side of 50-60 millimeters are used. The distance between the logs depends on the width of the grooved board used for flooring: - if you use a board with a thickness of 30 mm, then the distance between the logs should be no more than half a meter; - if you use a grooved board with a thickness of 400 mm or more, then the optimal distance between the logs will be 50-60 centimeters.
- When laying the lathing from the lag, be sure to check the horizontalness of the upper level of the beams. It is advisable to use a laser or ordinary building level for this, adjusting the height of the lag with the help of counter wedges knocked under it.
- The logs are fixed to the load-bearing beams by means of long nails or carpentry brackets.
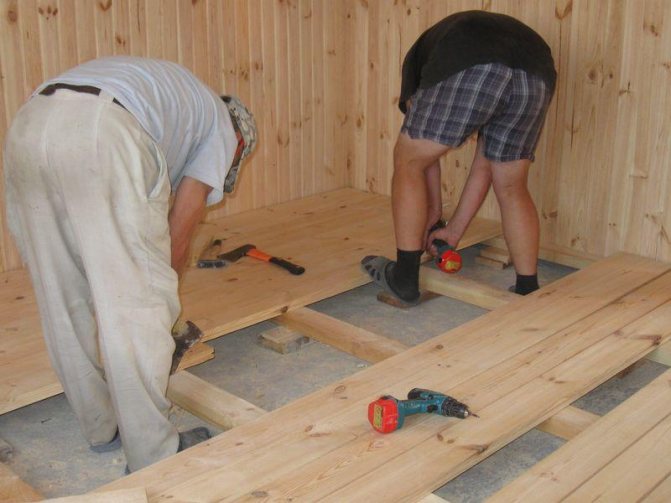
- The single-structure plank floor is laid directly on the logs. A tongue-and-groove board is used to lay the finished floor in one layer Its fastening is traditional: the next board is inserted into the lock of the previous one, adjusted by tapping with a mallet, and then nailed to the log with a long nail that goes into the body of the board at a slight slope. The nail head is recessed into the body of the board. If you plan to place a finishing floor covering on the floor in one layer, then it is possible to use unedged boards.
- A fine tongue-and-groove flooring is sanded and then varnished or painted. A finishing decorative coating, for example, linoleum, is laid on the subfloor layer.
This is a very fast and affordable way to build a floor in a wooden structure. However, the thermal insulation of such a structure leaves much to be desired, and in a house designed for year-round use, it is better to build a double floor structure.
3D self-leveling floor
The pouring technology in this case will be the same as for the arrangement of a simple polymer coating. But in this case, you will need to make two layers. The base is preliminarily applied to the prepared screed. Next, a mosaic of pebbles or some kind of artificial materials is laid out. You can also use a picture on self-adhesive film. In this case, the base base is pre-primed.
At the final stage, the final layer of the polymer floor is applied. After it has gained sufficient strength, it should be varnished.
Well, we hope we have answered the question of how to make floors in a private house quite extensively. The methods of their assembly, depending on the selected materials, can be different. But whatever method the owners of the house choose, everything must be done carefully, adhering to the prescribed technology. In this case, the floors will last as long as possible and will look neat.
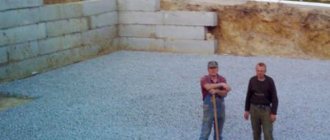
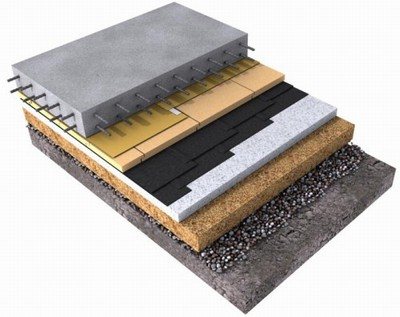
Is it profitable to make a rough concrete screed on the ground
This option is suitable for brick or block houses. The upper ball of earth is removed (about 5 centimeters), watered with plain water, covered with a gerbil, and left to dry on its own. Next, they knead the concrete solution on gravel instead of sand, fill in the desired area, leveling it with the rule.
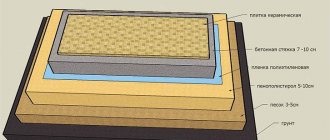
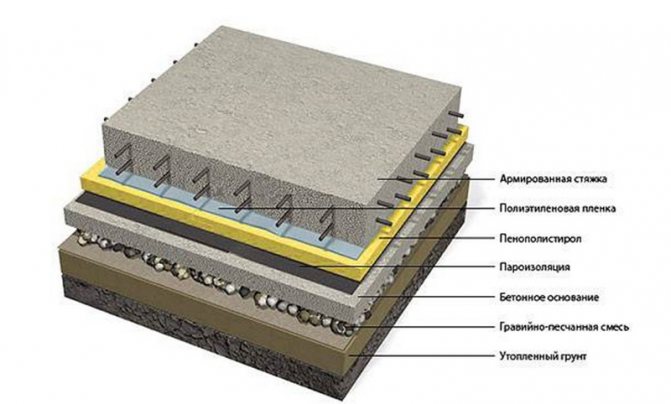
Concrete pavement on an earthen base consists of several layers, each of which has an important function. Layers are created from various materials, as a rule, the "cake" includes the following components:
- sand layer;
- crushed stone or gravel layer;
- waterproofing material;
- rough concrete floor;
- steam and heat insulation layer;
- clean concrete floor.
Any commercially available material that corresponds to the stylistic direction of the interior and most harmoniously fits into the design of housing can act as a finishing floor covering.
Floor construction on the ground
In no case should you start pouring concrete directly onto the ground, because the first two layers of the "pie" prevent moisture from the soil from penetrating into the floor covering, which can occur by capillary means. Creating a concrete screed is not the easiest and fastest process. The main difficulty lies in the fact that the work takes place in several stages.
The layering of the structure is a guarantee of a long service life of the screed and its durability. The modern technology for creating a concrete screed can be divided into two large stages: preparatory work and the actual arrangement of the concrete pavement. Each of these stages consists of several parts.

We make floors on the ground ourselves
Preparatory work is an obligatory stage in creating a concrete floor, it is they that take the lion's share of the time in the process of arranging the screed.But it is not possible to do without them, unless, of course, you want to get a low-quality result.
Filter layer
The first stage - preparation of soil and filtering layer
First of all, it is necessary to deal with the compaction of the earth at the base, which will help prevent its subsidence and, accordingly, possible cracking of the screed. Concrete floors on the ground are often equipped in combination with a strip foundation with a depth of at least 1-1.5 meters, filled with sand inside.
But this approach is not acceptable if the house is located on a clay area. After all, clay retains moisture, therefore, in the presence of sand inside the foundation, stagnant water forms and a real "pond" will appear under the building. That is why drainage is required in clay areas.
The photo shows the process of excavation inside the strip foundation
The most optimal in this case is the following procedure:
- the lower part of the pit is filled with clay extracted during the creation of the pit;
- internal thermal insulation of the house and external insulation of the foundation are carried out. These actions are aimed at leveling the heaving of the soil, even in the absence of heating in the building;
- gravel is poured onto the prepared soil and then carefully compacted. The quality of the ramming is very important in this case as it is about preventing voids. It is carried out using special ramming mechanisms;
- sand is poured onto the gravel, which is also carefully rammed and smoothed.
The thickness of the filtering layer depends on the characteristics of the soil, as a rule, the sand and gravel cushion is not thicker than 15-20 cm each.
Backfilling of the sand layer
Sand tamping
Prepared base
After filling the foundation, you can proceed to the arrangement of the waterproofing of the future screed. The most popular materials for this purpose are PVC and bitumen-polymer membranes. If the moisture level for the house is within the normal range, then you can get by with an ordinary polyethylene film with a thickness of 250 microns, which is laid in two layers.
The edges of the waterproofing material should be slightly higher than the intended level of the finished concrete screed. Particular attention should be paid to laying waterproofing in the corners, since it is through them that moisture most often penetrates. If the material does not completely cover the perimeter of the room, then its elements are overlapped and fixed with tape.
Pouring a layer of lean concrete
The optimum material for a rough screed is "lean" concrete, to which crushed stone is added. The resulting surface does not have to be perfectly flat, and there are no high requirements for it. It is quite enough if it does not have differences in height of no more than 4 mm. Moreover, its thickness should be about 4 cm.
Installation of thermal insulation
Insulation of a concrete screed is an important stage, therefore, a lot of attention is paid to the choice of heat-insulating material. He must have such qualities as:
- high strength;
- low thermal conductivity;
- fire resistance;
- ease of use.
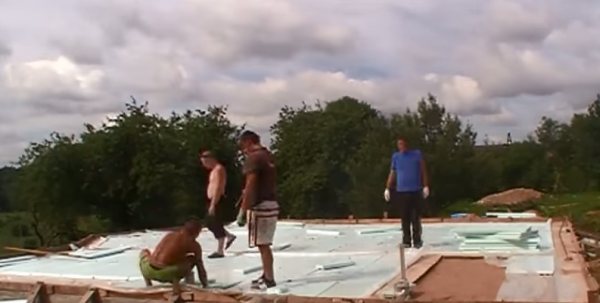
Most often, preference is given to a foam, expanded polystyrene or mineral wool layer. The required thickness of the material is determined by the location of the house. For example, in central Russia, plates 10 cm thick can be used for insulation, in less warm regions - up to 20 cm.
The laid heat-insulating material must be covered with a polyethylene film on top, which serves two purposes at once: it prevents the penetration of concrete mortar into the space between the insulation elements and provides vapor barrier.
The preparatory work is completed after the creation of the heat-insulating layer. However, it is impossible to immediately proceed to pouring concrete - you need to take care of the strength and reliability of the future structure.
Screed reinforcement
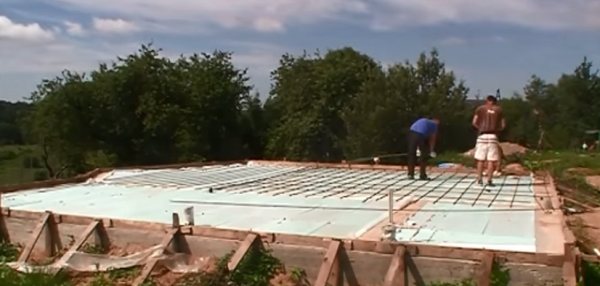
Reinforcement process - knitting of rods
The next step is to lay the reinforcement, which will give the concrete pavement additional strength and durability. Traditionally, a road mesh is used for this purpose, the diameter of rods with bark varies within 5-6 mm. The dimensions of the cells are 100 * 100 mm or 150 * 150 mm. Such reinforcement will prevent the appearance of cracks on the screed during shrinkage.
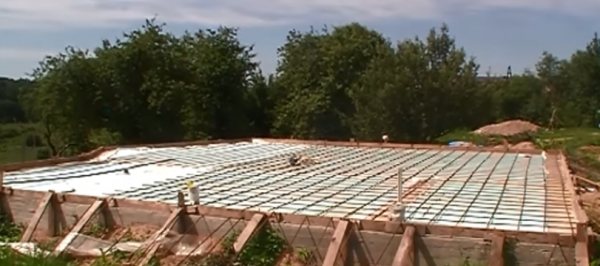
Reinforcing mesh
It is best to place the reinforcement layer a few centimeters above the insulating material, as this will end up inside the concrete pavement. If the operating load of the floors is very high, then a reinforcing cage is used to strengthen them.
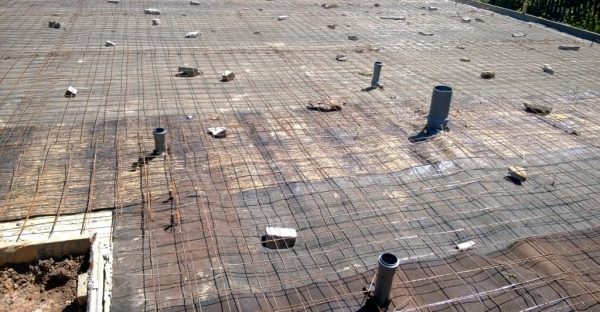
The photo clearly shows the mesh laid on the waterproofing
Formwork creation
Before starting the arrangement of the finishing concrete screed, guides and formwork are mounted. This technology allows you to more accurately maintain a given level. The available area is divided into equivalent segments, the width of which does not exceed 2 m. After that, the guides are installed, their height should correspond to the desired level of the screed. The guides are fastened with a cement mortar, into which clay and sand are introduced.
Then, the formwork is laid in the space between the guides, thereby dividing the base into rectangular parts, which are subsequently filled with cement mortar. The guides and formwork are brought to the desired level and aligned horizontally, serving as a guarantee of the evenness of the future coating. After pouring, they will be removed from the concrete, which is quite difficult to do, therefore, to simplify this process, they are coated with a special oil.
We invite you to familiarize yourself with Mounted Hydraulic Shears ⋆ Ksd
Filling the screed
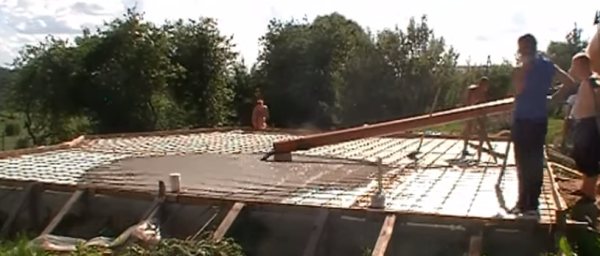
Filling the screed
In order to obtain a monolithic surface, the screed is poured in several passes:
- work begins from the corner located on the opposite side of the door. After filling several rectangles, the solution is distributed with a spatula over the entire area;
- then the time for rough alignment comes, which is carried out by movements of the rule towards itself, while excess concrete is removed;
- in the treated areas, the formwork and guides are removed, and the voids that appear are filled with a cement mixture.
Leveling process for freshly poured concrete
This procedure is maintained until the entire floor area is filled. To compact the concrete surface, you can use a special vibrator that will speed up the process and remove all voids. When the screed is completely ready and leveled, it is kept under the film for 3-4 weeks and periodically moistened. A leveling screed made of concrete M-100 and higher can be poured over the finished monolithic surface.
The process of pouring and leveling the concrete layer
A cement screed has a number of different functions in floor construction.
Depending on the type of flooring, the dominant role is given to one or another property of concrete pouring.
Let's consider what role the rough concrete layer can play in the arrangement of floors in a private house.
The screed will eliminate problems with bumps and depressions
The main purpose of the cement screed is to create a flat and solid base surface.
It is not possible to install any modern floor covering on an uneven surface covered with bumps and depressions.
An even bottom layer in one case makes it possible to save on expensive adhesives for the topcoat, allowing them to be made thinner.
Sub-floors, due to the special strength characteristics of concrete solutions, play the role of a base that takes on the weight of the weight of furniture and household appliances. The strength of the floors in the house fully depends on how strong the rough concrete fill is.
Finishing elements laid on a solid monolithic base will not move relative to each other, deform and crack.
In this case, it performs two functions at once - protective and heat transferring.
Protective functions
Concrete will protect underfloor heating from deformation and mechanical stress
Heating elements of underfloor heating systems are quite vulnerable to physical impact. Under external load, plastic pipes through which the coolant flows can deform and crumple.