Basic data for calculation
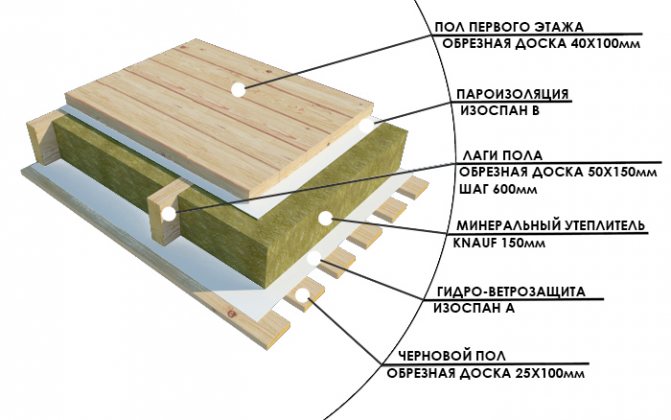
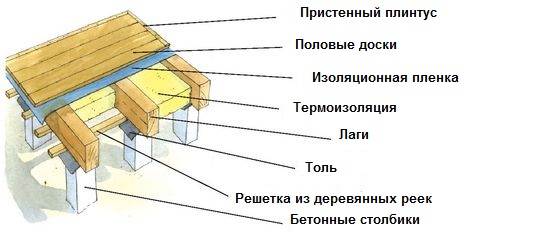
Logs are wooden or rectangular beams made of other material, which are laid on the floor of the room in order to level it and create a reliable support for the finishing flooring.
Basic information on logs and floor construction is presented in the article "Wooden floor on logs: DIY device". For the calculation, the following points are most important.
The dimensions of the premises and the planned mode of its operation.
The dimensions and purpose of the premises are important for determining the length of the span (the required length of the logs, solid or composite), their position and the choice of wood. For walk-through rooms or corridors, it is customary to place the frame across the direction of movement. Accordingly, you can use short lags.
In rooms with natural light, it is important to consider the direction of the light rays and their intensity. If the illumination is sufficient according to the norms of SNiP 23-05-2010, it is important to place the logs across the direction of the luminous flux. In this case, they will warm up (and deform, age under the influence of heating) evenly.
The choice of wood is influenced by the humidity in the room. For dry spaces, a tree of common conifers is used (spruce, pine, fir, smereka), for wet spaces - larch. In especially critical cases, oak is used.
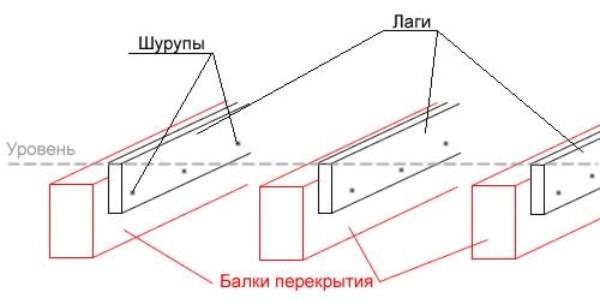
The type of support of the beams - on a solid base (screed, reinforced concrete slab or masonry), on adjustable or non-adjustable supports, along the perimeter of the room on the ledges of the foundation or grillage. The support of the lags is directly related to their location. When installing a floor over a floor of wooden or metal beams, the logs are attached directly to the beams.
If, at the same time, the distance between the floor logs does not meet the required for flooring (from the strength conditions), then a second layer is arranged on top of the first layer of beams, with the necessary step. In this case, leveling is performed for the first layer. On a solid base or ground, the logs are located according to strength standards.
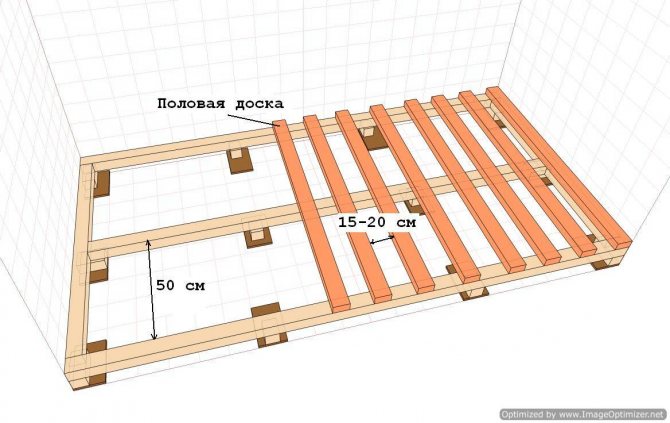
The arrangement of the beams is only in one direction or along and across the room. The frame is arranged in the form of a lattice, if increased strength of the flooring is required or a "floating floor" is planned. In both cases, the connection of longitudinal and transverse beams increases not only strength, but also the rigidity of the structure, its resistance to deformation.

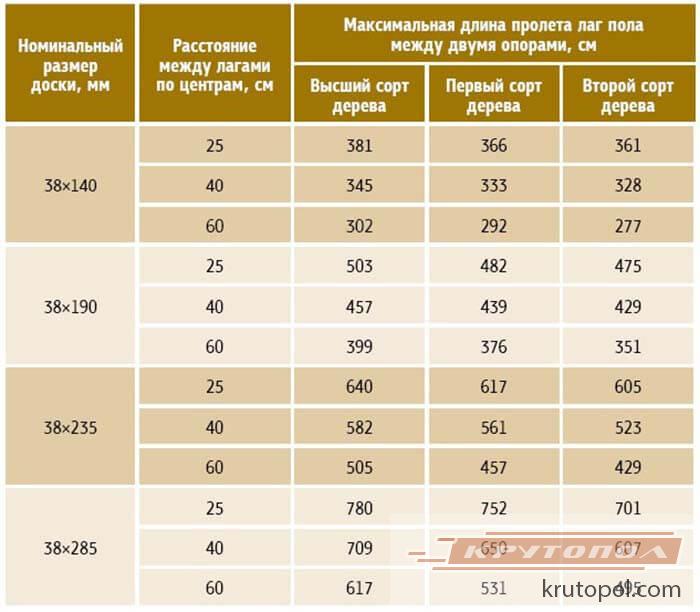
The section of the lag is selected depending on the thickness of the floorboard and the span. The greater the load and the longer the span, the larger the cross-section of the beam. The thicker the floorboard, the more you can increase the span and reduce the cross-section of the beams.
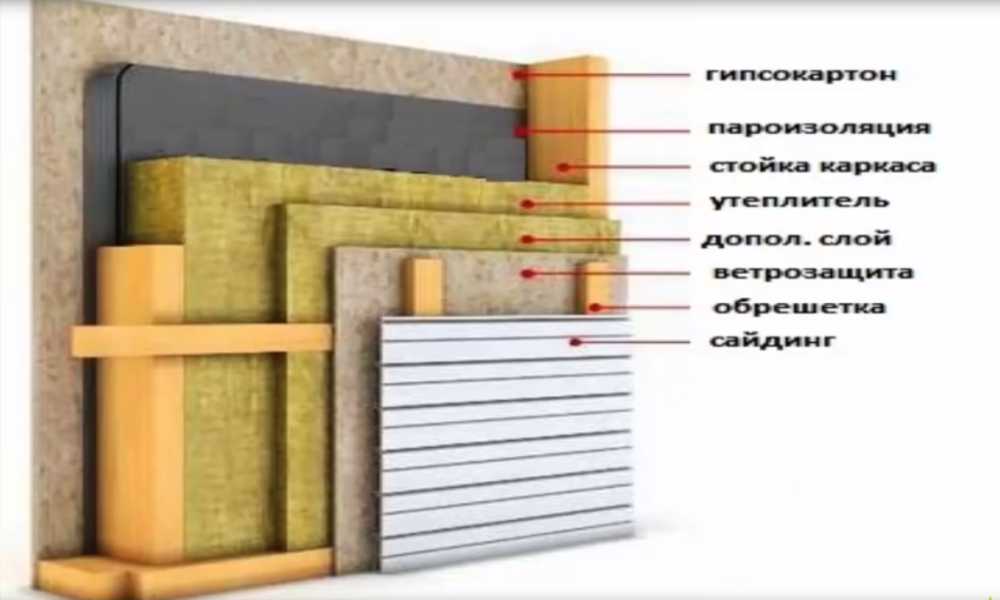
Floor insulation with polystyrene
Along with mineral wool, expanded polystyrene is a popular material. It is used in various areas of construction to solve a wide range of tasks for the insulation of various objects and structures. The demand for this material is due to its advantages and
If we talk in more detail about the advantages, then we will single out low thermal conductivity and vapor permeability, high strength, resistance to open fire. Its main feature is the presence of a cellular structure. It is thanks to her that the material has a high durability and provides sufficient thermal insulation efficiency when used during insulation work. Quite often, when working on thermal insulation of a wooden floor in houses, the owners use this particular insulation.
Minuses
It is worth mentioning the shortcomings of this material. Although there are few of them, they are still there.The main one - it easily absorbs moisture, the effect of which leads to the loss of its properties. Therefore, when it is used for insulation, a device must be made not only for a vapor barrier, but also for a layer of waterproofing material.
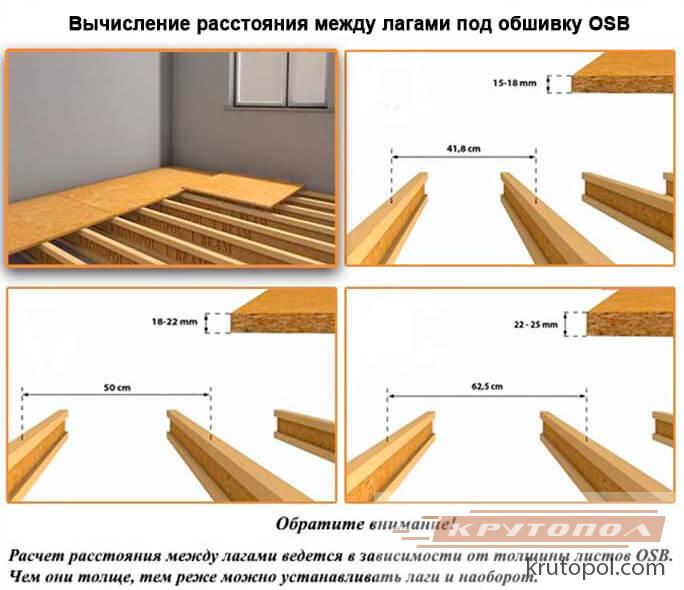
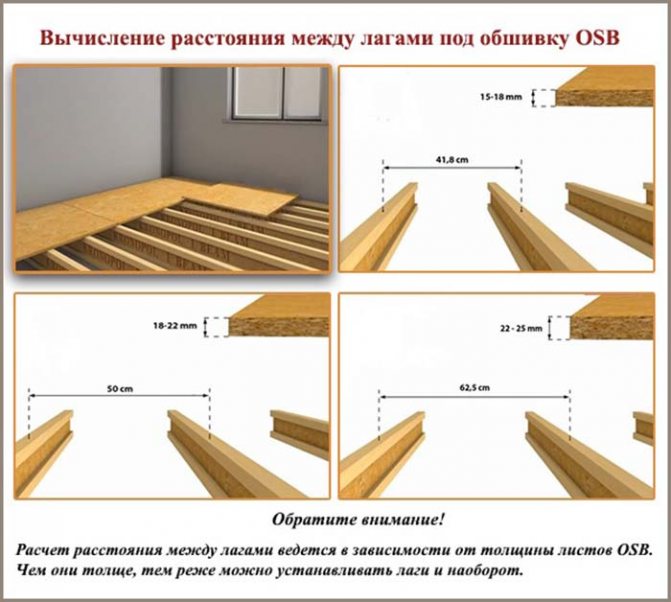
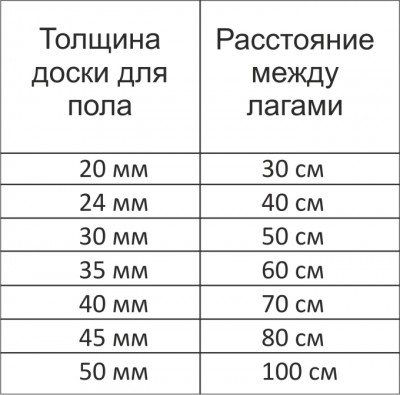
Tabular data
The analysis of statistics and calculations based on the data on the load capacity of coniferous wood (averaged) made it possible to compile a table of the distances between the logs, to derive the relationship between the thickness of the boards (slabs) of the flooring and the pitch of the support beams.
Important: if the permeability of the room is increased or the installation of heavy furniture (equipment) is planned, an amendment must be made. At the same time, the thickness of the floorboard increases, as does the cross-section of the beams, and the size between the lags decreases.
For flooring on a solid (reinforced concrete slab) foundation, the minimum allowable cross-section of the beams and the maximum distance between them are taken. When creating a flooring in a frame or wooden house, not only the payload on the flooring is taken into account, but also the own weight of the structure - beams, rough flooring, heat, sound and waterproofing, finishing.
Calculation 1.
Initial data - support on the floor slab along the base screed, with adjustable clamps (screw), under the laminate. The dimensions of the room are 3x5 m, the span is chosen 3 m (parallel to the wall with the window). Under the laminate, a rough plywood flooring of 20 mm is required.
According to the table, for such a thickness of the flooring (plywood), the lag step can be taken as 300 mm, and the section of the beam for a span of 3 m is 150x80 mm. The estimated amount x will be at a distance from the walls of 50 mm, a beam width of 80 mm and a lag step for plywood of 300 mm
5000 - 80x - 300 (x-1) - 100, x = 12.1 beams.
Since the number of lags cannot be whole, we take the number of beams 13 or - with a low load, you can increase the distance to the wall - 12 pieces.
If, under the same conditions, a lag step is calculated for a floor made of boards with a thickness of 50 mm, then the estimated number of beams x with a distance between them of 1000 mm will be
5000 - 80x - 1000 (x-1) - 100, x = 3.6 beams.
We accept a whole number of 4 pieces (here it is undesirable to reduce their number).


Calculation 2
Initial data - support on wooden floor beams, located with a step of 1000 mm, the same dimensions and configuration of the room, the same finish.
Determine how far the logs should be laid under the plywood flooring. According to the table for plywood with a thickness of 20 mm, the lag step is 300 mm, while the distance between the beams is 1000 mm. It is first necessary to place the logs according to the number of beams with attachment to their side side and alignment, then place the beams across the primary logs with a step of 300 mm.
Since the beams are 3000 mm long, the primary logs must also be 3000 mm long and have a cross section of at least 200x150 mm. For a five-meter room, such logs (according to the previous calculation) will require 4 logs (or five, depending on the position of the beams). The placement of secondary supports goes along a span of 5000 mm long, with a distance of 300 mm and a beam width of 150 (section 200x150 mm) they will be required
3000 - 150x - 300 (x-1) - 100, x = 5.3 pieces.
Taking into account the rounding, the required number of five-meter (composite) lags is 5 pieces.
For a floorboard with a thickness of 50 mm, the required distance between the joists is 1000 mm, which is equal to the pitch between the beams. Therefore, the number of lags corresponds to the number of beams (4 or 5 pieces).
In both cases, a correction must be made for the increased floor load. Depending on the operating conditions, you can increase the cross-section of the beams / decrease the distance between them / apply a complex correction (increase the cross-section and decrease the distance between the logs under the boards).
If we accept an increase in the cross-section, then in both cases the nearest higher value should be taken according to the table, that is, 220x180 mm (primary and secondary for cross-decking) and 180x100 mm for decking under the boards.Correction for changing the distance of the log under the floor (step) leads to an increase in the number of bars. For the first calculation, the number of primary lags will not change, but for the secondary ones, the number will be (with a reduced step of 250 mm)
3000 - 150x - 250 (x-1) - 100, x = 6.
When attaching the lag to the beams, the step does not change, therefore, this method of making corrections is not applicable.
Online calculators
An online calculator can be used to simplify calculations. However, in order to enter data into it, it is necessary to first determine the section of the timber, the thickness of the flooring and what step of the floor lag is adopted.
Note: This calculator distinguishes between subfloor and floorboard. This refers to a two-layer plank flooring, in which first the subfloor boards are laid with an interval of 2 cm (to compensate for temperature and humidity deformation), and then a floorboard is created from the floorboards and they undergo finishing (varnishing, painting).
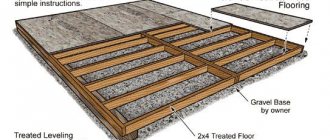
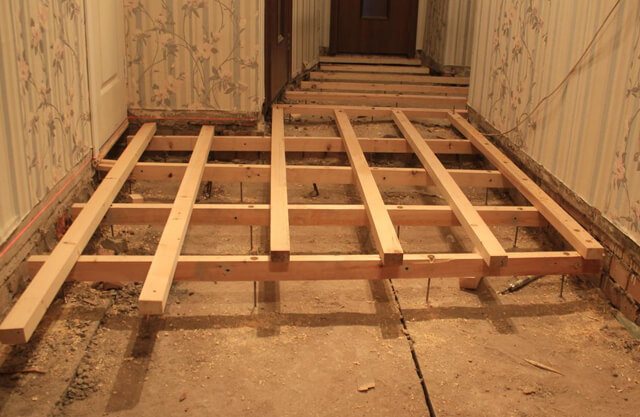
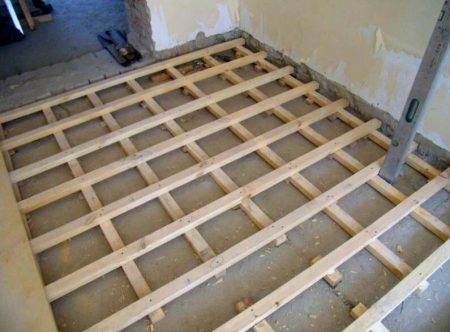
Frame installation
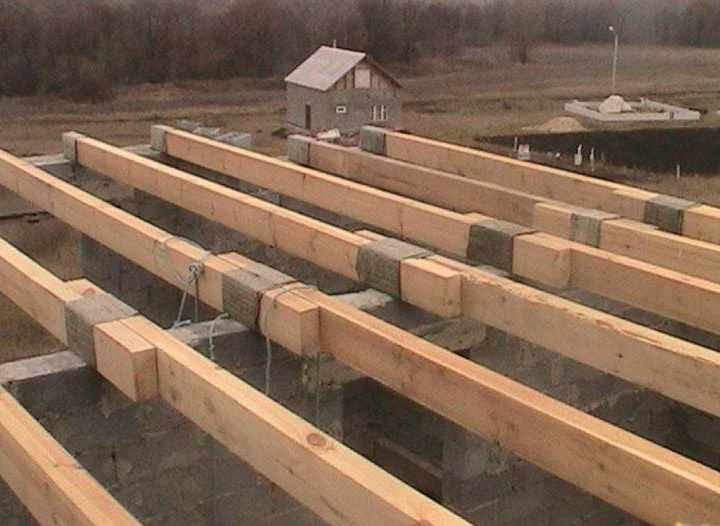
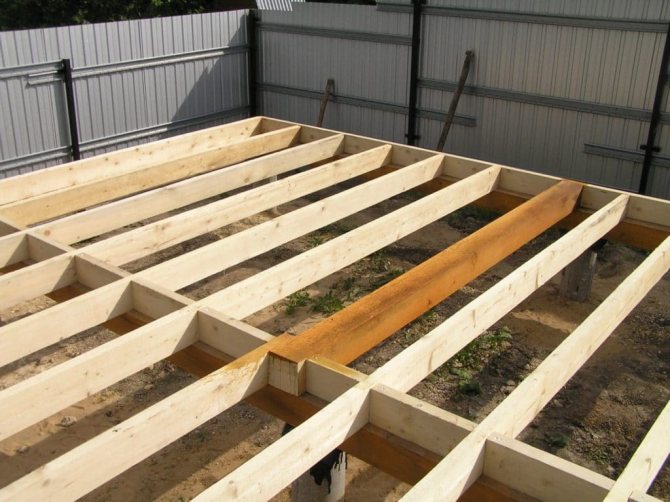
The floors along the logs can be equipped both on the floors of the house and on the ground base.
Installation of a lag on a wooden floor
Installation of logs on a wooden floor.
- The lags must be fixed to the strapping beams. It should be borne in mind that they are unlikely to have an absolutely even level. Therefore, it is best to attach the timber to the sidewalls of the beams.
- In this case, determine the horizontal position of the lag with a control rail, the pads can be omitted.
- Fix the lags with screws with a diameter of 6 mm. They should be 2 / 2.5 times longer than the width of the bar.
- So that the lumber does not crack, drill holes in the logs and beams. When doing this, use a drill that is 2.5 mm smaller than the screw size.
- When the beams are placed far from each other, double joists need to be mounted. First, lay the first row of logs on the beams, on top of them, with a smaller step - another one.
Laying timber on the ground

In the photo there is a floor diagram along the logs on the ground.
- First level with your own hands and tamp the soil. This work can be done with a large log. Nail a board to it from below and move the rammer along the ground with your partner, compact it. The board should be at least 5 cm thick and slightly larger than the cross-section of the log.
- Next, mark up the support pillars for the lag. When the frame is supported by the lower trim beams, marks can be left directly on the beams. If the support is a grillage covered with roofing felt, put marks on the waterproofing material.
- The distance from the initial lags to the walls should be 3/20 cm.
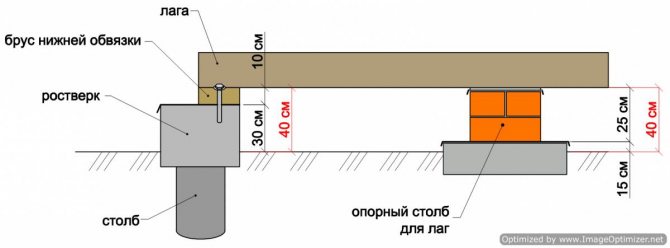
Before installing the support posts, you need to make a foundation for them. It can be poured separately under each support or laid under a row of posts.
The dimensions of the foundation for the post, the minimum is 0.4 × 0.4 m, the height is 0.2 m, 5 cm of which should protrude from the soil.
The instructions for arranging the foundation are as follows.
Installation diagram of the log on the ground.
- From the lag axis marked on the strapping beams, set aside 0.2 m in both directions.
- Pull the lace between the marks.
- Do a similar operation in a plane perpendicular to the lags to mark the corners of the posts located at the intersection points of the cords.
- Drive in the stakes in the corners. Next, remove the cords.
- When the foundation is laid under a row of supports, only the edges of the row are marked with cords.
- Remove the topsoil in the marked areas. Tamp them, add rubble and compact it.
- Assemble the foundation formwork with a height of 0.1 m.
- To waterproof the concrete, place a polyethylene film in the pits. If the soil is clay, then you can skip this.
- Reinforce the foundation with a frame welded from reinforcement with a diameter of 0.8 cm. It must be laid slightly below the center of the future concrete layer.
- Next, fill in the solution. Its composition should be the same as for the foundation of the house.
- Wait for the concrete to set for 2/3 days.
- After that, install the waterproofing.To this end, cut pieces of roofing material according to the size of the supports, in other words, 40 × 40 cm each. You can also make overlaps of 1 centimeter. Lay the insulation directly on the mortar; it is not necessary to coat it with bitumen.
- Now you can start laying bricks. Two rows in height are enough, the top of them should be oriented perpendicular to the length of the bar. To fasten the material, use a sand-cement mortar, use a brick with grades of at least m-100.
- Lay the waterproofing over the bricks.
- Place soundproofing pads on top of it. So that they do not slide out, secure them.
This is how the floors look in general.
First, lay the beacon logs, the first from the walls. Fasten them 2 meters apart.
Note! Check the horizontal placement of the material relative to the ground, as well as each other. If the logs lie unevenly, the protruding areas can be removed with a plane, and linings can be installed under the sagging parts. It should be taken into account what the maximum deviation is permissible - it should be one millimeter per 1 meter of timber.
Next, install intermediate lags. You can attach them to the supports with corners, using self-tapping screws, they should enter the wood by 4/5 cm. The second side of the corner is attached to the support with dowels.
What are lags for?
Lags in a frame house
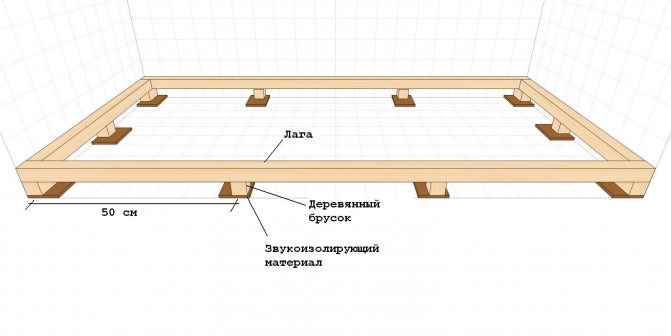
Lags are called bars that are laid on a previously prepared base. Such a base can be a concrete slab, posts or beams.
Logs are made from various types of wood. In dry rooms with low traffic, a spruce or pine timber is placed. If there is damp soil under the ceiling or the operation of the room is associated with dampness, then it is better to put a larch bar.
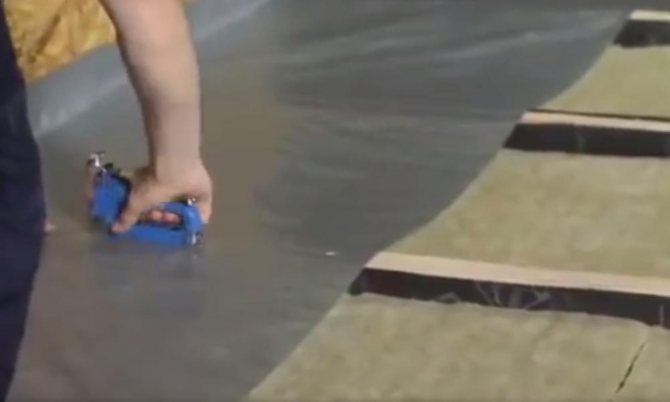
Regardless of the base on which the lathing will be located, you need to use waterproofing. Roofing material is best suited for this. Before installation, the wood must be well dried and treated with an antiseptic.
In some cases, a crate made of metal, plastic or reinforced concrete posts is arranged under the finishing cladding.
What decision to make, to choose a developer, focusing on their financial capabilities and skill.
Laying floors on logs provides the following advantages:
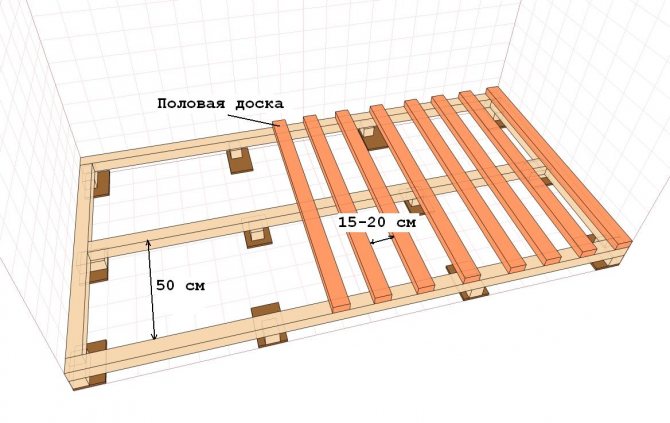
- An increase in the thickness of the floor, which will reduce its thermal conductivity, will improve the sound insulation characteristics. Between the logs, you can place communications, lay a heat-insulating material. This will have a positive effect on the comfort and interior of the room. Creation of a uniform load on the subfloor, which will increase its service life. Obtaining a perfectly flat base for the finishing coat.
In the absence of a bar, the logs can be made independently from the boards. Several lamellas are glued together and tightened with screws. Such products are distinguished by their increased strength and the absence of deformation during changes in humidity.
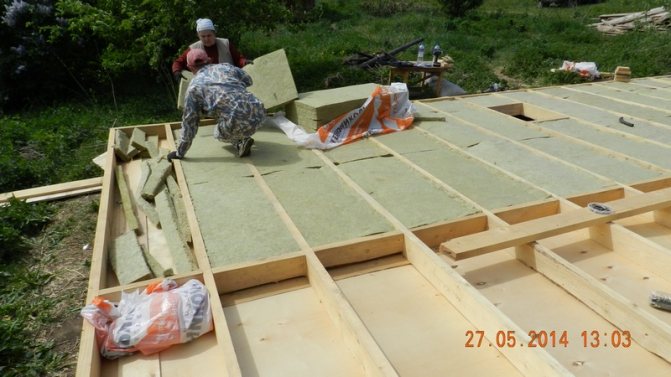
Thermal insulation of the floor with ecowool
Another popular thermal insulation material is ecowool. It is a heater, in the production of which only natural materials are used. It consists of 80% waste paper. The remaining 20% -
... The mixture containing the fibers is bound with boric acid. Lignin is also present in the composition as an antiseptic. It is this composition that ensures the main advantage of ecowool - environmental friendliness. Therefore, using it, no harm is caused to human health during thermal insulation work.
If we talk about other advantages of this material, we note the low degree of thermal conductivity, fire safety and the ability to restore its thermal insulation characteristics after drying. This insulation also has disadvantages. The main one is the high price. In this regard, it is superior to all other thermal insulation materials.
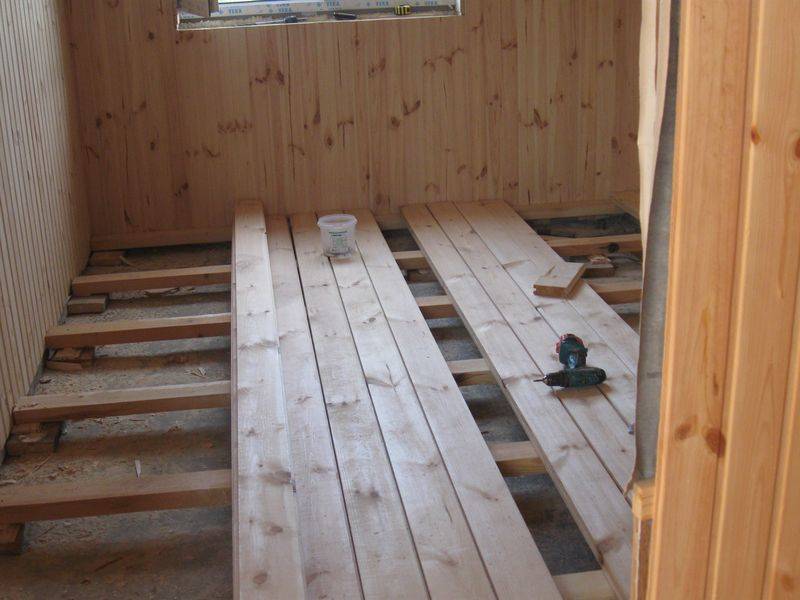
Calculation of the floor from planks
Beam for lags
Before laying the plank floor, you need to decide on the configuration of the timber for the log.
The parameters of the longitudinal supports depend on the thickness of the topcoat and the length of the purlin between the support points.They are considered to be beams and supports that are placed under the logs. The more such supports, the thinner the timber will be.
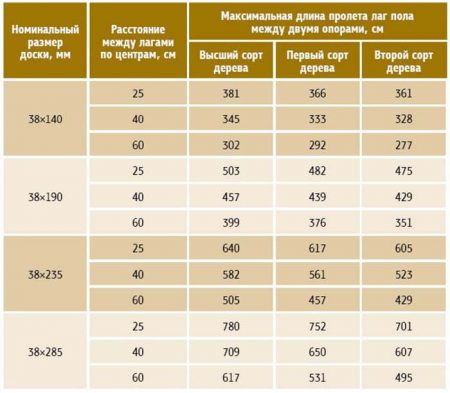
When carrying out calculations, one should adhere to the following ratio of the span length and the section of the bar:
- 200 cm - 100x50 mm; 300 cm - 150x75 mm; 400 cm - 180x100 mm; 500 cm - 200x150 mm; 600 cm - 220x175 mm.
The aspect ratio of the laid lags should be 1: 1.5. Position the beam so that its longer sides are vertical.
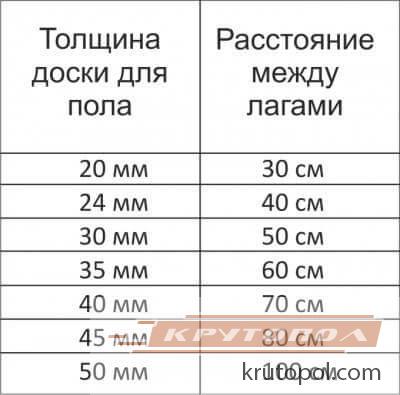
An equally important indicator of the strength of the finished floor is the interval between the lags. It must be such that the finished coating does not sag under a weight of 300 kg / m².
Such a norm is established for residential premises. With a board thickness of 20 mm, the step between the lags will be 30 cm.With an increase in the thickness of the finish coating for every 5 mm, the distance increases by 10 cm.

Before laying a floor from a bar and slats, you need to take into account the following rules:
There should be a small gap of 3-5 mm between the insulation and the topcoat. It is necessary for ventilation of the wood. The edges of the boards should be at a distance of 3-6 mm from the walls.
This is necessary to expand the coverage when it swells from high humidity. When carrying out installation, it is advisable to place supports under the timber every 100-150 cm. They can be made from bricks or lumber scraps. Small differences in height are compensated by pieces of roofing material.
When choosing a material for a lag, it is necessary to purchase a bar with a safety margin. Such a measure will allow not to limit the weight of interior items.
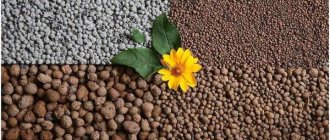
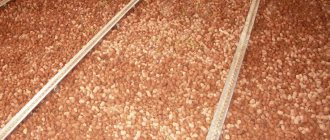
The choice of insulation
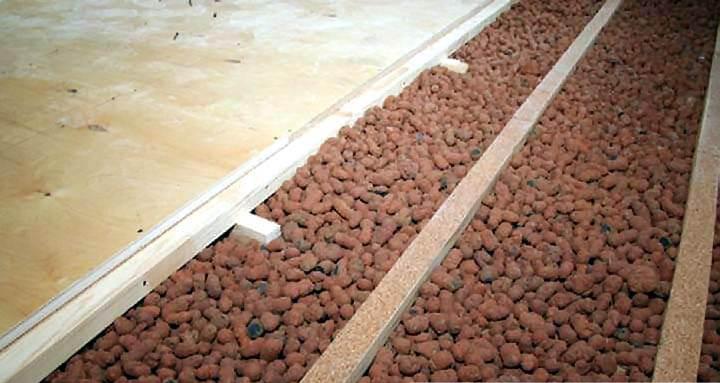
Many materials are used to insulate the floors of a wooden house. The simplest and most inexpensive can be called expanded clay or sand, which is poured between the rough and final coating. They are hygroscopic and protect the boards from rotting, the spread of fungus and provide ventilation. However, free-flowing nonmetallic heaters have their own drawback - over time, their hygroscopicity decreases.
Today on the market you can find many materials for the insulation of a wooden house. In addition to good thermal insulation, it must meet the basic requirements:
- ecologicaly clean;
- be safe for the occupants of the house;
- long service life.
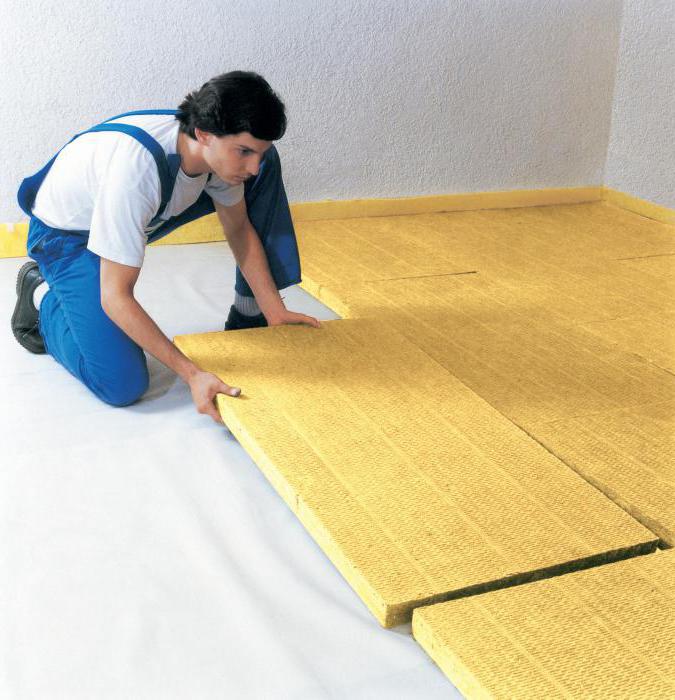
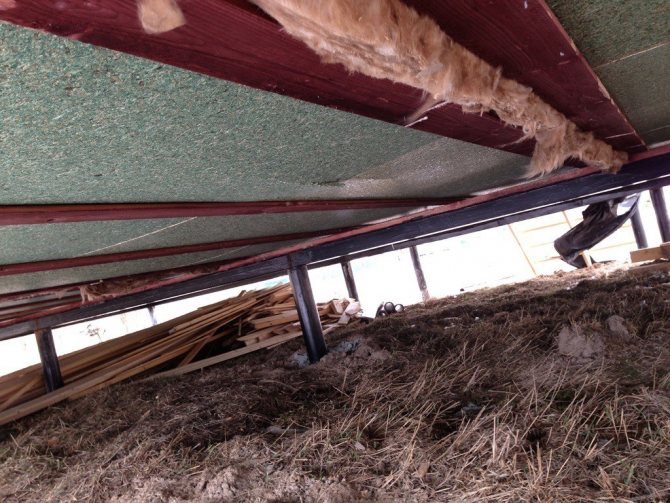
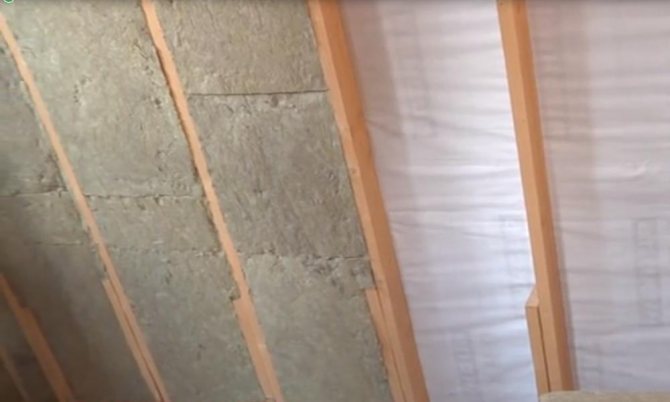
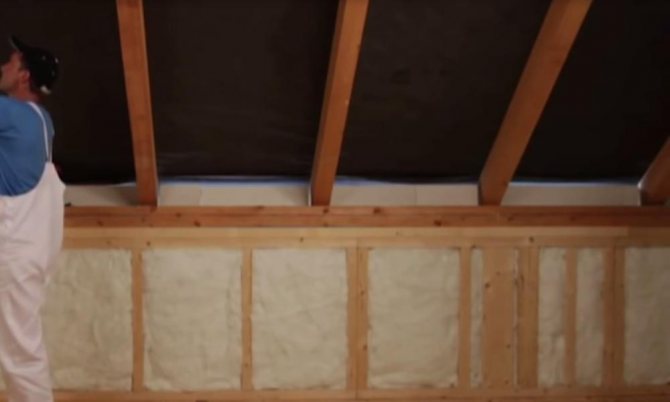
o Mineral wool. It can be slag, stone and glass. The release form is also varied - plate, roll, mat. Mineral wool has a high density, does not burn, conducts heat poorly and is quite economical. The main disadvantage is considered to be low moisture resistance.
When using mineral wool, the vapor barrier and ventilation should be well thought out. The side of the board that is not covered with foil should be on the bottom.
When buying mineral wool, they carefully read the composition, since the impregnation often contains substances hazardous to the body. The richer the yellow color of the material, there it is more dangerous.
In hardware stores, the following are more in demand:
- Izovol is a mineral fiber product. A distinctive feature is high hydrophobic efficiency in comparison with conventional mineral wool. Additionally, it has low thermal conductivity, non-flammable, biologically and chemically resistant.
- Rockwool is a basalt mineral oil. Its peculiarity is that it does not cake, does not lend itself to deformation and shrinkage, like mineral wool. Rockwool resists mechanical stress well. The material is additionally used for sound insulation, since the porous structure absorbs noise of any frequency well. Like Izovol, Rockwool does not conduct heat well, does not burn and is resistant to biological and chemical influences.
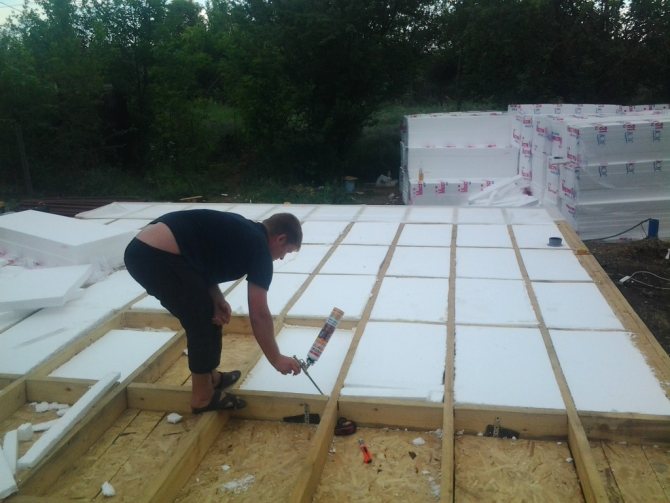
- Expanded polystyrene - has a high rate of thermal insulation. It is resistant to moisture and does not absorb water, keeps its shape well during temperature changes, is durable, environmentally friendly, durable and is not subject to the destructive effects of microorganisms. Styrofoam is easy to handle and use.
- Penofol is a modern heat insulator. Sold in rolls, it is a heater with a layer of foil. The thickness and weight are small.The base may be different, but in most cases it is penofol (expanded polyethylene). Thermal insulation properties are retained under high mechanical stress. Laying takes place with an overlap or butt. The seams must be glued with metallized adhesive tape. Penofol does not require an additional layer of hydro and vapor barrier, since the foil already performs these functions.
- Ecowool is a natural cellulose heat insulator. They bind fibers with boric acid and lagnin (organic antiseptic). The uniqueness of the material is that it does not absorb water and brings it out. In the composition there are no components hazardous to health. Ecowool is fire- and bio-resistant, absorbs sound well and does not conduct heat. A special spray is used for application, but the material consumption then increases by 40%.
- Izolon is a new material in construction. With a thickness of 2-10 mm, it has good heat and sound insulation, has high moisture resistance, is not subject to decay and is durable.
Ordinary sawdust can be used for insulation. This heat insulator has been used for many centuries. Natural material is quite cheap and completely safe for the body. Sawdust is often left behind after building a house. This is the most affordable insulation for a wooden house.
Sawdust is added to some building materials:
- sawdust concrete consists of sawdust, cement, sand and water;
- granular heat insulator - sawdust, glue and fire retardant antiseptic;
- arbolit - sawdust with cement and chemical additives;
- wood blocks - sawdust, cement and copper sulfate.
Creating a base for plywood
Despite the fact that this material is highly durable, its resistance to bending and pressure is much lower than that of solid wood.
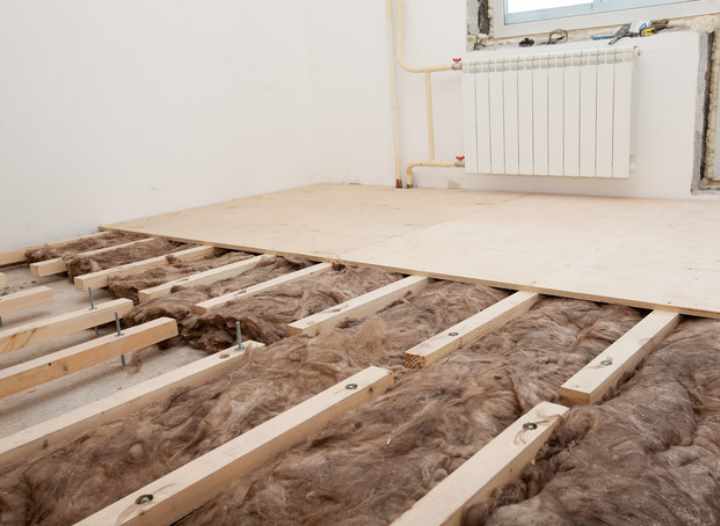
Based on this, the distance between the lags when building a plywood floor is taken less than when working with boards. Typically, plywood is used to create the subfloor. Linoleum, carpets and rugs, parquet and engineered board are laid on the floor.

For work, you should purchase plates with a thickness of at least 12 mm. If the coating is two-layer, then you can limit yourself to 8 mm plywood.
When designing the parameters of the lathing, one should be guided by the dimensions of the plywood. In hardware stores, you can purchase sheets in the 1525x1525 mm and 1220x2440 mm format.
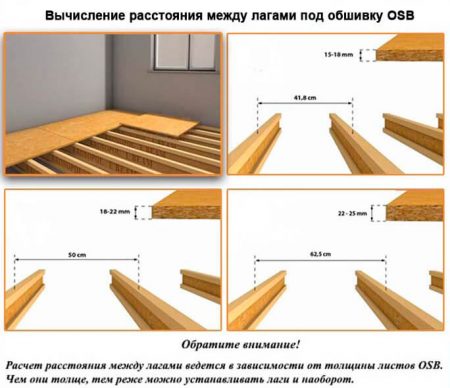
When working with 1525x1525 mm slabs, the logs are laid in 50 cm increments. If the coating is made in one layer, then the interval should be reduced to 38 cm. After laying the logs, the crossbars are fixed between them at the same distance.
If the choice is made in favor of a material with a format of 1220x2440 mm, then a frame is made with a side of 40 cm.That is, in all cases, the step of the distance between the logs is a multiple of the dimensions of the plywood. This is done so that the edges of the sheets are on the beam, and not in a suspended state.
Since the plywood, after fixing to the frame, will be covered with a topcoat, plates with one-sided grinding should be bought. To create the first layer, it is advisable to purchase unpolished plywood. When carrying out construction in rooms with high humidity, the choice should be made in favor of a waterproof material.
Plates are stacked in a checkerboard pattern. Before screwing in them, you need to make holes for self-tapping screws and chamfer them.
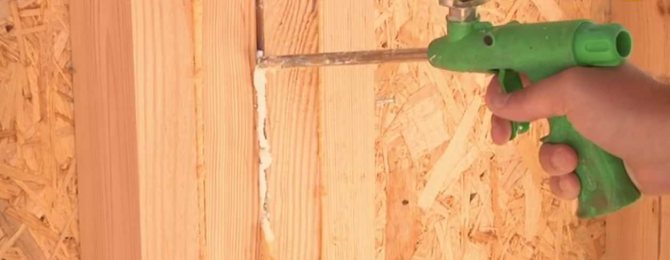
This is to prevent the plywood from cracking and the screw heads to be sunk into the subfloor. It is necessary to leave a technological gap with a width of 2-3 mm between the sheets of material. After installation, it is sealed with mastic.
In order for the floor covering to serve for a long time and to be durable, the floorboards do not creak or bend under the feet, you must first correctly calculate all the design parameters, including at what distance to lay the floor logs. The correctness of this calculation will determine not only the durability of the floor covering, but also the amount of material used for it, and hence the cost of the work.
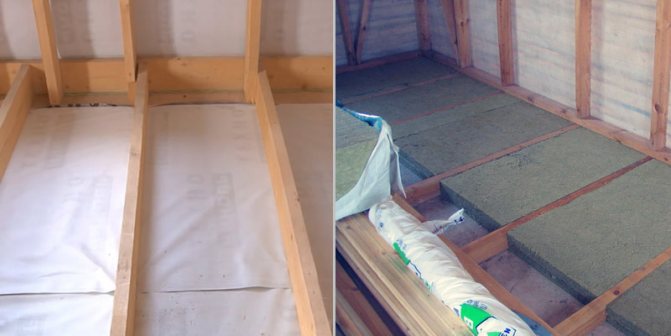
Thermal insulation of the floor with mineral wool
Minvata is most often used to insulate a wooden floor in a private house. It does not burn, easily transfers aggressive chemical substances, has good noise and heat insulation. The disadvantages include only low strength.
Read more: Septic tank "Cedar": review, device, advantages and disadvantages, reviews
Mineral wool should not be in contact with water. That is why waterproofing must be of particularly high quality. Many people refuse such insulation because of its non-environmental friendliness.
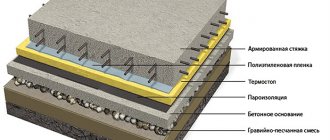
Base insulation scheme with mineral wool
Mineral wool is a flexible soft board. They are cut into the desired elements, and this is done easily. The marking is applied with blue stripes on the hard side. During installation, it is worth making sure that these stripes look up. Also, do not forget that the material for insulation is in one layer.
Among all heat-insulating materials, the most demanded among consumers is mineral wool. It is offered on the market in several varieties: fireplace, glass, slag. Its main plus is absolute incombustibility. It also has other advantages: fire resistance, chemical resistance. We also note the high properties in terms of sound and heat insulation, which are inherent in this material.
Minuses
Note that this insulation also has its drawbacks. Its main disadvantage is weak mechanical strength and low vapor permeability. This material absorbs moisture well. When it is humidified, it loses its thermal insulation characteristics and does not provide effective insulation. Therefore, when working on insulation using this material, they arrange protection from moisture in the form of a vapor barrier layer. You should also know that mineral wool is a material that is not absolutely safe for human health.
Manufacturers produce it in the form of slabs and flexible mats. Hydrophobized mineral wool is used as a base for the manufacture of solid boards The blue stripe on the slab insulation indicates the hard side. When this material is laid on the floor surface, it is necessary that the side with the marking is facing up. The main application of mineral wool slabs is to insulate a wooden floor. When carrying out work, the insulation is laid in one layer.
What should be considered when calculating?
When performing the calculation, the following factors are taken into account:

- the thickness of the flooring material (chipboard, boards, etc.); the approximate pitch between the floor logs; the estimated specific maximum load on the floor.
All these parameters will determine the cross-section of boards, beams and other lumber used for arranging the floor.
When calculating what distance should be between the floor logs, it should be remembered that the extreme logs cannot be located further than 30 millimeters from the walls, it is imperative to make a correction for this in the calculations.
As a result of calculations, usually not an integer number is obtained, but it should always be rounded up so that the real number of lags does not turn out to be less than the calculated one. Otherwise, the strength of the floor structure may not be sufficient, especially when you consider that such savings will be quite small compared to the likely risk.
The cheapest floor logs can be found on sawmills, followed by construction online stores.
When it comes to installing the floor, it is not advisable to save too much.
The lags must have not only a suitable cross-section, but also sufficient density. If you make the lag step for the floor of the boards too large, then the boards will begin to bend, "play". Similarly, if the distance between the lags for the OSB floor is made more than permissible, then the plates will begin to crumble and crack.


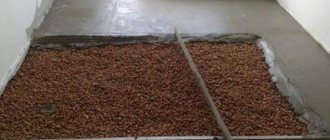
Floor insulation with sawdust
If the task is to insulate the floor, then in order to save money and time during work, you can choose the simplest insulation - sawdust. This material, like others used for floor insulation, has its advantages:
- low cost;
- ease of filling;
- environmental Safety.
It should be noted that not only sawdust in its pure form, but also other building materials, in which they are present as an additive, can be used as a heater.
An example of calculating the distance between floor joists
The distance between the joists of the floor under the board can be relatively large, since thick board is a stronger material than, for example, thin plywood. Accordingly, for thinner finishing materials, more frequent lagging will be required.
For clarity, consider an example of a floor arrangement with the following data:
- a room of 12 meters in length; the use of a beam of 100x180 mm for logs; the use of 30 mm boards as a topcoat.
Table of distance between floor joists under the board:

According to the table above, for a 30 mm board, the optimal distance between the floor joists should be 50 cm.
Let's designate the total number of beams by the letter "k". Then the total width of all logs will be (100 mm * k). The distance between the wall and the extreme beams will be 30 mm. Accordingly, the step between adjacent logs will be (k - 1). The distance between all elements will be (0.5 * (k - 1)).
The calculation of the distance between the floor joists begins with determining the step between the beams according to the following equation:
the length of the room = the total width of the beams + the sum of the distances between the beams + the indents from the walls
I.e,
12 m = 100 mm * k + 0.5 * (k - 1) m + 30 mm * 2
It is important to bring the equation to a unified system of calculation. As a result, we get:
12 m = 0.1 m * k + 0.5 * (k - 1) + 0.03 * 2
Remembering the school course in algebra, we solve the equation:
12 = 0.1 * k + 0.5 * k - 0.5 + 0.06; 12 + 0.5 - 0.06 = 0.1 * k + 0.5 * k; 12.44 = 0, 6 * k;
k = 20.7 pcs.
Since the number of beams can only be an integer, it is rounded up, that is, 21 bars are required.
The sum of all the intervals between the lags will be:
12 - 21 * 0.1 - 0.06 = 9.84 m
It is necessary to divide the resulting amount by the number of intervals, and we get the distance between adjacent lags:
9.84 / (21 - 1) = 0.492 m
Thus, we were able to establish the distance through which to lay the logs for the floor in this example - 0.492 m or 49.2 cm.