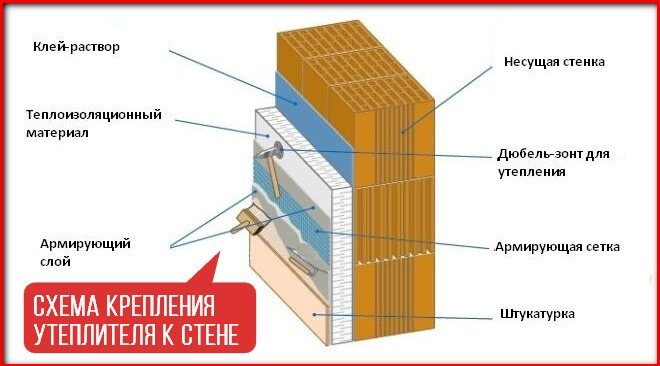
Fastening insulation to the wall: features
Installation of insulation indoors and outdoors is almost the same. But, there are some differences:
- Indoors, the lathing method is used. This is a frame created from wooden slats. The material is fixed in it.
- Outside, this method is rarely used due to the nature of the tree. Basically, thermal insulation is attached to glue-foam or dowels are used.
To select the fastening method, temperature indicators, wall load, constant humidity and other factors affecting the type of fasteners and thermal insulation are taken into account.
How to firmly attach insulation to any wall
There are 3 main methods for attaching to the walls of the building.
I - lathing. Create a frame base for ventilated cladding. To do this, choose metal galvanized profiles that are not susceptible to corrosion and temperature extremes.
II - glue. Bonding heat-insulating material has subtleties. First, you need to find a suitable composition that meets all the requirements. The second is moisture resistance. Further, the insulation is rarely "put" on the glue. Additionally, dowel-umbrellas are used.
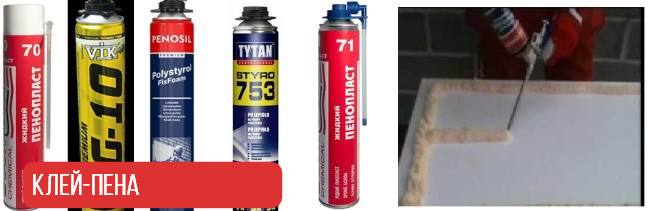
There are 2 types of glue:
The first type is produced in bags. It is bred according to the instructions on the package. Glue foam is produced in cylinders. It does not need to be diluted with water and mixed. Application is carried out with a construction gun.
To fix the thermal insulation, it is necessary to carry out preparatory work. The surface must be cleaned of dust and leveled by applying a plaster layer.
III - the use of dowels. This is the main method for firmly fixing thermal insulation. Dowels are used as additional fixation, as well as the main one.
Each method has its own nuances and features. Before choosing a fixing method, you need to assess the wall surface, as well as compare the factors affecting the materials (temperature, humidity, frost resistance).
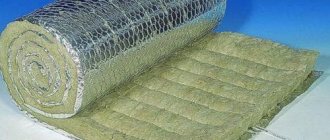
Mineral or stone wool
For the lathing, slats are used in height greater than the thickness of the cotton wool. This creates an air gap between the insulation and the topcoat. This will increase the thermal insulation of the wall.
Penoplex
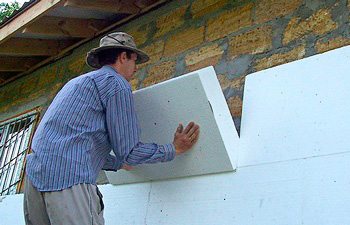
Penoplex is often used to insulate private houses and apartments at a height. To fix it, use glue and dowels.
For gluing expanded polystyrene, a flat surface covered with a primer is required. A support bar is stuffed at the bottom, and glue is applied to the foam sheets. After applying the sheet, you need to hold the material a little in order for the adhesive to set.
After the glue has set, holes are made in the sheet for dowels. They will create strength.
Polyurethane foam
It is a porous gas-filled polymer based on polyurethane components. It has a number of distinctive properties, low thermal conductivity. Therefore, it began to be often used in cold regions.
Water and sudden changes in temperature do not affect it. They produce polyurethane foam as foam. It is applied to the surface in 2 ways:
- spraying with equipment;
- pouring - for this, special equipment is used and voids must be equipped.
Insulation warranty period is up to 50 years.
Materials for warming house facades
There are a large number of materials on the construction market that are used to insulate facades. It is quite difficult for an ignorant person to understand their technical characteristics, and most importantly, what is their effectiveness when used to insulate facades. Indeed, the type of materials and the quality of the work performed directly depend on the cost of heating houses.
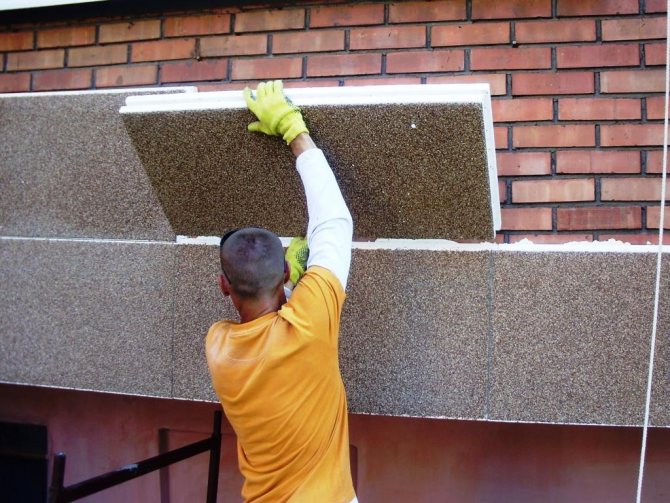
Figure 1. Insulation of the facade of the house with expanded polystyrene.
Mineral wool
When choosing a heater, first of all, a person pays attention to mineral wool slabs for facade insulation... The basis of this building material is mineral wool. Its use allows not only to insulate the house, but also to increase its resistance to the action of an open flame. In addition, mineral wool is an excellent sound insulator.
The difference between this material and other heat insulators is that it is completely environmentally friendly and has a long service life. According to the manufacturers, it is up to 50 years. Cotton wool is available in the form of mats or rolls.
In practice, the following types of mineral wool are used for facades:
1.Stone wool.
2.Basalt wool.
Stone wool
Heat-insulating material of this class is made from diabase and gabbro fibers, these are volcanic rocks. The building material has a high tensile strength and is able to withstand temperatures from -45 to +60 degrees Celsius. Stone wool consists of fibers with a diameter of 5-12 microns and a length of 16 mm. Its thermal conductivity is in the range of 0.048 to 0.077 W / mK.
This material can come into contact with any others and when working with it there is no need to use personal protective equipment.
Basalt wool
For the production of basalt insulation, the same volcanic rocks are used as for the manufacture of stone wool, i.e. diabase and gabbro. The difference from the first type is that no mineral or binding additives are used in its manufacture. Thereby basalt insulation can operate in the range of -190C to + 1000C. The thermal conductivity coefficient is in the range from 0.035 to 0.039 W / mK.
This material is classified as non-combustible and therefore it can safely come into contact with heated surfaces... According to manufacturers, the life of basalt wool is up to 80 years.
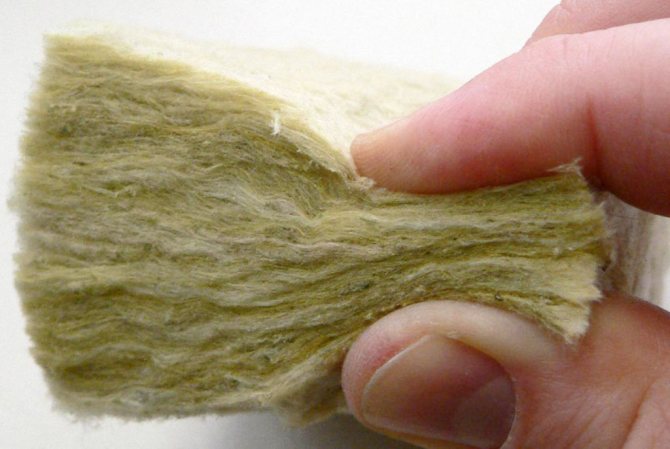
Figure 2. Basalt insulation for the facade of the house.
In addition to the above-mentioned mineral wool, there are also such as glass and slag wool, but due to their characteristics, they are not used in housing construction.
Manufacturers produce mats and strips of different sizes, but products are often used to insulate facades 10 cm thick.
Expanded polystyrene
Expanded polystyrene is polystyrene, in the shell of which a large number of air bubbles are enclosed. In this case, the proportional ratio of polystyrene and air is 2/92. That is, polystyrene is a solid foam.
The low coefficient of thermal conductivity of this material determines the presence of air trapped in polystyrene granules. Expanded polystyrene can be used in the temperature range of -50 to +70 degrees Celsius.
But expanded polystyrene, however, styrofoam and styrofoammade of polymers. This means that they are not susceptible to biological threats: fungi and microorganisms. As for its refractoriness, then under the influence of high temperature, expanded polystyrene begins to char. This happens because antipyrins are added during its manufacture, which prevent an open fire from forming.
When choosing this material for home insulation, you need to remember that it is afraid of direct sunlight. They gradually destroy it, so you cannot leave the insulation for a long time without finishing material.
Thermal panels
This type of insulation is a multi-layer material, which includes at least three components. In fact, these are insulated tiles for facade finishes, consisting of an outer layer (facing), an adhesive and a layer of insulation. As a rule, this material is made on the basis of expanded polystyrene. Manufacturers produce thermal panels in the form of slabs ready for installation.
Panels covered with clinker tiles, which are durable and attractive in appearance, are in demand among homeowners and builders.
Other materials
As already mentioned, a large number of materials are used to insulate facades. In particular - extruded polystyrene foam. In some ways, this material resembles polystyrene, but it is much stronger and better keeps heat. But, its price is higher than the price of polystyrene.
Penoizol - this material belongs to urea foams. It looks like shaving foam. The main advantage is that it can be produced directly at the construction site. Most often, this material is used for facade insulation. wet way.
Mounting methods
The choice of fixing method depends on several factors. One of them is the base of the surface: concrete, brick, wood or aerated block.
- The glue is used in a dry composition, requiring preliminary preparation: a mixing container, a construction mixer, spatulas. For outdoor use, certain brands are used that meet all the requirements: frost resistance, moisture, temperature drops, maximum heating.
- Liquid glue in cylinders is applied using a construction gun. It must also have features: adhesion percentage, moisture-tolerance, service life.
- Dowel-umbrellas. There are 3 types: plastic, with a metal pin, with a metal nail and a thermal head. Mostly they use polymer products or with a thermal head.
- Lathing. They are created extremely rarely due to the properties of the tree. Relation to moisture, temperature changes. Sometimes the crate is made of metal profiles. They are galvanized - this is an advantage, since the water does not wiggle on them, as well as the temperature regime.
- They also use insulating plasters. They are applied in 3 layers on a reinforced mesh (facade).
Dowels to a concrete wall
- The moldy surface is dried, cleaned and treated with special agents.
- After the work done, the surface is covered with a primer.
The preparatory process is over.
Now, at the bottom, you need to fix a wooden auxiliary strip or a galvanized profile. It will hold the insulation and will not let it slide down.
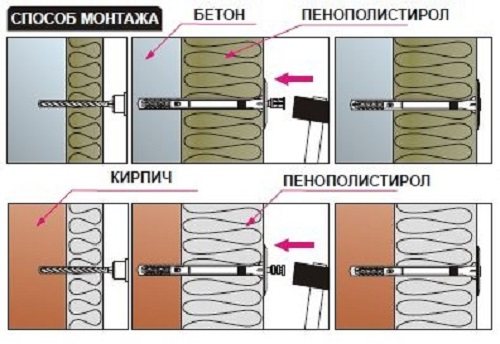
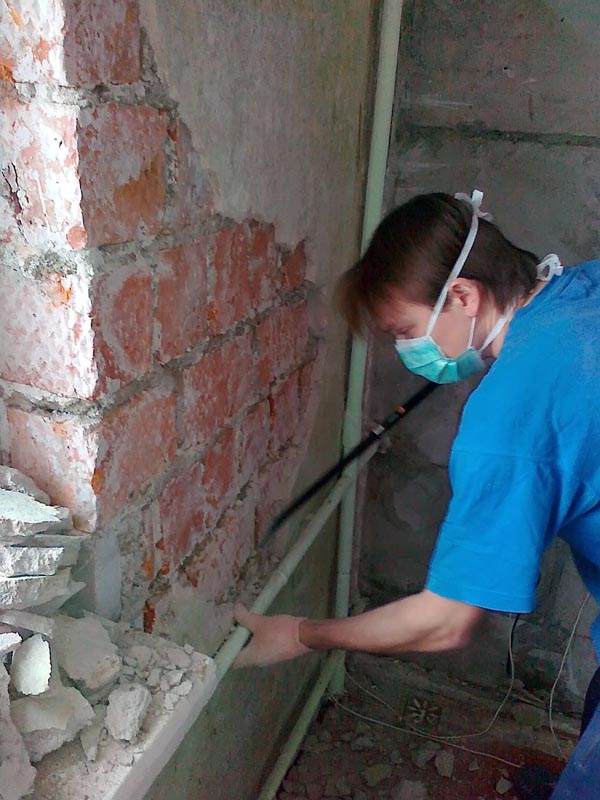
Mushrooms against a brick wall
Installation of tile insulation on a brick surface is similar to work on a concrete base. The algorithm of actions is as follows:
- Surface preparation. Checking it for evenness.
- Surface treatment with a primer.
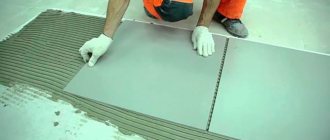
- Insulation plates - polystyrene, polystyrene foam, expanded polystyrene are smeared with an adhesive solution. Either a notched trowel is used and glue is evenly applied over the entire surface, or spot application - in the corners and in the center, mortar blades are placed.
- At the bottom of the wall, a holder bar is fixed. Insulation plates are fixed.
- After the glue has set, each plate is additionally fastened in the corners and in the center with dowels.
- All joints of the plates are covered with the same solution.
- The last step is surface plating. Decorative plaster or finishing materials.
Other mounting methods
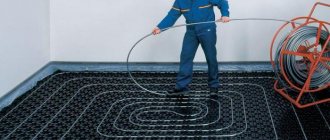
Roll insulation - mineral wool, often used in the insulation of buildings made of wood. A frame is required to mount it. Warming is carried out as follows:
- Fix the vapor barrier foil.
- Install a control strip at the bottom of the wall.
- Along the width (slightly less) of the insulation, fill horizontal or vertical wooden slats, which will be higher than the thickness of the insulation.
- Cotton wool is placed in the niches obtained.
- A windproof membrane layer is created on top.
What determines the result
In order for the house to be quiet, warm, it is necessary to carry out insulation not only outside, but also inside. Many types of insulation have indicators of soundproofing material.
If the outside is not possible to carry out insulation, then the optimal material is chosen for the inner lining - mineral wool, foil insulation. For external walls - polyurethane foam, expanded polyurethane foam (polyurethane foam).
Useful tips from the masters:
- Before applying the foam glue to the foam or polystyrene plate, the surface must be moistened with water. This will create good adhesion between the adhesive and the board.
- If there is a blockage at the bottom of the wall, then the control strip can be left unattached. In this place, carry out waterproofing and proceed with the installation of insulation.
- If the plates of the material are fastened in a staggered manner, then the seams will not coincide, and accordingly there will be no cold bridges.
- Do not leave the thermal insulation material outdoors after installation. It is necessary to cover it with putty or cover it with a windscreen.
If the recommendations are followed, the fixed insulation will serve for a long time.
The process of warming must be approached responsibly. For the correct selection of material, you need to study its characteristics, features and weaknesses. And also choose the right method of attachment to the surface. The result of the work done depends on this. Some insulating materials are fixed only for ventilation siding, while others can be covered with 3 layers of plaster on top.
Installation of plate heaters
Plate insulation is quite often used when equipping hinged ventilated facades, which include finishing with imitation of a bar.
It is effective both for internal and external wall insulation. However, there are some differences in the order of installation of thermal insulation layers.
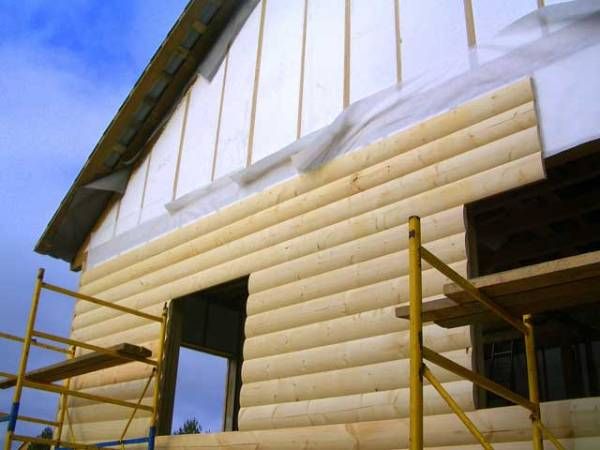
External wall insulation
It is considered the most effective protection against daily temperature changes, precipitation, and ice formation. It is these natural factors that have the greatest impact on the integrity of the building structures; under their influence, seams often open, cracks and chips form.
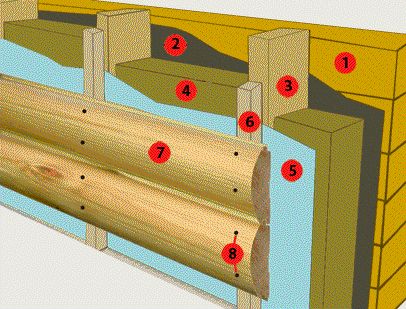
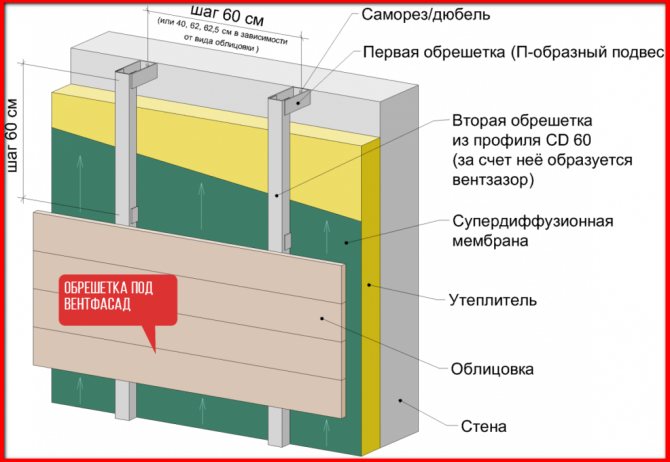
The procedure for installing insulation under the block house outside
1. Wall 2. Vapor barrier 3. Lathing 4. Insulation 5. Wind-protective film 6. Second layer of lathing 7. House block 8. Attachment points for house block
Pros of outdoor insulation
- The thermal insulation layer transfers the dew point from the surface of the walls to the insulation, thanks to which the walls themselves remain completely dry in the cold season. External thermal insulation eliminates the so-called cold bridges that can form during construction if materials with different levels of thermal conductivity are used.
- Thanks to the external insulation, fluctuations in air temperature in the interior from the heating of the outer sides by the sun and cooling them by the wind are reduced to zero.
- An additional plus - decorative function
: external thermal insulation systems hide possible wall defects.
However, in order for the insulation of the walls under the block house or other wooden cladding of the house to fulfill all these functions, it is necessary to strictly observe the technology of laying heat-insulating materials.
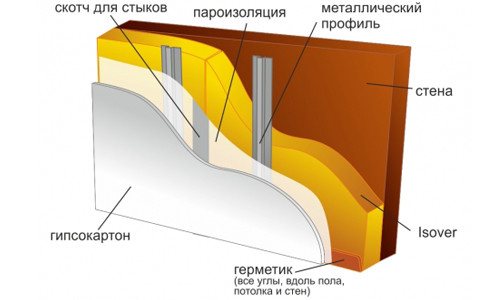
Step 1.
Preparing the walls. Before starting work on insulation, it is necessary to complete all "wet" operations: putty, plaster. Remove interfering protruding parts, possibly devices and equipment mounted on the wall (antennas, thermometers, alarms, etc.).
Step 2.
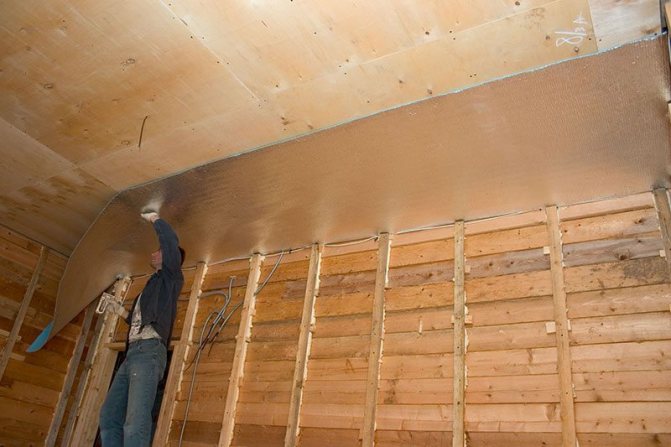
Place a vapor barrier on the prepared wall. Vapor barrier is a high strength polyethylene film in the form of rolls or slabs. When insulating surfaces of a large area, roll material is more often used. This results in fewer joints.
The rolls do not unfold vertically, but horizontally and are fastened with construction brackets or on double-sided aluminum tape from the bottom up. Each new strip is laid with an overlap of 5-10 cm. And the joints and joints with the walls are carefully glued with double-sided self-adhesive butyl rubber tape.
Step 3.
On top of the vapor barrier, we make a lathing with a bar or, in order to save money, with substandard wood. You can also use an aluminum profile, but wood is preferable. Fasteners are made with an expansion dowel if the wall is concrete or brick, and with ordinary nails if it is wooden.
The thickness of the battens should be equal to the thickness of the insulating material. For wood sheathing, imitation of timber, lining, as a rule, insulation of 50 - 100 mm is used. Step length - 600 mm (standard width of the insulation board).
Step 4.
We install thermal insulation boards. They should not have dents, folds or other defects. They need to be laid as tightly as possible to each other in the sheathing section.
If you are laying slabs in 2 layers, the joints should be staggered. Usually they are additionally reinforced with hat dowels. However, in the case of a block house, this is not necessary.
The waterproofing layer laid on top of the insulation reliably presses the slabs.
Step 5.
Laying a hydro-windproof layer. It is fastened to the lathing along the perimeter of the wall with staples. All joints are glued, as is the case with a vapor barrier.
Step 6.
The second wooden lathing is laid, on which the actual imitation of the timber is attached. In addition, the second lathing provides the necessary ventilation gap for air circulation.
Step 7.
Installation of imitation timber according to the tongue-and-groove principle. Fasteners to the lathing are performed using self-tapping screws.
Purpose and advantages of the poppet mount
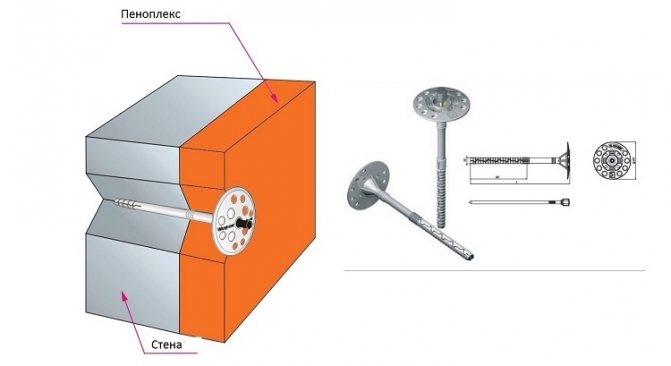
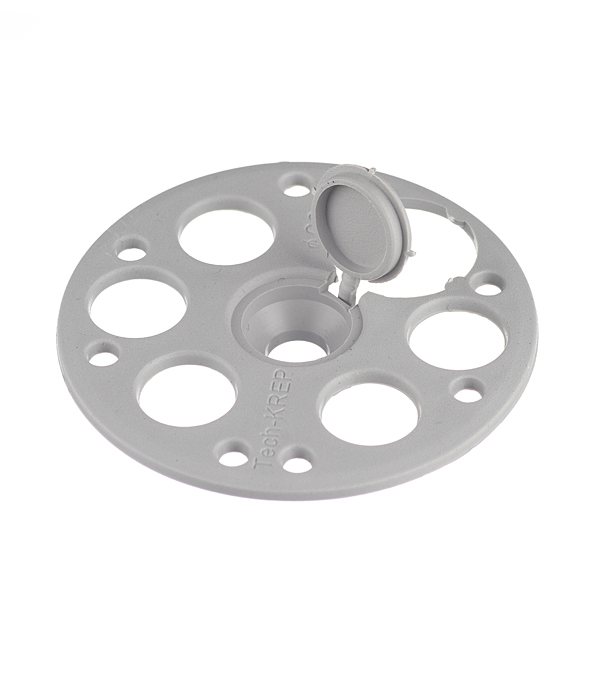
Dowels of a special shape, which are used to install thermal insulation, are called fungi, umbrellas in construction. They provide a secure adhesion even to fragile materials.
With their help, the heat insulator can be fixed to various materials:
The advantages of the poppet mount:
- Thanks to the wide head of the fungus, a secure fit to any building insulation is ensured.
- The umbrella, thanks to its long leg, is able to withstand significant loads. In the center there is a special hole in the head, into which the dowel is inserted.
- On the inside, the surface of the cap is rough for greater adhesion to the insulation.
- The dowels have anti-corrosion properties.
- The plastic from which the dowel is made is inexpensive and reliable.
- The fungus umbrella is a bendable element. It cannot damage the sealing product.
- For reliability, the dowel inside the structure expands in all directions, which leads to a strengthening of the fastener structure.
Types of fasteners for thermal insulation.
The mushroom dowel for attaching insulation is plastic or steel. Its type depends on the insulation that builders have to work with. Also, dowels differ among themselves by the type and quality of production, their configuration. The design may include a thermal head.
Features of plastic fasteners
There are cone-shaped holes on the surface of the umbrella. This design feature contributes to additional adhesion to the material. For the installation of non-solid materials, nylon fasteners are used, which are made from high-strength polypropylene, nylon, and polyamide.
The features of such fungi include:
- lack of response to temperature changes;
- low cost;
- reduced thermal conductivity;
- perfect stability in extremely harsh conditions;
- long service life due to the absence of rot and rust;
- withstand a load of 400 kg / m2.
Plastic fungi are widely used in the insulation of brick and concrete walls.
Metal fasteners
The insides of the fastening are made of metal from steel. A polypropylene sleeve is used, at the end of which there are spacers. With this type of fastener, a high degree of load is allowed. Telescopic fasteners TechnoNIKOL are used to equip the facade.The disadvantages of the material include:
- high price;
- the occurrence of condensation at the entry point of the metal rod;
- possible rust (metal parts come into contact with moisture, rust can appear on the plaster).
Thermal Head Fasteners
It is a metal rod, which is covered with polyamide near the head. This plastic part prevents condensation from accumulating at the attachment points, thereby preventing rust from appearing on the plaster.
These devices are mainly used to insulate wooden houses. The advantages of these fungi are similar to the positive properties of plastic and metal fasteners. The disadvantage of the product is the high price, which surpasses everyone in this segment.
Types of thermal insulation materials
Building insulation materials that prevail in the modern construction market:
- Styrofoam is a popular material that is used to insulate walls;
- the penoplex of the slab is a "relative" of the polystyrene, in terms of production it is higher than the polystyrene;
- expanded polystyrene - a porous material that is used to insulate floors, walls, various partitions;
- glass wool is an excellent material for insulating floors, ceilings;
- slag - it blocks heat well, but due to the fear of moisture and low quality, it was not widespread;
- mineral wool is an environmentally friendly material, ideal for insulation inside the house;
- ecowool - this material is perfect for insulating walls of residential, private houses, it is also an environmentally friendly material;
- polyurethane foam adheres well to all painted surfaces, metal, brick, glass, wood, concrete, perfect for insulation of the ceiling, walls and floor;
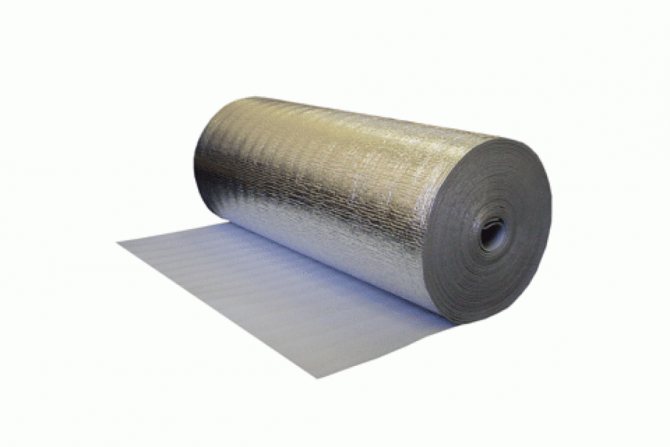
- reflective insulation (foil) - is a layer of reflective material, 2 cm thick.
After reviewing the types of material, we can unequivocally conclude: there is no ideal insulation. The choice should be based on the intended goals, money and the material itself.
Methods for attaching insulation to the wall and their features
Using the lathing
Convenient when using soft insulation such as mineral wool. Before laying, it is necessary to prepare the surface: a frame made of bars is attached to the wall, and mineral wool is placed in the resulting cells.
On the street, fastening of insulation with the help of a crate is done when there is a need for a ventilated facade. In this case, the frame is made of a metal profile.
However, this method is not used when the preference for cladding is given to a wet facade, since the latter means plaster and various solutions and mixtures are used during the work. Soft insulation is not able to withstand the weight of the plaster layer.
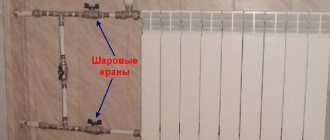
For dowels and nails
Dowels are required to install the insulation. They are of three types:
- plastic;
- dowel with a metal nail;
- mushroom dowel with a metal rod equipped with a thermal head.
To fasten the insulation to a brick wall, the length of the fastener is needed 70 mm more than the thickness of the seal. The plastic product is used up to a length of 120 mm. A dowel larger than the specified size will break the nail.
Methods for fixing the heat insulator
Adhesive mounting
Glue mounting
For the installation of heat-saving materials, a variety of methods are used today, but the most common are adhesive installation and fixation on plastic dowels.
It is about these methods, which allow us to fix the insulation on the base with our own hands, that we will talk in more detail:
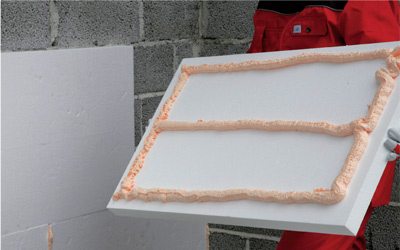
- For the installation of foam, polystyrene and similar plate heat insulators, special cement-based adhesive mixtures are most often used.
- The glue is prepared by diluting the dry component in clean cool water until a mixture of a homogeneous creamy consistency is obtained.As a rule, kneading is done not by hand, but with the help of a special drill attachment - this way you can achieve almost complete absence of lumps.
Advice! Experts recommend kneading the glue twice, with a break of 10-15 minutes. Thanks to this approach, the performance properties of the solution will be maximized.
- The best adhesion of the insulation to the wall is ensured by using primers. The primer is applied to the surface itself, and the panels begin to glue only after its polymerization.
Apply glue to the slab
- To keep the slab of material stronger, its seamy side is roughened. To do this, use either a needle roller or a polystyrene grater.
- The adhesive is applied either to the panel itself, or to both the panel and the wall. In the second case, the price of insulation increases, but the absence of cavities under the heat-insulating layer and maximum reliability of fixation are guaranteed.
- In order for the polystyrene plate to reliably adhere to the wall, it is coated with glue around the perimeter. It is also possible to apply some glue points in the center of the panel.
Most adhesive mixtures used to fix polystyrene do not require long curing. It is necessary to press the panel to the base no longer than 30-40 seconds: this time is quite enough for the glue to "take".
Adhesive foam application
Sometimes other adhesives are used for installation, such as polyurethane foam adhesive in cylinders. They are much easier to apply, but they are quite expensive.
Fixing with dowels
Dowels for fastening insulation are used almost more often than adhesive mixtures. Moreover, often mechanical fasteners complement the gluing, providing a more secure fixation of the panels to the wall.
Plastic dowel for attaching insulation with a fastening nail
With the help of disc dowels (they are also called umbrella dowels), plates of foam, polystyrene and mineral wool, as well as other materials that cannot be fixed in any other way, are mounted.
Impact-resistant polypropylene is used for the production of dowels. The standard width of the "mushroom" is 59-60 mm.
These parts are mounted according to the following scheme:
- First, the insulation panel is fixed to the wall using glue or brackets. In the case of the installation of mineral wool, the panel can not be fixed, but simply pressed to the base.
- Then the material is drilled through using a perforator, in which a drill of the corresponding diameter is fixed. In this case, the deepening of the hole into the base should be at least 40-50 mm.
Note! When external insulation of a loggia with a parapet of small thickness is carried out, smaller fasteners can be used to avoid the formation of through holes.
- We drill holes in the corners of the slab, as well as in the center.
- We insert a sleeve into the hole, after which the dowels for fastening the insulation are fixed with special nails or locking screws.
Installation diagram using dowels
Other technologies
The mentioned technologies are not the only ones that can be used for fixing heat-insulating materials to the base:
- Insulation materials, which include glue (polyurethane foam, ecowool, etc.) are applied to the wall by spraying under pressure. Adhesive components provide a secure hold on most materials.
- Rolled heat insulators, such as Penofol, are sometimes produced with a self-adhesive layer. Also, the fastening of the insulation to the OSB panel or wooden crate can be carried out using the staples of a construction stapler.
Thin foil material can be fixed with a stapler
- Cork roll insulation is glued to the walls in almost the same way as ordinary wallpaper, however, acrylic or contact glue is used for this.
- In some cases, fasteners are not used at all for the installation of thermal insulation.In this case, the material (most often mineral wool insulation) is inserted between the elements of the wooden frame and covered with a counter-lattice or sheathing made of gypsum plasterboard or boards.
Phased insulation technology using fasteners in the form of fungi
Before fixing the thermal insulation, it is necessary to place a vapor barrier material on the area of the future insulation. Along with its direct purpose, it will serve as an additional attachment.
Wall insulation
The installation process consists of simple steps:
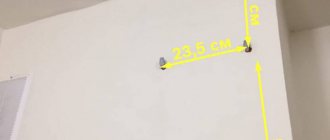
- The entire area of the insulation should be marked out for drilling with a pitch of 0.8 m horizontally and 0.3 m vertically.
- Then holes are drilled. The drilling diameter must match the mounting foot.
- Then the sleeve is inserted into this hole by hand. The core is placed in a sleeve and hammered in until it stops. This opens the umbrella with a special protection cover.
To start installing the insulation, you must first install the guide bar at the bottom of the wall. When installed, it will prevent the material from sliding down.
If the insulation is attached to the glue, then the fungi are mounted only after the glue has completely dried. The formed joints between parts of the material are treated with polyurethane foam. Foil tape can also be used if foam is used.
The calculation of the required number of fasteners is carried out according to the formula:
W (number) = S (coverage area) * Q (number of dowels per square meter).
The Q value for penoplex will be 4, and for basalt wool 6.
Substituting all the data in the formula, you get the required number of fasteners. You should always remember in reserve.
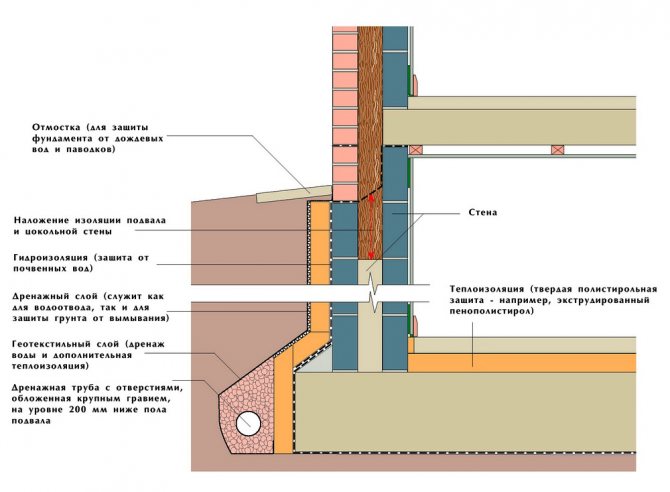
Base / plinth insulation
The basement of any building must be properly insulated. Due to poor insulation of this part of the building, cold through the soil and the floor will enter the house. Installation of thermal insulation is as follows:
- In order to start fixing the thermal insulation, it is necessary to provide access to the base / plinth surface. It is best to carry out this operation at the stage of building a building.
- A mastic is applied to the surface, which promotes the adhesion of the adhesive base.
- It is better to use expanded polystyrene as a heat insulator. It is not affected by moisture. Mastic acts as glue, which perfectly fixes the sheets of insulation.
- There is no need to spend money on fungi to insulate the basement. The glued sealing material will in any case be covered with soil. This will ensure that the seal is pressed against the perimeter of the base.
- After gluing the material, the joint joints must be filled with polyurethane foam.
The described algorithm of actions is quite simple, although it is considered more difficult than wall insulation.
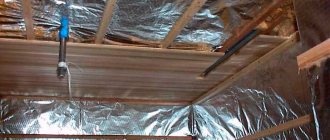
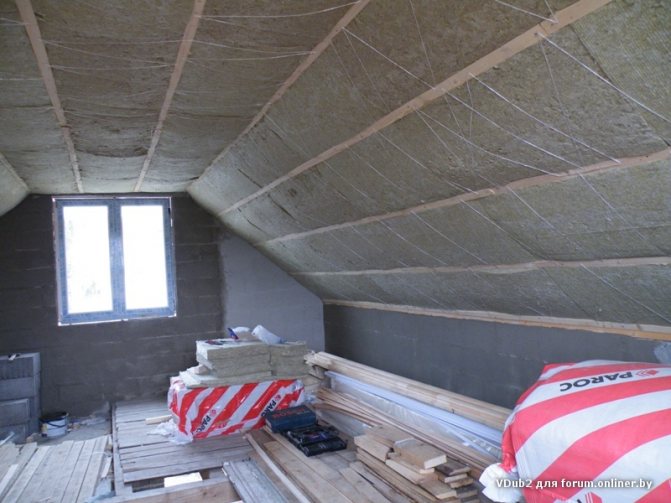
Attic insulation
When insulating a house, special attention is paid to the attic. The retention of heat in the house depends on the correctness of its insulation. When installing the insulation, the rondole hold-down washers are used.
There are several installation options, depending on the material that is used for insulation:
Foam insulation
- In this case, the sheet width is chosen at least 100 mm. If a sealant with such a thickness is not at hand, then you can use a thickness of 50 mm, laying in two rows. The paving work will be completed more quickly if the width of the material and the position of the rafters are correct.
- Polyfoam is installed using polyurethane foam or adhesive. If the product fits snugly against the walls of the rafters, then you can only walk along the edges of the seal (at the connecting joints). In this case, the foam will serve as an additional connecting element.
If plastering work is planned, then the double siding method is used.
For additional fastening, the insulation is fixed with a rail or board, on which the finishing material is then installed.
Another option for insulating the attic is to install roll materials. Mineral wool is easy to install.It has a number of distinctive features:
- The material is easy to cut and fit between the slings. The trimmed material should be four centimeters larger than the distance between the lines.
- These strips are then pushed into the timber structure between the slings. If desired, the mineral wool can be additionally fixed, although by itself it fits snugly to all sides of the structure.
- No glue or dowels are required to install mineral wool. This material is attached with small studs and twine. Nails are stuffed onto the rafters at a distance of 50 centimeters and twine is pulled, which will hold the insulation.
Ceiling insulation
Fastening the insulation to the ceiling has a number of features and installation difficulties.
Fungi are used to insulate a concrete ceiling with mineral wool. One cannot cope in this case. One fitter holds the gasket sheet, the other marks the attachment points, drills and fixes the gasket.

Styrofoam on a concrete, wooden ceiling can be fixed with glue. The cost of this material is low, so it is most affordable for a large number of those who want to insulate the ceiling.
In wooden houses, sheets of insulation are attached to a frame built in advance.
In the case of finishing the ceiling with clapboard, plasterboard, a seal is placed on the finishing material, which rises to the ceiling and is fixed with special fasteners.
Facade insulation systems installation technology
Installation of the LNPP external thermal insulation system is carried out in the following sequence:
Scaffolding installation
Installation and fastening of building scaffolds, scaffolding and cradles should be carried out according to the project of production of work (PPR) in accordance with the requirements of SNiP 12-03-2001 "Labor safety in construction", the instructions of the manufacturer and GOST 27321-87 "Scaffolding and attachment for construction and installation works. Specifications ", GOST 27372-87" Cradle for construction and installation work. Technical conditions ".
Scaffolding should be installed taking into account the thickness of the insulation board and the architecture of the building. The distance from the front edge of the scaffolding to the wall should be equal to the thickness of the insulating board plus (20 ± 15) cm. The most convenient access to any point of the treated surface should be provided. Scaffolding should go around the corner of the building for at least one span.
2. Preparation of the building base
Before starting work on insulation at any object, it is necessary to inspect the external walls and choose a method for their preparation. A properly prepared building base is a prerequisite for obtaining wall insulation with desired properties. The surface of the base must be dry, free from dirt and dust. Old plaster should be checked by tapping all over the surface, knocked down where voids are found and repaired. Old facade paint should be tested for compatibility with the adhesive. In case of incompatibility or when the chemical composition of old paints is unknown, it is necessary to completely remove the paint (sandblasting, mechanical cleaning), treat grease and rust stains with special compounds for neutralization. If there are deviations of the wall surface of more than 10 mm when checking with a 2-meter rail in horizontal or vertical directions and removing loose plaster without restoration, it is necessary to level the surface by gluing beacon strips or fragments of expanded polystyrene.
Error: Insulation boards are glued without preliminary cleaning of the base. This can lead to complete delamination of the insulation system.
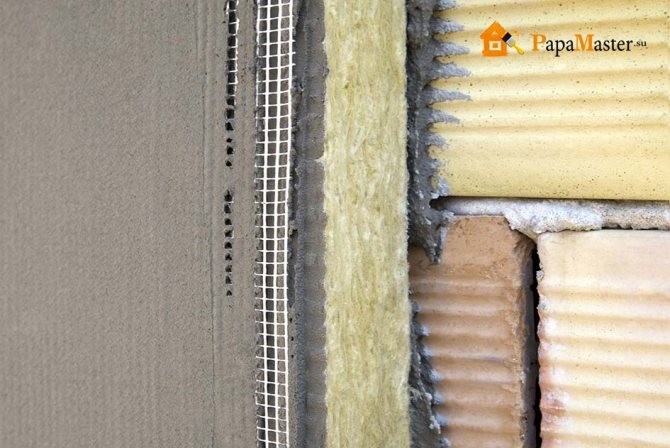
Fastening the insulation to the base
For fixing the insulation plates to the base, glue prepared on the basis of the LNPP adhesive composition and plastic dowels with steel rods are used.
Glue preparation:
Stir the adhesive in a bucket with a drill mixer until homogeneous and pour into two buckets equally. Prepare Portland cement M400 separately for each bucket (volume ratio - adhesive composition: cement 1: 1). Without turning off or taking out the drill mixer from the bucket, add 3-4 trowels of cement and stir until a homogeneous mass is obtained. It is possible to add clean tap water to adjust the viscosity and consistency. The volume of the glue in the bucket should increase to the original volume. Leave for 15 minutes until "ripening" and then mix thoroughly again. The finished glue must be used within 2 hours.
Error: Using improperly prepared glue. This can lead to complete delamination of the thermal insulation system.
Installation of the bottom row of insulation plates:
On the wall, mark the lower edge of the façade system or install temporary starting profiles. Then, above this place, apply glue to a width of 50 mm and glue a strip of fiberglass mesh to it to frame the border ("break") of the insulation system. The width of the framing strip: 50 mm for the insulation plus the thickness of the insulation, plus 50 mm of the mesh should go over the insulation from the front side. Similarly, all places where the thermal insulation system adjoins to the basement, window and door openings, roofs, communications inputs, expansion joints and any other "breaks" in the insulation system are pasted over. Align the bottom row of slabs horizontally using a plumb line, a level and a 2-meter rail.
Bonding insulation boards:
Insulation plates should be installed from bottom to top in compliance with the dressing rules: horizontal displacement of the seams at least 80 mm, toothed dressing at the corners of the building, framing window and other openings with plates with cutouts fitted in place. The ends of the slabs must be tightly joined. Glue is not allowed to hit the ends. Alignment of the plates to be installed is carried out using a foam float with light pressure or tapping. Surface flatness control is carried out using a level and a 2-meter rod. The deviation from the vertical or horizontal of the finished surface should be no more than 5 mm per 1 meter when checking with a 2-meter rod; the number of irregularities of a smooth outline on 4 m2 with a depth (height) of up to 3 mm should not be more than 2. In the LNPP-P facade insulation system, it is allowed to process the surface of expanded polystyrene plates to correct the unevenness of the base. Cleaning the surface of expanded polystyrene plates is carried out with special floats. In the system of external thermal insulation "LAES-M". Adjustment of mineral wool slabs in thickness with floats is not allowed.
Errors: Installation of insulation in the corners of the openings. This can lead to the appearance of cracks in the outer textured layer on the surface of the wall and in the corners of openings.
Methods for applying glue to the insulation board:
The first way - The glue is applied to the insulation along the perimeter with a strip of 30-50 mm, the thickness of which is about 10 mm, stepping back from the edge by 20 mm, and 6-8 beacons - "Easter cakes" with a size of about 100 mm in diameter and at least 10 mm in height are placed in the middle.
Second way — The glue is applied to the slab along the perimeter in a strip 30-50 mm wide, about 10 mm thick, stepping back from the edge by 20 mm, and 6-8 strokes 50-80 mm wide, about 10 mm thick and 250 mm long are made in the middle. When checking (control tearing), the adhesive should cover about 40% of the surface of the insulation board. The adhesive is applied with a smooth-edged stainless steel trowel.
Immediately after applying the glue, the insulation must be glued.
Installation of dowels
To install the dowels, holes are drilled in the wall through the insulation plate. The hole should be 10-15 mm deeper than the part of the plug to be driven in. The dowel is hammered into the supporting base by 50-60 mm. The dowel head must be flush with the surface of the insulation board.Strips of mineral wool boards, used as fire-prevention strips, are also fixed on the insulated surface with glue and dowels, regardless of the main layer of insulation. When gluing fire protection strips, the adhesive is applied in a continuous layer with a stainless steel trowel with serrated edges. No gaps are allowed between the cuts and the building base. The gaps between the mineral wool cuts and the expanded polystyrene plates must be filled with strips of expanded polystyrene, the gaps between the cuts - with strips of mineral wool.
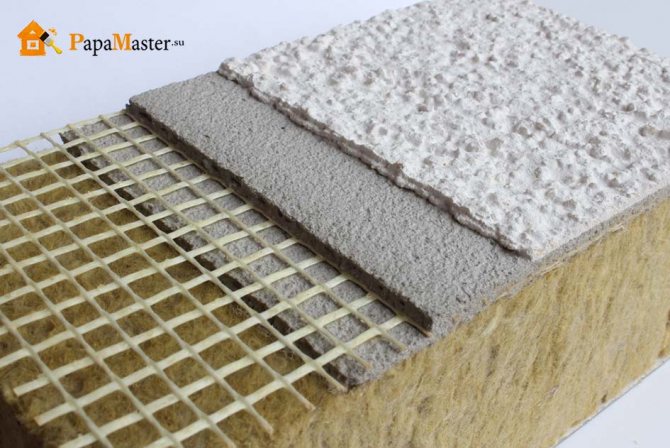
Installation of the base layer (insulation reinforcement with fiberglass mesh)
After all the insulation plates are installed, fixed with dowels and aligned, the base layer is installed. At the outer corners of the building and on the slopes of the openings along the perimeter, an angular fiberglass mesh should be installed. The free ends of the fiberglass mesh, left at the breaks of the thermal insulation system, are bent outward and glued over the corner mesh. On the first floors, along the perimeter of the building, up to a height of 2.5 m from the ground, a "armor" glass mesh should be installed. Cloths of armored fiberglass mesh should be glued end-to-end to each other and to the corner mesh. In the corners of window and door openings, additional diagonal sections of glass mesh at an angle of 45 ° should be installed, the size of such sections should be at least 280 x 330 mm.
Error: Absence of diagonal sections of fiberglass mesh in the corners of the openings. This can lead to cracks in the outer textured layer at the corners of the openings.
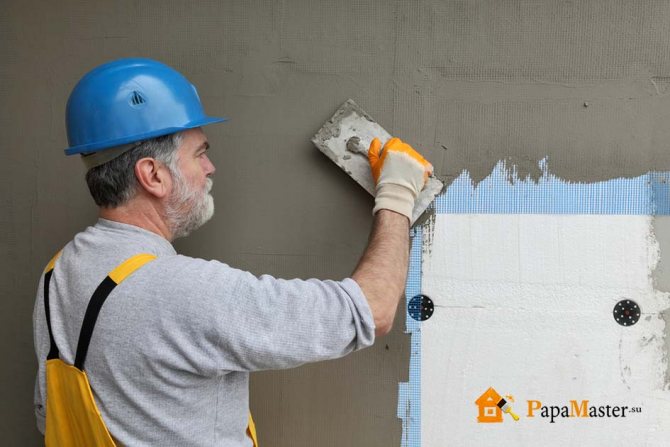
From above, glass mesh cloths "5x5 mm" are glued. For this, the adhesive should be applied to the surface in an even layer about 2 mm thick with a stainless steel trowel with smooth edges. Immediately after applying the glue, you need to apply a fiberglass mesh and drown it into the glue layer, while leveling the glue and smoothing the mesh with a trowel from the middle to the edges and from top to bottom. The mesh should be located in the middle of the glue layer and should not come out on the surface, the mesh pattern should not be visible. Subsequent glass mesh sheets should be glued with an overlap of 50-100 mm. To do this, remove the glue layer at the edges of the mesh or leave them clean (not glued) to a width of 50-100 mm, so that later, when overlapping the next mesh sheet, a double adhesive layer does not turn out, the same should be done during breaks in the work on gluing the fiberglass mesh.
Error: The mesh does not lie in the middle of the reinforcing layer, but on the insulation. This can lead to the appearance of vertical and spider web cracks on the outer textured layer on the surface of the wall.
Application of a tinting primer (if necessary)
The LNPP tinting primer is used for color preparation of the base layer before applying the textured coating. This is necessary for light textured colors. The LNPP tinting primer can be applied in two layers.
Preparation of material for work:
During storage and transportation, the tinting primer is slightly exfoliated, therefore, before starting work, it is necessary to stir the primer until it is completely homogeneous with a wooden mixer manually. Further, mixing must be repeated before each set of primer from the factory container. Any additions to the material are prohibited. Do not use mechanical stirrers.
Material application:
The primer must be applied manually - with a roller (you can use a brush) on the main plane, edges and abutments to adjacent surfaces must be “removed” with a brush. The primer should be applied in one technological cycle, sequentially covering the entire surface without gaps, avoiding uneven drying. The area of application should be delimited by corners, architectural or structural elements. If necessary, the surface to be treated can be delimited with masking tape.
7. Finishing the facade with textured compositions of "LNPP"
Preparation of textured composition for work:
Mix the composition in a bucket with a drill mixer until the mass is completely homogeneous and beat. During mixing, it is possible to add clean tap water (but not more than 200 ml per bucket), depending on weather conditions (in dry, windy and hot weather), porosity and quality of the processed surface. Water must be added in equal amounts to the buckets necessary to process the entire plane, otherwise there may be a different shade of individual areas. After mixing, the composition is suitable for use within 2 hours. After this time, the composition must be mixed again without adding water.
Application of textured composition:
The textured compound can be applied by hand with a smooth-edged stainless steel float or sprayed on with a spray gun. The compositions should be applied sequentially, covering the entire surface, without gaps, avoiding uneven setting. When applying by hand, you need to level the layer to the minimum possible thickness (by the size of the filler grain) and immediately, while the material is still wet, display the texture pattern - rub with plastic floats by performing circular, vertical or horizontal movements.
When applying the composition by spraying, the surface is not rubbed. The processing area in one technological step must be limited by angles, structural or architectural elements. If necessary, the surface to be treated can be delimited with masking tape.
8. Installation of sealing gaskets and drips
Sealing tapes or cords are installed simultaneously with the installation of the insulation in the places where the insulation system adjoins the window and door blocks, roof structures, communications inputs, expansion joints and other "breaks" in the insulation system. Sealants are applied after complete polymerization of textured compositions. When the thermal insulation system is adjacent to the window blocks, silicone sealants are applied simultaneously with the installation of the ebb. All operations for the installation of the facade insulation system are carried out taking into account the necessary technological breaks.
Variants and features
Today, buildings are most often insulated with foam and mineral wool. In this article, we will discuss the features of fastening thermal insulation materials using the example of mineral wool. However, if you are insulating the room with another material, for example, foam or polystyrene foam, the article will also show the general principles of correct installation.
The principles of attaching insulation inside or outside are very similar. However, there are also differences that need to be cleared up.
Installation of insulation on the walls inside is most often done using lathing. This is a frame, in the form of bars, which are attached to the wall, and insulation plates are already inserted into the formed cells.
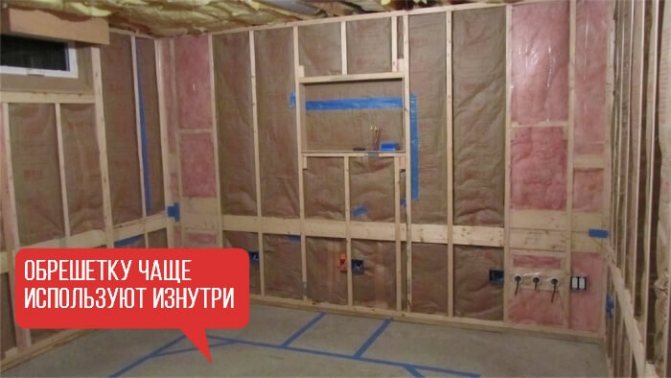
For external walls, the frame method is used less often. Most often they use a fixing on glue-foam or an adhesive composition with dowels. The frame from the outside is used only for facing the facade with soft slabs of stone wool in order to reduce the load on the lower rows of insulation. In this case, it is made from a metal profile or a wooden bar.
So, we have identified three ways to fix the insulation to the wall, which can be combined:
- Lathing;
- Adhesive composition;
- Using dowels.
Advantages and disadvantages of plate heaters
Insulation boards are most popular due to their ease of installation and excellent thermal insulation properties.
Panel insulation based on polyurethane foam or expanded polystyrene
keeps warm in the best way. It is resistant to decay and has excellent waterproofing characteristics.
However, it has one drawback - it practically does not have sound-absorbing properties. In addition, all foams burn, releasing toxic substances into the air.
Mineral wool insulation
it is considered one of the best for external walls due to its excellent vapor permeability characteristics.Basalt wool, moreover, practically does not lend itself to deformation throughout the entire service life and does not corrode.
Mineral wool has high sound insulation properties and belongs to the class of non-combustible materials. Moreover, it is used for fire protection. That is why it is mineral wool that is most often used as a heater in wooden houses from a bar, frame houses and buildings with wood trim (imitation of a bar, lining, block house, etc.).
Lathing
The lathing is used under ventilated facades. This is due to the fact that soft insulation, in principle, is not used for "wet" facades. It does not have sufficient rigidity to support the required weight of the plaster layer.
If you plan to finish in the form of "Bark beetle" or "Lamb", go to the following methods. Sheathing is often used for thermal insulation from the inside. There she fully justifies herself.
So how is the lathing made?
- Necessarily! A vapor barrier film must be laid on the wall, secured with stapling staples;
- The lower plinth profile is screwed on;
- On top of the vapor barrier, a bar with a thickness equal to the thickness of the insulation is screwed with self-tapping screws. The step of the timber in width should actually be equal to the width of the slab, but less by 2-5 centimeters. Most often they use a beam step of 60 cm.
- After that, starting from the bottom into the crate, the mineral wool is laid.
The slabs in the crate should be tight. In this case, the cold will not be passed through the gap between the timber and the stove. But, this approach is not used very often. It applies primarily to wooden houses. Also, soft mineral wool slabs necessarily require not only a vapor barrier inside, but a windproof layer outside. Otherwise the wind will blow. Installing a windscreen is an additional cost, so two other mounting methods are often used.
Laying the slabs in the crate is the right way when the question arises: how to fix the insulation to the ceiling.
Preparation of surfaces for insulation
Before fixing the insulation on the wall, its surface must be prepared. This is due to the fact that the thermal insulation process ensures complete overlap of the wall material for a long time, and only the correct processing is able to provide the required durability.
In the process of preparing the surface for fixing heat-insulating panels, typical instructions recommend performing the following operations:
- The base is cleaned of old finishes, plaster and putty... In some cases, it is allowed to preserve the plaster layer, but it should be carefully inspected.
The wall needs to be cleaned - as shown in the photo
- The detected weak sections of the wall are dismantled using a hammer drill or chisel... Cracks are embroidered with a grinder to a depth exceeding the size of the cracking. After that, the damaged areas are repaired with either cement mortar or quick-setting epoxy mixtures.
Advice! Fasteners for insulation can only be fixed in a sufficiently strong base. If the wall has a tendency to collapse, then it makes no sense to insulate it.
- For thermal insulation using high-density polymer panels, the surface is carefully leveled with plaster... If the insulation is made using mineral wool or other loose materials, then you can do without alignment.
- In order to avoid damage to the material with fungi, we treat the base with a fungicidal composition... This should be done even in cases where vapor-proof materials are used for insulation (polystyrene, polystyrene, penofol, etc.).
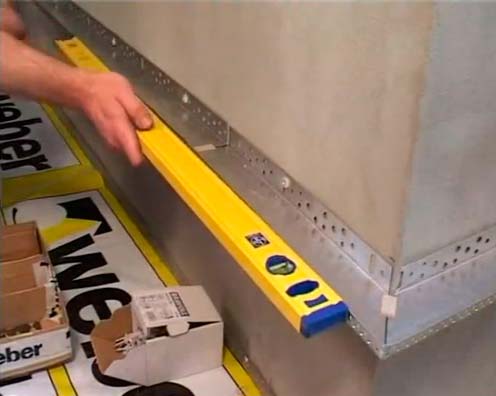
Plinth profile installation
A so-called plinth profile can be used as an auxiliary device for the installation of many types of thermal insulation materials. It is a perforated metal plate that is mounted on the bottom of the wall.
The plate is rigidly fixed on the base and serves as a reliable support for the plate heat insulator, preventing it from sliding under its own weight.
Advice! The basement profile must be selected depending on the dimensions of the insulation used.
On glue
As the only method of fastening exclusively with glue, it is rarely used and only under ventilated facades. For plastering work, additional reinforcement with umbrella dowels is needed. However, this method has its own characteristics that need to be considered separately.
First, there are two types of adhesives:
The dry mix is sold in bags and requires dilution. Glue-foam is sold in cans and does not require preliminary preparation. The latter costs a little more, but the convenience is worth it.
First, you need to level the wall and smooth out all the irregularities as much as possible, possibly by plastering the surface.
Sets the bottom bar, which will be the starting point for thermal insulation. The dry mixture is applied to the board itself.
In the case of a dry mixture, it is necessary to apply the glue to the boards in several pieces and evenly, using a comb, distribute over the entire surface. After that, the insulation slabs are fixed on the wall. Usually, the installation of mineral wool or other materials starts from the corner and always from the bottom row.
Foam adhesive is applied around the perimeter of the board and in several strips in the middle. After application, press the boards to the plane. The foam hardens from 30 minutes to 2 hours. During this time, it is possible to slightly adjust the position of the slab using a level.
Dry mixes are often used:
- EK THERMEX;
- Ceresit CT 190;
- Ceresit CT180.
Popular foam options:
- Ceresit CT 84;
- Soudabond EASY;
- Insta STIK.
The cost of one cylinder is from 200 to 500 rubles.
We have discussed the basic principles of how to fix the insulation on the wall using an adhesive composition. You can decide what exactly to use by reading a couple of opinions.
When we decided to insulate the facade, the foreman said that he would glue it on the foam. We were outraged, they say, the polyurethane foam is expanding, but he said that he would use glue foam. I asked which one to buy, a good one or a simple one. We said, "Good." We did not regret it, 30 minutes after gluing the sheet can not be torn off. We decided to conduct an experiment and glued plates with the name of the street and the number on it. Everything is holding up perfectly.
For large wall differences, it is recommended to use polyurethane foam, specifically for foam. It is also called "liquid foam". If the curvature of the wall is one to three centimeters, this is not a problem at all. I bought it at Epicenter a year ago, glued the sheet for the sake of interest - a year has passed, everything is holding, the sheet cannot be torn off. Styrofoam breaks, but holds.
Installation of thermal insulation
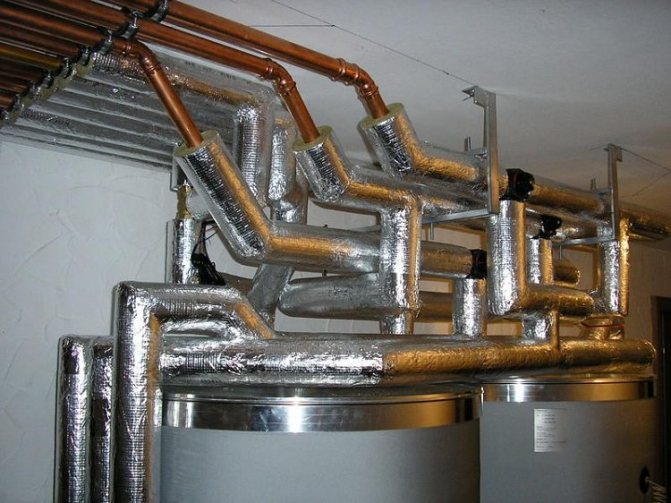
The installation and construction service of TeploEnergoProm LLC has been providing services for the installation of thermal insulation of pipelines, ventilation and tanks since 2007. Over the years, we have installed insulation on more than 35,000 meters of pipes and air ducts.
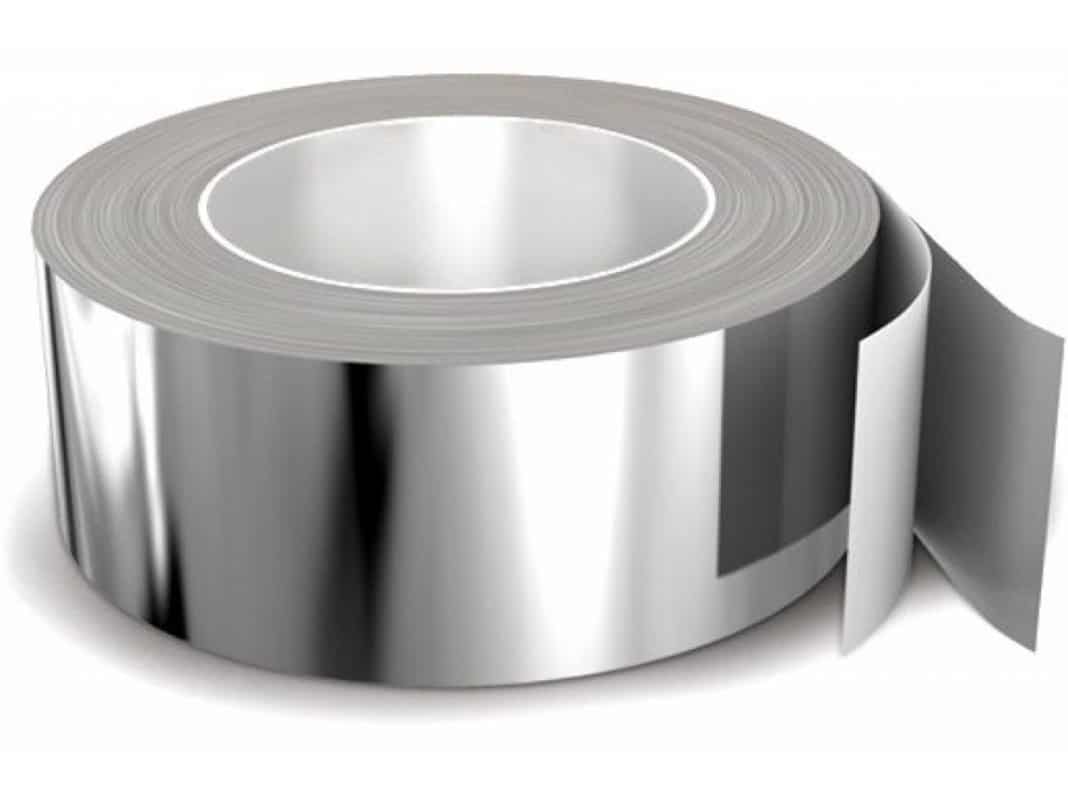
By ordering the installation of thermal insulation from us, you will receive a quality work performed and a significant reduction in heat loss. To preserve the properties and integrity of the insulation, order the installation of coating systems made of aluminum, pvc or other material.
We carry out thermal insulation:
- Heating pipelines;
- Hot water supply (DHW);
- Cold water supply (HVS);
- Steam pipelines;
- Boiler rooms;
- Individual heating points (ITP);
- Pumping stations;
- Pipelines with negative temperatures;
- Tanks (including for storing petroleum products);
Thermal insulation of heating pipelines.
To maintain the temperature of the coolant, it is necessary to install thermal insulation of the heating system pipelines. This will increase energy efficiency and reduce heating costs. When ordering our services, you receive advice on the choice of the optimal material for your facility, and 100% insulation of the surfaces of pipelines and valves.
Thermal insulation of hot water pipelines (DHW).
To ensure a hot water temperature of at least 55 degrees and to minimize heat loss, order the installation of thermal insulation c. We will select for you the most optimal option for thermal insulation made of modern materials. A team of experienced installers will deliver on time.
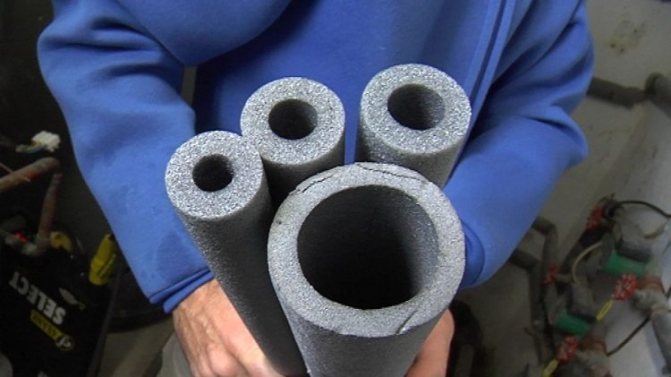
We work with most modern materials:
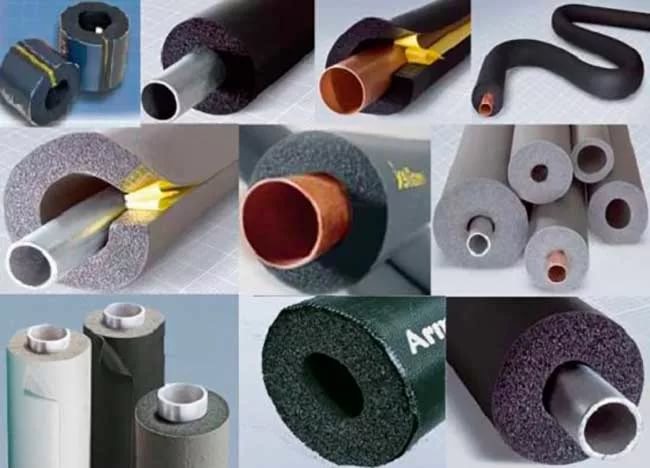
- Rubber thermal insulation (K-Flex, Armoflex, Kaiman all product lines);
- Coating and protection systems: made of aluminum; polymer; foil; PVC; combined;
- Foamed polyethylene insulation (Energoflex);
- Mineral wool thermal insulation;
- PPU shell;
Why you need to choose TeploEnergoProm for the installation of thermal insulation:
- We have been working since 2004, and have been dealing with thermal insulation since 2007;
- We offer reasonable prices;
- We have extensive experience, more than 35,000 m;
- A team of 5 Russian craftsmen is working;
- We have all the necessary equipment and tools;
- We comply with the terms and conditions of the contract;
- We have SRO approvals;
- We work on taxation with VAT.
How to make an order for the installation of thermal insulation?
Write a letter to e-mail In it indicate: your details and contacts; send a specification for materials. Dear customers, if there is no time to wait or if you have questions - call 8 910 646 7521; you can fill out the feedback form or write to e-mail. Within 30 minutes the engineer will contact you and agree on the time and date of the start of work.
DO YOU HAVE ANY QUESTIONS? Ask them in any way convenient for you. All consultations are free of charge.
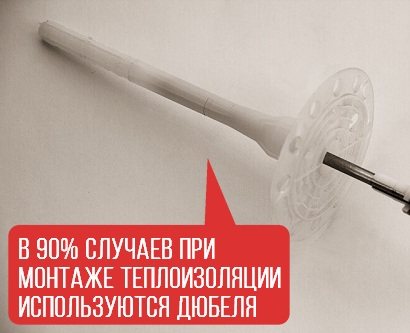
On dowels
In 90% of cases, the fastening of mineral wool and other materials to the wall occurs using dowels.
Now we will just describe the sequence of work when using this method.
First of all, if an adhesive was first used to fix the insulation boards, they must be well fixed. Most often, it is possible to fasten with dowels 2-24 hours after gluing. A more accurate figure can be found in the instructions for the adhesive composition.
- Choosing and purchasing an umbrella of the required length;
- We drill a hole into which the fastener will be driven;
- Insert the dowel into the hole;
- Using a hammer, hammer in the anchor (with plastic nails, you need to be especially careful with effort).
Our sheet is securely fixed.
In the case of laying mineral wool, namely its hard slabs, on the slabs themselves, you will have to pre-drill not only holes, but also round recesses for the umbrella caps. Otherwise, these hats will protrude above the surface of the insulation, which will create difficulties in the installation of the finish.
We have discussed the most popular ways of attaching insulation to the wall. Thinking about the difficulties and features of installation, they increasingly choose another material for insulation - polyurethane foam. It doesn't need to be fixed at all.
Dowels allow you to attach the material to a brick wall and surfaces made of concrete, as well as wood.