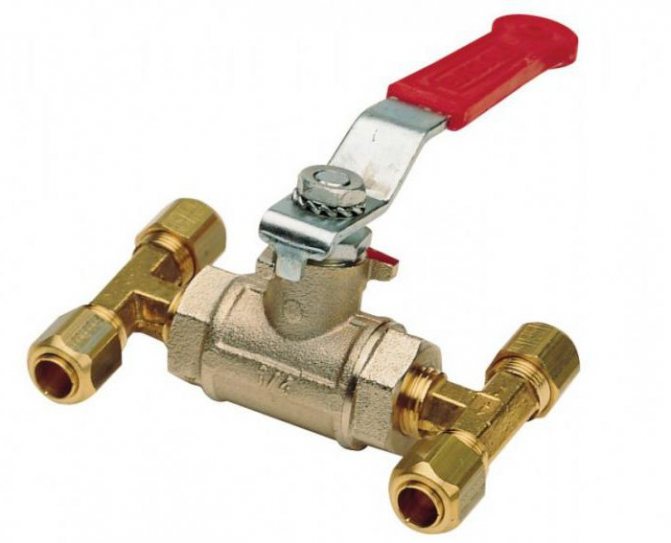
Manual Bypasses
Bypasses that are manually set (manual bypasses) are equipped with ball valves. The use of ball valves is due to the fact that they do not completely change the throughput of the pipeline when switching, since the hydraulic resistance in the system does not change. This quality makes the ball valve the best choice for bypass applications.
This type of shut-off valve makes it possible to regulate the volume of liquid that passes through the bypass section. When the tap is closed, the coolant moves in full along the main line. The operation of ball valves has one important nuance - they need to be turned regularly, even if there is no need to adjust the system. This is due to the fact that with prolonged stagnation, the taps can stick tightly, and they will have to be changed. Sometimes a recharge valve for the heating system is also installed, which plays a significant role.
Bypass design
The bypass device is simple. Structurally, the bypass device consists of the following elements: • circulation pump • coarse filter • shut-off valves.
The bypass in the heating system can work continuously or during the start-up of the radiators. The following elements can be used as shut-off valves in the system: • ball valve • check valve. Therefore, it is considered necessary to have a check valve in the heating system. In a heating system, a non-return valve can be installed instead of a tap.
In this case, when the circulation pump is turned on, the check valve is in the closed mode. In the event of a power outage, the valve opens automatically, allowing the system to return to natural circulation. Therefore, the issue of choosing shut-off valves in the bypass design is fundamental. In the absence of a valve, the circulation pump is switched on along the small heating circuit, which is formed by the main line and the bypass.
The check valve design must include a spring-loaded plate and a ball to close the lumen. The advantages of having a check valve in the system are that it functions without the presence or participation of a person. Turning on the circulation pump under the pressure of the coolant mixture "closes" the valve. But in terms of reliability of functioning, the valve is inferior to the valve, because the presence of abrasive impurities in the coolant mixture takes place.
According to specialists involved in the installation of valves, the best option is to purchase a valve from the best manufacturers, because a leaked ball valve cannot be repaired.
Operating principle
Most often, one-pipe heating systems are installed in apartments. In such systems, the heat dissipation of the first radiator affects the operation of the next. This is true for vertical as well as horizontal layout. If there is no bypass, then the batteries will be connected in series. As a result, the first battery will take all the heat, and the rest will get, at best, a warm, or even completely cold coolant.
View gallery
To prevent this from happening, the supply and return pipe near each radiator is connected by a jumper that directs part of the water bypassing the battery. The principle of operation of the bypass valve is to give the same amount of heat to near and far radiators and to reduce their dependence on each other.
Tips & Tricks
Before proceeding with the installation of the bypass in the heating system of an apartment building, first of all, representatives of the local housing and communal services should be notified of their decision in writing in order to coordinate the issue of temporarily shutting off the coolant supply from the boiler room. After that, adhere to the following recommendations:
In order for water to normally enter the heating device, it is necessary that the diameter of the pipe of the bypass section be one size smaller than in the general circuit. When purchasing a ready-made bypass unit, you must require a quality certificate, which will serve as a guarantee of durable and normal operation of the device. When buying elements of the bypass section, you should check the threaded connections - they should be easily unscrewed and not twisted when tightened. When deciding to install a bypass, use only ball valves, since they not only have low hydraulic resistance, but also open and close easily. It does not matter whether the bypass is working or not, it is necessary from time to time to open and close all the valves in order to avoid the ball sticking and will significantly increase the service life of all elements of the unit. Before putting the heating into operation after a long shutdown period, it is imperative to vent the area with the circulation pump. Throughout the entire heating season, preventative cleaning of the filters installed in the bypass system should be performed. In order to avoid mistakes, and for the heating to work efficiently, it is advisable to entrust all the work to an experienced specialist.
Bypass Installation Examples
Radiator bypass in one-pipe heating main
Installing a bypass in the heating system in parallel to the battery makes it possible to regulate the flow of liquid through it and, accordingly, the temperature regime, and also provides the possibility of replacing or repairing the heating device without stopping the functioning of the heating, which is especially important in apartment buildings. How to install the bypass correctly?
We look at the picture, similar systems look something like this ...
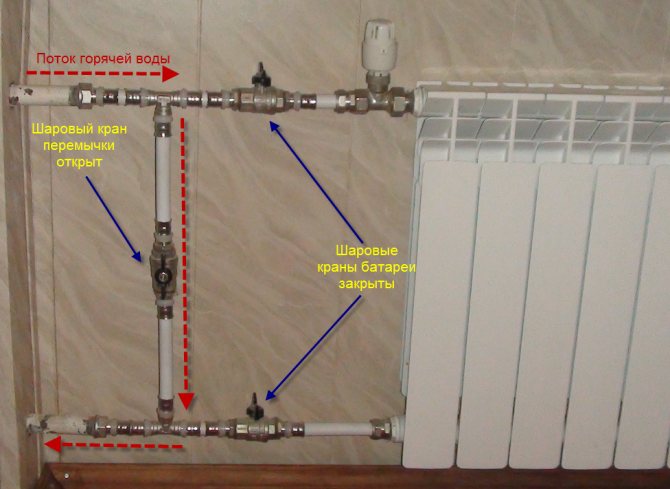
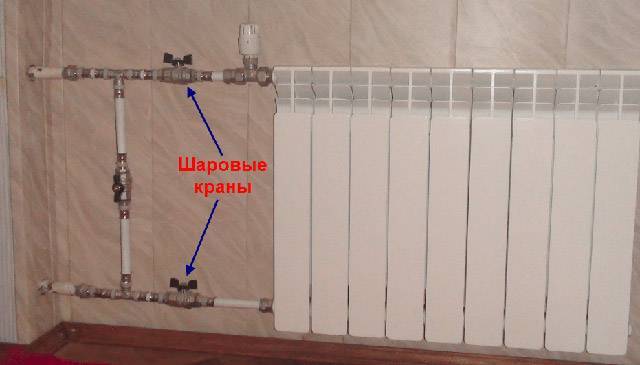
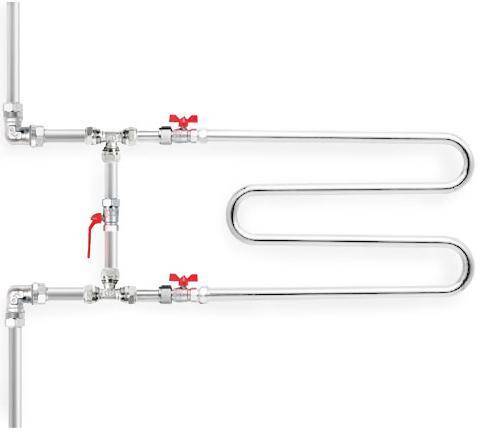
The bypass photo of which you see on the left is just an ordinary jumper connecting the supply (hot) and return (cold) pipes directly near the battery.
Ball valves are installed between the bulkhead and the radiator. It is they that allow you to turn off a separate device, and the coolant will calmly circulate along a parallel bypass path.
The third valve can be installed on the jumper itself and allows you to adjust the bypass mode - the balance of the fluid flow through the heating battery and the bypass pipe. The closed position of this valve ensures the circulation of the entire flow of the coolant through this heater. Optionally, instead of a tap on the supply pipe in front of the radiator, a thermostat can be installed that maintains the temperature set on the radiator.
In houses with central heating, it is advisable to install a bypass for a heated towel rail, since many models of this heating device may not be designed for the parameters of our boiler rooms. In this case, the diameter of the bypass is chosen less than the diameter of the main pipes - usually it is a half-inch pipe.
What is a bypass for? It allows you to reduce energy costs by limiting the amount of coolant entering the radiator. Thus, the heat transfer of the radiator is reduced and energy is saved. The lack of the ability to adjust simply leads to overheating of the room, followed by the opening of the vents and the heat dissipation. A heat exchanger with a bypass used in boilers allows you to regulate the required flow rate of the heat carrier through it.
By installing a bypass with your own hands (if you have plumbing skills), you will leave a significant amount of money in your pocket.
How the bypass valve works
If an abnormal situation occurs, a power outage or a pump breakdown, the pressure stops, and the valve automatically closes the jumper, letting water flow naturally. This allows you to fully automate the heating system. The disadvantage of an automatic bypass is sensitivity to water pollution and fine dirt. Before installation, it is recommended to clean the AED water supply system to eliminate deposits and rust in pipes and radiators.
Before starting work, you need to decide on the material of the water supply system. For polypropylene pipes, collapsible joints are used, and first the pump unit is assembled together with the bypass. The branch is connected using tees mounted in the main pipe. In the case of a steel version, the pipes are first soldered, then the valve on the bypass. The bypass system is installed in the direction of the coolant and must be assembled in a certain sequence.
Assembly diagram:
- Filter;
- Check valve;
- Compulsory pump.
The diameter of the passage of the bypass line must be equal to the diameter of the return. Experts recommend that all cranes be equipped with collapsible fittings during installation. In this case, various situations will be eliminated during the repair.
How the bypass valve works
Before starting the installation work on installing the pump, it is necessary to drain the coolant from the system. The entire structure is oriented so that the outlet pipelines are vertical or horizontal, depending on the pipe stroke.
How the bypass line works:
- A section of the bypass is assembled, which will be located parallel to the highway;
- A section equal to the length of the bypass is cut off from the return;
- Tees are installed at the ends of the line;
- A section with shut-off valves or a valve is mounted between them;
- The assembled section of the bypass is connected to the main with pipes equal in length.
During installation, it is necessary to leave space for the possibility of subsequent dismantling of the pump and other elements. It is necessary to do the installation correctly, following the coincidence of the arrow on the body with the coolant current.
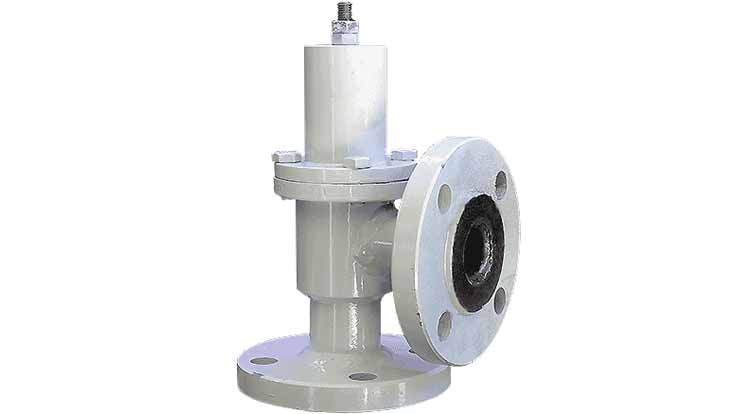
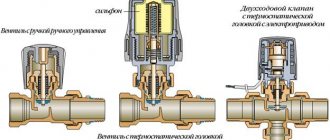
Bypass valve types
There are several types of bypass elements - unregulated, manual, automatic. The choice depends on the type of devices used, the availability of additional elements and the location of the shut-off valves.
Unregulated bypass
The device looks like a rim pipe without additional equipment. The tunnel lumen is constantly open, water flows without control. Bypass valves are used for connecting batteries.
It is necessary to take into account the transportation of a heat carrier with a low hydraulic resistance, therefore, the diameter of the flow area of an unregulated bypass valve for vertical installation should be less than the diameter of the flow area of the main pipe of the main line. Otherwise, due to the force of gravity, the water will go into the near bypass.
Types of heat carriers for the heating system of a country house
With horizontal installation, the heated medium rises up and therefore the specific gravity is reduced, therefore, the bypass valve of the lower wiring is made with a diameter size equal to the cross-section of the pipe of the main line, but the branch pipe to the radiator should be of a smaller diameter than the valve and the main line.
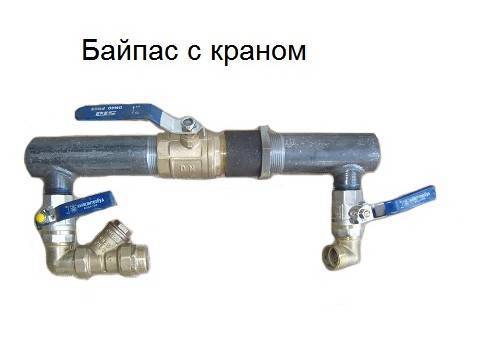
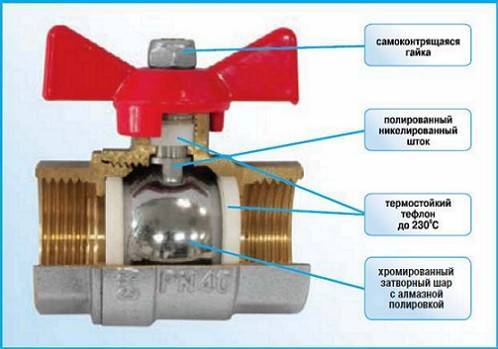
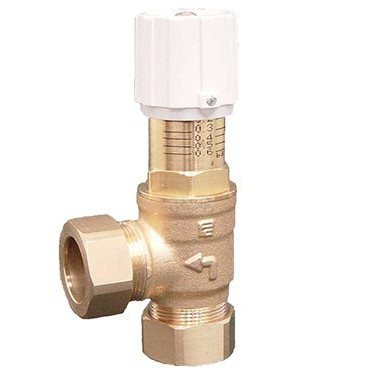
Manual bypass
It is a device equipped with a ball valve. A ball valve is considered the most suitable for forming a bypass section, since in the open state of the element there is no narrowing of the line channel, which means that no additional hydraulic resistance is created on the liquid when the flow moves.
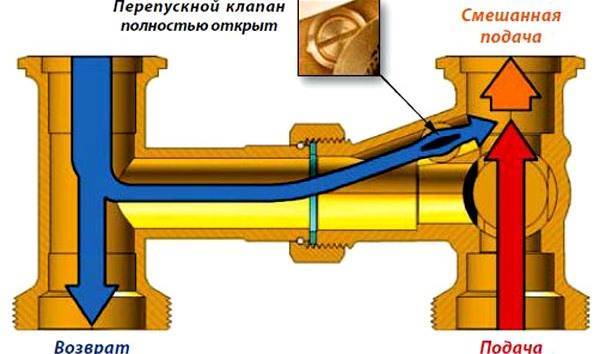
The use of a manual bypass valve provides precise control of the flow of the coolant passing through the bypass valve.If the valve is closed, the flow is directed along the main line, if opened, it will go through the bypass section.
On a note! Experts advise turning the ball valve from time to time to eliminate the risk of sticking of working elements.
A manual bypass valve for water is used when connecting batteries to a one-pipe line, hydraulic-type pump piping.
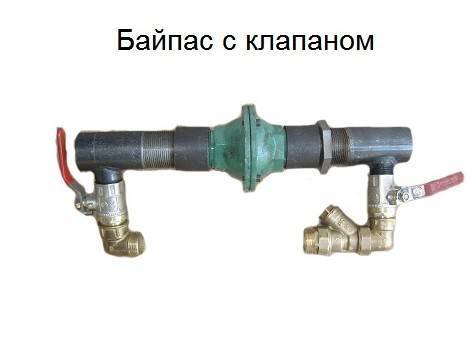
Automatic bypass
The valve is installed when working on piping the pump of a gravity heating system, where the coolant circulates without the use of pumping equipment, as well as in the presence of a pump. Automatic bypass redirects the flow without human intervention. If the pump is running, then the coolant flows through the unit, as soon as the pump turns off, then the water passes through the bypass valve so that the pump impeller, which blocks the flow, does not interfere with the passage of the coolant.
There are two types of automatic relief valves:
- Valve. It is mounted with a ball valve that reduces the hydraulic pressure on the heating medium. The disadvantage of a valve bypass is sensitivity to the purity of the liquid, if dirt, impurities are found in the flow, the equipment may fail.
- Injection. Works on the principle of a hydraulic elevator. The installation involves the installation of a pumping unit in a section of the main line, and the inlet and outlet pipes of the bypass valve must be continued inside the pipeline. Behind the cut of the outlet type pipe, when the coolant passes, a vacuum area is formed, which helps to draw water from the bypass. Then the jet is transported under pressure through the pipeline. In this case, a reverse flow of water is excluded. If the circular pump is turned off, then the water flows through the bypass device by natural gravity.
Types and designs
According to the principles of operation, there are overflow valves with spring and diaphragm designs. Spring mechanisms prevail in systems where the cross-section of the pipeline is no more than 200 mm; in other water supply and heating networks, a lever-load principle is used.
Membrane aggregates are used more and more when working with fluid media in which there is the presence of solid particles.
Depending on the pipeline environment, bypass devices are intended for:
- gas;
- couple;
- liquids.
According to the purpose of the system, they are used for pipelines:
- cold water supply,
- hot water supply,
- heating,
- cooling,
- air conditioning.
In heating and water supply systems, bypass valves are distinguished according to their purpose:
- for radiators;
- for boiler and bypass;
- for automatic feeding;
- for low or high pressures.

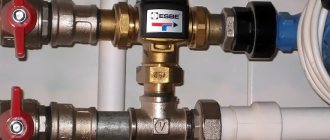
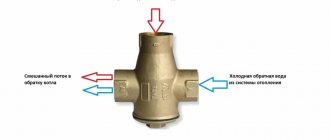
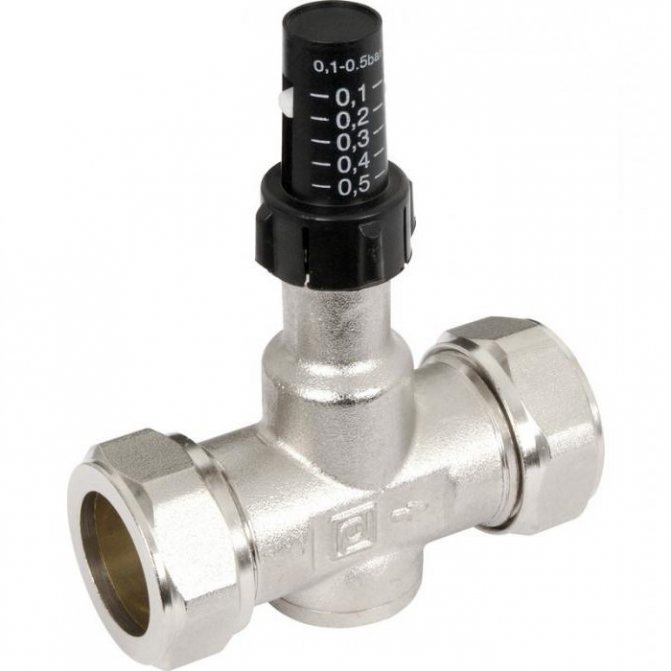
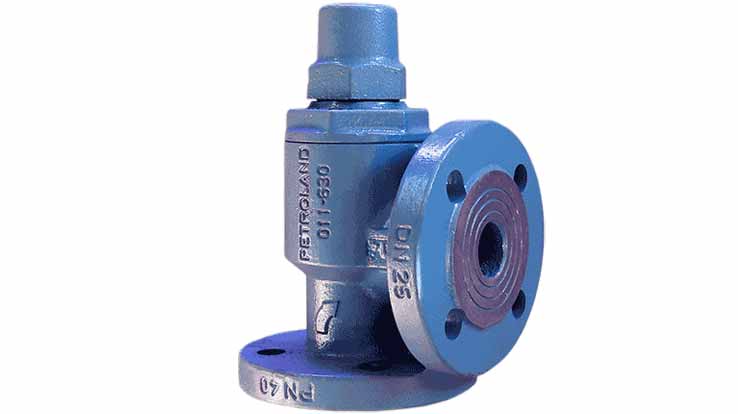
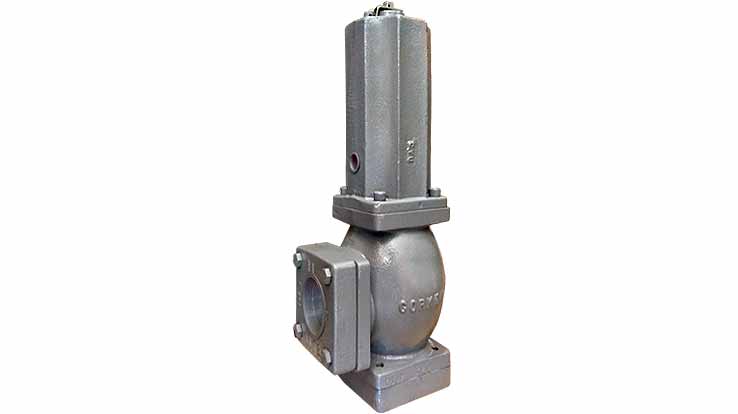
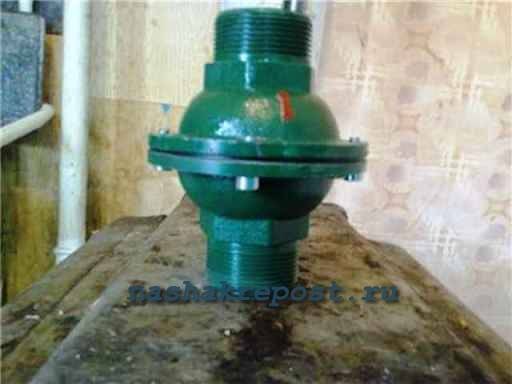
This photo shows an overflow valve with a setting scale. Made of bronze and brass, it is designed for installation in central heating systems.
Along with bypass regulators, the following are installed in the heating design:
- air vent to prevent air congestion in pipes;
- three-way valve for mixing or dividing streams of hot and cold water;
- backward, preventing backflow in the pipeline.
For industrial and utility networks, constructions with a nominal diameter of DN up to 500 mm and a flange connection are used.
In a car, access devices are used for:
- turbines;
- fuel supply mechanism;
- engine cooling systems.
The turbine bypass unit relieves the exhaust gases, reducing the head force in the manifold. Thus, it protects the motor from overheating.
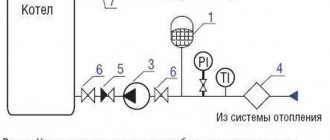
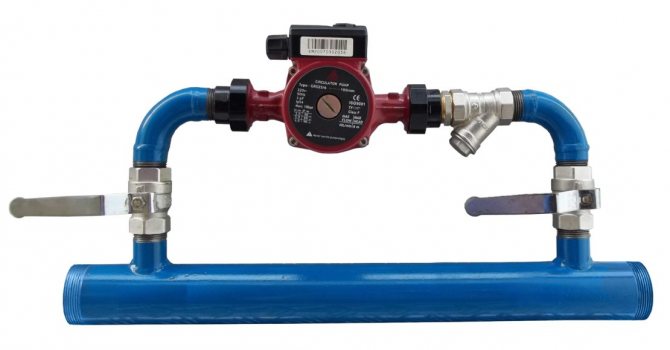
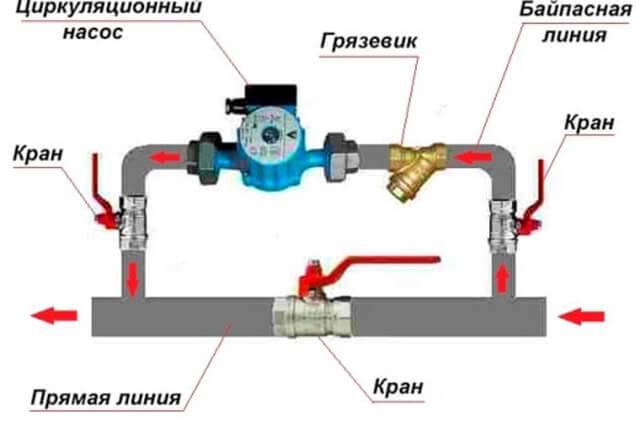
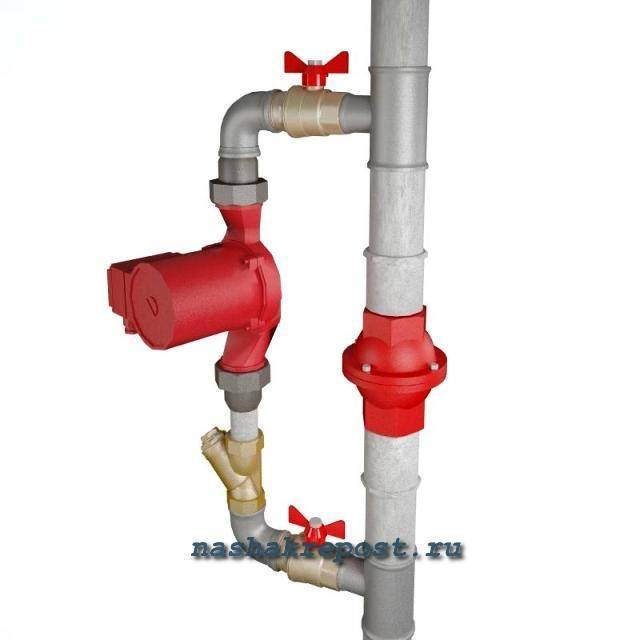
Installation with circulation pump
If it is necessary to install a circulation pump, then a filter must be provided.
View gallery
A suitable bypass is selected depending on the type of pump. In the case of a pump that has contact between the rotor and the coolant, a bypass is installed on the return and on the supply line.When the pump rotor is not in contact with water, then the bypass is placed only on the return pipe.
Pump connection via bypass
It is advisable to connect the circulation pump through the bypass only in those systems that were originally intended for natural circulation, i.e. they must have a booster manifold, the slopes of the pipes are observed and their diameters are correctly selected. The pump in such systems is not designed to keep them running, but to improve efficiency.
For systems that were designed for forced circulation at the design stage, the bypass is simply irrelevant. Such systems work only at the expense of the pump, therefore, when it is turned off, the circulation of the coolant simply stops. In this case, the bypass will not be able to solve the problem.
When the pump is connected via a bypass line, there is a possibility of backflow in the bypass. In addition, a closed circulation loop is formed between the pump and the bypass itself. In order for such a scheme to function normally, the bypass device must be equipped with a ball valve or check valve.
Bypass types
By its appearance and purpose, a bypass can belong to one of 2 categories:
- Bypass without valve.
- Bypass with non-return valve. In this case, the valve functions as needed - it opens due to an increase in pressure when the pump is turned on and automatically closes when it is turned off.

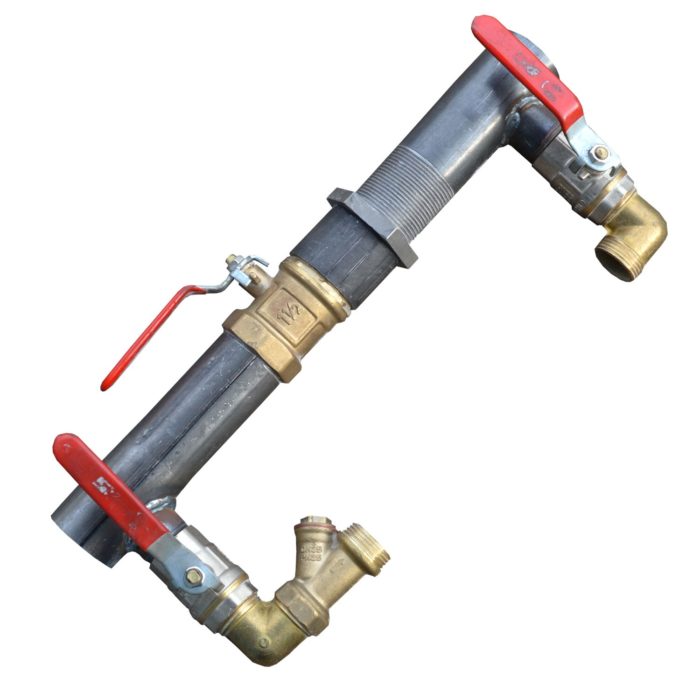
Installing a bypass: the subtleties of DIY installation
By and large, the bypass jumper has a fairly simple design, and it can be assembled even with minimal plumbing experience. Once again, I repeat that the principle of operation of this device and its understanding are important here - knowing this, it is not so difficult to independently make a bypass for a circulation pump or something else. Let's take a closer look at this process.
- What we have? For example, a heating line on which a circulation pump is mounted. The first thing to do to install the bypass is to remove it and slightly alter the line - in particular, you will need to slightly increase the distance between the threaded ends on which the pump was screwed. It is best to determine this distance in place - in the sense, to assemble the pump and the assembly around it as expected.
- To do this, immediately behind the pump, on one side and on the other, we wind up ball valves - this can be done immediately overhauled. We have detachable connections on the pump, so it will not be a problem to quickly disassemble the unit and mount it on the pipeline.
- After the taps (also on both sides of the meter), tees are installed with exactly the same diameter as the pipeline itself. A reservation should be made here - the type of tee depends on the pipeline itself. In most cases, tees made of the same material as pipes are used - if polypropylene or metal-plastic, then first threaded ends are screwed into the taps and then tees are soldered or screwed to them.
- In principle, everything, the size is set, and now we try on the assembled unit in place, cut the pipeline according to the marked marks and insert the assembled unit. For ease of use, it can be disassembled on American women - simply put, remove the pump, after which you will have two parts of the pipelines, which will need to be connected to the main line. After this section of the bypass is assembled, the pump is installed in place (overhaul) - only after that it will be possible to focus on the bypass pipe itself.
- Here, too, everything is simple - to begin with, we raise the pipeline from the tees upwards so that it does not interfere with the pump. Then, by turning, we bring the two pipes coming from the two tees to each other - at least we set them the right direction to each other. And then there is a jumper and a crane, for the installation of which, again, you will need a detachable connection and a pair of threaded ends.
In principle, this is the entire bypass for the circulation pump - exactly the same principle is used to mount the bypass for other plumbing fixtures. The bypass pipeline can be positioned both vertically and horizontally - from this moment its functional purpose and quality of work does not change.
That's all. Now you know what a bypass is and how it works. Moreover, an attentive and scrupulous reader will now have no difficulty in making this unit on their own, without the help of qualified specialists. I'm not afraid to repeat myself - if you understand the principle of its operation and understand the device and the purpose of each element, then it will not be difficult to assemble the bypass with your own hands.
The author of the article is Alexander Kulikov
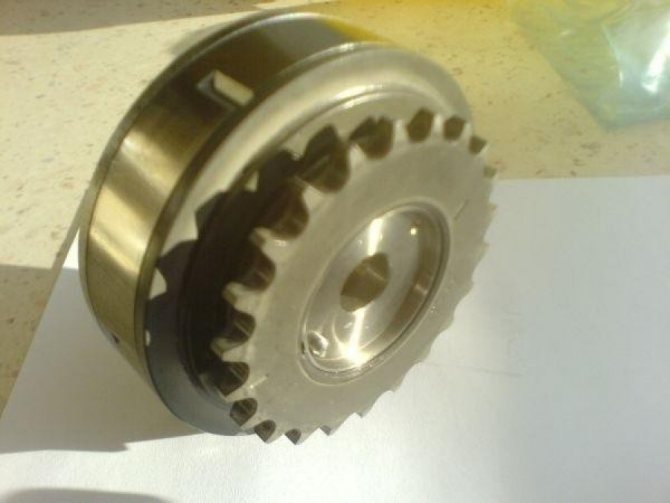
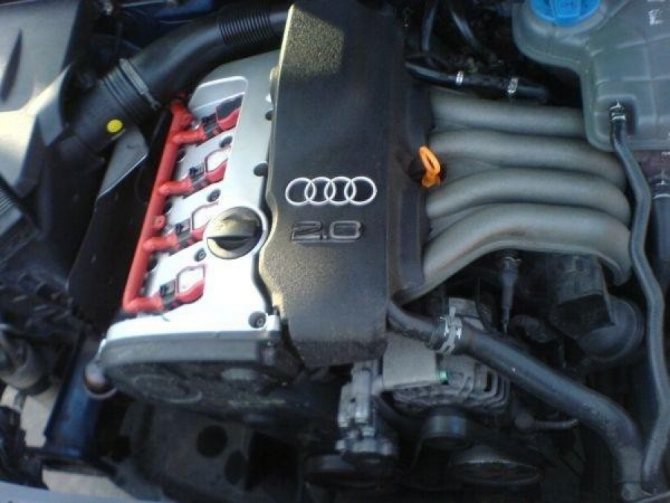
Replacing the phase regulator and bypass oil valve on the Audi A4 8E 2.0 ALT
Finally, having come to my senses, I decided to change the phase regulator and the oil valve for bypassing on an Audi car with a 2.0 ALT engine - the reason is rattling in the morning and rattling with a heated engine.

ZY The process that I will describe is just for acquaintance, it is not a step-by-step process.

First, we bring the frame to the service position, for this we remove the front bumper. Knowledgeable people advised me to first unscrew the nuts, remove the anti-fog devices and use my hands through the cracks to unscrew the three nuts securing the bumper.
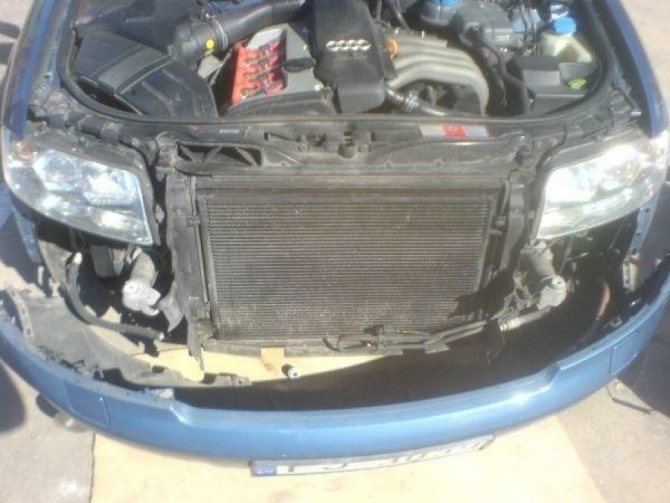
We disassemble the front bumper.

Disconnect the washer hose from the bumper and the fog device wiring plug, remove the entire bumper, and drain the fluid.

Now insert the tool (which you made yourself), screw in the space allocated for it and unscrew the three bolts from the supports. Also from the other side. Having familiarized yourself with Elsa, you will know which bolts are still being unscrewed to exit the frame to the front.
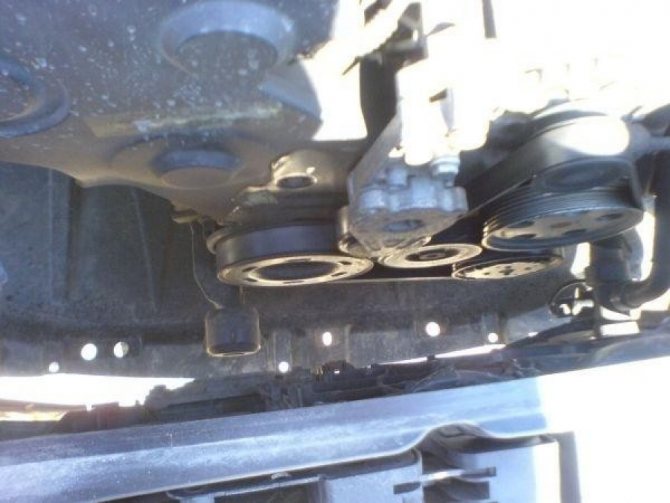
We carefully pull the frame towards us, now we have good access to the timing.
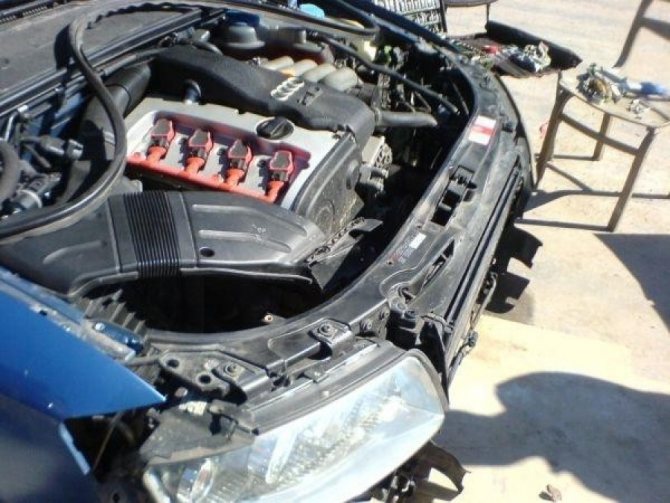
The frame is in the service position.
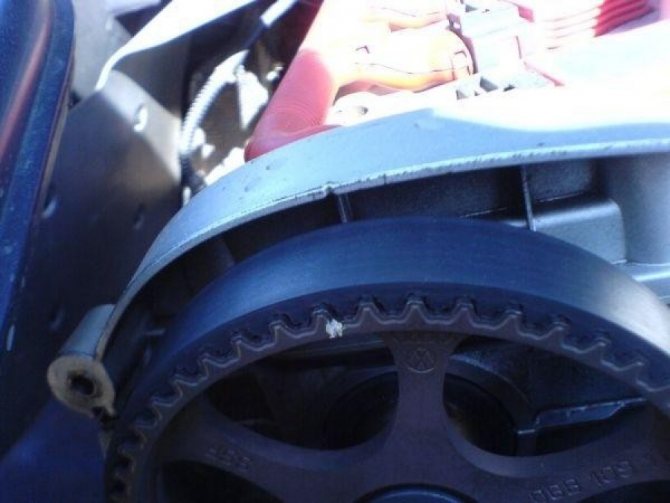
Set the TDC marks of the camshaft and crankshaft, num. the shaft must be turned to the left. It's easy to twist, you don't even need to twist the candles.
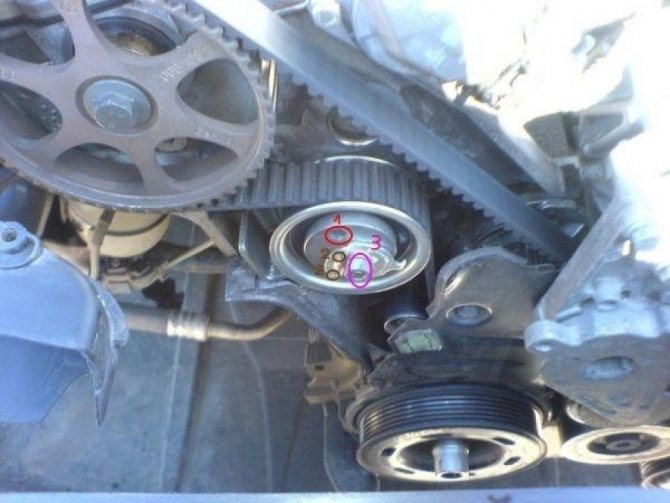
Remove the timing case from above and you will see the tension roller - loosen it. I do not understand the meaning of tightening it, but I followed Elsa's advice. Using the hexagon to the left, loosen the tension roller (1), insert the plastic in the middle of the rod and the roller body (the plate fell twice from me, and I was left without it), then release the nut (3), I do not need bent round-nose pliers here, when loosening the nut the tensioner also loosened, and the eccentric moved to the left.
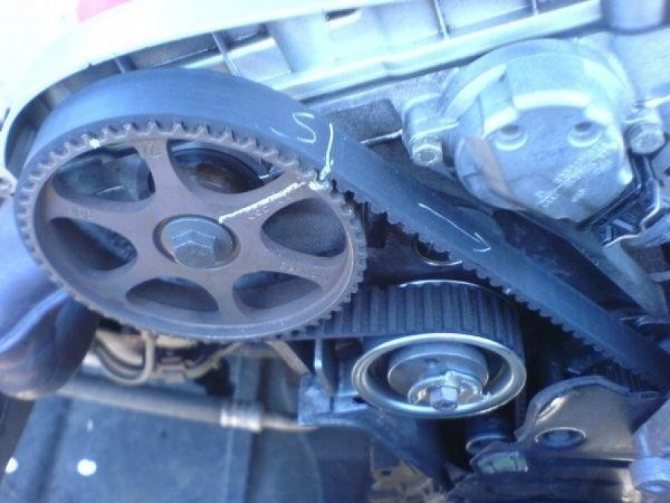
For safety reasons, I put a mark on the camshaft gear and a tooth on the belt.
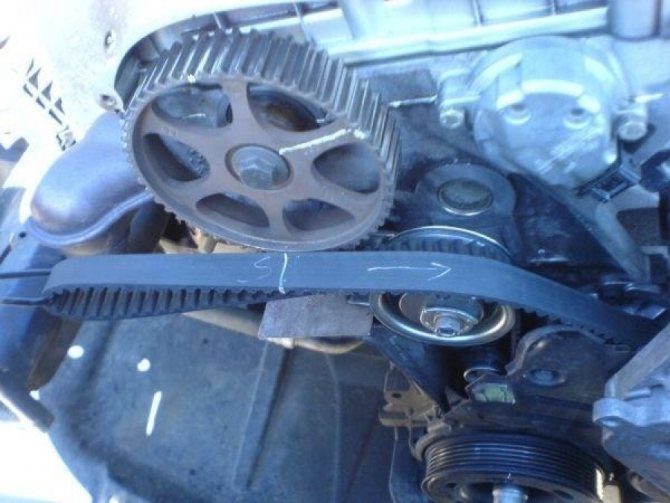
He also pulled off the belt, so as not to knock the teeth on the crankshaft, put marks on the camshaft.
Remove the canopy equipment following Elsa's advice. Do not forget, after removing the belt from the camshaft, roll the crankshaft forty-five degrees to the right so that when carrying out operations with the camshaft, do not bend the valves (when assembling, do not forget to roll back the crankshaft forty-five degrees to the left).
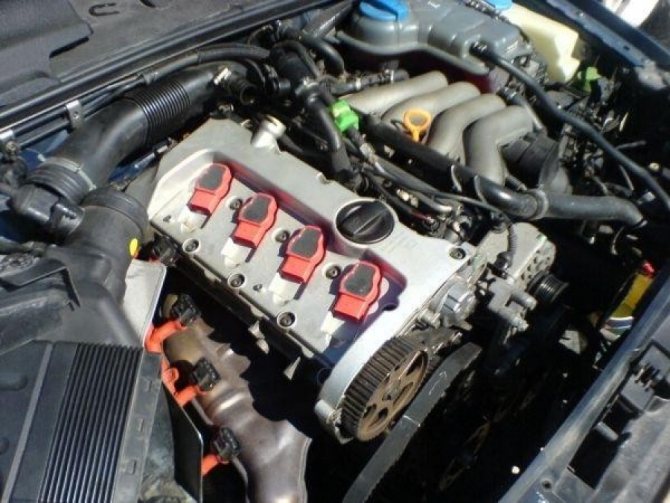
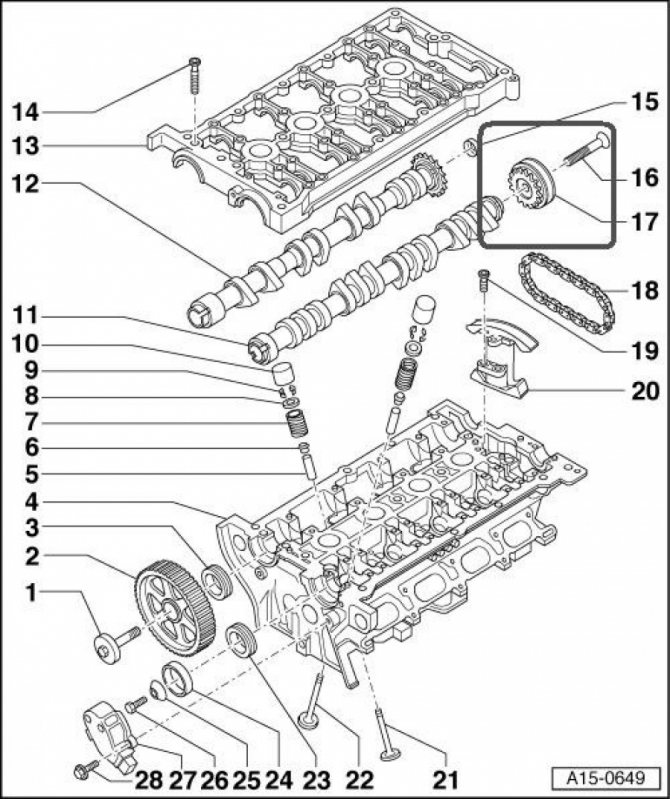
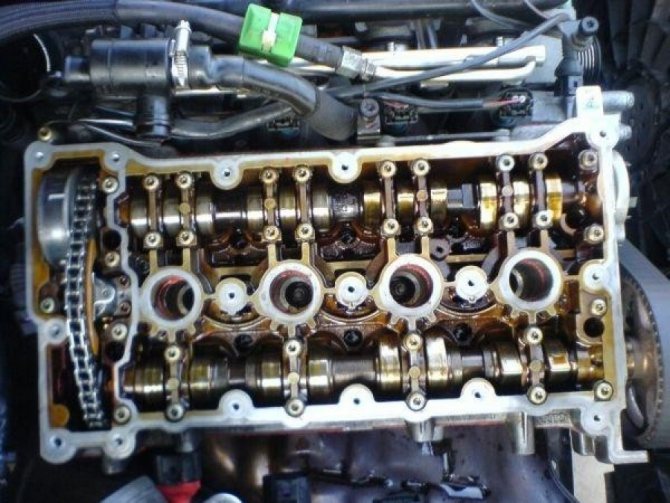
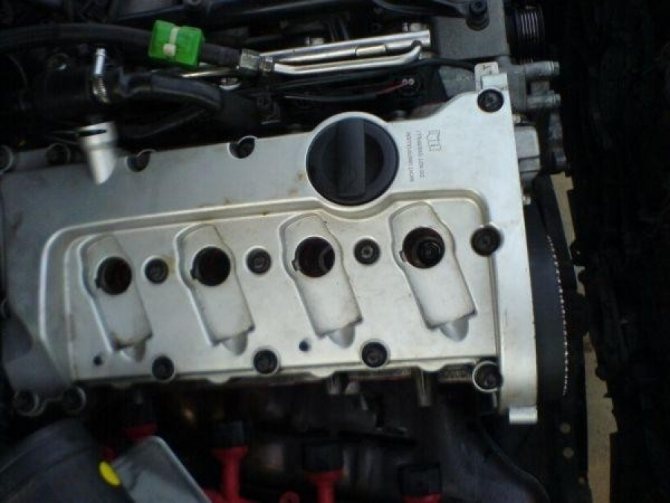
Dvadtsatikvalannik without cylinder head cover.
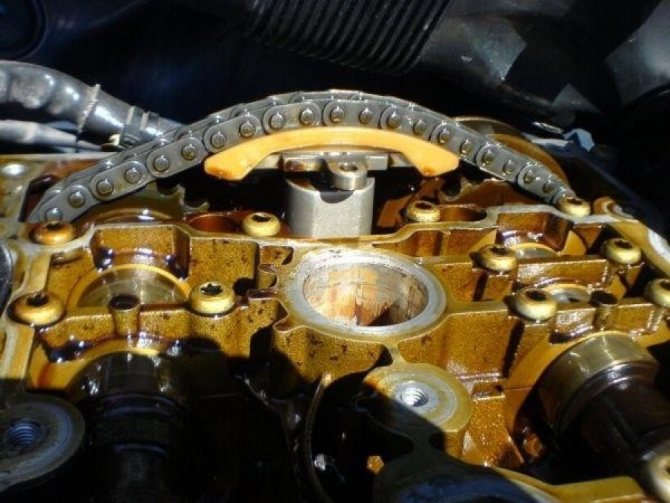
Camshaft chain tension.
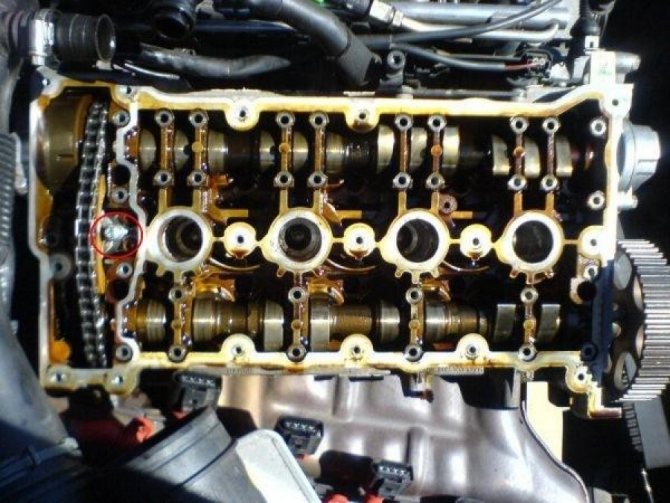
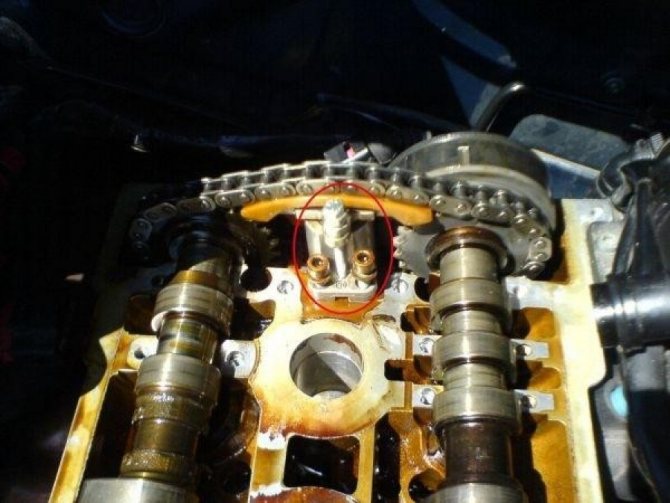
Skip a lot, unscrew the frame from the cylinder head. You need to observe the correctness when unwinding. Unscrew the bypass oil valve from the other side of the cylinder head - the most difficult stage is unwinding, since there is not enough space. Secure the camshaft chain tensioner with a bolt.

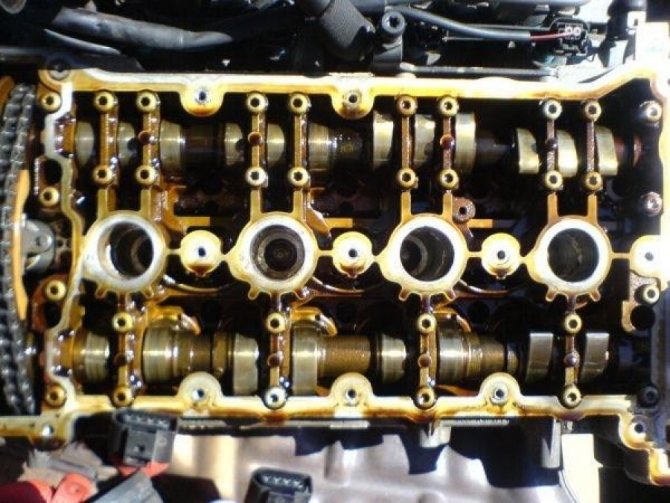
Without cylinder head frame. The camshafts are recessed as if they were dug in - it is better to lift them with an assistant - each one, one at a time, in the assembly with a chain and a tensioner.
The most difficult thing for me turned out to be unscrewing the bolt that secures the phase adjuster to the intake camshaft. It twists with a huge moment, eventually ruining the head of the bolt, I still managed to unscrew it with an assistant, clamping the gas key in the place where it is allowed on the camshaft. We twist it in the same place where the new phase regulator was a big moment.For those who will be replaced, get a brand new bolt.
Brand new headlight regulator assembly. We twist the frames to the cylinder head, do not forget to unscrew the bolt.
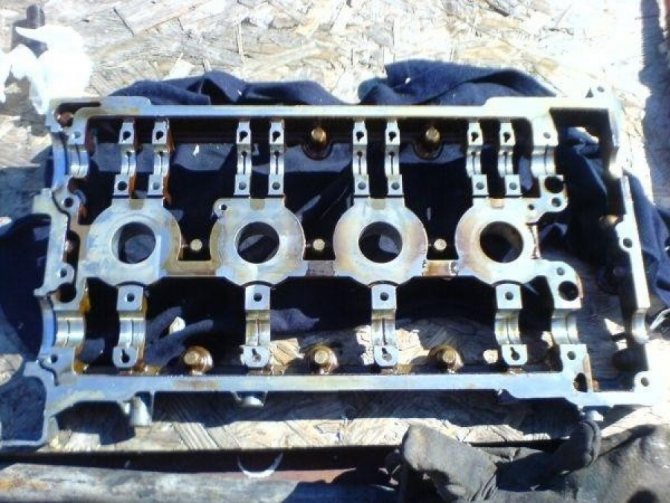
Degrease the side of the landing at the bottom of the cylinder head frame - you need gasoline. We do this to seize the sealant. Degrease the top of the cylinder head also.
After correctly installing the camshaft chains, drown them along the notch of the intake camshaft with the cylinder head cover. When tightening the frame with bolts correctly, the camshafts will sit as needed - for insurance, check how the camshafts are installed.
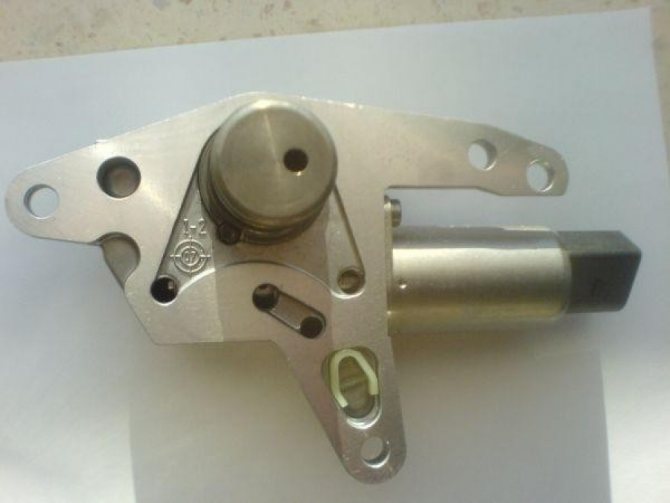
Brand new bypass oil valve.
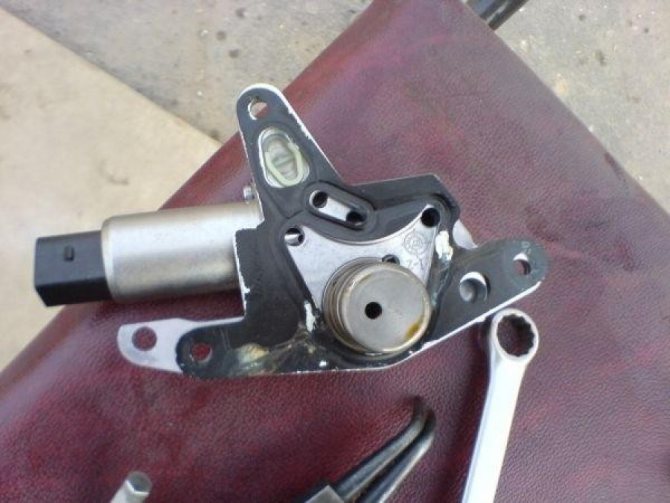
The bypass oil valve with an old cleaned gasket - I also installed it on the sealant.
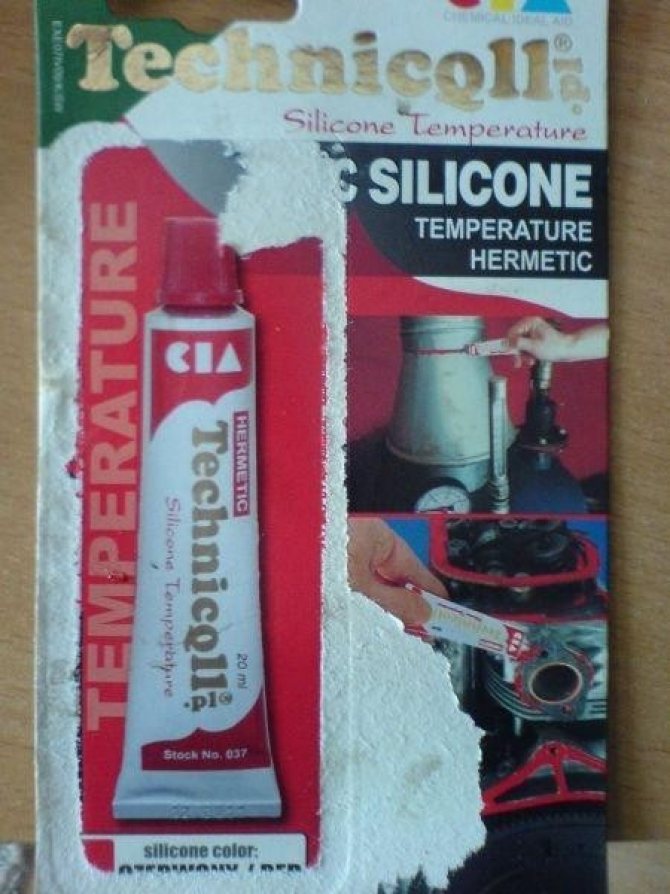
Sealed solution.
Brand new phase regulator.
Collect in reverse order.
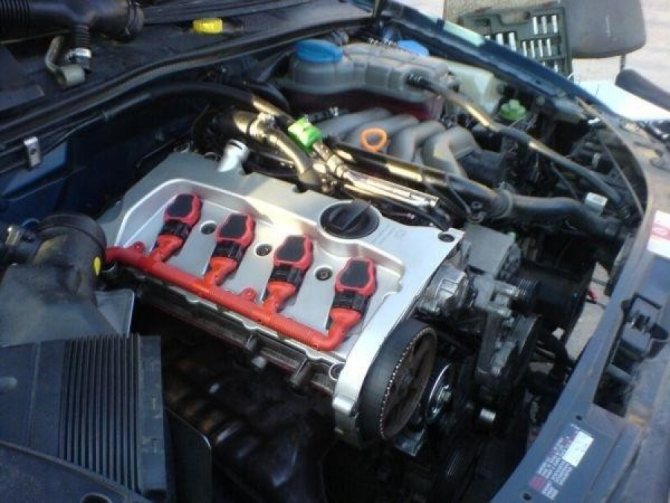
Slightly pull the belt over the camshaft gear - tighten the belt with a tension roller.
- Camp Jeep: when the coolest SUVs gather in one place
See all photo news >>
Bypass device
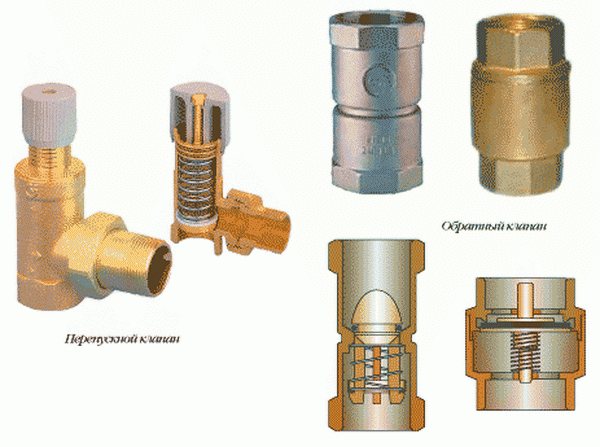
The use of a bypass for the installation of an additional pressure unit is often accompanied by the inclusion of an element such as a check valve in the main part of the pipeline.
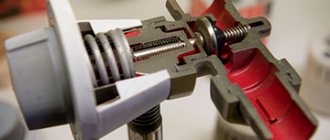
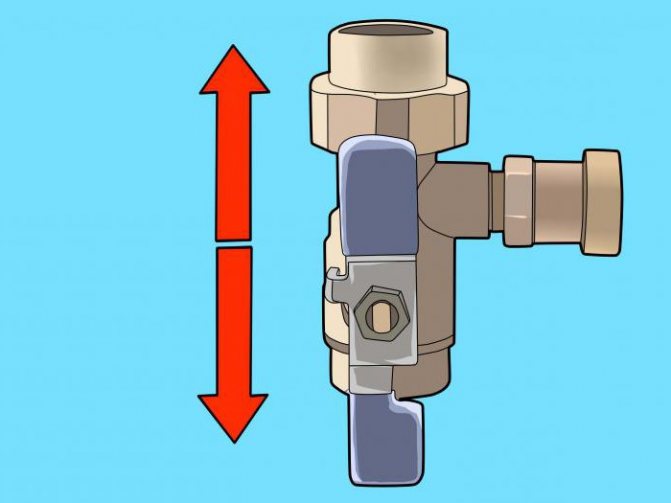
It is a small device with a two-piece body. A ball or spring-loaded baffle is located inside the bypass housing. The main task of the valve is to ensure the operation of the heating system in the absence of additional pressure generated by the pump. The operation of the valve in the heating system is automated and does not require human intervention. This is very convenient for emergency shutdown of the pump in the absence of residents of the house.
The principle of operation of the check valve is as follows. When the pump is turned on and in good working order, additional pressure is created at the outlet of the valve, which locks it and prevents the movement of liquid (lower part of the figure).
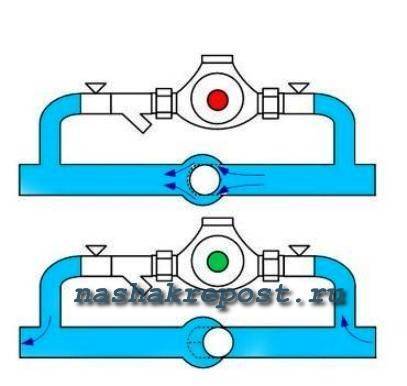
In the event of an emergency shutdown of the pump (upper part of the figure), there is no additional pressure in the system, which “unlocks” the bypass check valve and opens the main pipeline for the movement of the heated coolant. In this case, the device functions independently of the presence of an operator, using only the laws of physics. This allows you to protect the entire heating system of the house from destruction.
One of the fasteners that have appeared and are actively used in recent years when installing elements of heating systems is the so-called American nut.
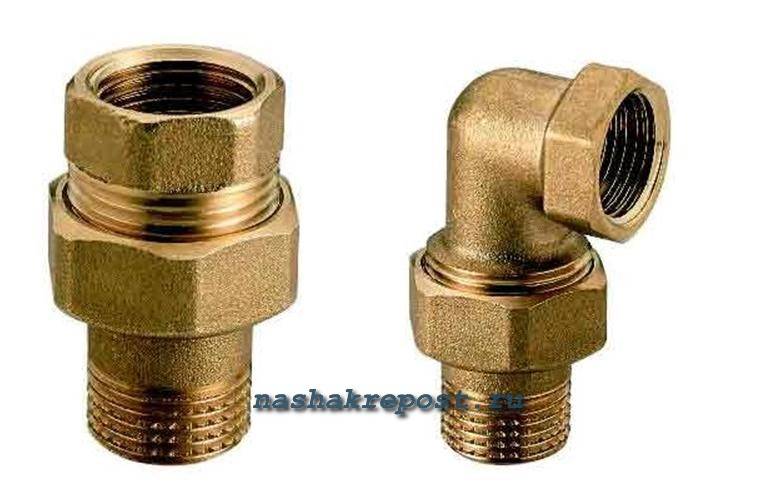
It consists of two parts, equipped with threads and screwed onto each other. Available in two versions - straight and angular. When fixing one or another element of the system, one part of the nut is screwed onto the threaded part of the branch pipe of the installed device, and the movable part of the connection is driven onto a threaded pipe or fitting. The use of such parts makes it relatively easy to fix certain elements not only in the bypass, but also in any other place of the heating system. The main advantage of the American connection is the ability to remove the installed device - pump, radiator and others without disassembling the system itself.
Dear readers, comment on the article, ask questions, subscribe to new publications - we are interested in your opinion