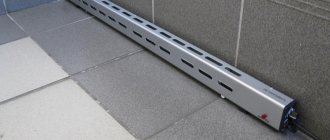
Having decided to arrange underfloor heating in your apartment, first you need to decide which heating pipes in the floor will provide this heat for the longest and most reliably. The choice, no matter how simple it may seem at first glance, is not so simple and depends on many factors.
Those pipes that are supposed to be used in the "warm floor" system must:
- be durable;
- not corroded;
- be impermeable to oxygen, which can corrode the steel components of the heating system (radiators or boilers).
Underfloor heating pipes are one of the most economical ways to heat rooms.
Features of fastening heating pipes under the floor
The technology of installation and fastening of the heating pipeline in the floor depends on the selected type of pipes, their wall thickness and diameter. Indeed, in the process of installing a hidden heating system, they try to avoid inserts, joints and other sections connected with fittings.
In other words, the pipeline should be laid in a screed or in a wall in one section, and it is advisable to create all bends, corners and roundings with your own hands or using pipe benders. Naturally, such a pipe laying scheme is only suitable for flexible construction materials such as XLPE, reinforced plastic and copper.
You need to know that the distribution of heating in the floor should be carried out according to a previously drawn up scheme. If you cannot work it out on your own, then you should use an alternative solution - a wiring diagram of the pipe system, outlined on a heat insulator or waterproofing substrate.
Pipes are attached to the floor using special strips, inside which there are landing slots for the required diameter. Alternatively, you can use single clips or paper clips. The best option is to lay pipes for heating in the floor or screed, certainly in the grooves cut in the panel insulation.
As a mandatory heat-insulating material, special plates of extruded polystyrene foam are used, in which holes are pre-equipped for laying a pipe of the required diameter. These boards are installed on bitumen waterproofing mastic. The pipes themselves fit into the grooves and bend if necessary.
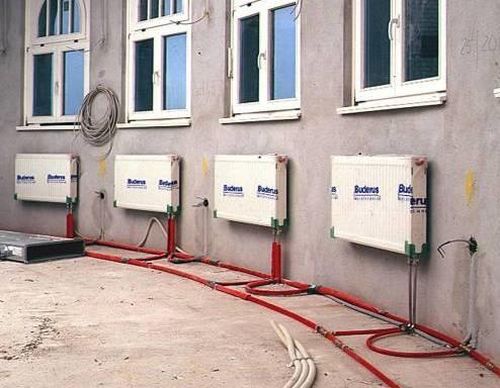
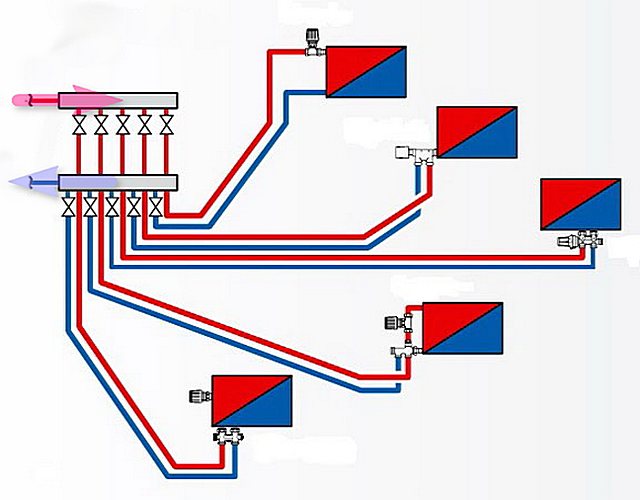
Apartment heating system
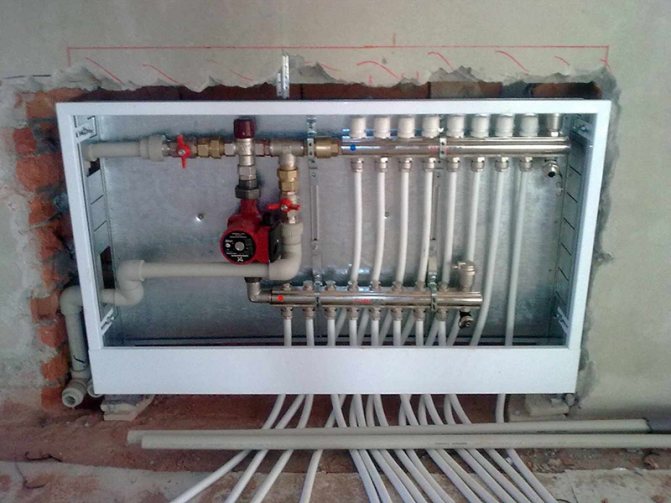
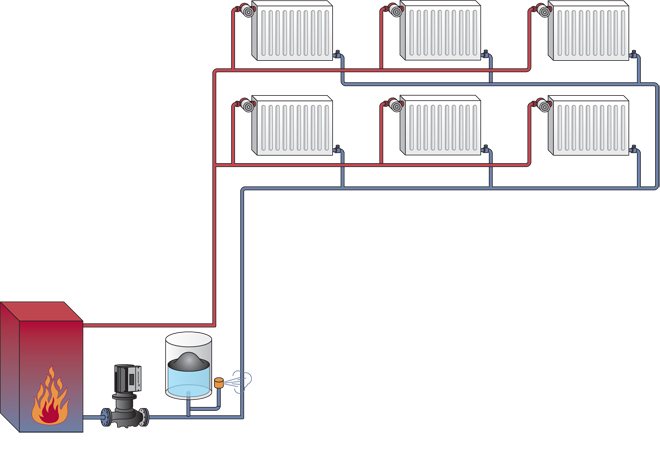
An individual apartment heating project provides for complete independence. From the storey group heating point through the combs, hot water flows to the heating partings in each separate apartment. Installing a manual balancing valve ASV in the pipeline turns the apartment heating into a subsystem with independent manual regulation of the pressure and flow rate of the heating agent.
1 - ball valve; 2 - mesh filter; 3 - complete heat meter; 4 - complete ball valve for installing a thermal converter; 5 - automatic balancing valve; 6 - manual balancing valve; 7 - distribution manifold; 8 - Drain valve; 9 - air outlet.
In the case when there are few apartments on the floor, distribution combs are installed in the group heating point. If there is not enough space for installation, a heating unit or a cabinet is provided directly in the apartment.
The piping scheme for heating the apartment includes:
- Ball valves that regulate the flow of water to the supply and return manifolds. Each individual floor heating system wiring has its own control valve.
- Automatic air vent valve.
- Manual balancing valve.
- Drain tap.
- Temperature sensor for flow, return.
- Flow meters at each manifold inlet.
- The filter is a sump on the return line.
Some of the benefits of apartment heating
The applied floor heating system in the apartment as a subsystem of the zoned floor distribution of the coolant is a promising direction in the construction of multi-apartment or multi-functional buildings. Such a scheme makes it easy for employees of the management organization to service any of its sections, significantly reduces the time for repair and maintenance work.
Distribution unit
Residents will receive unlimited opportunities for any changes to the scheme, complete independence from the general heating system of an apartment building.
Here are some of the benefits that apartment owners will get:
- the apartment system, where floor heating is used, provides the ability to turn off any heating device separately from the others or adjust it;
- comfortable living conditions are maintained;
- payment is made according to the meter, even if it is a new building where some of the apartments are not inhabited;
- nothing prevents you from making a warm floor, connecting it to the system.
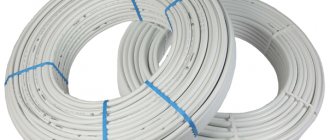
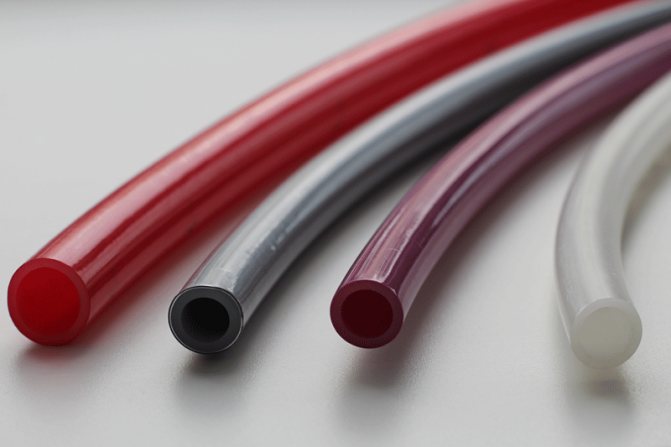
Types of floor pipes
Which pipes are better for heating Pipes for heating a private house - reviews, price
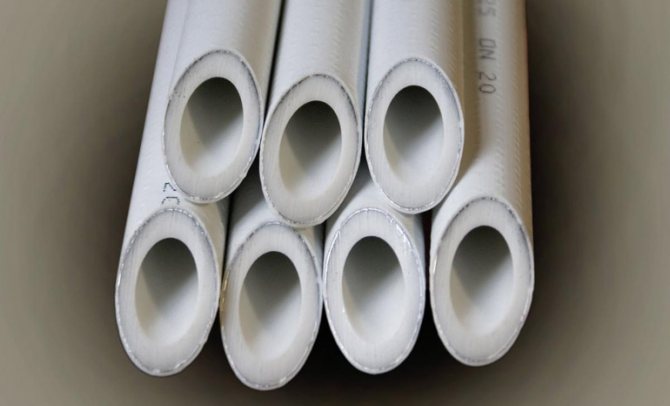
For laying heating, four types of pipes are used: cross-linked polyethylene, metal-plastic polypropylene, corrugated steel, copper (and copper in a plastic sheath). Copper ones are very expensive, difficult to install, equipment and a welding specialist are required. Therefore, despite their strength and durability, they are very rarely used in floor heating systems.
Reinforced plastic polypropylene
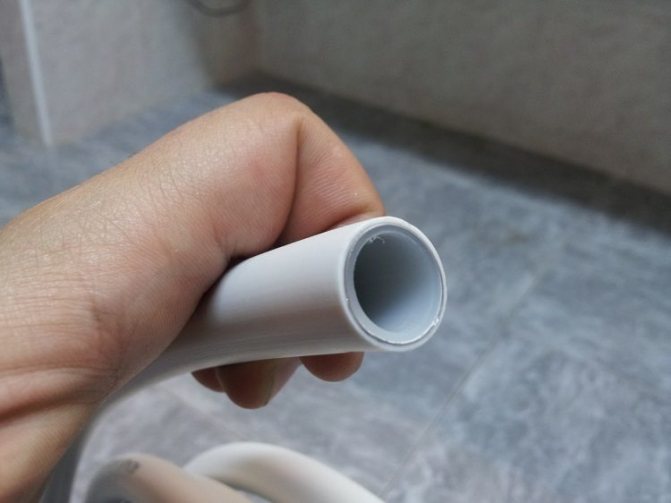
Polypropylene is the most popular heating material. Resistant to corrosion, strong enough, somewhat fragile (compared to other plastics), sufficiently plastic, chemically inert, withstands water hammer. The big advantage is the low price and easy installation.
It can work at high temperatures, but has a high coefficient of thermal expansion and lengthens greatly with increasing temperature. Reinforcement with aluminum foil reduces this disadvantage. A pipe, especially a reinforced one, bends poorly - it is mounted using soldering / welding. Therefore, it is a budgetary and reliable, but not ideal material option for a warm floor.
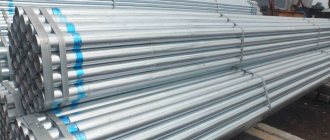
Corrugated stainless
Corrugated stainless steel pipes are also produced. The advantages of such a pipe:
- Strength.
- Long service life.
- Corrosion resistant.
- Chemical inertness - they practically do not overgrow from the inside with calcium and magnesium salts.
- Very wide range of flexibility.
- High resistance to mechanical stress.
- Resistant to high temperatures.
The disadvantage of metal corrugation is a rather high cost. This variety did not become widespread only because of the low awareness of consumers.
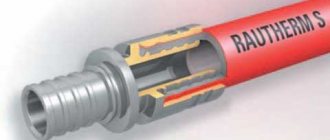
PE-X pipes
Crosslinked polyethylene has crosslinks between molecules, due to this, a volumetric cellular network with crosslinked molecules is formed. Cross-linked polyethylene (PE-X) has significantly higher strength than low and high pressure polyethylene, and greater strength compared to metal-reinforced plastic. The durability of cross-linked polyethylene is about 50 years.
PE-X is resistant to high temperatures - withstands heating up to + 95 ° С (for a short time - up to + 110 ° С); has other advantages of plastics: it is not subject to corrosion, it is resistant to hydraulic shocks, it is plastic, not fragile, chemically inert, and does not overgrow with salts from the inside. Compared to polypropylene, it has a lower coefficient of thermal expansion.
The disadvantage of PE-X is its relatively high cost.
Installing a sewer pipeline in the bathroom
Technical characteristics of polypropylene pipes for heating
The installation of sewer pipes in the bathroom floor is carried out in several stages. First you need to draw up a project for the future sewerage system, prepare materials. It is recommended to use plastic pipes with a sealed structure. Don't skimp on quality, as repairing a pipeline hidden in the floor can be very expensive.
Cast iron products are rarely used today for the installation of an internal pipeline. This is due to their high cost and weight. You should also prepare tools. If you still use cast iron pipes, you will need a grinder. When working with plastic products, you need a hacksaw for metal. During the installation process, you cannot do without a hammer and screwdriver.
If the sewer pipeline is being replaced, you first need to dismantle the old pipes, then you should free the room from foreign objects, clean the pipes, connect them, seal them, connect plumbing fixtures.
Heating distribution on the floor
The first time I encountered such a thing - the building company spread the heating on the floor in plastic corrugated pipes. pouring these pipes is clueless. The question is, can you get up the courage and walled them up in a screed? or change to rehau?
Good afternoon, are the pipes "pressed in"?
Add additional protection. And do not muruy ssy. The diagram is located. Sketch the pipes!
Can I ask you to upload a photo? The corrugated pipe can be used as a protective sleeve.
If we are talking about a new building, then a lot of developers make wiring in the floors with plastic already in a protective corrugation pipe.
Good afternoon ! Feel free to fill the screed, it is permissible and proven!
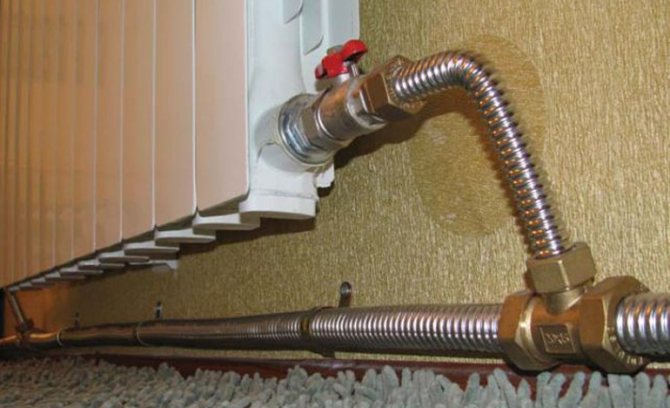
What's in the corrugation is correct. To compensate for linear expansion, a protective casing is specially worn on the pipes. And what pipes are from the developer? Rehau pipes, by the way, this is Pe-X (a) Cross-linked polyethylene obtained by cross-linking polyethylene molecules to a degree of 90%. They have the highest coefficient of linear expansion of all polymer pipes of the order of 10 mm per linear meter. And they are not just needed, but necessary. to be laid in a protective casing to ensure the unhindered expansion of pipes. That is, by changing the pipes to Rehau, at the output you will get the same thing that you have + serious additional costs. The only thing if you decide not to change (and there is nothing terrible in this and I feel that this is an option for you more to your liking))) It is better to pressurize the developer's tracks personally before pouring. To make sure that there are no damage to the routes and the complete tightness of the connections, if any. Pressing the system is carried out by creating an overpressure 1.5-2 times higher than the calculated (working). 6-10 bar for 10-30 minutes The test result is considered positive if the pressure drop does not exceed 0.2-0.5 bar from the initial one. you can fill in the screed. You can rent a press machine and carry out this procedure yourself. Or with the involvement of a master with special knowledge and equipment. Which is preferable, of course, because everything on the Internet cannot be described and cannot be found
but REHAU will explode for sure. if you have reinforced polypropylene in your room, then it's okay! Although according to SNiP. pipes are not laid in the floors - this is trash!
and where to put them? there is another option to pull on the ceiling
Polypropylene in the heating systems of apartment buildings is not much better than a garden hose for watering vegetable gardens))) Where and when it will break is unknown, but it will break for sure)))
pipes are pressurized, hot))) there are such pictures
In the photo, not a protective casing, but thermal insulation Energoflex Super Protect. It is put on over the pipe. And in addition to the linear expansion compactor, it performs the function of thermal insulation. The pipe is inside. Either mealloplastic or the same cross-linked polyethylene, hardly Rehau, Luxury for developers, but there are cheaper manufacturers of Pex pipes For a more accurate determination, you need a photo of the fitting of the pipe itself. The photo of the radiator connection is closer. This is necessary to find out for peace of mind. If there is a sewer, then there is no sense in replacing it with the same sewer only under a different brand.
in the photo there is just a corrugation (at least it does not look like a super protekt.Basically, the Birpex pipe cannot be determined by the fitting. fitting if axial then eagle. The corrugation is also not scary, but the photo or the name of the pipe is needed. And Birpex and polypropylene for disposal, Rehau-made and forgot!
Judging by the smooth surface, it is just more like Energoflex. Although it is difficult to judge by this quality of the photo. I agree that it is not fundamentally corrugation there or Energoflex
Make rehau stable, in a casing and murui
Scheme make rehau stable, in a casing and murui, and these panels in high-rise buildings do not last long.
GOOD. We changed it to reinforced rehau. From the developer burst. There was a water pipe on the heating. Developers often save so that there is more profit. A corrugated pipe is a normal protection for pipes. It is needed for thermal expansion of pipes. Draw and fill the diagram with dimensions.
Dear, I don’t understand something - the same sewn PP is used for underfloor heating, but why put it in a corrugation? it is clear that heat loss is excluded - but the sewn PP is a priori used in the TP - overtook the pressure and fill the screed
To compensate for linear expansion and protect pipes from damage during construction and finishing work. In accordance with DIN 18560 and SNiP. Also in the TP, the temperature of the coolant does not exceed 40 degrees in Heating systems, the temperature of the coolant must be at least 65 degrees.
Move the corrugation and look at the markings on the pipe. or ask the developer about the route. maybe you won't have to change anything :)
Take courage. And be calm!
maybe in corrugated pipes inside and lies ruhau or other normal pipes, then it is normal
Methods for installing heating pipes in the floor
DIY installation of heating in a private house from polypropylene pipes
In this block, we will look at two options:
- installation for pouring;
- installation under a wooden floor.
Flush mounting
The method is suitable for both apartments and houses, even with wooden floors. The screed can also be poured onto a wooden sub-floor. In both cases, the algorithm of actions is the same:
- waterproofing is spread;
- insulation is laid;
- reinforcing mesh is laid;
- pipes are bred and fixed;
- damper tape is glued;
- everything is filled with a layer of solution.
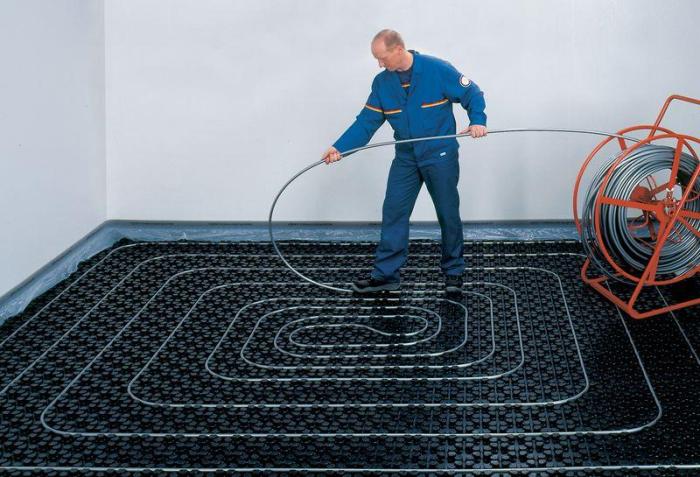
Now about everything in order. Waterproofing is spread on the floor to prevent moisture from entering from below, and also to avoid contact of the wet mortar with the wooden sub-floor. Then the working surface is insulated. The best insulation option is polystyrene and its derivatives, such as penoflex. A steel mesh is laid on the insulation, which will distribute the load in the layer of solidified mortar. Without reinforcement, the screed will crack.
There are special foam mats, on the surface of which there are bumps. They are arranged in rows at regular intervals, like grid cells. Such mats are simply laid on the floor, wiring is carried out along them, and all this is poured with a solution. Easy, fast and high quality. New technologies, however.
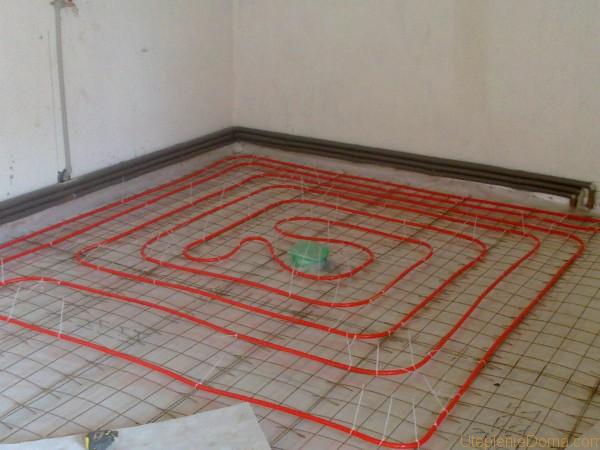
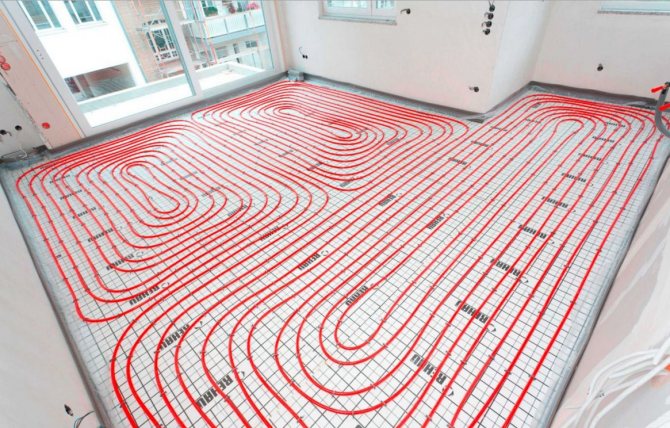
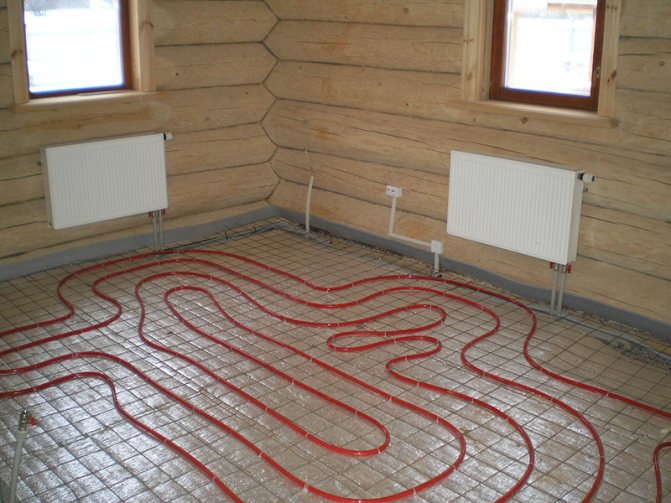
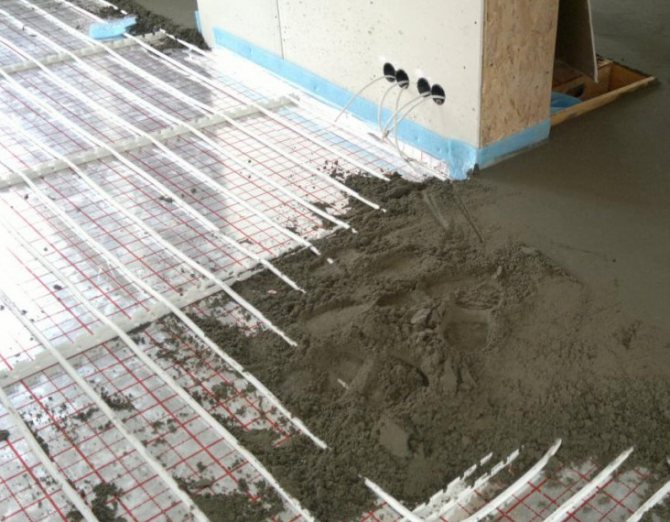
Scheme of the heating pipes in the floor "snail"
The distribution of heating pipes in the floor is carried out according to one of two schemes:
- snail;
- snake.
The snail scheme implies a circular masonry of the contour from the walls to the center of the room. At the same time, there are no sharp turns in the direction of circulation. The snake passes from one wall to the opposite one and at each segment the direction of water movement changes by 180 degrees. Not to say that this is very bad, but the first scheme is preferable.
The contour must be fixed to the surface, while remembering that it increases in length. Therefore, the mount should not be rigid, the line should be able to slide in it. Alternatively, you can use plastic clips that are screwed to the floor.It is easier to use ordinary clamps that attach the pipes to the mesh.
In fact, a warm floor is a layer of solidified solution, in which heating pipes are hidden. At the same time, the cement slab does not have a rigid connection either with the subfloor or with the walls. This large rectangular parallelepiped simply lies on the floor, periodically increasing and decreasing in volume.
In no case should you forget about the damper tape. This is a strip of foamed polymer that is glued around the entire perimeter of the room to the wall. The bottom edge should run across the floor. The damper tape compensates for the expansion of the screed and prevents the mortar from sticking to the walls during pouring. The thickness of the screed over the heating pipes should be at least three centimeters, and only about seven centimeters. If the layer is not thick enough, it will crack, if too thick, the surface temperature will be lower than expected.
Installation under a wooden floor
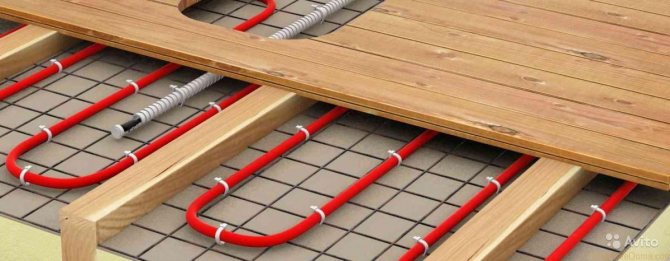
Heating pipes in a wooden floor
This method is not as effective as screed pipe installation, but it is sometimes used. First you need to create a buffer zone for laying heating pipes in a wooden floor. For this, lags (bars) are laid. Then pipes are laid between the lags. At the intersection of the contour and the bars, grooves are cut in the wooden logs so that the entire highway is in the same plane. Naturally, it is necessary to provide insulation and waterproofing so that all the heat goes up. The finishing floor is neatly punctured on the logs so as not to puncture the highway.
Now let's summarize. For the installation of heating pipes under the screed, products made of cross-linked polyethylene reinforced with ethylene vinyl alcohol, marking PEX / EVON / PEX, are best suited. There should be no breaks in the highway, everything is done from one segment. The floor must be insulated and waterproofed before pouring. The thickness of the heating pipe screed must be at least three centimeters and no more than seven. A damper tape is glued around the perimeter of the room. The temperature in the underfloor heating system is about 40 degrees, and on the surface of the finished floor - about 30 degrees.
Pipes for heating in the floor (in the interfloor or basement overlap) are installed either during the hidden laying of the heating system, or during the installation of the "warm floor" structure. It is worth noting that in these cases, pipes are used in principle and various technologies for assembling the pipeline are used.
Therefore, in this article we will describe the installation of heating pipes in the floor, placing emphasis on all the details of the technological process. In addition, we will say a few words about the "warm floor" technology itself.

Types and schemes of laying heating pipes
It is important to choose the correct method of piping. Alternatively, a single-pipe and two-pipe gasket system is distinguished.
With two-pipe laying, there is a supply and a "return" in the system. This increases the cost of the project, but increases the efficiency of the heating system, since the cooled water directly enters the return line, where, with the help of a circulation pump, it is pumped back to the boiler and quickly warmed up. That is, the heating boiler needs to spend less energy to heat water than to heat it constantly.
Two-pipe heating system
As for the one-pipe system, here, with less investment, the consumer initially pays more. The fact is that the cooled water from the radiator enters the supply, where it deliberately dilutes the water by about 15-20%. Thus, water will come to the next radiator in the system with a temperature equal to 80-85 percent of the primary values.
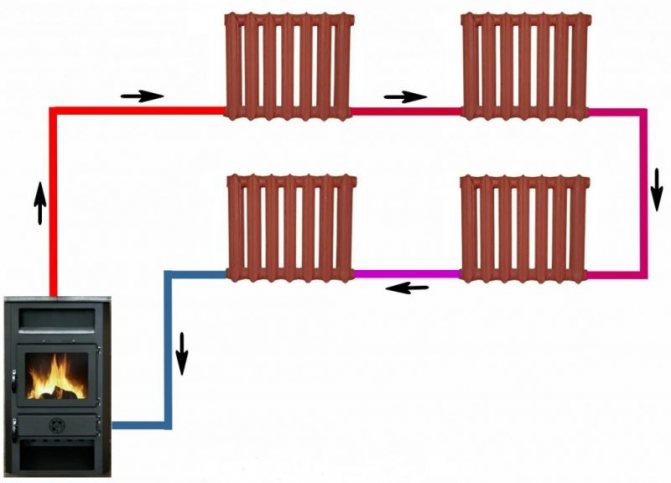
Example of a one-pipe heating system
Attention! The very last radiator in the circuit will be significantly colder than the first. This must be taken into account when constructing the heating circuit.Many people think that such problems can be compensated by using a circulation pump, but this is not the case, since the pumps only allow increasing the intensity of the exchange of water with the boiler.
It is the two-pipe heating system that is most effective. Now you need to figure out how to connect the radiator. There is bottom connection, side connection, and diagonal connection. Of all the above methods, it is most convenient to connect with the "bottom" one. But, such a connection is incapable of 100% converting the energy of the coolant into heat for your home, since the radiator is only half warm. The maximum efficiency is possessed by the diagonal connection, which involves the chasing and laying of the supply pipes into the wall.
With a diagonal connection, the "supply" comes from the top of the heating boiler, and the return flow goes from the bottom, from where the cooled water is fed back to the boiler. With a diagonal connection, it is imperative to choose a two-pipe system so that the coolant circulates faster in a closed loop.
As for the laying methods, if the heating system changes in an already finished house, for example, in a frame house, then nothing is chased and pipes are laid over the floor or along the walls. To do this, it is necessary to install a pipe clamp every 70 cm, so that it is important specifically for hot heat supply, otherwise the PVC material will be deformed. It is with such pipes that they often work, since their low cost and high durability allow reducing the overall project costs.
An example of laying a heating circuit over walls by installing pipes on clips and clamps
If the house is just being finished, the floors have not yet been poured, then it is most convenient to lay PVC pipes under the final screed. As a rule, it is not less than 7 cm, so with such a layer of concrete you can organize a hidden laying of polypropylene heating pipes. If the pipe is welded correctly, you will be able to exclude a loss of tightness. The main thing is to pressurize the system before pouring the finishing screed. For this, a system with a pressure gauge is used, designed to fill the circuit with water, with the help of which a pressure in the pipe of the order of 2-3 atmospheres is created. The circuit is pressurized and allowed to stand for about 5 hours. If during this time the pressure has not dropped, then the installation was successful.
Attention! It is recommended to check the system for functionality before pouring the fine screed. This will help prevent narrowing of the plastic pipe. The reason for this is overheating of the fitting.
As for the choice of the radiator connection scheme, today the beam scheme is actively used. The beam scheme is the connection of each radiator to the central collector, which is installed in the boiler room. From the collector to the heating boiler, there is a main pipe, which is often of a larger diameter than the diameter of the supply pipes. Thanks to the beam connection, you can use metal-plastic pipes or cross-linked polypropylene.
Here it is not at all necessary to lay polypropylene heating pipes in the wall, as well as observe rectangular turns. It is enough to lay them under the floor, which will facilitate installation and increase the pace of work. This scheme is considered the best for solid pipes that are not soldered.
Description. An example of a radial heating circuit from a collector in a private house.
Disadvantages of the location of heating pipes in the floor
Disadvantages of the underfloor heating system:
- The most serious drawback is the complexity of repairing communications in case of damage. The rule of laying in a screed only a single piece of the pipeline should be strictly observed.
- The flooding of housing with warm water in the event of a leak creates considerable problems.
- Significant cost of the entire complex of works on the installation of the system.
- Significant cost of a pump, a manifold with a mixing unit.
- It is necessary to allocate space for a collector cabinet - one cabinet for each floor in the house;
- The complexity of the design - it is desirable to involve specialists.
- Such a system cannot be installed in apartment buildings in which it was not provided for in the project (and this happens only in new buildings). The large weight of the screed creates a large load on the floor slabs and creates the danger of breaking the load-bearing structures of the house. The law prohibits connecting underfloor heating systems from centralized heating and hot water supply systems.
- The height of the entire structure of the screed + insulation reaches 110-120 mm, the weight of the screed is large - this should be taken into account when designing a house (both in terms of the height of the room and the strength of the floor structures).
- The heating system limits the choice of flooring - carpet, parquet with good heat-insulating properties make the heating work ineffective. Tiles, stone, porcelain stoneware, laminate are preferable. Only high-quality linoleum can be used - in cheap varieties, substances with an unpleasant odor will be released when heated.
- Significant thermal inertia - the screed heats up slowly.
- Water heating systems cannot be cooled below zero - it will not work to heat the porch, terrace, garage and walkways or equip a weekend cottage with such a system. Antifreeze can be used, but it is expensive and is also very poisonous.
Features of installing a warm floor
Reflective insulation under floor heating
After the materials from which the pipes are made have been determined, it remains to deal with the laying of heating pipes in a wooden house. At the same time, it is necessary to make a warm floor so that it has maximum efficiency and is reliable. Stages of laying heating pipes in a screed:
- laying of hydro-barrier and thermal insulation.
A water barrier is needed if moisture can seep from below. When placing heating pipes in panel houses under a layer of mortar, this is not necessary, but thermal insulation should be in any case. In this capacity, materials from expanded polystyrene are suitable. Reflective insulation will not be superfluous;
- laying of reinforcing mesh.
A metal mesh with a large mesh is suitable for this. In addition to the fact that it will distribute the load, it will also serve as a markup for laying heating pipes in the floor;
- system wiring.
There are two schemes for the hidden laying of heating pipes - a "snake" and "snail". In the "snake" scheme, the contour passes from one wall to another, while the direction of movement of the coolant changes by 180 degrees. In the "snail" scheme, the contour is laid out in a spiral from the walls to the center of the room, while there are no sharp turns;
If the warm floor is the main heating, then the distance between the pipes should be 20 cm. If this type of heating is auxiliary, then a distance of 30 cm is allowed, but no more.
- fixing the contour.
In order to secure the contour, you can use plastic clips, or ordinary disposable clamps. In the case of clips, they can be pre-fixed to the floor and wired along them. It is easier to use plastic clamps with which the contour is attached to the reinforcing mesh;
- gluing a damper tape.
The damper tape is made of polyester foam. It is glued to the wall along the entire perimeter of the room. Its bottom edge should be in contact with the floor. During operation, the screed increases and decreases in volume, therefore, it is necessary to leave a gap to the wall so that the warm floor does not crack;
- filling the screed.
Warm floor in a wooden house
There should be approximately 3 cm of solution above the circuit. In total, the screed can be from 3 to 7 cm thick, while the recommended thickness should not be less than 5 cm. Too thin a layer will not be strong enough and may crack. Any covering can be laid on top of the screed.
In wooden houses, heating pipes are sometimes laid under the floor, while the technique is slightly different from wiring under the screed. An air buffer is created between the subfloor and the finish. To do this, lags are laid along the perimeter. In the logs, grooves are cut out in which the contour will pass. The depth of the grooves should be slightly larger than the diameter of the pipes, so that from the system to the topcoat it is about a centimeter. In this case, you also need to take care of insulation.
Especially carefully you need to sew up the logs so that you do not accidentally break through the contour with a nail or self-tapping screw.
Wiring types
According to clause 6.3.3 of SP 60.13330, pipelines made of polymeric materials are allowed in apartment heating systems when the parameters of the coolant should not exceed: temperature - +90 0С, pressure - 1.0 MPa.
Important! The method of laying pipelines should ensure easy replacement during repairs.
According to paragraph 6.3.3 of SP 60.13330 - it is recommended to carry out the heating wiring under the polymer floor hidden in the corrugated pipe. Open laying is allowed behind skirting boards, screens where mechanical damage and direct exposure to ultraviolet radiation are excluded.
It is recommended to use such types of wiring as:
- two-tube beam;
- two-pipe perimeter;
- mixed.
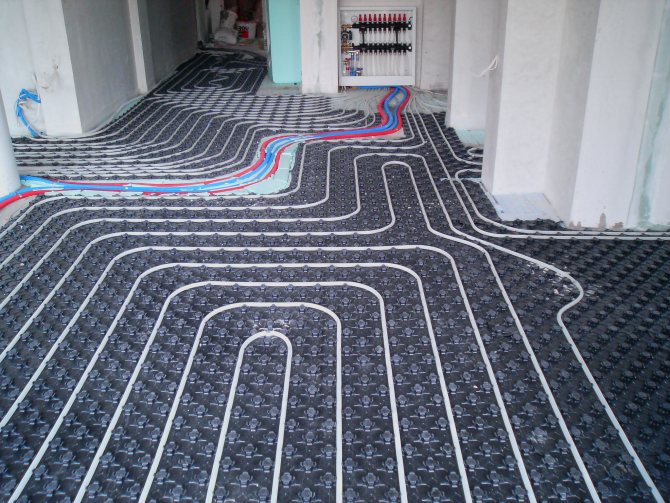
Beam
Two-pipe beam wiring provides for the connection of a separately located device to the distribution cabinet of the apartment. The floor is poured only after the installation of the corrugation, the installation of the fasteners to the floor, the device of the compensation loop, and the pressure testing for the permissible pressure.
According to building codes, underfloor heating in an apartment is laid without joints. Products of the PE-X line are produced by enterprises in coils, it is recommended to calculate the required footage in advance.
pipe routing system on the floor from the comb
The best option is radial wiring, in which each device is individually connected to the distribution manifold. There are no intermediate connections on the way from the manifold to the device, which ensures high reliability. In addition, a change in flow through one of the devices practically does not affect the operation of the others.
Perimeter, mixed
Code radial routing in the middle of the floor is undesirable for any reason; two-pipe perimeter routing is used. It is laid along the skirting boards under the floor or openly, but with screens.
When installing the skirting board, take into account the location of the perimeter wiring so as not to damage the heat pipe. When several separate radiators are located along the wall farthest from the switch cabinet, beam wiring is applied to the nearest device, then perimeter between the rest of the devices.
The laying of the heating pipe under the floor in the apartment is invisible, does not affect the appearance of the room, does not require opening when repairing or replacing the pipeline.
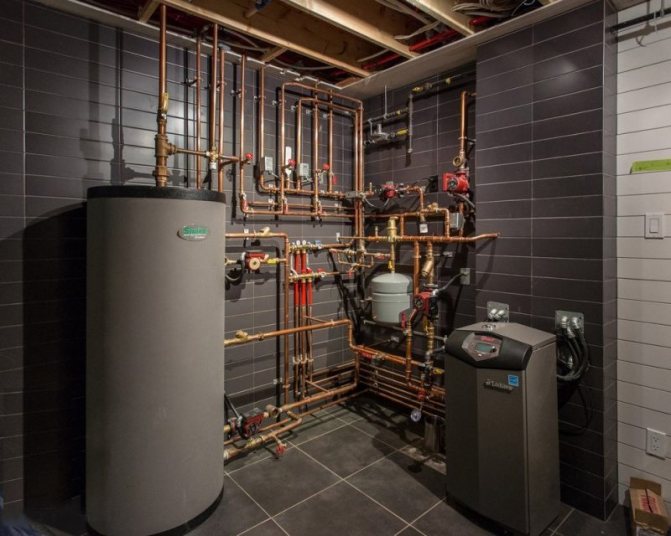
Stainless steel and copper in the heat supply system
Heating pipes made of stainless steel are characterized by reliability, high corrosion resistance to various media and heat carriers, strength, resistance to mechanical damage, durability, hygiene, and most importantly, aesthetics and versatility. The most common brand of metal is 10X17H13M2T and 12X18H10T, the latter brand is able to withstand temperatures of 1000 degrees. What are the disadvantages, you ask? The disadvantage of such a product is its enormous cost, therefore, stainless metal was most used in technological workshops of industrial enterprises, and not in an apartment.
Heating systems made with copper pipes are durable, corrosion resistant, and also have high strength.
Heating systems made with copper pipes are durable, corrosion-resistant and also highly durable. The temperature range for copper is up to 200-250 degrees. Copper products are versatile and antibacterial. The indisputable argument is that such a scheme is capable of withstanding five times defrosting, does not allow oxygen to pass through and is resistant to ultraviolet radiation. The connection of copper pipes is carried out using soldering and press fittings. The disadvantages include: high cost, susceptibility to mechanical stress of suspended abrasive particles in the transported medium, inadmissibility of connection with steel and due to undesirable electrochemical processes.
Installation
The technology of laying the "warm floor" system will be clear to any person after one instruction. Before installation, you need to prepare tools, consumables:
- reinforcement for the manufacture of mesh or finished metal mesh;
- grinder, file;
- pliers, drill;
- pipes, fittings;
- waterproofing material, insulation;
- drill attachment - mixer;
- container for mixing cement;
- trowel, level.
To calculate the number of consumables, you must select the thickness of the screed. Masters recommend making it about 7 cm.
Before installing the waterproofing, it is necessary to prepare the base. To do this, you need to level out irregularities, cracks, grooves to grind along the edges in order to ensure better adhesion with the mortar.
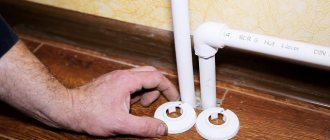
Installation:
- Fastening the insulation plate made of extruded polystyrene foam.
- Placement of the waterproofing film.
- Bonding damper tape.
- Connection of individual elements using fittings. The pipes must be secured with arcuate brackets so that they do not float when the concrete is poured.
- Securing the reinforcing mesh. To do this, you can use clamps or staples.
- Launching the pipeline. You need to carefully examine the connection. Water should not leak anywhere.
The seams are checked for several hours. During this time, you need to gradually increase the pressure in the system. It is enough to raise it to 0.6 MPa. Better to check 24 hours. During this time, you will need to bleed the air three times.
Sealing and thermal insulation
Only metal connections have to be sealed. The fact is that when working with HDPE pipes, they are soldered, which does not require additional sealing. For metal-to-metal connections, plumbing linen should be used. This is the most inexpensive method, which, in combination with the paste, allows you to achieve 100% tightness.
It is necessary to wind the flax in the direction of movement of the object, which will be screwed onto the thread, so that when screwing the flax does not turn. Instead of flax and paste, you can use fum tape, as well as other products.
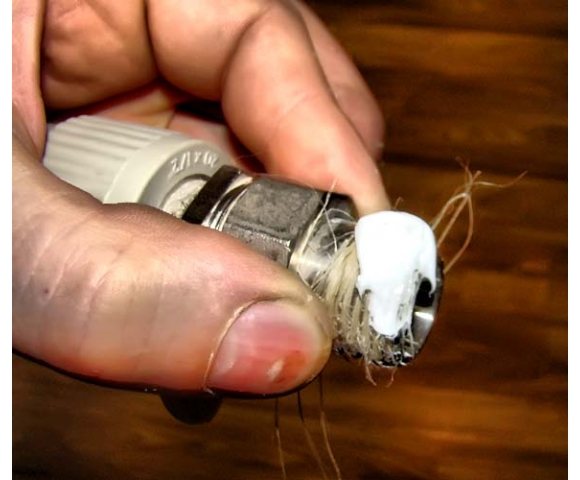
An example of applying sanitary flax with a paste for additional protection against leaks of threaded connections
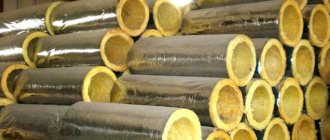
As for thermal insulation, there is a special insulation on sale that is made for the diameter of the pipe. It is recommended to insulate the coolant that is supplied from the boiler to the heating radiators. This should be done especially if the pipes lie against the wall under the floor, since it is here that the maximum level of heat loss is observed. Basalt wool, glass wool, expanded polystyrene and other insulation can be chosen as a heat-insulating material.
Important! Don't skimp. When laying underfloor heating systems, it is imperative to install the pipe on the insulation. For the central part of Russia, at least 5 cm of foam is used.
Underfloor heating installation
Heating in the floor allows you to forget about the usual batteries forever, since the system transfers more heat to the room. There are certain rules and an algorithm of actions according to which the installation of underfloor heating should be carried out.
- Surface leveling;
- Waterproofing.
- Installation of thermal insulation. Extruded polystyrene foam can be used as a guide frame for pipes.
- Competent pipe installation. Products should not have large gaps and joints.
- Reinforcing screed device.
In order to simplify installation as much as possible, a raster grid should be used. If you follow this scheme, you can easily make a heating system that will evenly warm the floor surface.
Before the installation process, special attention must be paid to insulation. This is especially important for homes where the floor is above a cold surface.
In this case, it is necessary to supplement the insulation layer with additional panels. Uniform heating can be achieved with a serpentine heating device. Also, it is necessary to leave expansion joints that allow the pipes to expand when heated. Only after that, you can proceed to the final pouring of the concrete screed.
The modern world makes high demands on the level of housing comfort. Therefore, new materials and methods of installation work appear. This leads to the fact that warm floors are gaining more popularity and becoming more affordable. They can be ordered inexpensively on the Internet, or purchased directly on the construction market.
System installation
Work always begins with a plan, procurement of materials, search for tools. Warm floor is no exception.
The wisdom of choosing pipes
What pipes are the most reliable for arranging heating? You are free to choose copper, but it is very expensive. It is better to dwell on polymer products consisting of polyethylene and polybutylene. Such a "duet" is resistant to pressure - both external and internal: it does not cause trouble if everything is correctly assembled. Polypropylene pipes should function in the floor screed, since their only drawback is their low hardness. Composite structures made of metal-plastic are no less good.
As for the installation of metal elements, in this case the risk will be unjustified. Water from the mains is sometimes replete with "chemistry", and the material may not withstand such aggressive impact - as a result, rust will appear, and then flow. Hard water also has a detrimental effect on metal. Therefore, polymer pipes are a wise decision, and at an affordable price.
Premises preparation
The installation of the network is carried out after removing the connection points of other communications, as well as after installing windows and doors. The room should be freed of furniture, the old heating network should be dismantled or left if you want to double-heat the room. Permissible surface irregularities are up to 1 cm. If they are larger, the base will have to be leveled.
Task number 1 - level the floor surface
Rooms located above the cold zone (basement) must be separated with insulating panels so that you heat the house, not the cellar.
The final stage of preparation is cleaning. An industrial vacuum cleaner will perfectly cope with such a task. It remains to ask the family not to interfere and proceed with the installation.
Intermediate stage of work
Installation of the structure
Work begins on the installation of underfloor heating with thermal insulation. You already understood that the hot air should be at the top, not below. For thermal insulation of the network, you can use materials in the form of sheets or rolls. The main thing is to make sure that there are no gaps between the joints of the heat insulator, if you see gaps, cover them with a special tape. Polystyrene or basalt fiber coated with reflective foil is ideal for this task.
How to lay pipes? The uniformity of heating is important, so use such options for the arrangement of elements as a snake or a spiral.
The main thing when laying the net is to adhere to the same pitch between zigzags or turns. Step size matters too. For rooms up to 20 m², a distance of 20 cm is sufficient.If you are installing the network in large rooms, it is recommended to mount multiple coils / snakes.
Laying is done wet or dry. If you choose the first one - the more common, in which the heat transfer is maximum, then you will have to install a reinforcing mesh. You are free to purchase a factory set or build a reinforcement structure on your own. The size of the cells depends on the pitch, but the side of the cell should not exceed the pitch distance. The armature is fixed with clips, but if special heat insulators with bosses are used, then the fasteners are not needed.
A reinforcing mesh is also installed on top of the pipe network - for safety net, so that the elements do not deform under the weight of the screed. Next, the mesh is poured with a solution (gypsum, cement or other building mixture). The thickness of the screed varies between 3-7 cm.
This is important to know! Before pouring the screed, check the piping for leaks. ...
The dry method of "masking" the net is also practiced.
How to hide pipes in a dry screed? Use chipboard plates. The technology differs only in that instead of a solution, chipboard sheets are installed on top of the structure. The technique is simple, you don't have to wait for the screed to dry. However, dry styling cannot be called popular, since it has a drawback - voids inhibit the heat transfer of the network.
The shape of the structure is at your discretion
Using pipes in a floor screed for heating is not at all a luxury, right ?!
Installation methods
- Open - the pipeline is laid along the perimeter of the room from the radiator to the radiator. This is a traditional solution, but far from the most profitable. Firstly, this method involves a lot of fasteners, which is quite costly. Secondly, if plastic heating pipes are used, then some of the fasteners will not be rigid to compensate: this has an extremely negative effect on the appearance. Thirdly, the formation of a collector type of wiring is completely excluded, since it is simply difficult to place such an amount of pipeline in an apartment.
- Hidden in the wall - for laying the heating it is necessary to gouge the walls. This is hard and dirty work. It is also necessary to provide for thermal insulation, since in this case the heat from the heating pipes is transferred to the wall material and is not used to heat the room. However, the method allows you to hide the most complex communications from sight and removes the issue of compensation for thermal expansion.
- Concealed installation in the floor - has its pros and cons. There is usually no need for strobing, although this method is also used in a new building. The advantage can be considered the lack of insulation - it is enough to protect the pipeline with a plastic corrugation. The dissipated heat will be transferred to the floor material, that is, it is still used for heating in the apartment. The disadvantage is the need to somehow provide access to the joints in case of repair and for preventive inspection. The photo shows the working moment of laying in the floor.