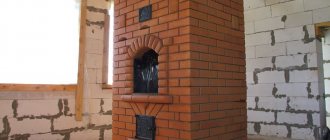
Types of mini ovens
Steel furnaces. This type of mini-oven is inexpensive and easy to install, but the service life of such a model will be short-lived.
Cast iron stoves. The cost of such stoves is quite high, but it can also serve for a very long time, but only if it is not subjected to sudden changes in temperature.
Mini brick oven. This type of stove is the most popular today and there are reasons for this:
- Keeps warm for a long time
- The ability to do it yourself
- Available fuel
- Possibility to make a stove with a stove or oven
- High reliability
Due to the availability of material and simplicity in execution, even a novice stove-maker will be able to make a mini-oven with his own hands.
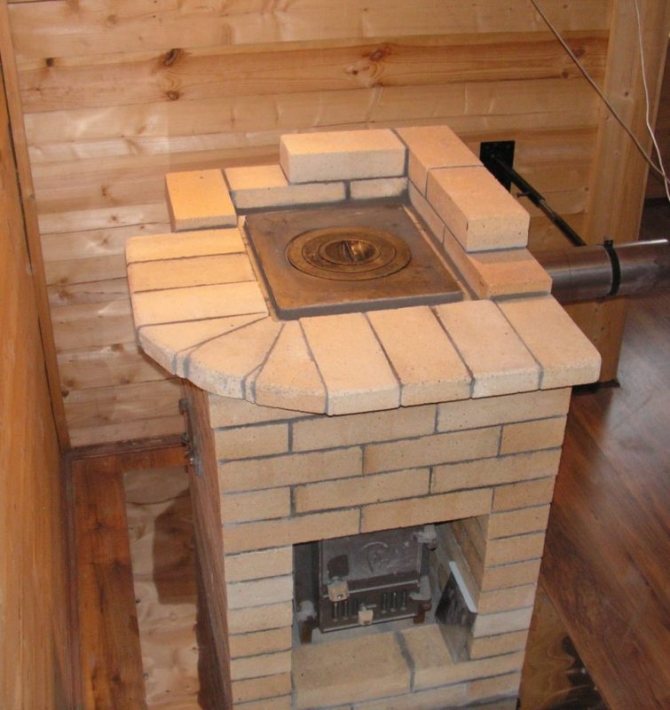
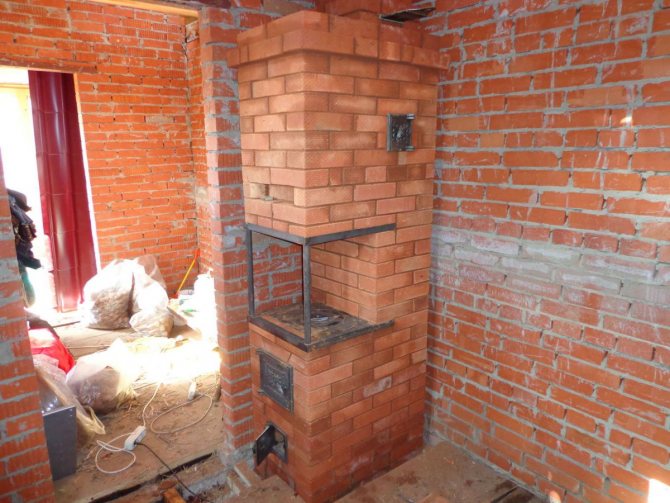
Most often, a mini-oven for a summer residence is made with or without a cooking stove. It is the second option that we will consider in more detail.
Recommendations for using a brick oven
It is recommended to build a compact furnace of a simple design in small buildings of temporary residence... These can be country houses or temporary huts built by the owners of the estate next to the cottage being built. Mini oven ideal for heating small industrial premises without central heating: workshops and cabins in the countryside.

All lovers of out-of-town recreation dream of a stove in their cozy houses in their summer cottages. As you know, a brick stove is the oldest universal design for space heating. Its effectiveness and high performance has been proven for centuries.
It is not at all necessary to build a serious bulky structure. Sometimes a small-sized stove is enough, which you can build with your own hands. The models may differ in shape, size, type or layout of the chimney, but in general, their construction will not take you much time and will not require serious stove-maker skills.
Advantages and disadvantages of mini ovens
Like other stoves, the brick mini stove has positive and negative sides. Of the positive aspects, one can single out:
- The stove will last a very long time if it is used correctly.
- Such a structure heats up quickly and retains heat for a long time, giving it to the room.
- You can make a mini brick oven with your own hands.
- During manufacturing, the structure can be made in any size and shape.
- If desired, you can add a stove or oven to the structure.
- A mini-oven made of bricks is safe, since it does not heat up very much, unlike ovens made of other material, therefore the likelihood of getting burned is minimal.
There are also disadvantages to this design:
- Due to the large weight, a foundation is needed for the furnace, which will take time to fill.
- During operation, it is necessary to take into account all the nuances of safety and clearly follow the drawings in order to make the oven correctly. Otherwise, it can be dangerous to use the oven.
DIY materials for making a mini-oven
In order to make a mini-brick oven with your own hands, you will need the following materials:
- Two types of bricks (fireproof and red)
- Building and fireclay clay
- Fine sand (well sieved)
- Roofing material
- Doors for the furnace, blower and for the hole through which the furnace will be cleaned
- Grate
- Gate valve
- Trumpet
From the tools it will be necessary to prepare a trowel, a level, a plumb line and a tape measure. After everything you need is prepared, we proceed to laying the stove.
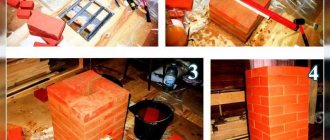
Manufacturing process
To carry out the independent construction of structures, in general, is forced by the high price of providing the services of a qualified master. However, in certain cases, the owners of real estate outside the city are driven by the desire to assert themselves by arranging a place for spending free time without additional help.
This is how the clay composition for brickwork looks.
Preparation of the solution
at the beginning of mixing, accompanying materials must be prepared, from which the composition of medium plasticity will come out. A high-quality solution, when cured, gives a small shrinkage, ensuring good fixation of the components in the structure.
It is made up of three elements.
- Pure water with a low salt content makes it possible to achieve a good distribution of all substances in the mass. After hardening, a strong seam emerges.
- Fine sand serves as filling. Before kneading, it is carefully sieved. To do this, in most cases, a specialized device with a cell of up to 10 mm is used.
- Clay is considered a binder substance, thanks to this, the strength of the structure will obey its quality. This component also affects the total consumption of sand.
Designation of the quality of the solution made.
First of all, clay is mixed with water until a uniform mass of medium density appears. Sand is added in the amount of 1 kg per bucket. The resulting mixture can be tested for elasticity by dipping a wood stick into it. A layer of 2 mm is considered ideal.
Assembly specifically in rows
As soon as the construction site is determined, key work begins. A roofing layer is laid on the basis. Sand is poured onto its surface, sifted through a sieve with a cell up to 1 cm.
The platform is carefully leveled so that no protrusions remain.
Main diagram for clarity.
- 1 row. 12 bricks are placed on a properly prepared surface. They are placed horizontally using a level and filled with a thin layer of mortar.
- 2 row. Masonry is performed using clay composition. Parts are placed along the perimeter, forming a blower chamber. The level is applied in the installation process.
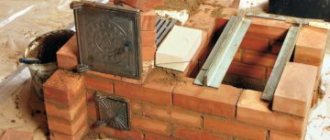
- 3-4 rows. The ash pan itself is being arranged specifically. The bricks are installed taking into account the dressing of the seams. A door is built in, which must be closed with asbestos cardboard.
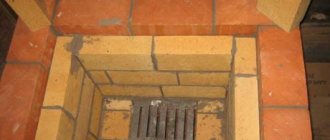
- 5-6 rows. The lower chamber is overlapped. On the upper side, a grate is fixed, on which the fuel will burn out. Ash will crumble down through it.
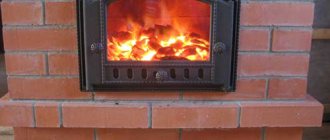
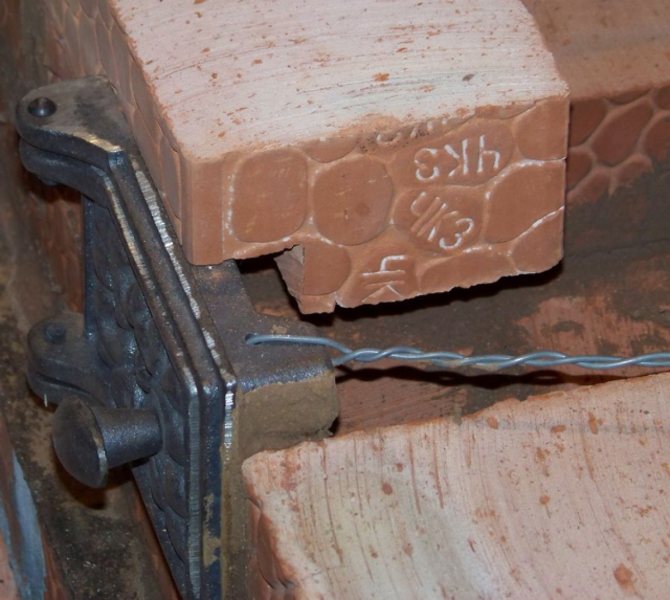
- 7-11 rows. The side planes of the combustion chamber lie down. An asbestos-coated iron door is installed. Its fastening is carried out using a burnt wire.
- 12-13 rows. The firebox is overlapped from the upper side with 2 brick rows. Closer to the rear wall, space is left for the outlet of the chimney to the outside.
- 14-15 rows. A small door is installed in the front part to clean the horizontal channel. The laying of the flue gas venting components begins at the rear plane.
- 16-25 rows. At this stage, a winding channel is generated through which the smoke will go out into the street, lingering in the structure for a long time. The gases must make their way upright, heating the walls.
- Rows 26-27. The key channel is overlapped. A clearance for the chimney is left on the front side. Exhaust gases will enter it, bypassing the winding path.
- Rows 28-29. Start of construction of an exhaust pipe. Its length depends on the height of the structure, thanks to which it is installed on site.
Fixing the door to the brick base.
Adding! Small brick stoves for summer cottages, laid out in this way, are capable of heating rather large objects. The service life depends on the correctness of the masonry.
Required recommendations
An example of ordering for a structure 520 × 520 mm.
- It is best to carry out dry masonry specifically before assembly, so as not to confuse anything later. You can immediately make a pin of a brick, thus simplifying the final stage.
- Laying should be carried out according to a drawing prepared in advance. It is recommended to check the quality of the finished work every few rows. The placement of the elements and the dressing of the seams are necessarily studied.
- When laying, the brick is pressed against the mortar with less force so that the extrusion is carried out. In this case, it will turn out to achieve the greatest strength.
- You can fix the door qualitatively if you insert the wire inside the box and twist it in half. A cut is made in the brickwork, which makes it possible to perform high-quality fastening.
- When small wood-burning stoves are assembled for a summer residence of this type, each brick is dipped into a bucket of water before the final installation so that moisture does not leave the solution in advance.
- To prevent parts from chipping off at the end parts of the structure and corners, it is recommended to install metal plates of the required shape. They make it possible to secure weak points.
- If similar structures are installed in houses outside the city from a block of containers, then to remove the chimney, you only need to cut a hole in the metal, which will be suitable for its dimensions, sealing the cracks with foam for installation.
- It is best to leave a 3-5mm joint between the brick. This distance makes it possible to preserve the best strength characteristics. Excess mortar is removed with a trowel.
Seam thickness shown is exemplary.
Drying the finished structure
After the construction of the Dutch oven, you will need to go through 1 more stage - the easiest one. It is necessary to dry the assembled structure within 12-15 days. If possible, it is better to open the doors and windows of the room, as well as the system itself, so that the air can circulate freely.
If the stove was erected in winter, then instead of natural ventilation, artificial drying can be performed. In this case, after 2 days, the combustion chamber passes with the use of ordinary paper, shavings, chips, thin branches and very small debris. This process should last no more than 30 minutes, otherwise the composition will dry out instantly and will not achieve the required qualities.
An example of a complete heating system.
The foundation for the furnace and the dimensions of the furnace
Before starting work, you need to choose a place so that the walls of the furnace are at least 50 cm away from the walls of the room. You should also think about the foundation: you can make a regular foundation from sand and cement. To do this, it is necessary to mix cement and sand in a ratio of 1: 3. The sand must be of good quality, and if you take ordinary sand, then it must be sieved well. The dimensions of the foundation depend on the size of the furnace plus 10 cm for a stock on each side, but the height of the foundation should be about 1 m.It is worth remembering that such a foundation dries for a long time.
For a mini-oven, you can make a foundation of clay and brick. To do this, we dig a hole, the depth of which should be at least 5 rows of bricks. Then we fill it with clay to a height of a couple of rows of bricks and tamp it well. Then we put roofing material on the clay, and on it bricks, which must be coated with clay. The last row of bricks must be level with the floor, and it must also be covered with roofing material. Only after that do we start making the oven itself. This option of the foundation is preferable in that it requires less time and effort than the previous option, and you can start manufacturing the structure right away.
Considering that the stove will be smaller than the usual ones, the dimensions of the furnaces for mini-stoves will be smaller, but they can be of the usual sizes if desired. If the firebox is small, then it will be inconvenient to put firewood, therefore we will consider the option of a mini-brick oven made of bricks with our own hands with the dimensions of fireboxes for an ordinary stove.
The sequence of the device of a small brick oven
For a mini-stove, you do not need to put a special foundation. Wooden floors, provided that the board has a thickness of 50 mm, may well serve as a basis for a stove.
- After choosing a place for a mini-stove, in the corner of a building, in a wall or in a niche, waterproofing is performed under the base of the stove. For this, any roll waterproofing materials in two layers and coating insulation - bituminous and bitumen-polymer mastics are applicable.
- Coarse dry sand 10 mm thick is poured onto the waterproofing layer and leveled under the horizon. In the first row of the base of the stove there will be 12 bricks, laid dry, without mortar. Horizontal alignment is performed using a building level
- A layer of clay mortar is applied to the starting row of bricks, then a blower door is installed, wrapping it with an asbestos cord. Fasteners to the masonry are made with wire.
- The second row and all subsequent ones are laid on clay mortar. Under the grate, a row is laid not with red ceramic bricks, but with fireclay bricks to ensure the lining of the mini-furnace
- In the fourth row, the bricks are placed on the edge. Starting from the level of the beginning of the chimney channel in the rear wall of the furnace, several bricks are made "knock-out" - they are laid without mortar, for subsequent cleaning of the chimney from soot. It is possible to install another door instead of knockout bricks, but the heat loss from a metal door will be greater than from several bricks without mortar. The rear wall masonry with kick bricks is done with a slight outward displacement. Under the inner partition of the chimney, lining of asbokarton or chamotte is laid
- Before installation, the furnace door is wrapped with an asbestos cord and fasteners are performed on the wire. the door opening must point upwards. Fixing the door in masonry with wire anchors
- In the fifth row, the bricks are laid flat, in the sixth - with an edge, in the seventh flat, the dressing must be performed, and the last brick of the row is always laid out, observing the dressing with the first. But the laying of the back wall of the mini-stove in question is done only with bricks on the edge.
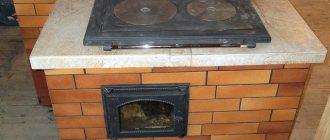
- In the eighth row, a brick is laid to close the firebox door. In this area, above the firebox, a brick with a beveled edge is required, since the flame must be directed to the cast iron hob of the stove, to the center of the burner
- It is unacceptable to install a cast iron hob on a clay mortar and directly on a brick, due to the significant difference in the linear thermal expansion of cast iron and ceramics. Heating to high temperatures will result in deformation in the contact zone, followed by the formation of cracks and destruction. The perimeter of the mini-stove under the slabs must have an asbestos cord gasket, and the slab is mounted on a cord
- After laying the ninth row, a chimney is formed in the tenth. A small-sized stove can have a different chimney design - straight, direct-flow or counter-flow, bell-type, horizontal or vertical, as well as combined. When laying bricks of the rear wall with an outward displacement, as in the example under consideration, a chimney pipe with a rear expansion will be needed
- The eleventh row is the section where the joint is made: the brick and metal sections of the chimney are connected. At the joint level, a latch view is mounted with a preliminary winding of an asbestos cord and subsequent clay embedding
The final stage is the first cleaning of the chimney. Take out the knockout bricks and remove debris from the chimney, then install the bricks in their original place
Finishing is required to complete the work:
- Sandy bedding under the starting row of bricks should not spill out, for this, the seam between the floor and the bricks is sealed with clay mortar and covered with a plinth, to strengthen the seam and give the structure a general aesthetics
- The finishing is the simplest and most economical - whitewashing the stove with lime in two times. Particularly carefully you need to go through the junction between the hob and the lower brick row. It is very difficult to wash off the lime from the metal of the stove fittings and the stove, so it would be reasonable to cover them with polyethylene or other material from splashes and drips of whitewash
There are few technical difficulties in the ordering schemes of small furnaces, and by precisely following the order of the furnace with a brick of the specified format, it is possible to get a furnace unit that will work correctly, have an economical fuel consumption and not smoke into the room. A few more nuances common for laying brick ovens of any design:
- Drying the stove to the accelerating firebox must be complete - the clay solution must dry completely. In this case, during firing, it will become "stone". A wet clay solution, giving off water too quickly when heated, will crack.
- The accelerating furnace is produced on rapidly burning fuel - wood chips, paper. The combustion section should be warmed up gradually, with an initial low temperature. The brick and mortar in the joints should warm up slowly, with complete drying, this adapts the materials and the entire structure for subsequent extreme operating conditions - prolonged contact with an open flame and thermal shock. If you immediately heat the built stove with coal or large logs, you can get the mortar mixture cracking in the seams, which are not necessarily visually noticeable. But the flue gases and air of the inflow will change the movement in the current and the chimney, and this is a direct decrease in efficiency, incorrect operation of the unit and smoke in the room.
- The first starting rows of the stove are laid out on cement-sand mortars on Portland cement PC400 or fast-hardening PC500, subject to the skill of fast laying. Classic proportions C: P = 1: 4 and 1: 5.
- Clay solutions for ovens are prepared empirically, choosing the amount of sand depending on the fat content of the clay used. The usual proportion is ½ - 1/3. A small oven does not require a large amount of clay, so it is easier to buy ready-made dry clay with the fat content indicated on the package. Sometimes, additions of chamotte powder and salt are made to the clay solution (to prevent rapid dehydration of the solution in the joints - a glass of table salt in a bucket of water for the solution).
Step-by-step instructions for making a mini oven
Considering the layout of the mini-oven for the summer cottage, let's get to work.
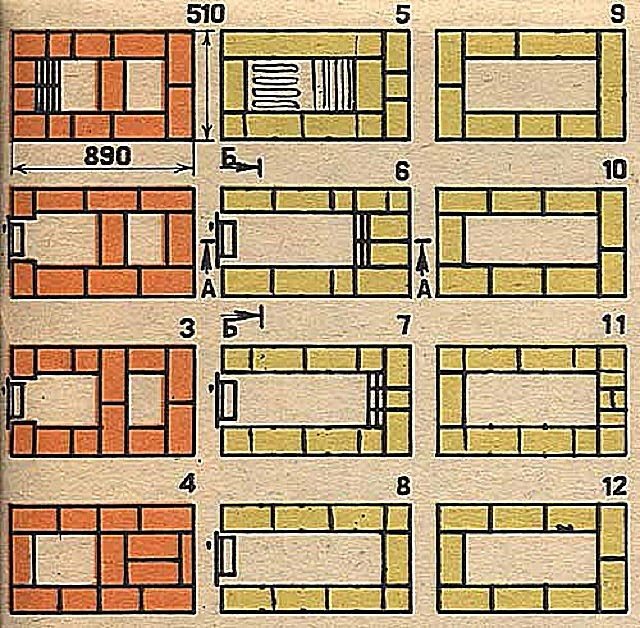
Stages 1 to 12
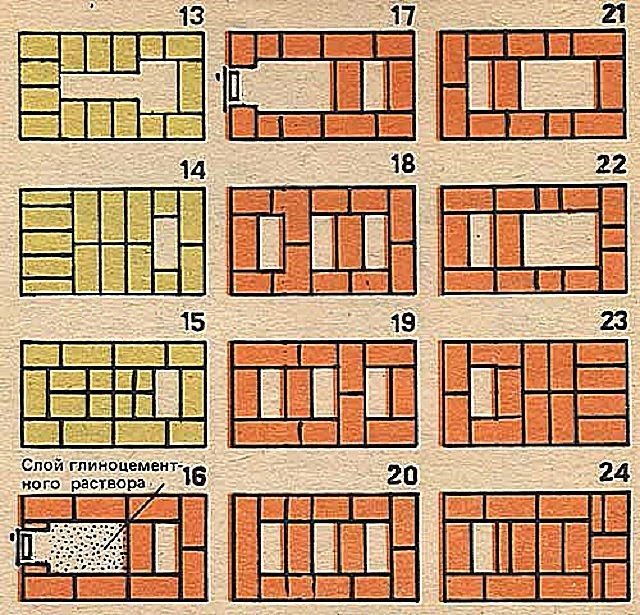
Steps 13 to 24
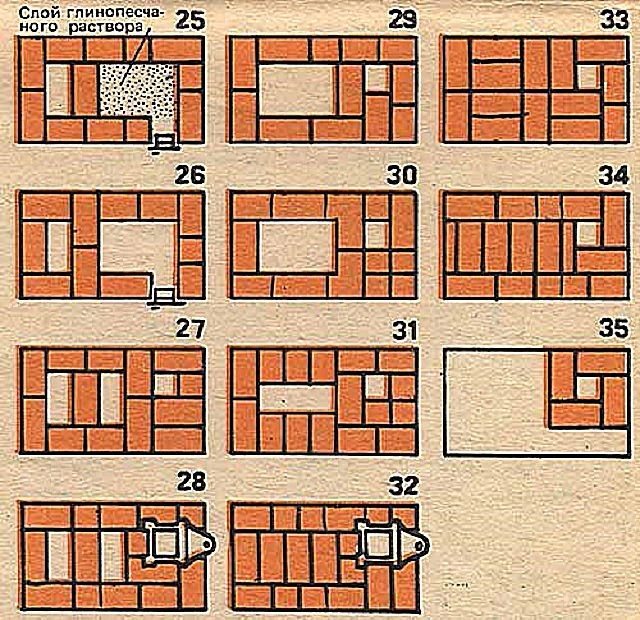
Stages 25 to 35
Laying from 1 to 12 rows
The first row is laid out, and in the second it is necessary to provide a place for the blower door. The rows must be coated with a solution. Before installing the blower door, it must be wrapped in asbestos, and the door will be fastened with wire.
Next, the 3rd row is laid out, in which refractory bricks and a mixture of refractory clay are used.
During the laying of the 5th row, a grate is installed. Starting from this row, up to the 15th, masonry should be made with refractory bricks.
In the 6th row, a firebox door should be installed, with which the same work should be done as with the blower door (wrap with asbestos, secure with wire).
Lay out the 7th row according to the layout. Each layer must be coated with a solution. Lay out the 8, 9, 10, 11 and 12th rows in accordance with the layout.
Laying from 13 to 24 rows
From the 13th row, we begin to form the combustion chamber and vertical channels. The main thing here is to carefully follow the orders, otherwise you can violate the correctness of the design.
On the 15th row, it is necessary to lay out a layer of clay-cement mortar. It will strengthen the bottom of the cleaning chamber, after which you can install the door itself.
Installing a mini stove
There are many different designs of mini brick ovens, they are able to satisfy any request.But which of them would not be preferred, you should always follow a number of the most important tips and tricks:
- When choosing a place for erecting a stove, remember the fire safety rules - you need to reliably insulate the base and leave at least 300 mm indent from the walls. If the walls and floor are wooden - the use of combined asbestos-steel aprons on the wall and floor is mandatory!
- If the stove is fired exclusively with wood, then it can be completely laid out of ordinary bricks, but in the case of coal firing, lining with fireclay bricks is required.
- Having built the stove, do not rush to heat it. A test furnace is made with a minimum amount of chips and paper to check the presence of traction and the absence of cracks. A full-fledged firebox can be carried out no earlier than in 2-2.5 weeks.
- During the drying of the oven, the cracks formed must be covered with a clay-sand mortar prepared in advance.
- If the stove is laid out by the master for the first time, then it is better to use a ready-made cast-iron firebox with a door. This will simplify the work and, if you buy a door with heat-resistant glass, will make a very decorative element of the interior out of the oven.
- All internal surfaces of the oven should be free of mortar flows.
- Fireclay and ordinary bricks cannot be tied together in masonry. At different rates of thermal expansion, destruction of the masonry and the appearance of cracks will inevitably occur.
- For the construction of the main part of the furnace - the firebox and smoke circulation, it is important to use a high-quality heat-resistant solution. It is made from clay, but it is often difficult to correctly determine its grade and fat content. Therefore, it is better to purchase a ready-made dry composition for factory-made masonry.
- All metal parts of the stove (doors, grates, hobs) need to be purchased cast iron. This somewhat increases the cost of the entire structure, but significantly extends its service life and excludes sudden warping and cracking of the adjacent rows of masonry.
- For reliable installation of cast-iron doors and a blower, you need to use pieces of steel wire (embedded in a solution between rows of bricks like "mustache") and strips of sheet asbestos with a thickness of about 3-6 mm. This is necessary to compensate for thermal deformations.
Important! After reviewing the above material on how to make a homemade mini stove at home, any householder, without any problems and significant material costs, will decide the issue of heating his country house. The main thing is to strictly follow the construction instructions and observe safety precautions during the further operation of the furnace.
Masonry mortar
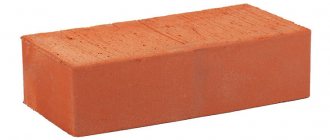
Brick is a traditional stove material that has been used for centuries. A mini brick oven is made of bricks, but it is best to use two types of them during construction.
- It is often worth using refractory material to build a workbench. He will be able to withstand the firebox even with coal.
- The front material is also quite suitable for decoration.
We do the masonry
Having prepared the required amount of bricks, you can start work, the instructions are set out below:
- First of all, you should decide on a place for a mini-oven. Its effectiveness largely depends on this.
- A mini brick oven for a bath will take an area of about 800x550 mm. You just need to lay a fire protection layer, as well as a layer of waterproofing. Roofing material can be used as a waterproofing layer, and sheet asbestos can be used as a fireproof layer if the base is wooden.
- A layer of sand, about 10 mm thick, is poured onto the waterproofing layer.
- The first row of bricks is laid on top of the sand, without the use of mortar. This row is aligned strictly horizontally, hammering in the peeking bricks with a rubber mallet.
- A thin layer of clay mortar is applied to this brick row and the blower door is immediately installed. The door is exposed strictly horizontally and strictly vertically, after which it is securely fixed.After fixing it, you can start laying out the second row.
- The 3rd and subsequent rows are laid out with refractory bricks (chamotte). After laying out the 3rd row, a grate should be installed, which should be in the center of the blower.
- The 4th row is laid out in a quarter of a brick (on the edge), regardless of how the previous rows were laid. The back wall is laid out without mortar. In the future, these bricks will be removed.
- After the 4th row, they begin to install the firebox door. It is installed in such a way that it opens upwards. It is attached in the same way as the blower one, with the help of wire, the ends of which are embedded between the bricks that form the rows of masonry. The door is exposed and securely fixed.
- The 5th row of bricks is laid out according to the 4th row, but the bricks are flat.
- Then the last row of the 6th is laid out, which lies on the edge. The walls of the chimney and the inner surface of the bricks are cleaned of mortar and wiped with a damp cloth.
- The next row lies flat, while the back wall is laid out on the edge in two bricks.
- This row closes the level of the firebox and in this row a brick is installed at an angle so that it hangs over the firebox, shifting the flame closer to the center of the stove. This operation is performed on the eighth row. This brick is effective when the stove is used as a fireplace, working with the firebox door open.
- The 9th row is shifted back a little to keep the door open. To ensure the tightness of the joints of the slab and brick, an asbestos cord is used. It is not recommended to lay the cast iron plate on clay.
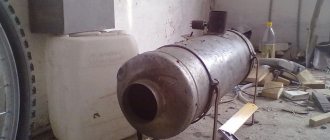
- On the 10th row, a place for installing the pipe is formed. In this case, an attached metal pipe made of light iron is used. The brick pipe for such a mini-stove will be heavy.
- The valve, sealed with an asbestos cord, is installed on the 11th row.
- With the help of the following rows, a part of the pipe is formed, which is joined to a metal pipe - a chimney.
- The final stage in the construction of mini-ovens is whitewashing it, but decorative tiling with tiles can be made. Unfortunately, whitewashing is not practical: the whitewashing will have to be repeated approximately once a year, and the tile will not only decorate the stove, but also save you from constant whitening.
- Before whitewashing, it is advisable to clean the stove from debris and make a test ignition. If the stove is working and there are no problems, you can start whitewashing or facing, after which you need to give time to completely dry. This is very important and you should not rush to light up the mini-stove, so as not to harm. You should prepare for the heating season in advance, then the winter will seem not so cold.
Building a mini-stove with your own hands requires at least the ability to determine the quality and quantity of material.
- In order to fold such a furnace, you need to stock up on red bricks, about 60 pieces, and refractory (fireclay) bricks, about 40 pieces. It takes about two buckets of mortar to put all the bricks together.
- The stove will not be complete if you do not purchase and install such elements as a furnace and blower door, a hob and a grate, as well as a metal shutter. As for the grates, doors and plates, it is better to purchase cast iron. Cast iron is not afraid of high temperatures and does not lead to large temperature differences if large elements were made according to technology.
- The design of the mini-stove is simple and does not require much effort to build. The main thing is to correctly determine the stages of its calculation and purchase all the necessary materials, have the right tool and prepare the right solution.
- The efficiency of such a mini-oven is approximately 90%, which speaks volumes. At the same time, it is important to note the financial costs, which are minimal, while the functionality of the stove is quite high.
- You can build a mini-stove for any combustible material, but, as a rule, firewood or coal is burned in such stoves. The use of other combustible materials is not justified on the basis of some requirements, including fire safety.
- Using firewood or coal, the stove does not emit any foreign odors that could harm your health. You can imagine what the smell would be in the house if diesel was used. Only using firewood, peat or coal will the stove be environmentally friendly.
We suggest that you familiarize yourself with the Boiler in the furnace for heating: do it yourself options, the need to use
A mini brick oven for a summer residence can have a rather different shape. Therefore, look at the photo in advance and select the option you want.
iz-kirpicha.su
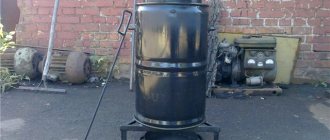
This version of the stove is perfect for those who like to relax in nature. The finished product is lightweight and takes up very little space in your backpack. With all the simplicity of the design, the stove from the can is very convenient and productive - a liter of water can be boiled by spending a few small dry branches on it.
At the same time, such a homemade stove can work not only on branches, but also on leaves, cones and even hay. You will definitely not stay hungry!
Prepare three cans of different sizes in advance. Canned food containers are perfect. From the largest jar, you will make the body of the oven, place the medium-sized jar in the body, and from the small container, make an improvised burner.
In addition, prepare scissors, a block, an electric drill and a felt-tip pen.
First step. Insert a block of wood vertically into the largest jar and mark a couple of lines on the wood at a distance of about 8 mm approximately at the level of the lid.
- Small ovens are optimally economical.
- They have a high heat transfer coefficient.
- They have an increased heat capacity.
- You can melt it with wood, coal, pallets, briquettes and other solid energy resources.
- They also combine cooking functions in the presence of a cast iron stove, as well as the functions of a heater or fireplace.
- Due to their small size, they are suitable for both home and sauna.
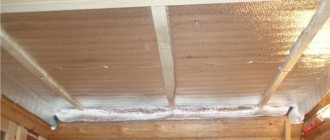
To prevent moisture from entering the future structure, you need to purchase roofing material.