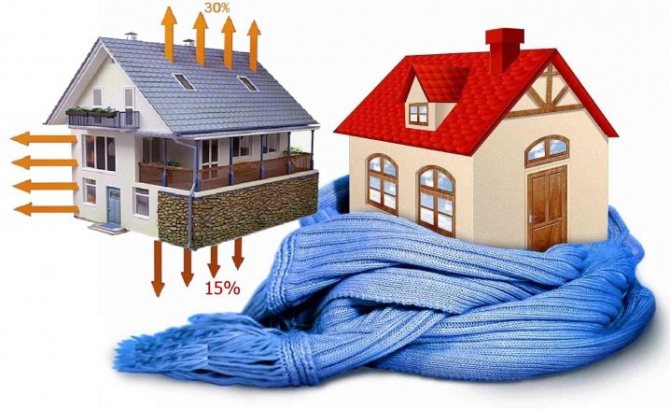
The value of thermal insulation of the basement located under the house is very high. Thanks to the thermal insulation procedure, it turns out to reduce heat loss, provide protection from dampness and reduce the risk of cracks as a result of soil swelling.
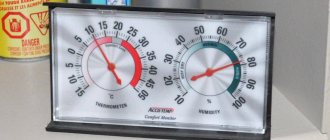
After the thermal insulation measures are carried out in the basement, the air temperature in it will not drop below + 10 ° C.
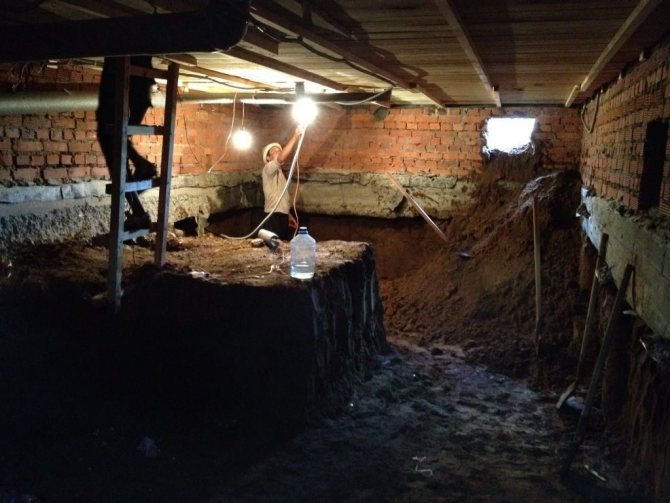
The basement is the room that separates the ground from the floor of the first floor of the house. Usually its height is quite comfortable so that you can move around without any problems. In this case, the height of the basement is determined by the height of the basement of the house. If the basement is quite spacious, then not using it is a big mistake.
Basement insulation from the outside, from the inside and whether it is worth doing what it will give.
Modern construction dictates its own rules for the functional use of free areas of the house, both new and old, becoming one of the most important tasks in the design and construction of a house. On one area of the site, you can build an underground floor - a basement. The construction of a basement becomes a profitable measure, as the usable area of the building increases without increasing the area of the building site.

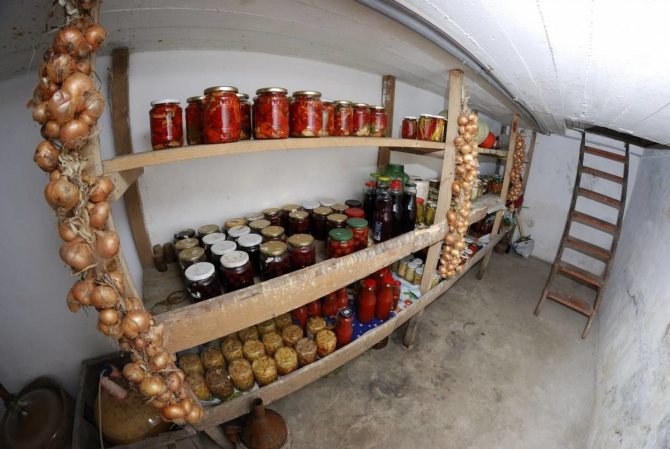
Previously, using a basement without insulation made it possible to use it for storing preserves, vegetables, or as a cold warehouse. Today, the functionality of the basement has expanded significantly. Now in the basement you can make a garage, an office, a hookah room, a storage room.
It does not matter for what purpose this room will be used, its normal use is possible only if there is a temperature acceptable for life in it. If the height of the ceilings in the basement does not allow it to be fully used, it still needs to be insulated, since basement insulation is the only way to reduce heat loss in the house and, as a result, reduce heating costs, especially if the house does not have a gas boiler room.

It is worth noting the fact that basement insulation outside the house during construction is cheap and cannot harm the foundation of a house under construction, in contrast to insulation from the inside. If the house has already been built, it will be cheaper to insulate the basement from the inside.
Basement insulation options
In general, the basement can be insulated in three ways, and each has its own advantages and disadvantages, we will talk about them below:
- Insulation inside the basement... If you have an already built house, then this method is most suitable. Requires calculations and additional work to identify the causes of moisture and their elimination. Mistakes in the installation of basement insulation will make all efforts to insulate it meaningless, since condensation will still form and dampness and fungus will appear.
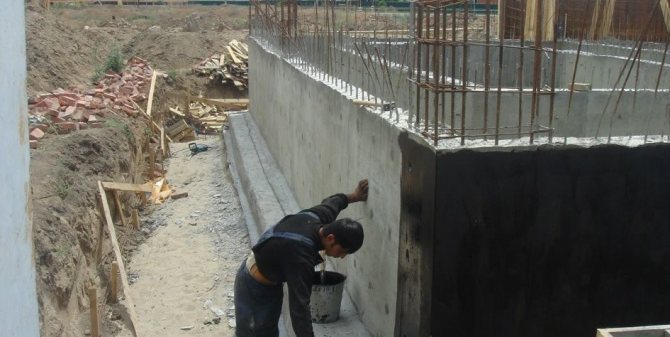
- Insulation outside the basement... Usually this method is used when building a house. This method will make it impossible to freeze the foundation and walls, since the construction of the house takes place at a positive temperature, this allows you to perform a high-quality connection of the thermal insulation material and the wall surface. The obvious advantage of using this method is that useful space inside the basement is additionally saved. However, as mentioned above, this method of thermal insulation in the basement of a country house is suitable only under the condition of current construction and it is very expensive to insulate the basement from the outside of an already constructed building.
- Combined insulation... Fundamentally high-quality and, as a consequence, the most expensive method. It is the most effective because thermal insulation occurs from the outside and from the inside of the basement. This method is great for brick and concrete houses. In this case, the heat loss of the house will be the most minimal, a method of insulation should be foreseen in advance so as not to overpay for repeated work that occurs when installing thermal insulation in the basement room.
To choose a suitable method of basement insulation, 4 criteria must be determined.
- How the basement will be used in the future.
- Room humidity mode.
- Will a drainage drainage system be installed around the basement?
- Will the basement be heated in the future?
Basic structures for insulation
Thermal protection of vertical elements in a private house is required in three cases:
- floor insulation over a cold basement;
- intermediate floors;
- attic floor in the presence of a cold attic.
In the second case, work is carried out to improve the noise insulation characteristics.
Insulation in a wooden house helps prevent the following problems:
- overruns in the heating system;
- violation of the temperature and humidity conditions of the room;
- decay of floor structures;
- the appearance of mold and mildew.
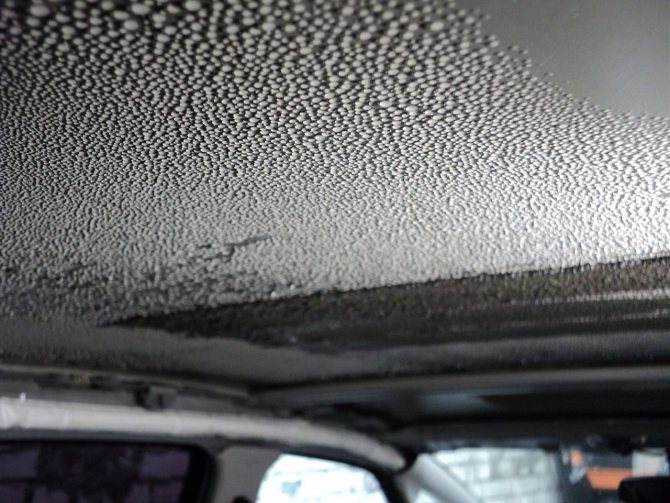
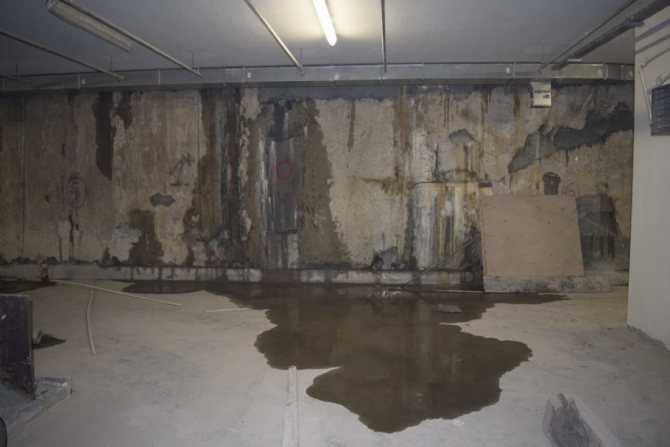
Dampness in the basement. Why?
In order to ultimately correctly perform the thermal insulation of the basement room, you should understand the causes of moisture on the walls inside the premises. Why does condensation form (fires of water on the walls) and what are the reasons for its occurrence.
Why condensation forms in the basement
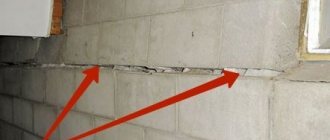
1. Usually the basement is located below ground level into the room itself through the pores and leaking joints between building materials can seep water. Due to the poor condition or poor quality installation of the drainage system on the site, poor sealing of the walls also affects.
2. The transformation of water into condensate occurs from the temperature drop of the warm air entering the house, especially in summer. This happens because non-insulated basement walls will always be colder, the ground is always colder than the ambient temperature.
To insulate the basement from the inside is forced by circumstances when it turns out that it is too expensive to insulate the basement from the outside and it is not advisable to carry it out. The inside of the basement should be insulated only on dry and defrosted walls of the foundation of the house. It should be understood that with this method, the risk of premature destruction of the foundation increases, since it has been defrosted. This is due to the different coefficients of expansion of materials at different temperatures.
What tools and materials will be required
https://www.youtube.com/watch?v=C8Vrqd_0utI
Of the tools and materials required for laying thermal insulation:
- insulation;
- building level;
- screwdriver;
- construction stapler filled with staples;
- self-tapping screws;
- lumber (bars with dimensions 50x50 mm, boards);
- reinforced tape;
- a tool designed for working with wood;
- materials for vapor and waterproofing (vapor barrier membrane, special film for waterproofing);
- sheets for creating the subfloor.
Insulate the basement? Yes or no?
Despite all the fears and doubts, it becomes obvious that it is better to insulate the basement. There are several arguments for this, for those who still think and doubt.

The consumption of electricity and gas for heating is significantly reduced.
There is an additional area in the house that can be useful.
The appearance of dangerous fungi and mold in the basement is excluded, due to which an unpleasant smell of mustiness and humidity in the house appears;
The air temperature in the insulated basement does not drop below +5 degrees.
The braided basement protects the foundation of the house from sudden changes in temperature and thus prolongs its service life before destruction.

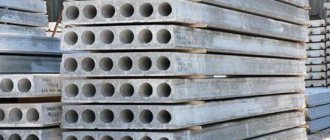
In the end, there is GOST 9561-91 which says: Reinforced concrete floor slabs must be insulated over the floor that separates the floor of the first floor of the building from the non-insulated zone. A similar requirement is indicated in SNiP 2.08.01-85
Insulate the basement with your own hands
To insulate the basement cheaply, you need to work with your own hands, and this is not as difficult as it seems at first glance. Consider the common cases when thermal insulation is made. The first option is when water enters the basement from the outside and it is constantly wet. The second option for insulation with a dry basement.
The first case is a wet basement:
The flow of water occurs through the walls of the foundation, which means that it is strictly forbidden to insulate such a basement from the inside! Insulation of the foundation inside will cause even more and without that strong moisture of the foundation, and when the ambient temperature drops, thermal expansion will destroy the foundation of the building for several years.
First of all, it is necessary to stop the flow of water into the room. To do this, it is necessary either to equip the drainage system circuit or, if there is an existing drainage system, to revise or repair it. If there is water in the basement, this is a sure sign of an error in the design and installation of the drainage system (drainage).
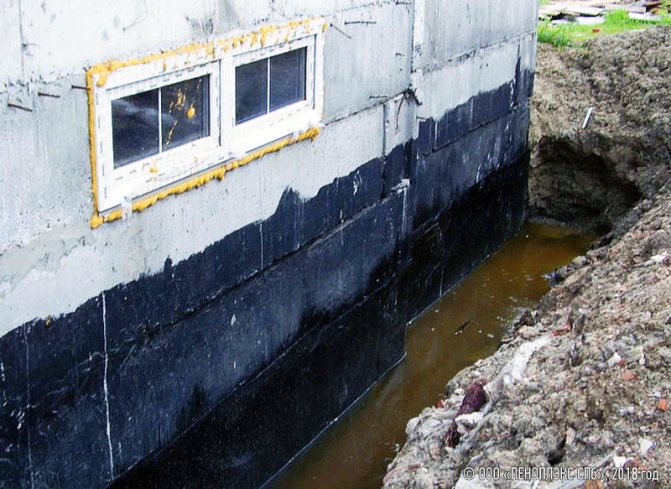
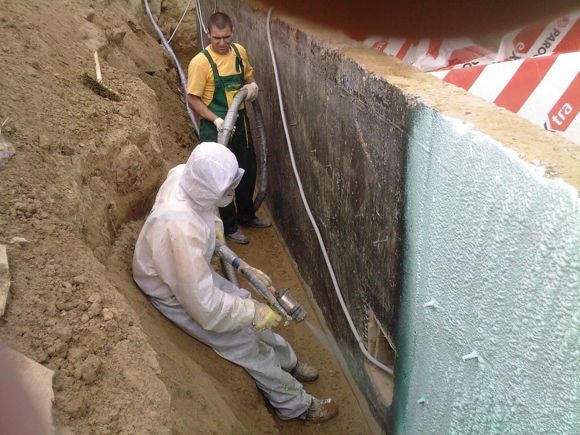
After fixing the drainage, it is necessary to dig out the foundation of the house from the outside. Measures are being taken to waterproof the foundation of the building, and in this case it is cheaper to insulate the basement from the outside.
If we are talking about a village or a group of houses, then it is possible to solve the problem of draining the plots by laying a drainage system.
If there is a flow of water under the basement, a small well is mounted in the basement and a pump with a float is installed, as soon as the water level rises to a certain level, the pump works and pumps out the required amount of water. In harsh conditions, Grundfos water pumping equipment is good at pumping water. If there is a large amount of spring water in the well, this water can be supplied for home heating or water supply. A wet basement can be insulated in only one way - this is to first drain the basement and insulate it from the outside, with preliminary waterproofing.
If you plan to build a basement with heating, then the thickness of the insulation should be no thinner than 15 cm. The minimum thickness of the insulation layer for the basement is 10 cm. Depending on what material the insulation is made of, the thickness of the insulation layer may vary.
If you are lucky and you have a dry basement, it would be more expedient to carry out insulation inside.
Geography and infrastructure:
1) The location of the village. Road: the quality of the road, who is responsible for cleaning and maintenance (this is critical in winter!). Transport accessibility: congestion, traffic on weekends and weekdays. Possibility of arrival of emergency services (ambulance, firefighters). Public transport availability.
2) Infrastructure of the village: shops (grocery and household, construction). Pharmacy. Hospital (or nearest location). Kindergarten, school. Be aware of the presence or absence of these institutions: it can make your life uncomfortable.
3) Administration of the village: by whom is it managed? Who provides waste collection, removal and disposal? (without solving this issue, the village runs the risk of very quickly turning into a dump). Visit the local administration: communication will help evaluate plans for the development of the area around - the construction of roads, the development of infrastructure.
4) Social homogeneity: An often overlooked but important factor. You will care who your neighbors are. Who your kids play with and what they see on the street. Therefore, soberly assess this moment and pay attention to it.
5) Security: organized villages with a fenced area are still a rarity for us. But you can evaluate other points: the presence of abandoned garden cooperatives, the proximity of unwanted institutions - all this can be taken into account. Is there a district police officer in the village and where is his location?
6) Ecology: this point has something in common with the following and is generally understandable: it is undesirable for the house to stand by the railroad, behind the fence of the oil refinery, and not far from the landfill.
7) Wind rose: where do the prevailing winds come from? Farms, factories, sewers, aeration fields or landfills can make life very difficult. Even make it impossible. The wind rose also affects how the house should be located on the site - if the orientation is wrong, you risk being busy clearing snow all winter.
 Nature. Are there any reservoirs nearby? Suitable for bathing? Woodlands? These are already “nice bonuses” - but without them, why would you need a house outside the city at all?
9) Relief of the village and site: the location in the lowland can bring difficulties for transport in winter. And on a hillock - it risks being blown by all the winds around the clock. The location of the site on a slope or in a lowland - there may be problems with melt water, the passage of streams, stagnant water on the site, flooding of the basement, flooding of shambo (as a result, a non-working sewage system). Water disposal and the organization of hydro-modes is a fascinating, laborious and very expensive task.
10) Hydrology: depth and water quality. Deep occurrence of water (more than 35 m) - extremely high costs for its provision. Worse if the water is of poor quality or heavily polluted. Cleaning systems exist. But the cost of treating poor quality or heavily polluted water will be high. And water is a daily resource. And it will be expensive every day. Horizon of water location: a close water horizon is fraught with flooding of the house during floods, flooding of the shambo (if it is of an open type) or its pushing out if installed incorrectly. It is necessary to clarify the minimum level of the horizon (February) and make sure that your source of water supply is located at a greater depth and will provide you with water even with a minimum level of the aquifer (more about this point in terms of engineering communications).
Above, we discussed with you the fundamental points associated with the choice and purchase of a country house. We looked at administration, security, infrastructure, transport and social components. Ecology, geography and hydrology.
What you need to consider to insulate the basement from the inside
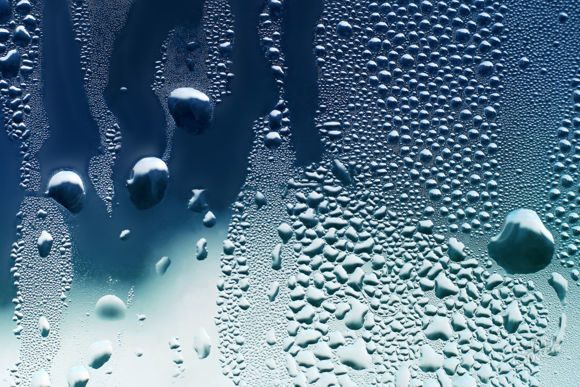
In the basement of a house, condensation or condensed steam is formed due to the temperature difference between the soil itself and the wall itself with the ambient temperature in the basement or the so-called dew point.
The dew point is usually called the temperature of the air at which the vapor (humidity) that is contained in the air will begin to turn into drops of water (condense).
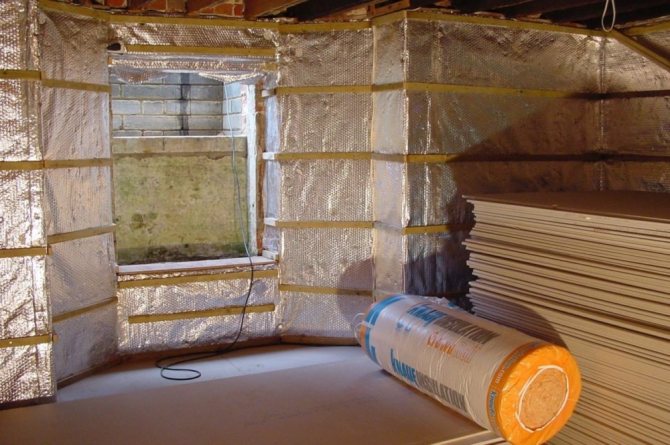
It is necessary to insulate the basement from the inside according to a certain technology, the most important thing is to exclude the empty space between the wall and the surface of the basement insulation. It is also not allowed to use materials that absorb or let water through when insulating a basement, since they will quickly get wet from the formed condensation and it will become meaningless to insulate the basement.
The best and most commonly used materials for insulation inside the basement are extruded polystyrene and sprayed polyurethane foam (PPU). The use of polyurethane foam insulation allows filling the space between the wall surface tightly and without voids, it also turns out to place the material in all the cracks. This will only work when the work is carried out by experienced craftsmen; outwardly, such insulation does not look aesthetically pleasing and requires additional work on refinement.
On top of the polyurethane foam layer, false walls are usually erected, which are attached only to the load-bearing floors. Installation should be carried out in such a way as not to damage the basement insulation.
Extruded expanded polystyrene Listar does not have these disadvantages. This material is a building board, before mounting the panels on the walls, either level the wall or use polymer glue, which with a layer thickness will level the unevenness of the wall. In difficult places, the necessary pieces of any surface shape are cut out of Listar building panels.
It is worth remembering that you cannot attach basement insulation to plastered surfaces without processing or peeling fragments of the concrete surface. Before starting the installation of basement insulation, it is better to clean the entire surface of the wall from fragments of rough or fine finishing to clean concrete and brick. The wall is usually leveled with glue during the installation of polystyrene boards. In case of significant damage to the surface of the walls, the cavities are leveled using a DSP 300 raster.
It is also worth paying attention to the fact that it is not allowed to use dowels and self-tapping screws for mounting polystyrene plates for basement insulation. The insulation itself must be attached to the wall surface exclusively with glue, so that the plates fit snugly and evenly to the wall surface.
Requirements for materials
The peculiarities of the method of carrying out the work force the use of only certain heat-insulating materials. The main requirements for carrying out thermal protection measures in a private wooden house or in the country from below include:
- a small mass of insulation, since the place of attachment to the ceiling experiences increased loads;
- Ease of use;
- high efficiency;
- the coherence of the structure (bulk materials are not suitable);
- fire resistance, if possible, since when carrying out work in a wooden house, it is necessary to ensure maximum fire safety.
We invite you to familiarize yourself with SPK "Pogranichny", UNP 500030740 || Spk frontier grodno region
There are many options for materials that meet all these requirements.
Basement insulation materials
For insulation of the basement from the outside and from the inside, a lot of materials are presented, we will consider the most effective and proven ones from the point of view of the economic feasibility of their use.
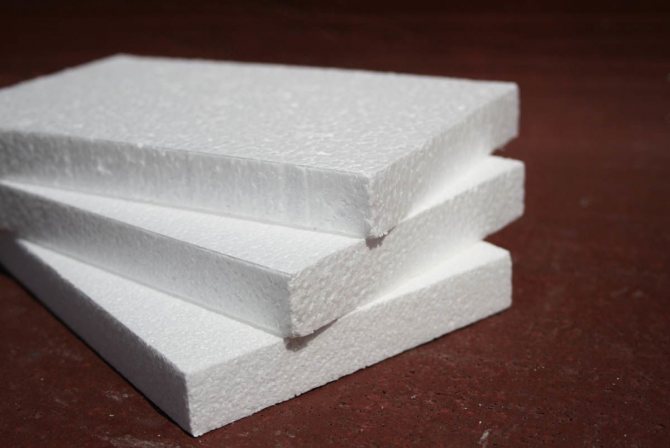
Polyfoam for insulation
Styrofoam... The cheapest material for thermal insulation Usually, foam with a density of 25 kg / m3 is used for insulation.
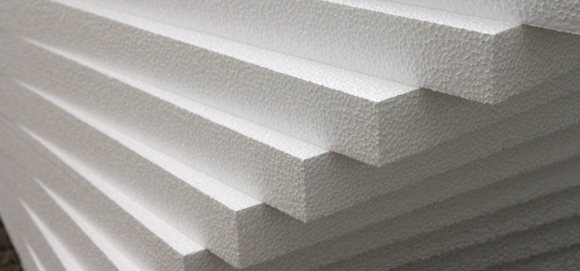
Polyfoam for insulation is worth buying for a number of qualities: excellent thermal insulation characteristics, light weight, does not rot and does not contribute to the development of fungus and is not subject to destruction from time to time. Styrofoam slightly absorbs moisture, but is suitable for cheap insulation. Therefore, basements are most often insulated with foam, but there is one significant drawback. Polyfoam is an easily combustible material and it is not worth laying electricity networks next to it, since the material is capable of accumulating static electricity. Styrofoam should not be used in rooms with a high degree of fire. When burned, it releases caustic and life-threatening substances. Reviews about the use of foam are contradictory and for the most part boil down to the fact that if there is an opportunity not to use this material, it is better not to use it.
Expanded polystyrene for insulation
expanded polystyrene... Material with a denser structure and therefore does not crumble. It has all the positive characteristics of foam, which made it possible to connect the panels to each other along the groove system.
Therefore, the insulation for the basement made of expanded polystyrene is characterized by the speed and ease of installation and processing of the sheets themselves. Unlike expanded polystyrene, the expanded polystyrene sheet is not painted into pieces during cutting and installation).It resists static and dynamic loads better. Therefore, this basement insulation is somewhat more expensive than polystyrene foam. Most often, it is expanded polystyrene that is used for external insulation of the basement or from the inside, when they plan to carry out finishing work after insulation.
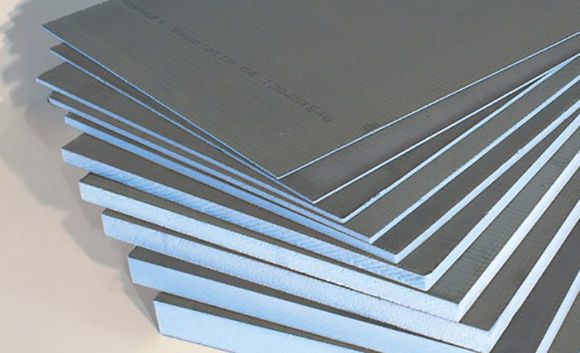
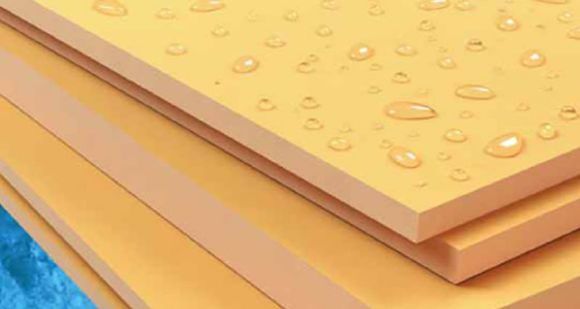
Extruded polystyrene for insulation
extruded polystyrene the most innovative and, as a result, allows you to significantly reduce the cost of work on the basement insulation from the inside and outside. The material is based on extruded polystyrene, which has all the advantages of expanded polystyrene and, unlike them, is not afraid of fire. Such panels are worth buying with a reinforced layer. This will allow you to get rid of the work on the preparation of the finishing layer of the insulated wall. Of the manufacturers of extruded polystyrene reinforced panels, Listar panels are most often used. Less commonly, Ruspanel and Vedi panels. Most of the reviews about Listar panels are positive.
For installation of panels, glue is used, and the side reinforced with fiberglass mesh and impregnated with a cement-polymer composition will allow you to immediately apply the finishing layer of finishing the room. These plates are more expensive than expanded polystyrene, but in the end, due to the lack of additional work on the lathing and plastering, it is cheap to use construction panels for the insulation of Listar. The main advantage is also the fact that work on warming the basement from Listar slabs can be done by hand without the help of craftsmen or specialists and without using a complex and expensive tool.
Urethane foam for insulation
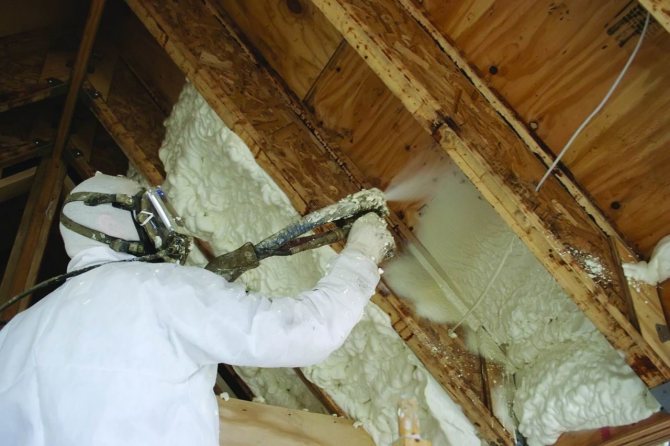
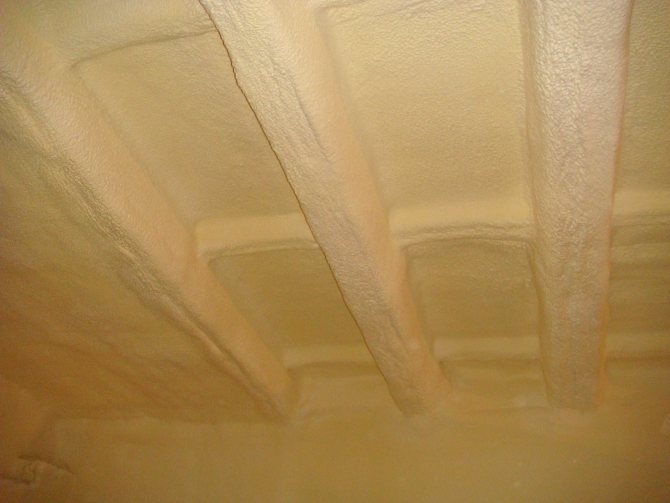
polyurethane foam... This is a material sprayed onto a surface that should be insulated. A significant feature of polyurethane foam or polyurethane foam for short is its ability to fill inaccessible places. Polyurethane foam, like extruded polystyrene, is resistant to fire and moisture absorption, fungus does not form on it either, the method of application allows you to make the most tight connection between the surface and the insulation. A strong layer of thermal insulation is obtained when using polyurethane foam and craftsmen with "hands from the right place", but there is a significant disadvantage when using it if you want to insulate the basement cheaply. The main disadvantage is the high cost of the material itself and the fact that it is not possible to do insulation in PU foam with your own hands, special equipment and tools are required, the purchase of which is not economically feasible if this is your business for insulation in PU foam.
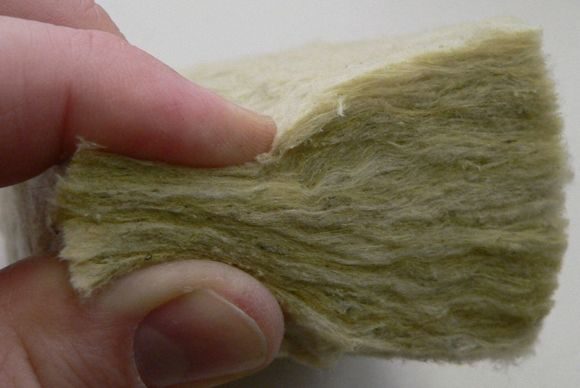
Mineral wool for insulation
Mineral wool or mineral wool... We do not recommend insulating the basement with mineral wool. In dry rooms, it is allowed to use soft insulation, but mineral wool is not suitable for the basement because it is hygroscopic (passes water) and during operation, when wet from condensate, loses itself as a material for warming the basement.
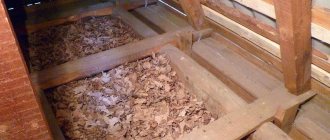
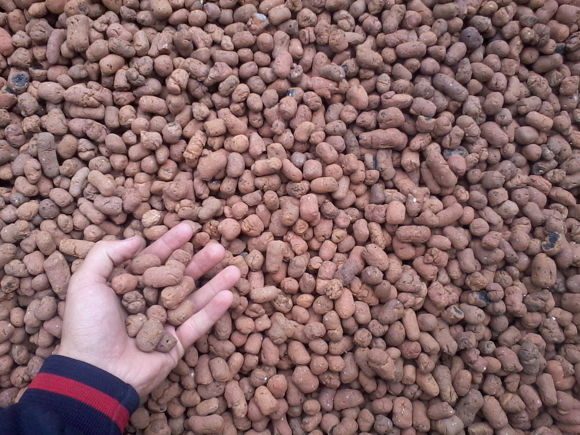
Expanded clay for insulation
expanded clay... We consider it only as a material that can be used to insulate the floor. It is also justified to use expanded clay stone for insulation of the foundation from the outside, since expanded clay stone is a good help to the drainage system of the site. And it provides the drainage of groundwater.
In each case, the type of insulation is selected based on the requirements for the future room and what will be there. It is better to contact specialized companies and order the development of a house project, in which there will already be a calculation of heat losses and a suitable insulation for your tasks. In other cases, you can get technical advice on the choice of the type and thickness of the material from the companies producing insulation. Not all insulation options are suitable for certain materials.LISTar and Wedi specialists provide high-quality and free consultations on the choice of material thickness for basement thermal insulation using building panels based on extruded polystyrene.
Basement insulation
Do you want to know how to insulate the underground in a wooden house? First of all, read the general rules for performing installation work. In this order, any insulation is fixed:
- creating a waterproofing layer;
- the formation of thermal insulation;
- applying a vapor barrier material;
- attachment of structural elements of the floor;
- laying decorative flooring.
Experts assure that when the layers are formed in this order, the thermal regime will be optimal, and it will be possible to ensure the necessary moisture circulation in the living rooms.
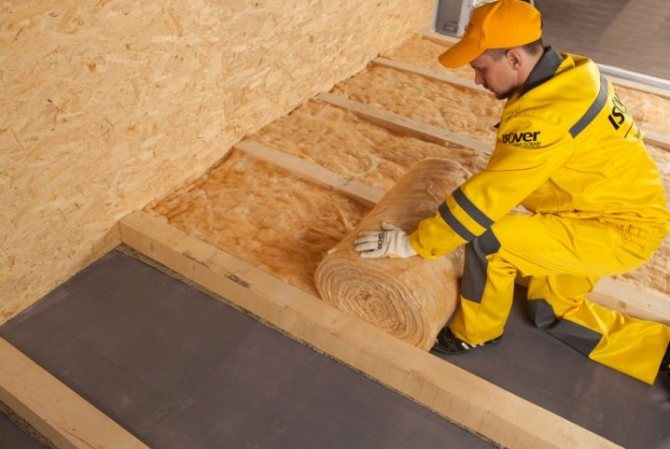
Thinking over the thermal insulation on the basement floor, it is necessary to prepare beams with a cross section of 50-100 mm. These elements are fixed from below using a layer of insulation, after which the floor is sewn up with boards.
If there is a wooden floor on the first floor, the beams are connected to bars, the cross-section of which is 50x50, no more than 50x100. A layer of insulating material is placed between them. After the waterproofing layer, planking is performed.
Most often, the installation of the heat-insulating layer is carried out along the logs:
- lay the logs on the finished foundation, keeping certain gaps between the beams - about one 1 m, maximum 1.2 m;
- fix the sheets of chipboard or plywood with self-tapping screws, as a result you will have a basis for applying a layer of insulation;
- distribute the insulation material between the lags. Determine the appropriate thickness of the insulation, taking into account its characteristics, but remember that the insulation material should not be thicker than the log;
- form a waterproofing layer. Experts advise to go through this stage to achieve the best possible results. You can skip it, but before abandoning this stage, pay attention to the features of the selected material. If a heater is purchased for installation that is unable to repel moisture, it is still worth forming a layer of waterproofing;
- install the floor covering. You can apply the old version or update the coating with a new material.
When insulating the floor from the basement from below and in other parts of the house, follow the specified sequence of actions.
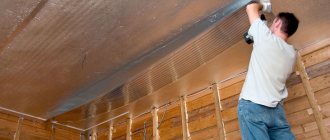
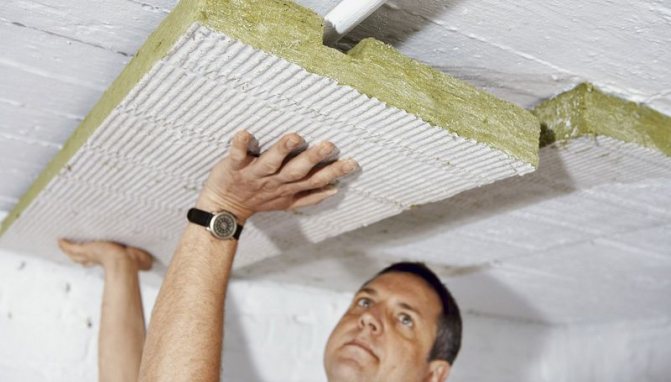
If possible, you can carry out additional insulation work from the basement side. It is produced on the ceiling surface of the basement. For this, it is recommended to give preference to foam blocks, since it is this material that copes well with high humidity. Foam blocks are glued to the ceiling surface using a specialized adhesive, which you can purchase at any hardware store.
After the adhesive is completely dry, the joints between the foam blocks will need to be sealed with polyurethane foam. Excess foam is removed with a knife.
Foam blocks as an example were not chosen by chance. Polyfoam is one of the cheapest materials for insulation. In addition, in the event of damage, replacement is quick and easy. However, it is permissible to use any other thermal insulation material. This can be rock wool, which is available as a roll or slab. The latter option is more convenient in fixing to the ceiling surface, since the rolled mineral wool has a loose structure.
In the presence of a dry basement and floors made of reinforced concrete slabs, an insulation material presented in the form of a slab will be the best solution. If the overlap is made with wooden beams, it will be extremely difficult to fix the insulation in the form of sheets or slabs to the ceiling surface.
Since you will have to adjust and cut the insulation to avoid a gap at the joint. In this situation, it is recommended to give preference to roll insulation materials. Due to their flexible structure, they will bend around the beam and do not create a gap. The canvas is fixed with nails or self-tapping screws.
In order for any insulation material to efficiently cope with its functions, all joints formed between the vapor barrier film and the insulation must be sealed with construction tape. This will seal the entire surface. To avoid the formation of condensation - never cover the ventilation opening.
For more information on how to insulate the floor of the first floor from the basement side, see the next video.
There are two ways: to process the basement ceiling with heat-insulating material and to insulate the floor from the side of the house. In the first case, the choice of insulation is small: either sheet / plate materials that are glued to the ceiling and fixed with mushroom-type dowel-nails, or spraying with liquid polyurethane foam.
When insulating the ceiling from above, various bulk substances are also used.
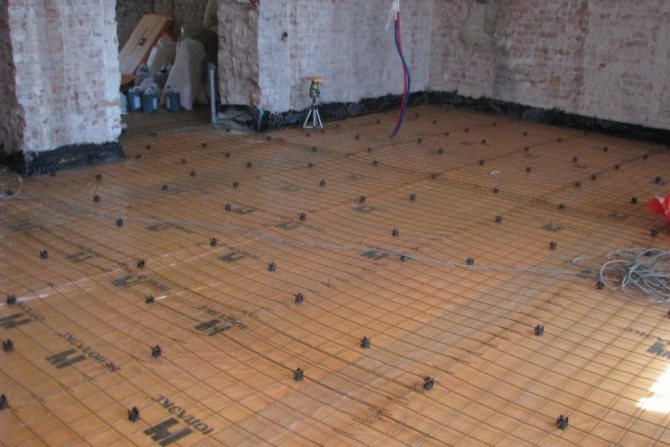
In addition to laying thermal insulation in the house, you can install a "warm floor" system, water or electric. The construction of the underfloor heating cake also includes waterproofing and insulation - otherwise, most of the heat from the cable or pipes will go into the basement.
With any method of insulation, waterproofing is first laid. In this capacity, ordinary plastic wrap is suitable. The adjacent strips are overlapped and fixed with mounting tape. Necessarily need an overlap on the walls. Its height depends on the thickness of the cake, including the screed, if any.
You can use PVC film as a material for waterproofing.
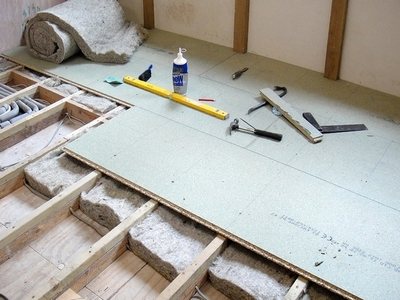
1. On a flat base, the insulation slabs are laid out end-to-end on the floor, connected with tape.
2. When laying on wooden logs, the slabs are placed between the logs by a strap, fixation is not required.
3. When pouring the screed, put another layer of waterproofing on top.
4. When installing underfloor heating under pipes / cables, a layer of foil is placed on top of the insulation, which reflects all the heat from the system into the room.
5. It is most convenient to place loose materials between the logs and close them on top with subfloor boards: this way they do not reduce the height of the room. When mounted on a flat base, instead of lags, wooden partitions are installed, on which the subfloor boards will then rest.
Expanded clay between wooden partitions Expanded clay between logs
6. Before pouring the screed, a waterproofing membrane (preferably PVC) must be laid on top of the expanded clay. The screed is poured over the lighthouses and leveled with the rule.
7. When installing the screed on top of the underfloor heating system, it is necessary to lay a damper tape around the perimeter of the room, otherwise the concrete will crack when heated.
8. The composition of the sawdust mixture: 85% sawdust, 5 - gypsum, 10 - lime. The components are mixed dry, then diluted with water. The recommended layer is 25 centimeters.
We suggest that you familiarize yourself with Breeding rabbits at home
Sawdust screed is not used for underfloor heating. It should be fenced off from the furnace with refractory bricks.
The top coating can be anything: planed boards, linoleum, parquet, laminate, ceramic tiles. Some of them require a solid base. In the absence of a screed, sheets of chipboard or fiberboard can be used in this capacity.
Warming with mineral wool from the bottom
The fastening methods for each material are different, but when installing a reliable thermal protection, it is required to observe the order of layers, which is the same for all. When insulating from the side of a cold basement or underground, the materials for insulating and protecting the insulation are arranged in the following order:
- waterproofing;
- thermal insulation layer;
- vapor barrier;
- floor structure;
- floor construction.
Compliance with this particular order will ensure a normal temperature and humidity regime in the house. Next, you need to consider in more detail the location of the protective materials.
In a house with an existing wooden floor on the 1st floor, insulation from the bottom can be done by attaching bars with a cross section from 50x50 to 50x100 to the beams from below and placing an insulating material between them. After waterproofing, the resulting cake can be hemmed with boards.
Waterproofing
Cold air from the basement can drop out as condensation onto the warm floor surface. The constant presence of moisture on the structure will lead to the formation of mold or mildew, and subsequently to decay, even if the wood is treated with special compounds. In addition, condensation is very harmful for the thermal insulation layer. It can lead to an increase in thermal conductivity. To avoid this, a waterproofing layer is laid on the side of the cold air.
Vapor barrier
From the side of a warm room, the situation changes. Here the problem is not liquid water, but warm steam. Penetrating into the thickness of the material, as it approaches the outer surface, the steam cools and turns into water. This process is especially dangerous in that, unlike the previous case, moisture is formed not on the surface, but in the thickness of the structure. This increases the risk of wetting and destruction of the insulation and decay of wood elements.
Vapor barrier - polyethylene film
A vapor barrier layer prevents steam from entering the room.
When insulating the ceiling of the upper floor, the arrangement of the layers changes. Based on physics, it is necessary to place protection against steam from the warm air side, and from moisture from the cold air side.
In the simplest case, you can use plastic wrap as both types of protection. When insulating a basement floor, sometimes moisture-windproof membranes are used as waterproofing. They do not prevent air movement, but reliably retain moisture.
In order to reliably protect the house from the penetration of cold, it is necessary to think about this even at the design stage, but measures to protect the basement from below allow work to be carried out during operation.
It is important to carefully approach the choice of material for insulation and follow all the manufacturer's recommendations. This will ensure reliable and long-term operation. The thickness of the layer is selected depending on the climatic region and the selected insulation. Knowing the thermal conductivity and layer thickness, even a non-professional can perform competent calculations. This is possible thanks to the convenient Teremok program, which is freely available.
How to insulate a basement with your own hands
Below we will talk about how to insulate a basement with your own hands using building boards based on extruded polystyrene and expanded polystyrene.
To complete these works yourself, you will additionally need to purchase:
- Interior fittings
- Polyurethane foam "Macroflex"
- Reinforced polymer mesh for strengthening the surface of the slabs (not required if using Listar panels)
- Waterproofing material to isolate the surface before fixing the insulation (not required if Listar panels are used);
- Prepared glue solution.
- External plaster or DSP for sealing strong cavities in the wall (not required if Listar panels are used);
- Hand tools (spatula, hammer, hacksaw, knife, gloves, etc.).
Insulate the basement outside on your own
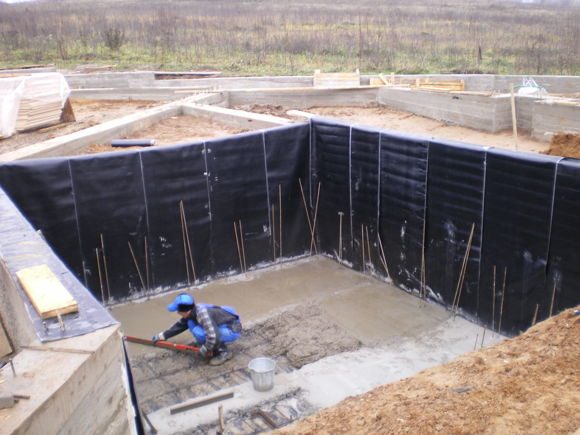
- First of all, it is worth knowing that the installation of basement insulation must be carried out exclusively in wet weather in sunlight, this is necessary so that the moisture of the soil and foundation is minimal;
- Thermal insulation works start from the development of the earth and soil at the foundation, it is better to use the manual method of excavation;
- after excavating the foundation, the surface is inspected for damage and flaking of the waterproofing
- the surface of the wall is cleaned and a layer of waterproofing is applied to it, in the case of using construction panels Listar - you will not need to waterproof the walls, although for reliability it will not be superfluous.
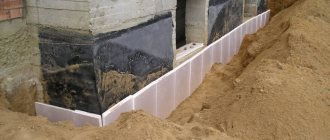
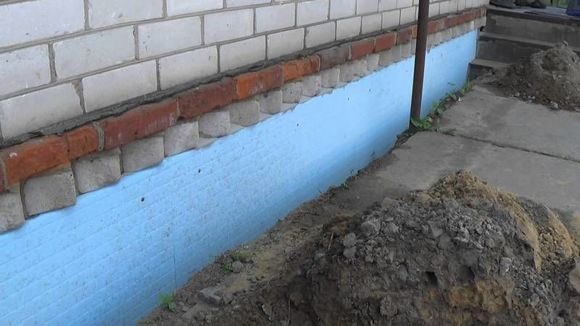
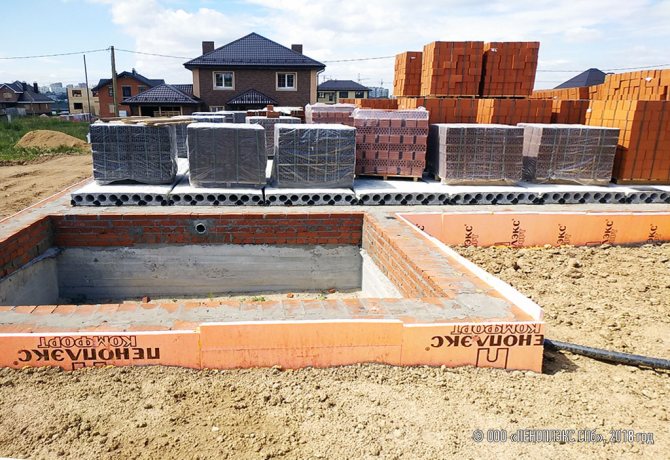
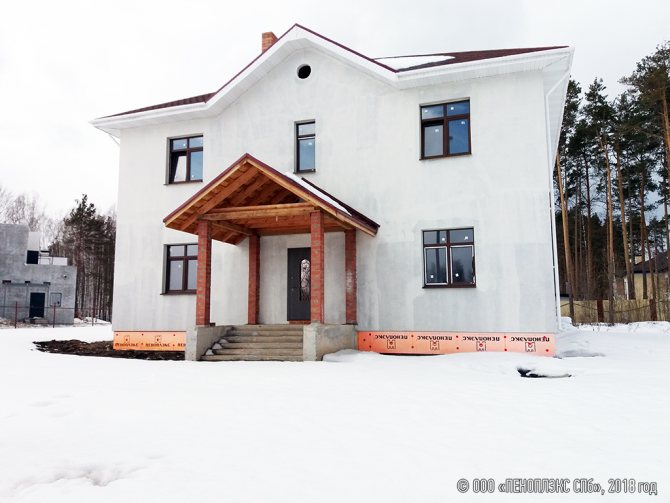
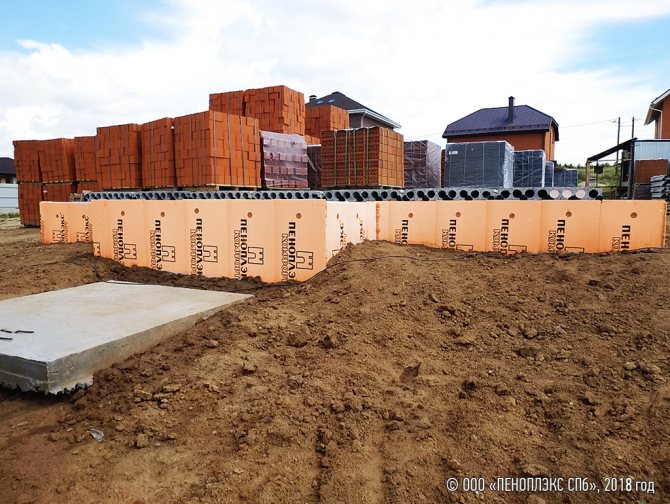
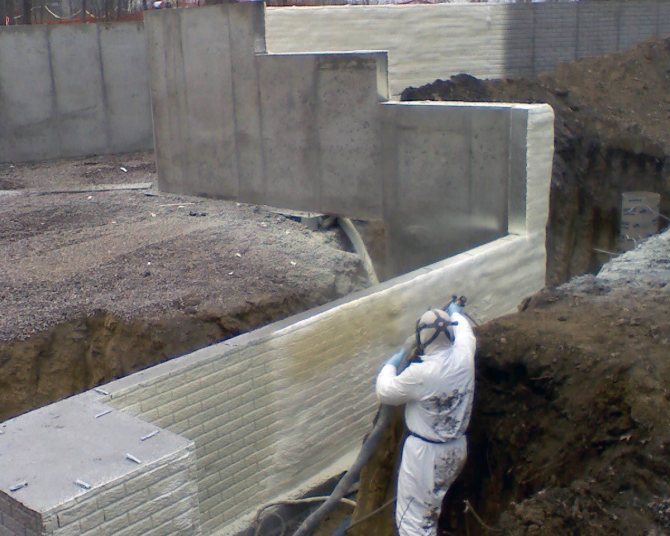
- We attach panels for insulation to the walls. Extruded XPS or PU foam panels are preferred. These materials adhere best to concrete and provide a long service life, on average, with proper installation of basement thermal insulation, 20-40 years.
The insulation for the basement should go 50 cm (half a meter) above the ground level, in other words - stick out of the ground at least 50 cm.This is due to the correct technology of insulation and the reviews of people who have already made mistakes at this stage.
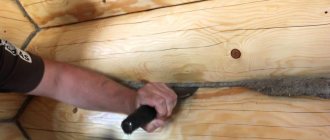
Only glue is used for the installation of the insulation. As mentioned above, damage to the insulation by dowels and self-tapping screws is not allowed. The glue is applied to the panels with a notched trowel, which will avoid uneven application and the formation of empty spaces under the insulation sheet. The gaps formed during the work are filled with a special sealant or polyurethane foam.
- A layer of waterproofing is reapplied to the installed insulation. For double-sided Listar panels - this is not required, but it will not be superfluous. Waterproofing should be applied to those areas of the surface that will be under the ground.
- A drainage drainage system is being installed so that the groundwater near the house and is quickly discharged from the insulation itself.
- In the end, it is necessary to decorate the basement of the house in order to even better close the insulation from the effects of a harmful environment. In this case, siding or plaster is suitable. When using Listar panels, the surface is already ready for gluing artificial stone and other finishing materials.
When insulating the basement from the outside with your own hands, you should understand that it is necessary to completely insulate all the plates and not leave voids in them. The insulation layer must be completely sealed and not allow air and liquid to pass through. Only in this case, condensation will not form under the layer of thermal insulation and the basement will be really insulated.
See in detail how to insulate a basement on your own using an example house facade insulation see here:
What material can be used to insulate the floor
1. Expanded polystyrene with a density of 35 kg per cubic meter, including extruded. Excellent thermal insulation properties, water resistance, vapor permeability, ease of installation, low price.
Special profile mats are made of PPP for laying underfloor heating.
Cons of the material: flammability and toxicity when burning.
2. Mineral wool (usually basalt). Also high-quality insulation, non-combustible, environmentally friendly, easy to process and inexpensive. Minus: hygroscopicity. When wet, most of the heat-shielding properties are lost. When installing mineral wool insulation, it is necessary to lay a vapor barrier membrane on top, because cotton wool is a vapor-permeable material.
3. Expanded clay. Loose material, fired clay granules. Non-flammable, environmentally friendly, cheap. Low weight, can be used to insulate wooden bases. It is used both separately and as part of a concrete screed.
Minus: hygroscopicity. When wet, the weight increases and the load on the floor increases.
4. Ecowool - fluffed cellulose. Ease of processing, environmental friendliness, non-susceptibility to damage by rodents and fungus. Does not shrink, does not lose heat-shielding properties when wet. Does not support combustion, but smolders. It is used dry and in solution. Negative: special injection equipment is required for styling.
5. Sawdust. Environmentally friendly, cheap and warm material. Cons: flammability, hygroscopicity. In its pure form, it is prone to decay, damage by rodents, insects, fungus.It is used as a mixture with lime and gypsum or clay.
6. Liquid polyurethane foam. It is applied from a spray gun in an even layer over the entire surface of the base, it forms a hermetically sealed even coating without voids.
Can be applied on a reinforced concrete slab, on a rough floor or between logs. Cons: flammability (G1, G2), susceptibility to destruction by UV rays, spray gun is required for application, not too low price.
Most insulation can be installed both under a concrete screed or without it. In this case, the choice depends on the base material: you cannot put a screed on a wooden floor, it will not support the weight of the concrete. The screed is a common structural element of underfloor heating if they are installed on top of a concrete slab.
Note!
The minus of the screed is that it greatly reduces the height of the room (for example, the total thickness of the water heated floor in this case can reach 10 centimeters).
If you are wondering how to insulate the floor in an old wooden house where the floor is made of concrete, check out the step-by-step instructions:
- Create a multi-layer base that will provide reliable protection for the insulation. In no case do not give up the waterproofing layer, since the concrete is good at allowing moisture to pass through, and gradually it will pass to the layer formed for thermal insulation.
- Make a batten with metal or wooden battens. Lay the resulting frame (this step is required when implementing the classic version of floor insulation from below using mineral wool).
- Having cut the insulation into strips of the required size, install it in the raspor cells.
- Next, proceed to the organization of work aimed at protecting the thermal insulation layer from fumes.
- Place a counter-batten and plywood or other material of the same type on top of the vapor barrier (without the use of a batten, the work process is faster, but later difficulties arise associated with the installation of the sheathing).
Consider an economical sawdust option. The work is carried out up to the flooring.
Before insulating, treat the sawdust with a special antiseptic and dry thoroughly. By doing this, you can protect the material from mold and rodents.
When the insulation is ready to use, spread the slaked lime evenly with a shovel. To determine the required amount of this material, focus on the amount of sawdust (you will need 1/10 of the insulation taken).
We invite you to familiarize yourself with Acacia Juice
In the next step, be sure to add gypsum, it will give strength to the insulating material. Observe the ratio 17: 2: 1 (sawdust: lime: gypsum). After adding water, prepare a moderately steep solution.
Fill the wells gradually, adding the solution in small portions.
Make sure the boards to be treated are dry. If not, dry them thoroughly first.
Create a layer of waterproofing, then lay the mineral wool, having previously cut it into pieces of the desired size. Use thin stainless steel wire and staples as fasteners. The wire can be replaced with a plastic mesh. The heat-insulating layer will protect against steam with a special membrane.
Install the insulation so that its reflective side is directed downward, that is, towards a warm space.
Attach the insulation to the joists, keeping a small gap between it and the rough surface. Secure the material with strips, padding in a perpendicular direction, or with construction staples.
If the house provides for the presence of a basement, the process of increasing the heat-insulating properties of the coatings must be started from this room, since the heat losses in it are the highest.
If you want to know how to insulate a floor without opening it, consider the following procedure:
- Prepare wooden slats of small thickness, securely fix the vapor barrier film to the ceiling liner. Make sure that the overlap is 10 cm;
- when stuffing wooden blocks, keep gaps between them corresponding to the dimensions of the plates with which it is planned to insulate;
- place insulation plates in the cells, secure them securely with slats or wire mesh;
- attach the boards on top of the insulating layer.
The process of floor insulation is quite simple and can be done independently. The choice of material remains with the consumer. Consider all the options presented and choose the one that best suits your case.
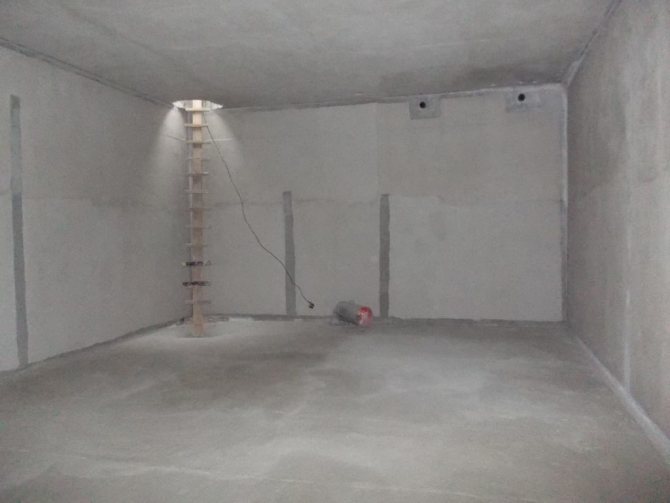
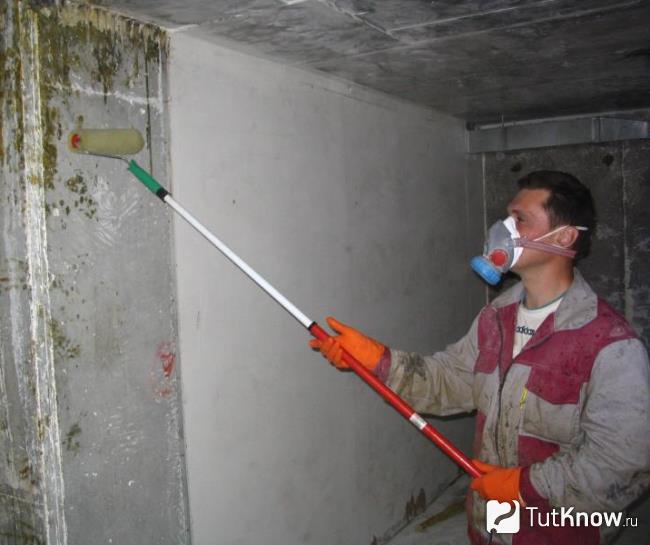
 Insulate the basement from the inside with your own hands
The procedure for work on the internal insulation of the basement, according to the principle of operation, is the same as for external insulation, with the exception of without earthwork:
- The walls are cleaned of dust and dirt, strong irregularities are plastered with cement mortar, as well as when insulating outside, and protruding parts are also knocked down.
- We fix a fiberglass or polymer mesh on the wall (if Listar panels are used, then this is not required).
- Applying waterproofing to the wall with mesh. In order for the soil layer to dry quickly and evenly, it is necessary to organize ventilation in the basement. The easiest way is to make two holes in the basement walls.
- Insulating panels and joints are coated with glue or sealant to the prepared surface with glue.
- The assembled panels are plastered and prepared for finishing. When using heat-insulating panels Listar, no plaster is required, the panels are ready for application of the finishing layer of finishing.
If finishing the room requires (frame) for further finishing the basement with plasterboard, then after the walls are insulated, the guides should be fixed to the non-insulated parts of the room (floor, ceiling).
The thickness of the insulation should be on average 10 cm when using polystyrene and not less than 8 cm when using polyurethane foam. If the basement is planned to be heated, it is recommended to increase the thickness of the insulation to 15 cm. This will keep the temperature in the basement at 20-25 degrees. If you use Listar panels, the thickness of the panels should be 8-10 cm.
Preparation for work on thermal insulation of the basement
Before insulating the basement, it is necessary to find out the characteristics of the soil on the building site. If its water saturation is higher than the norm, it is recommended to carry out drainage works in order to drain ground water from the underground part of the house.
The drainage system consists of drainage pipes with holes. They need to be laid alternately on a gravel pad, made with a slope of 3-5% below the base of the foundation. After installation, the pipes must be covered with washed rubble. During the operation of the drainage system, ground water seeping through the rubble enters the laid pipeline, through which it is then discharged into the sewer or into a separate well.
In order to prevent the pipes from silting up, the crushed stone bedding must be protected with geotextiles - a filtering material. It perfectly permeates water, retaining small particles of soil. Thanks to this filtration, the drainage system will not clog for a long time.
In addition to draining groundwater from the basement, before insulating it, it is necessary to examine the condition of the buried part of the walls. First, they need to be cleaned of dirt or old insulation. If, after that, cracks and chips are found on the walls of the basement, they should be sealed with sealing mastic. All identified surface irregularities must be smoothed out with a cement mixture. Otherwise, the adhesion of the insulation plates to the basement walls will be loose.