

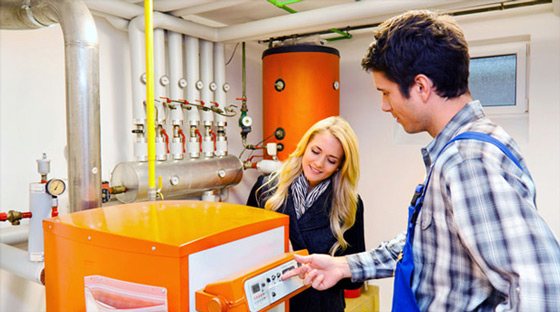
If he does not dream of autonomous gas heating with hot water supply, then any householder must have seriously thought about it, both in a city apartment and in a private house. Only today it is able to reliably provide a comfortable temperature in the house cheaper than the central one. However, installing a gas boiler with your own hands is a complex, responsible business that requires a permit. Actually, it makes full sense to take on it yourself only if you have sufficient funds to purchase a double-circuit boiler with a boiler and a full set of automation, and your home according to the TU is suitable for installing a boiler.
The second case when you need a gas boiler is if you are not rich, and there is no hot water in the house at all and is not expected. In this case, you need the simplest budgetary single-circuit flow-through boiler for hot water supply, which allows you to wash the dishes and take a shower. A gas boiler is more expensive than an electric boiler, but, taking into account the cost of installing a gas meter, at current rates it pays for itself in a winter and a half years, depending on the place of residence. If, again, you can put it in your apartment, and you are not afraid of going through the authorities.
Two big differences
The boilers mentioned above are the extremes of a huge variety of models of gas water heating devices. They are the ones that are available for self-installation. Any other gas heating boiler for installation requires professional work. However, every cloud has a silver lining - specialized firms undertake the preparation of the premises with the paperwork. But why only the "scissor tips" can be installed by yourself?
Simple water heater
The simplest boiler is really very simple: a gas burner, a heat exchanger - that's all. It is enough to connect water, gas to it, bring the exhaust into the chimney - and you can use it. If the papers have already been issued; otherwise, an imminent large fine.
Home boiler room
A double-circuit boiler with a boiler and full automation is so smart that it is as easy to install as the simplest one. Automation is important not only for simplicity: a complete system with a double thermostat and a microprocessor monitors the temperature in the house and outside, according to a given program, it reduces heating to a minimum according to sanitary standards when there is no one at home (for example, when everyone is at work). The gas consumption of such a boiler is 30-70% less than with manual or semi-automatic regulation, and the more severe the weather, the more savings.
But such a home boiler room has a serious drawback: if you find yourself in a natural disaster zone and the power supply is interrupted, the automation “stalls”, and the boiler goes into the mode of minimum heating of the room. Therefore, such a boiler requires additional consumption for a guaranteed power supply. It is not difficult to provide it yourself, see below.
Installation of a floor-standing gas boiler: instruction
The floor-standing gas equipment shown in the photo is more powerful than the wall-mounted equipment and is designed to heat a large area. Often, a private house has several floors and in order to heat it before choosing heating equipment, one should imagine the location of the pipes in the boiler room. It is necessary to know this so that the boiler nozzles are located on the side of the pipe inlet.
- Since floor-standing models of heating appliances are heavy, they require a solid and reliable base.On a solid wooden floor, it will be enough to lay a sheet of galvanized iron, the size of which exceeds the area of the base of the device (for more details: "Installing a floor-standing gas boiler - how to connect the boiler correctly"). It should protrude about 30 centimeters from the front of the boiler. It is necessary to install the heating unit as evenly as possible, if necessary, placing a piece of solid non-combustible material, for example, a plastic ruler, under the legs.
- If the appliance does not work on forced draft, it must be connected to the chimney. Then the boiler is connected to the heating system. After the outlet through which it is filled, a hard filter should be installed in front of the inlet of the return pipe, which serves to prevent clogging of the heat exchanger.
- Double-circuit devices must not only be embedded in the heating structure, but also connected to a cold water source. When a tap is made into the water supply, it should be placed closer to the place where the pipeline enters the building. If it is not possible to do this, then the tie-in is done before the pipe branching. Thus, it is possible to ensure the highest pressure for the cold heat carrier in the unit and an uninterrupted supply of high pressure gas. Then a pipe for heated water is connected to the corresponding branch pipe.
- The rules for installing a gas boiler assume that the installation is carried out in such a way that, if necessary, the device can be easily dismantled. For this purpose, valves are installed on each incoming or outgoing pipe from the device, allowing it to be removed without discharging water from the heating structure. This point is especially important for systems operating on purified water that has undergone special treatment.
- Now all that remains is to connect the heating unit to the gas pipeline. The connection must be made exclusively with a steel pipe.
- A specialist from Gorgaz must check the quality of the work done, sign the commissioning certificate of the boiler, and only then is it allowed to open the valve coming from the gas main. Now you can enjoy the warmth and comfort in your own home and, if you did the work yourself, enjoy the savings.
The video shows the basic rules for installing a gas boiler:
Where can and where not to put a gas boiler
The rules for installing a gas boiler provide the following requirements for installing a HEATING boiler, regardless of whether it also provides DHW or not:
- The boiler must be installed in a separate room - a furnace (boiler room) with an area of at least 4 sq. m., ceiling height of at least 2.5 m. The rules also indicate that the volume of the room must be at least 8 cubic meters. Based on this, you can find indications of the permissibility of a ceiling of 2 m. This is incorrect. 8 cubes is the minimum free volume.
- The furnace must have an opening window, and the width of the door (not the doorway) must be at least 0.8 m.
- Furnishing the furnace with combustible materials, the presence of a false ceiling or raised floor in it is unacceptable.
- The air flow into the combustion room must be ensured through a through, unclosed air duct with a cross section of at least 8 sq. Cm. for 1 kW of boiler power.
Note: 8 free cubes - with a boiler power up to 30 kW. For power from 31 to 60 kW - 13.5 cubic meters; for power from 61 to 200 kW 15 cubic meters. For boilers with a closed combustion chamber, the volume of the combustion chamber is not standardized, but the dimensions must still be observed.
For any boilers, including wall-mounted hot water boilers, general standards must also be met:
- The boiler exhaust must go into a separate flue (often incorrectly called a chimney); the use of ventilation ducts for this is unacceptable - hazardous combustion products can get into neighbors or other rooms.
- The length of the horizontal part of the flue must not exceed 3 m within the combustion chamber and have no more than 3 angles of rotation.
- The outlet of the flue must be vertical and raised above the ridge of the roof or the highest point of the gable on a flat roof by at least 1 m.
- Since combustion products form chemically aggressive substances during cooling, the chimney must be made of thermo- and chemically resistant solid materials. The use of laminated materials, eg. asbestos-cement pipes, it is permissible at a distance of at least 5 m from the cut of the boiler exhaust pipe.
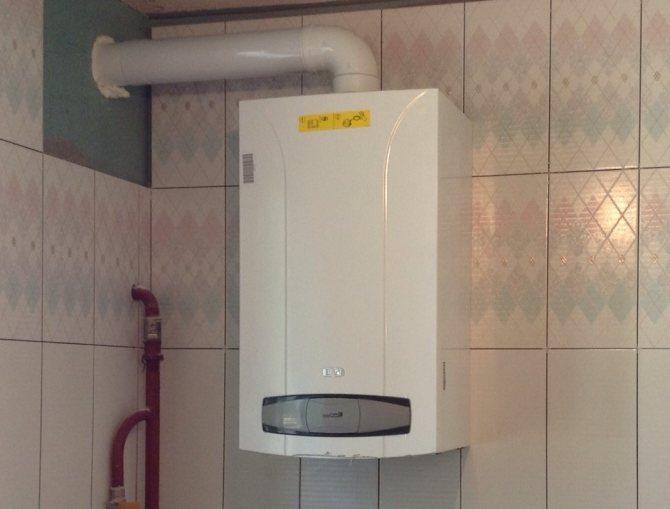
When installing a wall-mounted hot water gas boiler in the kitchen, additional conditions must be met:
- The height of the boiler suspension along the edge of the lowest branch pipe is not lower than the top of the sink spout, but not less than 800 mm from the floor.
- The space under the boiler must be free.
- A durable, fireproof 1x1 m sheet of metal must be laid on the floor under the boiler. Gas workers and firefighters do not recognize the strength of asbestos cement - it wears out, and SES prohibits having anything containing asbestos in the house.
- The room should not have cavities in which combustion products or an explosive gas mixture can accumulate.
If the boiler is used for heating, then gas workers (who, by the way, are not very friendly with the heating network - it always owes them for gas) will also check the state of the heating system in the apartment / house:
- The slope of the horizontal pipe sections must be positive, but not more than 5 mm per running meter of water flow.
- An expansion tank and an air valve must be installed at the highest point in the system. It is useless to convince that you will buy a "cool" boiler, in which everything is provided: rules are rules.
- The state of the heating system must allow its pressure testing under a pressure of 1.8 atm.
The requirements, as we see, are tough, but justified - gas is gas. Therefore, it is better not to think about a gas boiler, even a hot water boiler, if:
- You live in a block Khrushchev or other apartment building without a main gas duct.
- If you have a false ceiling in your kitchen, which you do not want to remove, or a capital mezzanine. On a mezzanine with a bottom made of wood or fiberboard, which, in principle, can be removed, and then there will be no mezzanine, gas workers turn a blind eye.
- If your apartment is not privatized, you can rely only on a hot water boiler: the allocation of a room for a furnace means redevelopment, which can only be done by the owner.
In all other cases, you can put a hot water boiler in the apartment; a heating wall is possible, and a floor one is very problematic.
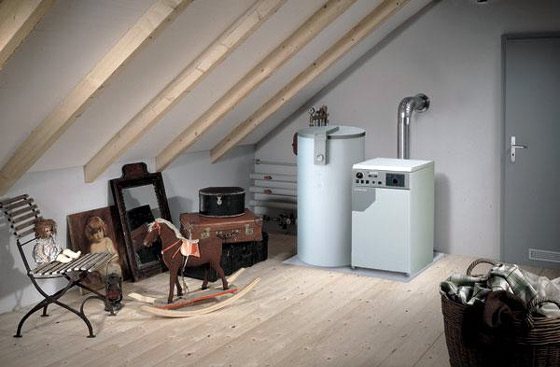
In a private house, any boiler can be installed: the rules do not require that the furnace be located directly in the house. If you make an extension to the house outside under the furnace, then the authorities will only have fewer reasons for nagging. It is possible to put a high-power floor-standing gas boiler in it to heat not only a mansion, but also office premises.
For private housing of the middle class, the optimal solution is a wall-mounted boiler; it is not required for it, as for a floor one, to arrange a brick or concrete pallet with sides of half a meter. The installation of a wall-mounted gas boiler in a private house also does without technical and organizational difficulties: a fireproof closet for a furnace can always be fenced off, at least in the attic.
Installation of a chimney for a gas boiler
An important point in the safe functioning of a gas boiler is the presence of a chimney. Both a malfunction of the device and its incorrect operation can end in tragedy. Most models of modern gas heating equipment are equipped with automation, which, when the draft in the chimney deteriorates, stops the fuel supply.
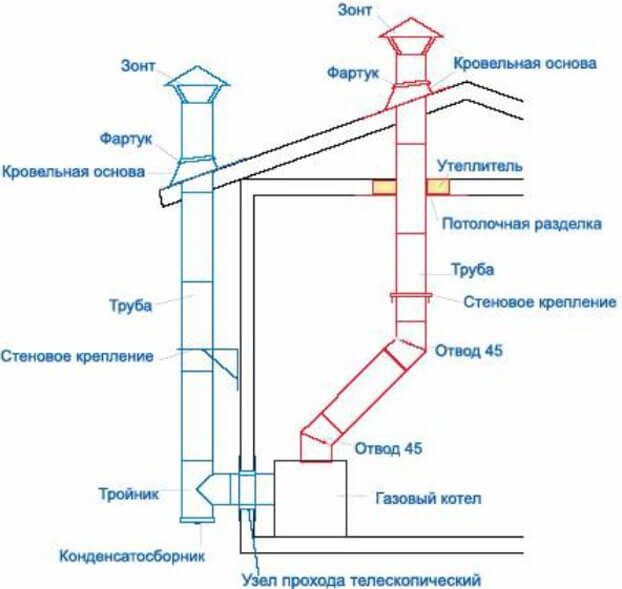
The rules for installing a gas unit contain a list of requirements for the chimney:
- the diameter cannot be smaller than the instructions for installing a gas boiler prescribe (in more detail: "Diameter of a chimney for a gas boiler - diagram and calculation of dimensions");
- its cross-section must correspond to the size of the chimney opening of the device;
- it must rise at least 50 centimeters above the roof ridge;
- for gas boilers, it is recommended to use chimneys with a cylindrical shape and a hole for cleaning. They must be stainless or black steel;
- The requirements for chimneys of gas boilers prohibit the presence of more than three pipe bends in the path of the exit of combustion products from the gas boiler. The part of the pipe connecting the unit to the chimney must not be made longer than 25 centimeters.
About flue
The cross-sectional area of the house gas duct for it depends on the required boiler power (see below). At any power, the diameter of the flue must be at least 110 mm and at least the diameter of the exhaust pipe. The dependence of the flue diameter on the boiler power is as follows:
- up to 24 kW - 120 mm.
- 30 kW - 130 mm.
- 40 kW - 170 mm.
- 60 kW - 190 mm
- 80 kW - 220 mm.
- 100 kW - 230 mm.
Boiler selection
Power
It is obvious that the boiler output must be sufficient. But it should not be excessive, especially if the heat exchanger is cast iron. Drops of condensate from the flue will crack the hot cast iron. There is another dangerous effect: the dew point temperature of the exhaust gases is about 56 degrees Celsius. If the water temperature in the heating return is lower, acid condensation may form in the combustion chamber. What does this have to do with excess capacity? A too powerful boiler will quickly warm up the system and go into standby mode until it cools down. The thermal inertia of a powerful heat exchanger is high, and while it warms up again, acid dew may fall out.
With a properly selected boiler power, the temperature in the combustion chamber will be 80-90 degrees. The permissible difference in power is large enough, but if a 60 kW boiler is installed in a medium-sized private house, then acid rain from the inside will quickly disable it.
The required boiler power for a particular room is determined by a heat engineering calculation. It is easier for residents of high-rise buildings: the data is in the DEZ, the technical inventory bureau or the owner. In any case, you can use the approximate data by calculating an intermediate value for yourself. The maximum power values are given for cases with a minimum outside temperature of -25 / -40 degrees:
- One room apartment on the middle floors - 8/14 kW.
- Corner apartment 60 sq.m. total area on the top floor of the block Khrushchev - 20/28 kW.
- Private house 100 sq. M common - 24/38 kW.
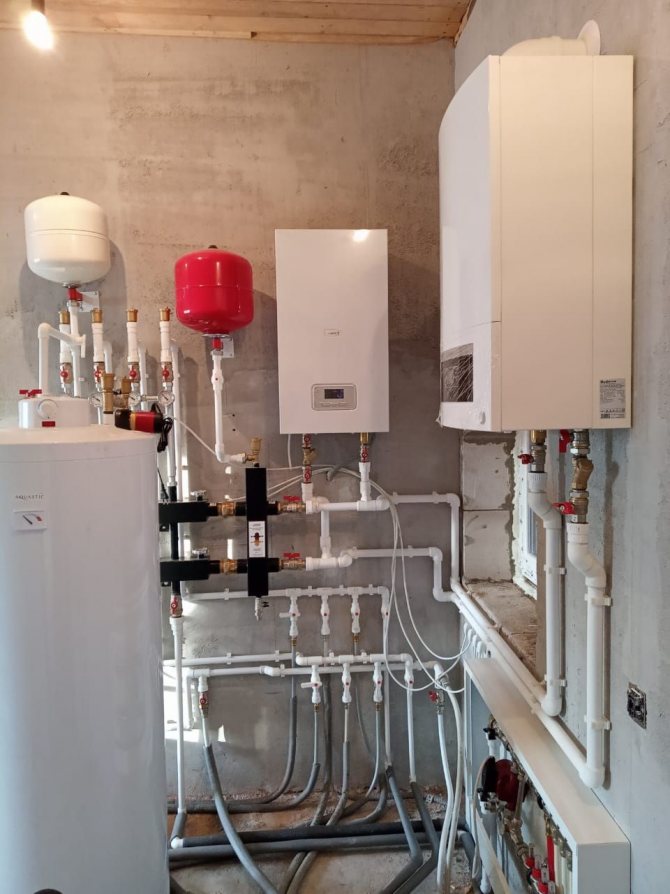
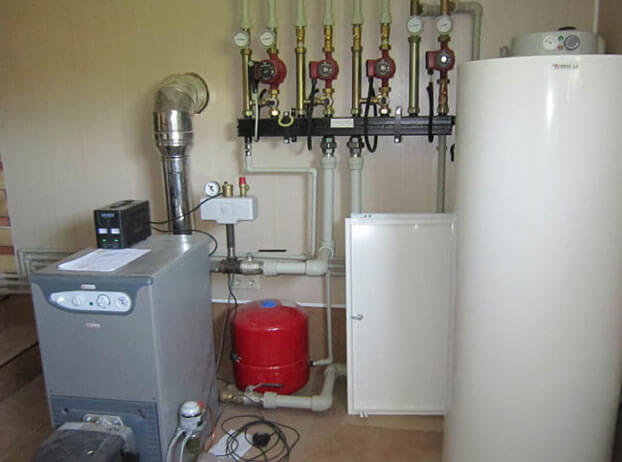
Boiler
The purpose of the boiler is to accumulate hot water for domestic needs. If you look at the instructions for the boiler, then the power there will be indicated through a fraction, for example - 10/22 kW. The first number is the heating capacity for average conditions; it determines the gas consumption by 80%. The second power, maximum - for fast heating of domestic water.
If the boiler is empty, the boiler temporarily stops heating the heating (it will not have time to cool down) and heats the domestic water at the maximum. In this case, the gas consumption is, of course, the maximum. If you take a little water from the boiler, then it will be heated in operating mode, without force majeure. Based on this, the capabilities of the boiler can be judged by its capacity:
- 2-10 l - wash your hands and wash the dishes.
- 30-50 liters - take a quick shower.
- 100 l - wash thoroughly in the shower.
- 150 liters or more - you can take a bath and connect a washing machine to the hot water supply.
Note: if you already have a household electric boiler, it is advisable to leave it by turning off its automatic machine. It will make a good hot water accumulator, and in case of problems with the gas boiler, you can turn it on.
Video: expert opinion on the choice of gas boilers
Boiler documents
Let's say you have equipped a furnace in compliance with all requirements. Buying a boiler? It is too early. First of all, check if the old papers are not lost on gas, and take them out into the light of day:
- Gas supply contract, if the boiler is heating.Sub-consumers can only install hot water boilers.
- All documents for the gas meter. Any boiler cannot be installed without a meter. If it is not there yet, there is nothing to be done, you need to set and arrange, but this is another topic.
Now you can buy a boiler. But, having bought, it is too early to install:
- In the BTI, you need to make changes to the registration certificate at home. For privatized apartments - through the organization operating the building. The new plan should include a closet under the boiler, and clearly marked: "Furnace" or "Boiler room".
- Submit an application to the gas service for the project and technical specifications. As part of the required documents and a technical passport for the boiler, so it must already be purchased.
- Install the boiler (see next section), except for the gas system. This can be done while the gas workers are preparing the project, if the premises are approved.
- Call a specialist to make the gas piping.
- Submit an application to gas workers for commissioning.
- Wait for the arrival of the gas service engineer, he will check everything, draw up a conclusion on suitability and give permission to open the gas shut-off valve to the boiler.
Note: gas workers are not allowed to give permission to individuals to work on gas equipment. Therefore, to connect the gas to the boiler, you will have to call a specialist or then "resolve the issue" with the inspector during commissioning. As a rule, the former is cheaper.
Is self-installation possible?
With your own hands, you can install a wall-mounted gas boiler of the simplest modifications. Such as, for example, single-circuit devices with an open combustion chamber.
To install them, you will need to connect the heating system, supply gas and organize a chimney. However, some boiler manufacturers in the technical documentation for their products indicate that the installation should be carried out only by specialists.
Installing and connecting a gas boiler is a responsible and rather difficult job. Many heating equipment manufacturers require professionals to do it.
In this case, self-assembly of even the simplest models is prohibited. Thus, if you plan to install the equipment yourself, you should make sure that the manufacturer allows it before purchasing it.
Verification of the correct installation and connection of the device to the gas main should only be carried out by a specialist with a special permit.
In addition, the gas service representative must issue a permit to operate the installed equipment. Without this, the owner of a self-installed and running device will face serious fines.
Thus, without the invitation of specialists, you can only connect the device to the heating system and to the water supply. Moreover, it is advisable to do this only if you have a certain experience.

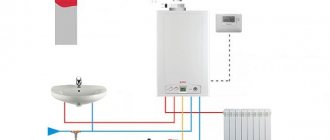
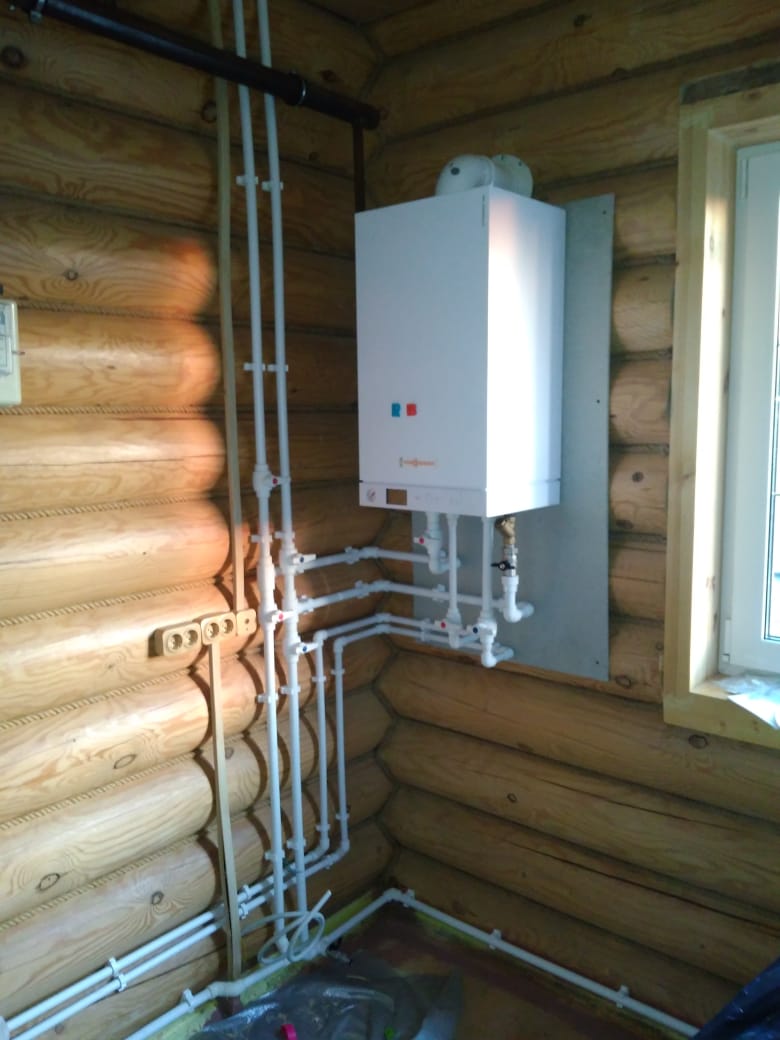
Wall-hung gas boilers are installed in autonomous forced-type heating circuits with natural circulation of the coolant
Boiler installation
Adjoining the boiler body close to any of the walls is unacceptable, therefore, remodel the fasteners of wall-mounted boilers, sink the boiler into a niche, etc. it is impossible. After installing the boiler in place, its piping is done - connecting three systems: gas, hydraulic and electrical. The gas piping should, as indicated, be done by a gas specialist, and last of all, when everything else is already connected.
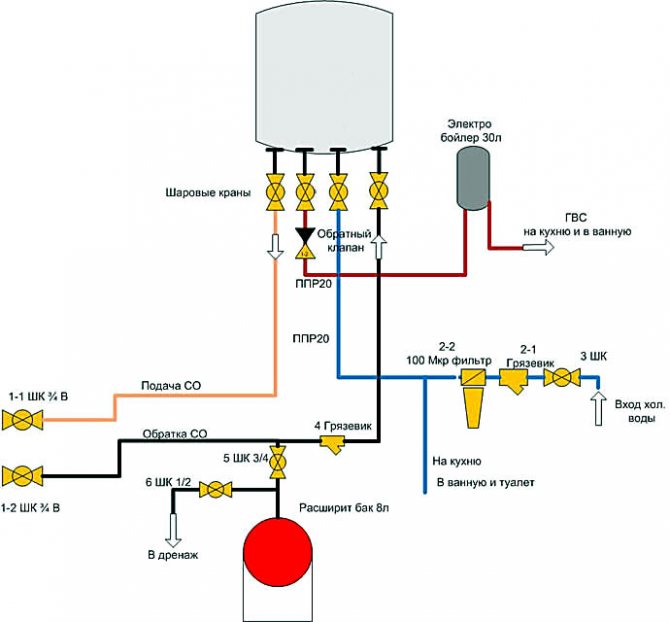
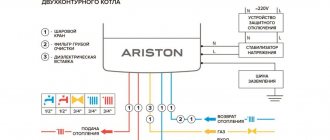
Gas boiler hydraulic piping diagram
Electrical and hydraulic piping can be done independently. Here the main guiding document is the instruction for the boiler. A typical boiler hydraulic connection diagram is shown in the figure. For any boiler, the following conditions must be met exactly:
- Water and hot gases in the boiler heat exchanger must flow in a counterflow, otherwise it can simply explode with any automation.Therefore, it is extremely important not to confuse, through negligence or for the sake of ease of installation, cold and hot pipes. After hydraulic piping, inspect the entire system carefully again, then rest for an hour, and inspect again.
- If antifreeze has been poured into the heating system, drain it completely and flush the system twice with clean water. The admixture of antifreeze in the water entering the heat exchanger is also explosive.
- Do not neglect "mud collectors" - filters for coarse water purification. They should be located at the lowest points in the system. The accumulation of dirt between the thin fins of the heat exchanger also creates a hazardous situation, not to mention the excessive gas consumption. At the beginning and at the end of the heating season, drain the sludge through the mud collectors, check their condition and, if necessary, flush the system.
- If the boiler has a built-in expansion tank and a de-airing system, remove the old expansion tank, and close the old air valve tightly, having checked its condition beforehand: air leaks will also create a dangerous situation.
Step-by-step equipment installation
Before installation, you need to unpack a brand new boiler and check the completeness of the delivery. The presence of parts is checked according to the operating instructions, which must be attached to the device.
If any item is missing, contact the supplier immediately. One more nuance. The boiler must have a perfect appearance without dents, chips and signs of repairs being carried out. If this is not the case, you need to call the sellers.
It is important to make sure that the technical data indicated in the technical passport of the heater exactly matches those that are printed on the device itself. In addition, they must correspond to the numbers indicated in the operating instructions for the device.
Immediately before starting the installation, you need to flush the boiler pipes, which may contain various debris that got inside during the manufacture of the device and its transportation.
The installation of a gas boiler involves the connection of heating pipes, a water supply and a gas main, as well as the arrangement of a chimney
It is also advisable to flush the heating system lines. After the preparation is over, you can proceed with the installation.
The specifics and procedure for its implementation are determined by the features of the equipment: the number of circuits involved and the type of combustion chamber.
Most often, double-circuit appliances with a closed firebox are installed in houses. Consider in detail the installation of just such a modification.
Stage # 1 - preparing the wall mount
For fixing gas boilers, a special bracket is used, which should be included in the delivery of the device. Reliable fasteners are used to mount it on the wall. They should be selected for the material from which the wall is made.
It is possible that the ones that the manufacturer packed with the heater will not work. Then you will need to select and purchase others.
The task of the bracket is to support the weight of the boiler and additional equipment, as well as to provide it with an even, well-adjusted position without distortions.
To accurately mark the wall, you can use a paper stencil, which usually comes with the boiler. With its help, you can easily mark holes for fasteners.
Once this is done, the bracket is secured in place and the boiler is hung onto it.
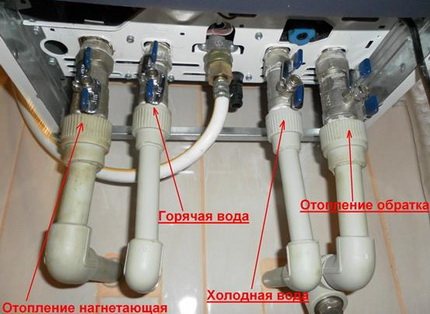
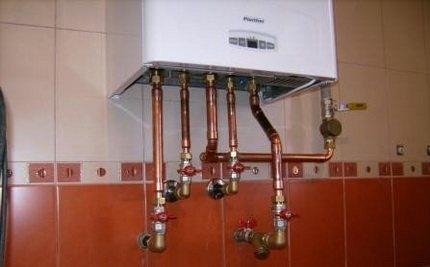
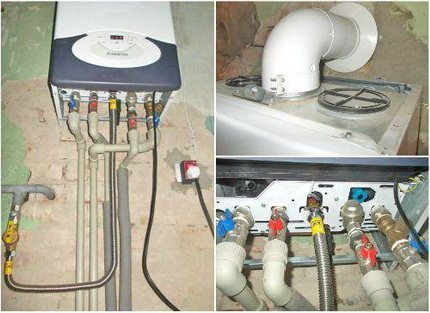
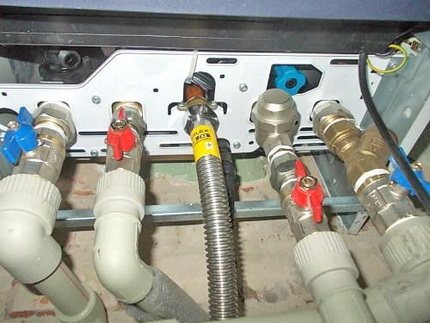
Heating pipes are connected to the corresponding branch pipes of the gas equipment. You can determine their location by photograph
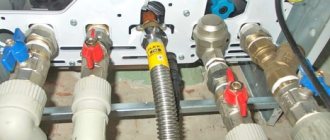
Stage # 2 - connecting pipes of the heating system
Depending on the type of heating system, and it can be one or two-pipe, the number of pipes connected to the boiler may vary. In any case, we start by removing the plugs from the device nozzles.
To protect the boiler from the ingress of dirt particles from the heating main, it is recommended to install a strainer at the return inlet.
If the water in the system is hard or, according to other parameters, does not meet the requirements declared by the manufacturer of heating devices, you should take care of installing additional treatment equipment.
This can be, for example, polyphosphate dispensers. If this is not done, the device will quickly break down. All connections must be carried out in compliance with all rules and regulations.
Sealing is required. For this, special sealants are used: traditional paint or tow or modern thread seals. In addition, experts recommend the mandatory installation of cut-off valves for supply and return.
This is necessary to facilitate the repair of the boiler should it fail. In addition, the fittings will help prevent possible airborne radiators.
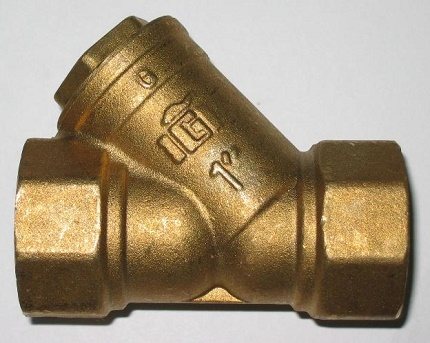
Water filter - an element that must be installed when connecting a gas boiler to the water circuit
Stage # 3 - connection to the water circuit
This work is almost the same as connecting heating pipes. The main difference is the taps used and the pipe diameter.
The cold water supply must be equipped with a filter, which will eliminate the possibility of dirt particles entering the heater. Otherwise the equipment will deteriorate.
The taps used to cut off the boiler from the water supply must be with detachable connections.
Such models are also called "American". They greatly simplify installation, and in case of unforeseen situations, they make it possible to replace a worn-out crane as quickly as possible.
It must be remembered that the cold water supply pipes are located on the left side of the heater relative to the center, the hot water supply pipes are located on the right.
Stage # 4 - connection to the gas main
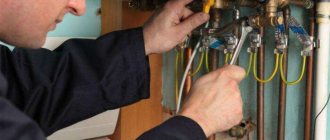
This part of the work should only be carried out by a qualified specialist, since the cost of an error can be very high. In any case, upon completion of the connection, its correctness must be checked by a representative of the gas service. He will also carry out the first start-up of the equipment.
All operations during independent work must be performed with utmost care. Start by connecting the branch of the gas line to the corresponding branch pipe on the boiler.
When connecting the boiler to the gas main, only tow can be used to seal the threaded connection, otherwise it will not be possible to achieve the required tightness
A special filter must be installed on the valve that cuts off the gas supply from the main. Experts strongly recommend not to skimp on this detail.
A cheap filter of poor quality will not work for long, which can lead to a failure of the gas boiler. When arranging the connection, special attention should be paid to its sealing.
It must be understood that the weight of gas is much less than that of air, and if the connection is not tight enough, it will ooze from the pipeline. The consequences can be dire. Therefore, the most thorough sealing is required.
The main materials for sealing the threaded joint are paint and tow; the use of seals such as fum tape is unacceptable.
A special flexible connection is installed after the filter element. You need to know that it is strictly forbidden to use rubber hoses for its arrangement.
This is due to the fact that over time, the material from which the part is made dries up and becomes covered with cracks, through which gas begins to seep. Therefore, the best choice for arranging such a connection is a corrugated hose.
A corrugated hose is a good choice for connecting the appliance to the gas line.It is strong enough, durable and does not collapse under the influence of gas
For its manufacture, high-quality durable stainless steel is taken. It is a very strong and durable material that is particularly resistant to high humidity and adverse effects of gas.
The hose is secured to the heater connection with a union nut. In this case, a paranite gasket is necessarily used, which provides the necessary sealing of the connection.
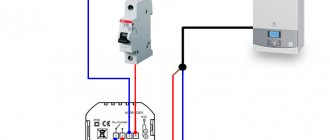
Stage # 5 - connecting to the electrical network
This operation is only necessary for appliances with a closed firebox that need electricity. It feeds the fan, which removes the combustion products, and the automation that controls the system.
Typically a standard 3-wire connection is used. Experts recommend connecting the boiler to the network only through a stabilizer, which will make it possible to avoid voltage surges and thereby extend the life of the boiler.
Stage # 6 - arrangement of the chimney outlet
The easiest way is to connect a heater with a closed firebox to the chimney. For them, special coaxial pipes are used. In apartment buildings, the boiler must be connected to a collective chimney.
In individual buildings, the coaxial type chimney is led out into the street through the wall. The height of the pipe suspension in this case does not really matter, since the required draft is created by the built-in fan.
Devices with an open firebox must be connected to an individual chimney. The boiler is connected to it with a pipe of the required section.
The material for its manufacture is selected so that the part is resistant to the effects of combustion products, high temperatures and mechanical wear.
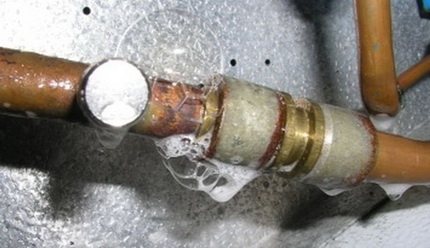
You can check the tightness of the gas pipe connection using a soap solution. A gas leak will manifest itself by the appearance of bubbles.
Before starting work, you need to make sure that there are no soot residues, assembly debris, etc. in the chimney. When installing the chimney, it should be positioned with a slight slope towards the gas boiler.
At the exit from the device, a vertical pipe segment is installed; its length before turning must be equal to at least two pipe diameters. The total length of the flue gas outlet must be kept to a minimum.
Stage # 7 - preparation for the first launch
Before the test run, the heating system is filled with water. The fluid is pumped until a pressure of 2 atmospheres is reached. The injection of water is carried out as slowly as possible in order to remove the maximum amount of accumulated air.
In addition, the system is checked for leaks. All leaking connections must be sealed immediately.
To identify insufficiently tight connections on the gas line, you need to dilute the soap solution and lubricate all connections with it. Then watch.
Air bubbles will appear on poor-quality areas. All found faults should be eliminated and rechecked. The first start-up of the equipment should only be carried out in the presence of a gas service representative.