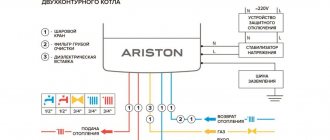
Where and where to connect the wires on the gas boiler?
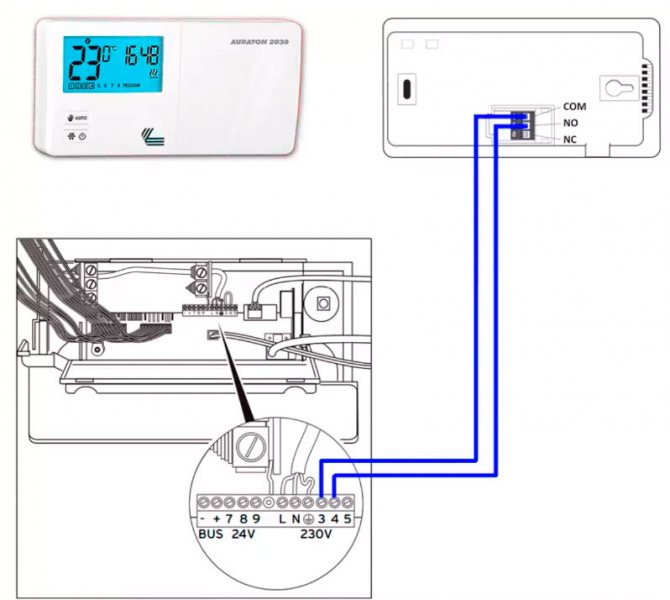
To connect the thermostat from the terminal block of the boiler to the Dry Contact contacts, you need to connect two conductors.
According to the instructions, the recommended cross-section of copper conductors is at least 0.75mm2.
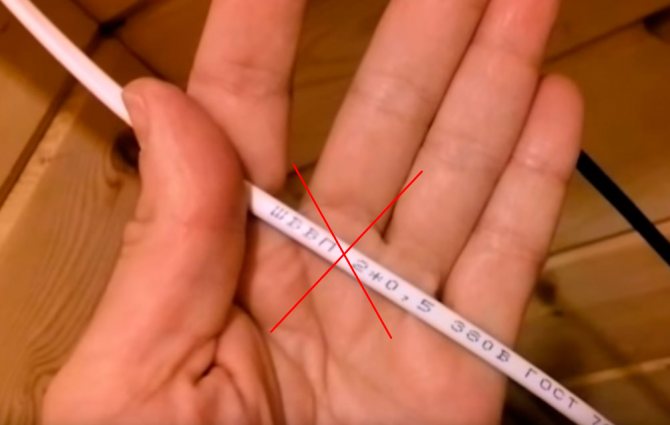
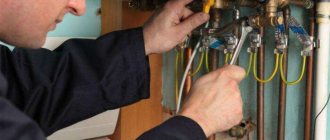
The cable length to the place where the thermostat is installed must not exceed 50 meters.
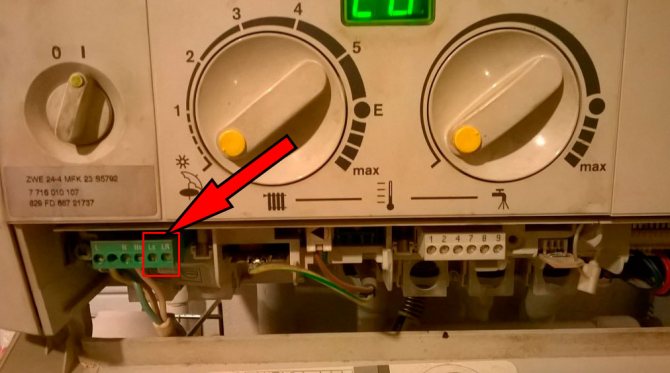
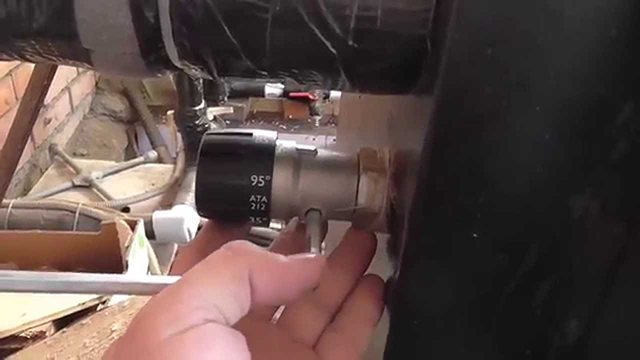
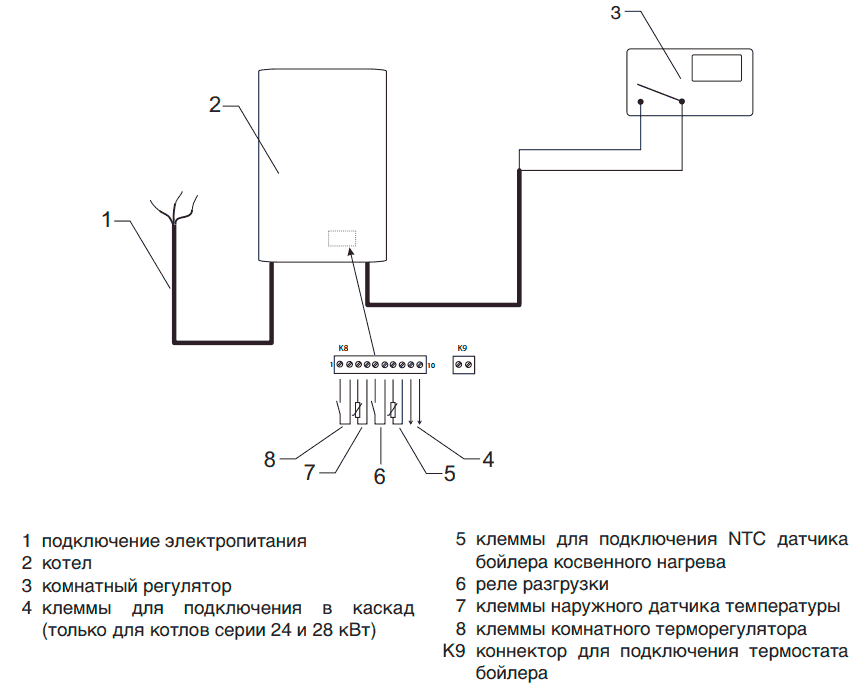
Look for the necessary terminals on the boiler itself in the manufacturer's instructions, or be guided by the inscriptions on the blocks.
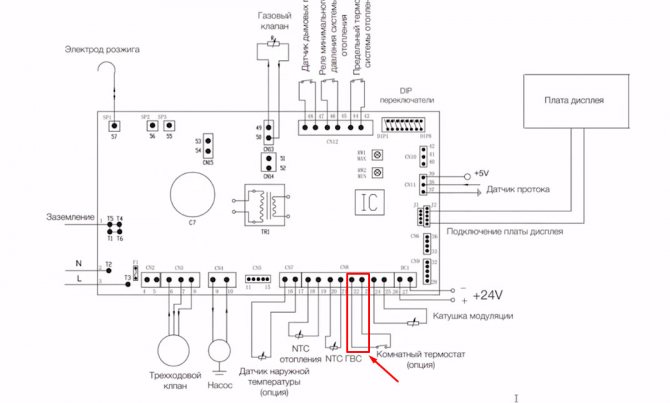
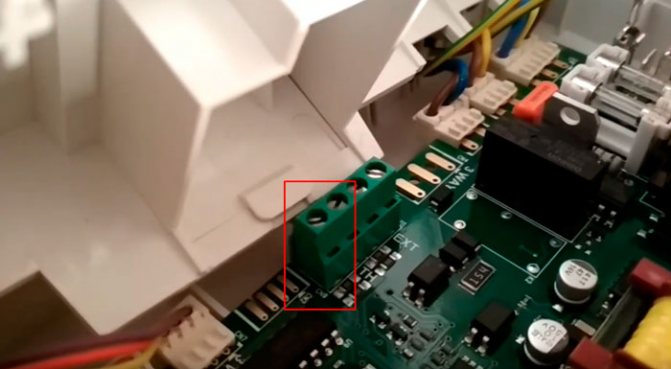
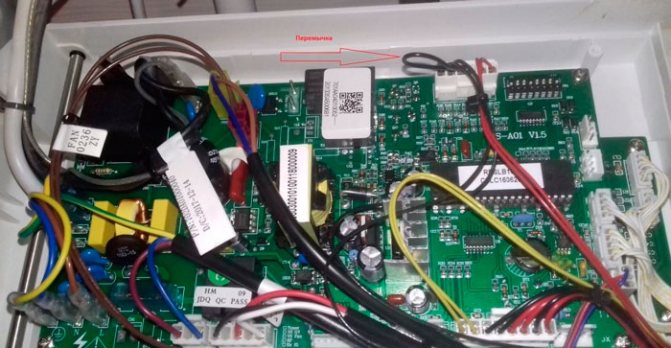
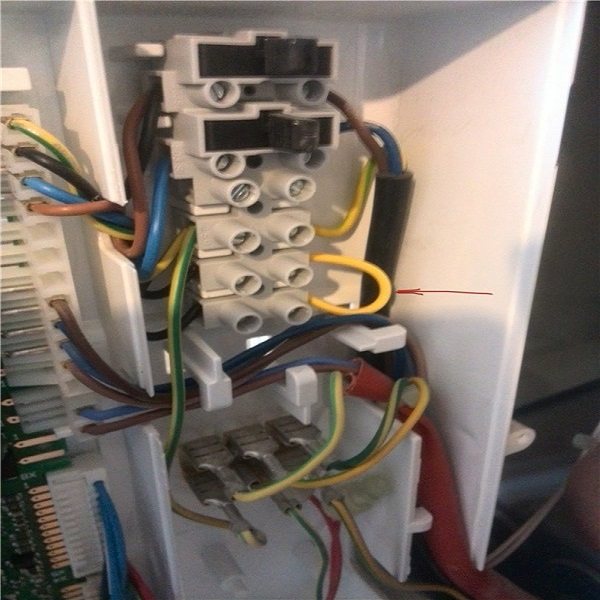
These terminals are most often located on the back of the control board.
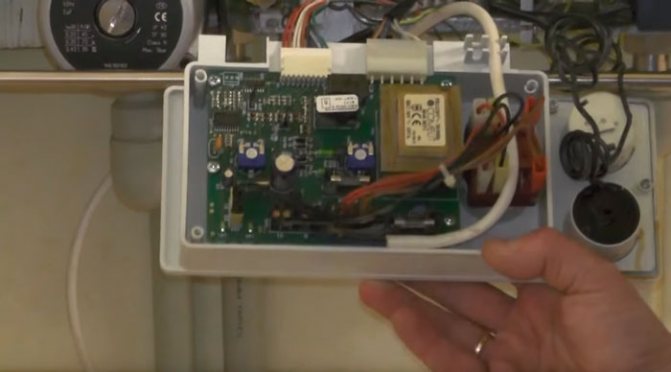
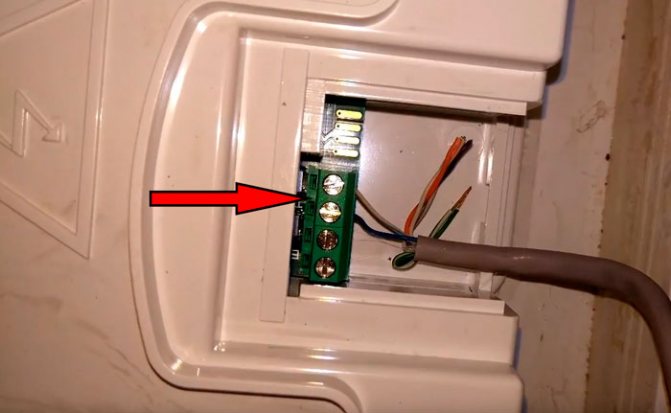
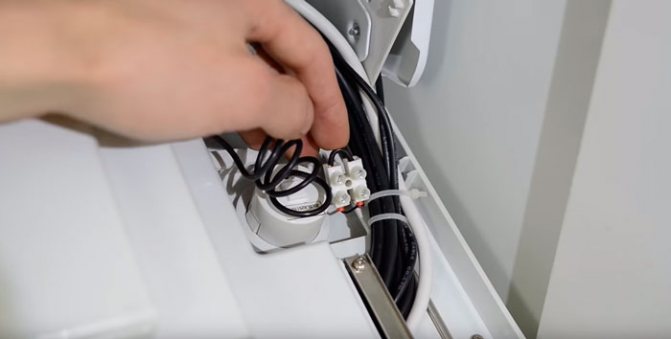
However, sometimes manufacturers take them out of the board.
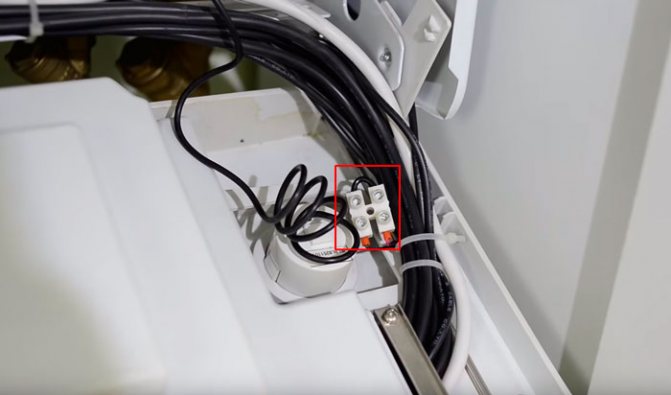
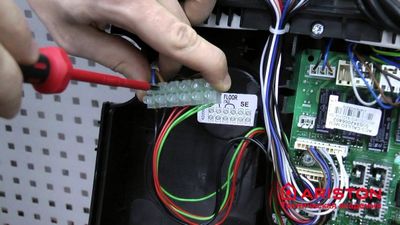
Some installers, during installation, connect a cable here and bring it out so that the consumer does not climb to the board in the future and does not confuse something there. Since the thermostat has not yet been installed, the cable ends are short-circuited.
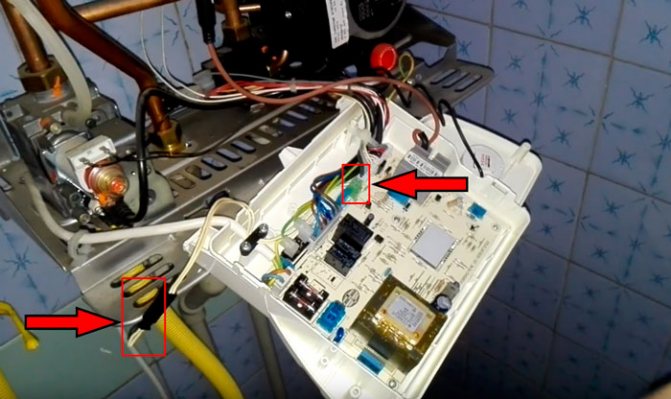
By the way, be careful with this remote block. Some consumers faced the problem of factory wire entanglement, such as Protherm (Proterm).
As a result, everything started to work as it should, only with the reverse connection.
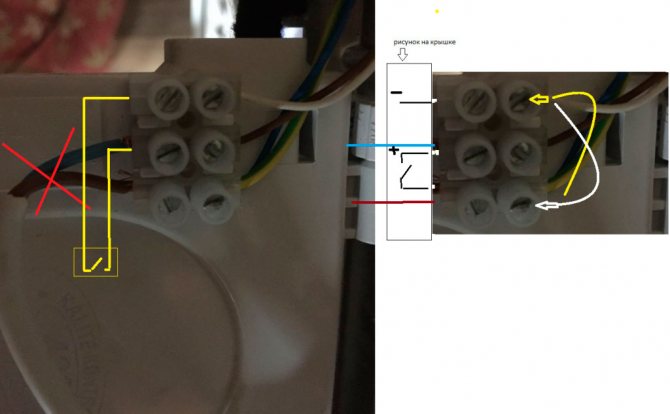
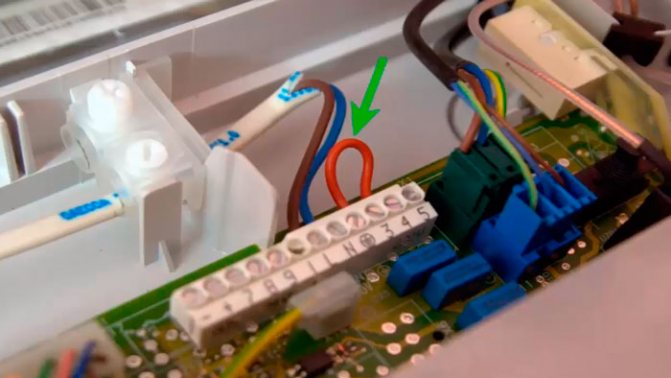
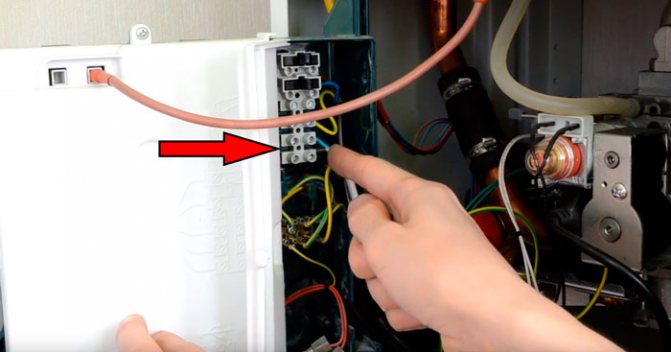
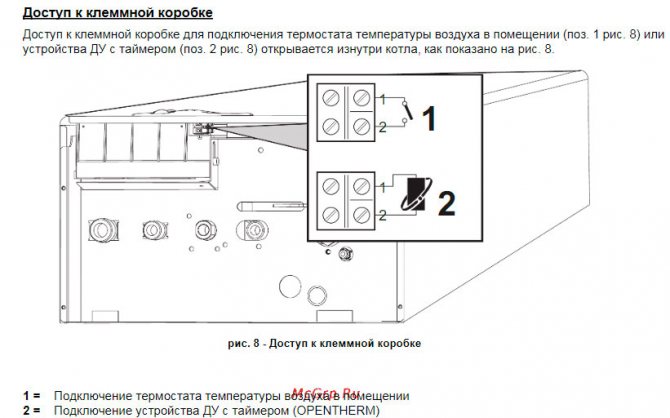
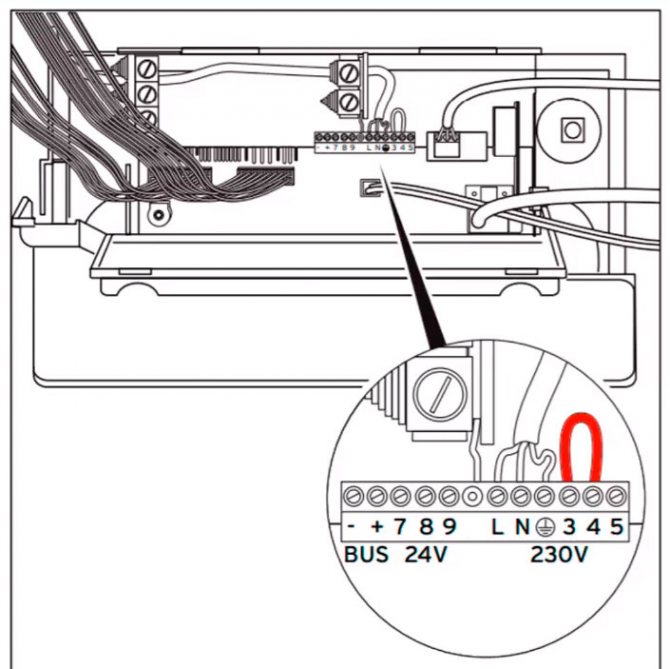
Initially, there is a jumper between the terminals. If the jumper is broken, the gas boiler will simply stop working.
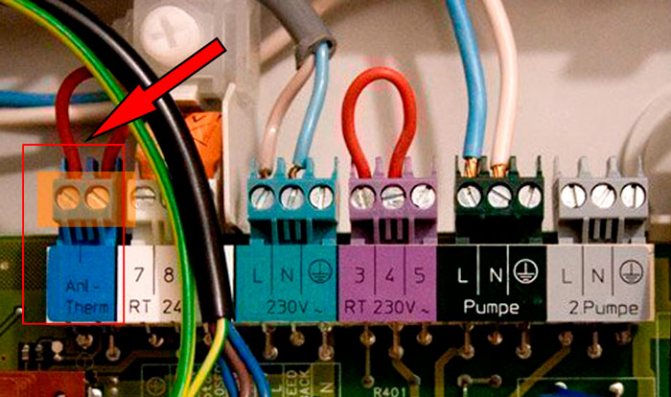
When the thermostat is connected, the factory jumper is dismantled and a cable is put in its place, laid to the place where the thermostat is installed. Most importantly, there is no need to change any internal settings on the boiler.
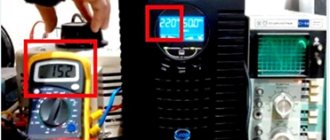
A low voltage control pulse (usually 24V) is supplied through these contacts.
We have a control device (thermostat) and a slave (boiler). Between them, a set of requests-responses is constantly transmitted over a low-current line.
The principle of operation here is simple - by closing the dry contact, we thereby enable the operation of the boiler, by opening it, we interrupt the data transmission and prohibit it. Closing and opening occurs through the thermostat relay, depending on the set temperature on the device and comparing the current indicators in the room.
When triggered, the burner is switched off first, then after a certain interval (pump run-on time) and the circulation pump. Although in different models, the pump operation algorithm may differ.
One of the variants of the algorithm
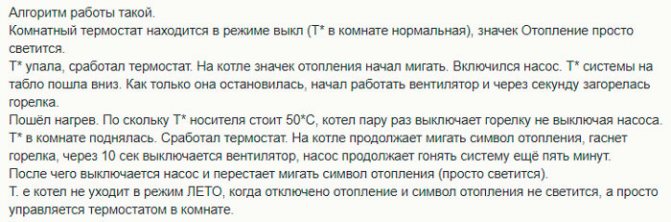
It is not advisable for the pump to turn off immediately after the thermostat has tripped. In this case, set the overrun from 5 to 10 minutes in the menu. Then the entire heating system will cool down evenly and the time intervals for the automatic operation will increase.
On expensive models that support the OpenTherm protocol, a remote programmer can be used to control many of the built-in parameters of the boiler, and not just turn it on and off.
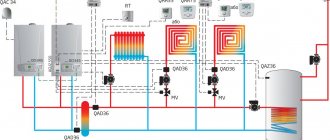
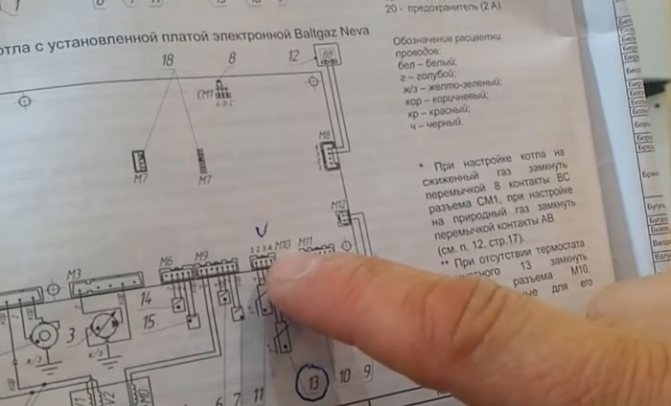
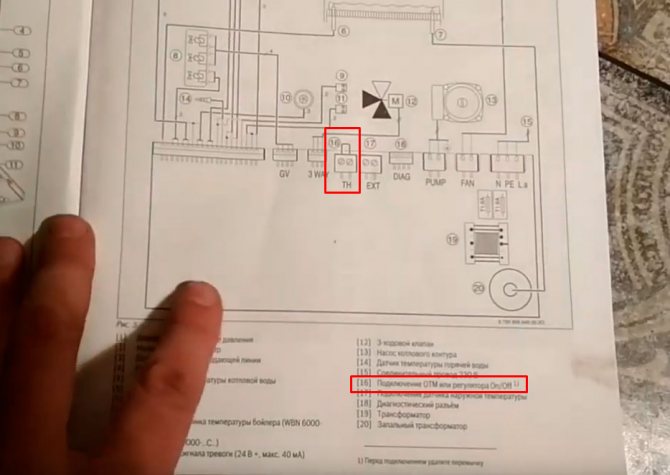
Here are illustrative examples of where to connect the thermostat for different boiler models:
BaxiBoschElectroluxVaillantJunkersBuderusViessmanFerroliAtronAlpha CalorImmergas


What happens if the thermostat fails? How will the boiler behave in this case?
It all depends on the position in which the dry contact remains. If closed, nothing bad will happen. The boiler will simply start operating according to its last preset program.
If open, the heating will not start and will not work.
Please note that the thermostat does not affect the operation of the burner in hot water mode.
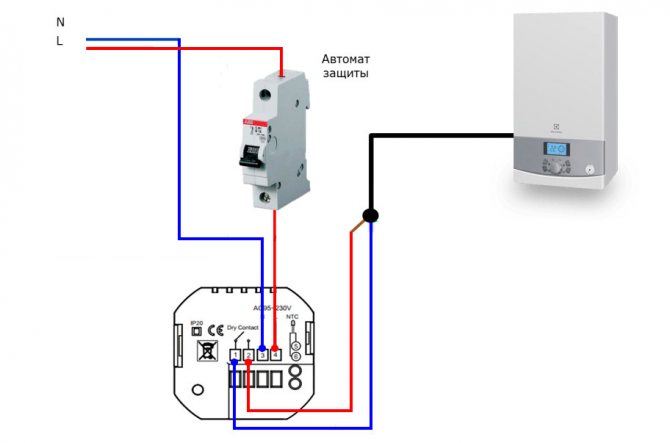
The voltage of 220V is applied to the power contacts of the thermostat - phase and zero (L and N). This can be done either from a separate outlet or distribution box, or taken directly from the boiler itself.
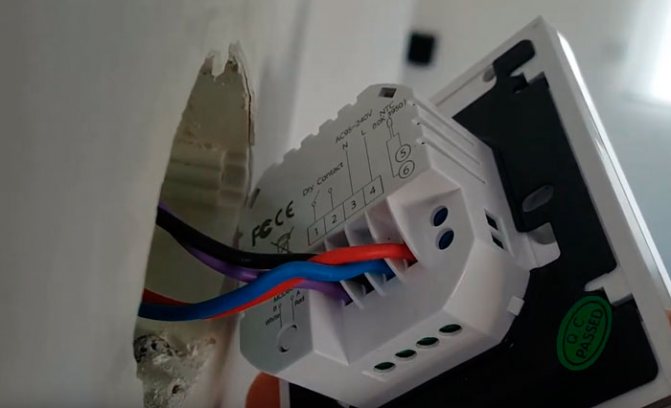
On a regulator with dry contacts, it does not matter where to start the phase or zero, but on models for electric underfloor heating, this plays a significant role in the issue of operational safety.
Since if the connection is incorrect, only the neutral conductor will break, and the phase will constantly be on duty on the heating cable.
Mechanical or electronic thermostat
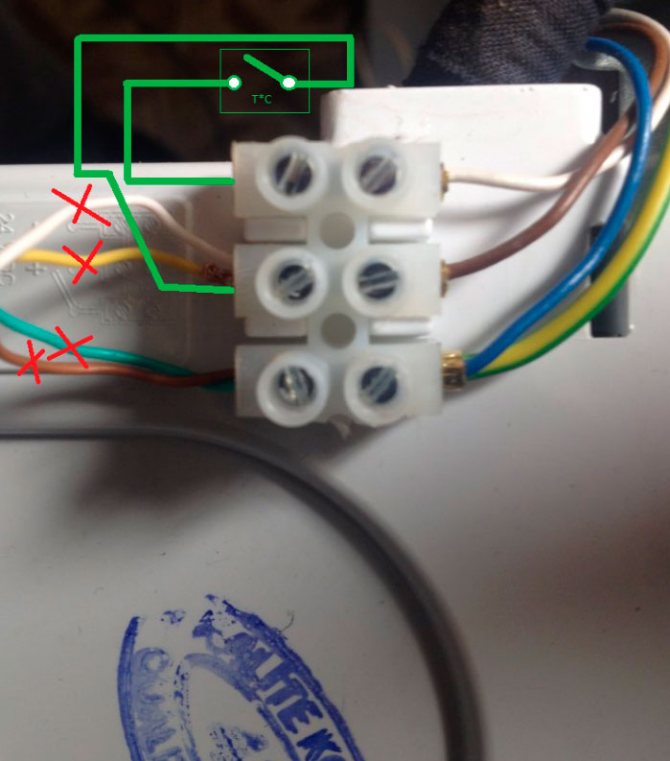
By the way, for a gas boiler, you can also use another simple type of regulator, which does not even have to be supplied with a voltage of 220V. For example, Termec Emmeti mechanical thermostat or other similar models.

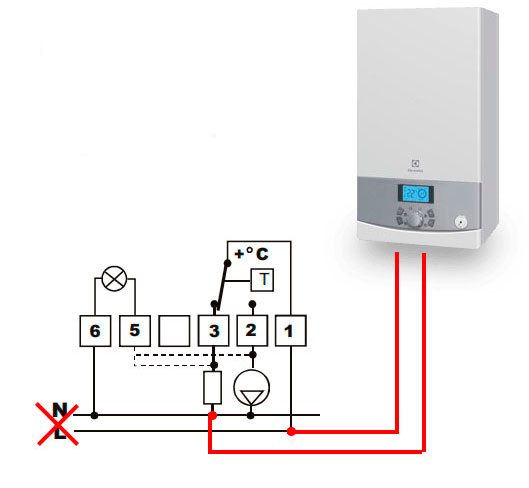
Here is the "usual" Termec wiring diagram.
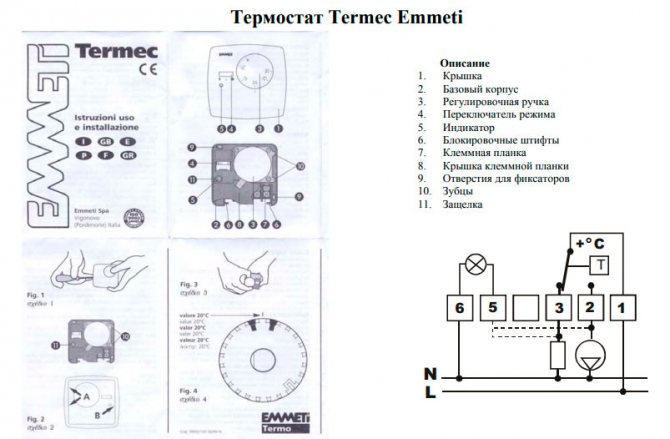
You only need to use normally closed contacts 1 and 3, completely eliminating the change of 220V (L and N).
The built-in sensor will open and close the internal contact when the temperature in the room changes. He does not need any food. In this case, the entire logic of the heating operation is similar to that discussed earlier.
Just remember that almost all mechanical models have a very large hysteresis. You cannot create a comfortable room temperature with their help.

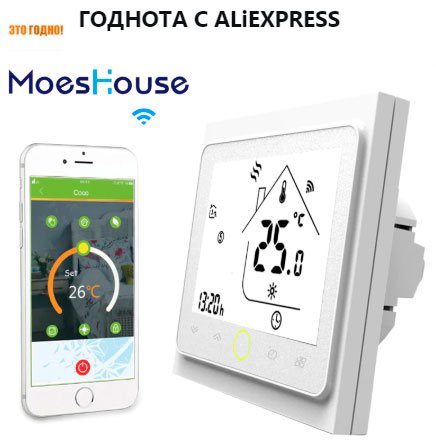
Therefore, whenever possible, choose electronic devices with a WiFi connection. Fortunately, in our time, the Chinese can find very decent and inexpensive options.
For example, such as this one (thousands of satisfied customers and positive reviews).
More details
Some models have contacts labeled NO (normally open), NC (normally closed), and COM (common). Someone advises to connect through them, namely through NC and COM.
However, be careful, the thermostat is the thermostat, and always read the instructions. Through them, an alternating voltage of 220V can also be supplied, and thereby you start a phase on the control board where you do not need it.
Here's a prime example of these multifunctional Fluoreon and Beok controls.

On multifunctional devices, the room temperature is also determined using the built-in temperature sensor.
However, they have terminals on the body for connecting and external (Sensor). It is most often used for underfloor heating.
Place of installation
As you know, the air temperature in a room with traditional heating systems on radiators warms up unevenly. It is lower near the floor, higher under the ceiling.
Based on the presence of a built-in temperature sensor in the thermostats, their installation height is regulated.
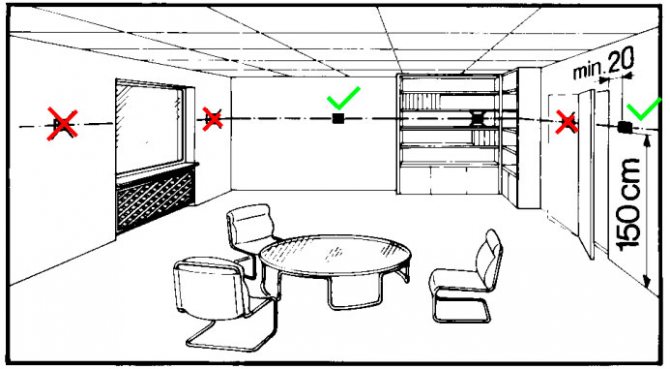
Such thermostats should be placed at a height of 1.2-1.5 m from the floor level and as far as possible from heating sources, including protected from direct sunlight.
It is also not recommended to put thermostats in the hallway or in the kitchen.
Connecting a floor heating thermostat to a gas boiler
Often consumers ask themselves the question, is it possible to use a standard thermostat from heated floors for 220V to work with a gas boiler?
Suddenly you did not find a special thermostat with dry contacts, and you already have a model for warm floors in stock. Such a connection is possible.
However, for this you need to “decouple” the 220V voltage. In most underfloor heating thermostats, it comes to the power terminals and then is removed from the terminals that go to the heating cable. And as mentioned above, when working with a gas boiler, “dry contacts” are used, through which low voltage pulses are transmitted.
If you directly connect the cable from the boiler control board here, you will provoke a short circuit and damage your boiler.

For a safe connection, an intermediate relay or an additional contactor with normally open contacts will have to be added to the circuit.
From the thermostat terminals, instead of the underfloor heating cable, apply 220V voltage to the relay (contactor) coil, and through its normally open contacts (1-2 or 3-4), connect the wires to the gas boiler.

The principle of operation is the same as discussed earlier.However, keep in mind the following feature.
Since this is a thermostat for warm floors, it will most likely work according to the following scheme: air sensor + floor sensor. This means that it will require you to install and set a temperature limit for a floor sensor, which you will not have.
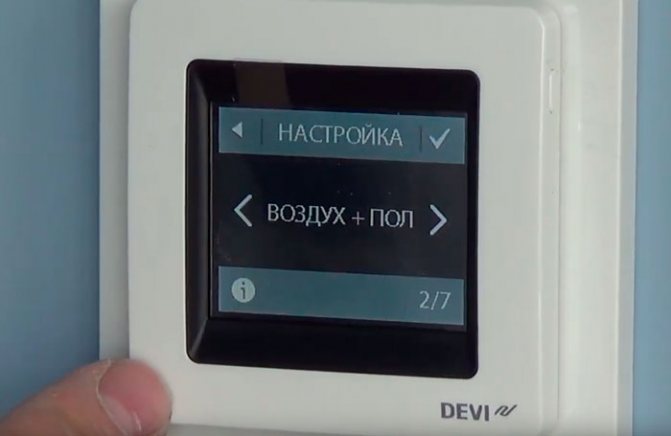
Therefore, in the settings, you will have to untie the floor sensor and leave only the air sensor in operation. How to do this, read the instructions for your model in detail. Different devices may differ.
For example, in Devi Touch, for this you have to break a special jumper on the back side.

In order not to have all these difficulties and problems, it is better to choose the correct thermostat model from the beginning.
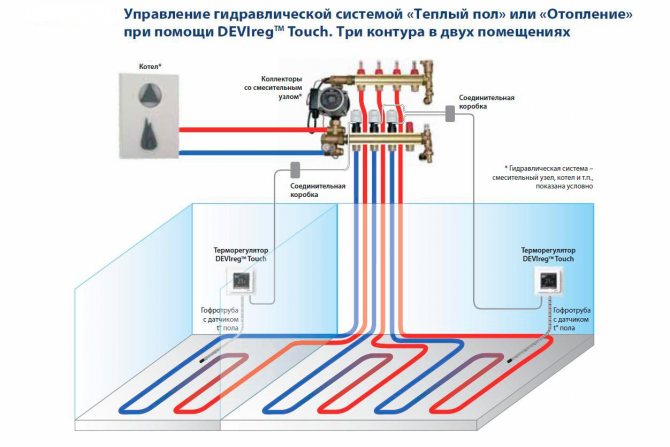
Water floor collector thermostat
If there is a water heated floor in some rooms, which can be powered from the same gas boiler, a slightly different type of thermostat is needed. It must be connected to the servos on the manifold.
The reverse side of such a device looks like this.

If your servo is normally closed, then the cable conductors are connected to terminals 1 (Close or NC) and 3 (N-zero or COM). If normally open - 2 (Open or NO) and 3 (N-zero or COM).
The principle of operation is as follows. When a normally open servo is installed in the system and there is an interruption in the supply voltage on the supply cable, the servo opens the duct. In normally closed, the situation is the opposite.
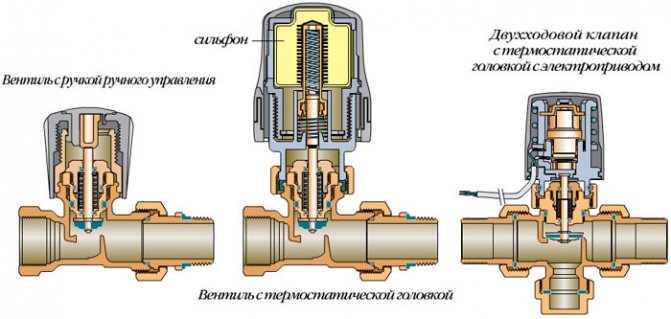
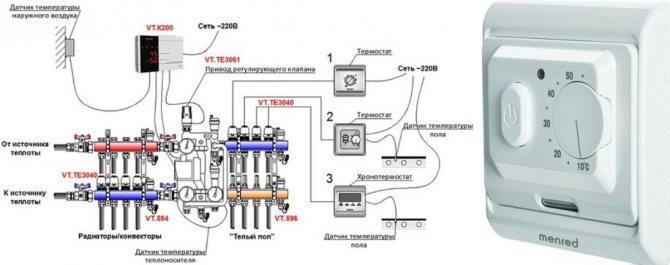
At the same time, do not be confused, this is not some kind of relay or electric magnetic drive, which, when a voltage of 220V is applied, flips and instantly switches to another state. It is a thermoelectric actuator that gradually opens and closes the valve.
Therefore, if you want to test the performance of such a device, do not be surprised that it will not immediately respond to a signal and immediately cut off the flow.
The thermostat power connection is carried out on the L and N strips. The cable for the remote temperature sensor in the floor is connected to the side terminals.
A source
Share the news on social networks
- Similar posts
- Methods for fastening cables, wires, cable channels to the wall - clips of hilti assembly guns
- 5 differences - which sockets and switches are better. How to choose a good brand and firm - legrand, schneider, abb, gira.
- 5 rules on how to choose a good dryer for fruits and vegetables - which one is better than housewives' reviews. Rating and operating errors.
«Previous post
The main criteria for choosing a thermostat
In total, several types of equipment are distinguished according to the principle of their design. Mechanical and electronic, which are connected via a cable, so installation is best done during repair work. Wireless electronic models are much more expensive, but justify their price by functionality and ease of use.
When choosing a thermostat, it is important to consider not only the type of connection, but also the required functionality of the device:
- maintaining a fixed temperature in heated rooms;
- accuracy of adjustment;
- price;
- ease of use and installation;
- compatibility with the existing gas boiler.
When choosing an electronic model, it is better to adhere to the devices recommended by the boiler manufacturer itself. They will be indicated in the technical data sheet for compatibility.
The premium segment includes models with a Wi-FI module and a voice control function. Such devices are used in smart home systems and allow you to control all settings remotely from your smartphone.
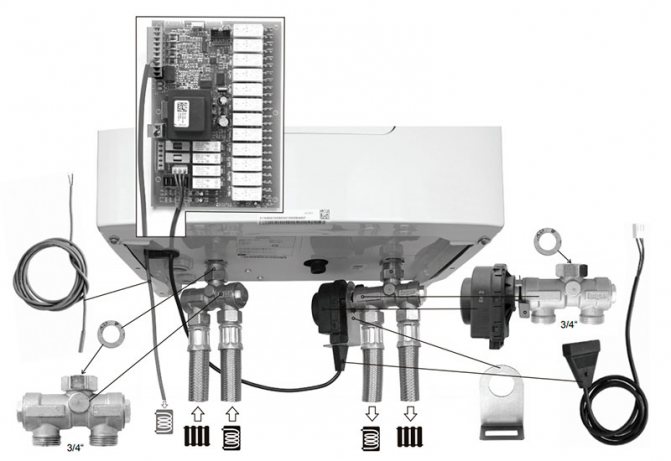
Vilant group Slovakia, spol. s.r.o. Pplk. Plushtya, ...
Page 40
- Picture
- Text
Vilant group Slovakia, spol. s.r.o. Pplk. Plushtya, 45 909 01 Skalica Slovak Republic
www.protherm-ru.ru
Your service:
We reserve the right to make changes

Comments (1)
Highlight → I found instructions for my water heater here! #manualza
- Click →
What's the stupid rule of thumb in the “don't put your fingers in the outlet” guide? Here I shove, but they will not crawl there!
Manualza! Manualza.ru
Still not with us?
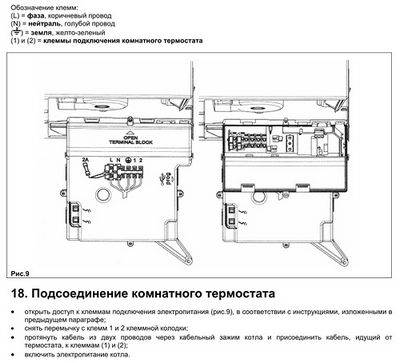
Installation and connection of the thermostat

Modern manufacturers of boilers and various heating systems complete their products with wireless ports or connectors for additional connection of temperature sensors.
There are two basic options for connecting a temperature sensor:
- via the controller cable;
- using a terminal located on the heating equipment itself.
You can easily find out how to connect the thermostat to the boiler from the operating instructions supplied with the device by finding the appropriate section with a detailed description of the installation diagram.
There are some general rules of thumb and requirements for how to install a temperature controller regardless of its functionality. It should be clearly remembered that the correct operation of the entire heating system directly depends on the cooling and / or heating of the thermoelement itself.
The speed of its response is in direct proportion to the speed of temperature changes. Therefore, it becomes obvious that if the thermal sensor is blocked by any objects, then it will respond with a delay to changes in the temperature parameters in the room, and its indicators will become unreliable.
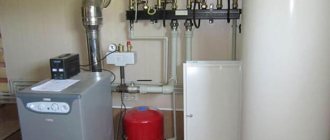
Installing a thermostat on a heating boiler
As practice shows, the thermostat should be installed:
- away from any electrical appliances in order to minimize the effect on the sensor of heat fluxes emanating from them;
- provide free air access to the device itself;
- avoid unwanted closure of the thermostat with heavy curtains or pieces of furniture;
- in the coolest rooms, especially in those where people spend most of their time;
- in places where there is no direct sunlight;
- at points inaccessible to drafts;
- at a height of one and a half meters from the floor, since cold air always concentrates at the bottom, and warm air invariably rises up the room, this rule is especially true if heated floors are installed.
These recommendations must be followed in order to avoid false alarms of the thermal sensor, which will lead to a general incorrect operation of the entire system as a whole.
How to install correctly
Installation of the device is not difficult. The main task is to choose the right place.
Experts recommend placing thermostats in living rooms, avoiding installation in corridors or in the kitchen.
Otherwise, the boiler begins to provide the microclimate of these particular areas of the house, and the temperature in the rooms is set with distortions.
The optimal installation height is considered to be 1.5 m from the floor, away from heating appliances, household appliances that generate heat.
NOTE!
Make sure that there are no drafts in the control area and that there is an even and steady flow of fresh air.

Room thermostat: what benefits do we get from using it?
As promised in the last article, here I will talk about a device that is also called a thermostat, however, in my opinion, it would be more correct to call it room thermostat... Because, unlike those discussed in the previous article, he himself does not mix the coolant with the hot one, but controls other devices, including thermostatic valves.
What is a room thermostat for?
The thermostat allows you to make the operating mode of the heating system the most optimal, thereby significantly saving fuel and electricity, as well as the boiler resource: the boiler will not start when the rooms are already at a comfortable temperature.
Also: if you are not at home all day, then you can program, for example, from 8.00 in the morning to 17.00 in the evening to keep the temperature in the house less, for example, 15 degrees.The rest of the time, when you are at home, from 17.00 to 8.00, program the temperature higher.
With the thermostat, weekly programming can be done. This is convenient if the heating is somewhere in the country house, where they are only on weekends. Then you program on the regulator the time for the system to warm up to a comfortable temperature, say, from Friday evening to Monday morning, and by your arrival on Friday evening the house will become warm and cozy (well, this device does not go to the store, this is its minus ... :))
The principle of operation of room thermostats
The principle of operation of thermostats is quite simple: the contact closes / opens - that's it. And everything else is an external environment, which can be different, adding some programming possibilities, well, and, of course, cost.
Types of thermostats
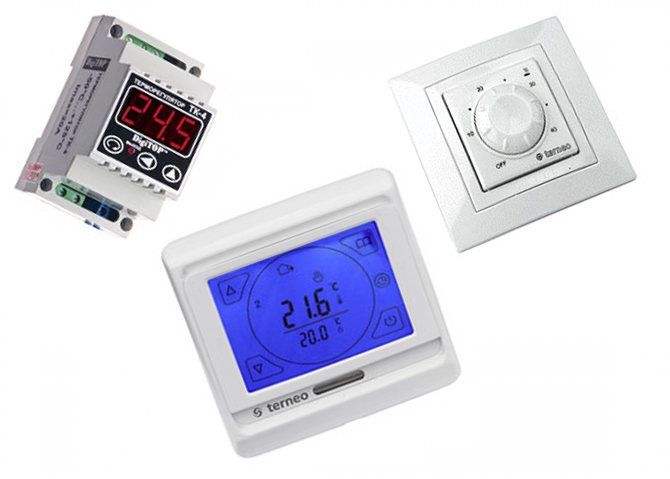
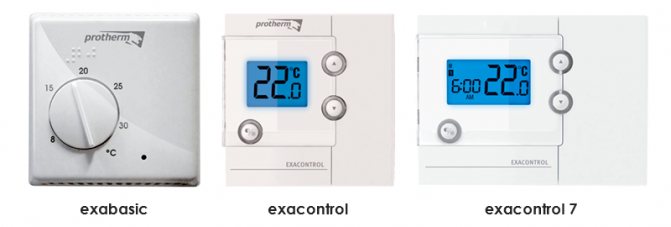
There are many room thermostats produced, it will not be easy to list them all, I believe that manufacturers are not lazy and now and then throw new models onto the market. I will give just a few examples - to give an idea of what this device looks like.
On the picture mechanical room thermostat :
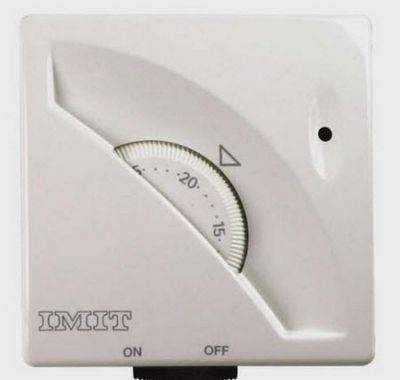
Thermostat (thermostat) room mechanical
This is perhaps the simplest model. Here, the required temperature for a particular room is set by turning the wheel. When this temperature is reached, a contact is closed inside the thermostat, and the signal goes to the actuator, that is, the servo that opens / closes one or another valve.
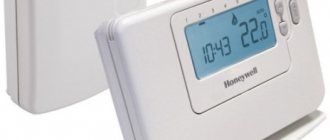
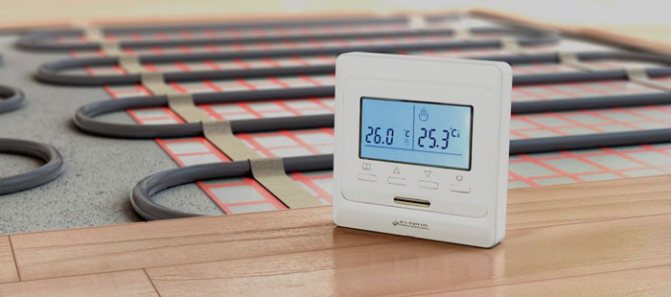
The photo below shows another model of an electronic thermostat:
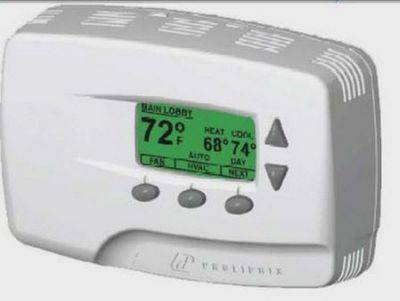
Electronic thermostat with display
Its principle of operation is exactly the same as that of a mechanical one. The only difference is that the set parameters are shown on the display.
Electronic thermostats are more accurate, their error is much smaller than that of mechanical ones.
Electronic thermostats are also different. There are more complex, programmable ones on which you can set daily or weekly adjustments.
Electronic thermostat programmable
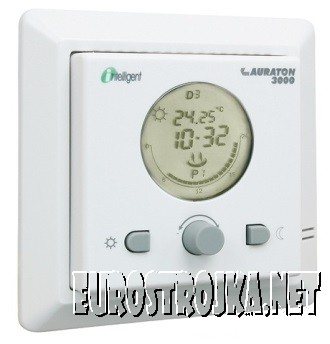
Another electronic room thermostat - AURATON 2005 / AURATON 2005 TX RXPLUS:
This is a pretty perfect thing that allows you to set different modes for the operation of the heating system. The model shown in the photo above is connected to the boiler with a wire, but there is the same manufacturer, but wireless:
- consisting of an executive part, which is located next to the boiler, and a sensor located in the room, where it is necessary to maintain a certain temperature.
How to install a room thermostat?
The way the thermostat is connected depends on whether it is wired or wireless.
Sensor wired thermostat installed in a room where the temperature must be maintained, on the part of the wall where the sun's rays do not fall, at a height of 1.5 m from the floor. A thin two-wire wire is connected to the sensor (there is still an NC terminal to the NO and COM terminals, we leave it empty), which we pull into the boiler room and connect to the boiler, which also has the same marked terminals. The sensor itself is powered by 2 AA batteries, which last for a long time.
Wireless the sensor is good in that you do not need to pull wires from it.
Such a thermostat consists of an executive part connected to the boiler and a sensor that can be moved around the house, the signal from it passes through any ceilings and walls. The wireless thermostat also works from two AA batteries.
The installation consists in connecting the executive part of the regulator (using a relatively short two-core wire) to the boiler in the boiler room and plugging it into a socket. Installing such a thermostat is much faster than a wired one, since there is no need to pull the wire around the house.
Several wireless thermostats can be used in one house - on separate pumps. You just need to configure the signal numbers for the devices so that the signals do not get confused.
How to connect a room thermostat to a gas boiler (burner)?
Almost every automatic boiler has contacts for connecting a room thermostat. At the factory, a jumper is installed there.
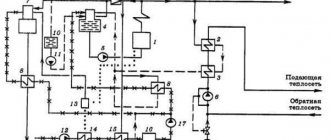
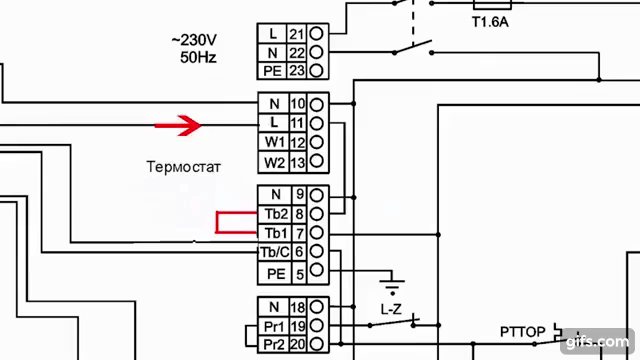
We read in the documentation where there is a place for connection, something like in the diagram:
We find this place in the boiler and remove the factory jumper, after which we connect the thermostat wires - there is nothing complicated about it.
How do I adjust the temperature with a room thermostat? - There are many models of thermostats, there is no talk about all or about any one meaning by buying a device, we read the instructions that come with this model and set it up.
What are the advantages of using a thermostat?
The advantages of using a thermostat - increasing the comfort of living:
- once just set a comfortable temperature and it is stably maintained
- no need to make sure that the boiler temperature is constantly adjusted with changing weather
- no need to turn the valves on the radiators
- no need to specifically turn on / off the boiler
- everything works by itself - depending on the temperature: cold - turns on the boiler, warmer - turns off
- shows the time (I don’t know what the time doesn’t show now), temperature, whether the boiler is on
- easy change of the set temperature, convenience and ease of control
- the ability to set the day and night temperature, which makes heating more economical.
In conclusion, I will add: if you are making a heating system for yourself, then put room thermostat and do not hesitate. Because its use significantly improves the quality of the heating system. Thermostats are suitable for any boilers: both wall-mounted and floor-standing, gas or electric or diesel.
room thermostat
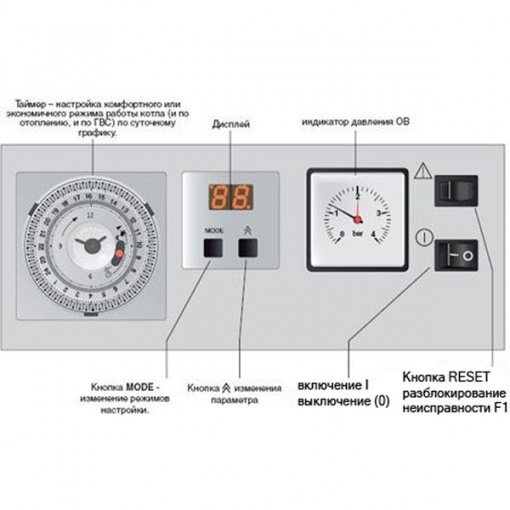
Setting up a gas boiler Proterm Medved
The floor-standing gas boiler Proterm Medved has a simple design. There are models on sale that can only provide heating, and there are those that produce hot water. Depending on the characteristics, the Proterm Medved gas boiler is configured as follows:
- DHW temperature - press the MODE button, the lamp in the upper left corner will start blinking, and another diode will be on in the lower right. Using the button with the image of two arrows pointing upwards, set the required temperature in the boiler in the range of 40-70ºC. Confirm the selected temperature by pressing the MODE button.
- Heat carrier temperature - in the heating temperature setting mode, the lamp blinks in the upper left corner. Using the button with two arrows pointing up, set the required temperature of the heat carrier in the range of 45-85ºC. Press the MODE button to activate the selected value.
The temperature list contains the parameter -. When it is selected, the gas boiler switches to summer mode, when the heating is turned off and the hot water supply mode is working.
When an equithermal temperature regulator is connected to the boiler, additional settings are made.
Even the most luxurious interiors and attractive decor will not delight households if they have to suffer from damp and cold. Agree that a comfortable temperature is the main guarantee of comfort. Therefore, the installation of a Protherm gas boiler becomes the key to the complete improvement of an apartment or house. But how to do it correctly and can you do it on your own?
In this article, we will talk in detail about the features of installing boilers, about the nuances and connection diagrams of popular brand models. Only if the norms and requirements for installation are observed, the brand's gas equipment serves for many years without interruption, providing housing with heat to every house.
Technology
Connection is made with the boiler and thermostat turned off. According to the instructions for both devices, the corresponding jumper is removed in the control board, and the thermostat is connected to the contacts..
Technologically, this process does not represent any complexity, but for an unprepared person who is afraid to get into the complex electronic stuffing of equipment, it may seem impracticable. In such cases, it is necessary to invite a specialist who can carry out a qualified installation and connection of the thermostat.
Usually work starts from the boiler:
- With the unit off, remove the protective cover to gain access to the control board.
- Remove the jumper on the corresponding contacts, according to the instructions.
- Attach the ends of the connecting wire to them.
- The wire is pulled to the place where the thermostat is installed and fixed on the wall.
- Connect the device itself, connect it to the power supply.
- They start and adjust the operating mode.
IMPORTANT!
It is recommended to entrust these actions to a specialist from the service center, otherwise conflict situations and refusal of warranty service are possible.
Which thermostat is better to choose
To make the right choice of a room regulator, we propose to consider the pros and cons of two types of household appliances. Disadvantages of mechanical models:
- low accuracy of the maintained temperature;
- wired connection - the cable will have to be pulled from the boiler room to the desired room;
- lack of various convenient functions available in the programmers.
Note. Judging by the reviews of real owners on the forums, the accuracy of temperature maintenance is not a critical issue and does not bother users too much. Another thing is the wires that need to be hidden under the baseboards, in the grooves of the walls, and so on.
There are also three obvious advantages of bimetallic thermostats:
- low price and availability;
- reliability in work - in the simplest models there is nothing to break;
- simplicity of boiler control with one handle, which is important for elderly homeowners.
The negative aspects of electronic regulators are the higher price, not always clear interface and the need for timely replacement of batteries. Cheap Chinese models have an additional problem - communication failure with the relay unit when the control panel is installed behind 1-2 partitions.
An unconditional plus of digital thermostats is comfortable operation. It is enough to lay down the weekly and daily program of the heat generator once, no more action is required.
In wireless programmers, you need to change the batteries on time
We list a typical set of functions using the example of the Baxi Magic Plus thermostat:
- temperature control range - 5 ... 35 ° С;
- protection against freezing of the heating system, by default it starts the boiler when the dwelling cools down to +3 degrees;
- Backlit LCD display, push-button control;
- shift of temperature sensor readings ± 5 ° С (for an explanation see the next section of the publication);
- 2 operating modes - economical and comfortable;
- hour / daily / weekly programmer.
Reference. Manufacturers often refer to such devices as digital chronothermostats. The weak point of the devices is their low maintainability in the event of a breakdown, especially for Chinese products, for which it is not easy to find spare parts.
Knowing the features of electronic and mechanical regulators, it is not difficult to choose the right model. Focusing on your budget, first of all consider reliable products from European, Japanese and Korean, there are also decent brands, but on average, the quality of the products leaves much to be desired.
Thermostat-programmer for a heating boiler
.
Room thermostat - a device that regulates the operation of a gas boiler depending on the temperature AIR in room. Thermostats, room thermostats - programmers, room temperature sensors - these are all synonyms for the device for adjusting the room temperature using a heating device. The thermostat helps to maintain a comfortable room temperature, save gas and electricity consumption and increase the service life of your heating unit.
But let's start in order - if you have a gas boiler installed, then you regulate the room temperature indirectly (by increasing or decreasing the temperature of the coolant - WATER) in your heating system. The boiler is switched on and off depending on whether the WATER in the heating system has reached the set temperature. When the outside temperature drops or rises, you again need to adjust the heating temperature on the boiler manually. And these manipulations must be done during the entire heating season, when the temperature in the heated room becomes either too cool or too hot.
In this operating mode, very frequent boiler starts occur for a short period of time. As a rule - once every 5-10 minutes for 1-2 minutes of the boiler burner operation. That is, the boiler is constantly working in on-off mode. In this case, the boiler circulation pump works CONSTANTLY, regardless of whether the gas in the boiler is burning or not.
Electricity consumption of a 24 kW double-circuit boiler during the heating period is about 60-90 W / h or 43-65 kW per month.
There can be no talk of any comfort, economy and durability of the gas appliance.
How does a room thermostat work?
You set the required room temperature on the thermostat, for example + 23 ° С. When the air temperature drops by 0.25 ° C (the response threshold depends on the thermostat models), the thermostat gives a command to the boiler to turn on - the boiler starts to work for heating.
As soon as the air temperature in the room reaches + 23.25 ° C, the thermostat turns off the boiler. Moreover, it turns off not only the burner, but also the pump (we start saving).
The air in the room cools down much more slowly than the water in the heating system, and the frequency of switching on the boiler is reduced tenfold, which cannot but affect the increase in the service life of the device.
Now you do not need to adjust the temperature on the boiler manually - once you set it on the thermostat!
It has become warmer outside in winter - the boiler does not turn on, the whole family has gathered in the house, the temperature in the room has risen - the boiler does not turn on, the sun heats the room through the window - the boiler does not turn on, your apartment is inside the house and the neighboring apartments are heating you up - the boiler does not turn on.
Boilers without a room thermostat uselessly consume up to 25-30% of energy, since an increase in the room temperature, above the required one, even by 1 ° C, in addition to tangible discomfort, leads to a significant excessive consumption of fuel by the boiler.
Installing and connecting the programmer to a gas boiler
Let's consider the installation using the example of a programmable thermostat - Auraton 2005.

It is advisable to install a room thermostat in the living room, and not in the kitchen or boiler room. The coldest room in the house or the room where people are most often is the best choice.
ATTENTION: Avoid thermal noise, do not install the thermostat near a heating device, in direct sunlight, near household appliances and in a draft.
Also, do not install the thermostat in a room where there are valves with thermal heads on the heating radiators.

The thermostat switches the boiler on or off using a relay with connection points 1 (N0), 2 (COM), 3 (NC). To control the heating device (boiler), the thermostat is connected to points 1 (N0) and 2 (COM), and to control the cooling, it is connected to points 2 (COM) and 3 (NC).
The way of connecting the thermostat cable to the boiler depends on the brand of the boiler. Usually this is a pre-installed thermostat cable or a terminal on the boiler board (Westen / Baxi), a pre-installed terminal on the body. You can read about this option in the boiler passport.
An example of connecting a room thermostat to Ariston boilers
A jumper is installed at the thermostat connection point, which is removed immediately before connecting the thermostat. Before connecting the thermostat to the boiler board, be sure to read the appropriate section in the instructions for this boiler model.
Example of connecting a thermostat to BAXI boilers
As you can see, the installation and connection of the thermostat is not difficult. To set up a programmable thermostat, use the instructions supplied with the thermostat.
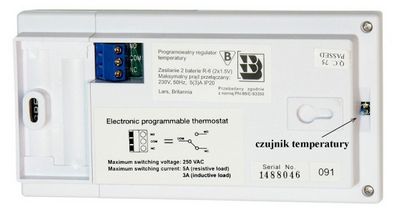
Familiarization with the thermostat
1) Appearance of the thermostat
On the front panel of the thermostat, on the right, you will find a sliding cover, after moving it, you will see 7 buttons. The cover can also be completely removed for battery replacement. After removing the cover
you can see the place for batteries (R-6 cells), as well as 3 microswitches.
1st switch for heating or air conditioning control
2nd switch to control the operation of the original signal with a time delay of five
minutes to prevent “idle” switching on of the actuator, for example, due to a short draft
3rd switch for controlling temperature fluctuations (0.5 ° C or 1 ° C), for example, in case of temperature fluctuations of 0.5 ° C and setting the operating temperature to 20 ° C, the thermostat will turn on at a temperature of 19.75 ° C and it turns off at a temperature of 20.25 ° C. In the event of temperature fluctuations of 1 ° C and the operating temperature is set to 19.5 ° C, the thermostat will turn on at a temperature of 19 ° C and it will turn off at a temperature of 20 ° C.
Buttons located on the left side of the thermostat marked with icons:
- optimal temperature (comfortable warmth during the day)
- economical temperature (at night).
The AURATON 2005 thermostat is a programmable device that provides the ability to automatically adjust the temperature in rooms to the desired level during the day when you are at home, or, in order to save energy, automatically lower it in case of your absence or at night. To do this, adjust the thermostat accordingly, in the memory of which 9 programs are fixed. With the help of the thermostat, you can program the temperature regime with an accuracy of 1 hour, which means that during the day AURATON 2005 can switch day and night temperature modes 24 times, taking into account the 7-day programming cycle - AURATON 2005 provides the ability to switch modes 168 times a week.