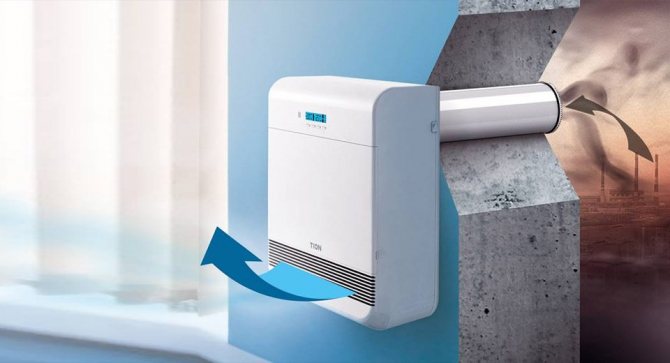
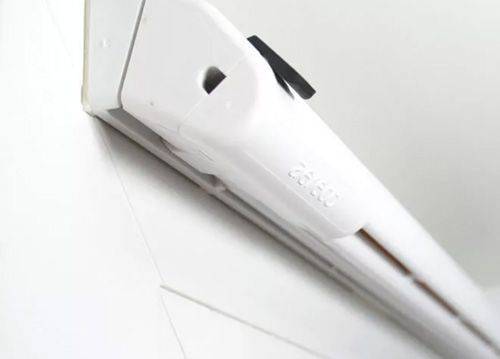
KIV air infiltration valve
The infiltration valve KIV is designed
for supplying outdoor air to rooms in ventilation systems, mainly with forced draft (Statvent).
The KIV-125 air infiltration valve is an independent supply ventilation device
and is not intended for installation in window structures. This allows the valve to be installed on almost any object without affecting the window structure and without affecting the heat engineering, soundproofing and other characteristics of the window structures.
Compared to ventilators and dampers installed in windows
KIV has a number of advantages:
- does not violate the design of the glass unit;
- does not complicate the installation of windows and does not increase their cost;
- can be installed at any time, even after repair;
- Phased installation is possible;
- does not impair the appearance of the window;
- does not clutter up translucent surfaces;
- can be located anywhere on the outer wall;
- KIV valve can be installed in rooms without windows at all.
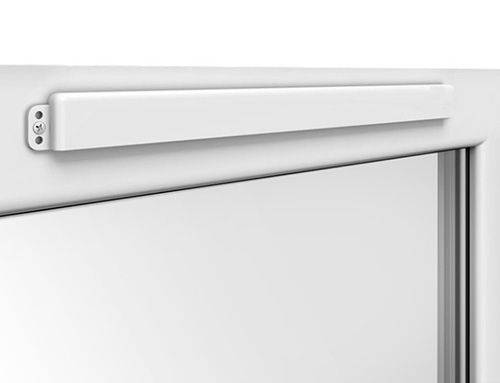
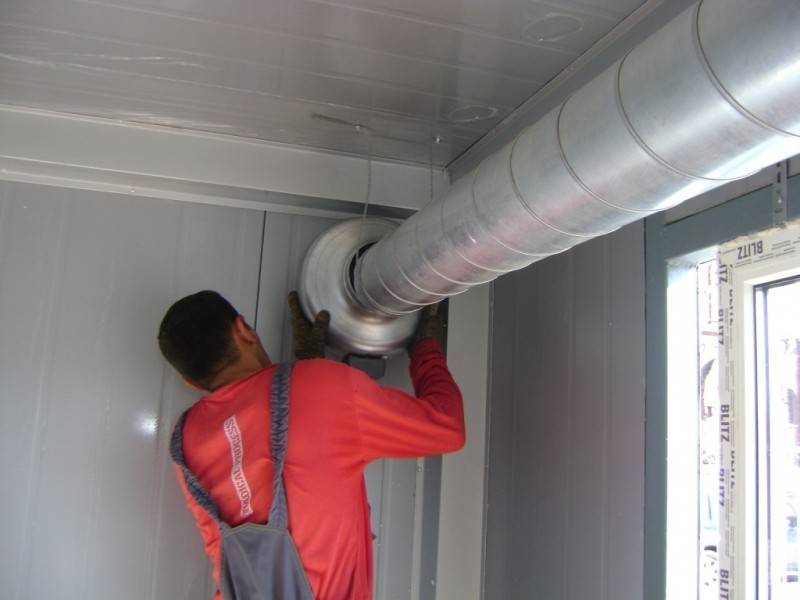
The valve is
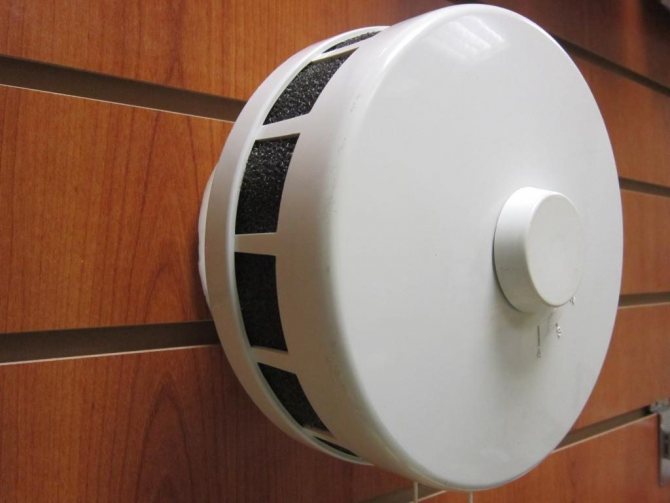
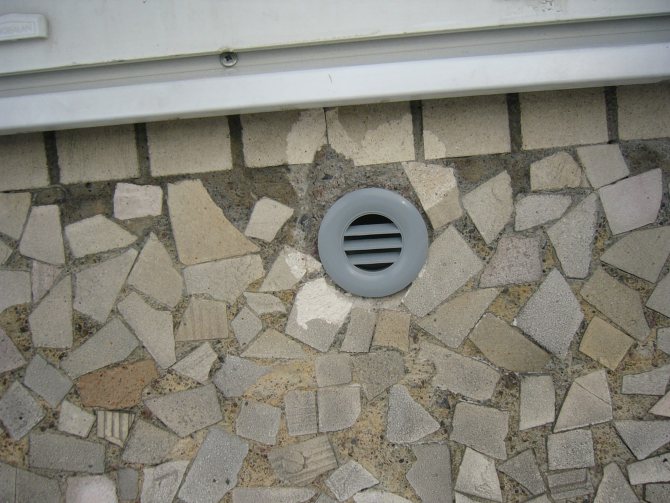
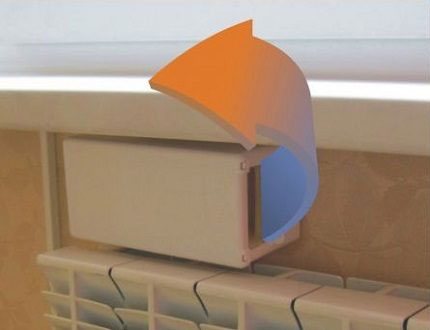
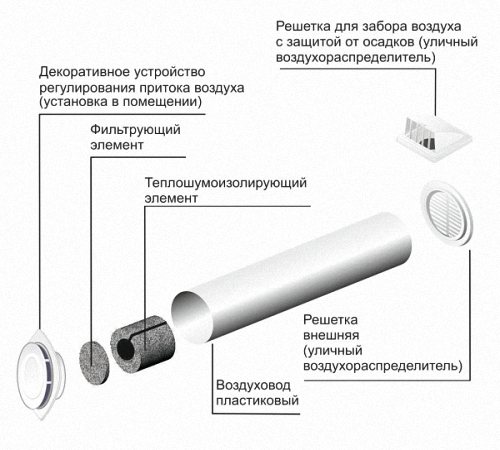
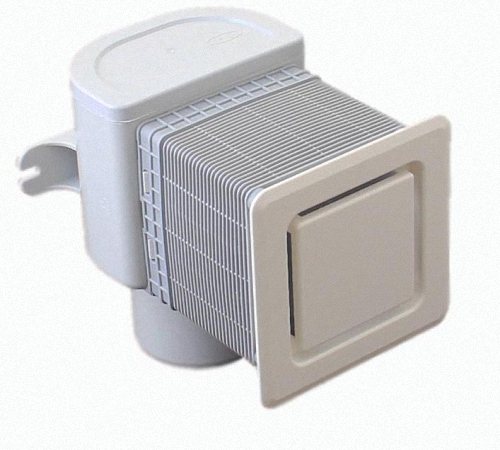
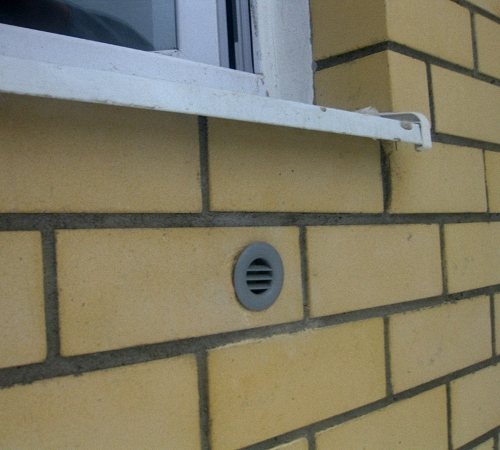
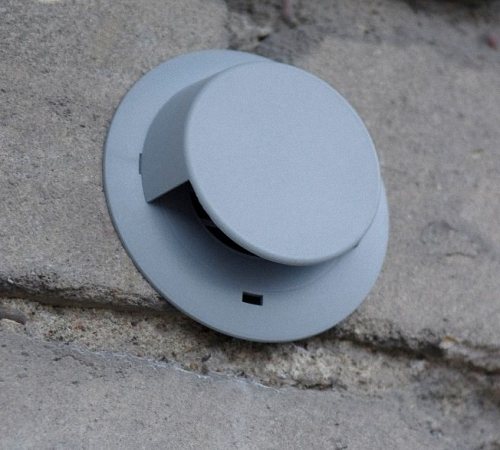
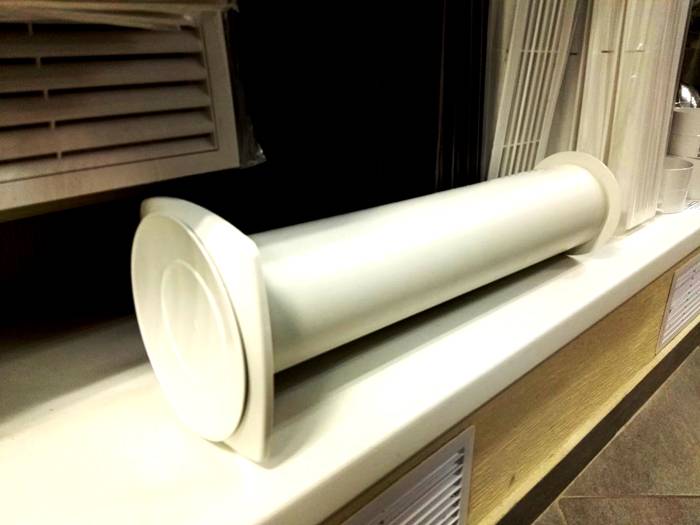
a plastic pipe with an outer diameter of 133 mm and a length of up to 1 m (trimmed depending on the thickness of the wall). The pipe is inserted into the outer wall of the building and closed from the street side with a cast aluminum grating with mesh. Heat and noise insulation is located in the pipe. Inside the room, a special head made of white plastic is installed with a filter and a damper that allows you to regulate the air flow. The damper can be opened and closed using the handle on the head or a special cord if the valve is located high. During the operation of the KIV supply valves during the winter period, condensation does not form on them due to the special design and the presence of good thermal insulation in the valve elements.
We can say that the KIV 125 is a version of the modernized window. The outer grill with a net retains foliage, poplar fluff, insects. Thermal and noise insulation prevents the "spreading" of cold in the thickness of the wall and reduces street noise. A flap in the valve head controls the amount of air supplied.

How to choose the right supply valve
When choosing a ventilation valve for PVC windows, it is necessary to take into account a number of technical characteristics of the device and the budget for the purchase. A good unit should operate on an air flow of at least 30m3 / hour per person. It should also provide a minimum noise level in the room within 35 dB. Comfort during operation depends largely on the way the air flow is regulated. An automatic valve on PVC windows is more convenient in this regard.
Such devices are produced by brands from Germany, Poland, Britain and Russia. Imported valves for ventilation windows are more expensive and technically complex. Russian factories offer affordable samples, both mechanical and automatic. Therefore, if there is a goal to save money, take a look at domestic brands.
Valve installation
Where is the KIV valve installed?
- In living rooms;
- In rooms with a constant presence of people;
- In rooms with a fireplace;
- In boiler rooms;
- In other rooms where an outside air supply is required.
Where to locate the KIV valve.
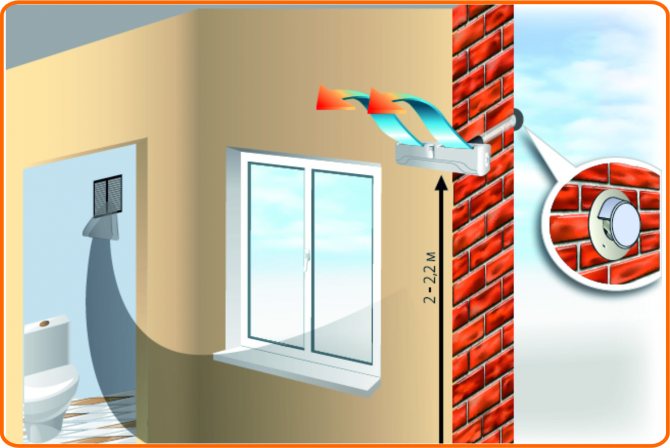
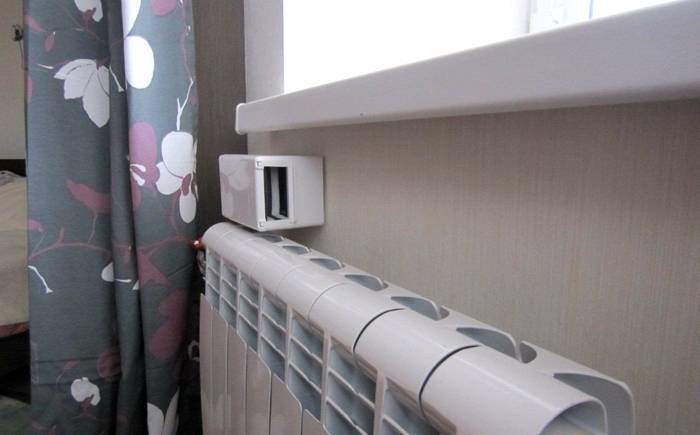
The KIV valve should be installed in the wall. Preferably above a window or next to a window at the level of the upper third of the window. So, how is the valve:
- falls into the range of the heater;
- not visible behind the curtain;
- air circulation in the room is improved due to air convection during the operation of the heater;
- it is convenient to service the external grille through the window.
Where KIV should not be installed.
KIV should not be installed in rooms where odors, moisture and other hazards are emitted. An exhaust hood should be made from these rooms:
- kitchen;
- bathroom;
- smoking room;
- corridor;
- premises where harmfulness is formed.
If you still need to install KIV in a room where odors or moisture are emitted
, then it is necessary to ensure the excess of the exhaust over the supply in this room and the valve should be located as far as possible from the exhaust grilles to avoid "looping" the flow.

Preparing to install the wall valve
With some repair skills, you can install the supply valve in the wall with your own hands. This will require a little preparation and calculation.
The best place to install a wall valve for fresh air ventilation is under the window sill above the radiator. In this case, the air from the street will be additionally warmed up by a radiator and there will be no drafts in the room during the cold season.
In addition, under the windowsill, the valve will be less noticeable, especially if there are light curtains on the windows. Another plus - the wall for the radiator always has a window opening niche, which means that in this place it will be thinner and it will take less time and effort to create holes.
If for some reason this arrangement is not suitable for implementation, the valve can be installed anywhere on the wall facing the street. The main thing is to choose such an arrangement so that the device looks appropriate in the interior and its installation does not cause big problems. The issue with air heating in winter can be solved by purchasing a model of the device with this function.
It is worth taking care of the outflow of incoming air from the room. If the interior doors do not have a gap above the floor, the air from the valve will not pass into other rooms and be drawn into the ventilation duct. Therefore, it is worth replacing the door or mounting small holes with decorative flaps directly in the canvas.
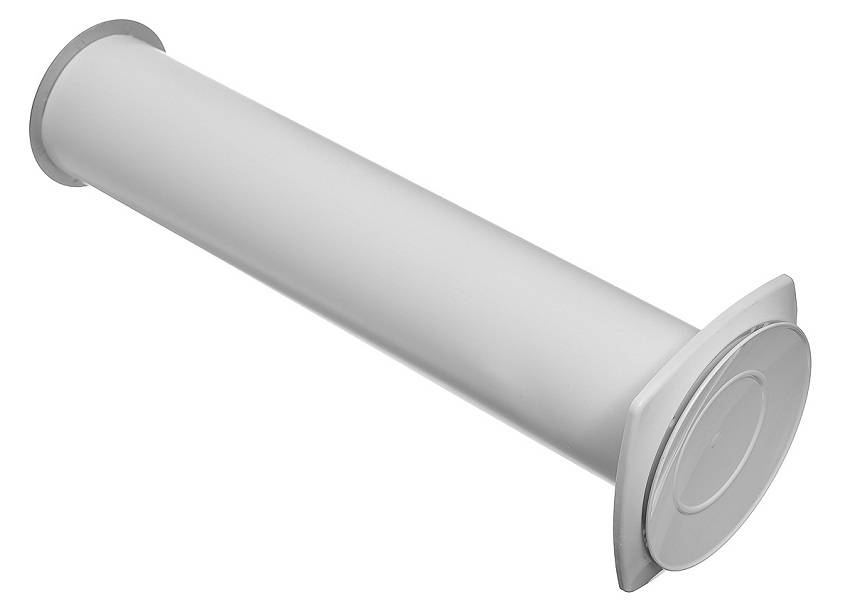
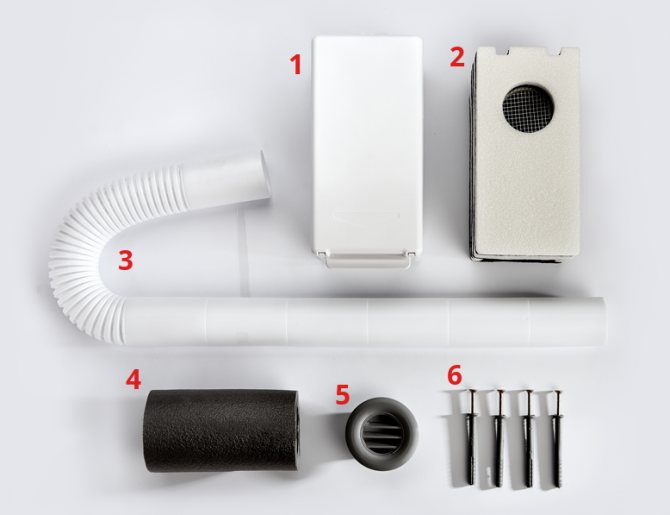
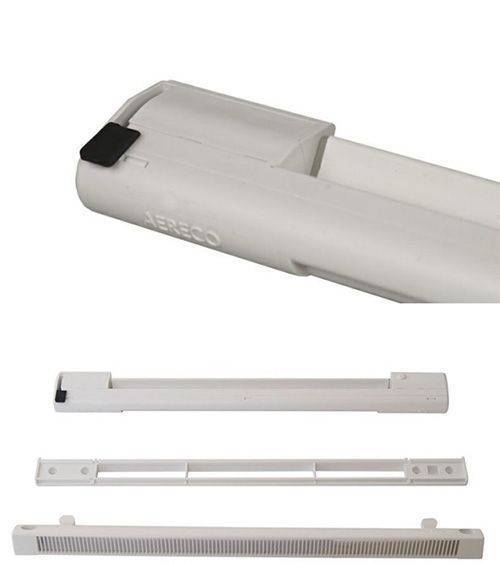
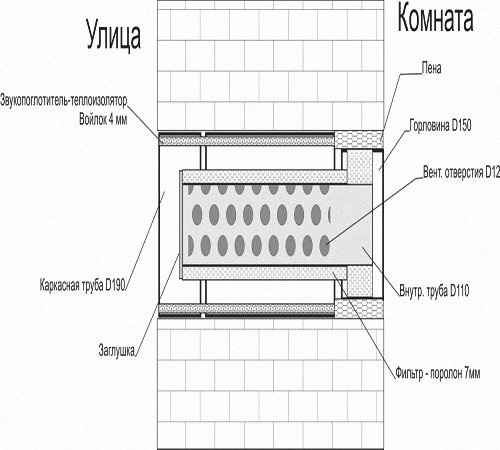
Plastic channel (pipe)
The plastic channel (pipe) is intended
for the passage of air from the outer grille to the inner head. Inside the pipe there is heat and noise insulation, which performs two functions:
- preventing the "spread of cold" from the plastic channel to the inner surface of the wall;
- absorption of noise passing through the channel. When installing KIV valves in living rooms, thermal insulation absorbs most of the street noise that enters the plastic channel. When installed in a boiler room of a country house, thermal and noise insulation absorbs the noise of a working boiler and maintains silence around the house.
The standard length of the plastic channel is 1000 mm.
The channel can be cut depending on the thickness of the wall into which it is installed.
The standard length of heat and sound insulation is 312 mm.
If the length of the channel allows, then it is possible to increase the length of the heat-and-noise insulation, which will additionally increase the noise-absorbing properties.
When installing the KIV valve, heat insulation should be placed
from the inner side of the wall close to the KIV head or (60 mm from the channel edge).
Criteria for the correct selection of a supply valve for windows:
The AERECO ventilation supply valve can be viewed, on the one hand, as a window accessory along with a mosquito net, window sill, blinds, etc., and on the other, as ventilation equipment.
| Criterion name | Installation of a ventilation valve for supply ventilation AERECO EMM | Installation of a ventilation valve for supply ventilation AERECO EHA2 | Installation of a ventilation valve for supply ventilation SCHUCO CORONA VENTO | Installation of a ventilation valve for supply ventilation AIR-BOX COMFORT |
| Minimum productivity | 5m 3 / h | 5m 3 / h | 4m 3 / h | 5m 3 / h |
| Maximum productivity | 35m 3 / h | 35m 3 / h | 4m 3 / h | 42m 3 / h |
| Soundproofing | up to 37 dB | up to 42 dB | up to 32 dB | up to 32 dB |
| Influence on illumination during valve installation | not | not | not | not |
| Governing bodies | there is | there is | not | there is |
| Design | overhead | overhead | hidden | overhead |
| Insect protection | there is | there is | not | not |
| Installation of aerodynamic air flow stabilizers and wind gusts blockers | there is | there is | not | not |
| Supply valve for windows price | from 3,000 rubles | from 3 900 rub. | RUB 500 | RUB 600 |
| Valve installation, price | RUB 1,500 | RUB 1,500 | 800 RUB | 800 RUB |
| Low temperature performance | Yes | Yes | Yes | Yes |
| Ease of use | Yes | Yes | Yes | Yes |
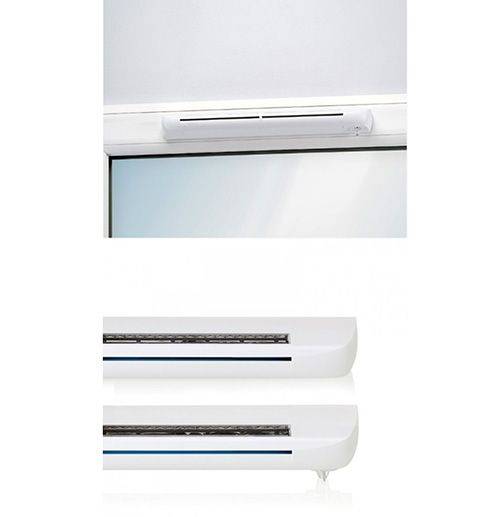
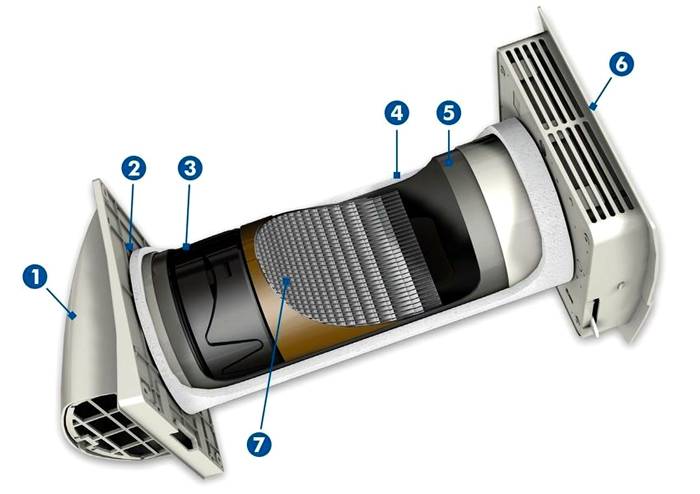
Internal head
The inner head of the KIV valve is designed
for air distribution and regulation. It is made of shockproof ABS plastic that is resistant to temperature extremes and UV radiation.
The inner head consists of:
- inner part with flap and sealing ring;
- adjustment unit;
- filter;
- head covers;
- adjusting knob.
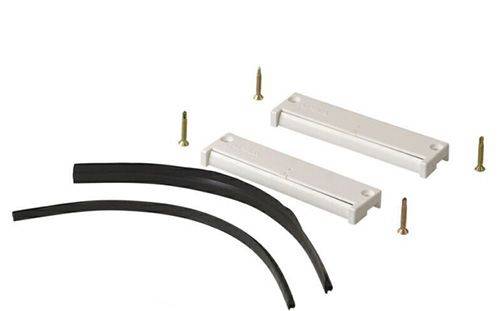
The inner part of the head is tightly inserted into the plastic channel and is screwed to the wall through a sealing gasket.
The adjustment knot allows the shutter to be opened and closed using a handle or cord.
The filter of class EU3 (G3) is a porous washable synthetic material that effectively cleans the incoming air from dust.
The removable head cover has a scale indicating the degree of opening of the damper.
With the help of the adjusting handle, you can easily open and close the KIV damper.
What is Wall Ventilation Valve
One of the fundamental features of inversion work a href = "/ ventilyatsia / klapany / klapan-kiv125-1000mm"> KIV-125 is the mandatory presence of exhaust ventilation to remove used air. The valve is based on a plastic pipe, which communicates with the outside atmosphere through a technological hole in the wall. The circulation of air masses occurs due to the difference in pressure inside the room and outside. In the absence of ventilation ducts, the device will not be able to work efficiently enough.

Noise reduction by KIV valve
| Distance from the KIV head, m | Decrease in sound pressure level (dL, dB) in 1/3 octave frequency bands, Hz | |||||||||||||||||||||||
| 50 | 63 | 80 | 100 | 125 | 160 | 200 | 250 | 315 | 400 | 500 | 630 | |||||||||||||
| 0,1 | 14,1 | 18,7 | 22,0 | 26,9 | 27,9 | 28,7 | 30,9 | 31,7 | 28,8 | 29,8 | 30,6 | 32,5 | ||||||||||||
| 2,0 | 26,2 | 31,3 | 34,4 | 39,7 | 41,6 | 41,9 | 45,5 | 46,2 | 44,8 | 45,1 | 46,4 | 48,7 | ||||||||||||
| Distance from the KIV head, m | Decrease in sound pressure level (dL, dB) in 1/3 octave frequency bands, Hz | |||||||||||||||||||||||
| 800 | 1000 | 1250 | 1600 | 2000 | 2500 | 3150 | 4000 | 5000 | 6300 | 8000 | 10000 | |||||||||||||
| 0,1 | 34,5 | 36,2 | 36,3 | 36,1 | 37,7 | 39,3 | 40,3 | 39,7 | 39,6 | 41,6 | 41,6 | 41,8 | ||||||||||||
| 2,0 | 50,3 | 49,0 | 50,0 | 49,7 | 50,9 | 54,0 | 56,8 | 55,2 | 54,8 | 55,4 | 55,5 | 55,1 | ||||||||||||
The studies were carried out with an open flap in the valve head. Reduction of the white noise level dL, dBA is 38.9 at a distance of 0.1 m and 53.3 at a distance of 2 m from the KIV. Reduction of the level of reference traffic noise dL, dBA is 33.6 at a distance of 0.1 m and 48.6 at a distance of 2 m from the KIV.
Pros and cons of using
The main advantage of this valve is the comfortable ventilation of the room, without having to open the window. In modern plastic windows, as a rule, a whole window sash opens to a certain angle, which creates draft phenomena and brings a number of undesirable factors:
- Too much air flow;
- It is impossible to control the supply of fresh air;
- Drafts;
- A sharp change in room temperature;
The KIV-125 damper completely eliminates these problems, allowing you to control the microclimate in the room, and provides a stable flow of fresh air, simultaneously with the removal of humid vapors and stuffiness. Thus, the room will always have the same temperature, clean air without drafts.
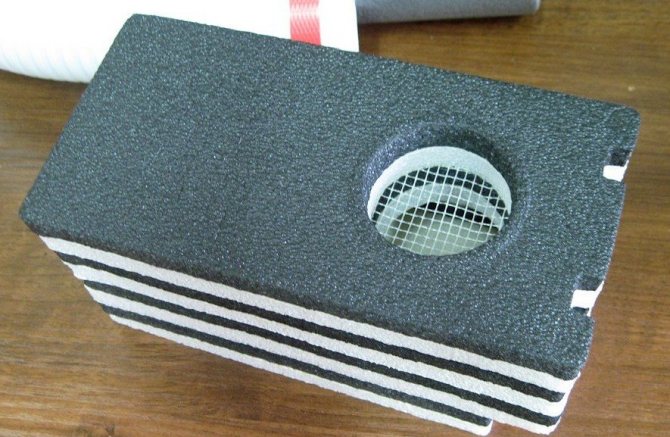
How to make an inlet valve into the wall with your own hands
To make a simple device you will need:
- grill from the bathroom or sink;
- filter (a piece of foam rubber);
- insulation;
- plastic pipe;
- valve.
The plastic pipe will be an air duct, the piece should correspond to the thickness of the wall (a small margin can be provided).The optimum tube diameter is 10 to 12 centimeters.
Too large diameter can lead to significant heat loss
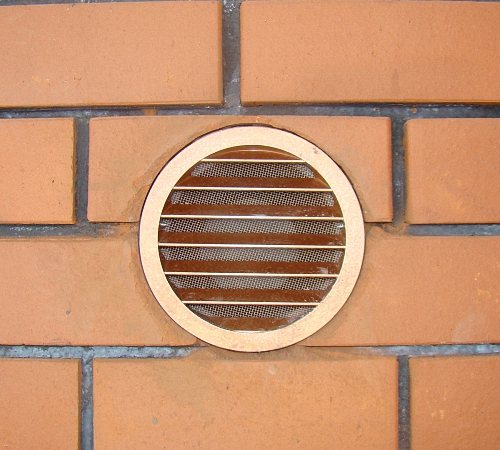
- A grid is fixed on one side of the tube; this will be the outer part of the device.
- A rolled-up insulation (mineral wool, expanded polystyrene) is inserted inside the tube. For this purpose, you can use pipe insulation. The thickness of the layer should be about two centimeters, this is enough to prevent freezing.
- Next, a foam filter is inserted into the tube.
- The last step is to install the valve. You can make it yourself or purchase a finished product at any ventilation equipment store.
A grill with movable blinds can be an alternative to the ventilator. They can be manually closed and opened if necessary.
Related article:
Supply ventilation in the apartment with filtration. In our review, you will learn the principle of operation of the device, varieties, step-by-step installation technology with photos and videos, useful tips and tricks.
Firms manufacturers of supply valves and an overview of popular models
The most popular devices in this category today (according to online consumer reviews) are: Aereco, Regel-Air, Air-Box and Aeromat.
| Illustration | Name | Description |
| Aereco | ||
| Aereco EMM series | The supply valve of the EMM series aeroeco has a moisture sensitivity and a hygro-regulator. The direction of the air flow can be inclined or vertical, depending on how the device is fixed. Has two modes of operation, providing minimal ventilation or intuitive automatic. |
| Aereco EHA series | Equipped with a hydraulic regulator and a set of acoustic accessories that provide high-quality sound absorption. |
| Aereco EHA2 series | Has soundproofing properties. Works in three modes - minimum, automatic and maximum. |
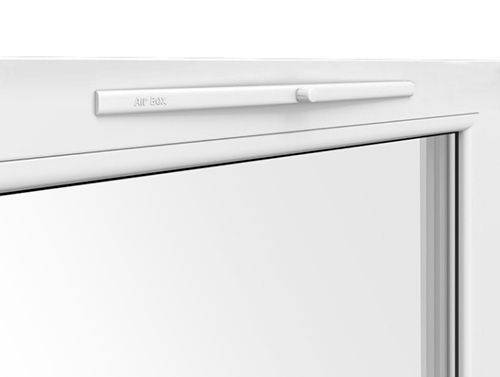
| Air Box | ||
| Standart | The installation of two valves assumes a window width of 500 mm. |
| Comfort | Many people advise buying an Air Box Comfort supply valve, the price of which starts at an average of 500 rubles. There are two ways to fix the product. The milling method assumes the presence of a ventilation duct in the upper part of the sash, which is previously cut or drilled out. With this method of installation, the device works twice as efficiently than with standard fixation. |
| Comfort-S | The product is installed at the factory. |
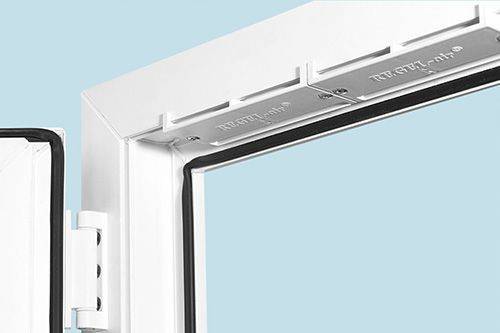
| Regel-air | ||
| Devices of this brand are affordable. They are characterized by hidden installation, maintainability, maintaining the sound insulation of the room at the proper level. | |
| Aeromat from "Siegenia" | ||
| The high cost of these devices is justified by the maximum heat retention and noise insulation of the room. |
Climate
28 votes
+
Voice for!
—
Against!
If there is a lack of fresh air in the house, the microclimate is oversaturated with vapors and odors from the kitchen, and excess dampness condenses on metal products and window panes, then ventilation must be added. To do this, you will need to additionally install a ventilation inlet valve into the wall. This simplest device, working autonomously, has a number of advantages, providing additional portions of fresh air even in a house where windows and doors are closed.
Table of contents:
- Additional ventilation system properties
- Equipment selection
- Preparing the room for the installation of the ventilation valve
- Supply valve selection
- Features of installation of supply ventilation valves
Additional ventilation system properties
People with good health do not always pay attention to the fact that the house is stuffy and there is not enough oxygen, and an excess of moisture does not allow breathing normally. Children and weakened people suffer the most from a lack of oxygen, but stale air is of no use to anyone.And if in the summer most people use open vents or transoms, then the minimum winter ventilation provided for plastic windows is not enough.
A wall vent is usually installed in the kitchen, especially if there is no extractor hood above the stove. If the window is opened periodically, and other ventilation is not enough, then the air is "heavy" or musty, everything is saturated with kitchen smells, condensation on the glass. In such conditions, dampness starts in the house, and even clean woolen clothes seem damp in the morning, and synthetics are saturated with smoke, fumes and house odors.
Keeping the window open all the time is also not always convenient - cold air and noise from the window penetrates, especially when the house is on the highway. In apartment buildings, general ventilation is provided, and in private houses it can be successfully replaced by local ventilation, supplemented by a plastic ventilation valve. A good ventilation system will provide:
- oxygen supply;
- increased air circulation;
- air flow adjustment;
- will bring the musty air out.
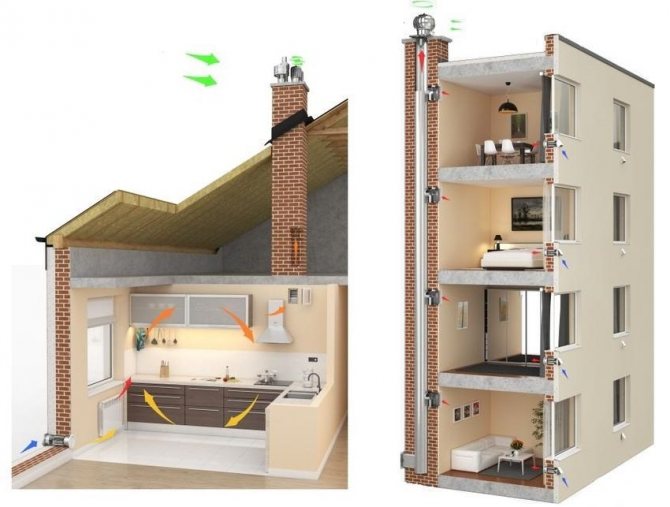
Today, several types of ventilation valves are on sale for an additional flow of fresh air, which is easy to install in the house with your own hands. A supply ventilation valve (from the word "inflow" of air) can be installed in an apartment or in a house. This device functions autonomously, without electricity, allowing slightly heated air from outside to enter the dwelling, but does not allow precipitation and environmental pollution, insects, allergens and noise from the street to pass through. The valve is installed using common household tools - during construction, renovation or completion. You can mount it:
- directly at the heating system;
- at the ceiling;
- in a space where the most stagnant air (pantry, bathroom, corridor near the kitchen).

Tip: Apartment buildings are usually equipped with ventilation. But if there is high humidity in the apartment or offices on the ground floor, then it is worth installing a supply valve in the room farthest from the ventilation shaft near the central heating battery. It will not be visible behind a window shade or under blinds, but it will significantly change the situation for the better. It is also worth monitoring the temperature in an apartment with high humidity - the colder, the more dampness is felt, the more likely the appearance of mold and fungi.
Equipment selection
A plastic vent is the easiest way to provide additional air circulation. There are valves for installation in the wall of the house under the window at the radiator and a valve for winter ventilation for windows.
Attention: The tightness of the window can easily be broken if the window valve is incorrectly installed, at the same time losing the right to the manufacturer's warranty service. It is difficult to mount a KMV or KPV valve into the wall - because of the drilling of a hole, but for self-arrangement of supply ventilation this is the most acceptable option.
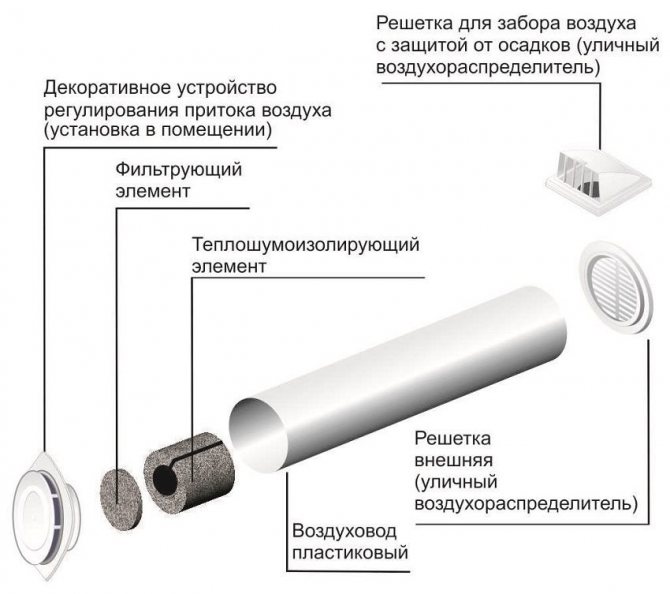
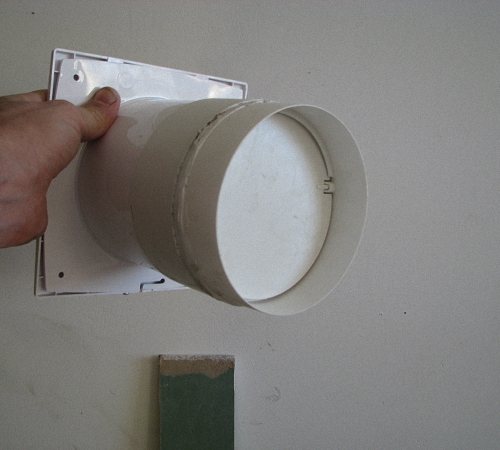
Valve device:
- decorative cover for indoor installation, which regulates the air flow;
- filter washer;
- soundproofing unit;
- plastic cylinder-air duct;
- external diffuser grille;
- closed external valve with protection against precipitation.
When choosing a model of a supply valve, it is imperative to find out the temperature range that is permissible for its full functioning, the dimensions of the cylinder and outer covers. It is imperative to clarify whether the length of the cylinder (internal block) is enough to pierce the outer wall of the house through and through. And the size of the ventilation valve cover must be suitable for placement between the heating radiator and the window sill.
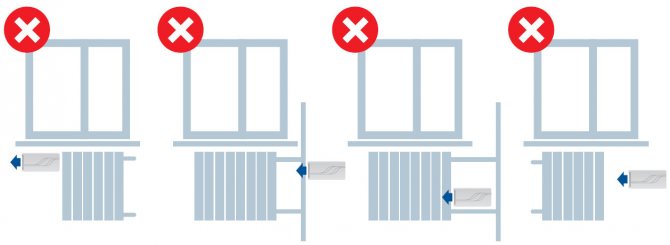
If the heating is weak, then in cold climates the volume of fresh air entering through the wide valve may be too much, and it will not have time to warm up.On the other hand, if there is too little air coming from the forced ventilation, then sometimes 2 valves have to be installed.
Advice: With a large equipment capacity and without a control system for valves with a switch, it is undesirable to place them on opposite walls. This can lead to drafts in winter, when the difference between indoor and outdoor temperatures makes the ventilation to function most actively.
It is also important to think about cost issues in advance. If you buy a domestic ventilation valve, the price ranges from 1.5 to 3 thousand rubles. The price of an imported device for forced ventilation can be offered 1.5 - 2 times more expensive. If you hire a foreman with a tool, he will deliver it in 30-45 minutes, but for this you will have to pay extra for installation work at least half of its cost. If you decided to buy a ventilation valve in the wall in an imported version, you should try to save money when you install it yourself.
Preparing the room for the installation of the ventilation valve
For the full functioning of ventilation in the house, an additional flow of air is required, for example, through a special valve or other ventilation means (open transoms, vents). Before installing the supply ventilation valve, it is important to check in the building how the general ventilation system works, it must be provided. To check the ventilation, they open the windows and bring a sheet of paper to the ventilation grill - it should "stick", that is, it should be pulled into the niche. When dealing with the arrangement of ventilation at home, first of all, it is worth cleaning the general ventilation.
Caution: It is not recommended to check ventilation with a candle or a match, although it is effective. If the house uses gas heating, then an open flame provokes an emergency! This is especially facilitated by gas leakage during strong gusts of wind and open fire near the ventilation shaft!
It is most convenient to install supply ventilation in an apartment on the upper floors on the balcony. A ventilation valve or monoblock is a compact way of providing ventilation, which is complemented by an internal soundproofing pad, filter and mosquito net. The outer part is completed with a device (rain protector) so that precipitation does not fall through it.
Attention: During installation, you must correctly mount the system - with the socket downwards, moisture should not accumulate there.
1. Individual valve installation is applicable for one room, because it has a small flow capacity. The main advantage is ease of installation.
2. The duct installation assumes an air supply network with the installation of ventilation grilles. The main disadvantage is that it is important to think over the location so as not to spoil the interior design without compromising the full functioning of the system.
For the installation of additional ventilation, 2 types of supply valves are used with the same function - starting fresh air into the room. The KPV 125 damper differs from the KIV 125 only by the marking and some details of the external plugs.
Supply valve selection
KIV 125 (air infiltration valve) or KPV 125 (forced ventilation valve) are installed in the wall. Both models are similar in functionality. The design is cylindrical, which is selected slightly wider than the wall in order to fix the covers at both ends. Visually, only the head with the traction force regulator inside and the rain damper outside will be noticeable. Inside there is a soundproofing seal with air holes and filters with grilles. The switch is designed to regulate the intensity of the outside air entering the room. It can be opened completely or completely shut off the air supply for a while.
The main advantages of the infiltration valve:
- works autonomously, control is not required;
- does not spoil the look of the interior;
- do-it-yourself installation of the checkpoint is available;
- installation is possible both before and after repair;
- the air from the valve is warmed up near the radiator (battery);
- effective for filtering air coming from outside;
- does not let insects through;
- retains dust, fumes and other fine suspension from the street.
KIV is most often used in a house where a general forced ventilation system is already provided, and the valve serves to supply fresh air. It does not have a significant effect on temperature reduction in heated rooms if it is installed directly next to central heating radiators. The valve is somewhat similar to a mini-window with filters and a grill, but without glasses. It can also be installed in rooms without windows or radiators, such as a storeroom or hallway.
If the cylinder valve is too long, it is trimmed from the outside and closed with a grid with a mesh. The part that goes into the room should have heat and sound insulation, as well as a filter, which is covered by an aesthetic plastic head with a damper and a regulator.
The outer funnel contains a grill and inclined louvers for protection from atmospheric precipitation, and a fine mosquito net protects against the penetration of all types of insects. Nets and grates keep flies, spiders and mosquitoes, as well as poplar fluff, pollen and other allergens, which usually enter the apartment through open windows, without hindrance. The valve has also been successfully tested for noise protection and temperature threshold reduction.
The base of the valve can be cut, depending on the thickness of the walls where it will be inserted, but the standard format of the plastic cylinder of the supply valve is in the range from 40 cm to 1 mm.
The soundproofing layer is placed on the inside of the wall, always close to the external regulator. The internal air flow regulator or cap is made of impact-resistant white plastic. It is resistant to temperature extremes and consists of:
- regulating unit;
- washable replaceable filter;
- outer cover;
- knobs-regulator;
- gaskets and gaskets for thermal insulation.
This head in the design of the cylinder is quite tight, and the valve is fixed by means of screws to the wall - behind the holes of the seal. Details can be found in the instructions supplied with the valve upon purchase. The intensity regulator can be closed with a handle or with a cord.
Features of installation of supply ventilation valves
Before installing the ventilation valve, it is important to choose the right place:
- it should not be conspicuous;
- it is desirable that the air supplied from the outside has additional heating along the way;
- usually mounted in a load-bearing wall;
- it is undesirable to install with access to a zone with an unfavorable environmental situation and in the direction of the industrial zone;
- in a multi-storey building, it is most convenient to mount a valve with access to a loggia or balcony.
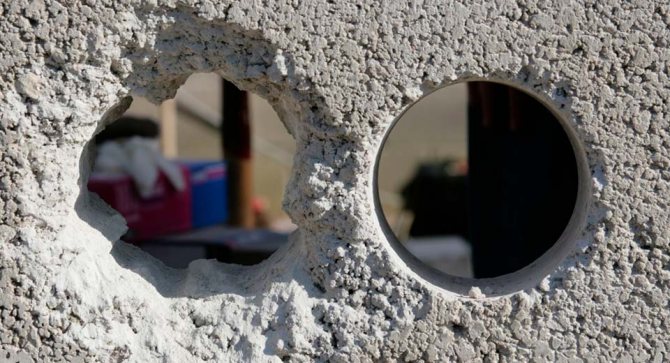
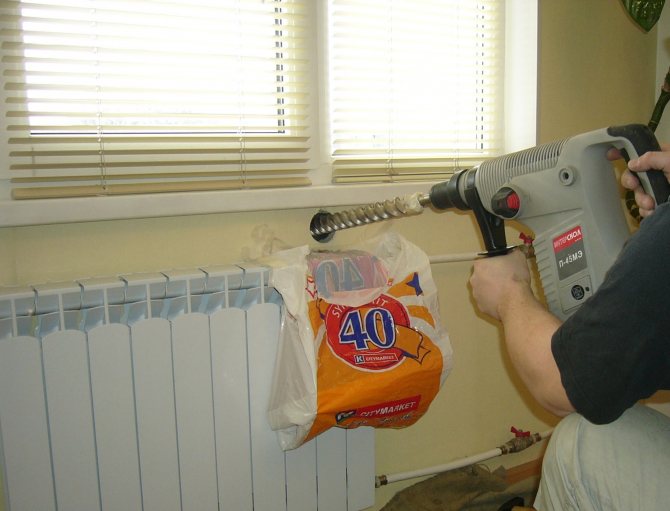
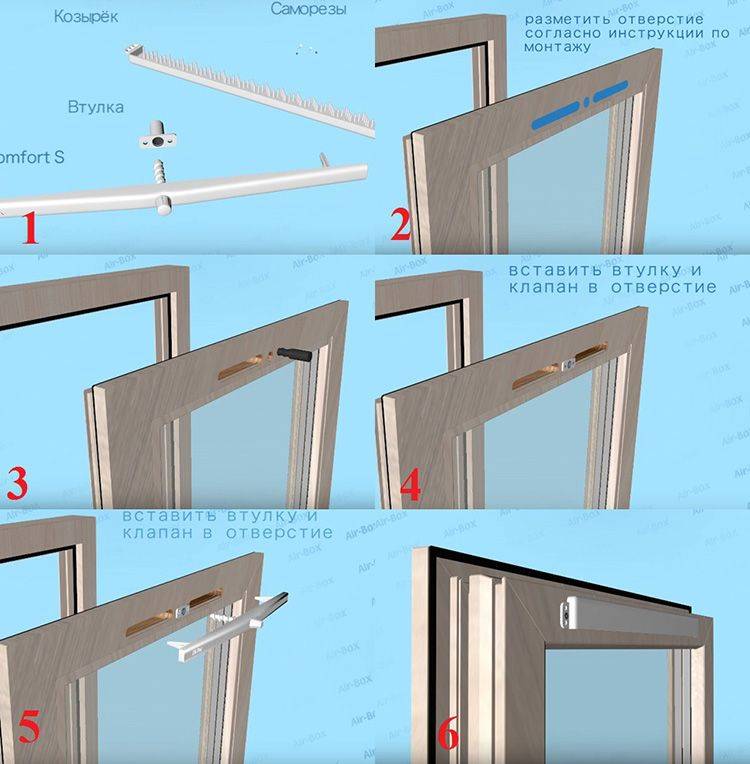
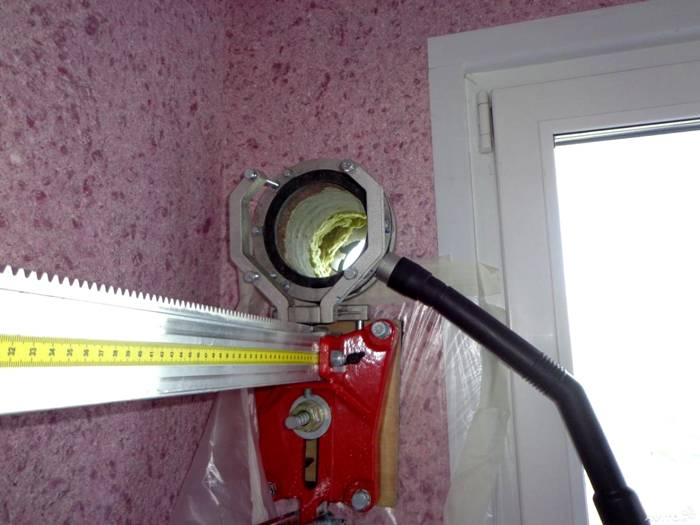
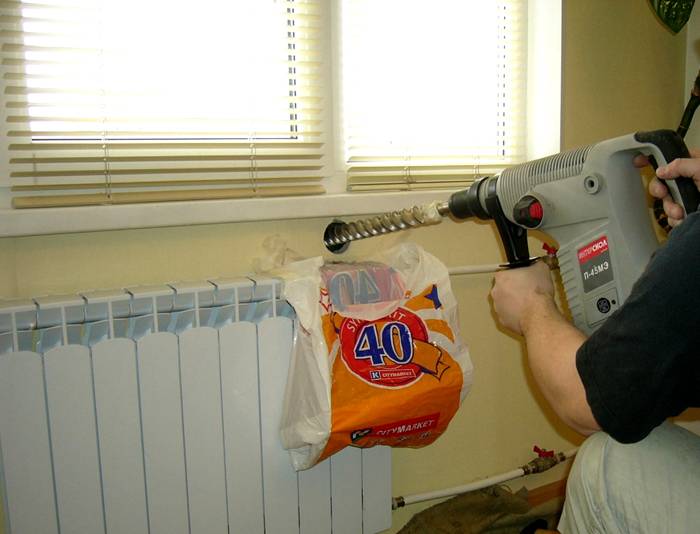
1. Drill a hole of the required diameter in the wall along the outlined contour - slightly wider than the throughput cylinder so that it passes freely and takes a horizontal position. We select the length of the valve according to the thickness of the bearing wall - from 0.4 to 1 meter.
2. The location of the valve does not have to be strictly horizontal, it can be slightly tilted outward. And it is better to additionally wrap it in an insulating material.
3. After placing the damper duct, fill all the cracks around the main structural part with polyurethane foam.
4. We close the outer end with a rain protector - the socket downwards so that atmospheric precipitation and condensation do not penetrate into the ventilation cylinder.
Tip: If there is no ready-made valve and its analogue is made independently, then a hole is drilled under the plastic pipe at an angle - outward downward, and apart from an anti-mosquito net, nothing is placed outside.This makes sense when installing supply ventilation with access to a balcony or loggia, protected from precipitation. But at the same time, the inner part is equipped with a porous filter and a lid.
Maintenance of the external air supply valve is minimal - wash the filter with water 1-2 times a year. If the general ventilation is not working properly, then the operation of the valve is minimal - air movement is possible only due to the temperature difference in the house and outside.
Inlet valve into the wall: principle of operation, features of installation and operation
Reading time: 5 minutes No time?
We will send the material to you by e-mail
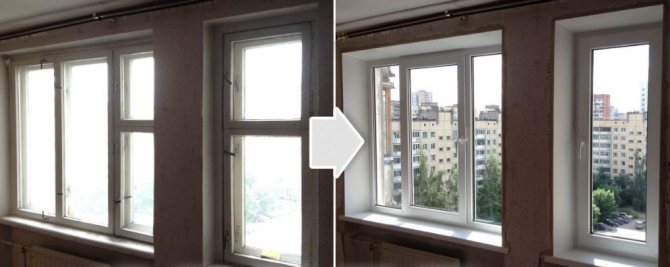
Modern technologies make our home more and more airtight. Reinforced plastic windows, laminated surfaces and stretch ceilings impede natural ventilation, which leads to dampness and mold in houses. Households suddenly begin to suffer from allergies and frequent respiratory diseases - this is also a side effect of completely sealing the house. Stagnant air is replete with allergens, pathogenic bacteria and microorganisms actively multiply in it. That is why it is important to install a supply valve in the wall, which will provide access to outside air into the room and at the same time prevent the appearance of drafts.
The supply valve is a simple device for ventilation
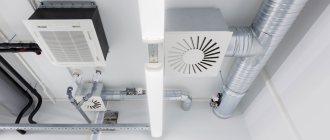
Features of air duct installation
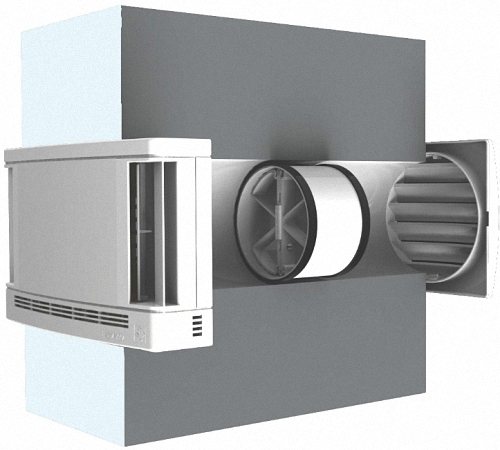
Before installing the valve, you must decide on its location. The best place for this purpose is considered to be a place near a heating radiator on a supporting wall.
Supply unit device: 1 - outer casing; 2 - fan; 3 - filter; 4 - insulated casing; 5 - adjustable body; 6 - decorative panel with a switch; 7 - ceramic element
- Step 1. Drilling a hole to install the air exchanger. The hole diameter should be slightly larger than the valve tube. This will allow the device to be correctly positioned and securely fixed in the wall.
- Step 2. Outside on the wall in the area where the device is located, it is necessary to provide protection from rain. If it is not possible to do this (the valve outlet will be located in a place inaccessible for work), the hole must be made with a slight slope towards the street. This will prevent raindrops from entering the appliance.
- Step 3. Install the supply valve into the wall and fix it with construction foam.
To install the device, you will need to drill a wall
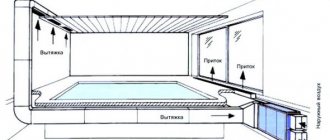
How is forced ventilation of air with heating done by own hands
For those who have a desire to make supply ventilation in a private house with their own hands, we can say that it is not difficult. The main thing is to approach the process very carefully and not to rush. If the drawing and calculations are incorrectly created, the device will not work correctly, which will affect the indoor air and temperature.
Schemes and drawings
Before proceeding with the installation of the device, it is necessary to fully implement your plan on paper. The drawing should be with all sizes and directions, so it will be more convenient to mount the finished system and make calculations. Be sure to mark the valves for the presence of grids and dampers. The following nuances should be taken into account in the scheme:
- The movement of air should go from clean rooms to polluted ones, that is, from the bedroom to the kitchen and bathroom.
- A heated supply ventilation valve must be located in all rooms and areas where there is no hood.
- The exhaust ducts must be the same size everywhere, without any widening or narrowing.
Calculations
In order for the device to fully perform its functions, it is necessary to calculate its power as accurately as possible. To do this, you need all the parameters of the room. This includes the number of floors, the area of the rooms, the layout of the premises, the number of people who can be there at the same time, as well as the availability of equipment in the form of computers or machine tools.
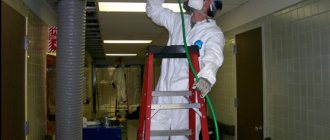
Installation
In order to mount the supply ventilation, you must have the following tools:
- Perforator.
- Spanners.
- Sledgehammer.
- Screwdriver.
- A hammer.
- Ratchet wrench.
- Clamp.
First of all, you need to prepare the place and choose the size of the hole. Using a diamond drill or hammer drill, you need to drill a hole with a slope towards the street. Then a pipe is inserted into this hole. It should be larger in diameter than the fan.
After that, a fan is installed, and all the gaps between the pipe and the wall are foamed. Then channels for wiring are laid. In some rooms, it is convenient to connect the wiring with a switch, this will make it possible to automatically turn on the ventilation system after the light is turned on in the room.
Finally, all remaining parts are installed, including noise absorbers, temperature sensors and all filters
It is important to constantly check with the diagram in order to avoid mistakes during installation. Grilles are attached to the ends of the system
As a result, the entire system needs to be checked. This is easy to do: you need to bring a sheet of paper to the grates. If it sways even slightly, then the ventilation is working.
It is important to note that lately people are increasingly shielding themselves from extraneous noise. As a result, together with the sounds, we stop the access of fresh air to the room.
This provokes both allergic reactions and diseases of the upper respiratory tract.
Therefore, in any room, be it an office or an apartment, there must be ventilation. And in order not to freeze at the same time, ventilation should be installed with heating. Then it will be useful for health and warmth.