General conditions for masonry
When a heat shield is being erected, it is necessary to remember:
- The optimal laying of this device is considered to be half a brick.
- The main temperature of exhaust gases from the furnace should not be lower than 110-125 ℃.
- The use of control valves that are installed in the chimney.
- You can do the styling yourself.
- Using clay mortar is more sustainable.
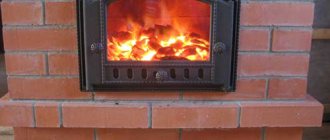
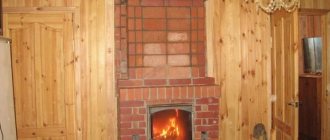
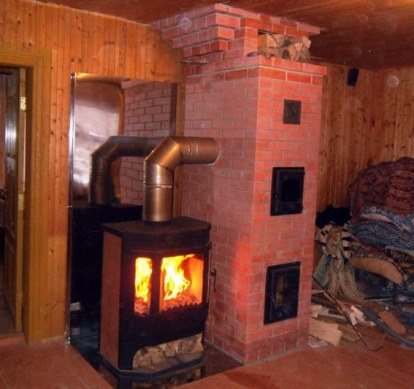
For a potbelly stove, this shield is necessary to increase heat transfer, since it is compact and cannot produce sufficient heating of the room. All the heat from these stoves goes outside together with the gases. This is due to the high temperature, which can exceed over 300 ℃.
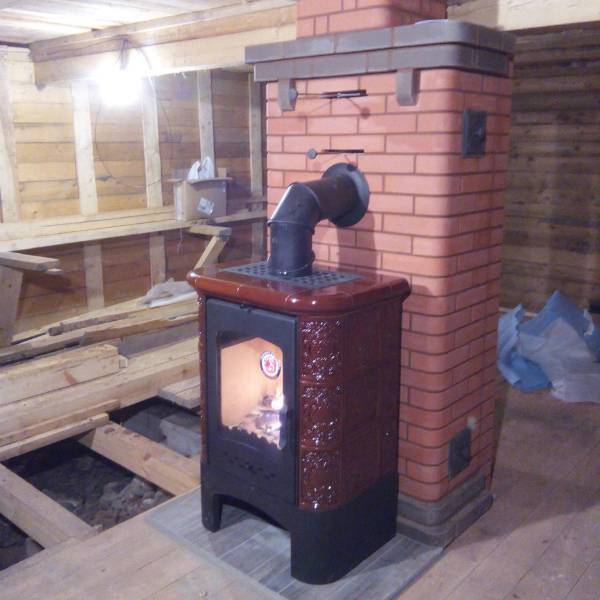
For a metal furnace, this device is indispensable, as it increases the efficiency.
Thanks to this setting, you can avoid cold winters and create a cozy and warm atmosphere in your home.
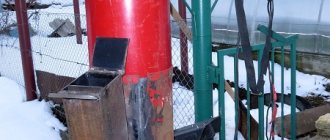
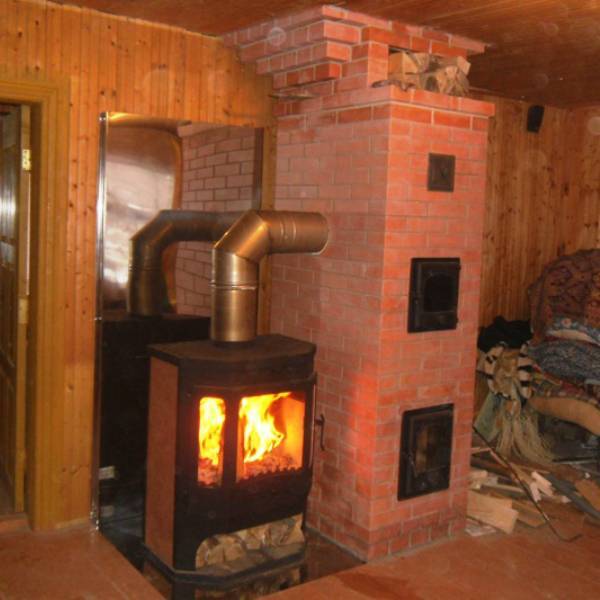
Metal furnaces have a number of advantages over brick ones. They quickly heat up, in a short time they are able to heat a large volume of the room. But they have a significant drawback: they heat only while they are heated. The wood has burned out, and the stove cools down instantly.
Therefore, the question often arises before stove-makers: is it possible to connect a metal stove to a brick panel.
Based on the experience of both our own and other masters (many of our familiar stove-makers), we can answer in the affirmative. However, there are two things to keep in mind:
Firstly, not all models of steel and cast iron stoves allow you to do this. Bavaria, La Nordica, Jotul, Tim Sistem, EUROKOM, META furnaces work well in combination with a heat storage shield.
Secondly, many furnace designs provide for the possibility of firing in a slow combustion mode. At the same time, the temperature of the flue gases is very low, the shield does not heat up and condensation forms in it.
Therefore, when heating the shield, the stove should be heated in normal mode, it is FORBIDDEN to heat the stove in slow burning mode with the brick shield connected! As a rule, our brick shields have two modes: summer and winter.
In summer mode, it is easy to melt the stove, and part of the shield does not warm up.
In winter mode, the flue gases are switched over with a valve in a large circle. The shield warms up completely.
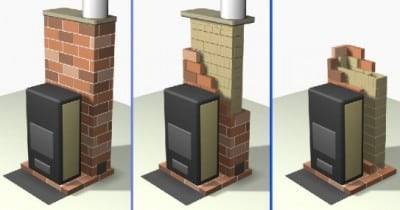
The construction of the metal stove type - a brick shield is the best option for country houses, which are visited by their owners only on weekends. It allows you to quickly warm up the frozen house to ensure the accumulation of heat. In this case, the walls of the shield can be laid out in half or a quarter (brick by edge) of a brick. In the latter case, the shield warms up faster, but also cools down faster.
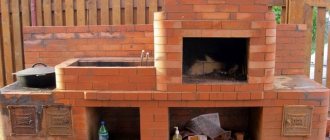
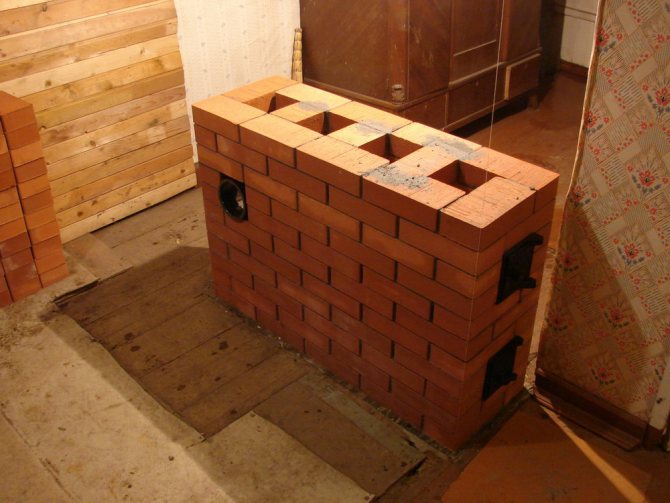
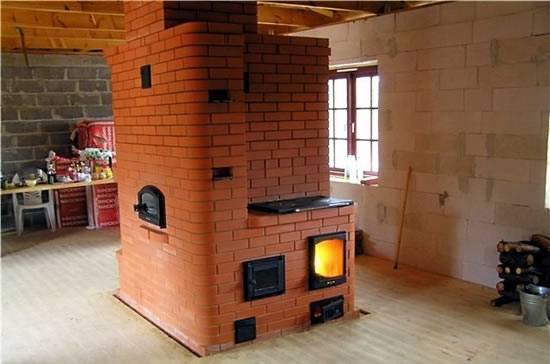
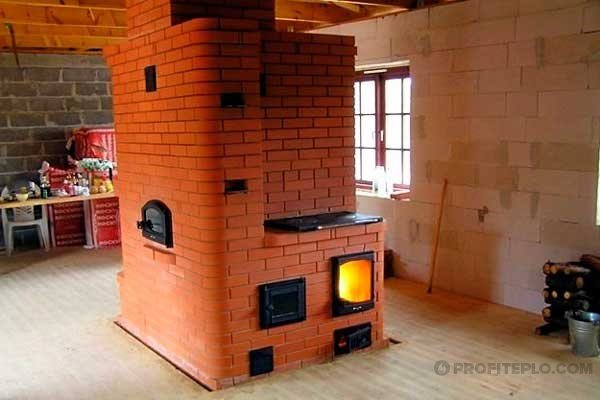
We have extensive experience in assembling steel and cast iron furnaces in combination with a heat shield and so far there have been no complaints from customers. Below you can see samples of work. Some photos are not our work and are given as an example.
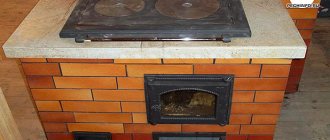
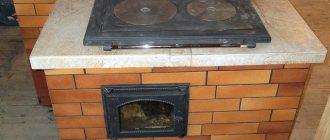
1 Gucha Lava stove with a shield. 2 Meta stove with a flap in a tile. 3 Nordica oven with cover.
4 Bavaria with a plate with a shield. 5 Frame plate with shield. 6 Hob with shield.
5 Bavaria with an oven with a shield. 6 META oven with a cover. 7 Cast iron stove with a shield.
Construction of a heat storage shield
I abandoned the common dashboard schemes: a three-channel design with two turns, which seemed huge to me, and a bell-type one in the form of a channel with a "brick" cross-section. In the second design, the flue gases from the furnace rise upward, at the ceiling they are cooled, and in the same channel they go down, where they exit into the chimney.
EVERYTHING YOU NEED FOR THIS ARTICLE IS HERE >>>
The idea came up to make only one channel in which the flue gases would move downward. The heat transfer in this direction of flow should be higher than in the natural upward movement. A valve is provided for heating the pipe during crushing. If you open it, the smoke will go, bypassing the shield, immediately into the pipe, and immediately into its insulated part.
I bought 120 pieces of oven bricks produced by the Gzhel plant, a cast-iron valve from the Finnish company SVT, two small bags of oven mixture (produced in Kostroma). All costs for the construction of the shield did not exceed 6,000 rubles at that time. Not very expensive - you can experiment!
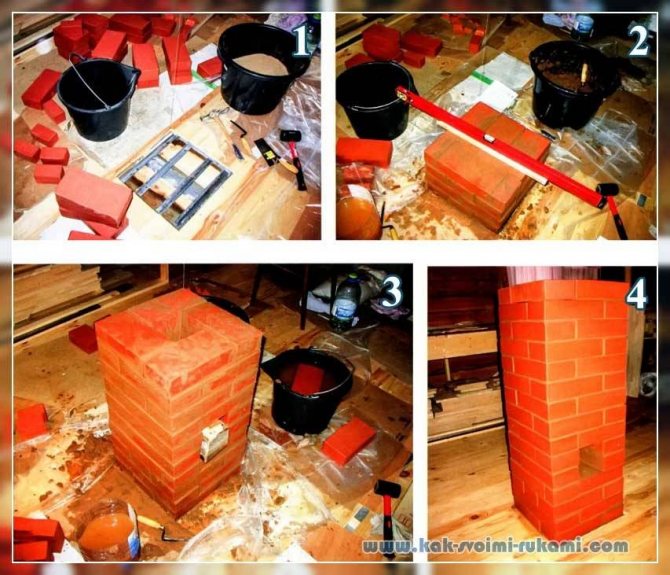
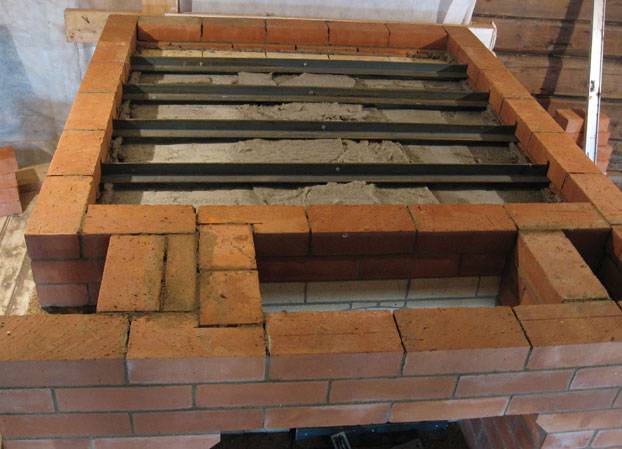
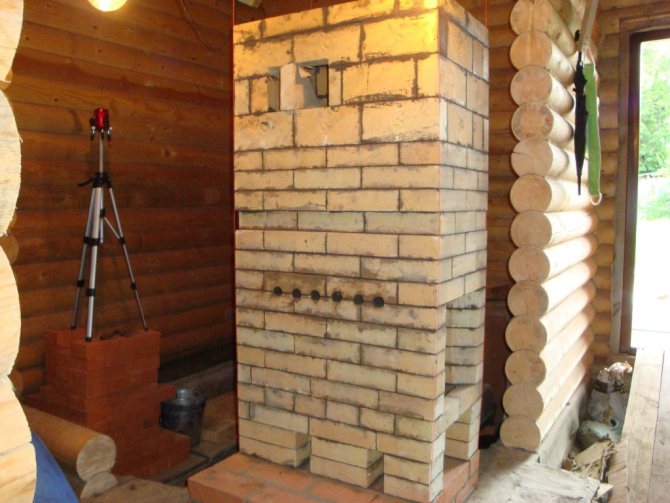
1.The base of the shield rests on the foundation strip. 2. The first 4 rows are laid. 3. Laying the channel on clay. 4. The scutellum grows.
Reference by topic: How to insulate a summer cottage and the calculation of heating for a country house
Advantages of a brick heating shield
Filling the foundation is considered an important part of the construction process. When constructing such devices for a sauna stove with your own hands, you need to carefully consider every detail of the construction process, since any mistake leads to incorrect operation of the entire system in the future
Key recommendations:
When constructing such devices for a sauna stove with your own hands, you must carefully consider every detail of the construction process, since any mistake leads to incorrect operation of the entire system in the future. Key recommendations:
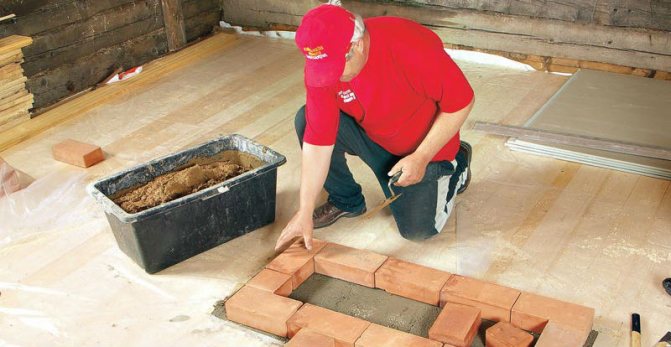
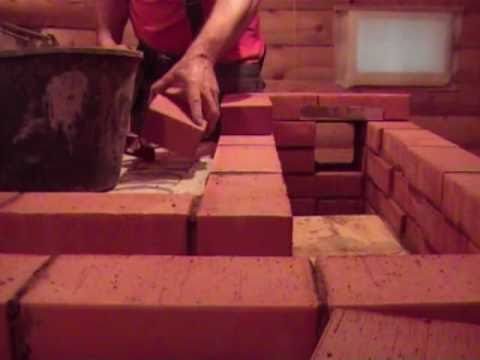
At the initial stage, the cement foundation of the structure is laid, it is preferable that it is not connected with the base of the room. The top level of the foundation is 150 mm below the floor level. After the waterproofing layer of roofing material is laid out, further laying is done in full accordance with the order. The solution for work, which consists of sifted sand and filtered soaked clay, is important to mix well. The thickness of the seam of the thermal system should not exceed 3 mm, the maximum that is allowed in operation is 5 mm. Each masonry level is measured with a building level and a plumb line. The excess that remains on the surface from the solution is removed, and the inside of the gas passage is wiped with a damp towel.
do-it-yourself sauna stove
When choosing a stove for your sauna, first of all, you need to decide what we want to get and what we are ready to spend. The simplest, cheapest and most durable option is a stove welded from metal with cast-iron ingots in a stove, it is pointless to list all the advantages of such a stove, they are all on the face-soviet bath ala "a miner came from the face to wash" in such a bath, no need to finish clapboard not polished shelves and a tiled floor, it is better to leave at least 1 light bulb for 40 watts in the corner so that you can see where you hung the towel. A completely different option if your bath has a good finish, lighting and you go into it not to wash, but to relax your body and soul. In this case, the best option would be a beautifully folded brick sauna stove. Such a stove will have a high heat capacity, dry steam, an appearance pleasing to the eye with its naturalness, graceful lines and proportions. The steam of this pei will not give off rust and have a temperature close to 90 degrees.
In addition to the tavo, a minimum of tools and skills are required for laying this stove. All that is required of you is accuracy in work, adherence to the ordinal drawing drawn below and a minimum of bricks with stove fittings and general knowledge about laying stoves that you can easily find on our website.
Materials and tools
Roofing material or polyethylene can be used to waterproof the foundation of the furnace and the heating shield.
Shields usually have summer and winter options for work. In the summer version, the passages are blocked using a valve, as a result of which the entire flap does not warm up, and only the plate heats up. During the heating season, it is advisable to open the valve and warm up the entire structure.The masonry is carried out strictly observing the fire safety requirements. The device should be placed on a solid foundation with mandatory waterproofing.
The designs can be varied, and the heat transfer of the shield depends on them. Smoke dampers are installed in the upper part of the shield. The second valve is used for the summer version of the gas flow. In this case, the third should be closed. The third valve will open the winter flow of gases, but the second should be closed at the same time. While the gases pass through the channels, they cool down, giving off heat to the walls, and already in a cooled state leave the pipe. The shields themselves are channel and bell-type - their order is significantly different. This design has a summer and winter course, but the valves are located at the top and bottom of the shield. Its weight is 1210 kg, and dimensions are 89 x 38 x 224 cm. This shield is thick-walled, heat transfer with one firebox is 430 kcal / h, with two - 600 kcal / h. The movement of gases is regulated by means of three smoke dampers. Operating modes:
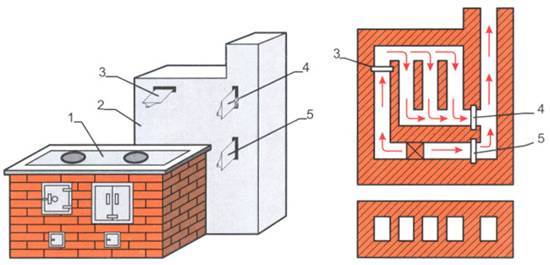
Heating panel with smoke dampers: 1 - stove; 2 - heating shield; 3, 4, 5 - smoke dampers to regulate the heat flow in summer and winter modes.
- Winter option - the third valve is closed, and the first and second valves should be open. In this case, flue gases pass through the entire shield, giving off heat to it.
- Summer option - the first and third valves are open, the second is closed. The gases bypass the flap chimney and go directly into the chimney. To ensure ventilation of the room, a special channel is arranged in the nozzle pipe, which is closed with a grate. It has valves that provide 3 modes - partially open, closed and open.
Tools required for work:
- a combined trowel, which serves for leveling, laying, trimming excess mortar;
- hammer-pick - cutting bricks and cutting;
- jointing;
- plumb line;
- level;
- tape measure or folding rule;
- square;
- cord;
- ruler.
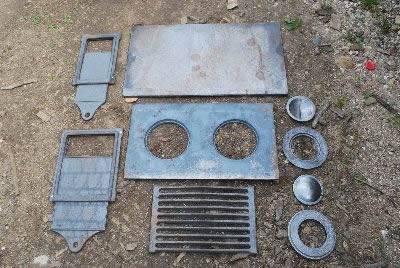
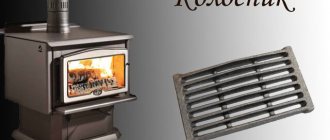
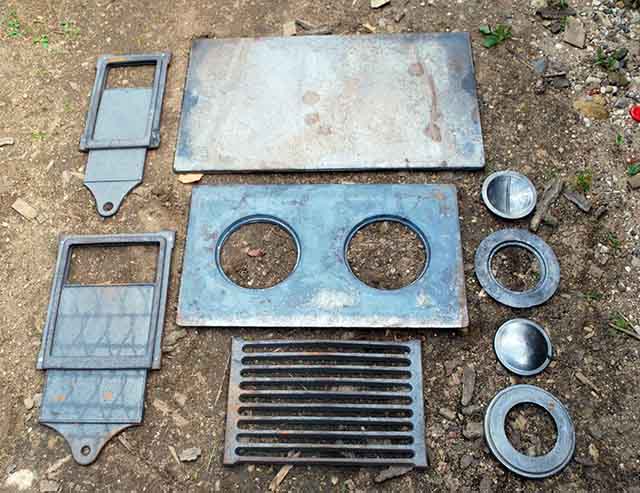
Furnace fittings: hobs, smoke dampers, ventilation grill.
Materials and fittings:
- brick - 309 pcs.;
- sand - 3-4 buckets;
- clay - 6 buckets;
- roofing felt to ensure waterproofing - 1.5 m;
- smoke valves 13x13 - 3 pieces;
- ventilation grill - 15-20 cm;
- cleaning doors - 3 pieces.
When laying the foundation in height, it is not brought to the floor level by 2 rows in height. 1 row of bricks is placed on top of the foundation, and waterproofing is laid on it. Then mark the shape of the oven. Next, a second brick row is laid, the surface of which coincides with the floor level in the clean version. The next step is the ordering of the flap.
Masonry recommendations
Only medium fat clay with admixtures of sand is used for masonry of the shield.
To fold a brick shield for a metal stove in a bathhouse or house, you need to follow the recommendations:
- The mortar should only be clay-based. You cannot use cement.
- During laying, it is immediately necessary to remove the remnants of the mixture from the inside of the structure.
- Construction must begin with the installation of the foundation. It should be separate, not connected to the foundation of the house. First, the brick is laid dry to check for horizontal alignment. After checking all the parameters, the foundation is fixed with a solution.
- To limit the draft of smoke, you need to install a gate damper at the top of the structure.
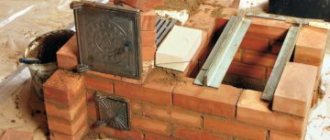
The first two rows are laid out deaf, smoke channels are not made in them. This is necessary in accordance with fire safety requirements.
Ordering
Doors must be installed on the brick shield to clean the channels from soot
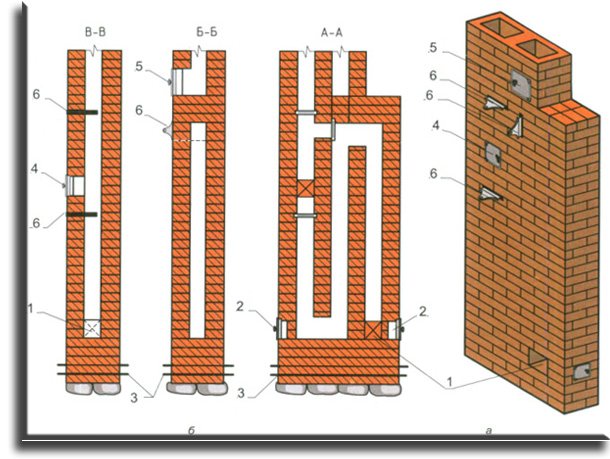
The order of the bell-type heating shield is as follows:
- Rows one through three are laid out in the standard way. In the third row, it is necessary to leave an empty space in which the combustion door will be installed.
- On the fourth and fifth rows, a blower and a door for cleaning are mounted, and two plugs are also installed here.
- In the sixth row, the number of channels begins to gradually decrease, a heating tank is installed.
- The seventh row is for mounting the grille. In order for it to be securely fixed, you need to cut off all the bricks that might get in the way. The channel is overlapped to further make two forks.
- The eighth row is designed for the installation of two doors.
- On the ninth and tenth, a steel strip insert is placed.
- The next stage is the implementation of door overlaps. From above, they should be greased with a clay solution.
- A cast iron plate is installed on the twelfth row.
- On the sixteenth tier, bricks need to be chopped off in the area of the right corner, and on the nineteenth, a valve is installed.
- The twenty-second row is reserved for the installation of the shield and the samovar.
- For expansion on the thirty-first row, the bricks are shrinked, and at the next stage, a ventilation grill is installed.
The order in all cases is individual, but based on the same principles.
Second design option
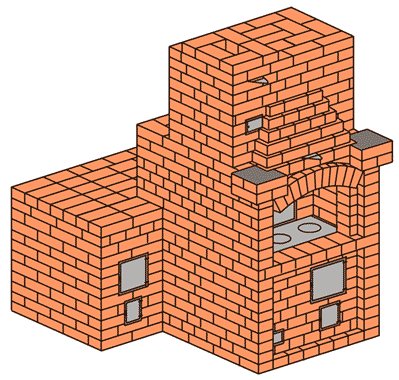
A stove with a heating shield and an independent firebox has a different design and order.
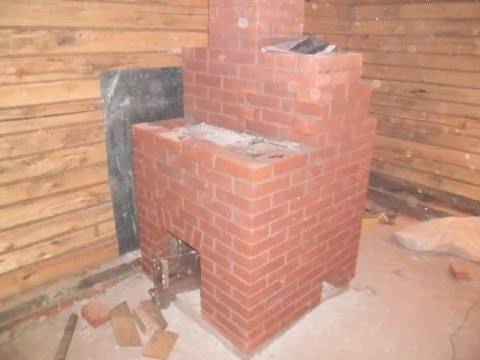
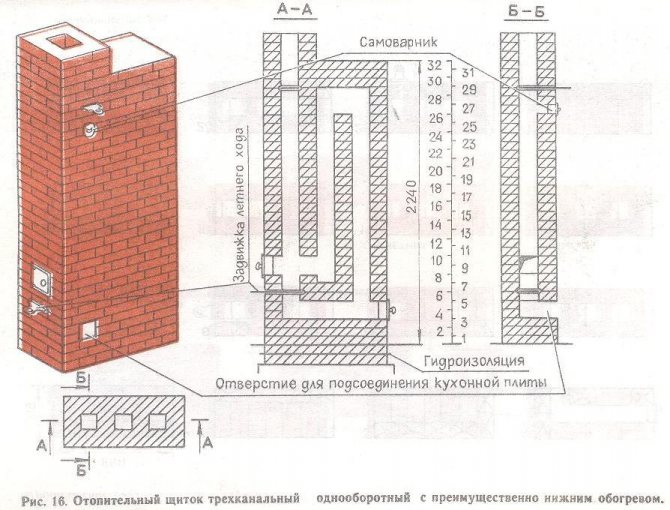
Below is a stove with a shield that has an independent firebox. The shield also has summer and winter smoke circulation systems. You can heat separately either a stove or a heating shield. Dimensions - 140x102x217 cm.Total weight - 2800 kg. With two furnaces, the heat transfer is about 3100 kcal / h.
Required materials and devices:
- ordinary brick - 680 pcs.;
- sand - an average of 20 buckets;
- clay - 22 buckets;
- steel corner (30x30x4 mm) - 4 meters;
- steel strip (50x22 mm) - 55 cm;
- steel sheet (pre-furnace) - 50x70 cm;
- cast iron plates with two burners (52x20 cm) - 6 pcs.;
- grate grates (300x130 mm and 300x262 mm) - 2 pcs.;
- blower doors (14x13 cm) - 2 pcs.;
- furnace doors (205x130 mm and 205x205 mm) - 2 pcs .;
- cleaning doors (14x13 cm) - 2 pcs.;
- smoke dampers (13x24 cm.) - 2 pcs.;
- hot water box (56x34x12 cm);
- door (14x13 cm) or samovar (10 cm in diameter).
Before the start of laying, a solid foundation is laid on the waterproofing layer, which must be previously installed.
Next comes the ordering:

An approximate ordering diagram of a stove with a heating shield and an independent firebox.
1st and 2nd rows - in accordance with the order. 3rd brick row - similar to 1st and 2nd, while leaving the ash pan under the firebox. 4th row - in the process of laying, 4 doors are installed (cleaning and blowing doors) and 2 valves (for summer and winter smoke flows). Doors are clean inside have brick bookmarks. 5th - similar to the fourth
Special attention should be paid here to the dressing of the sutures. 6th - during the masonry, all channels are reduced, the installed doors are blocked, the oven and the hot water box are installed. 7th row - lay the grates for the stove and the fuel shield. Bricks that are located on both sides of the grates must be chipped
In order, this is indicated by dashes. The long channel, which is located on the left, is blocked in order to form 2 short ones. 8th row - install 2 fuel doors, where the smaller one goes for the shield, and the larger one for the stove. The 9th and 10th are laid according to the order. In the 10th, a steel strip is laid over the oven. 11th row - they overlap the doors, coat the top of the oven with a solution of clay about 1 cm thick. To the left of the box, the hot water channel is left unenclosed, and to the right, it is closed with a brick. The 12th brick row completes the masonry. Cast iron flooring is installed and the frame is fixed along the entire perimeter of the slab. Further, the order shows the sequence of laying the fuel shield. 16th row - the brick on the right at the second channel is being cut off. in the 19th row, a valve is installed that closes the pipe. Starting from this row and up to the 25th, five channels are formed from three. 22nd row - a samovar is installed. And further along the masonry of the next rows, one channel is left - this is a pipe. The shield is covered with masonry in 3 rows. 31st row - a hewn brick is installed to expand the pipe channel.The 32nd and 33rd rows form a separate channel during the masonry process and install a ventilation grill.
When laying the flap, be sure to observe the dressing of the seams, which is indicated in the order, and observe the thickness of the seams - it should be in the range of 3-5 mm. If necessary, uneven bricks are pressed together.


How to do it?
Panel without autonomous firebox
- The 1st row is completely laid out from bricks.
- 2-3rd is drawn up according to the order.
- The 4th stage includes the design of the window for the future connection with the corner shield.
- The 5th row unites all the previous ones, plus the dressing of the stitches is connected.
- On the 6th, channels for gases are laid.
- After the 7th stage, all the next odd rows up to the 25th must follow the order with a remainder of 3 channels.
- The 8th and every future even row is laid exactly according to the drawing.
- Rows numbered 10, 11, 17, 23, 24 include a different type of masonry, which allows for a stronger brick bond.
- At the 10th, 18th, 24th stage, the valve is fixed on the right side. Further work proceeds according to the plan scheme.
Masonry with a self-contained firebox
Such an organization of work is more complex and implies the separation of the elements of the Feringer's iron furnace: the firebox, the stove and the shield itself. In this case, the consumption of materials will be more significant than in the first option. The order of work:
- The foundation is poured, the first 2 rows of bricks are laid according to the ordering drawing.
- On the 3rd row, the actions are similar, but the installation of an ash pan is added.
- Next, fittings for the structure are laid - 2 types of valves (for summer and winter), doors.
- On the 5th row, the order of work does not change, the seams are additionally tied.
- From the 6th stage, an oven with a hot-water box is fixed, the size of the gas channels is reduced, and the doors are closed.
- 9-10th rows are laid according to the drawing.
- Already from the 11th row, the oven doors are blocked, and the upper cavity of the oven is smeared with clay.
- The last stage includes fixing the common frame and fixing the cast iron flooring.
Foundation
Getting started is to lay the foundation. The stability of the heating shield depends on how well the foundation is erected. At the very beginning, you need to prepare a solution. After placing the place and pouring the mass of the solution, the surface is leveled and left about 10 cm to the floor. When the base dries up, a lightweight brick is laid out, the building is treated with asbestos waterproofing, the outline of the furnace is outlined. The next stage of laying bricks finally aligns the floor surface with the level of the future furnace. Further, the work is lined up according to the scheme typical for each type of masonry.
Types of shields
There are two types of shields: duct and bell. They differ from each other in design and installation method.
The duct-type shield implies a complex winding chimney, the design of which does not undergo a change in diameter along its entire length. Instead, partitions are located along their entire length, which can be either vertical or horizontal. It is not difficult to guess the principle of the system's operation. As the name implies, hot gas passes through the arranged channel and gives off heat to the walls, which in turn heat the air in the room.
A convenient device for the oven is special jumpers that allow you to adjust the flap for supplying heat to the hob without heating the room. This can be done in conventional stoves, but it is completely unsuitable for fireplaces. If you are planning to assemble a fireplace, you must be prepared for the fact that it will not be possible to use it in the summer. If, however, the design is planned to be standard, with all the usual requirements, then it is highly recommended to mount them.
The second option is a cap-type flap. Here, one or two surfaces are connected to each other using channels. The extreme points should be below the upper limit, which allows the heated air to circulate on its own.Based on the laws of physics, heated air moves upward, then, passing through the channel, it cools down and descends, and if it is pushed by another heated gas, it continues to be displaced upward.
Based on this theory, we can conclude that a two-bell heating shield has a positive effect on the room temperature. Therefore, if the installation of the stove is planned in a large room, then it is better to use a two-channel system.
The corner heat shield is an excellent solution for small spaces. The creation of such a shield allows you to save space without compromising the heating properties. If you equip it with a metal firebox, then you can use it as a full-fledged stove for heating the whole house, regardless of the number of storeys.
https://youtube.com/watch?v=jhl-P4_QMzI
Varieties and schemes of shields
According to the internal structure, these structures are of 2 types:
- duct: a well-developed network of gas ducts is arranged in the body of the dashboard, which consists of several vertical channels connected to each other. Before going outside, the gases make a winding path along these passages, intensively giving off heat;
- bell-type: such a shield for a cast-iron stove or stove has one or two chambers with horizontal vaults, where incandescent gases are retained until they cool down. Only then can they get into the vertical channel and go into the chimney.
Duct-type heaters are structurally simpler, therefore it is easier to fold them. The hoods are more efficient in terms of heat extraction, but they are much more complicated to perform. It is not recommended for beginners to undertake their construction, the hand of a master is needed here. For self-construction, we present to you drawings and sections of a simple duct-type heating shield with three vertical gas ducts:

In order for our heating and cooking stove to be used in the summer for cooking, the design provides for switching the smoke turns to summer mode. The transition is carried out using three valves built into the gas ducts. In addition, in the upper part of the structure there is an exhaust ventilation shaft for organizing air exchange in the room. To prevent the draft from tipping over in strong winds, a grate with a check valve is installed at the exit from the mine.
The following diagram below shows a metal hob with a bell-type heat shield. As you can see, here, after leaving the furnace, the gases enter a chamber with a vault, from where 2 channels lead.
Since you can only move downward from the chamber, combustion products with a high temperature are retained under the roof until they cool down. Then they become heavier and, according to the law of convection, leave the space of the chamber. In this case, to increase efficiency, the stove with a heating shield is equipped with tubular heaters located inside the gas ducts.
Note. As a rule, heating flaps are designed as simple heat exchangers and do not have their own combustion chamber. But there are also structures, whose design provides for the device of a small firebox, as can be seen in the photo:
Varanti masonry especially
At the connection with this, the warmth of the kitchen stoves is very low, the stench is not too foul, the smell of food is not in the main world. The first entry into the situation will be a scorch shield.
The scorching flap pushes the heat of the stove twice, allowing you to save money on resources for scorching.
It will be built with more heat, increase the heat capacity of the furnace in 2 times and bring the KKD from 30-45% to 50-65%. With a lot of vitrati for the whole, the accessories and the hour are robust, the way is even more popular and docile. The shield is a trickle of the turnover in the middle of the country.
The masonry of the flap can be installed in the pivceglin and in the quarter of the tsegli. The best option would be the first option, the stench of stench will soothe the heat better, and the more trivial program will be better. Until then, such a flap was larger in terms of fire safety.Subtle - to be warmed up more quickly, but it can be achieved more quickly, such constructions are recommended to be seized with a metal casing, so that you can follow the rules of fire safety.
Masonry options and features
Due to the fact that the total heat capacity of kitchen brick stoves or cast-iron stoves is very low, they are not able to heat the room around the clock to the full. And an excellent way out in this situation will be a heating shield.
The heating plate doubles the heat capacity of a brick stove, thus saving on heating resources.
It is erected completely brick, increases the heat capacity of the furnace by 2 times and brings the efficiency from 30-45% to 50-65%. At the same time, the costs of bricks, fittings and work time are fully justified, therefore this method is very popular and expedient. The shield is a brick wall with smoke flows inside it.
The flap can be laid in half a brick and a quarter brick. The first option would be optimal, since they retain heat longer, but at the same time require a longer heating. In addition, such a shield is more preferable in terms of fire safety. Thin-walled - it warms up faster, but also cools faster, such structures are recommended to be fenced with a metal casing in order to comply with fire safety rules.
So is a stove cover needed?
Obviously, the shield is too thick-walled, I would like the structure to be two to three times lighter. But, alas, you can't. Wall masonry with a thickness less than half a brick should be carried out only in a metal casing.
There is no harm from the shield for sure - excessive cooling of flue gases is imperceptible, like rivers of condensate because of this. The fire safety of the system as a whole has improved - flue gases of low temperature enter the sandwich. But the effect of heat accumulation is manifested only with prolonged heating. Do not heat up the flap in a short time and in what mode! But in a few hours, it heats up to about 50 ° C or slightly higher with almost any combustion intensity.
The shield cools down for a long time, and the oven, oddly enough, also - until late in the evening. For me, after 23-00, the operating time of the electric convectors comes again.
Here's what the flap will not interfere with, so it is the sauna stoves. They are usually drowned rather intensively. For example, the temperature of the coals is clearly more than 500 ° C, some measurements with a pyrometer showed 800 ° C. And the high temperature at the entrance to the sandwich is unacceptable. In this case, the shield will take away excess heat, accumulate it and help dry the steam room after the procedures. Fire safety will clearly increase with it.
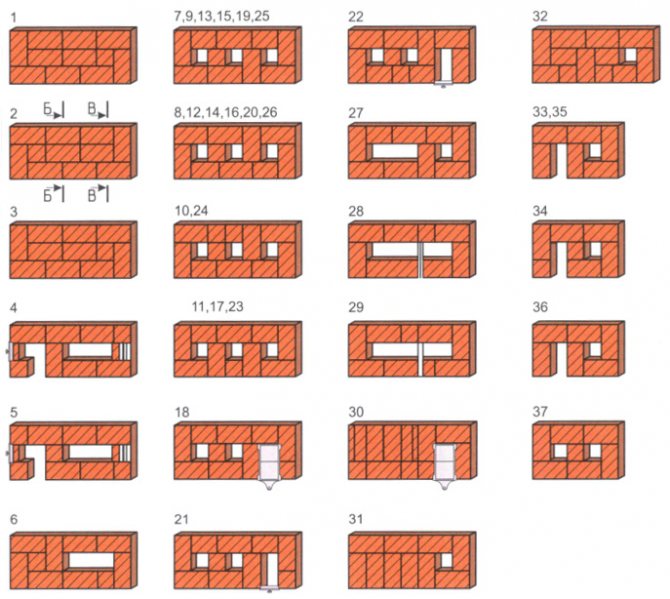
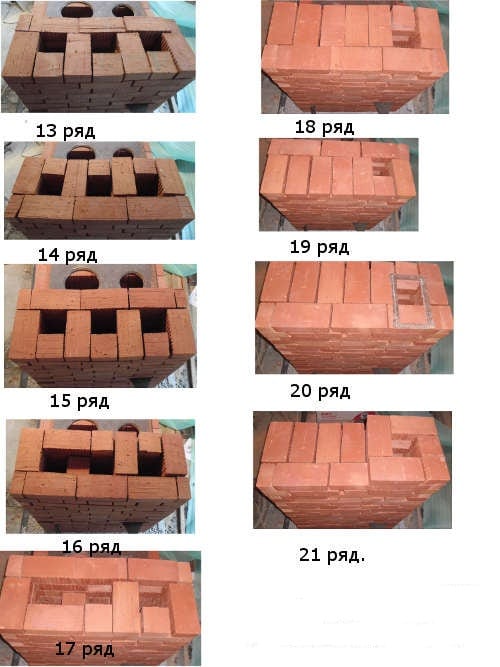
Laying the main series
poryadovkoy:
The approximate scheme poryadovkoy (brick masonry) in the regeneration of the heating panel.
- 1st row spread from a brick completely.
- 2 nd and 3 rd - based poryadovkoy.
- 4th brick row - left window for further connection to the shield and set 2 cleaning.
- 5th - similar to the fourth row, but should pay attention to the dressing seams.
- 6th - during the laying channel 2 is left.
- 7th row and all the odd rows, 25th inclusive - in accordance with the form and poryadovkoy 3 channels.
- 8th row and all even rows, 26th inclusive - per poryadovkoy.
- 10, 11, 17, 23, 24-th rows - similar to the previous one, but to improve the reliability ligation sutures operate differently clutch.
- 18th - the same 10-th and 24-th series. The channel put the latch on the right side.
- 21st, 22nd - lay with the installation samovarnika.
- 27th brick row - combined 2 Left channel 1 channel. Overlain samovarnik.
- 28th row - mounted valve.
- 29th - placed under the poryadovkoy. At the same time pay attention to the dressing.
- 30th row - right put the latch on the left channel overlap.
- 31 th and 32 th rows - you need to pay attention to the dressing seams. Overhang is placed in 3 rows, that is fully compliant with fire safety. All of this can be seen from poryadovki-.
- 33rd, 34th and 35th ranks respectively put poryadovkoy.
- 36th row - always in the process of laying leave it and smoke ventilation channels.
General purpose of the heating plate
Before talking about how the heating shield should be laid, it should be described in more detail where this element is used.
As you know, one of the main advantages of standard hobs and stoves made of steel and cast iron lies in their small and convenient dimensions (in more detail: "Do-it-yourself stove stove - manufacturing options"). However, there is also a negative side to this: the working surface is very small, which is rather inconvenient.
Moreover, it is also important to remember the operating temperature of these devices, which is usually very high (at least 300 ° C). Due to the large value of this parameter, there is a serious risk of fire, therefore, the need for thorough insulation of the chimney pipe is extremely urgent
And if this procedure is carried out incorrectly, then the heat will go away in large volumes, which, of course, will affect the efficiency of the equipment.
In order to solve the problem of heat loss, you can use one of the two most effective methods:
This is due to the fact that the thermal conductivity of the brick is high, therefore, when the room is heated, heating will be guaranteed for a considerable time.
The working power of such a device varies from 7 to 14 kW.After the solid fuel burns out, the heat in the room will remain for a long time (its volume will be about one kW).
Materials (edit)
In the process, you will need a trowel.
It is not only the correctness of the work performed that affects the result. The quality of the device also depends on the correctly selected inventory and working materials. The inner and outer walls of the chimney are built of even bricks, devoid of chips. It is recommended to spend effort on a high-quality grouting of all seams and joints of the device. Used in the work for the construction of shields are ordinary bricks, but the material should not be hollow. The seams are covered with a mass of clay, the cement mixture is not suitable. The list of required equipment is presented in the table:
Consumables
| Inventory | Level and square |
| Pickaxe and hammer | |
| Plumb line | |
| Roulette | |
| Cord | |
| Trowel | |
| Ruler | |
| Materials (edit) | Refractory bricks |
| Clay | |
| Sand | |
| Waterproofing material | |
| Doors are clean | |
| Ventilation grates | |
| Smoke dampers |
Materali nstrumenti
For hydro-insulating the foundation of the stove and the opalescent shield, it is possible to vikorisovuvati ruberoid or polyethylene.
Shields wake up in summer and winter options for robots. When the summer option is over-crooked, go for an additional blow-by, as well as the entire flap does not warm up, if only the hot plate is hot. In the scorching season, docritically check the airflow and program the entire structure. Viroblyayut masonry, suvoro dotrimuyuchis vimog pozhnoї bezpeki. Razmіschuvati pristіy slіd on mіtsnomu baseі z obov'yazkovoj hydroizolyatsіyu.
The constructions can be useful, because of them and the heat output of the shield can be stored. Dims are installed at the upper part of the shield. Another suction to serve for the lithium version of the course of the gas. At the same time, a third is guilty butti is closed. The third run is due to the winter run of the gas, but to a friend at the same time it will be closed. At that hour, if the gas passes through the canals, the stench reaches, the warmth of the walls is brought out, and the chimneys go through the chimney into the cold mill. The shields themselves are channeled and Kolpakov's - the order is meaningfully changed. Tsya construction is a great time and winter, ale the blowing of the rosette in the mountains and at the bottom of the dashboard. Yogo weight - 1210 kg, and dimensions - 89 x 38 x 224 cm. Shield of the whole load, heat output with one top - 430 kcal / h, with two - 600 kcal / h. Robot modes:
Opalyuvalny shield with dimovy blows: 1 - plate-2 - dimovy shchіtok- 3, 4, 5 - dimovіs blowing for regulating the flow of heat in summer and winter modes.
- Winter option - the third pass is closed, and the blame is due to the fault of the first and the friend. With a lot of dimovi, gases pass through the entire dashboard, giving it warmth.
- Lіtnіy option - persuasion first and third suction, another close. Gazi pass the flap dimple and go into the pipe without going into the middle. To ensure the ventilation of the installation, a special channel is inserted in the top-mounted pipe, which is closed with burrs. There are no valves, which will provide 3 modes - partial pressure, close and open.
Tools Needed for Robots:
- combinated trowel, which serves for shaping, stacking, increasing oversize;
- hammer-Kirochka - to the hews of the tsegli and the felling;
- roshivannya;
- grabbed;
- rіven;
- tape measure or folding meter;
- kutnik;
- cord;
- line.
Food accessories: cooking plates, dims, ventilation grilles.
Materials and accessories:
- tsegla - 309 pcs.;
- pisok - 3-4 buckets;
- clay - 6 buckets;
- only for securing hydroisolation - 1.5 m;
- suction dimov 13x13 - 3 pieces;
- ventilation grilles - 15-20 cm;
- clean doors - 3 pieces.
With the foundation of the foundation along the height, do not bring the pidlogi to the level for 2 rows along the height. Lay 1 row of tsegli on top of the foundation, and lay hydro-insulation on the new one. Let's change the oven figurine.Then lay another row, the surface of which is to be taken from the podlogi in a pure version. Let's step by step and order the flap.
Lightweight design
What does it look like
The lightweight heating shield is assembled in a metal frame, lined with either metal sheets or asbophane. In both cases, the sheets for cladding are cut out in advance according to templates prepared in accordance with the dimensions of the walls of the stove and taking into account all the relying holes.
Masonry features
- The wooden floor, on which it is planned to install the shield, is preliminarily prepared - two layers of felt must be laid over the construction area, which must first be impregnated with clay solution (as an option, for such a base, asbestos can be used, upholstered with sheet steel)
- The frame of the shield on a welded frame made of a steel corner is installed strictly vertically, with a solid support on the base with four legs.
- The frame is verified, after which the bottom row of cladding sheets is laid.
- The first row of bricks is laid flat on a prepared base.
- After the floor is ready, the masonry should be brought up to the level of the first row of cladding.
- As soon as the first row is laid out, install the frame cladding for the second row and continue laying.
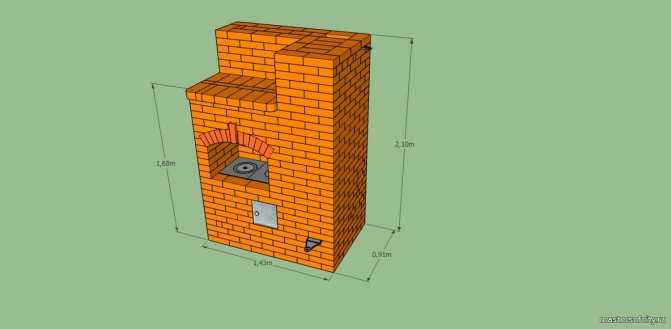
Dimensions to be guided by:
- Length - 730 mm.
- Width - 340 mm.
- Height - 1930 mm.
- Weight - 650 kg.
- The level of the first row of cladding is 625 mm.
- The height of the frame legs is 65 mm.
- Dimensions of a welded frame made of a steel corner - 30x30x5 mm.
How to lay out a shield with a self-contained firebox
Masonry features
The order of the heating plate in this design has its own characteristics (the diagram can be found on the Internet by asking the appropriate request). In general terms, the process looks like this:
- Rows 1 and 2 are laid out in accordance with the order.
- In the 3rd row, you must leave the ash pan under the firebox.
- 4th row: two valves are installed (one for the summer run, the other for the winter) and four doors (two blower doors + two cleanout doors with brick inserts inside).
- 5th row is similar to the fourth (suture dressing is observed).
- 6 row all channels are reduced, all doors overlap. An oven and a hot water box are installed.

- In the 7th row, two grates are laid (one for the firebox of the stove, the other for the firebox of the shield). The bricks on both sides of the gratings are chipped off. The long channel on the left overlaps to form two short channels.
- In the 8th row (put in order), firebox doors are installed (one smaller for the firebox of the shield, the other larger for the firebox of the stove).
- The 9th row is laid according to the scheme, also the 10th, but in it a steel strip is placed above the oven.
- 11 row: the doors overlap, the top of the oven is greased with clay solution. To the right of the water-heating box, the channel is closed with a brick, to the left - it remains unencumbered.
- In the 12th row, a cast-iron flooring is laid, a frame made of steel corners is reinforced around the slab. This row is the final one in the laying of the slab.
Other orders are the masonry of the shield (look at the diagram).
- In the 16th row, it is necessary to cut off the brick on the right at the second channel.
- At 19, a valve is placed that closes the pipe (from this to the 25th row, inclusive of the three available channels, five are formed).
- A samovar is placed in the 22nd row, then one channel remains in the subsequent rows - a pipe, and the shield is overlapped by masonry in three rows.
- In row 31, the pipe channel is broadened by cutting off the brick.
- A ventilation grill is placed in rows 32 and 33 (a separate channel is formed for this).
Dimensions to be guided by:
- Length - 1400 mm.
- Width - 1020 mm.
- Height - 2170 mm.
- Weight - 2800 kg.
- The length of the steel strip above the oven is 550 mm.
General purpose
Before starting the construction of the oven shield, understand its need and technology for implementation.Hobs and stoves made of cast iron have a huge advantage due to their compact size. However, this negatively affects the operational points. If you plan to use it as a hob for a large number of people, then it will take a lot of time and effort to cook. Therefore, stoves of this kind are used in temporary buildings or summer cottages.
Not every unit is able to withstand such a voltage, the device may catch fire. Therefore, insulate the chimney pipe as carefully as possible. At the same time, it is necessary to correctly calculate its parameters, since a huge amount of heat goes into large pipes along with smoke. This will not only affect the quality of work, but also the service life.
There are two effective methods for solving the problem of heat loss:
- The direction of heat energy, which is obtained as a result of fuel combustion, towards the heating of the element responsible for heat exchange. The familiar water fuel system can serve as an example. In it, the coolant can circulate both with the help of a pump and in a natural way.
- Equipping the cooker with a heating shield. Thus, you get a system where the combustion products passing through the chimney built into the wall will minimize heat loss.
The disadvantage of the first option is the instability of the state of the liquid in the pipes. So if you admit
freezing of water, the pipes can burst or depressurize. To avoid this situation, it is better to use the second method.
The brick-built system guarantees a low heat loss of the furnace, and a high heat capacity ensures long cooling. The heating plate is able to fully replace the usual, traditional stove. Plus, you get more heat with less physical and financial costs.
For what devices is the dashboard used?
The two most common situations are:
- Purchase of a metal stove, which is also a fireplace.
- Using a brick hob.
Also, a brick shield is in demand among residents of country houses in which Swedish Zhirnov ovens are installed. Outwardly, they resemble a fireplace, but structurally they consist of a firebox and a hob: most of the heat goes to heating, a small part to cooking.
Feringer ovens are also usually completed with a brick wall, which increases their productivity.
If a heating shield for a metal stove or brick plate is not used, then the heat obtained from the combustion of the fuel literally flies out into the chimney. And in the case of its presence, heat is retained, which allows you to heat the room.
Stove with a shield for space heating
A heat shield, which looks like a thick brick wall, can be compared to a gas-air heat exchanger, which is attached to any furnace in order to increase its efficiency. Gas flows under the influence of the chimney draft move along vertical and horizontal channels inside the wall.
The principle of operation of this device is based on taking heat from flue gases. As a result, the brick-built structure heats up by itself, and then heats the air in the room. Due to the heat capacity of the material, the wall cools down for a long time and continues to give off heat after the fuel burns out.
As a rule, the flap is not equipped with its own combustion chamber, playing the role of only an additional element. But sometimes the design provides for the presence of a firebox.
Operating principle
Most often, Zhirnov stoves and stoves are used in Russian country houses, which are compact heating units of the "Swede" type. Such a furnace is easy to set up, heats up quickly and does not require special care during operation. It is ideal for small summer cottages.Its disadvantage is the inability to switch to summer mode.
The most famous are several types of ordering of such a furnace, but, despite the distinctive nuances, they are united by the following characteristics: the power of the furnace reaches 3.5 kW; there are 4 hoods in the cooking chamber and the chimney pipe does not exceed the dimensions of 270 × 140 mm.
The beauty shield can be finished with plaster, tiles, or left brick.
The meaning of the heating flaps
Due to their compact size and excellent functionality, Swedish stoves Zhirnov and potbelly stoves are very popular. They have only one significant drawback: a small work surface, which does not allow to fully warm up the room.
In addition, the ovens have a high operating temperature, which is fraught with fire.
To prevent this from happening, it is important to properly equip an insulated chimney. Sometimes the minimum error during its construction is enough for the heat to go into the pipe in huge volumes, without having time to heat the room. How can this problem be solved?
How can this problem be solved?
There are two solution options: either mount a water heating system with natural or forced circulation of the coolant, which requires constant monitoring, or build a stove with a heating shield. It is he who is able to almost double the heat capacity of the stove, which will regularly save on raw materials. A decrease in heat loss in this case is due to the passage of combustion products through a chimney made of bricks with high thermal conductivity.
Positive qualities of a stove with a heating shield
A cooking stove with a stove, additionally equipped with a shield, which is made of bricks with perfect walls without chips, in compliance with all technical standards, can completely replace the classic stove.
In comparison with an ordinary brick oven, a cast iron plate with a heat shield has the following advantages
:
- It is able to perfectly warm up the room in a short time period.
- Allows you to preserve heat in the house for a long time even after the stove has died out.
- considered an electric stove.
Classification
Typically, the flap is powered by hot gases emitted from the oven hob. But in some cases, an individual firebox can be built into it.
The result is a structure in which the heat turnover does not depend on the stove in any way.
By wall thickness
Shields are of the following types:
- with thick walls (laid in half a brick);
- with thin walls (laid in ¼ part of the brick).
The thick-walled option is beneficial in terms of low flammability and in the event that a long-term operation of the slab is expected.
The second option requires a clearer observance of fire safety rules, since the structure heats up not partially, but completely. In addition, these shields are laid on a waterproofed foundation. And if they decide to decorate with tiles, then this must be done during the construction process. Such furnaces must be equipped with a metal shell - a casing.
The heating plate must be adjusted differently for operation in summer and winter. This allows you to use only the stove hob in the heat without heating the walls, and in winter to achieve the maximum possible heating. The principle of operation looks like this: in the summer version, the smoke passages are blocked by means of the valve, as a result of which only the stove heats up, and in the winter the valve moves back, which gives an impetus to heating the entire surface of the shield.
By design
Also, shields, depending on the design and installation features, can be:
- Bell type. This unit consists of 2 vertical brick surfaces connected by channels. Getting inside a special hood, the heated air is retained there and effectively heats the room.
- Channel type. It involves the operation of a winding chimney with a metal pipe of the same diameter.In this case, jumpers must be installed, which do not allow the entire surface to heat up in the summer.
Basically, the shields have a straight configuration, but sometimes they can also be angular.
Types of devices and principle of operation
By wall thickness
There are several classifications of heating devices. A stove with a heating shield is divided into the following types:
- Thick walls. The work is carried out on the principle of half a brick. A similar system is used in case of need for long-term equipment with low flammability.
- Thin walls. The ordering is done with a quarter brick thickness. In this case, it is necessary to strictly observe all the points related to fire safety rules in order to prevent the possibility of fire due to the complete heating of the furnace surface. It is recommended to pay attention to waterproofing and metal sheathing when assembling.
By design
A heating and cooking stove with a flap and a trestle bed, depending on the internal structure of the system, is classified as follows:
- Channel. The shield for a metal furnace has a specially developed gas duct grid, which consists in the presence of vertically located channels intertwining with each other. Before leaving the structure and outside the system, gases pass through these channels and transfer heat.
- Bell-type. With a similar shield for a furnace with a cast iron stove, the heating process is realized due to the presence in the system of two chambers with a horizontal vault, which retain gases until they are completely cooled. They then move into a vertical channel and leave the stove through a free exit from the chimney.
Stages of work
Before starting work, you need to purchase a pick, plumb lines, a ruler, a level, a tape measure and a square, a cord, a hammer and a combined trowel, which serves to remove excess mortar.
Of the material for the construction of a standard heating shield and fittings, you will need refractory bricks (about 310 pcs.), About 6 buckets of clay and about 4 buckets of sand, 1.5 meters of waterproofing roofing tar, 3 special cleaning doors, a 20-cm grate for ventilation and 3 pieces of valves (smoke) measuring 13 × 13 cm.
As mentioned above, the shields are erected on the foundation. Therefore, the process begins with the arrangement and waterproofing of the base.
Foundation construction
The mortar in the foundation is leveled with a level, without reaching about 10 cm to the floor. A brick is placed on the dried layer, the base of the structure is treated with a waterproofing material, the outline of the unit is outlined. Then a second layer of brick is laid, finally comparing it to the floor level.
The basic algorithm for laying the foundation is the same for ordering a heating shield of any configuration.
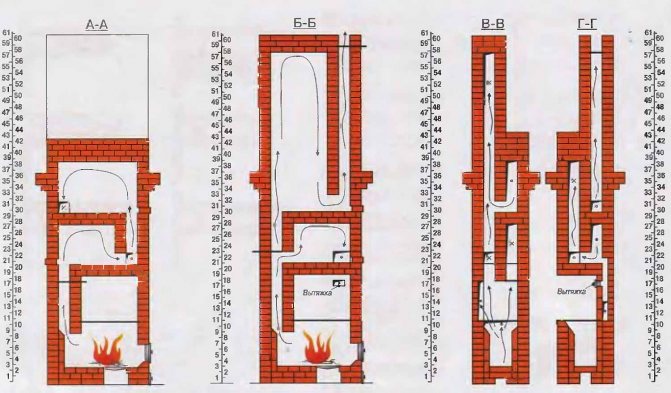
Masonry panel without a stand-alone firebox
1 row - fully lined with bricks. The 2nd and 3rd rows are laid following the order. At the level of the 4th row, 2 cleanings are placed and a window is left among the brick for further connection with the shield. On the 5th row, the same work is performed, but attention is also paid to dressing the seams of the furnace. The 6th row is laid, not forgetting to leave 2 channels.
- Starting from the 7th, including all the remaining odd rows (up to the 25th), lay out the bricks in order, leaving 3 channels.
- Starting from the 8th and including all even-numbered rows, they act strictly according to the scheme-order.
- At the level of the 10th, 11th, 17th, 23rd and 24th rows, a different masonry is used, which provides a stronger bunch of seams.
- In the 10th, 18th and 24th rows, do not forget to put the valve on the right.
- At the level of the 21st and 22nd layers, a samovar is installed, which will be blocked on the 27th row, combining 2 left channels into one common one.
- A reliable valve is placed on the 28th layer, and the 29th is laid out, according to the order, not forgetting about the dressing.
- On the 30th row, the channel on the left is overlapped, and the valve is also reinstalled.
- The 31st and 32nd rows should provide the ligation of the seams and the overlap with a thickness of 3 rows.
- Levels 33, 34 and 35 of layers are laid on the basis of the order, and on the final - 36th row, it is imperative that they take care of leaving the ducts (ventilation with smoke).
How to make a heating shield with your own hands
Making a heating shield is a very real task even for a person who does not have much experience in construction before. At first glance, it will seem to someone that the design is too complex, others will consider this type of heating element simple. However, do not forget that each process has its own nuances that must be taken into account and must be recognized in advance, before the material is laid out.
It is important! The basic rule of long-term layout of the future shield is a properly executed furnace foundation.
The first masonry option
First of all, concrete is poured, it is important that the foundation is not tied to the base of the house structure. After the concrete dries out, it is necessary to lay the roofing material. It will serve as an excellent waterproofing. For clarity, see the figure below.

The diagram will help you clearly understand the design features
Let's look at two simple basic ordering methods.
In the first case, the parameters of the future shield will be 89x38x224 cm.To lay out such a structure, you will need the following tools:
- Trowel;
- Hammer with a small pickaxe;
- Plumb line;
- Roulette, ruler, square, level.
You will also need jointing and lace. These simple tools, in most cases almost every person has them, otherwise it will not be difficult to acquire them.
The materials that will be needed for laying out the shield are also familiar to many and are sold in hardware stores. You will need 309 bricks, about four buckets of clean sand, at least 6 buckets of clay cleared of debris. You will also need 1.5 m of roofing material, 3 smoke dampers, 3 small doors for cleaning from soot and a grate up to 20 cm in size.
Preparatory work
The foundation should be below the floor level, the first brick layer should be laid on it, and then roofing material should be laid. Another brick layer is placed on the roofing material, and it should be at the level of the floor surface. This is the best and safest way to start laying the future shield.
In order not to be distracted during work, check the availability of all accessories in advance.
Process
All actions must be performed according to the instructions:
- After laying the foundation, the first layer of bricks is laid. From 2 to 3 rows, bricks should be laid out, depending on the order that will be preferable.
- The fourth and fifth rows will require cleaning and a window in order for the connection to the flap to be successful.
- In the sixth row, you will need to leave 2 channels.
- From the seventh to the twenty-fifth rows, it is enough to follow the selected order and leave three channels. In this case, the masonry will be in odd numbers of rows.
- From the eighth to the 26th rows, it is enough to follow the order.
- On the eighteenth row, you will need to put a valve. The twenty-first and twenty-second rows are stacked together with the samovar. On the 27th row, after the samovar is closed, it is necessary to combine both channels on the left side.
- On the 30th row, a latch is placed on the right. For row 36, you need to follow the order. The 36th row is the last, but it requires no less attention, since it is necessary to leave the ventilation and smoke channels in it.
The second masonry option
Materials:
- Bricks are needed here in the amount of 680 pieces;
- Refined sand and clay - at least 22 buckets each;
- Steel corners 4 m;
- Door;
- Steel strip about 55 cm;
- Steel sheet not less than 0.5 × 0.7 m;
- Cast iron stove, preferably with 2 burners;
- Door for firebox, blower, cleaning;
- Gate valves;
- Water heating box.
Preparation
Preparation in this case will not differ from the first option. A well-laid foundation is required that meets all the rules. The parameters of the future shield are as follows: 1.40x1.02x2.17 m.Such a design will be larger than the previous one, it will require more forces and materials, but it will be durable and more heat-intensive than the previous version.

The ordering scheme will not allow you to make mistakes during masonry