The normal functionality of a home water supply system depends on the health of the accumulator. If there are malfunctions in the water supply network, it is necessary to immediately establish the cause of the malfunction and repair the equipment. Otherwise, more serious breakdowns and irreversible failure of all equipment may occur. The most common cause of a breakdown is the accumulator membrane. We will learn how to check, replace and diagnose the system.
Pressure in the accumulator and expansion tank
Let the minimum allowable pressure in the system (heating - for an expansion tank, water supply - for a hydraulic accumulator, when the relay is triggered and the pump turns on) is X atmospheres. Then the optimal pressure in the device in the absence of water in it (it is empty) should be 90% of X. You need to check the pressure by completely draining the water. Otherwise, measurements will give nothing.
In general, air from accumulators and expansion tanks can gradually escape. But checking the air sufficiency regularly is difficult. To carry it out, you need to drain all the liquid from the device, which is not always possible. But there are signs that clearly indicate that the air has escaped. For a hydraulic accumulator, this is too frequent turning on of the pump, for an expansion tank, a strong change in pressure in the system when the temperature of the coolant changes. Therefore, immediately after installing the tank, you need to measure how many percent the pressure changes when the medium in the system is completely warmed up, write down this value, and then make sure that this value does not increase too much, pump up as needed. For the accumulator, you need to measure the time between turning on the pump and turning it off, and also make sure that this time remains constant.
Accumulator repair
The reason that can lead to repair work is the rupture of the rubber membrane. Determining that the pear has broken is quite simple. It is necessary to remove the protective roof from the nipple and press it, for example, with a match. If water poured out, it means that the membrane is torn and the liquid has filled the entire tank.
The repair consists in replacing the torn pear:
- the pump is disconnected from the power supply;
- the water pressure in the water supply system is released by opening one of the consumers;
- the flexible hose is disconnected, with which the accumulator is connected to the water supply;
- a wrench unscrews six bolts that attach the flange to the tank body;
- the membrane is pulled out;
- the tank is washed and dried;
- a new membrane is inserted inside;
- a flange is installed, which is tightened with bolts;
- air is pumped through the nipple;
- the accumulator is connected to the plumbing system with a flexible insert.
It is not necessary to use a sealant to seal the joint between the flange and the device body. The rubber bulb, or rather its flange ledge, is itself a sealing element.
Sometimes there are situations where the steel flange of the diaphragm is corroded and cannot perform its function. It just needs to be replaced with a new one. The replacement method is exactly the same. Just don't take the bulb out of the accumulator and rinse it.
The maintenance and repair of a hydraulic accumulator for the water supply system of a private house must be approached responsibly. All manipulations do not take much time. But it is on them that the operability of the tank with the pump depends, and their long-term trouble-free operation.If it is not possible to carry out repairs on your own, for example, the flange bolts are not unscrewed, it is recommended to take the accumulator to a service center. A torn thread or a broken bolt is a breach of the tightness of the instrument.
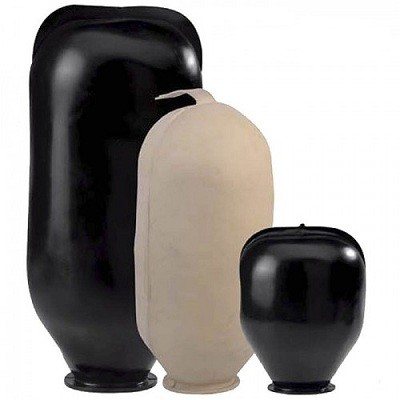
Design differences
First of all, you need to understand that a hydraulic accumulator and an expansion tank, despite the assurances of some unscrupulous managers, are not the same thing. Their design differences are due to the specifics of the application. Installing an expansion tank as a hydraulic accumulator is fraught with unpleasant consequences.
The bottom line is that in the expansion tank for the heating system, the membrane divides the internal volume in half. Initially, the air pumped into the lower half creates enough pressure for the membrane to be completely pressed against the inner surface. As the temperature of the coolant rises, its volume increases, the pressure increases and water begins to flow into the upper half, squeezing out the membrane. Accordingly, the air in the lower half is compressed. The accumulator differs in that a balloon membrane is installed in it, entering into which water does not come into contact with the inner walls.
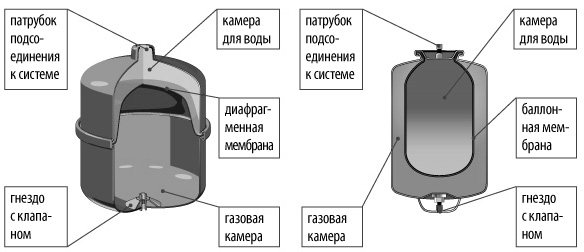
Closed expansion vessels: with diaphragm diaphragm, with balloon diaphragm
Considering the difference between an expansion tank and a hydraulic accumulator, it is necessary to understand that they work in different conditions. The change in the volume of liquid in the heating system is insignificant, in addition, it happens slowly, without sudden jerks. However, temperatures can reach 90 ° C. Therefore, the first requirement for such a membrane is resistance to prolonged exposure to high temperatures.
For a bladder diaphragm in a cold water accumulator, high temperature resistance is not so important, but the ability to operate in a frequent expansion / contraction mode is key.
Unfortunately, there is no universal material that is equally resistant to high temperatures and regular stretching. Diaphragms in modern expansion tanks are made of the following materials:
- NATURAL - can be operated at operating temperatures from -10 to 50 ° С. Extremely flexible material, however, partial diffusion can occur with use. Natural rubber rubber can be used for both drinking and industrial water; - BUTYL - operation at temperatures from -10 to 100 ° C is possible. More stable in terms of diffusion, but not as elastic as NATURAL. Synthetic butyl rubber can be used as a membrane for a hydraulic accumulator; - EPDM - works at temperatures from -10 to 100 ° C. More water permeable than BUTYL. Synthetic ethylene / propylene rubber is installed in tanks for drinking or service water; - SBR - operation at temperatures from -10 to 100 ° C is permissible. Less elastic It is used exclusively in expansion tanks of the heating system, not elastic enough for installation in hydraulic accumulators; - NITRIL - works at temperatures from -10 to 100 ° С. Resistant to active media.
The scope of use of expansion tanks is not limited to heating systems and water supply, they are successfully used for storing extinguishing liquid in automatic fire extinguishing systems, as well as as part of a powder fire extinguishing module.

Regardless of the type, the accumulator and expansion tank are an integral part of any life support system and provide a high level of comfort and safety of living.
The choice of a hydraulic accumulator, expansion tank. Service. Exploitation. Repairs. (10+)
Hydraulic accumulator, expansion tank. Features of choice
The accumulator and expansion tank are designed for slightly different purposes, but they have almost the same structure, so I combined them in one article. The hydroaccumulator is designed to accumulate water in the autonomous water supply system, protect the system from overpressure, and exclude frequent switching on of the pump. The expansion tank is installed in the heating system. It protects it from overpressure that can occur when water (or other heat carrier) expands from an increase in temperature. The key difference between the hydraulic accumulator and the expansion tank is that the expansion tank must operate at a sufficient temperature; such requirements are not imposed on a hydraulic accumulator for cold water. But on the other hand, for most accumulators there are high requirements for the quality of the membrane material, since they are used in the supply of water that can be used for food. For an expansion tank, such requirements are less critical.
How to find and fix a breakdown
Hydraulic tank device
To find the fault yourself, you need to know the structure of the hydraulic accumulator. Parts of its construction:
- metal case;
- rubber membrane;
- flange with outlet for water supply;
- air injection nipple;
- installation platform.
A simple device ensures long-term operation of the equipment and rare breakdowns. Incorrect operating mode settings become their main cause. Troubleshooting is carried out by characteristic signs. Having found the cause of the breakdown, they fix it on their own or invite a specialist.
Frequent activation of the pump causes several factors:
- Low air pressure in the tank. Eliminated by pumping the compressor through the nipple.
- Loss of tightness. Holes appear in the metal case due to rust or mechanical damage. Cover the container with a liquid soapy solution to check for a leak. The tightness is restored by specialists.
- A small threshold difference is set on the pressure control switch. The problem is corrected by adjusting the small spring of the device.
- Diaphragm rupture. The rubber bulb inside the tank can burst due to excessive stretching, friction against the walls of the tank, due to natural wear and tear. The breakage is corrected by replacing or repairing the membrane. Vulcanizing the rubber product restores its integrity. When replacing, you should choose an original part of the same volume.
Low water pressure:
- Insufficient pump power. Check the calculations for the correspondence between the volume of the accumulator and the characteristics of the unit.
- Leaks through the non-return valve. Replace the part after shutting off the water.
Diaphragm for accumulator
Constant water pressure drop:
- Air rarefaction - should be pumped up with a compressor or pump to 1.5-2 atmospheres.
- Broken nipple. The device through which air is pumped may break. The tightness of the tank is lost. You can replace the nipple in the accumulator with your own hands or take the device to a service center. The part is secured with a nut, it is carefully unscrewed, then removed. When installing a new nipple, a rubber gasket and sealant is used.
Fluid leaks on the body:
- The flange is fluid. If the part is new, it is enough to tighten the screws with a wrench. Old rusted flange needs to be replaced. Parts are sold in a specialist store. They are made entirely of metal or with plastic inserts.
- Leaking from the nipple. The cause of the problem is a ruptured membrane. For replacement, it is necessary to remove the flange, then remove the rubber container. It is recommended to wash the inside of the tank. The new membrane is installed after complete drying. It is secured with a flange.
Before starting any repair work, the pumping station is disconnected from the power supply. All the water is drained from the tank by opening the nearest tap.To replace parts, the accumulator is dismantled from the water supply system. During the disassembly process, prepare to remove the significant amount of water remaining inside the membrane.
Design and purpose of devices
Expansion tank
- The main purpose of the tank is to compensate for the expansion of the coolant. When heated, the water increases in volume, and quite strongly (+ 0.3% for every 10 degrees Celsius). In this case, the liquid practically does not shrink, so that the heated coolant will exert significant pressure on the pipe walls, joints and shut-off valves.
- To compensate for this pressure, as well as to minimize the effects of water hammer, an additional reservoir is built into the system - an expansion tank. The first tanks had a leaky design, but today pneumohydraulic models are almost universally used.
- Inside such a tank is a membrane made of elastic material. Since the membrane is in contact with a heated coolant, it is made of polymers that are resistant to high temperatures - EPDM, SBR, butyl rubbers and nitrile rubbers.
- The membrane divides the tank into two cavities - a working one (the coolant enters it) and an air one. As the pressure in the system increases, the air chamber decreases in volume (due to air compression), and this compensates for the load on the pipes and valves. Roughly the same thing happens with a water hammer - but here the process goes at a higher speed.
- With a decrease in the temperature of the coolant, the volume of water decreases, and the air, putting pressure on the membrane, displaces an additional volume of hot water into the pipes of the heating system.
Hydroaccumulator
The hydraulic accumulator, at first glance, practically does not differ in design from the expansion tank:
- The base is the same container made of corrosion-resistant steel, only painted blue.
- There is also a membrane inside the tank, although it is slightly different in shape from the expansion tank membrane.
- The internal volume is also divided into two chambers, only for hydroaccumulators the chamber for water is inside the membrane, i.e. contact of the liquid with the metal walls of the tank is completely excluded.
And the structure functions according to a similar principle, although it is used for a different purpose:
- When the pump is turned on or water is supplied through the centralized water supply, the chamber is filled with liquid at a certain pressure.
- If the pressure drops for some reason, the air chamber expands and water from the working chamber enters the system. Thanks to this, the pressure in the pipes is stabilized, and the equipment (washing machines, dishwashers, etc.) works without interruptions.
- The second aspect of the accumulator's operation is to protect the pump from frequent switching on. As long as it is possible to compensate for the water withdrawal from the system by means of a reserve in the tank, the pressure switch will not work, and the pump will not start pumping water. Thus, the equipment will be turned on less often, which means it will work longer.
- A large accumulator (for 50, 100 or more liters) is also a supply of water. Yes, you won't last long on such a stock, but if you spend it economically, it is quite possible to survive an accident on the water supply system or a power outage, which will make it impossible for the pump to work.
- In addition, the hydraulic accumulator, like the expansion tank, compensates for water hammer.
Required volume of accumulator and expansion tank
You need to clearly understand that the volume of these devices, which is given in the specification, is the volume of the tank itself. It fits less liquid. The volume of the liquid depends on the pressure.
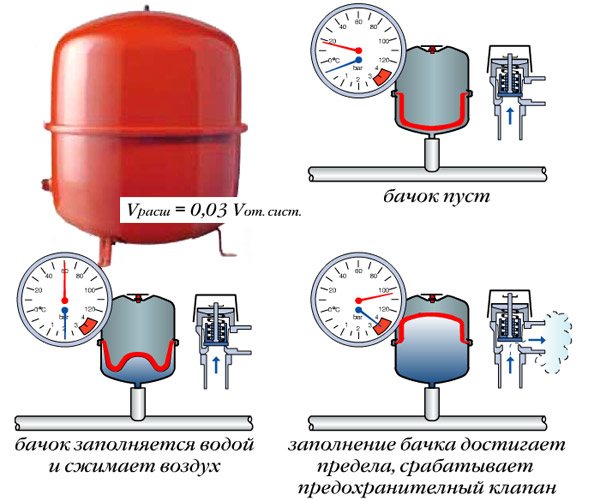
Determining the volume of the expansion tank is quite simple. You need to understand how much water (or antifreeze) will be in your heating system. We take the coefficient of thermal volumetric expansion of water with a margin of 6E-4. Thus, the volume of water when heated from zero to 100 degrees will increase by 0.06 times, that is, by 6%.If there are 100 liters of water in the system, then the excess volume will be 6 liters.
Now we need to decide on the permissible coolant pressure in the heating system. Let the minimum value be X1 and the maximum X2. This is usually 1.8 atmospheres and 2.4 atmospheres. If the pressure in the empty expansion tank is 90% of the minimum allowable for the coolant (let it be X0), then [The required volume of the expansion tank, liters
] = [
0.06
] * [
Coolant volume in the system, liters
] / (([
X0, liters
] + [
1
]) / ([
X1, liters
] + [
1
]) — ([
X0, liters
] + [
1
]) / ([
X2, liters
] + [
1
])). For our case with 100 liters of media, we get 36 liters. In this case, more is not less. You can take it with a margin, but this volume will be enough.
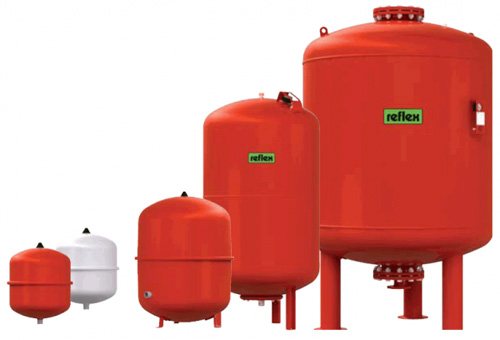
The accumulator volume depends solely on the maximum peak water flow. If one tap can work in the house at the same time, then the volume of the accumulator should be about 30 liters, if two taps - 60 liters, if 3 - 90, and so on.
Connecting the accumulator to the system
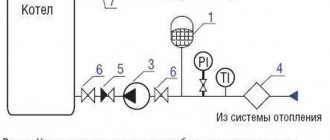
Typically, the water supply system of a private house consists of:
- pump;
- hydroaccumulator;
- pressure switch;
- check valve.
In this scheme, a pressure gauge may still be present - for operational pressure control, but this device is not necessary. It can be connected periodically to carry out test measurements.
With or without 5-way union
If the pump is of the surface type, the accumulator is usually placed near it. In this case, a check valve is installed on the suction pipeline, and all other devices are installed in one bundle. They are usually connected using a five-way union.
It has leads with different diameters, just for the device used for piping the accumulator. Therefore, the system is most often assembled on its basis. But this element is not at all necessary and you can connect everything using ordinary fittings and pieces of pipes, but this is a more laborious task, and there will be more connections.
With one inch outlet, the fitting is screwed onto the tank - the fitting is located at the bottom. A pressure switch and a pressure gauge are connected to the 1/4 '' outlets. The pipe from the pump and wiring to consumers are connected to the remaining free inch outputs. That's all the connection of the gyroaccumulator to the pump. If you are assembling a water supply circuit with a surface pump, you can use a flexible hose in a metal winding (with inch fittings) - it is easier to work with it.
As usual, there are several options, you can choose.
Connect the accumulator to the submersible pump in the same way. The whole difference is where the pump is installed and where to supply power, but this has nothing to do with installing a hydraulic accumulator. It is placed in the place where the pipes from the pump go. Connection - one to one (see diagram).
How to install two hydraulic tanks on one pump
When operating the system, sometimes the owners come to the conclusion that the available volume of the accumulator is not enough for them. In this case, you can install a second (third, fourth, etc.) hydraulic tank of any volume in parallel.
There is no need to reconfigure the system, the relay will monitor the pressure in the tank on which it is installed, and the viability of such a system is much higher. After all, if the first accumulator is damaged, the second will work. There is one more positive point - two tanks of 50 liters each cost less than one per 100. The point is in a more complex technology for the production of large-sized containers. So it is also more cost effective.
How to connect a second accumulator to the system? Screw a tee onto the input of the first one, connect the input from the pump (five-way fitting) to one free output, and the second container to the remaining free output. Everything. You can test the circuit.
No water enters the hydraulic tank
This reason for the inoperative state of the hydraulic tank is common.It's all about the degree of pollution of the water that is pumped from a well or borehole. Filters are installed in front of the pump and the entrance to the house, which periodically clog up. This leads to the fact that the accumulator does not collect water.
The pump has the least problems with the first filter. It rarely clogs, because it has a mesh structure with large cells. Its task is not to let stones and debris inside the pumping unit.
Filters installed inside the house in the water treatment system often get clogged. The dirtier the water, the faster the blockage occurs. Usually the cartridges are replaced with new ones. In the passports of these products, standards for the service life of devices are established. They should be taken as the basis for prevention.
Repairs
Common malfunctions are: breakage of the air check valve (nipple) and damage to the diaphragm. The check valve can be replaced by supplying from a car tire. They fit in most accumulators and tanks. Damage to the diaphragm can only be repaired in repairable (dismountable) devices. I myself have done this a couple of times successfully. It is necessary to disassemble the tank, remove the membrane, thoroughly wash and dry it, find the place of damage, degrease, glue or vulcanize it
When choosing an adhesive, be sure to pay attention to whether it is waterproof, elastic, whether it can be used for elevated temperatures (for an expansion tank), whether it can come into contact with food (for a hydraulic accumulator)
Unfortunately, errors are periodically encountered in articles, they are corrected, articles are supplemented, developed, new ones are being prepared. Subscribe to the news to keep up to date.
I have such a question - is it possible to use a container with one input as a hydroaccumulator. Will water compress the air inside the tank and thus act as a damper? I mean there is no membrane in the design. Read the answer.
Forced circulation heating system. Organization of forced circulation of the coolant in the heating system circuits.
Fill in the coolant. How to replace antifreeze in the heating system. How to properly fill the heating system with coolant, choose between water and.
Pipe heating system so that the winter water supply does not freeze. With your hand. DIY plumbing. External, non-freezing. Laying water pipes h.
Gas into the house is autonomous. Is it real? Personal experience. Feedback. Installation errors. Review of the experience of autonomous gasification, installation of a gasholder for liquefied gas. T.
Tight threaded pipe connection. Plumbing glue - sealant. How to properly thread pipes in a pipeline? Ensuring tightness.
Personal experience in the selection of a gas burner for heating according to the characteristics of K. How to choose the right gas burner for heating. Advice. Personal experience. Feedback.
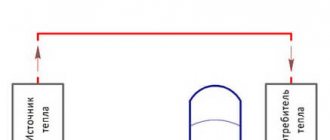
In order to prevent the pump from turning on every time a tap is opened in the house, a hydraulic accumulator is installed in the system. It contains a certain volume of water, sufficient for a small consumption. This allows you to practically get rid of short-term pump starts. The installation of a hydraulic accumulator is not difficult, but a certain number of devices will be required - at least - a pressure switch, and it is also desirable to have a pressure gauge and an air vent.
What should be the pressure in the accumulator
In one part of the accumulator there is compressed air, in the second water is pumped. The air in the tank is under pressure - factory settings - 1.5 atm. This pressure does not depend on the volume - it is the same on both a 24-liter tank and a 150-liter tank. More or less can be the maximum permissible maximum pressure, but it does not depend on the volume, but on the membrane and is indicated in the technical specifications.
Preliminary check and pressure correction
Before connecting the accumulator to the system, it is advisable to check the pressure in it. The settings of the pressure switch depend on this indicator, and during transportation and storage the pressure could drop, so control is very desirable. You can control the pressure in the gyro tank using a pressure gauge connected to a special inlet in the upper part of the tank (capacity from 100 liters and more) or installed in the lower part of it as one of the strapping parts. Temporarily, for monitoring, you can connect a car pressure gauge. His error is usually small and it is convenient for them to work. If this is not the case, you can use the standard one for water pipes, but they usually do not differ in accuracy.
If necessary, the pressure in the accumulator can be increased or decreased. There is a nipple for this at the top of the tank. A car or bicycle pump is connected through the nipple and, if necessary, the pressure is increased. If it needs to be vented, bend the valve of the nipple with some thin object, releasing the air.
What air pressure should be
So should the pressure in the accumulator be the same? For normal operation of household appliances, a pressure of 1.4-2.8 atm is required. To prevent the tank membrane from breaking, the pressure in the system should be slightly higher than the tank pressure - by 0.1-0.2 atm. If the pressure in the tank is 1.5 atm, then the pressure in the system should not be lower than 1.6 atm. This value is set on the water pressure switch, which works in tandem with a hydraulic accumulator. These are the optimal settings for a small one-story house.
If the house is two-story, you will have to increase the pressure. There is a formula for calculating the pressure in the hydraulic tank:
Vatm. = (Hmax + 6) / 10
Where Hmax is the height of the highest draw-off point. Most often it is a shower. You measure (calculate) at what height its watering can is relative to the accumulator, substitute it in the formula, you get the pressure that should be in the tank.
If a jacuzzi is installed in the house, everything is more complicated. We'll have to select it empirically - changing the relay settings and observing the operation of the water points and household appliances. But at the same time, the working pressure should not exceed the maximum allowable for other household appliances and plumbing fixtures (indicated in the technical specifications).
Accumulator problems
The most common malfunction is a decrease in pressure inside the water supply network. There is only one reason - the pressure between the rubber membrane and the steel walls of the accumulator has dropped. At the factory, nitrogen is pumped into the tank under a pressure of 1.5 atm. It creates a pressure inside the water supply network by pressure on the membrane into which water is pumped from a well or well.
The nitrogen pressure decreases for various reasons, but more often due to the weak holding capacity of the nipple. It is not difficult to solve this problem yourself. For this, a car pressure gauge is used, which checks the pressure by installing it on the nipple. The latter is located on the opposite side from the inlet pipe of the hydraulic tank.
- Remove the plastic nipple cover.
- Install a pressure gauge, check the pressure inside the container.
- If the parameter is underestimated, air is pumped through the same nipple with a conventional automobile pump to the desired value.
- Close the nipple with a cap.
Usually this operation is carried out on an operating device, therefore there are certain requirements for the procedure. To do this, turn off the pump, open one of the consumers (usually the closest to the accumulator) and drain all the water.
Even if after this the pressure in the accumulator used quickly drops, the reason must be looked for in another. Most often these are smudges at the joints of the plumbing system. Therefore, it is necessary first of all to investigate the entire water supply system.Usually, they check the joints between pipes, joints with fittings, with valves, with filters for various purposes, with consumers and other products installed in the plumbing system of a private house. If smudges have been identified, they must be eliminated.
There are two more reasons why the accumulator does not hold the required pressure. This also applies to reducing the nitrogen pressure inside the tank.
- Over time, areas of leaks appear at the junction of the flange-nipple connection. Gas leaks through them. To solve this problem, it is necessary to unscrew the nipple, remove the old flange and replace it with a new one. Spare parts and parts from hydraulic tanks are sold in all hardware stores.
- The same goes for the joint between the flange and the pear-shaped rubber diaphragm. Sometimes this problem is solved by simply tightening the fastening bolts (there are six of them in the tank design).
Sometimes in the accumulator, the membrane simply breaks due to wear. To replace the rubber bulb, you need to disassemble the device:
- the pump is disconnected from the power supply;
- one of the consumers opens, water is drained from the water supply network;
- flexible hoses connecting the accumulator with the water supply are unscrewed;
- unscrew the six bolts connecting the flange with the membrane with a wrench;
- the flange is removed, the pear is pulled out;
- the container is washed and dried;
- a new membrane is installed;
- a flange is mounted, which is tightened with fastening bolts;
- from the side of the nipple, air is pumped into the tank using a car pump up to a pressure of 1.5 atm .;
- the accumulator is connected with flexible hoses to the water supply;
- the pressure switch is configured to turn on and off the pump unit, taking into account the passport pressure of the hydraulic tank.
This repair process can take several hours. The service center will do it in half an hour. But since the procedures are simple, you can do them yourself.
To find out exactly whether the rubber membrane has torn or not, one experiment is necessary. You need to take a screwdriver or a match, which you need to press on the nipple. If water poured out, it means that the container is completely filled due to a ruptured membrane.
How to choose
The main working body of the hydraulic tank is a membrane. Its service life depends on the quality of the material. The best today are membranes made of isobutated rubber (also called food grade). The body material matters only in membrane-type tanks. In those in which the "pear" is installed, water is in contact only with rubber and the material of the body does not matter.
What's really important about pear tanks is the flange. It is usually made of galvanized metal.
In this case, the thickness of the metal is important. If it is only 1 mm, after about a year and a half of operation, a hole will appear in the metal of the flange, the tank will lose its tightness and the system will stop working. Moreover, the warranty is only one year, although the declared service life is 10-15 years. The flange usually deteriorates after the end of the warranty period. There is no way to weld it - a very thin metal. You have to look for a new flange in service centers or buy a new tank.
So, if you want the accumulator to serve for a long time, look for a thick galvanized flange or a thin one, but made of stainless steel.
Repair or how to glue
The membrane can be repaired by vulcanization. This method can extend its life by several weeks before purchasing and installing a serviceable product. But any repairs are a temporary measure and in any case you will have to buy a new one.
Accumulator without diaphragm
In addition to standard factory-made hydraulic tanks, you can make such a device yourself. A hydraulic accumulator without a membrane is a normal water tank because it is the membrane that helps maintain the pressure in the system. It is much easier to buy an inexpensive ready-made hydraulic accumulator.
In order to build a hydraulic accumulator yourself, you need the following materials:
- tank (capacity) with a volume of at least 30 liters;
- shut-off valves;
- ball valve;
- half-inch faucet;
- fasteners (washers and nuts);
- sealant (sealant);
- rubber gaskets;
- nipple;
- fittings (tee, worm).
- Make holes in the container (on the lid and bottom, on the side).
- Install a half-inch valve in the upper hole (on the cover), seal the connection with gaskets and sealant, and secure with washers.
- Put a tee on the tap.
- Fix a shut-off valve ¾ in the lower hole, onto which to slide a tee.
- Install a ball valve on the side hole.
Expansion tank
Heating water is used to transfer heat from the boiler to the radiators. It is known that when heated by 10 ° C, the volume of water increases by about 0.3%, from which it follows that heating to the prescribed 70 ° C will give an increase in volume by about 3% of the original. It is known from the school physics course that liquids are practically incompressible, therefore even such a seemingly insignificant increase in volume can lead to a rupture of the pipeline or leaks at the joints. In order to prevent this from happening, an expansion tank is installed in the heating system.
Initially, such containers were open, which led to certain problems:
- the liquid in them constantly evaporates, you have to monitor the water level and regularly replenish it; - an open expansion tank should be installed in the upper part of the system and insulated to prevent the coolant from freezing and, as a result, the structure's rise in price; - constant access of oxygen promotes corrosion; - pressure regulation with an open circuit is difficult.
Modern materials and, in particular, a strong and elastic membrane material, make it possible to equip a closed system, without oxygen access to the coolant. This also allows for a constant water level and the ability to adjust the pressure. Another advantage of the closed container is that it is easy to install and maintain. It can be installed anywhere in the heating system and, if necessary, can be easily dismantled and connected elsewhere.
Accumulator maintenance
In order for the plumbing system to work, taking into account the responsibilities assigned to it, it is necessary to properly maintain it. In this regard, special attention is paid to the hydraulic tank. Preventive actions:
- check once every six months for compliance with the nitrogen pressure inside the container;
- check the membrane for leaks once a year;
- once a month inspect the tank for dents, rust and other external defects;
- once every six months, check the operation of the pressure switch: whether the pump turns on and off correctly, whether it corresponds to the specified parameters.
If the house is preserved for the winter, the water supply must be prepared. The main task of the owner is to drain the water from the accumulator and pipes. It is recommended to check all the elements in the spring. In the hydraulic tank, first of all, the gas pressure is checked, and then it is filled and checked for leaks.
The normal functionality of a home water supply system depends on the health of the accumulator. If there are malfunctions in the water supply network, it is necessary to immediately establish the cause of the malfunction and repair the equipment. Otherwise, more serious breakdowns and irreversible failure of all equipment may occur. The most common cause of a breakdown is the accumulator membrane. We will learn how to check, replace and diagnose the system.
How to check and diagnose faults
Most of the malfunctions of the accumulator can be corrected independently. All reasons can be divided into several groups.
Table 1. Malfunctions in accumulators
| Signs | Possible cause of the malfunction | Diagnostics | Remedy |
| Pump malfunctions - frequent switching on / off | Diaphragm breakage | Disconnect the accumulator from the system: |
Start draining the water.
If air escapes, the membrane is mechanically damaged.
lack of compressed air in the tank.
Air pumping to the required pressure
Recommendations for the maintenance of accumulators:
- Monthly inspection, checking the compliance of operating parameters with the norm (for each model and system individually).
- Check for corrosion spots on the body and connections.
- Check for smudges and moisture of surfaces at the joints.
- If there are malfunctions or malfunctions, eliminate them immediately.
- Checking the integrity of the membrane (inspection every six months).
- When not in use, store the hydraulic tank in a dry place, avoid contact with heating devices (to avoid drying out and destruction of the membrane material).
Membrane selection
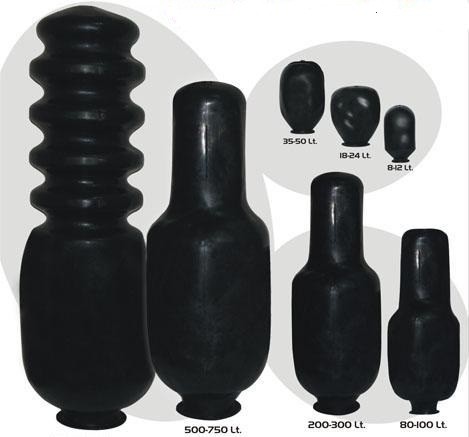
Accumulators distinguish between vertical and horizontal design. Accordingly, the membranes also differ in different shapes and designs: cone-shaped, cylindrical, spherical, ribbed.
When replacing a unit, you should purchase a product with similar characteristics - size, volume, throat diameter, maximum temperature of the working medium, material, working pressure, etc.