Characteristics of closed expansion tanks
Sealed metal containers are used, in which there is a supply of coolant in case of temperature compression of the liquid. This is how the problem of airing the pipeline is solved. If the coolant, expanding during heating, creates too much pressure, the hydraulic tank compensates for the difference.
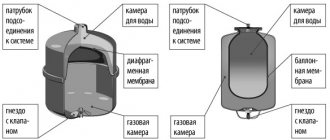
Despite the apparent simplicity of the design, the expansion tanks are different from each other, and different models have different operating parameters. Structurally, the following types of hydraulic tanks are distinguished:
- Reservoirs for pear replacement.
- Tanks with a permanently installed membrane.
- Tanks that do not have a membrane in the design.
In the first case, the pear acts as a membrane. It is into it that air is pumped, which changes the volume of the working chamber with a thermal increase in the volume of liquid in the system. The air pressure in the expansion tank must be such as to squeeze water into the pipes when the temperature in the radiators drops.
Why are air pockets forming in the cooling system?
There can be several reasons for air entering the engine cooling system. The most common of them is a leakage at the joints of the pipes of the system with branch pipes and fittings. In addition, very often air enters the cooling system due to non-observance of the rules for replacing or adding coolant.
Another possible reason for the formation of an air lock in the system is a malfunction of the expansion tank air valve. When the valve fails, instead of releasing excess pressure, it allows air to enter the system. Also, air can be sucked in through the pump if its tightness is broken.
Air can also enter the engine cooling system due to a defect in the outer shell of one of the radiators or the cylinder block gasket.
The cause of air entering the cooling system should be eliminated, and the plug itself should be expelled from the system to avoid more serious problems.
Setting the tank pressure in the water supply system
Initially at the time of sale, plumbing tanks have a standard pressure of 1.5 bar in the tank chamber. The instructions for use indicate the permissible range, which is not recommended to go beyond, especially in the direction of increase.
To correctly set the optimal mode for the hydraulic tank, the following recommendations are taken as a basis:
- The air pressure in the expansion vessel is adjusted after the power supply is cut off.
- The valves must be closed. The water is drained, leaving the container empty.
- The air pressure in the expansion tank is recorded using a pressure gauge.
- In case of non-conformity, the air is pumped up or vented until the values set by the manufacturer are reached.
In the production of hydraulic tanks, inert gases are used instead of air in order to exclude the appearance of foci of corrosion. When manually adjusted, the pressure is made 10% lower than the manufacturer requires.
It should be remembered that after turning on the pump, the working chamber of the hydraulic tank will be filled with water, and only then will it reach the consumer. If the air pressure drops, the head is unstable. And when the equipment is operating normally, it is constant and does not change while using the system.
Adjustment of the hydraulic tank in the piping of the water heater
There is one peculiarity here. Such hydraulic tanks must have a slightly higher operating air pressure, namely 0.2 bar higher than written in the instructions.
So, if the pump delivers 3.5 bar, the hydraulic tank is set to 3.7 bar.The first functional check and adjustment is performed before starting the system, until the tank is filled with coolant.
No liquid in the chamber is normal operation. And it fills up only when the water in the pipes heats up. Lack of air pressure in the expansion tank leads to the fact that the coolant fills the tank, which is a violation of operational requirements. In this case, it is necessary to turn off and release the system, and then configure the hydraulic tank again.
Air has entered the engine cooling system: the main signs of airing
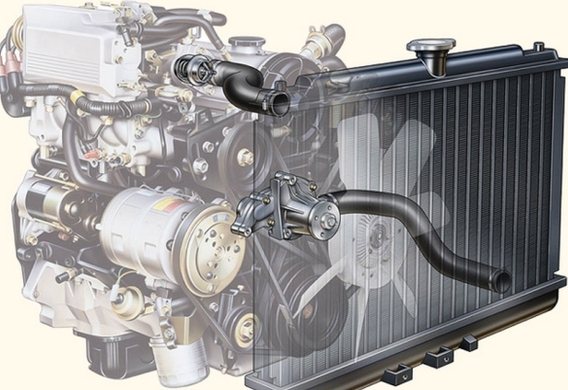
For a better understanding, let's start with the general principles of work. While the engine is cold, the liquid circulates only through the cooling jacket (special channels in the cylinder block and cylinder head), without entering the radiator. The circulation is provided by a water pump (pump).
After the coolant temperature reaches a certain value, the thermostat is triggered, which opens a large circle (the liquid passes through the radiator). If the cooling of the coolant when driving in a large circle is not enough, then the engine cooling fan (air cooling) is automatically activated.
In this case, it is important that the system works correctly, since its efficiency depends on maintaining the optimal temperature of the internal combustion engine, the normal functioning of the interior heater (stove), etc.
Please note that these malfunctions can occur for various reasons, that is, the engine begins to overheat not only due to the occurrence of air jams, but this likelihood should also not be ruled out.
As with any closed loop fluid system, trapped air can cause the system to stop operating normally. In this case, the risk of motor overheating also increases significantly, the stove stops working normally.
- The main symptom of an air lock is engine overheating. In other words, the temperature rises above normal, the temperature gauge may rise to the red zone. In this case, when checking the coolant level in the expansion tank, no deviations may be detected.
- Also, in the cold season, the driver may notice that warm air practically does not enter the passenger compartment, although the engine is normally warmed up. It also indicates that there may be air in the cooling system.
One way or another, but the air lock does not allow the coolant to circulate normally through the channels of the cooling system. As a result of impaired circulation, certain problems arise. As part of the diagnosis of the engine cooling system, you should check the coolant level in the expansion tank, and also carefully inspect individual sections of the system.
Leaks of antifreeze or antifreeze, any visible damage to hoses and nozzles are not allowed. You also need to check the reliability of fixing the clamps at the joints. It often happens that air enters the system precisely because of a loose or worn-out clamping clamp.
We also note that air can enter through subtle cracks in the rubber pipes, while there may not be intense leaks through these cracks. Usually, such cracks are not immediately visible, however, a detailed inspection or the introduction of air into the system under pressure for verification can identify problem areas. Also, during the check, you should pay attention to the pump, check the operation of the thermostat and the cooling fan.
If everything is normal, then there is a high probability that the stove does not work and the motor overheats precisely because of air congestion. In this case, it is necessary to take measures and "drive out" such a plug from the cooling system.
Open type hydraulic tank
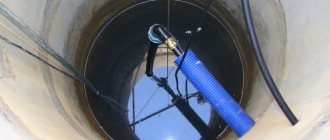
Such designs are considered obsolete, since they do not provide absolute autonomy, and can only increase the period between services.The heated liquid evaporates, and its shortage must be eliminated by periodically adding the coolant, replenishing its volume. No diaphragms or pears are used. The pressure in the system appears due to the fact that the open hydraulic tank is mounted on a hill (in the attic, under the ceiling, etc.).
Naturally, there is no air pressure in the open-type expansion tank. When calculating, it is taken into account that one meter of water column creates a pressure of 0.1 atmospheres. However, there is a way to automate the extraction of water. For this, a float is installed, which, when lowered, opens the tap, and after filling the tank, it rises and blocks the access of water to the tank. But in this case, you still need to control the operation of the system.
Niva Chevrolet cooling system malfunctions
First of all, the breakdown can be determined by the engine temperature. Significant overheating or hypothermia can be caused by many factors. First of all, you should pay attention to the temperature threshold at which the fan on the radiator turns on. If the thermostat fails, there will be a significant difference in engine and radiator temperatures. It is also necessary to check the belt that drives the pump.
Depressurization of the system is possible due to damage to the expansion tank or the valve in its lid. This will lead to a decrease in pressure in the system, antifreeze will boil at a lower temperature, but not enough to turn on the radiator fan.
Attention! Antifreeze can only be topped up when the engine is off and cold, as hot antifreeze can splash out, causing severe burns. It also increases the risk of poisoning with vapors that are formed as a result of the boiling of antifreeze.
If the thermostat sticks in the open position, it is possible that, when driving at high speed, the engine will overcool. This also leads to serious problems in the winter: the engine cannot warm up to the desired temperature, the ECU increases fuel consumption for warming up, a large amount of carbon deposits forms on the cylinder walls. It also helps to reduce the viscosity of the oil, reduces the resource of the catalyst.
Hydraulic tank maintenance rules
The essence of the audit is to check the pressure in the air chamber. The pressure gauge must be in good working order and have a measurement accuracy of 0.1 bar. You can use a car tire pressure tester. Convenient when the scale contains gradation and in atmospheres. Then you do not have to recalculate if the instructions indicate the pressure in other units.
If, as a result of inflation, the air pressure in the expansion tank does not rise, this may indicate that the bulb or membrane has failed and requires replacement. During the inspection, the nipple and valves are checked. They must be sealed.
It is important that this equipment adheres to the parameters set by the manufacturer. It is not worth checking the strength, but after pumping the air should remain in the gas chamber for a long time.
How to properly pump the expansion tank in the boiler.
Today I want to talk about what a closed-type expansion tank is, how it is arranged, what it is for, how to choose the right expansion tank, what air pressure needs to be maintained in it and how to pump it up correctly. If you are interested, then listen further.
The device of a closed-type expansion tank is very simple - it is a container, most often made of steel, divided inside by an elastic diaphragm. On one side of the diaphragm, there is water in working order, on the other - air. Instead of a diaphragm, something like a rubber bulb or "balloon" placed inside a steel container can be used.In the part that is filled with water, a connecting nipple with a thread with a diameter of 3/8, ½, ¾ or 1 inch and others is welded. In the part where the air is located, a fitting with a conventional automobile nipple is built in for filling with air. The shape of the tank can be different - cylindrical in the form of a small barrel, it can be rectangular or round. It depends on where you want to install this expansion tank. There are tanks with feet for installation on the floor, there are for hanging fasteners to the wall or inside the boiler or other equipment.
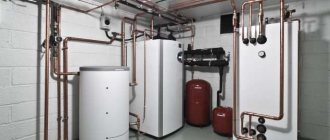
Now let's figure out what the expansion tank is for and where they are installed. They are installed in heating and water supply systems.
IN heating system an expansion tank is needed to compensate for the thermal expansion of water or other coolant poured into the system. As we all know, a liquid is an incompressible medium that tends to change its volume depending on temperature. To put it simply, the same amount of liquid at different temperatures occupies a different volume. Most modern heating systems are closed, that is, they have no connection with the atmosphere, and have a certain volume that does not change. If an expansion tank is not installed in the system, or it is selected incorrectly, then when the heating heats up, the liquid will not expand where and the pressure will rise to a critical value, after which the coolant will be discharged through the emergency relief valve in the system. After turning off the boiler and cooling down, the pressure, on the contrary, will drop to zero, the pressure sensor will work and to start the boiler into operation, you will have to refill the system with water again.
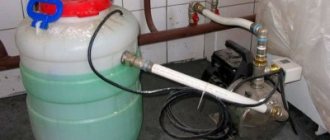
General rules for using a printer with CISS
1. First and foremost - CISS containers with ink, they are donors, should be on the same plane with the printer (there are rare exceptions, but this is a separate conversation), i.e. if the printer is on the table, then donors should also be there. Under no circumstances should the user lift the ink containers higher as this threatens to leak ink into the inside of the printer.
You can repair or update your printer in Simferopol at the service center on the street. Starozenitnaya, 9 (entrance from the side of the fence). Please contact us during business hours from 9.00-18.00 at +7 (978) 797-66-90
Often, containers are placed on the printer during transportation of the device, wiping dust from the table, and then they forget to return to their place, and the most common case is when they see air gaps in the ink plume and try to drive them into the cartridges, raising the donors up.
Dear friends, do not do this if you do not have extra money or time to repair the printer.
2. Refill on time with CISS ink... As I wrote above, very often they forget to refuel or put it off for later and forget again. Try to refill CISS donors when the ink level has reached about 1.5 cm from the bottom of the containers. It is not necessary to fill up to the eyeballs, it is advisable not to add about 1 cm to the top, so that the ink does not flow from all the slots of the donors and they remain clean.
3. The donors of CISS should be clean and without a layer of dust. Please keep an eye on the purity of the CISS, as. dirt can get into your ink, then into the print head, resulting in poor print quality, and subsequently a print head replacement. Dirt enters the air holes of the donors, thereby preventing air from entering the donors and the release of ink into the cartridges. If during refueling with ink, you accidentally spill it on the CISS, do not be too lazy to immediately wipe off the leaked ink, not leaving it for later.
4. Make sure that the ink train is not bent, squeezed along its entire length... I often meet printers with not very neatly installed CISS, namely, not always reasonably laid ink trains. This is very important becausecorrect operation of the printer and stable ink supply to the print head depend on a correctly laid cable. Correctly laid and securely fixed ink ribbon will not interfere with the movement of the carriage with cartridges, thereby causing various errors in the printer. The ink ribbon should not be pinched, for example, by the scanner unit of the printer, because because of this, ink will not flow and, accordingly, the printer will not give you high-quality printing.
5. Clean air filters. I highlight this as a separate item, because users do not care when the air filter is painted in the color of ink, but in vain!
The direct purpose of the CISS air filter is to prevent dust from entering the inside of the donors and, in the event of a donor coup, not to allow ink to flow through the air holes of the donors.
The air filter painted in the color of the ink sometimes does not allow air to pass through and, accordingly, for this reason, the color that protects this filter will stop printing. Therefore, either wash the filters with running water, or it is better to change them.
It seems that everything with regards to the rules for using the CISS, if you missed something, or wrote it incorrectly, tell me in the comments to the article.
CISS ink
I will say a few words about ink ...
The most important rule that I have learned for myself is that fresh ink must be filled into the printer, regardless of the manufacturer!
What does fresh ink mean, this is ink that is up to about 6 months from the moment of refilling it in the CISS or from the moment the container containing this ink is opened. It is advisable to spend the ink filled in the CISS in 8 months, tk. by the year there will most likely be problems with print quality.
Do not refill printers with old ink, the printer can and will print, but due to old ink, there is a constant loss of colors, complete or partial, and as a result, the number of head cleaning increases, as a result an overfilled diaper. Not the best color reproduction due to old ink.
When is it worth pumping the CISS, and when it is not worth doing it
CISS should be pumped in the following cases:
1. During printing, part of the color or one of the colors disappears. Perhaps there is little ink left in the cartridge (s) and there is a shortage of ink during printing, as a result of which part of the color or one of the colors, or several, disappears.
2. Does not print one of the colors or several. The cartridge or capsule is completely out of ink.
3. The ink plume is filled with air for a third or more of its length. In this case, it would still not be bad to check the system for leaks.
You should not pump the CISS in the following cases:
1. When you see air gaps up to 5cm in the ink trail. This may be due to raising and lowering the ink tanks.
How to pump ink into CISS of Epson printer
The usual cartridge CISS of Epson printers can be pumped in two ways:
- through the hole from which ink comes out of the cartridge into the print head.
It is necessary to insert a medical syringe into this hole, tilt it at an angle of about 60-70 degrees (see photo 2), pull the syringe plunger towards you and remove the syringe from the cartridge at the moment the syringe starts filling with ink. This will fill the ink loop and the CISS cartridge with ink. Follow the procedure with each of the cartridges.

Photo 2
- through the air / filling hole of the cartridge.
The air / filling hole in CISS cartridges is always closed with a sealed plug. Having pulled out this plug, it is necessary to insert the syringe tightly into the hole and pull the syringe plunger until the syringe is filled with ink, then close the hole back with the plug.
Attention! It is very common for users to make a serious mistake by punching the plug that closes the air / fill port with the syringe needle.photo 4), thereby violating the tightness of the CISS. As a result, over time, the cartridge runs out of ink, and from the ink plume the ink runs back to the CISS donors.
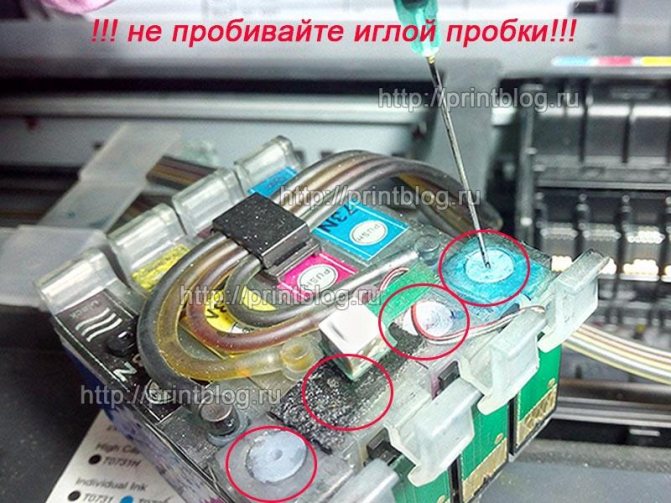
Photo 4
How to pump ink into a Canon CISS printer
If with Epson printers everything is already clear in principle: a separate print head and separately cartridges, then with Canon printers everything is a little more complicated. Canon printers have models where the print head is located directly on the cartridges (see photo 5), and there are models in which, like Epson printers: separate cartridges, separate print head (see photo 6).
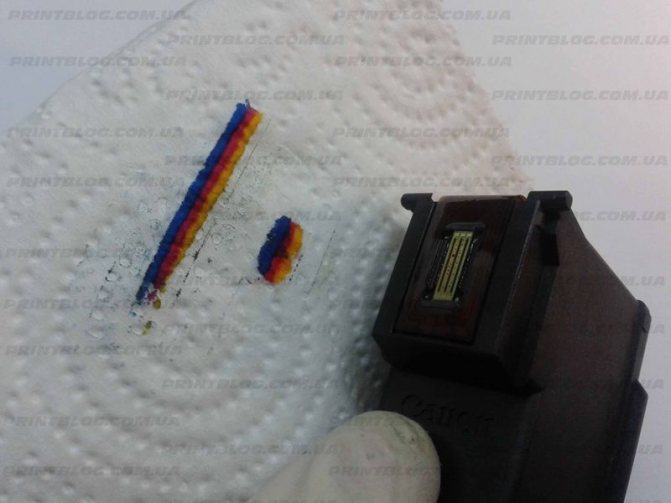
Photo 5

Photo 6
How to bleed CISS in Canon printers where the print head is built into the cartridge
There are two ways to do this:
1. Disconnect the CISS from the cartridges, refill the cartridges in the usual way, fill the CISS loop and connect it back to the cartridges. Note that in CISS based on original cartridges with a built-in print head, air appears in the ink plume often due to leaky connections, and sometimes due to a leaky cartridge.
2.Using a special platform or clip, unfortunately I don't know its exact name (see photo 7). A very handy tool and makes work very easy. You insert the cartridge into the mouthpiece, turn the cartridge over so that the print head is at the top and draw out the ink with a syringe. Pull the ink out until no more air escapes from the cartridge.
- 20 in stock
Water pressure and air pressure
In this article, I first look at the problem from a theoretical point of view. I don't even take the tank itself, but an ideal model and see what processes take place in it. And only towards the end of the article I indicate how our ideal model differs from a real tank
These, as they say in Odessa, are two big differences. Water is incompressible, therefore, it is impossible in principle to create pressure in the water supply system by compressing water. And how can you? Due to just two things. By stretching everything that can be stretched with water. For example pipes or hoses.
A more working idea is to create water pressure with air. Air, in fact, is compressed very well and can simply act like a spring. That is why it is used in closed expansion vessels. Let's refer to the following diagram. On it, I depicted an expansion tank. But conditionally, so that you can understand how it works from the point of view of a principle, and not a real device. Everything is very simplified here. We have a cylinder in which a piston runs. There is water on one side of the piston and air on the other. The main physical law that will interest us is that with a decrease in the volume of gas at a constant weight of the gas and temperature, the pressure increases. The relationship is linear. We reduced the volume by 2 times - the pressure increased by 2 times.

Why does it become necessary to pump the fuel system of a diesel internal combustion engine and how to do it
As mentioned above, diesel is supplied with fuel under high pressure. The specified pressure is created by a high pressure fuel pump (high pressure fuel pump). In the event that air leaks, the pressure in the pump does not reach the required values for efficient fuel injection into the cylinders of a diesel engine.
Naturally, in such a situation, the diesel engine does not start well, operation in idle mode and under load can be unstable (diesel troit), the speed begins to float, the power unit can stall while in motion, etc. Note that not only airborneness manifests itself in the form of these symptoms, but it may also be one of the reasons.
Next, you need to invite an assistant who will turn the engine with a starter. The main thing is to determine whether fuel is coming or not coming from the pipelines. If there is no supply, there may be air in the system and it needs to be pumped.
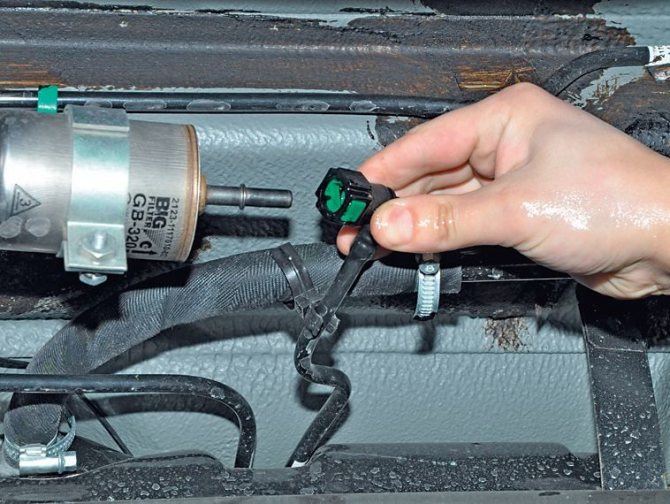
- First of all, the fuel filter is pumped first. To do this, use a wrench to slightly unscrew the screw on the filter housing.
- Next, you need to pump fuel with a manual pump. The pumping lasts until the fuel starts to flow out through the screw hole, and without air bubbles. The screw on the filter housing can now be tightened.
Note that not all diesel engines have a manual priming pump. It will be somewhat more difficult to pump the diesel fuel filter on such engines, since the fuel priming pump also does not work in case of airing the filter.
To solve the problem, the screw on the filter housing is unscrewed, then the assistant turns the motor with a starter. Please note that the procedure can take a long time and there is a risk of completely draining the battery. For this reason, it is recommended to carry out pumping with a starter in a garage or use a booster (starter-charger) to minimize battery discharge.
How to pump fuel injection pump
After the fuel filter has been pumped, then you need to start removing air from the high pressure fuel pump.
- First, you need to unscrew the central bolt, which is located centrally between the high pressure line fittings;
- Next, the ignition is turned on, after which the pumping is carried out using a manual booster pump. The pumping lasts until fuel appears from the hole under the previously unscrewed central bolt.
- The bolt can now be tightened slightly to make it easier to control the presence or absence of air bubbles in the escaping fuel.
- If, during the pumping process, diesel fuel still does not appear in the bolt hole, then you can turn the engine with a starter and continue pumping until clean fuel without air appears.
- After the air bubbles disappear, the bolt must be unscrewed again and the motor must be turned from the starter. In this case, you should pay attention to how the diesel fuel is pushed out of the hole.
- Normally, the fuel should come out with a pulsation, dosed. In this case, it can be assumed that the injection pump is working properly, and problems with the operation of the motor have arisen due to the airing of the system. The bolt can be tightened.
In a situation where fuel does not appear in the hole, there is a high probability of failure of the booster pump, which is integrated into the injection pump. Both in the first and in the second case, the injection pump must be removed, after which the high-pressure pump is diagnosed and repaired in the service.
- After pumping the injection pump and tightening the bolt, it will be necessary to loosen the fittings on the fuel lines and divert each to the side. Next, the assistant turns the engine with a starter until the fuel starts to flow out through the fitting. If the diesel fuel does not flow out, you still need to unscrew the union with a spanner wrench. Then the pumping is repeated.
After making sure that the fuel went through the unscrewed union, the specified union is twisted, after which similar actions are performed in turn with other unions. A successful result can be considered such when diesel fuel is supplied from all the fittings at the time when the starter rotates the crankshaft.
Now you can return the union nuts of the fuel lines to the fuel pump fittings, after which the tightening is performed. The engine must be continued to turn with the starter; in parallel, the union nuts of the fuel lines are placed on the injectors.
Also note that the starter every 15 sec. continuous work is recommended to give a break of about 60-120 seconds. Ignoring this recommendation can lead to starter breakdowns or a significant reduction in its resource.
We have created air pressure, but the water is not connected

Suppose we pumped our tank on the right with air to a pressure of 1 bar on the pressure gauge. In this case, it is quite obvious that the piston under air pressure will be pressed against the left end of our cylinder. Suppose we put some negligible amount of water on the left. Well, 1 gram, or 1 thimble, or 1 cc. never mind. Question. What pressure will this drop of water be under? Under pressure 1 atmosphere.In fact, a little more, because this drop has moved our piston by some micron, the gas volume has decreased and the pressure has increased. But since the amount of water is negligible, we will not consider the increase in pressure either. What else is important here? The fact that we could place this drop in the left side of the tank only using a device (pump) that creates a pressure greater than the air pressure, because we act with water against air. In our case, this is more than one bar.
We start filling the tank with water
What happens if we fill the tank with water to half its volume? The air volume will decrease by 2 times. The pressure in the empty tank was 1 bar. In half filled with water, there were 2 bars. The pressure in the water supply also became 2 bar. Everything is very logical. Can we drive another quarter of the water tank on the left? Let's assume that yes. We can. In this case, the volume occupied by the air will decrease by 2 times and we will get an air pressure of 4 atmospheres. The water pressure in the system will also be 4 atmospheres.
How much can we compress the air to the right? In an ideal circuit, I think it is very strong. Until the air is liquid, I suppose. In real conditions, we, after all, do not have a piston, but a rubber bulb, and I have not seen anywhere in the characteristics of real tanks an indication of the maximum volume of water in them (more information is available below). I suppose everything is governed by common sense, namely, reasonable limits for turning the pump on and off. And let's finally move from ideal schemes to real questions.

How does this ideal diagram differ from a real expansion tank?
To many. We have no piston. Instead of a piston, we have a rubber bag that crumples under pressure. No means are provided for neatly folding the bag. The bag will wrinkle as it wants. Obviously, it forms all sorts of folds. When water rushes into the bag, it straightens these folds. Again, this bag has a seam.
Rubber itself also stretches, which introduces some nonlinearities in the described process.
And in general, all the laws about the dependence of pressure and volume (Boyle Mariotte) were written for an ideal gas and ideal conditions. In practice, only molecules were considered and that was all. With real gas, especially with air, which is a mixture of gases, everything is more complicated, of course.
In a real system, there are attendant factors. Such as the quality of rubber, the quality of the tank, the adjustment of the equipment on which the tank was produced, the team of workers who made these tanks. I am sure that the tanks made by the workers from Albania will be different from the tanks made by the workers from Serbia. I’m not saying who will do better - I don’t know. But what will be different is absolutely certain.
Pump on and off pressure
What happens if all the water from the tank is gone and the pump does not turn on? In our tank, pumped empty to 1 bar, the minimum water pressure is 1 bar. That is, our water flows out, the pressure decreases and after the 1st bar it should simply collapse to zero. Simply because there is no water. It's over. The motor starts running and the entire system is under unexpected stress. Water shoots out of the pump, hits the pipes and is extinguished by the tank membrane, which takes the entire blow. This is all not very comfortable and rather dangerous. It is much better if the pump turns on while there is still water in the tank! But not too many. In our case, the pump should turn on when the water pressure is more than 1 bar. How much more? If it is much more, then we will reduce the amount of accumulated water and increase the frequency of pump starts (it will turn on more often and for a shorter time), which is not good. Now we are beginning to understand why we were advised to pump the tank 2 tenths of a bar less than the pump activation pressure. In this case, at the moment the pump is turned on, there will be a reasonable water level in the tank. Reasonable means reasonable by the manufacturer.
Why are very large expansion tanks good for the farm?
Here's an abstract example. We have a tank of 100 liters of full volume. We pump it up with one bar. We put the pump on at 3 bars, and the pump off at 4. In this case, the minimum remaining water in the tank will be more than half a tank (more than 50 liters). Our tank will work on a range of about 12 liters. That is, the pump turns on every one and a half minutes. I think that the pump will maintain such a rhythm, but on the other hand, we get a super comfortable water supply system, in which hot water in the shower does not "walk" with us due to pressure changes. I mean a fairly common case when hot water cools down with a decrease in pressure in the water supply system, and then heats up again as the pump operates to increase the pressure.
And if we assume that we are standing in the shower with a soapy head and the lights are turned off. What do we think? With a tank that is adjusted to almost complete drainage, we don't know how much water we have left in the tank, even if the tank is one liter. It is quite possible that the power outage caught us when the tank was completely running out! And in my scheme proposed above, the non-draining residue is as much as 50 liters. I will definitely have enough water to finish washing my head and torso even. There is nothing to even think about! You just need to shout to your wife to bring a candle.
But how, after all, to pump up the tank with water?
We may have only two tank faults, which are related to air pressure. If the pressure is too high (the tank is over-pumped), or too low (the tank is deflated).
If the tank is pumped over, then we experience the drop of the needle of the water pressure gauge to zero, and, only then, the pump is turned on. For example, the switch-on pressure is 2 bar, the air pressure is 3. The arrow goes down to three bar, then drops sharply to zero, the pump turns on.
The tank is under-pumped. You know, in this case, it should somehow work until it is completely deflated. If our tank is deflated, then we get an increase in the remaining water in the tank. In this case, the pump runs for a shorter and shorter time. After all, he needs to pump less and less! And by the way, the time before switching on is reduced. As a result, the air pressure in the tank disappears. It is completely filled with water and begins to "blink", that is, feverishly switch on and off.
Thus, in a pressurized system it is not at all easy to determine if there is a problem!
If the tank is over-pumped, then the pressure must be relieved through the nipple. If the tank is under-pumped, it is necessary to measure how much water it accumulates. Then, knowing the switch-on pressure and the switch-off pressure of the pump, it is possible to determine, at least approximately, how much water it should pump in one session.
Without knowing how much water is in the tank, we will not be able to accurately determine the air pressure. We can only act approximately.
Remove the airlock from the vehicle Priora
Priora air from the fuel system
Here's how to do it:
- the VAZ 2107 tank is checked to make sure there is fuel in it;
- the air outlet on the fuel filter opens;
- fuel is pumped up with a hand pump until fuel without air bubbles flows through the fitting;
- without stopping pumping, close the air outlet;
- continue pumping until resistance is felt.
Related article: How to install an additional interior heater for UAZ "Patriot"
Now you need to try to start the engine. If it does not work out, it means that air has entered the vehicle, and it must be expelled from there. On the Priora, this is done like this:
- the union nuts on the injection nozzles are loosened;
- the starter turns until the fuel comes out;
- the nuts are now tightened and the engine can be started as the air will escape along with the fuel.
Thus, the airing system of the Priora car takes place.
What to do with the heating tank?
But for this I, to be honest, wrote an article. It is easy and pleasant to drain the water supply. Draining heating is a problem. Especially when you consider that it is frosty outside, and after pouring there will be, as always, problems with air in the pipes.
What are the features of the expansion tank installed in the heating system? There are features! There may be no rubber bulb in the heating tank. Heating tanks come without flanges. Then, instead of a rubber bulb, there really is a membrane in the tank. And she is in the middle. And it stretches. Is there a pear analogy? It is difficult to say, but we will assume that yes.
The maximum pressure in the heating system is tiny. Only one and a half atmospheres. There should be as much water in the tank as possible. Thus, the minimum air pressure should also be minimum. In my opinion, the main thing is to keep it simple. And we must remember that there is always pressure in the heating system with water! Simply because there is a natural difference in elevation, and a significant one.
Thus, the air pressure in an empty heating expansion tank should seem to be somewhere around 0.5 bar. Then, under the maximum water pressure, the tank will hold three quarters of its water volume. With a 25-liter tank - 18 liters. And this seems to be a super-maximum.
You can act with the tank in the same way as described for a completely deflated tank from the water supply system.
Have you checked if there is air in the tank? To do this, they pressed with a fingernail or something suitable on the nipple button. If it does not hiss, then we connect the pump and pump up the air, while draining the water. A quarter of the tank was drained and left under a pressure of 1.5 atmospheres. Checked the nipple. Then they let down a little water so that the pressure was not maximum and that's it. We believe that we are ready.
Dmitry Belkin, an amateur to solve problems that have no solution.
How to expel air from the engine cooling system?
So, let's start with simple cars (old foreign cars, domestic auto industry).
On such cars, air removal from the cooling system is carried out as follows:
- It is enough to drive the car onto the overpass. This must be done in such a way that the front part is slightly raised.
- Next, you need to unscrew a special plug on the radiator, after which the engine can be started.
- After several minutes of work at XX, air is vented from the engine cooling system.
However, this method will not help solve the problem on more modern cars. On such vehicles, the cooling system is of a completely closed type, that is, the air must be "expelled" for air release. To do this, you can go in two ways.
The first method involves unscrewing the expansion tank cap, then the engine with an open cover works for XX for a while, then you need to get into the car and turn off intensively, raising the speed to 3-3.5 thousand rpm. Next, the lid must be screwed on and the system operation checked.
If this method does not help, then the upper branch pipe that goes from the stove is weakened. You need to be prepared for the fact that the antifreeze itself will begin to flow out. Next, the engine starts, and you need to monitor when air bubbles disappear from the flowing coolant. Their disappearance will indicate that the airlock has been successfully removed from the system. Let's consider this method in more detail using the example of the VAZ "Kalina" model.
Before starting work, you should prepare keys for dismantling the plastic protective elements. You will also need a screwdriver to loosen and then tighten the clamps.
- So, the first thing to do is remove the plastic protection. This protection on the specified vehicle model is attached to the body using studs that have rubber seals.
- Further, the clamp must be removed from the upper or lower branch pipe. Now you need to unscrew the cap of the expansion tank. If the engine is hot, be careful, as hot coolant may spill out of the reservoir!
- Then the neck of the tank is covered with a clean rag. Next, a suitable rubber tube should be pulled over the neck. After that, you need to supply some air into the tank by blowing into the tube. It is advisable to do this with a compressor.
Remember, coolant is a strong poison! Only in extreme cases, blow out the tank with your mouth, while do not allow the coolant to get inside, in the eyes or on the skin, do not inhale the vapors!
- After air is supplied to the tank, antifreeze should begin to flow from the branch pipe from which the clamp was previously removed. After that, you need to make sure that there are no air bubbles in the flowing coolant, then quickly put the pipe on the fitting, put the clamp in place and tighten it. At this stage, the de-airing process can be considered complete.
- Next, you will need to bring the coolant level to normal (usually "cold" is poured 4-5 mm. Higher o, since after warming up the internal combustion engine, the liquid will increase in volume and rise to o.
- After that, the engine can be started and warmed up. In some cases, as part of this procedure, you need to slightly screw the cap of the expansion tank without tightening it. Then you should let the power plant idle, periodically increasing the speed. This method will remove excess air that may have formed when adding fluid.
- If everything is in order, the cover can be screwed on more tightly, but do not try to tighten it too tightly.