The roof drainage system consists of gutters, drainpipes and storm sewers and can be an independent heating object (without the roof edge). This is possible when the roof configuration avoids significant accumulation of snow and ice (rather steep slope, good thermal insulation, etc.).
The anti-icing system prevents gutters from clogging up with ice from melting snow on roof slopes and gutters, extending the life of the facility.
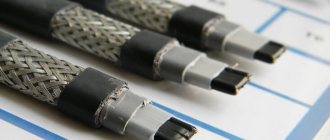
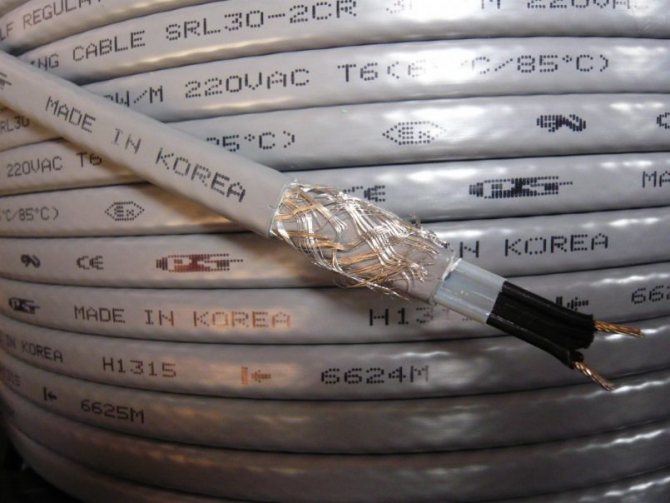
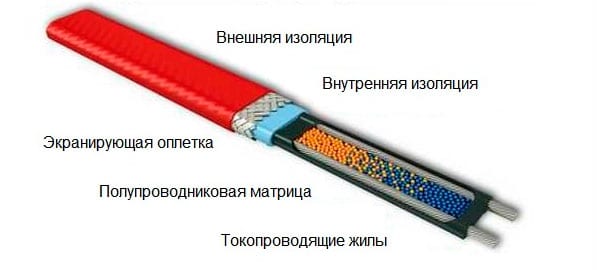
For heating, a cable with UF protection must be used to prevent cracking of the sheath and damage to the structure under the influence of ultraviolet radiation.
In addition, for anti-icing systems, only a cable with a protective braid (screen) is used to exclude mechanical damage.
System composition:
- Heating cable
- Mountings
- Control system
- Supply system
When designing the heating of the roof drainage system, the total length of the gutters / gutters, drainpipes and the number of other elements (funnels, drippers, water cannons) are taken into account. Based on this, the total power is determined and the heating control system is selected.
What is it and why is it needed
A heating cable is a wire that carries an electric current. The energy of the electric current is converted into heat, the amount of which directly depends on the resistance of the cable material and on the strength of the current.
Designed to prevent ice formation on drainage systems.
When heating is needed
Gutter heating must be carried out in the off-season - when the first snow falls and in spring, at the beginning of thawing. The temperature outside at this time ranges from -5 to 3˚С. It is at this time that ice and icicles form.
In addition, in country estates, it is often necessary to warm up external water and sewer pipes.
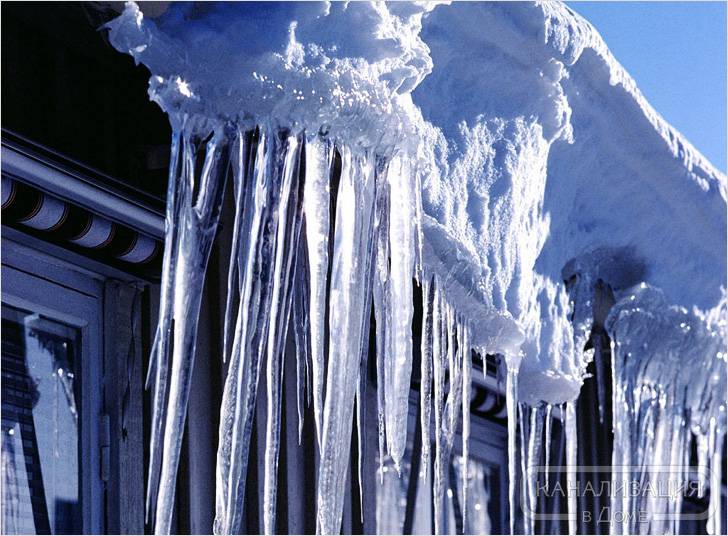
Why does ice accumulate
Ice on the roof and in the gutters accumulates for several reasons:
- Temperature jumps. The snow on the roof first melts and then freezes in the form of icicles;
- Incorrectly calculated roof slope angle;
- Untreated gutters. Foliage and dirt clog the drain holes, which prevents the normal flow of water;
- Warm roof attic. The difference in temperature inside and outside the room leads to the formation of condensation, which freezes and forms ice.
A roof and drain heating system will help prevent the formation of icicles. With its help, the following tasks are solved:
- Removing ice;
- Prevention of roof damage due to water accumulation;
- Prevention of sudden temperature jumps;
- Reduction of snow load;
- Roof cleaning;
- Extending the service life of the entire roofing cake.
Purpose and characteristics of the system
The anti-icing system consists of a cable through which an electric current flows, as a result of which thermal energy is released into the surrounding space.
This wire allows heating elements of the roof and gutter, preventing:
- the appearance of icicles;
- blockage of the pipeline with ice plugs;
- deformation and destruction of gutters under the mass of snow and ice;
- damage to pipes due to the accumulation of ice.
The downpipe heating cable is constantly exposed to mechanical stress, cold and moisture. Therefore, a high-quality wire has the following technical characteristics:
- moisture resistance and tightness of the protective coating;
- resistance to ultraviolet radiation;
- the ability to maintain its practical use in different temperature conditions;
- high mechanical strength;
- high-quality electrical insulating properties.
Cables are sold in special sections or coils, which are equipped with a power cable and a sleeve.
Experts recommend giving preference to sections, as they are more convenient to use and install. Coiled cables are used for the installation of complex roofs and drainage systems, to which standard sections cannot be connected.
Advantages and disadvantages
Like any engineering solution, a heating cable has a number of pros and cons.
Advantages:
- Fast uniform heating;
- Long service life - at least 10 years;
- Safety and environmental friendliness;
- The system configuration can be easily changed;
- Sufficiently low power consumption.
- Resistance to external influences.
Disadvantages:
- The need for accurate and competent calculation;
- The cost of a good cable is quite high.
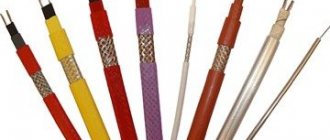
Types of heating cables
There are 2 types of heating cable.
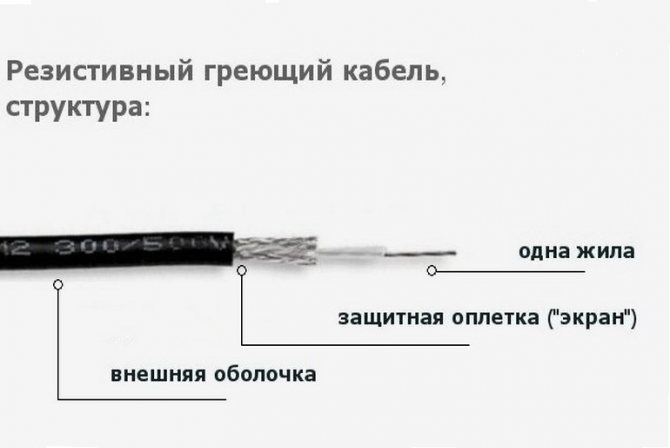
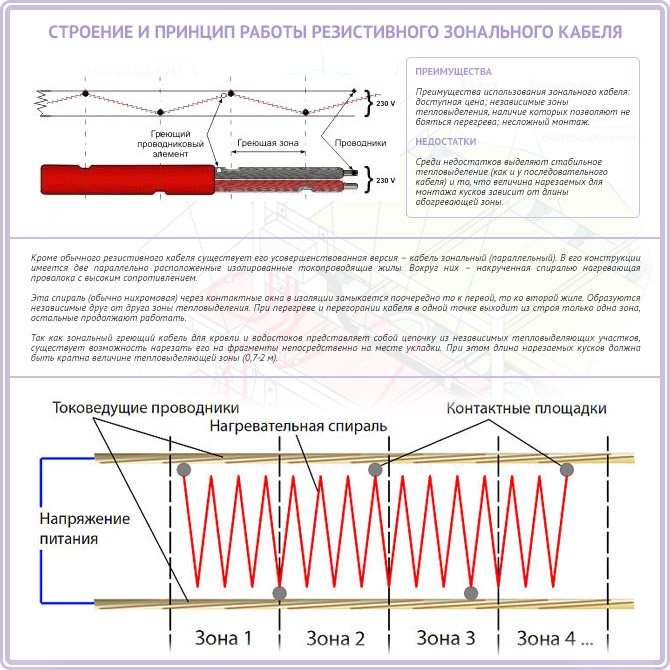
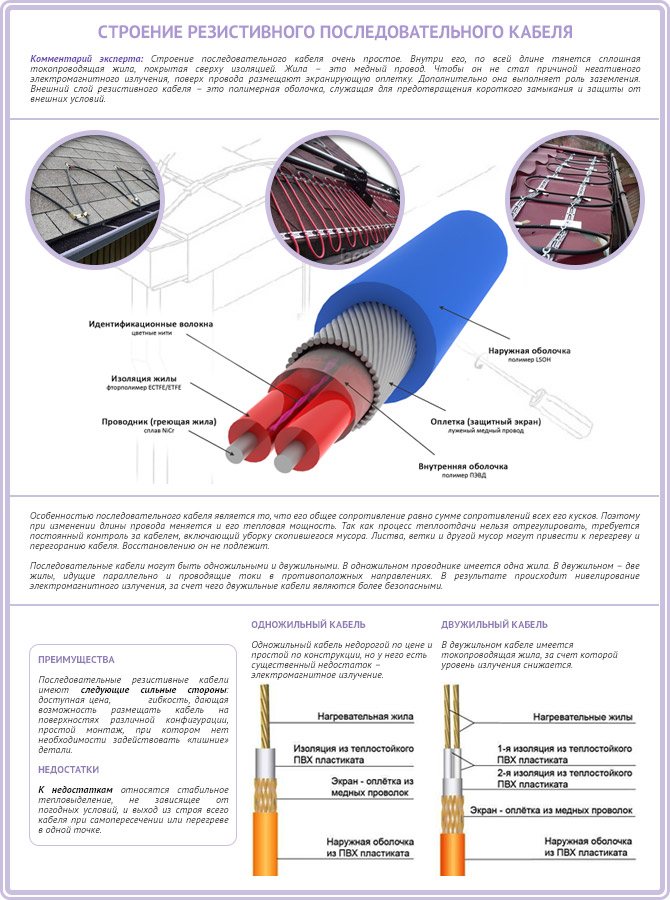
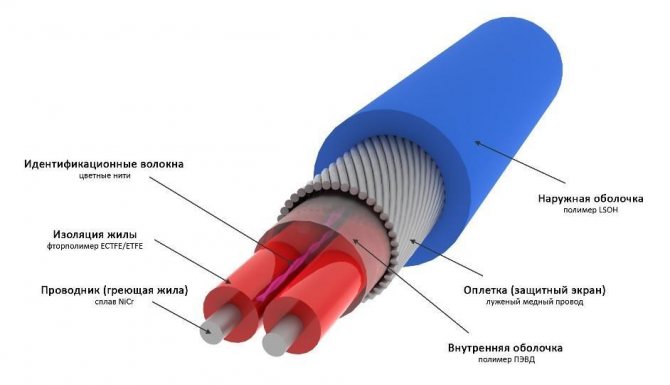
Resistive
Traditional, simple and inexpensive. It is a high resistance copper wire covered with an insulating layer. The entire length of the product is heated evenly. Ideally, protect the wire with a layer of thermal insulation.
The resistive cable is available in two versions - serial and zone. Zonal is an improved version of sequential. There are -2 cores in its structure, connected at regular intervals with a special wire. These gaps form independent zones, and if one burns out, the others continue to work normally. If the serial cable burns out, it will not be possible to restore it.
The main advantages of a resistive cable are low, ease of installation and operation, fast heating.
An important nuance is that the heating of the cable is distributed evenly along the entire length, but its temperature in different parts of the roof is different. For example, in severe frost, the part of the wire located under the open sky will be colder, and the part inside the pipe will be warmer.
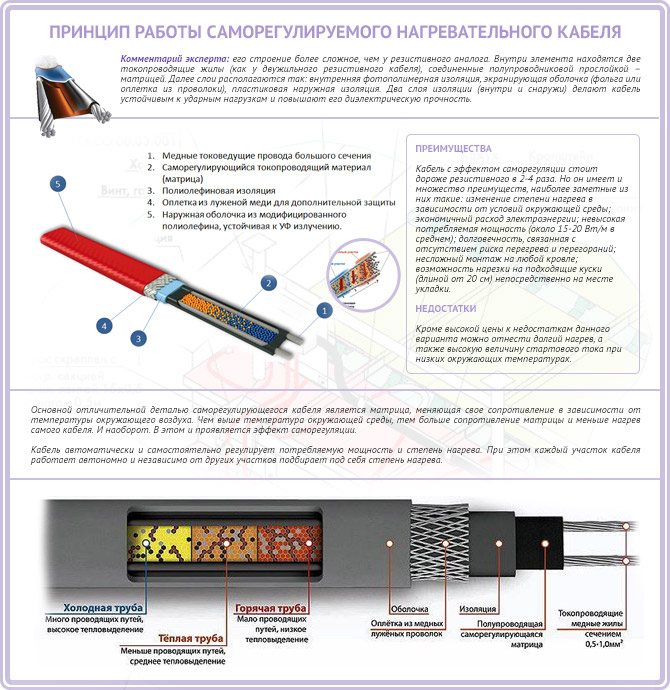
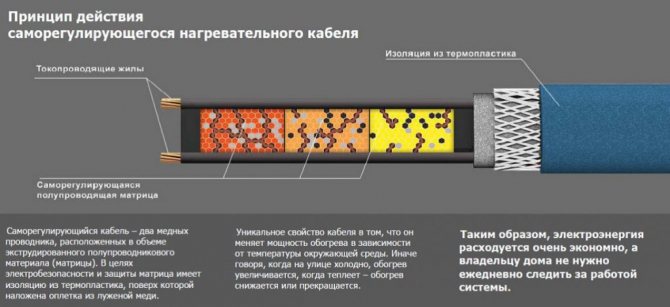
Self-adjusting
Differs in a more complex device. Inside - 2 wires, placed in a special matrix.
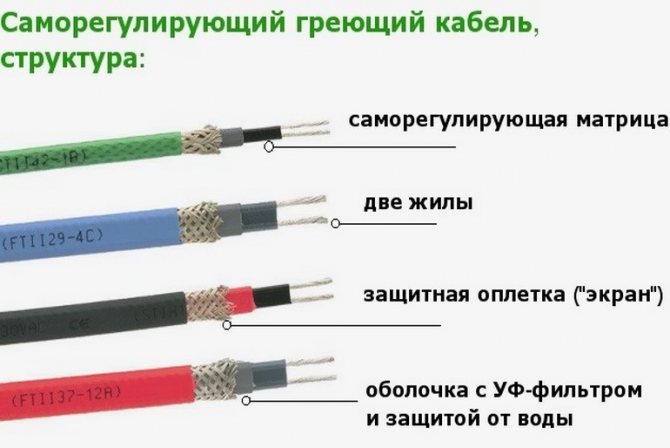
The matrix adjusts the resistance of the conductors depending on the air temperature. The whole structure is wrapped in several layers of insulation and covered with a sheath that protects against external influences. The warmer it is outside, the less the wire heats up, and vice versa.
This option, although more expensive, is more reliable than the resistive one, it does not burn out, does not overheat, it can be divided into sections of the required length.
Types of heating cables
The main element of the anti-icing system is produced in several variations.
Resistive heating cable
Although the definition of "resistive" for this type of cable is firmly established, it is not entirely correct. It is more correct to call this version of the cable "unregulated", since all heating cables are inherently resistive.
An unregulated cable has the simplest device. This is a heating element stretched into a long core made of a metal alloy with high electrical resistance (usually nichrome is used), enclosed in a screening sheath and insulation. He has the following advantages:
- has a low cost;
- during switching on does not cause a significant surge in current (so-called inrush current).

Resistive cable is easy to connect and is inexpensive, but it uses electrical energy inefficiently
Disadvantages:
- Has a constant heat output. Because of this, those sections of the roof that currently need less heat are exposed to overheating, and even at the expense of the user (power overrun). In addition, if the heat dissipation is insufficient, the unregulated cable can overheat and burn. In particular, overheating is a subject of overlap between two cable lines.
- It is impossible to shorten the length of the cable in an already mounted system, since this will reduce its electrical resistance and, accordingly, increase the current in the circuit.
- The linear power also depends on the length.
- If the heating core breaks, the entire cable becomes inoperative.
Unregulated resistive cable is available in two versions:
- single core;
- two-core.
In fact, a two-core cable also uses one core, only it is folded in half. This allowed us to win the following:
- There is no longer the need to close the circuit by pulling the other end to the connection point. Thus, a two-core cable is laid in one strand, and not in two, as a single-core one, therefore, the danger of overlap when large masses of snow come together is eliminated. It should be noted that a system with such a cable is easier to design and install.
- The currents flowing in the conductors of the cable, and in essence in the two halves of one conductor, have opposite directions, therefore the magnetic fields generated by them are mutually annihilated. A single-core cable in close proximity to a person (for example, if the attic is residential) with its electromagnetic field can be harmful to health.
Zone resistive cable
The heating core is also made of nichrome, but the cable is designed somewhat differently: it consists of two insulated conductive cores (phase and zero), and the heating core is wound around them in the form of a spiral. In this case, the nichrome conductor is divided into segments, which are connected by their ends to the conductive veins. Thus, the zone cable consists of many heating elements connected to the mains in parallel. This provides the following benefits:
- The length of the cable can be reduced, since the current at the input decreases in this case, and the linear power remains constant at any length.
- If the heating vein breaks in any place, the other sections remain functional.
With a decrease in the length of a resistive cable, its linear power remains unchanged
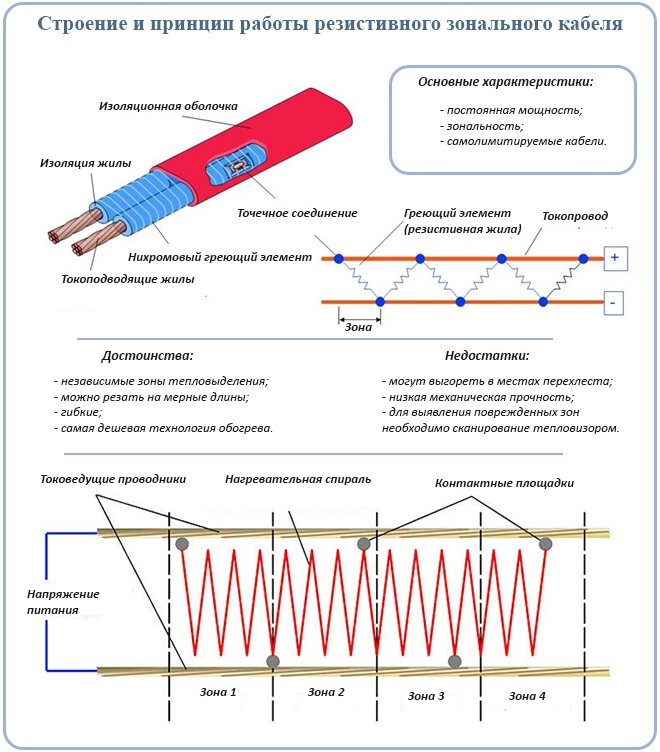
There is a zonal resistive cable, as you might guess, more expensive than usual.
Self-regulating cable
In this cable, as in the zone cable, there are two conductive cores, but the heating wire is made of a completely different material: it is a special polymer with semiconducting properties, called a "matrix". It is not laid around the conductive cores, but between them. The peculiarity of the matrix is that its electrical resistance depends on temperature: the stronger the heating, the smaller the number of conductive paths is active.
In the end, when heated to a certain temperature, the polymer generally turns into a dielectric, that is, it turns off, while the sections with an allowable temperature continue to function. The advantages of a self-regulating cable are obvious:
- Burnout in places of overlap or due to insufficient heat dissipation is physically impossible.
- If the roof overheats in any place, the corresponding section of the cable automatically reduces the heat generation power, so that the electricity is consumed very rationally. As practice has shown, on average, a system based on a self-regulating cable consumes 2 times less electricity than one equipped with an unregulated analogue.
- All current-carrying paths are connected in parallel, so the cable length can be shortened. A break in the matrix does not lead to cable failure.
- The service life is about 30 years. This is several times (!) More than that of an unregulated cable.
Self-regulating cable is more expensive than usual, but it is much more reliable and economical to operate
But there are also negative aspects:
- the cost of a self-regulating cable is 3 - 5 times higher than the cost of an unregulated cable (240 - 660 rubles / running meter versus 90 - 150 rubles / running meter);
- in the cold state, the matrix has a very low electrical resistance, therefore, when turned on, there is a high inrush current (more expensive protection devices have to be used).

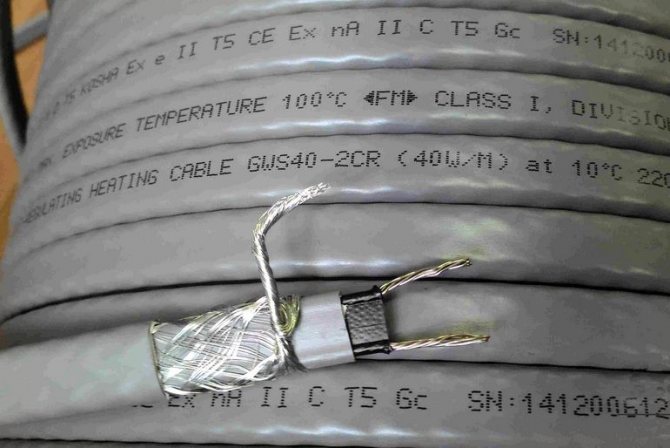
Shielding
Screen - protective shell made of aluminum or copper foil. Serves as an additional source of heat distribution, but its main function is to prevent electric shock of a person carrying out repair work.
The construction of a shielded conductor is more complicated, and, accordingly, the price is higher.
Most often, there is a cheap unshielded version on the market. For its safe operation, a residual current device (RCD) is required.
Power and duration
The power of the cable depends on its temperature class.
- Low temperature. Heating up to 65C, power up to 15 W / m;
- Medium temperature conductor. Heats up to 120C, power 10-33W / m;
- High temperature. The most powerful - up to 95W / m, heats up to 190C without problems. Designed for industrial plants and pipes of large diameters.
It is rational for different communications to select a wire of suitable power, its underestimation will lead to poor heating, and overestimation will lead to increased power consumption.
The choice of cable power depending on the diameter of the drain pipes:
- Outside pipe diameter (D) from 15 to 25 mm - power 10W / m:
- D25-40mm - 16W / m;
- D40-60mm - 24W / m;
- D60-80mm -30W / m;
- D 80-300mm - 40W / m;
Life time
The service life of the cable depends on the operating conditions and the materials from which it is made.
We can bring the service life of products from different manufacturers to a common denominator:
- Resistive - in a screed it serves up to 50 years, in other conditions - on average 15;
- Self-regulating - “lives” up to 20 years.
Particular attention should be paid to the choice of the manufacturer.
Preparation and installation of the cable system
After the wire is selected and purchased, they begin to install it. The process does not require special skills, so you can do it yourself.
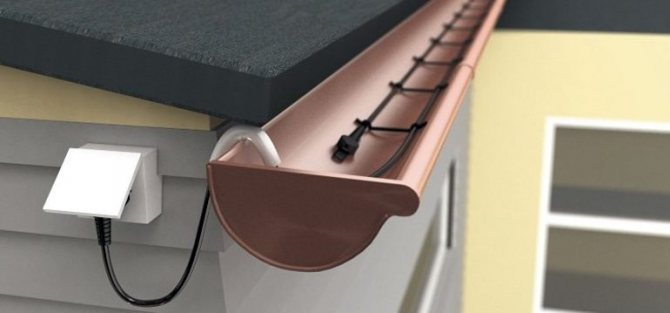
To work on the roof, you will need a safety cable and a ladder, you need to purchase tools. Together with the power cable, it is worth buying an RCD machine in advance. You will need a sensor and a thermostat. To fix the cable in place, you will need clamps, it is worth purchasing clips and a set of parts for fasteners.
Laying the cable on the roof
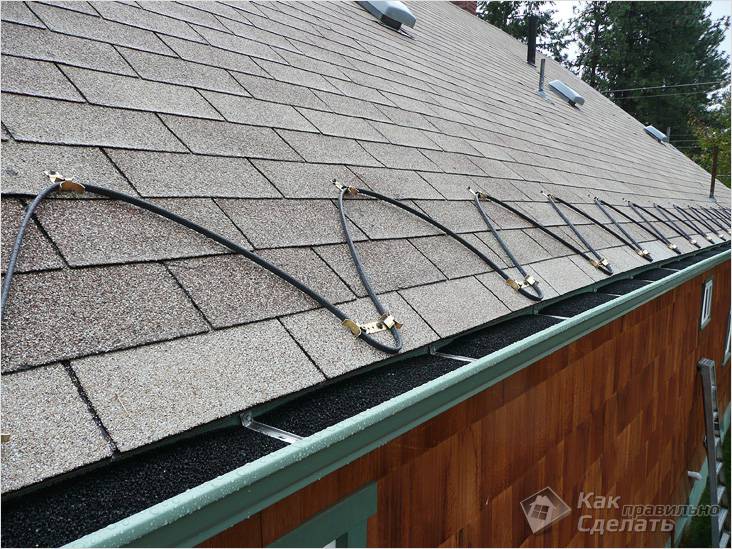
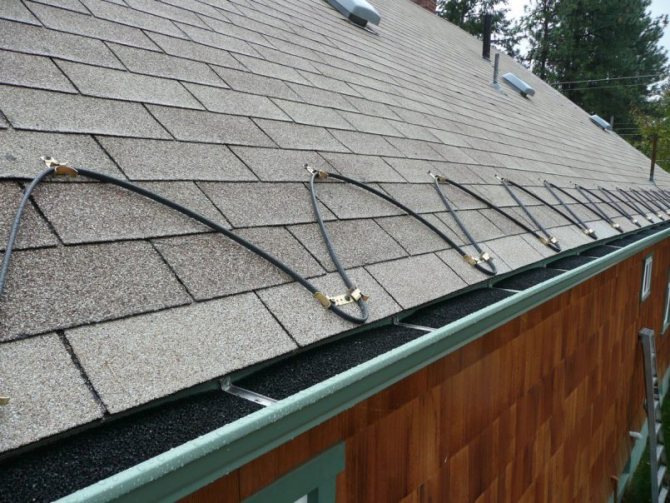
There are 2 ways to lay the wire:
- drip circuit;
- snake.
The choice of a suitable option is influenced by the material from which the topcoat was made. If the roof is folded, then special niches are made on it. They are needed in order to place different parts. During installation, the cable is pulled along the seam. On the other hand, they lower it down, go around the edge of the niche, and then throw it up. They cover the entire roof area with a thermal pipe, and then proceed to the procedure for connecting to the mains.

Installation diagram of the heating cable in the drain.
If a metal tile was used as a topcoat, the cable is mounted close to the edge. Even a beginner can handle the job, since it is not difficult. Increased attention should be paid to the points of the wave, in these places the heating system should be fixed as best as possible. If this is not done, then when snow melts from the roof in spring, the wire will be deformed and will stop working.
The roof can be made without gutters. In this case, its edge is even, therefore, during the thaw, icicles often appear here.
To avoid them or ice, the thermal pipe is laid in a drip method. In this case, the installation process is no different from laying on a metal tile.
The cable can be laid in another way - a snake. In this case, it is placed so that it hangs down at least 10 cm.
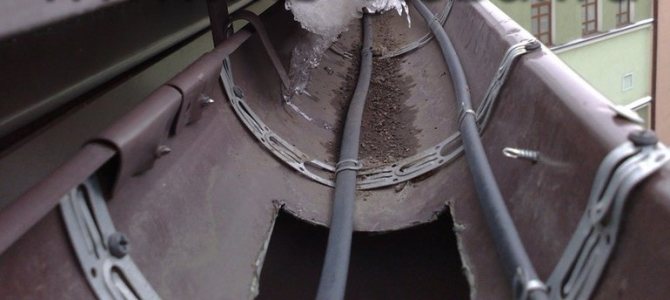
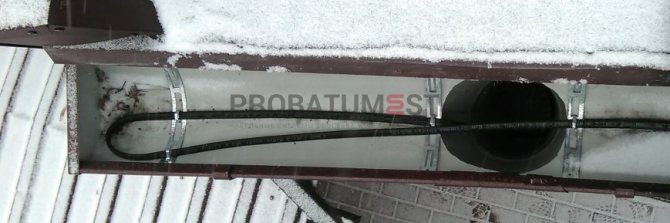
Cable laying in gutters
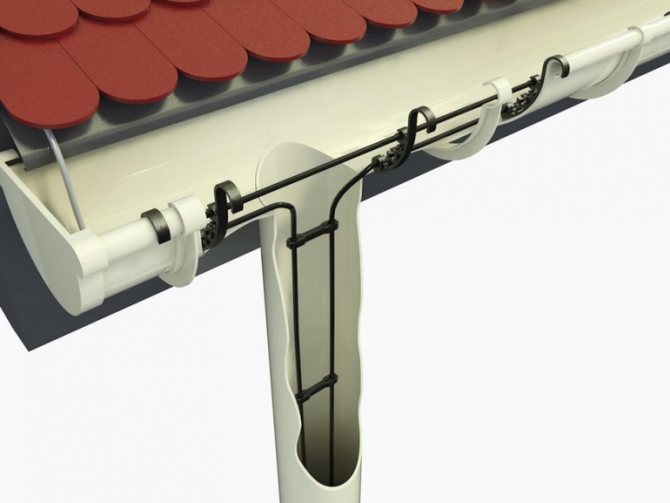
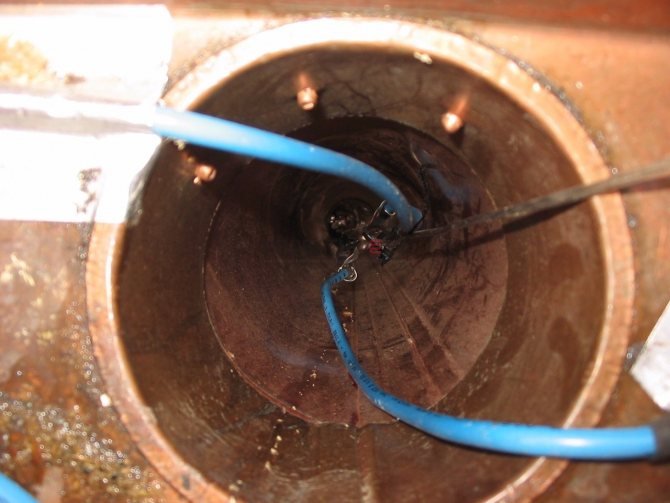
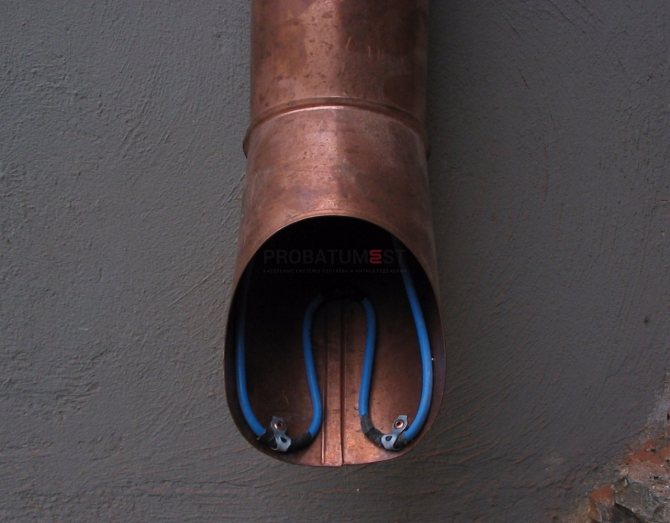
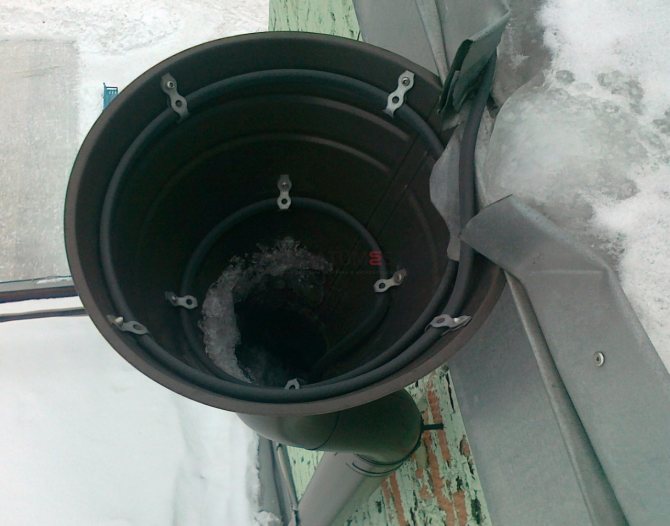
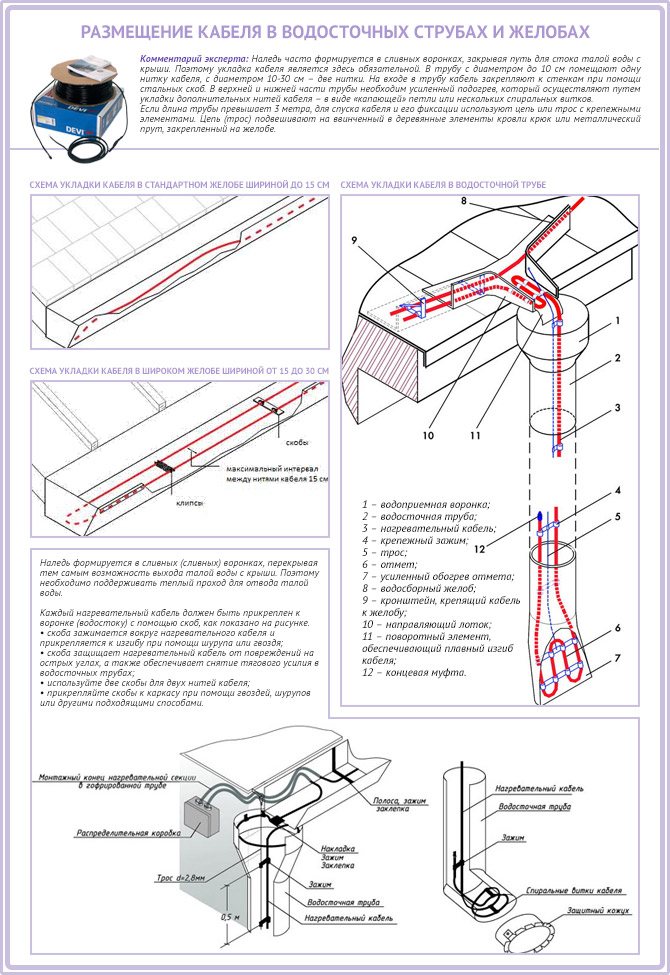
When snow melts, water often freezes in gutters. To prevent this from happening, a heating system is installed. If the pipe has a diameter less than 10 cm, 1 cable is passed through. In larger drainage systems, 2 cables are passed along the entire length.
Do it yourself or buy
The range of heating cables in stores is very large. But there are several ways to make a wire with your own hands. I will give an example of a home-made cable device:
- We take a double-insulated two-core copper wire and a 300W power supply (a computer is suitable), in addition, a temperature sensor is needed to measure the parameters.
- We close the wire to the 5V output of the power supply.
- After 10 minutes, the temperature of the cable will reach about 50 C-, this is quite enough to heat the drain.
Features of the arrangement of the heating system
Heating methods for different types of roofs may vary. We are talking about the so-called "cold" and "warm" roofs. Let's analyze the features of each option.
Cold roof heating
This is the name of a roof without thermal insulation along the slopes with good ventilation. Most often, such roofs are located above non-residential attic spaces. They do not allow heat to pass outside, so the snow cover does not melt on them throughout the winter.
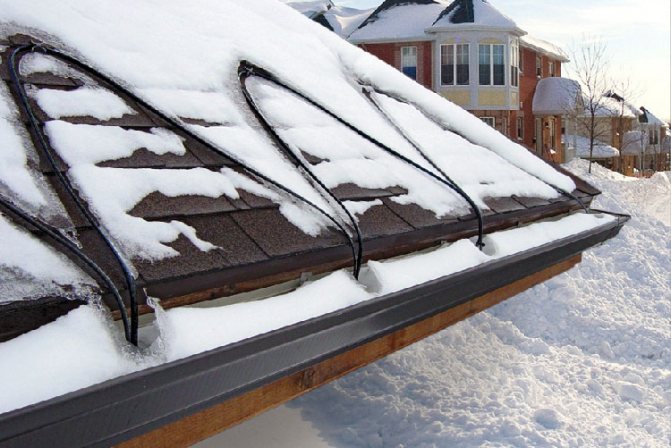
For such structures, a gutter heating installation will be sufficient. The linear power of the laid cable should be gradually increased. They start with 20-30 W per r / m and finish with 60-70 W for each meter of the drain.
How to heat a warm roof?
A roof with thermal insulation is considered warm. They allow heat to pass outside, so that even at negative temperatures on the surface of a warm roof, the snow cover can melt. The resulting water flows onto the cold roof fragments and freezes, forming ice. For this reason, it is necessary to arrange the heating of the roof edge.
The so-called warm roof allows heat to pass through to the outside. Therefore, the snow melts over the “warm” areas, melt water falls on the “cold” fragments and freezes.
It is realized in the form of heating sections laid along the edge of the roof. They are laid in the form of loops 0.3-0.5 m wide. In this case, the specific power of the resulting heating system should be from 200 to 250 W per square meter. Arrangement of heating drains is implemented in the same way that is used for a cold roof.
Selection Tips
The advantage of a home-made system is the cheapness of the components (on average, all equipment is no more than 1000 rubles), and besides, the cable is easy to repair, it will not burn out, it will not melt. The power supply is very easy to replace if necessary.
Cons - lack of automation of the process, it is necessary to adjust the temperature manually and periodically check the power supply.
Therefore, the industrial version is still easier. Professionals recommend installing a combined heating system. In it, a resistive cable is located in areas with the same temperature (roof slope, etc.), and a self-regulating cable is located in gutters, valleys, pipes.
You can manually turn on the resistive part of the system for convenience.
Design features
The design of the anti-icing system, in addition to the cable, includes the following elements:
- fasteners;
- coupling for connecting parts;
- a wire that supplies voltage to the main cable;
- Power Supply;
- Temperature regulator;
- RCD.
In most cases, the efficiency of the entire system depends on the type and principle of operation of the thermostat. This appliance starts and stops heated sections. For the operation of the thermostat, external sensors mounted in areas of maximum moisture accumulation can be used.
The standard models are equipped with thermostats with 1 sensor.More expensive options are equipped with weather stations that take into account the presence of moisture on the roof, in the pipeline, etc. Such equipment has several operating modes and allows you to save energy during the operation of anti-icing systems.
DIY cable making and installation
Drawing and diagrams
Regardless of whether the heating wire was made by hand or purchased from a store, it is quite possible to install it yourself.
As an example, I will give several ready-made schemes for different sections of the roof (just below in the text: Fig. 1, Fig. 2, Fig. 3).
Sizing calculation
Initially, we measure the diameter of the pipes and select the power of the wire. It should be noted that if the roof is reliably insulated, a cable with a capacity of 25-40 W / m will be sufficient. If the roof is cold, choose a product of at least 40-50 watts.
There is another formula for an accurate calculation, in which the cable length is added to the length of the heated space and multiplied by 2. The resulting number is the required power.
The resulting power value should be compared with the value recommended based on the physical and technical indicators of the material used:
- for plastic gutters - at least 20 W per linear meter;
- for metal gutters - at least 25 W;
- for wooden gutters - at least 18 W.
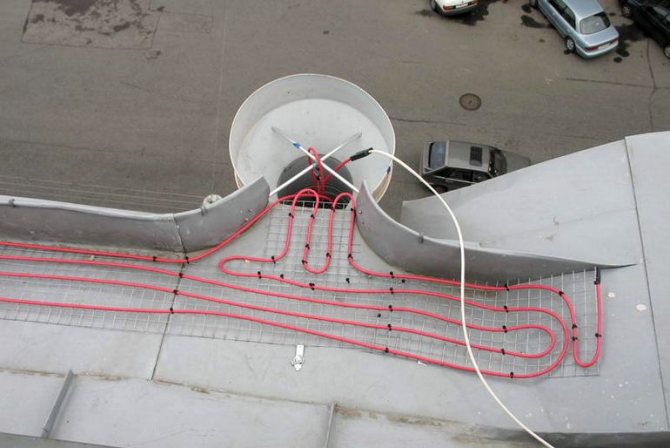
If the cable in the anti-icing system is laid using the spiral piping method, its length must be calculated using the following formula:
Total length = pipe length x spiral factor.
The pitch of the spiral is determined depending on the diameter of the pipe according to special tables.
Next, you should draw an accurate diagram of all elements of the system. All stages of work will be carried out according to this drawing.
Fig. 1. Laying the cable along the edge of the roof:
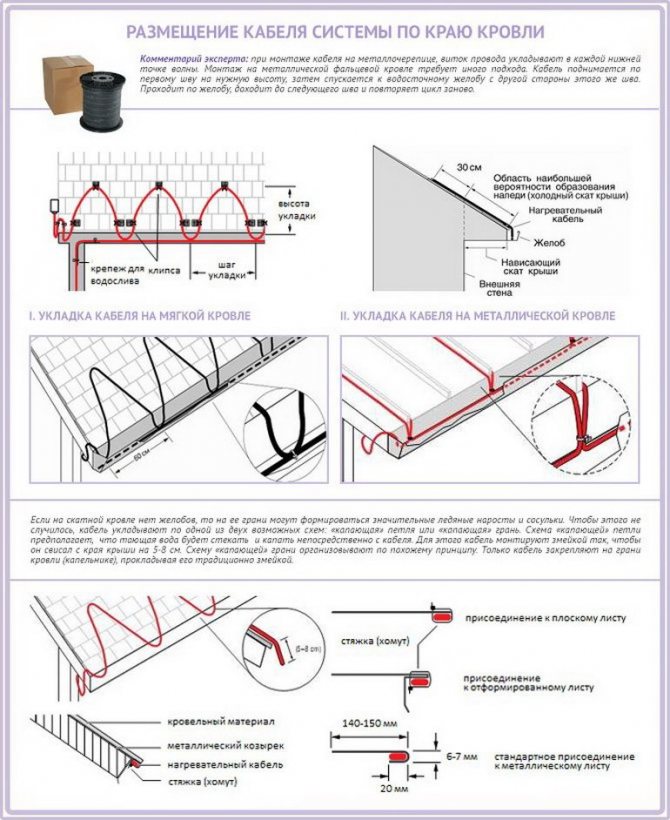
Fig. 2. Installation in gutters and pipes:

Fig. 3. Accommodation in valleys:
Anti-icing system design and calculation
Developing a roof heating system is not an easy task, especially since an individual approach is required in each specific case. Specialists should be engaged in designing. But the future owner should still familiarize himself with the general provisions of the calculation. At least in order not to become a victim of an unscrupulous supplier trying to sell an unreasonably expensive system.
So, in general, they do something like the following:
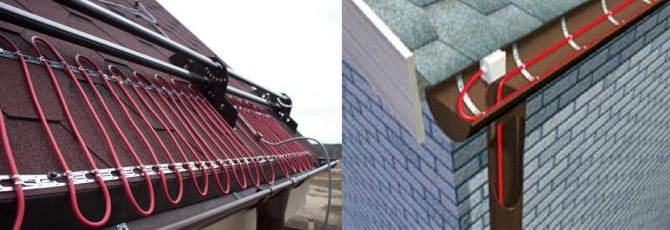
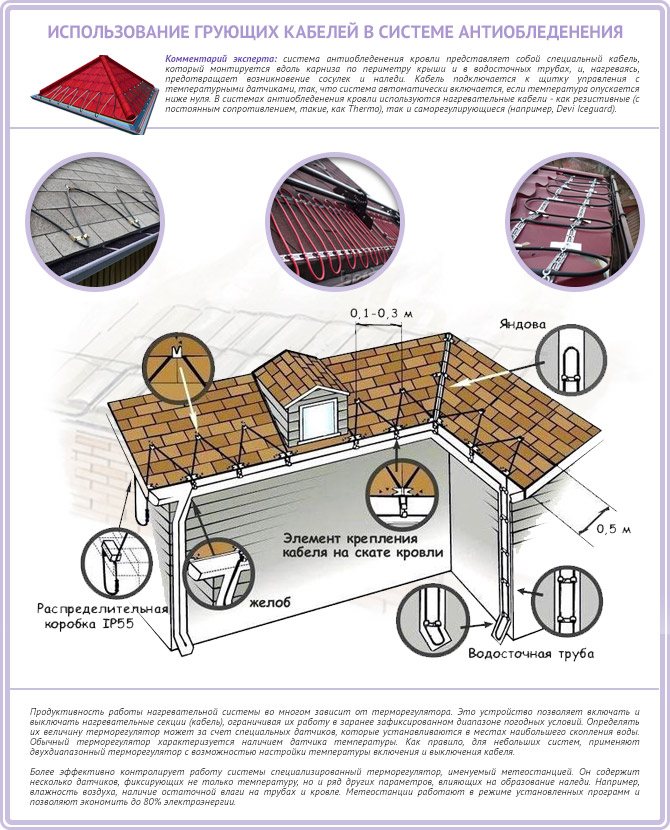
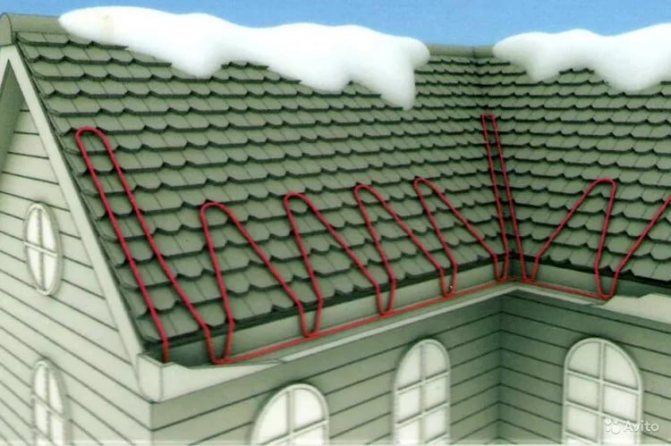
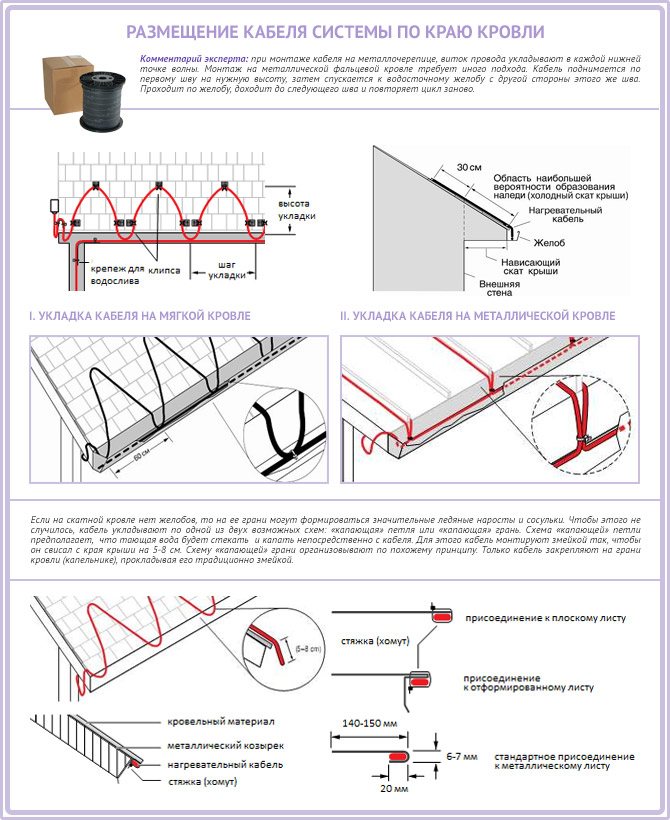
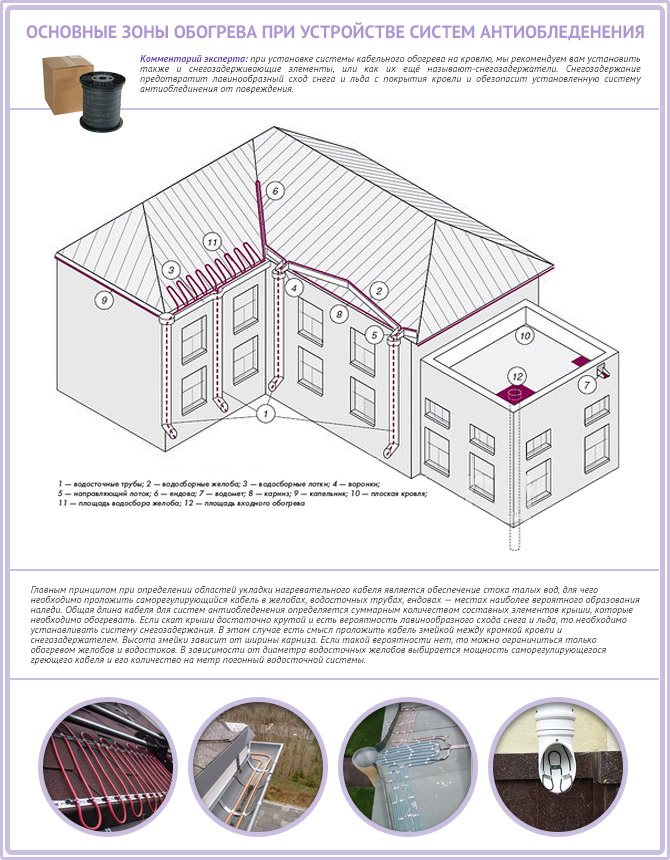
- A heating cable laying scheme is being developed. If the roof is "cold" (that is, it is well insulated) and sloping, you can limit yourself to heating the drainage system. On a "warm" roof, the edge of the roof is also subject to heating, the boundary of which is determined as follows: 30 cm are laid up the slope from the line of intersection of the planes of the outer wall and the slope. On roofs with a significant slope, due to the high probability of snow collapse, this boundary should be attributed even higher by 15–20 cm. If the roof is flat, then the cable is laid along the perimeter and near the drain funnels.
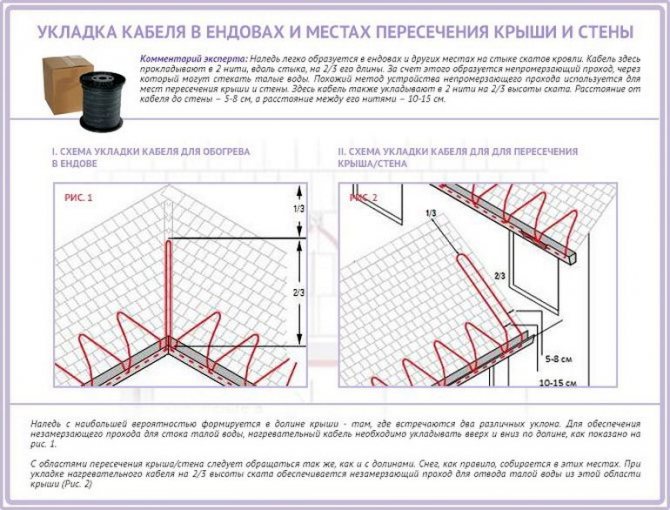
On shallow and well-insulated roofs, only the junction zones of the gutters of the drainage system can be heated - With a large slope angle, it is also envisaged to lay the heating cable in a zigzag between the edge of the roof and a snow guard, which must be installed on such a roof without fail (due to the high probability of slipping of the snow mass). Particular attention should be paid to the places where two parts of the slope with different slopes meet - these are valleys (drainage edges) on flat roofs and valleys on gable roofs. The same can be said about the place where the roof adjoins the wall. Ice is formed here especially often. The cable should be laid in the form of an elongated loop at 2/3 of the height of the valley or valley. If the roof is adjacent to the wall, the cable must be laid 5 - 8 cm from the latter, while the distance between the threads of the extended loop should be 10 - 15 cm.
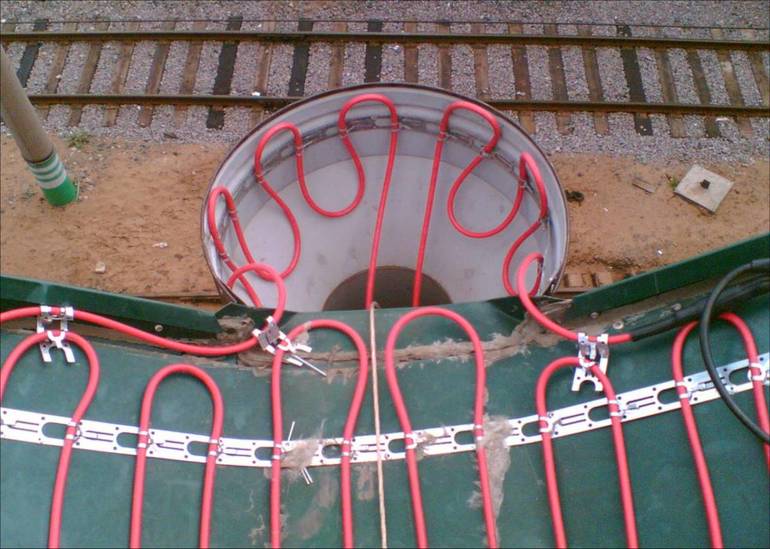
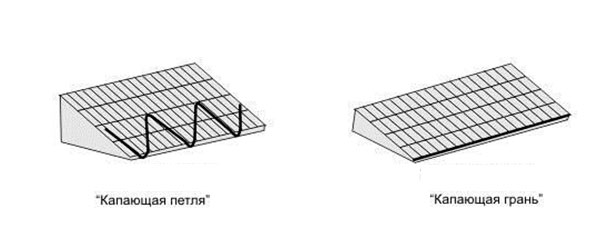
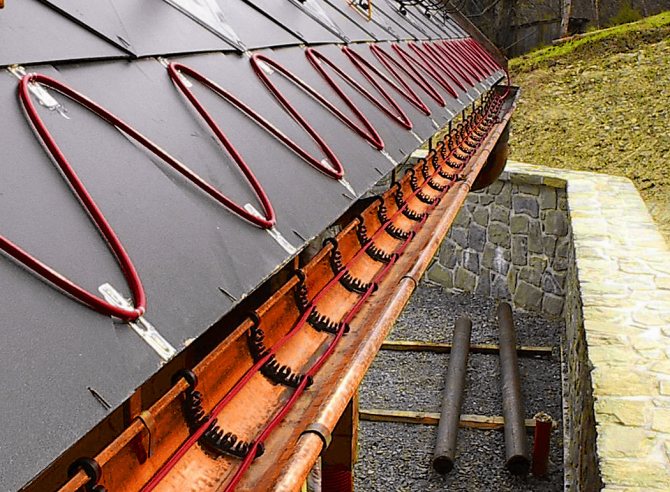
At the junction of two slopes, the cable must be laid at a height of 2/3 of the length of the valley - If the roof is not equipped with a drain, the cable is placed on its edge according to the "dripping loop" (with a large slope) or "dripping edge" (with a small slope) scheme. The idea is as follows: the loop is suspended so that the water from it drips directly to the ground. For drip-loop installation, the cable must have an allowance of 5 - 8 cm.
If the roof is not equipped with gutters, the cable is laid so that water drips directly to the ground - One cable line is laid along the gutter up to 15 cm wide. The cable lying in the gutter should be led by a “dripping loop” 30 - 40 cm long into the funnel of the downspout. The same is done when installing the system on a flat roof.
- One or two threads are also run into the drainpipe, depending on its diameter. In the lower part of the downpipe, the number of turns should be increased, since it is colder than the upper one. On the roof, the cable is laid in a zigzag pattern. The zigzag step is determined as follows: for a soft roof based on the required specific power (W / sq. M), for a rigid one - in accordance with the pattern of the roof covering.
The heating cable on the roof surface is arranged in a zigzag pattern with a constant pitch - If the funds for the purchase of a self-regulating cable in the required amount are not enough, it can be used only in part of the system. The most appropriate can be considered the use of such a cable for heating the drain, while the roofing part can be equipped with a cheap unregulated cable.
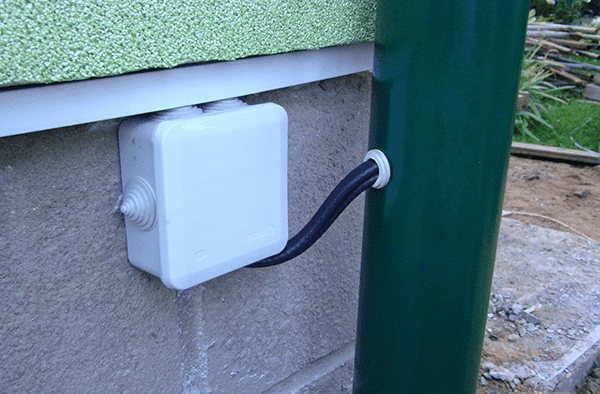
- Next, select the location of the junction boxes so that they are accessible for maintenance. Most often they are located on the roof next to the heating cable. This element can be fixed somewhere under the visor or on the fence (on the parapet). If you have an attic, you can put boxes there.
Installation boxes should be installed in places accessible for regular maintenance. - Determine the required linear and total power.
The approximate heating capacity for various roof elements is:
- for a gutter up to 150 mm wide: on a "cold" roof - 30 - 60 W / m, on a "warm" - 100 W / m;
- for gutters over 150 mm wide: 200 W / sq. m;
- on the roof (eaves): on the "cold" roof - up to 150 W / sq. m, on "warm" - 200 - 250 W / sq. m;
- in valleys: 250 - 300 W / sq. m;
- on flat roofs around drainage trays located in the area of abutment to the parapet: 40 - 80 W / sq. m.
If the gutter system is assembled from plastic parts, the cables heating it can have a total linear power of no more than 17 W / m. For roofs with soft roofing, the maximum permissible heat input is 20 W / m.
Next, the total length of the heating cable is calculated and the number of circuits is determined, taking into account that the length of one circuit cannot exceed 120 - 150 m (depending on the cable brand). Each circuit must be connected through a separate RCD.
Last of all, the control panel is designed taking into account the number of circuits and the electrical power they consume.


Installation features
The installation of a heating system for roofing communications should be carried out taking into account the following rules and in the following sequence:
- It is necessary to take care of the presence of a temperature change controller, a power supply unit with a temperature sensor, a precipitation control sensor;
- A wire of the required length is prepared, according to measurements and diagrams. Ideally, install the cable before installing the top layer of the roof and finishing;
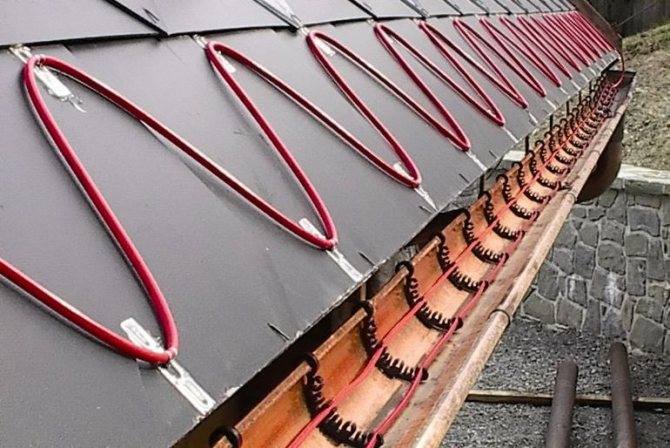
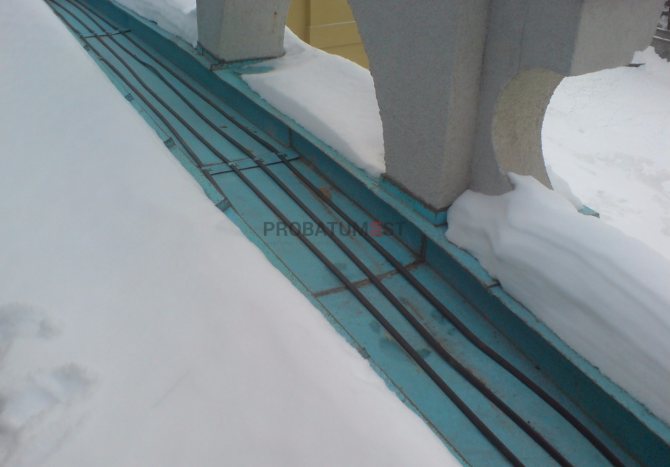
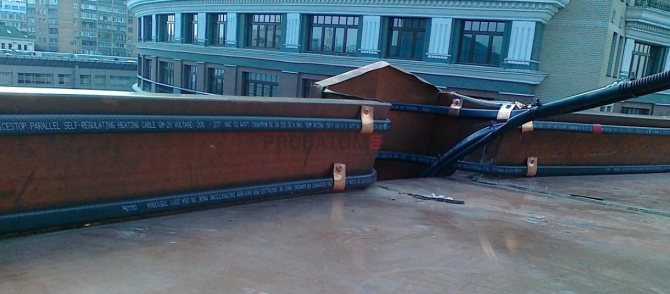
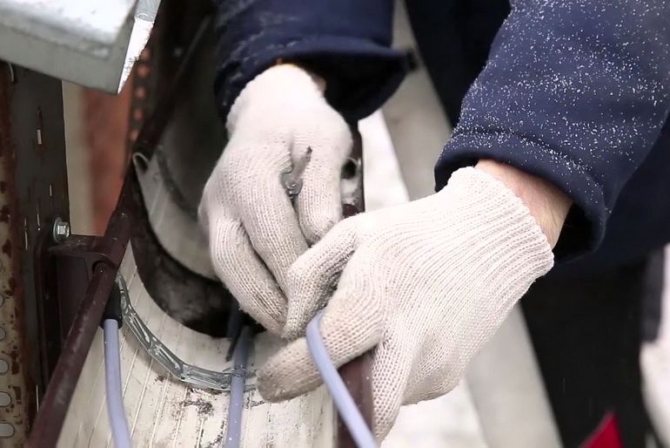
- The cable is tied into bundles with the help of special clamps, then it is laid in trays and pipes. The cable at the edge of the roof is mounted in a zigzag, fixed with special clamps;
- In the gutters and pipes, the heating cable is attached using mounting tape, in strips across. If the heated drain or sewer pipe is longer than 6 m, the wire is first attached to a metal cable in a sheath, and then the whole structure is lowered into the pipe;
- To heat the drainpipes, 2 pieces of the required power are laid simultaneously. Installation is carried out from above and below.
- The place where the wire is attached must be inspected for sharp edges and unnecessary items;
- Thermostat sensors are fixed;
- The control panel is installed;
- Commissioning works are in progress.
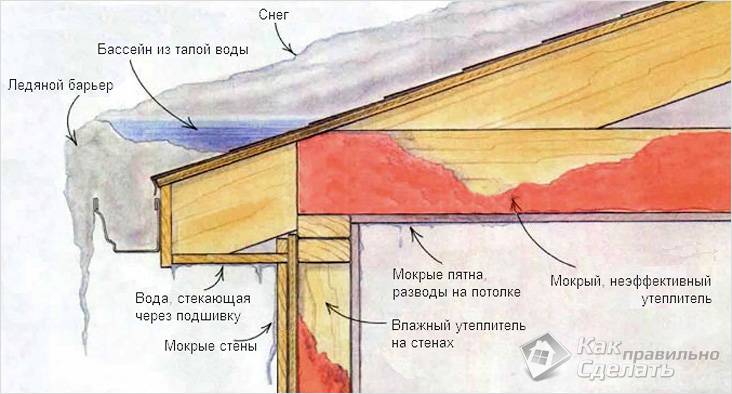
Where do ice and icicles come from?
Melts during the day and freezes at night
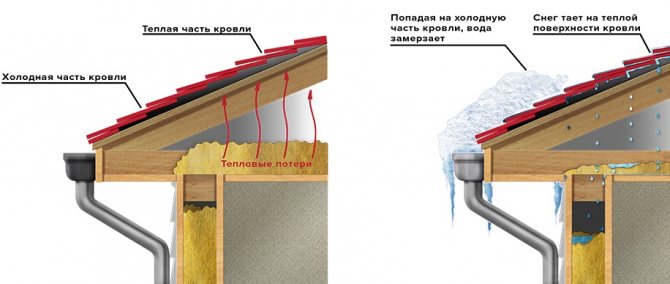
Where does the ice on the roof come from? After all, it does not rain during the winter period, and no one pours water on the roof from above. Ice formation is influenced by two factors.
Temperature difference between day and night... Especially this factor has its effect in the early period of spring, when the sun's heat acts on the snow during the day, and it melts on the roof, gradually flowing into the water drainage system. With the onset of night, the air temperature changes, reaching below zero, as a result of which the melt water begins to freeze. This is how ice forms in gutters and pipes. The same applies to the overhang of the roof when icicles hang from it. Please note that the entire drain structure is not designed to support additional weight. If it does not burst in a certain part of the expansion, it can easily break, not supporting the weight of the ice. In this case, you will have to completely change it.
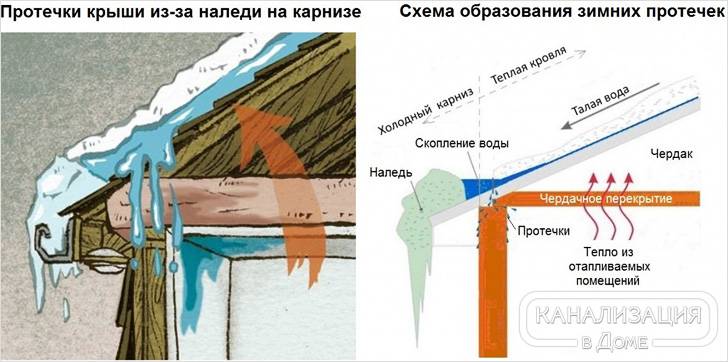
Warm roof effect
Warm roof effect... Often, developers make mansard roofs or warm attics. If the roof is poorly insulated, heat loss can occur. It turns out that even in winter, at sub-zero temperatures, the snow begins to melt, since the room is heated and, albeit a little, the roofing itself heats up. Well, then the scheme is the same as in the first case: flowing down, the water cools down, and then freezes again. The consequences are the same. But in this case, installing the heating cable in the drainage pipes will not eliminate the problem itself, but only the consequences: the formation of ice and icicles. Better, of course, to solve the problem itself, and not the symptom, by insulating the roof.
To prevent the roof from heating up in winter, professionals advise making a so-called cold roof when the ventilated attic is not heated inside. Another point is to correctly perform the roofing pie, where the insulation is selected with sufficient thickness and there is a ventilation gap. However, this is not a 100% guarantee that the problem will be completely resolved. For reliability, it is better to heat the drainage system. But the question arises, which cable is better to choose?
Frequent errors and problems during installation
It is not difficult to install a heating system, but during assembly there are common mistakes:
- The cable must not be fastened with self-tapping screws, steel strips, wire, vinyl tape, tape. You always need a sealant and mounting tape;
- Incorrectly selected power - fraught with either high costs or inefficiency of the system;
- The wires cannot be twisted, a short circuit will occur;
- Any connection should be carefully insulated from moisture;
Common problems:
- Circuit breaker malfunction;
- Malfunction of the residual current device;
- Poor braided cable termination;
- Low voltage, hence a decrease in heating power;
- Mechanical damage;
- Overheating (resistive version);
Gutter heating system device
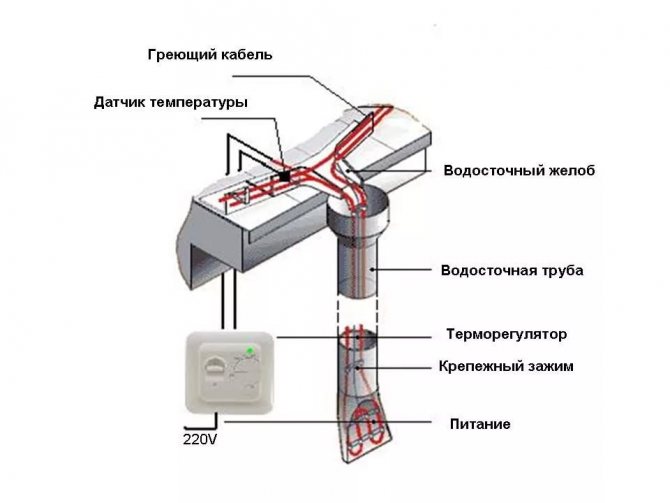
For heating roofs and gutters, a heating cable system is most often used. Let's consider its main elements.
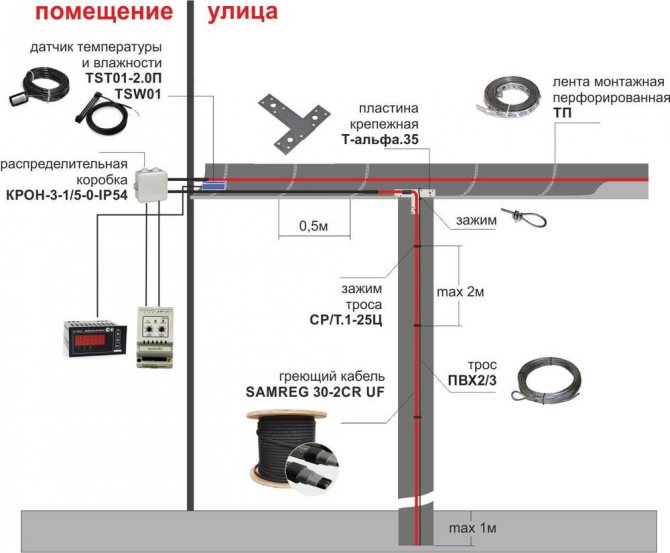
Distribution block and sensors
The distribution block is designed for switching power (cold) and heating cables.
The node includes the following elements:
- signal cable that connects the sensors to the control unit;
- power cable;
- special couplings used to ensure the tightness of the system;
- mounting box.
The unit can be installed directly on the roof, therefore it must be well protected from moisture.
The system can use three types of detectors: water, precipitation and temperature. They are located on the roof, in gutters and gutters. Their main task is to collect information for automatic heating control.
The collected data is sent to the controller, which analyzes them, decides to turn off / turn on the equipment and selects the optimal operating mode.
Controller and control panel
The controller is the brain of the entire system, responsible for its operation. In the most simplified version, it can be some kind of thermoregulatory device. In this case, the minimum operating range of the device should be in the range from +3 to -8 degrees C. In this case, the control and switching of the system cannot be fully automated, human intervention will be required.
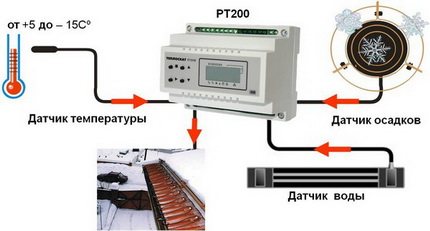
To fully automate the operation of the heating system, you will need a controller. This device collects and analyzes the information coming from the sensors, and not based on it, corrects the operation of the system.
A more convenient option for operation is the use of a complex electronic control device with the ability to program. Such equipment is able to independently control the process of melting precipitation, their amount, and monitor the temperature.
The controller quickly responds to changes and makes optimal decisions, choosing the best operating mode for heating equipment in existing conditions.
The control panel is designed to control the entire system and ensure safety during its operation.
The following elements are usually used to equip the node:
- three-phase input circuit breaker;
- RCD (it is also a residual current device);
- four-pole contactor;
- signal lamp.
In addition, you will need to install single-pole circuit breakers for each phase, as well as protection of the thermostat circuit.
In addition, during the installation process, you will need fastening parts: roofing nails, screws, rivets. You will need heat shrink tubing and special mounting tape.
Service
Maintenance of the system is reduced to monitoring its operation, periodically checking all sensors and visual inspection of the integrity.
Modern gutter heaters are equipped with special thermostats with LED bulbs. If the light is on, it means heating is in progress, turned off - the required temperature has been reached. If heating does not occur, look for the cause of the malfunction. The main reasons are listed in the previous paragraph.
Expert advice
Some helpful tips:
- The cable can be laid both inside and outside the pipe. Usually pipes with a diameter of more than 40mm are tied with a self-regulating cable from the outside. If the pipe diameter is smaller, the use of an internal resistive is suitable;
- It will not be superfluous to ask the manufacturer for a hygiene certificate (especially important when heating pipes with drinking water);
- A new food-grade cable may emit a pungent odor at the beginning of use - that's okay;
- Before buying - check your energy consumption
- If an open gasket is planned, it is desirable to have UV / protection. For indoor installation, a waterproof casing is required.