Replacement of the membrane of the water unit of the gas column Neva 4510, Neva 4511, Neva 4513, Neva 4011
AND So! Let's start with the simplest. (The topic is relevant for all gas water heaters).
The weakest point in any gas column is the membrane. Why? Because in 99% of cases the following happens.
You turned on the tap, but the column does not start. The first and most likely reason is that the membrane has burst. You turned on the tap, and the column does not give the flame at full power. The flame is "small" and the water heats up poorly. This is because insufficient gas is being supplied to the burner. The diaphragm does not push the stem with the force required to open it completely. The first and most likely reason is t thickness in membrane ... You turned on the tap, and the column is unstable. It often turns off or only turns on from the third or fifth time. The first and most likely reason is Rmembrane stretched from time to time .
Therefore, before raising a panic, you should always start by replacing the membrane. In general, we recommend simply changing the membrane every two years, without waiting for the above troubles. What's the matter?
The membrane is the most basic element during normal column start-up. Why? When the tap is opened, the water flow creates a vacuum behind the membrane, the membrane bends. That, in turn, shifts the stem, which opens the gas supply to the burner, and all this works purely mechanically, which means it is subject to wear.
The price of the issue. The cost of a membrane for any gas water heater is from 200 rubles. up to RUB 500 We buy a membrane. When we have a brand new membrane in our hands, we need to replace it: a pair of screwdrivers, 8 mm and 24 mm open-end adjustable wrenches, a glass (only for professional plumbers) and 30 minutes of time.
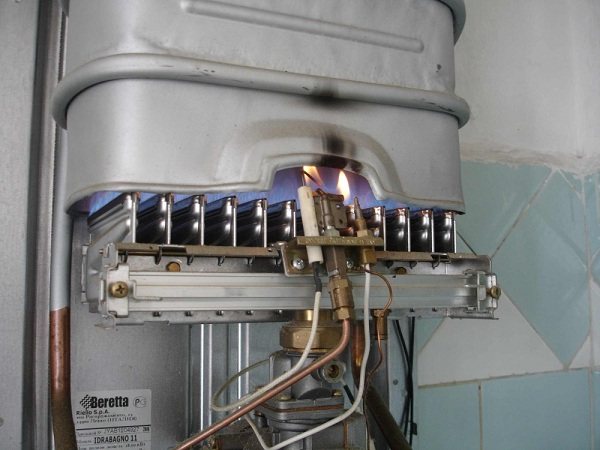
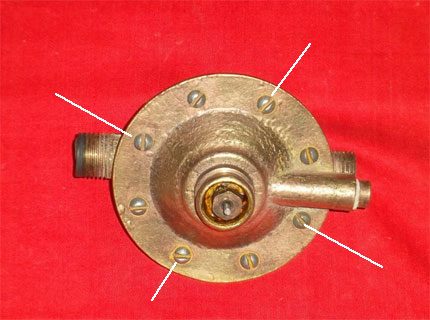
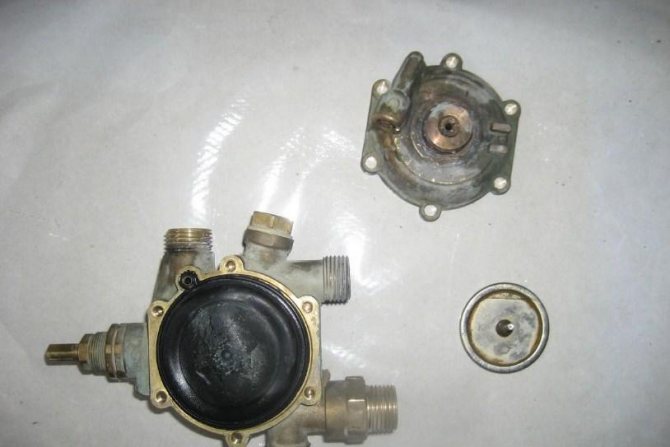
In order for your eyes not to run, first look directly at the photo of the NEVA 4511 column with a water-gas unit installed inside. Screws and nuts are marked with red dots, which must be unscrewed to separate the water part and then work with it. When the eyes are more or less accustomed, we move on to the first point.
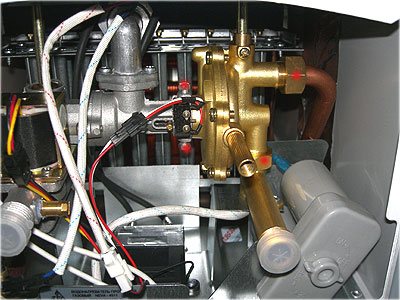
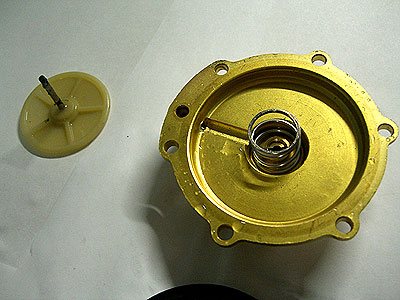
1. Before us is a water-gas unit used in gas water heaters NEVA 4510, NEVA 4511, NEVA 4513. Between themselves, these units have a tiny difference, but this will not interfere with the matter. First, a couple of points to understand what it is. It consists of two halves: a gas unit (this part is gray) and a water unit (this part is yellow). We take a "plus" (cross) screwdriver and separate the gray part from the yellow one.

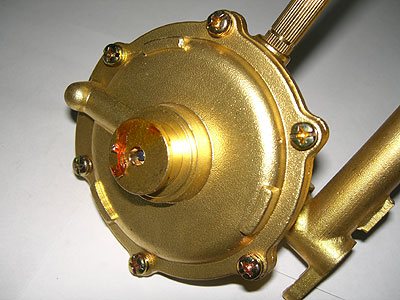
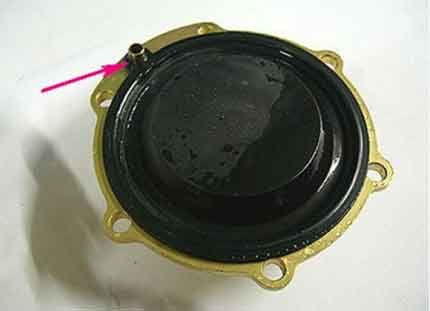
2. The third photo shows how they are fastened to each other: with the help of two screws, simply squeezing this "grease cylinder" of the water unit from the ends. Let's consider the water part. Photo 4. Here, where the grease is, do you see a hole on the end of the cylinder? It is from this hole that the stem comes out, which opens up gas access to the column. It is it (the stem) that our membrane pushes when opening the tap.
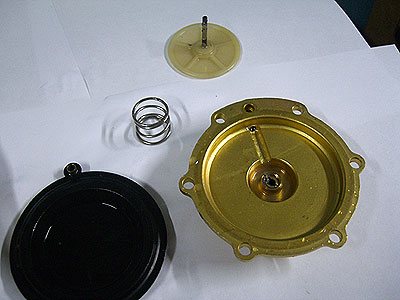
3. To reach the membrane, carefully unscrew all six screws and the water assembly will open in half, like an oyster.
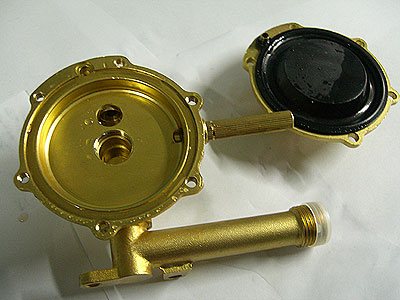
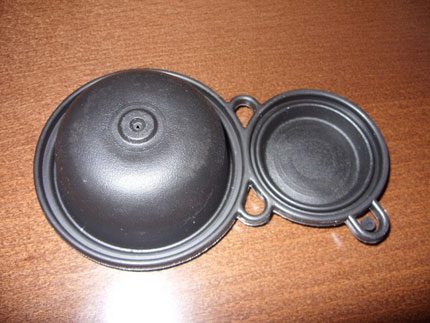
4. If you carefully examine both the resulting halves, it is easy to guess that the membrane is this black elastic band lying in the right half. The membrane, as you can see, has an eyelet that fixes its position. Carefully remove the membrane from its containing halves.
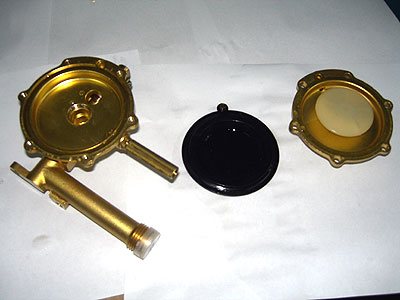
5. And what are these parts inside? One of them is a plate with a stem, the second is a spring. Our membrane presses on this plate with the stem. The spring, on the other hand, returns the stem to its previous position when the valve is closed, gas access is stopped and the column is turned off. If everything inside our oyster is dirty, take out the plate, take out the spring.
6. Everything inside this yellow saucer is thoroughly cleaned and washed. We replace the membrane with a new one. Do not forget about the membrane eyelet, which fixes the position correctly. Don't forget about the sides of the membrane. It should, as it were, hug the plate with the stock with its recess.Then everything will work correctly.
Now we scroll everything in the opposite direction (both pictures and screws). We open the tap. Finally, we wash ourselves. Section Membranes.
Here you will find out:
The water regulator is actually the heart of the gas water heater. The unit in which the rubber gasket (diaphragm) is installed regulates the flow: it opens and closes the gas supplied to the burner device.
The principle of operation of the membrane in the gas column is as follows:
- The water regulator is a metal assembly with an empty cavity divided into two parts by a diaphragm.
- The first compartment is required for filling with water. After opening the hot water supply tap, the liquid enters the connected part of the regulator. Pressure builds up inside the assembly that bends the gasket.
- The diaphragm in the gas column presses on the stem located in the adjacent section of the regulator. The metal rod opens the gas valve and at the same time gives a signal for electric ignition of the burner (in automatic dispensers).
- After closing the hot water tap, the pressure drops. There is a spring on the metal rod that returns it to its original position. The gas supply is interrupted. The burner is extinguished.
The device of the membrane on the gas column may vary depending on the model of the water heater, but the basic principle of operation remains the same. Over time, the diaphragm wears out, becomes insufficiently elastic or breaks, which leads to the failure of the heat generator.
The membrane in the flow-through gas water heater is responsible for supplying gas and turning on the automatic ignition of the burner. A malfunction of the water regulator (frog) immediately affects the performance of the equipment.
Signs of membrane breakage
How do you know when it's time to change the rubber diaphragm? You need to pay attention to:
- The force of pressure of gas and water in the system. Open the tap, count how many liters are consumed per minute. Normally, it should be at least two to three liters. The gas flow can be calculated visually by looking at the strength of the fire.
- Flame location. In appliances with wick ignition, the fire must burn from the edge of the burner, be at least 3-5 centimeters high. Does not match? Then check the jets for blockages. After cleaning, look at the flame again. If the situation does not change, the problem is the diaphragm.

- Technique with piezo ignition should click when the button is pressed. This means that the diaphragm has worked. If no sounds are heard, the part may be damaged or torn.
- In some models, the rod, which controls the operation of the control unit, will help determine the breakdown. Remove the protective cover and open the water. If the stem is not moving, the diaphragm must be replaced.
After you have found a breakdown, you need to choose the right replacement part.
How to identify membrane breakage
The reason that the gas column does not work correctly is most often a torn membrane. Check the water and gas pressure levels first. Normal operation of a household appliance is impossible if it is unstable or does not reach the norm. Calculate the amount of hot water flowing through the tap. Its volume should be within two to three liters per minute. The gas pressure level can be estimated by eye, focusing on the shape of the fire in the burners of the gas stove. There are different methods for different types of columns.
Wick ignition
When dealing with devices of this type, pay attention to the position of the pilot burner and its size. Ideally, the tongue should be three to five centimeters high and just below the edge of the main burner.
If the signs do not match, this may indicate a malfunction, for example, a clogged nozzle. Try cleaning it and re-inspecting it.If the procedure did not help, and the column stopped lighting up, then the problem is definitely in the membrane.
Battery ignition
If the column is ignited from the button, you should periodically monitor the attempts to ignite. During switching on, the owner should hear a certain sound, similar to a click. This means that the rubber membrane is working properly, and the source of the problem must be looked for in the gas section or ignition electrode. If the clicks were not audible, there is a high probability of rupture of the membrane. However, there are several reasons for this phenomenon; you can find out what the matter is only by disassembling the node.
Other cases
There are models of water heaters in which the performance of the membrane is revealed by the movement of the rod, which regulates the operation of the electronic unit using a microswitch. This is easiest to notice if you remove the protective cover. A static part with an open hot water tap becomes clear evidence of a broken membrane. In this case, replacement of the stem is not required.
How to choose a new part
For each column (Termet, Ariston, Beretta), the membrane is selected individually. For foreign models, it is most difficult to find a replacement, since the product can only be purchased from an official supplier. In this case, you have a choice: spend on a new element or buy a new column.
With domestic equipment, everything is easier. Replacements can be found in stores or ordered online.
Experts recommend choosing a silicone diaphragm. It is more elastic and durable.
If you think that the principle of the structure of all membranes is the same, this is not so. For example, in water heaters "Ariston" special elements - "eight" are installed. They are made of dense rubber and have a special shape. Their cost ranges from 300 to 500 rubles.
The membrane in Electrolux devices works according to the "figure eight" principle. But its price is much lower - from 200 rubles.
The easiest membrane to operate and replace is "Neva" and "Astra".
There are also universal options, but they are only suitable for temporary installation. It is impossible to fine-tune equipment without factory parts.
Is it possible to make the membrane yourself and from what
Before starting repair work, it is worth making sure that poor operation of the burner is due to a failed diaphragm. The cause of a malfunction of the water heater can be dead batteries and malfunctions in the igniter. Only after all other breakdowns have been excluded do they proceed to repair the water regulator.
Diaphragm problems often occur unexpectedly. It takes a few days for a suitable pad to arrive. To use hot water all this time, you can restore the membrane yourself or make it yourself.
For temporary laying, rubber with a thickness of 1.5-2 mm is suitable. Some people use an old car camera or thick household gloves as a blank. The bolt holes and the bypass are made with a punch, which is easy to make yourself from a metal tube.
The new diaphragm is cut out using the old one as a template. As a temporary measure, the membrane can be sealed with a patch. After completing the repair work, the column will be able to work for some time, sufficient to purchase the factory diaphragm.
How to find and fix a breakdown
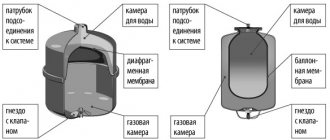
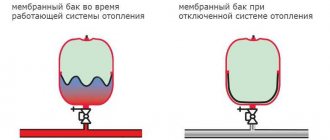
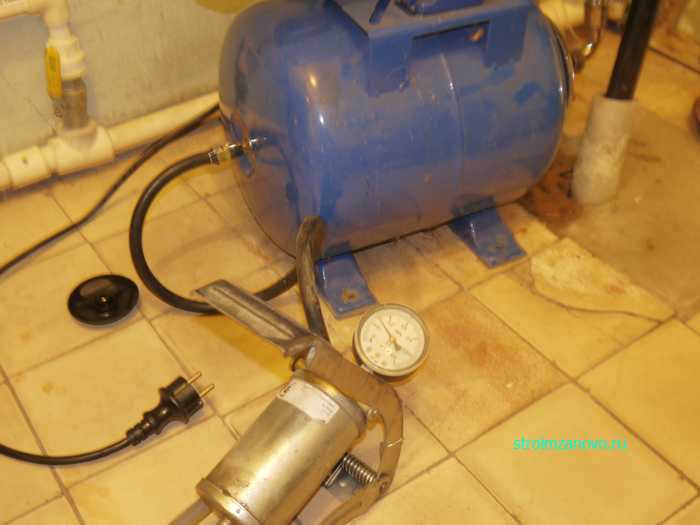
Hydraulic tank device
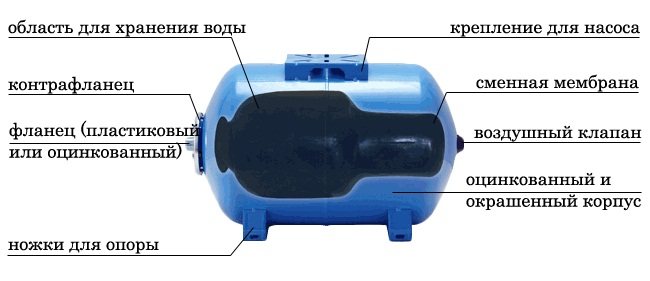
To find the fault yourself, you need to know the structure of the hydraulic accumulator. Parts of its construction:
- metal case;
- rubber membrane;
- flange with outlet for water supply;
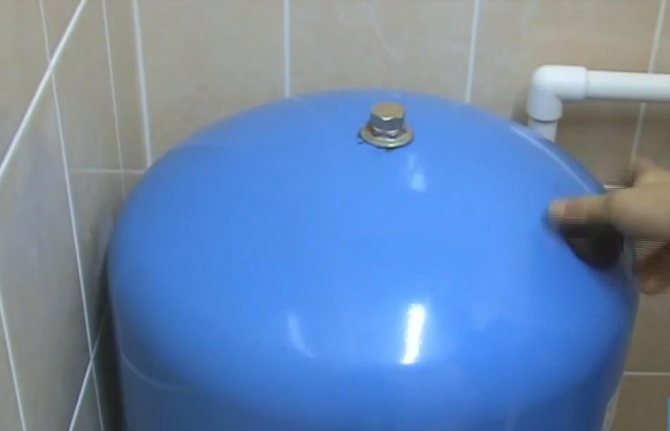
- air injection nipple;
- installation platform.
A simple device ensures long-term operation of the equipment and rare breakdowns.Incorrect operating mode settings become their main cause. Troubleshooting is carried out by characteristic signs. Having found the cause of the breakdown, they fix it on their own or invite a specialist.
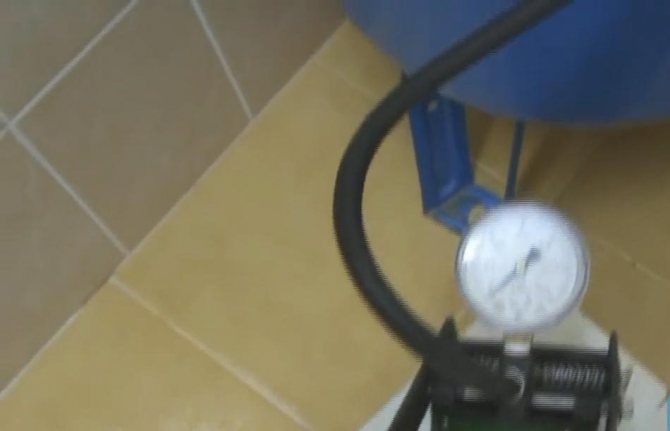
Frequent activation of the pump causes several factors:
- Low air pressure in the tank. Eliminated by pumping the compressor through the nipple.
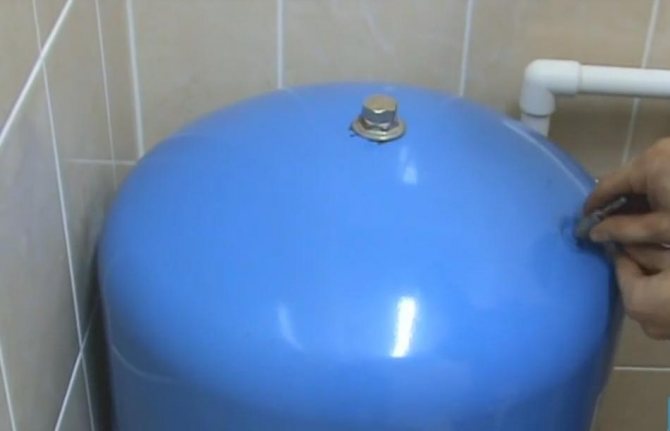
- Loss of tightness. Holes appear in the metal case due to rust or mechanical damage. Cover the container with a liquid soapy solution to check for a leak. The tightness is restored by specialists.
- A small threshold difference is set on the pressure control switch. The problem is corrected by adjusting the small spring of the device.
- Diaphragm rupture. The rubber bulb inside the tank may burst due to excessive stretching, friction against the walls of the tank, due to natural wear and tear. The breakage is corrected by replacing or repairing the membrane. Vulcanizing the rubber product restores its integrity. When replacing, you should choose an original part of the same volume.
Low water pressure:
- Insufficient pump power. Check the calculations for the correspondence between the volume of the accumulator and the characteristics of the unit.
- Leaks through the non-return valve. Replace the part after shutting off the water.
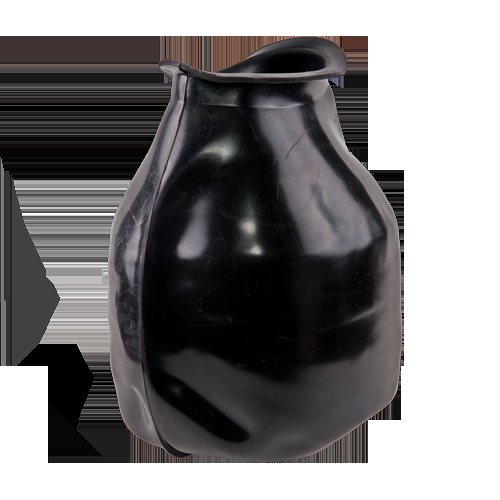
Diaphragm for accumulator
Constant water pressure drop:
- Air rarefaction - should be pumped up with a compressor or pump to 1.5-2 atmospheres.
- Broken nipple. The device through which air is pumped may break. The tightness of the tank is lost. You can replace the nipple in the accumulator with your own hands or take the device to a service center. The part is secured with a nut, it is carefully unscrewed, then removed. When installing a new nipple, a rubber gasket and sealant is used.
Fluid leaks on the body:
- The flange is fluid. If the part is new, it is enough to tighten the screws with a wrench. Old rusted flange needs to be replaced. Parts are sold in a specialist store. They can be made entirely of metal or with plastic inserts.
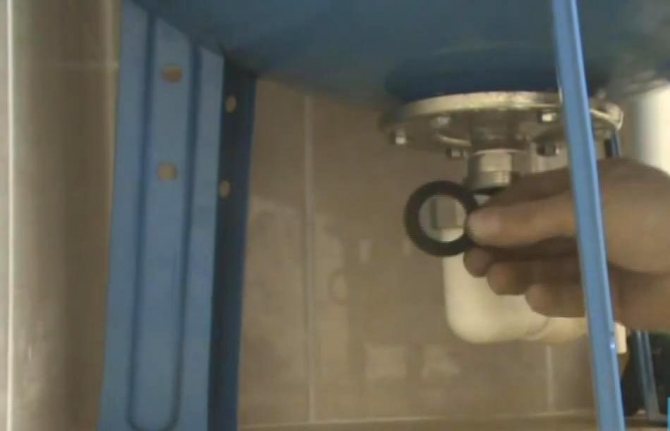
- Leaking from the nipple. The cause of the problem is a ruptured membrane. For replacement, it is necessary to remove the flange, then remove the rubber container. It is recommended to wash the inside of the tank. The new membrane is installed after complete drying. It is secured with a flange.
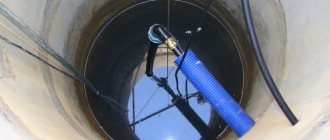
Before starting any repair work, the pumping station is disconnected from the power supply. All the water is drained from the tank by opening the nearest tap. To replace parts, the accumulator is dismantled from the water supply system. During the disassembly process, prepare to remove the significant amount of water remaining inside the membrane.
Warning before work
In other words, the owners of gas water heaters are prohibited from performing work on gas equipment on their own.
And even considering that the water reducer is theoretically not related to the gas system, it is also forbidden to disassemble this structural part and change the membrane with your own hands.
According to the rules of service, any service or repair work is carried out only by representatives of specialized companies.
Sometimes the desire to do everything on your own, without any practical experience in performing this kind of work, can turn into disastrous consequences. As evidenced by the numerous accidents associated with household gas equipment.
A bitter example from life, when, due to self-repair of the column, a gas explosion occurred. As a result, the destruction of a significant part of a multi-storey residential building.
And there are a lot of such cases every year. Often there are craftsmen who are ready to independently change the reducer membrane on the gas water heater. Moreover, it is, in fact, not difficult to perform such an operation if you have locksmith skills.
Do this light job as follows:
- With the help of documentation or by opening the column case and examining the internal contents, the brand (model) of the installed gearbox is determined.
- Based on the obtained technical information, they acquire a new membrane on the market.
- If the equipment is imported, it may be necessary to purchase a membrane only to order.
- In the presence of a membrane, shut off the gas supply to the equipment, close the tap for cold water supply from the central heating system.
- The contents of the heat exchanger of the gas heater are drained using the service drain valve, the location of which is determined according to the documentation.
After these operations, you can proceed to dismantle the gear unit. However, one should not rush here. It is required to work carefully, carefully so as not to damage other nearby parts of the gas column.
About reducer and diaphragm location
The device, called a water reducer, is included in almost any design of gas heat exchangers.
This part can have a different configuration depending on the model of the water heating device, but the principle of operation of such devices remains unchanged.
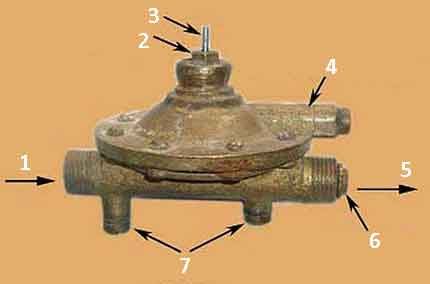
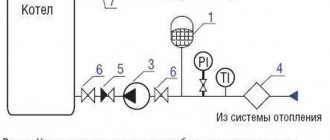
Gas column reducer where the membrane is located: 1 - water inlet; 2 - stem head and stuffing box group; 3 - stock; 4 - ball valve; 5 - water outlet; 6 - nozzle; 7 - plugs for draining water from the internal areas of the device
The water reducer, installed on the gas column, serves to maintain stable water pressure directly in the water heater heat exchanger system. due to the uniformity of pressure, a uniform flow is ensured, which means the same uniform heating of the liquid.
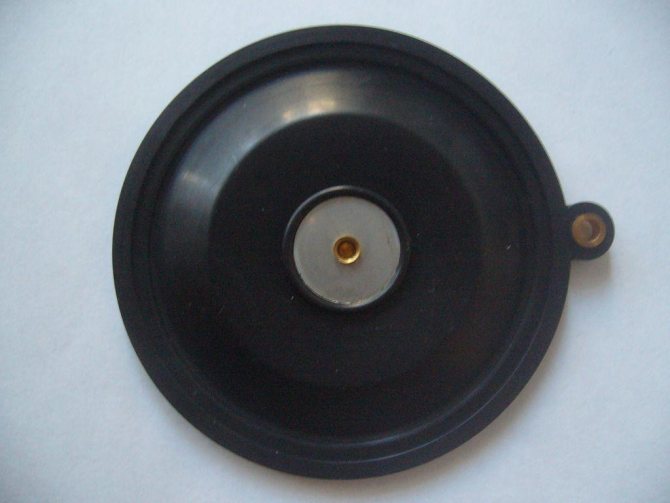
The part of the reducer, contributing to smooth pressure regulation, is a rubber membrane. This component of the gearbox, made in the form of a gasket, usually based on technical rubber, is in the shape of a circle. It is installed inside the gearbox housing.
Due to the long-term operation of water heating equipment, being constantly in motion, the membrane gradually wears out.
The wear of technical rubber in some places leads to tears of the material. Accordingly, the water pressure regulation function stops acting according to the set algorithm.
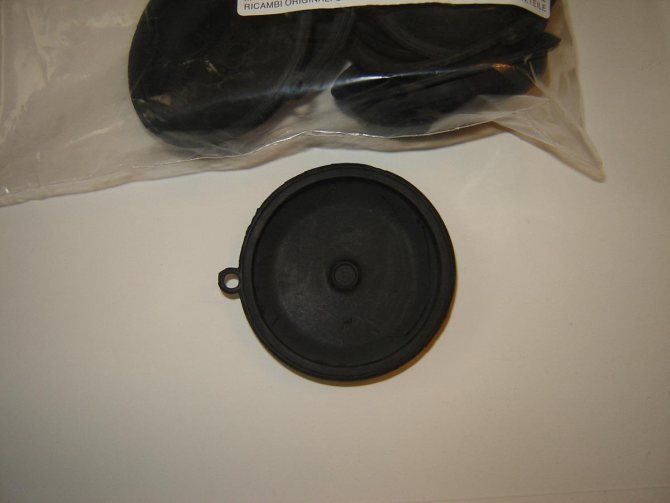
The prototype of the classic membrane based on technical rubber. The shape of the plate is round, the surface has a characteristic feature - a convex central part. Similar accessories are used on most gas water heaters
In such cases, it becomes inevitable to replace the rubber membrane of the reducer in the gas column, because the water heater does not work properly.
The quality of the individual hot water supply is sharply reduced, and in other cases, the column simply cannot be turned on. User comfort is lost.
Steps for replacing the reducer diaphragm
If we proceed from the rules for servicing gas equipment and strictly follow these rules, the performance of any installation, plumbing work, as well as work related to the power supply is the prerogative of the gas services, in particular, the local service gas company.
Dismantling the gearbox and disassembling
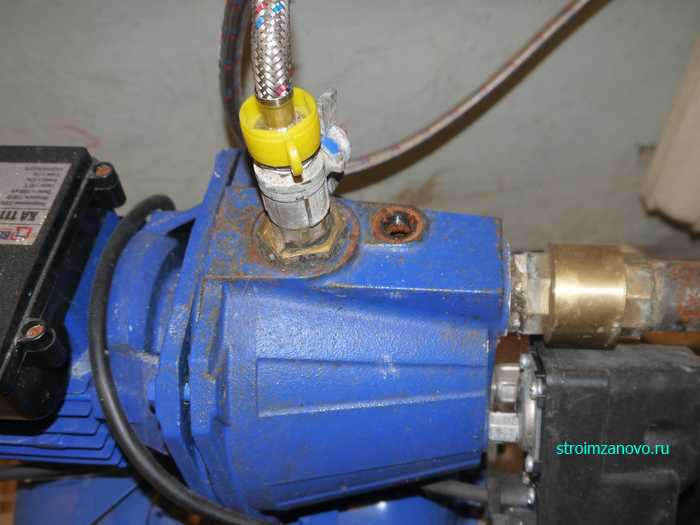
The water pressure reducer has inlet and outlet pipes. Actually, thanks to the threaded fittings, the device is mounted inside the gas system, directly on the water flow line.

Two positions for dismantling: 1 - pipe nut on the inlet of the pressure control device; 2 - pipe nut on the outgoing branch pipe. Drain plugs should also be used
How to replace the diaphragm of the reducer
If we proceed from the rules for servicing gas equipment and strictly follow these rules, the performance of any installation, plumbing work, as well as work related to the power supply is the prerogative of the gas services, in particular, the local service gas company.
What do you need to know before starting work?
In other words, the owners of gas water heaters are prohibited from performing work on gas equipment on their own.
And even considering that the water reducer is theoretically not related to the gas system, it is also forbidden to disassemble this structural part and change the membrane with your own hands.
Maintenance of a gas water heater by a specialist. According to the rules of service, any service or repair work is carried out only by representatives of specialized companies.
Sometimes the desire to do everything on your own, without any practical experience in performing this kind of work, can turn into disastrous consequences. As evidenced by the numerous accidents associated with household gas equipment.

A bitter example from life, when, due to self-repair of the column, a gas explosion occurred. As a result, the destruction of a significant part of a multi-storey residential building. And there are a lot of such cases every year.
Often there are craftsmen who are ready to independently change the reducer membrane on the gas water heater. Moreover, it is, in fact, not difficult to perform such an operation if you have locksmith skills.
Do this light job as follows:
- With the help of documentation or by opening the column case and examining the internal contents, the brand (model) of the installed gearbox is determined.
- Based on the obtained technical information, they acquire a new membrane on the market.
- If the equipment is imported, it may be necessary to purchase a membrane only to order.
- In the presence of a membrane, shut off the gas supply to the equipment, close the tap for cold water supply from the central heating system.
- The contents of the heat exchanger of the gas heater are drained using the service drain valve, the location of which is determined according to the documentation.
After these operations, you can proceed to dismantle the gear unit. However, one should not rush here. It is required to work carefully, carefully so as not to damage other nearby parts of the gas column.
Dismantling the gearbox and disassembling
The water reducer has a water inlet and outlet. Actually, thanks to the threaded fittings, the device is mounted inside the gas system, directly on the water flow line.
Two positions for dismantling: 1 - pipe nut on the inlet of the pressure control device; 2 - pipe nut on the outgoing branch pipe. Drain plugs should also be used
Therefore, in order to dismantle the device, it is necessary to unscrew the two union brass nuts on the pipeline.
But before doing this work, it is recommended to unscrew one or both plugs on the drain taps of the gearbox, which are located under the poppet housing.
The nuts should be unscrewed smoothly, at the same time keeping the device from possible turning. The mechanism of the device has a regulator rod in contact with another part of the gas column.
On some models, the stem head is secured with a screw. This point should be taken into account and, if necessary, loosen this screw.
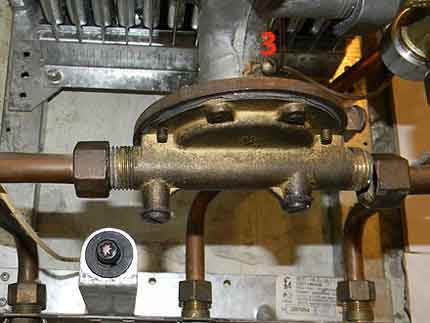
The fastening nuts to the pipeline are unscrewed. It remains to release the retaining screw holding the stem head. In the picture, this position is marked with the number 3
Dismantling can be accompanied by residual water leakage. It is recommended to stock up on a convenient collection container.
Brief instruction on membrane replacement
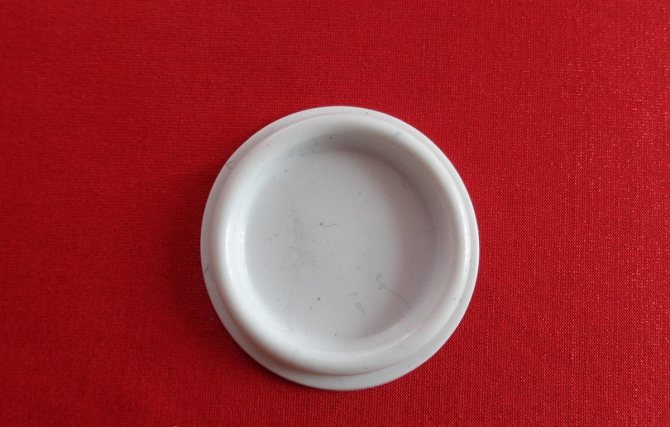
The removed pressure regulator will need to be disassembled to reach the rubber (silicone) diaphragm. The disassembled part looks like a plate.

The two halves of the poppet body of the pressure regulator, inside which the diaphragm is located. Now the defective accessory can be easily removed and replaced with a new one
Disassembly / assembly sequence:
- unscrew the fastening screws on the top of the plate;
- carefully use a flat screwdriver to bifurcate the plate;
- remove the defective membrane;
- install a new one;
- articulate halves of the plate;
- fix the joint with screws in a circle.
The correct position of the diaphragm on the gear plate is determined by a special "key" recess or pin, which, in turn, is located on the radial edge in the same row with the holes for the fastening bolts.
It is necessary to align the diaphragm “key” with this recess before joining the cymbal halves and screwing in the screws.
The same pin on the body of one of the body halves, thanks to which the membrane is precisely fixed in place. The accessory itself has a hole for a pin fit
The moment of screwing in the fastening screws is a traditional action. However, it should be borne in mind that the parts of the gearbox are tightened evenly. Technically correct tightening is performed using the "criss-cross" method.
That is, first, four screws are sequentially tightened, located one opposite the other, and only then all the rest are tightened.
The assembled gearbox, complete with a new diaphragm, is installed in place in the reverse order.
Carefully insert the stem inside the tube of the regulating device, align the device to the level of the water pipes. The pipe nuts are then screwed on by hand.
The picture shows the even distribution of the tightening torques of the screws when the two body parts are articulated. This condition must be adhered to in order to avoid water leaks through leaks in the future.
Typically, pipe connections are fitted with gaskets and are properly seated. This moment must be taken into account when installing the gearbox at the installation site.
Then it remains only to tighten the fastening nuts, applying a little effort and do not forget to tighten the drain plugs under the plate.
Membrane shapes and materials
The design of gas water heaters is diverse. Accordingly, a change in the design of the pressure reducing valve is not excluded. Therefore, the existence of reducer membranes of various shapes is also seen as an obvious phenomenon.
If a round product is considered standard, which can often be found when disassembling the valves of domestic gas water heaters, imported devices are often equipped with "exotic" ones.
The so-called exotic version of the rubber membrane. As a rule, products of this kind are most often found in imported structures.
One of such examples is gas water heaters of a well-known foreign company that produces household appliances under the Electrolux brand. Many models of this brand's equipment are equipped with figured membranes in the shape of the "eight".
The devices of the foreign company Vaillant are somewhat less popular in comparison with Electrolux, but they also stand out from the whole range of household gas water heaters by non-standard production of reducer membranes. When disassembling their valve, there is a chance of colliding with the flag membrane.
Another "exotic", not so figuratively expressed and quite a bit different from the classics, but nevertheless. Such accessories are also used on foreign devices.
For the sake of objectivity, it should be noted: non-standard products show a finer regulation of the flow pressure, however, in terms of long-term performance, they are often inferior to standard ones. Often the quality of the material determines the degree of durability.
In practice, it has been noted that silicone membranes last longer than rubber ones. However, for silicone, an important criterion is a thorough filtration of network water.
Even a small amount of sand or rust trapped in the area of the silicone product dramatically reduces the life of the material.
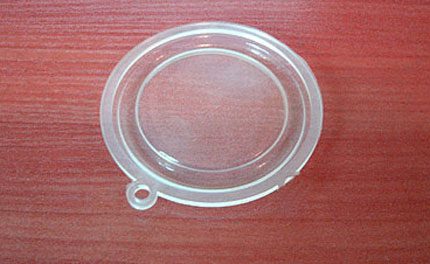
Manufacturing of a membrane using a relatively new material - silicone.In terms of the quality of work, the accessory in this design is characterized by more expressive parameters in comparison with technical rubber
Technical rubber is less sensitive to suspended particles, but for the most part "suffers" from insufficient chemical resistance.
That is, if the composition of the water to some extent has an aggressive component, in these conditions, products made of technical rubber usually do not serve for a long time.
Repair of gas column membranes
The desire to save on everything makes some users resort to such a virtual replacement technique as repairing a defective membrane with their own hands.
It should be noted right away: this occupation may be interesting for a handyman of all trades, but, from the point of view of service, it is absolutely irrational and meaningless.
They try to repair the membranes of gas columns in different ways:
- by filling with silicone sealant;
- using adhesives of various types;
- the imposition of pentelast;
- installation of miniature patches;
- and even masking tape.
The activity of such a "repaired" part usually lasts no more than 1-2 days. After that, problems begin again, and often even more aggravated.
Repair of membrane plates of gas columns, especially with your own hands, in any case fails. It has been tested in practice more than once. So, it is not recommended to change the “awl for soap”, unless there is a purely research interest in this matter.
What are gas column membranes
A person's life should be comfortable. To achieve convenience, many equip their home with various modern appliances. Some of them must be kept in every home, since without them the standard of living is significantly reduced.
Gas water heaters are a reliable and convenient way to heat up cold water and provide your home with hot water.
With the right choice of column and its use, you can be sure of a long service life. But it also happens that the column breaks. In such situations, the owners often do not know where to start the renovation. If the outlet water is not hot enough, it is definitely a membrane that may have deteriorated.
Replacing the accumulator flange
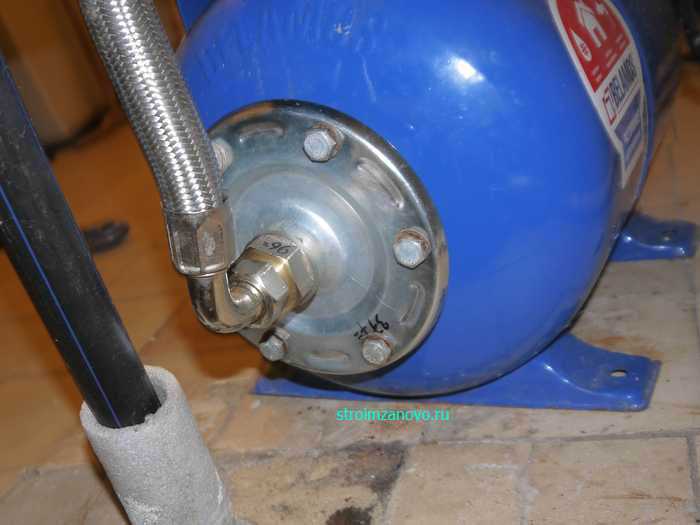
Replacing the pump station accumulator flange is required in one case - if the flange rusted and began to leak water. This happens not so rarely - inexpensive models of Chinese manufacturers are equipped with parts of not the highest quality. It would be logical to make this element out of stainless steel or plastic, but marketers intervened in the work of engineers and changed predictable reliable solutions for more profitable from a commercial point of view. The flange has become a consumable part, so it needs to be replaced approximately every 2 years.
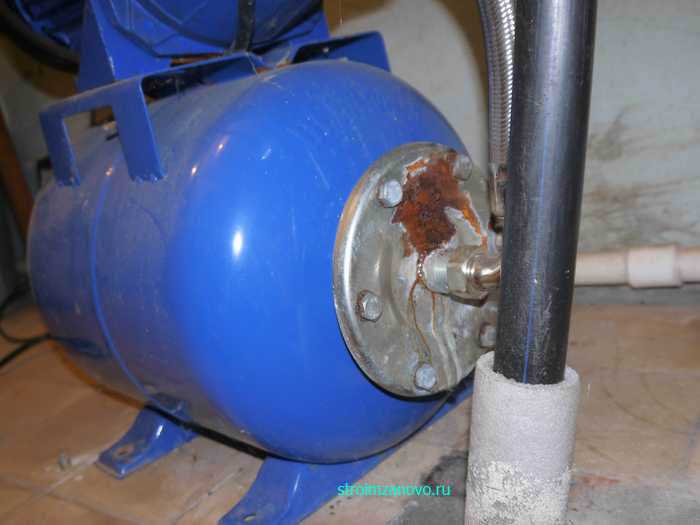
Usually it happens like this: rusty smudges appear on its body, digging begins. Since the pumping station is under constant water pressure, untimely repairs can lead to unpleasant consequences. Therefore, as soon as rust begins to appear on the flange, it must be replaced.
Manufacturers of accumulators do not hide that the flange is a consumable part, so there has never been a shortage of this product in plumbing stores. Flanges are made of different materials: plastic, stainless steel, common metal. These products differ only in price. In this article, we will show the procedure for replacing the accumulator flange.
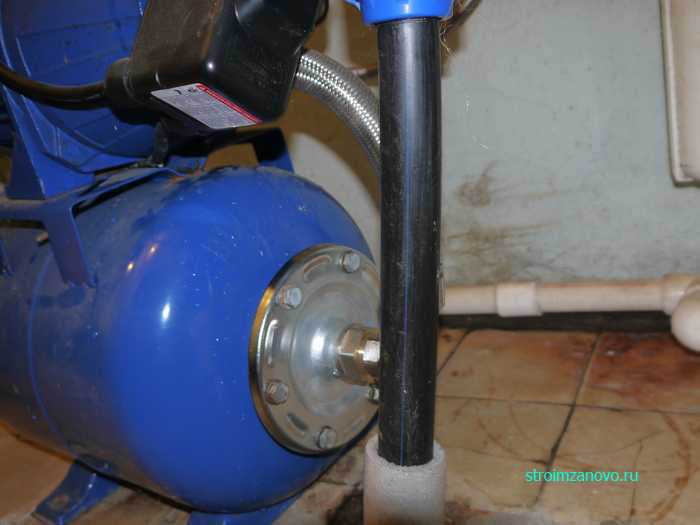
Before replacing, we disconnect the pumping station from electricity. Then we open the cold water tap and drain it from the pipes and the tank. Next, we unscrew the flexible hose connecting the station body with the hydraulic accumulator. The rest of the water will pour out of the tank, so you need to substitute some container under it.
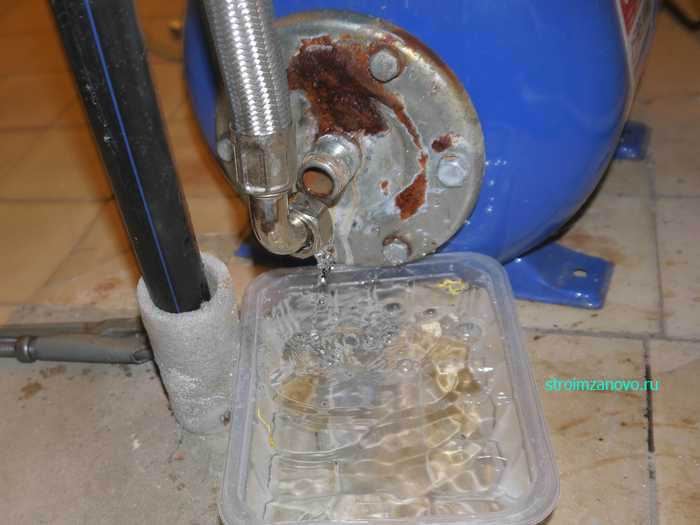
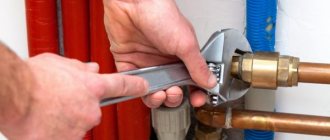
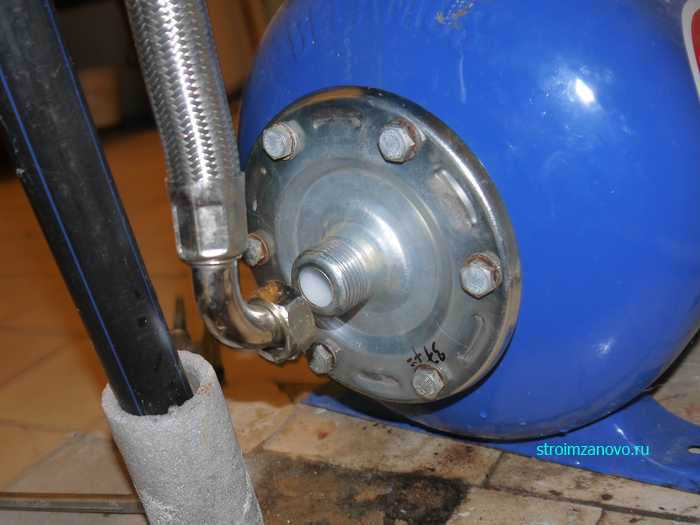
Using a 14 wrench, unscrew 6 bolts and remove the flange from the body.
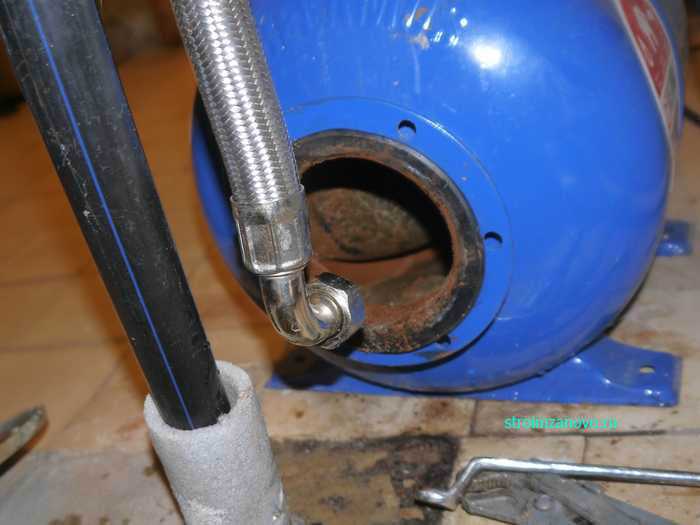
Upon examination of the part, it became clear that the metal had rusted through and needed to be replaced.The same flange was purchased from a plumbing store, only with a plastic insert at the point of contact with water. Hopefully the plastic will protect it from rust.
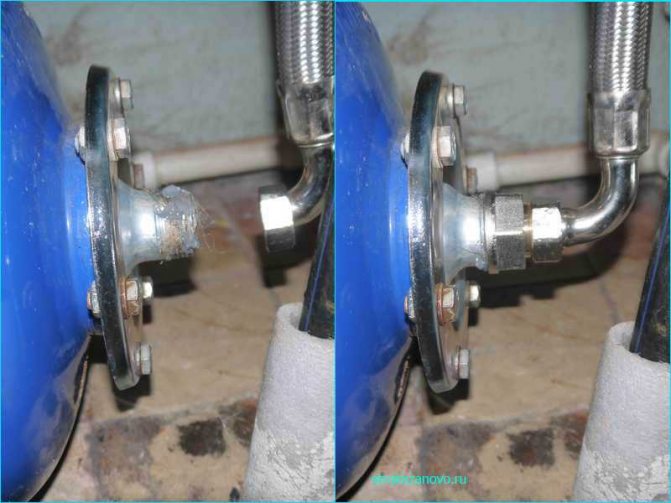
We install the flange to the station in the reverse order. First, we screw it to the body, tightening it with bolts and nuts.
On the flange, which we removed from the accumulator, the hole diameter was ¾. On a new part - 1 inch. Therefore, it is necessary to use a coupling to change from a larger diameter to a smaller one. To prevent leaks at the junction, it is advisable to use linseed tow and Unipak paste, or any other moisture-resistant sealant.
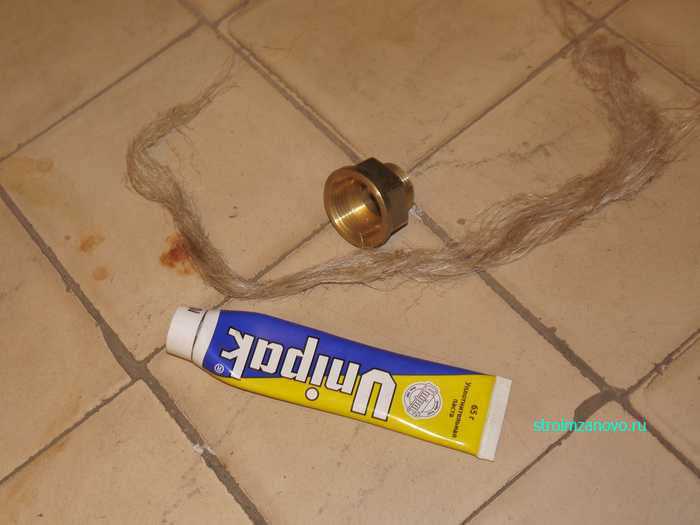
We wrap the thread on the flange with tow, apply a little paste and tighten the sleeve with a gas wrench. Then we fasten the hose nut.
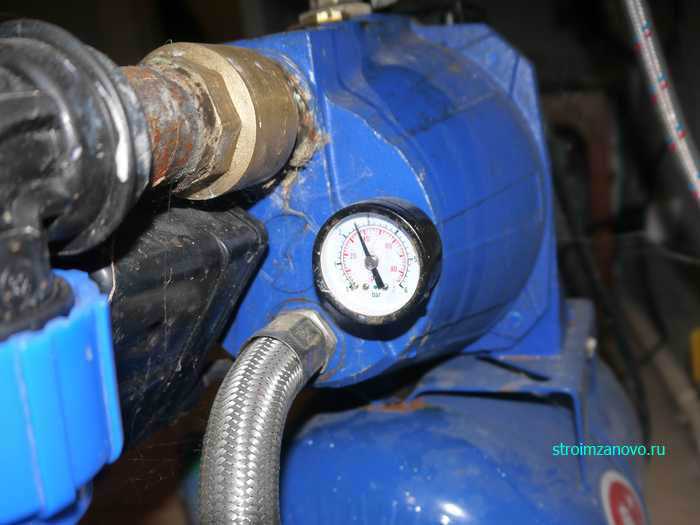
Now it is necessary to pump air in the accumulator tank. We connect a conventional pump to the nipple and bring the air pressure to 1.5 bar.
To start the pumping station into operation, 1.5 liters of water must be added to its body. To do this, unscrew the plug on the filler neck and pour water there.
We plug the station into an outlet. The tank will begin to fill with water, pumping it from the well. If, for some reason, the pressure at the station does not rise to certain values, this means that air has entered it. In this case, you need to repeat the whole procedure again: turn off the station from the outlet, pour water into it and start the engine. As soon as the device reaches a pressure of 2.5-3 bar, the station will enter operating mode and turn off.
In the future, you will need to check it from time to time for smudges.
The process of replacing the membrane in the gas column
The membrane is designed to separate the cavities in the water regulator. Despite the quality of the column and its manufacturer, the membrane wears out over time, leading to rupture. This type of malfunction is very common, but anyone who first read the instructions will be able to cope with the choice of a new membrane and replacing the old one.
According to the instructions, any repair of the gas water heater must be carried out by qualified personnel.
Self-repair without special skills and knowledge can lead to equipment damage. Also, self-repair is very dangerous because a gas leak may occur. If any difficulties arise during self-repair, you should immediately contact the gas service.
Membrane replacement process:
- Turn off the column.
- Shut off cold water and gas.
- Open a hot water tap to change the pressure in the pipes.
- You need to open the tap that is located closer to the column. Usually it is a bathroom faucet.
- When disassembly takes place, water from the heat exchanger and pipes will flow out through the open tap, and the siphon effect will help this.
- There is no need to turn on the kitchen faucet, which is located higher than the water regulator. This can cause 3 to 5 liters to simply spill onto the floor.
- Remove the column cover. Finding attachment points will not be difficult. The absence of a casing will make the interior of the column accessible.
- Remove the water regulator. For this, the union nuts and fixing screws must be removed.
- Disassemble the regulator and replace the diaphragm.
It is not difficult to change the membrane. But it is important to make sure that all actions are performed correctly. The membrane should not be upside down, and the bypass, which facilitates the integration of the water unit, should not be blocked.
Conclusions and useful video on the topic
The video demonstrates the personal experience of one of the owners of the heater - that is, do-it-yourself repair of the water pressure regulator. In particular, all repairs are reduced to replacing the membrane. We would like to remind viewers once again: self-repair of gas systems is unacceptable!
It is easier to find and buy a new membrane for the gas water heater, replace this accessory according to the instructions described above and sleep well.Moreover, replacement, in most cases, does not require significant financial costs. On average, 200-300 rubles are enough for the purchase of a complete accessory.
Advantages of the membrane for the gas column "Neva"
To replace a broken membrane on your own, you will need certain knowledge and skills. Repair of the Neva-4513 column can be done with the help of the service center specialists, but it will cost several times more. Before buying a part, it is important to study the device of a particular gas water heater.
When buying a membrane in a specialized store, you do not need to hesitate to ask questions to specialists - they should answer the client's question in as much detail as possible.
The rubber diaphragm, designed to regulate the flow, is designed to last for five years. The actual time of its serviceability largely depends on the quality and hardness of the water, the intensity of the column. When buying a membrane, it is important to pay attention to the rating and reviews about the manufacturer of the product.
Membrane advantages:
- Consists of high quality rubber.
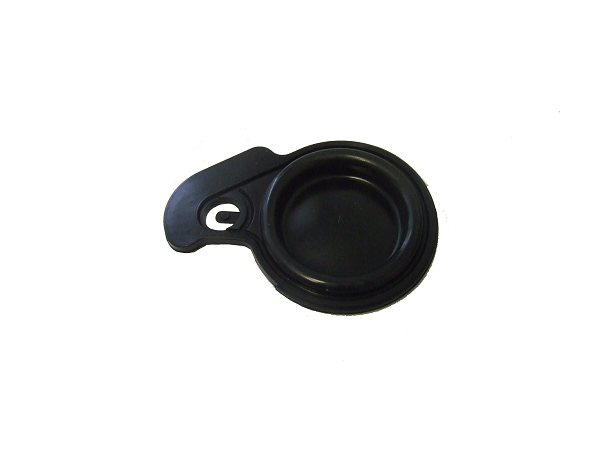
- In the presence of an arcuate branch in the shape of an ear.
- If the membrane is damaged, then the gas column does not produce hot water.
No matter how high the membrane is, it will eventually become unusable. Modern technologies allow you to purchase a membrane of the highest quality without leaving your home. On specialized sites, the membrane can be ordered online. You can also purchase a membrane in specialized stores, where you can consult with a specialist in real time.
Accumulator repair
It is not difficult to repair a hydroaccumulator with your own hands
As we have already determined, the most frequent breakdowns are the loss of tightness of the membrane or housing. They are eliminated simply.
Membrane permeable
Diaphragms for accumulators
We are looking for the bag (pear) we need. They are actually consumables and are interchangeable even for products of different companies.
You just need to pay attention to the following things:
- so that the volume of the bag corresponds to the volume of the accumulator;
- you need to choose the diameter of the pipe for connecting the water supply;
- the flanges must also match in size and the location of the mounting bolt holes.
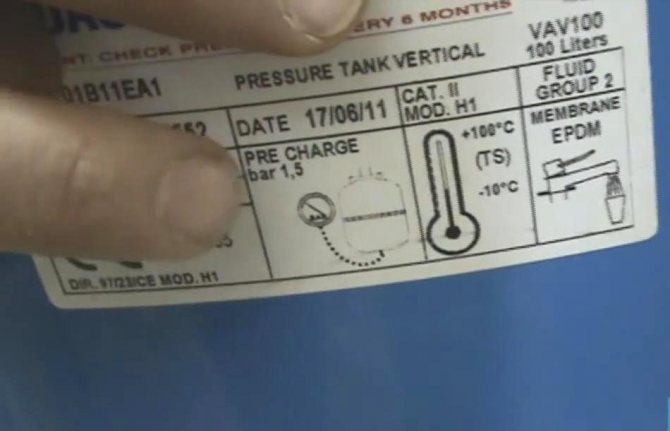
Advice. There are membranes for heating and hot water accumulators. They are designed for higher temperatures and are more expensive. If you are simply repairing cold water pipes, then you should not overpay.
The replacement process itself is easy to do with your own hands:
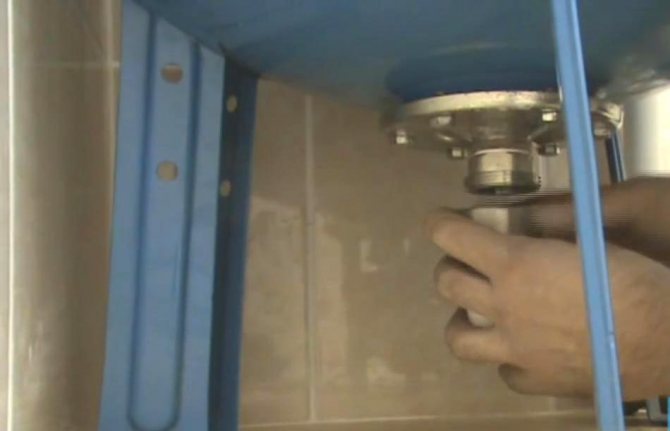
- Disconnect the accumulator from the water supply system by unscrewing the appropriate coupling or flange.
- We release the pressure in the body by unscrewing the spool.
- We unscrew the nuts connecting the flange with the outlet for connecting the battery to the water supply, and at the same time securing the pear (membrane).
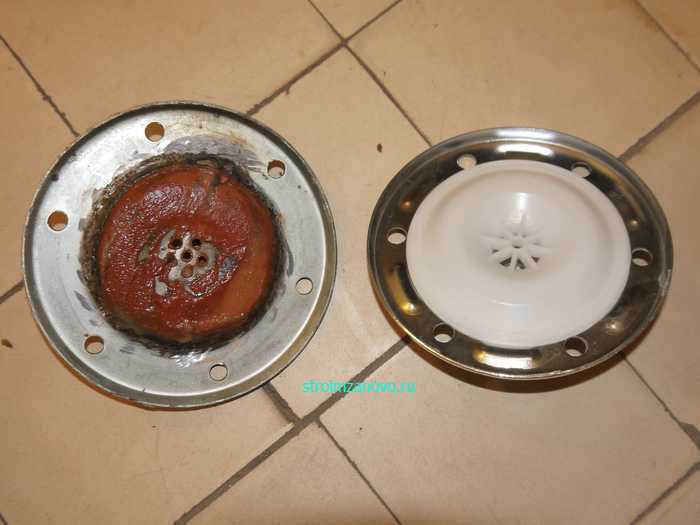
- We remove the old membrane. You can personally look for her defects.
- We clean the flanges and ebbs of the new "pear" with which it will be attached and degrease them.
- For greater reliability, we coat the contact points of the flanges with a sealant.
- We collect the accumulator and connect it to the water supply.
- We pump air into it to the required pressure
- We adjust the pump control system to the required pressure. Usually they choose to turn on at 1.5 atmospheres, turn off at 2-3. We described above how to set up a hydraulic accumulator in a water supply system.
- We flush the system by draining the water for at least an hour.
Skips the body
It is undesirable to use glue (cold welding) to repair the body
Once you find the leak, you can try to weld it. Glue (including epoxy - "cold welding") is unlikely to help. If this is not possible, the procedure is the same. as when replacing the membrane.
True, it is better to change the assembled hydroaccumulator, since the body costs an order of magnitude more expensive than the "pear", and the old one should not be installed because of its cheap price.
Silicone membrane repair: tips
Gas water heaters in our country are represented by a large number of manufacturers. At the same time, the columns themselves hardly differ from each other in terms of their internal functional content. In many columns, the disadvantage is the frequent breakdown of the membrane.
A silicone membrane is considered to be of better quality than a rubber membrane. The latter breaks so often that it has to be replaced once a year or even more often.
Many users claim that after replacing the rubber membrane with a silicone one, the problems with water heating and its leakage stop. But it is also impossible to guarantee a long service life of such a membrane. Therefore, many users ask questions about whether a membrane made of silicone can be repaired.
Silicone membrane repair:
- Try to seal with a sealant.
- Use Pentoelast.
- Choose a silicone sealant that has a high stretch ratio.
- Try to glue the patch.
- Apply scotch tape.
Many agree that the silicone membrane simply needs to be replaced. This approach can be justified, since constant repairs will lead to the cost of time, effort and nerves. Replacing a part is not so difficult if you know how to handle the column in general. The most common speaker models for which users are looking for new membranes: Vector, Beretta, Oasis.
Replacing the membrane
Quite often, you have to change the membrane in the accumulator. However, before disassembling the tank, you should make sure that the reason is in the membrane. After all, the matter may be in the wrong setting of the pressure switch, or in a small volume of air in the hydraulic tank.
One of the most common problems is membrane breakage.
The main signs by which you can determine the damage to the membrane:
- too frequent switching on of the pump;
- water flows from the nipple and air valve.
In this case, the membrane is repaired in the following sequence:
- first of all, you need to purchase a new pear and prepare a set of keys;
- after that, the accumulator is disconnected from the water supply system;
- water is drained from it and air is released;
- now you need to unscrew the flange and take out the old pear;
- further, it is advisable to carefully examine the inside of the tank - if there is dirt or rust, then you need to clean it;
- after that, the new membrane is expanded and installed in the seat;
- then, it is pressed against the flange.
Now, it is required to pump its operating pressure into the accumulator, usually 1.5-2 atmospheres. And then do a test run. At the same time, water must be supplied to a new pear under low pressure - this will eliminate the likelihood of its damage. You can read more about the nuances of repair in the article "How to replace a membrane in a hydraulic accumulator".
Replacing the membrane for the gas column (video)
Gas water heaters are so common today that few people do not know how to handle them. However, when devices break down, many fall into despair. There are such types of breakdowns that can be quickly eliminated.To do this, you can contact a special service or fix it yourself. But you should be extremely careful. Often the breakdown of the membrane affects the cessation of heating by the water column. It is she who passes water to the heating device. Diaphragms can be made of rubber or silicone, but they all tend to wear out.