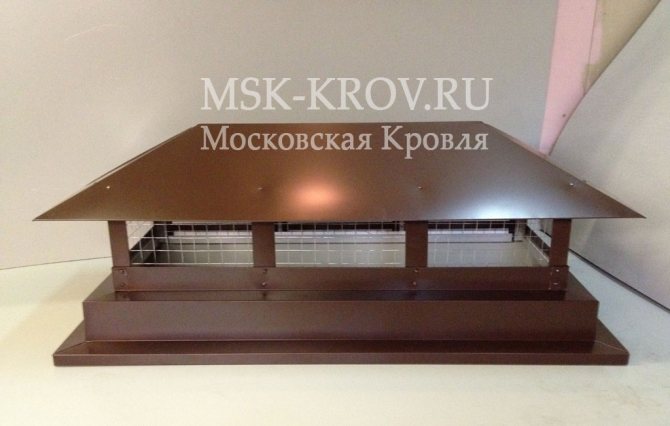
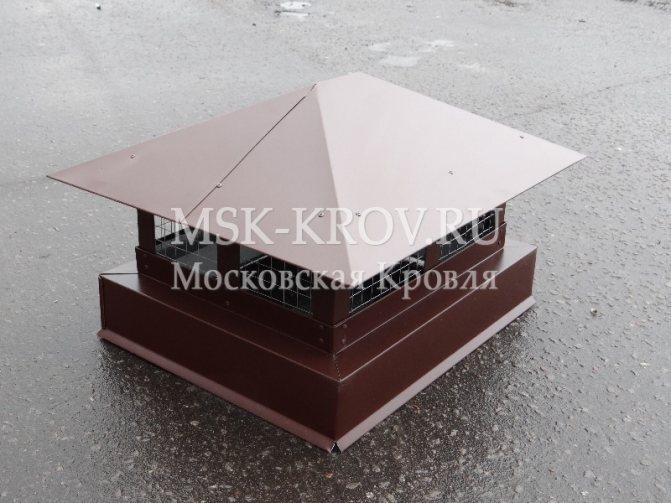
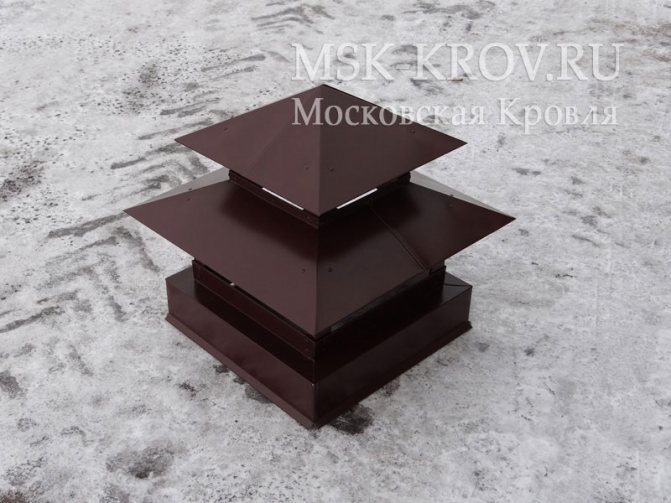


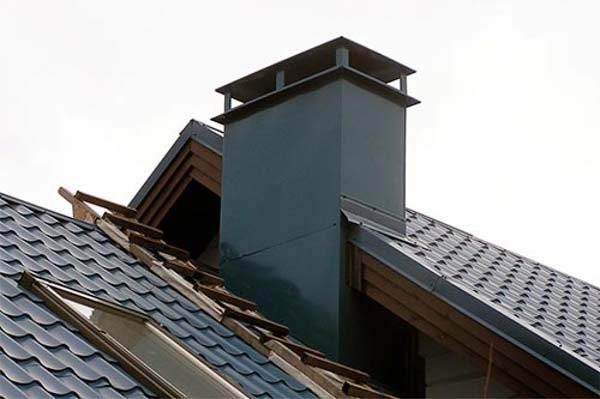
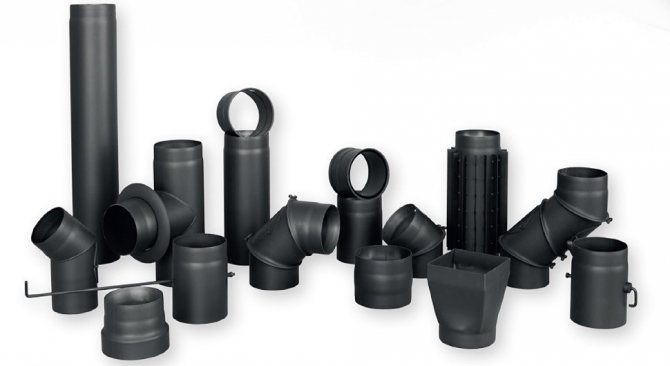
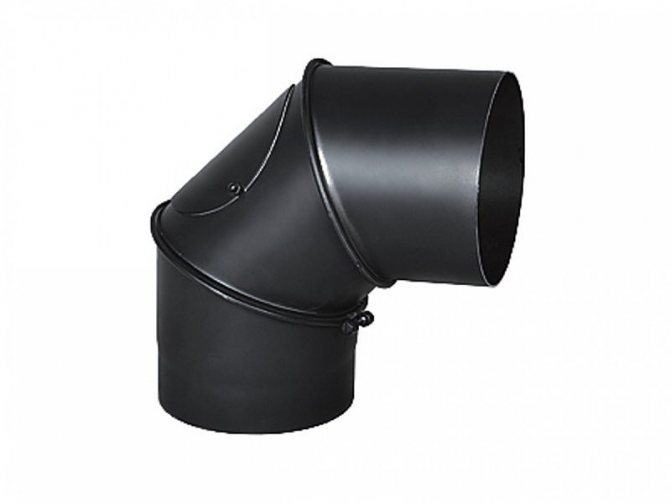
Covers for pipes are an affordable tool to update the appearance of the roof, to hide irreversible changes in dilapidated, unrecoverable chimneys. Covers for pipes are made to order, according to individual dimensions, in two versions:
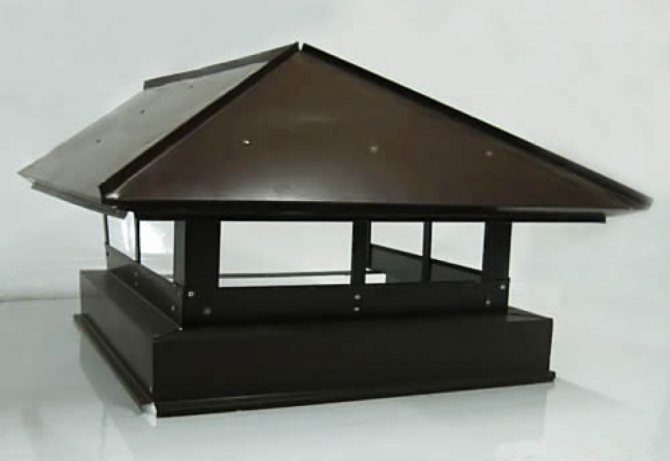
"Dismountable" - for ease of installation and transportation. In the finished version, the casing has vertical stiffening ribs that give the product a distinctive look.
"ALL-METAL" - this option allows you to install the entire casing on the pipe with small dimensions. This saves time on installation work.
Usually, for chimneys, the following dependence is valid - the higher the pipe, the better the draft. The metal casing should not spoil the impression of the aesthetics of the facade and the interior of the house, therefore, the excessive elevation of the chimney above the roof will turn your building into a kind of industrial boiler station. In this case, the ratio of the cross-section of the pipe and its height must be calculated by a specialist.
As a rule, even a small pipe height is sufficient - its overhead part should rise only 0.5 meters above the ridge, since the atmospheric pressure at the level of the combustion chamber is always higher than the pressure of the air column above the roof.
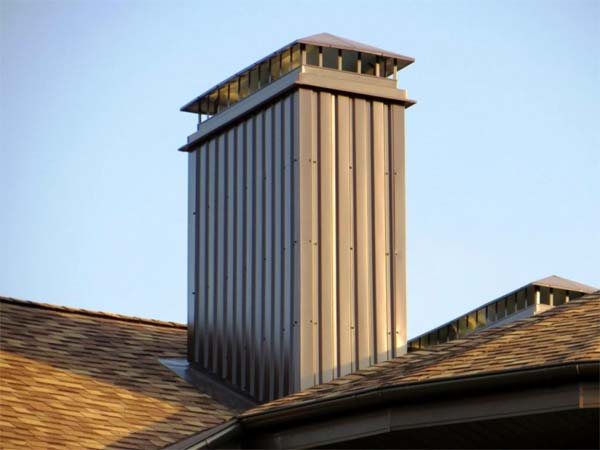
The metal casing for chimneys has a number of advantages:
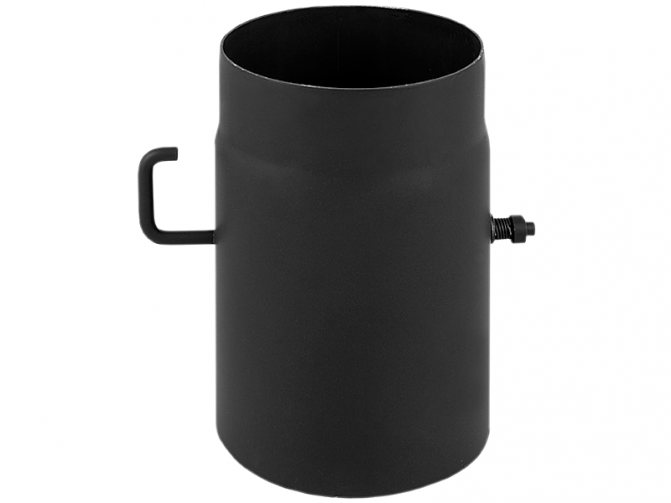
- ease of installation - long operating period - mechanical strength - the metal casing weighs significantly less than a pipe made of bricks, so a foundation is not required for them
Our site is not only informational, but also service. It provides a quick calculation of the cost of products.
Some of the owners of suburban housing, bath rooms, do not take into account special nuances when designing chimneys. For an example of today's article, let's take a box on a chimney pipe. Many people forget about it, but this is one of the main safety requirements, especially in wooden buildings. In advance, I would like to stipulate that it is quite difficult and time-consuming to make parts of the apron on your own. After all, this is not just a decorative element, which it certainly is, but not to the extent that it is a technological one, for smoke removal and reliable thermal insulation from ceilings. In order for the work to be done efficiently, you need to know a lot of nuances, among which, for example, the material for the manufacture of the pipe and the materials of the floors.
Types of chimney boxes?
Today, manufacturers offer two main types of casings:
- Galvanized.
- Corrugated (stainless steel).
The "case" of the first type is considered more suitable and in demand. It has high fire resistance properties. In addition, in terms of service life, such a casing for a chimney on the roof is considered the most durable. Galvanizing is, in principle, easy to install, which, of course, is considered an important point when choosing. As a rule, metal with a thickness of 0.40-0.50 mm is taken as a basis.
The corrugated stainless steel cover is also very easy to install. In addition, it is the corrugation that has a decisive advantage, namely, it has the ability to take any design forms, which is quite convenient. By the way, such pipe boxes are highly resistant to temperature and atmospheric extremes. And corrosion is less susceptible.
The casing can even be made independently, with the necessary tools at hand. So which material is right for you:
In addition, do not forget that in addition to the box, you need to choose a heat-insulating material that is characteristic of each product. So, when choosing, be guided by:
- Flue gas duct materials.
- Temperature conditions at the highest peak values.
- Heat-resistant properties of the material itself.
Pay special attention to the choice of chimney insulation if the choice fell on plastic. Like any polymer, it has a number of specific nuances that must be taken into account in any case.
Chimney box: why is it needed and how to assemble it yourself?
The chimney box is an additional thermal protection of the pipe and is designed to ensure the fire safety of the roof structure. Also, the device carries an aesthetic load and allows you to improve the design of the facade. The independent manufacture of a metal casing for the chimney on the roof is carried out on the basis of diagrams and drawings, taking into account the structural features of the roofing system.
Purpose and design features
The chimney box provides for heat and waterproofing of the chimney section on the roof. The presence of a protective and decorative casing helps to level the risk of destruction of a brick or asbestos gas duct under the influence of atmospheric loads.
This eliminates the possibility of ignition of roof elements due to high temperatures of the chimney surface. Also, the functionality is designed to provide an aesthetic appearance of the chimney section protruding on the roof to support the facade and architectural style of the house.
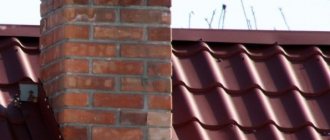
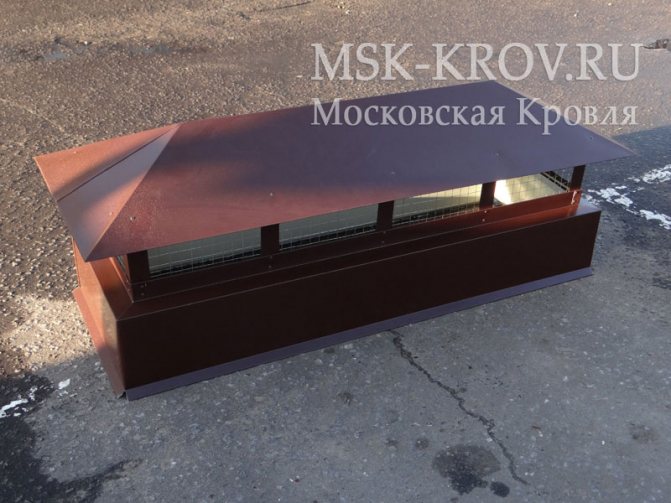
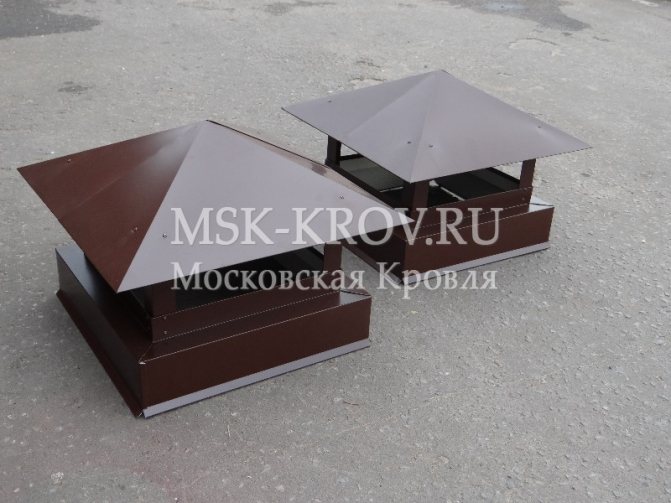
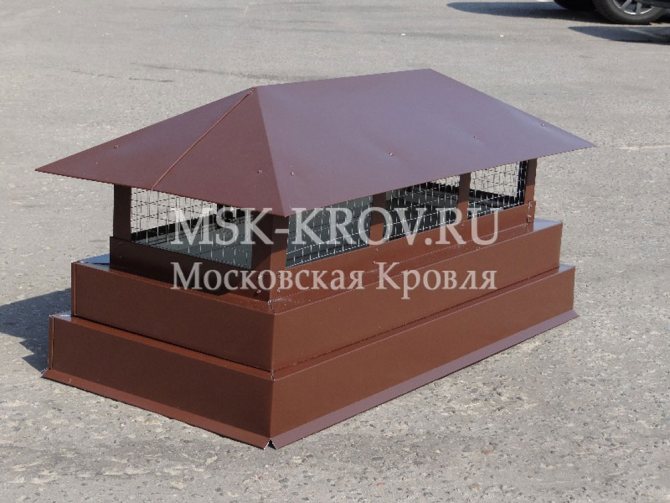
Structurally, the box repeats the shape of the chimney, it can be of a square, rectangular or round configuration, it is made of various materials. The finished casing is put on the chimney and securely fixed to the base.
The chimney box is an additional thermal protection of the pipe
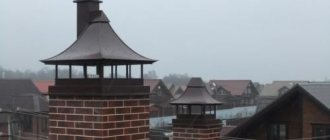
Decorative box
You can easily assemble a pass-through casing yourself, the so-called decorative. Do not assume that such casings will differ in their properties. After all, the main function is one and it is adhered to in any case. It will be about how the body can be processed, how it can be brought into a single modular segment with the rest of the building. The problem is not presentable, it can be easily solved with the help of a decorative coating, which you can easily find in stores. The most common finishing coating today, made of polymers. It is capable of imitating wood, brick, stone and the like, without limitation.
For example, the metal box itself does not represent any decorative highlight and attractiveness. However, finished with polymer, it can imitate brickwork or laid beams, logs.
Okosyachka in a house from a bar
Windows in a wooden house require the manufacture of a separate box for each of them. The cage is mounted without screws, nails, self-tapping screws, and other similar fasteners. Insulation is placed between the log and the frame, which will act as a guarantee of the maximum possible insulation of the structure, its complete sealing.
A correctly installed window increases the heat and sound insulation of the room, helps to save openings during the inevitable shrinking of wood. This design can last up to a hundred years.
Important! It should be mounted even if the house stood for a couple of years and did not shrink visible to the eye.
The casing makes the wall more stable, stronger, retains the unchanged shape of the opening. Okosyachka can become an excellent element of the external decor of a building, the main thing is to choose it exactly for the overall style of the exterior.
Experts distinguish between three types of work to create a window:
- Massive: solid wood is processed here, while maintaining the necessary structure of the raw material.
- Glue: the casing is created from a set-glue board, it is glued with micro-spikes on the four sides of the opening. Resin pockets, knots must be completely removed.
- Combined: the most common type. Top, risers are created from a coniferous massif.The window sill, the threshold are made of a type-glue board, it has a final appearance, after the installation process, it is opened with varnish and paint.
The structure can have a selection for the window and be without it. The first arrangement is needed when there are no plans for external, internal wall decoration. Otherwise, it is better to take the option without a sample. This type of squash can be finished or rough.
It is possible to manufacture a structure of any shape, the standard system has the shape of a rectangle. A non-standard device may be needed when it is necessary to create the shape of a trapezoid, polygon, balcony blocks. There are disadvantages here, which are easy to avoid with a competent approach.
Making a wooden frame
Making a frame is one of the most important things when working. Indeed, the durability and stability of the entire structure will depend on its characteristics. Often, wooden lathing is used for gas boilers and channels, which will subsequently be processed with a picket fence or OSB sheets. It is not justified to mount wooden frames for metal or plastic parts. After all, more space will be required for a slot in the base of the roof, which will have a rather negative effect on the bearing capacity.
- Measure the dimensions you want on the roof.
- By size, hold, drank in the rafters and floors.
- Make four U-shaped bar blanks, which will subsequently be joined in the overlap itself.
- Consider extreme lathing and vapor barrier.
- Also, don't forget that the bottom will need to be made.
Given the temperature changes, it is better to make it from metal or, in extreme cases, from plastic. A tree for such purposes is not the best option, since it will play and constantly “take” a different overall structure.
It is better to make a chimney box with an assistant. This makes it easier to dock and fasten a weighty structure.
Making and installing the box with your own hands
The high cost of materials plus production costs dictate the high cost of components from which the casings are assembled. For this reason, many who want to own such a product ask themselves the question: how to make a box for a chimney with their own hands and how this process takes place.
All stages boil down to the following:
- drawing a detailed diagram based on the diameter of the pipe, calculating the width of the ceiling or roof slab, choosing the material for the chimney;
- assembly of the box from the selected materials;
- cladding of the finished structure (if necessary).
Required tools and materials
At the first stage of manufacturing a casing for a chimney pipe, it is necessary to decide what it will be made of. Depending on the chosen base, you may need:
- construction tape, level;
- scissors for metal (for working with sheets of stainless and galvanized steel), a hacksaw or an electric jigsaw (for sawing wood), a stationery knife (if the base is assembled from drywall);
- drill or screwdriver, riveter, hammer;
- pliers, vise.
Then the basic materials are purchased: sheets of suitable metal, boards or gypsum plasterboards. If there is a need to equip the chimney with heat-insulating material, the most suitable one is selected.
Drawings and diagrams
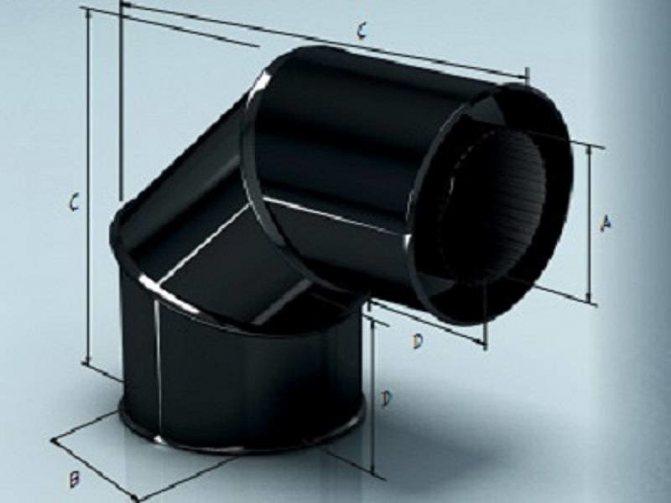
The drawing of the future product directly depends on its configuration: it will be a simple installation fittings in the ceiling or a full-fledged structure in the entire height of the chimney.
The box consists of several basic elements:
- ceiling-pass unit;
- the body of the box is square or rectangular;
- protective visor.
Based on the dimensions of the available material, a drawing of individual elements is created with an exact indication of the dimensions, the places where the parts are joined to each other, and the sequence of installation.
Sizing calculation
The dimensions of the box begin to be calculated by determining the diameter of the inlet inside the ceiling element. It should be 0.5 mm larger than the cross-section of the pipe to ensure a comfortable passage.
Then determine the width and length, which will provide reliable protection of the external environment from heating. To do this, draw a line of at least 7 cm from the edge of the hole or center its location in accordance with the finished opening in the ceiling or roof. So, for example, with a diameter of 20 cm, the edge length will be 37 cm.
The next step is to calculate the depth of the structure and the size of the base that will be attached to the ceiling. To do this, the thickness of the overlap is increased by 13 cm, and the size of the sheet with a hole is increased by 5 cm.
The dimensions of the towering parts are calculated taking into account the method of joining steel blanks. In the case of welding work, the allowance is not carried out. If the fixation is carried out by pressing or rivets, several centimeters of excess material are provided on the workpiece.
Making a wooden frame
To ensure reliable fixation of the box on the roof, it is necessary to mount a structure between the rafters, which will serve as the basis for further manipulations. The wooden box is assembled from boards 10x2.5 cm, securing with products of the same size.
The assembly is carried out in such a way that the internal space corresponds to the dimensions of the box. The surface of the wood is upholstered with an insulating membrane and a waterproofing film. For even greater protection of the boards, the inner ends can be upholstered with a metal profile, increasing the internal space by a few millimeters.
Manufacturing of a metal box
The manufacture of a casing for metal chimneys begins with cutting blanks. If everything is simple with the main vertical parts - they have the shape of rectangles with a seam allowance, then the overlapping box consists of several elements:
- two U-shaped elements with stripes bent at right angles;
- two rectangles with a width equal to the size of the through hole;
- the bottom, the dimensions of which are several centimeters larger than the opening on each side, for secure attachment to the surface, and a round hole in the center with a diameter equal to the cross-section of the chimney;
One of the main manufacturing steps is the creation of pipe fittings. To do this, before cutting out the center of the bottom, draw 4 small rectangles directed inward from the cut line. They need to be bent up at a right angle.
Chimney box finishing
There are many decorative coatings available for use on metal surfaces that can withstand harsh environments. They will give the structure a beautiful appearance and will serve as an additional protective layer. The choice is based on individual preferences and roof design.
Manufacturing of a metal box
Let's say a hole in the wall, the overlap has already been made, now it's only about the manufacture of the case. Therefore, we carefully study the stages of work and instructions. So:
- After cutting the required hole, we recommend to strengthen the edges with "support", use a bar with a section of at least 40 to 40.
- We cut out two plates from metal, keep in mind that they should be 50 mm. more hole. Next, we bend them so that an angle of 90 degrees is formed, thereby obtaining two U-shaped figures.
- The strips are screwed to the hole.
- The next stage involves the manufacture of similar U-shaped structures, but of a different size, according to the initial parameters and dimensions of the already bolted strips. New elements need to be overlapped.
- Next, we prepare the bottom and the "roof". Cut out two identical sheets, corresponding to the size of the hole. Cut a hole in the middle for the chimney.
- Next, we mark four identical stripes from the center. We bend it at an angle of 90 degrees, so we get a mount.Consider the optimum width of 20 mm.
- Further, the bottom and the lid are attached to the U-shaped forms and screwed on. After that, you can insert the pipe, pay attention not to its fastening, use clamps. Further, the entire space is filled with the selected thermal insulation.
The chimney box is a structure that is assembled from different materials and serves as a heat insulator, as well as additional protection for the chimney. In addition, such a case performs one more function - an aesthetic one, giving the chimney a presentable appearance. If desired, it can be completely or partially dismantled, which is very convenient and functional.
The metal casing, put on the chimney, performs a protective and heat-insulating function
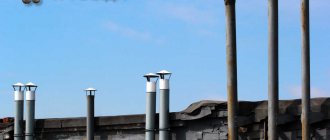
What is a pipe casing for?
The chimney on the roof is a very important part of the chimney structure. Its location, the material from which it is made, as well as accessories on the chimney - all this affects the traction indicators in the system. This part of the chimney structure is located outside the building, therefore, various destructive environmental factors affect it all year round: precipitation, wind, temperature changes.
Regardless of what material the chimney is made of, these factors gradually destroy it, which inevitably leads to a deterioration in the traction performance in the system. And as you know, thrust is the main indicator that determines the operational characteristics of the system as a whole.... Therefore, the installation of a protective case on the chimney pipe provides not only its protection, but also prolongs the operational life of the chimney structure.
Varieties of casings for the chimney pipe
Today, the most popular are two versions of such casings. Consider them:
- galvanized casing for pipes;
- corrugated cover made of stainless steel.
The chimney case made of galvanized steel sheet is the most demanded. Galvanized steel has high fire resistance, corrosion resistance and long service life. The galvanized casing is easy to install, which is also a very important factor affecting the popularity of this product. Such products are made from galvanized steel sheet with a thickness of 0.45 mm.
The corrugated case made of stainless steel is just as easy to install and has one very important advantage - the structural design of the corrugated box allows it to be bent, to give it the required shape, which is very convenient. Such a casing is resistant to corrosion and temperature extremes.
It is best to use chimney hoods that are made of metal that is resistant to corrosion.
Protective cases can perform the function of organizing thermal insulation for the chimney. Covers for thermal insulation of chimneys can be made from different materials with your own hands. Consider these materials:
- galvanized;
- roofing iron;
- aluminum;
- plastic;
- profiled sheet;
- slate.
When insulating the chimney on the roof, a suitable thermal insulation material must be used. The heat insulator is selected individually for a specific situation. When choosing a heat-insulating material, it is worth considering the following indicators:
- chimney material;
- chimney heating temperature on the roof;
- thermal stability of heat-insulating material.
The thermal insulation material must be resistant to the heating temperature of the chimney in order to avoid ignition. You need to be especially careful when choosing a heat insulator if you are installing a casing made of polymer material.A plastic pipe box is easy to install, however, it is considered the least safe option, so you need to provide the necessary thermal insulation of the chimney, taking into account all fire safety rules and regulations.
Protective structure can be decorative
Roof pipe sealing
Sealing of the chimney on the roof is carried out taking into account the shape of the pipe and the relief of the roofing:
- For rectangular and square designs, a metal apron is suitable;
- For round exits, flexible rubber or polymer penetrations are often used;
- Sandwich pipes are equipped with a metal cone fixed at an angle on a steel apron;
- The slate or metal tile is equipped with lead abutment strips or the Master Flash system.
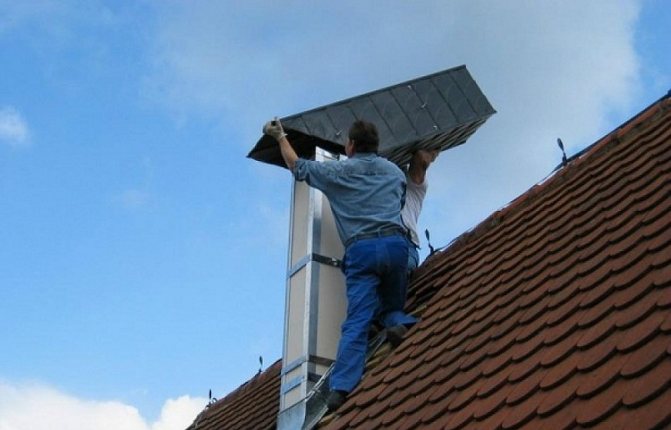
Installation of a pipe on a metal roof
There is a pattern - the lower the pipe is placed along the roof slope, the more effort will be required to waterproof the joint between the chimney and the roof.
Roofs made of profiled sheet are equipped with pipes in the following areas:
- Near the skate. According to SNiP 41-01-2003, the withdrawal of the device near the ridge will reduce the likelihood of the formation of snow pockets and the appearance of condensation.
- Chimney insulation on the slope. Chimney passage at a distance of 500-700 mm. from the ridge of the roof reduces the risk of leakage and preserves the rafter structure. Elastic penetrations or additional elements of the apron will help to protect the joint.
When planning to make a chimney passage through the roof with your own hands, start with a wooden box.
- Select the bars corresponding to the thickness of the floor beams (at least 5-10 cm), and measure the length that increases the size of the pipe by 15-25 cm.
- Connect the boards to form a square or rectangular structure (corresponding to the shape of the chimney), attach to the horizontal and vertical floor beams.
- Prepare additional materials: top and bottom apron, tie (long smooth sheet with a flange to drain rainwater), sealant.
- The abutment strips that form the apron are installed on the sides, top and bottom. The inner apron is placed under the roofing material to drain water. A tie is laid under it with a length equal to the distance of the lower apron to the cornice. External abutment strips perform decorative functions and prevent moisture from entering the area where the chimney passes through the roof.
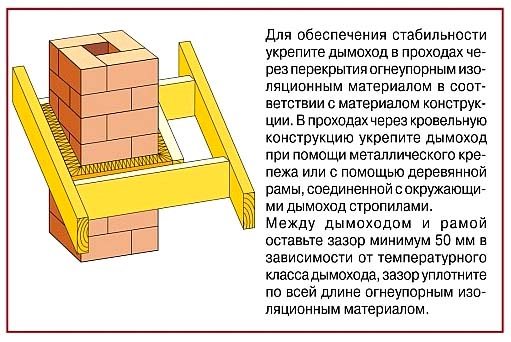
- Basalt wool will help to close the hole around the pipe and floor beams. The distance between the concrete and brick chimney, relative to the elements of the rafter system, is 13 cm, a clearance of 25 cm is left from the ceramic uninsulated pipe, in the presence of a heat-insulating layer - 13 cm.
- The gap between the pipe and the combustible material is covered with sheet metal. The tightness of the roof is provided by a special film, which is cut with an envelope, and the edges are fixed on the outer part of the pipe, a wooden box.
We suggest that you familiarize yourself with How to choose the front door to an apartment: my advice
When organizing the outlet of a round pipe, it is enough to choose an elastic seal that eliminates the need for additional waterproofing protection around the penetration.
Waterproofing a chimney on a roof made of metal tiles requires the preparation of the following tools and materials:
- construction pencil or marker;
- drill and drill set;
- grinder with a 2 mm disc;
- silicone sealant;
- riveter;
- aluminum strips and clamps;
- metal corners;
- roofing screws;
- long ruler or tape measure;
- pliers and hammer.
Tools and materials necessary for work
Bypassing the chimney on a roof made of metal tiles provides for the creation of two protective layers, which are done as follows:
- An internal apron is assembled on the crate, covering the roof and chimney.
- Prepare external decorative strips covering the roofing material and the bottom apron.
If the smoke system is located near the ridge, then the edge of the upper strip is introduced under the ridge element.
The arrangement of the inner apron begins from the bottom wall of the riser.
- Each element covers the slope by 200 mm and rises vertically of the ventilation structure to a height of 150 mm.
- The side strips go under the ridge of the metal tile, cover the lower element of the apron along the entire length, go beyond the pipe by 20 cm.
- All parts are firmly connected with self-tapping screws.
- Measure 15 cm on the pipe, make a 15 mm deep groove with a grinder.
- Next, the ditch is filled with silicone sealant, after which the lower abutment bar is fixed.
When pouring silicone, it does not need to be spared, it must fill all the voids between the pipe and the apron
Important! The upper part of the apron should fit snugly into the groove filled with sealant.
It remains to lay the roofing material and attach the upper strips to the chimney with self-tapping screws, fill the sealing line with waterproofing mastic.
So that the screws do not stand out against the background of the roof, the color of their caps should be matched to the tone of the roofing
A finished apron-cap, represented by a metal sheet with a hole, closed with an inclined truncated cone, will help to seal the round chimney.
- The sheet is attached to the crate, the pipe is passed through the cap, the upper part of which is pressed against the chimney with a steel clamp with a heat-resistant gasket.
- Wanting to direct the flow of water downward, a side is made along the edge of the sheet with pliers and a hammer.
Interesting to know! An apron for a round chimney is made of black steel with a thickness of 1-3 mm. They cover the metal with heat-resistant enamel that can withstand heating up to 600 degrees. It is also possible to manufacture stainless steel parts with a maximum thickness of 2 mm.
Sealing the joint using a ready-made apron-cap made of stainless steel
To ensure the reliability of the roof in the places of valleys and abutments, a tie made of metal parts (abutment strips), which are brought under the covering by 150-200 mm, will help.
The joints of the apron with the profiled sheet around the chimney are sealed with roofing sealant. Cornice bends are installed below and on the sides, directing the flow of precipitation to the roof slope.
Before applying the corrugated board, it is necessary to seal the riser passage with a membrane.
- A cruciform cut is made in the material, and glued to the walls of the chimney at a height of more than 5 cm.
- Self-adhesive tape "Wacaflex" is attached under the upper abutment bar: from the bottom, from the side, then from the top.
- Sometimes the chimney is arranged in the finished roof, cutting out a hole in the corrugated board with a margin of 1.5-2 cm.To do this, the metal sheet at the junction of the rectangular pipe is folded back, a waterproofing membrane is glued and the lower, then the upper crate is installed, tightly pressed against the roofing pie and chimney.
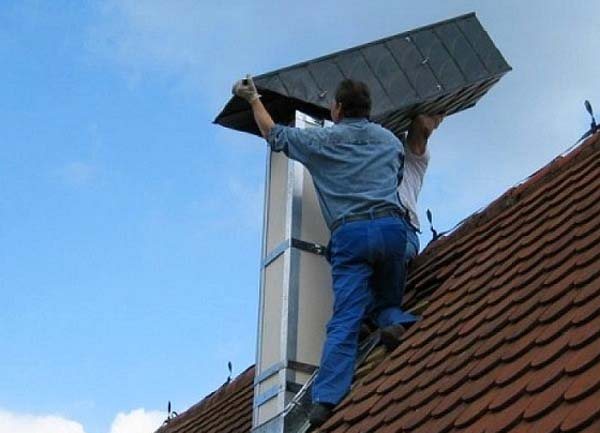
Safety measures when installing the chimney must be strictly observed
In order to avoid the formation of a thick layer of plaster, you should know how to properly insulate pipes:
- To begin with, seal up all existing irregularities on the pipe with cement mortar;
- Then cover the walls with a reinforcing mesh;
- The final stage is the application of plaster.
We invite you to familiarize yourself with the Chimney device in the sauna for a wood-burning stove How to make a safe pipe in a bath
Important! Before covering the first layer, bring the solution of lime, cement and slag crumbs (or sand) to the thickness of sour cream, sprinkle without leveling. The second coating is more dense, it is applied with a trowel, rubbing until a smooth surface is obtained.
Reinforcing mesh will allow the plaster to adhere well to the pipe and will not crack when it dries
Plating a chimney with asbestos cement requires the use of a cement-lime mixture applied to the surface of the slabs.
- The chimney is reinforced with a mesh and the first layer of solution is sprayed.
- A new layer of the mixture is applied to the insulation sections and fixed to the surface of the chimney.
Asbestos contains carcinogens that are dangerous to humans, so experts do not recommend using it in residential premises.
When insulating a metal pipe, the distance of the chimney from combustible materials should be observed - 60 cm.
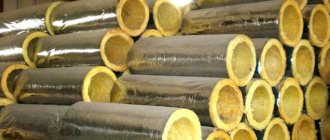
- The structure is wrapped with 5 cm thick mineral wool with an overlap, clamped with steel wire. Wrap it on top with a metal sheet.
- Rivets are inserted into the previously prepared gaps, the heads of the retainers are closed with a special tool.
In order for the work to be performed efficiently, and not to have to redo your own mistakes, you need to follow a few simple guidelines:
- Layout - even with "spontaneous" repairs, there should still be time when you should stop and think about: where exactly the stove will be located, how the smoke removal system will be performed. Where will the chimney run on the roof. The calculation will make it possible to calculate what height of the chimney above the roof will be sufficient to provide the necessary traction.
- Chimney Location - There is a general rule of thumb that the better the wind blows around the chimney, the stronger the draft in the furnace. The chimney, following this, is tried to be placed as close as possible to the center of the roof - to the ridge. The height above the ridge depends on how far the pipe is from it.
- Sealing and insulation of the chimney on the roof - a single-layer metal chimney can heat up during intense combustion, the brick does not heat up so intensely, but it still requires the use of thermal insulation at the place where the roofing cake passes. The outlet through the roof of the chimney must be carefully insulated so that moisture does not pass through the opening.
These three tasks are the main and priority ones and the quality of their implementation depends on the professionalism of the master.
There are certain rules governing what should be the gap between the chimney and the roof. According to SNiP, the distance to hot materials from the chimney should be at least 13-25 cm.
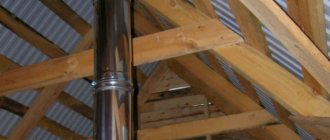
Mounting and installing an iron chimney through the roof is a process that cannot be rushed. The master needs to understand the features of each roof with which he will have to work. The essence of the work is reduced to two important principles:
- After installing the chimney, the integrity of the roof should not be lost, in other words, it is necessary to avoid a situation in which after the first rain the roof will leak. Often, the water runs directly through the installed chimney. At the same time, the waterproofing of a chimney on a slate roof is significantly different from how the same operation is performed on a metal tile or soft bituminous roof.
- A single-layer metal chimney is very hot, therefore it is necessary to install a thermal insulation barrier or box.
For chimneys made of different materials, there is a solution to this problem. Namely:
- Waterproofing a brick chimney - a special plate is used for it. For a slate roof, you will need to make a special pedestal around the chimney. A plate is placed on top of it on top of a sealant for sealing.
- Pipe box - used if the roof is made using a roofing cake. The fact is that violation of the integrity of the pie leads to the loss of waterproofing and heat-insulating properties. To avoid this, a special box is made. The structure surrounds the chimney around the perimeter and a special heat-insulating compound is poured into it.
- The roof pipe can be protected with a special insulating apron. The advantage of the apron is that it completely follows the curves of the roofing material and fits snugly, protecting against moisture ingress. The apron is a rubber seal made of durable material that is resistant to temperature and weather conditions.
- Installing a roof covering around the round chimney is the best solution. In this case, the laying of the material is carried out already on a completely finished structure. This allows you to narrow the required opening. For a roof made of metal or corrugated board, the chimney hole can be made larger than the pipe diameter by only 0.5-1 cm.
Decor of a steel box for a chimney pipe
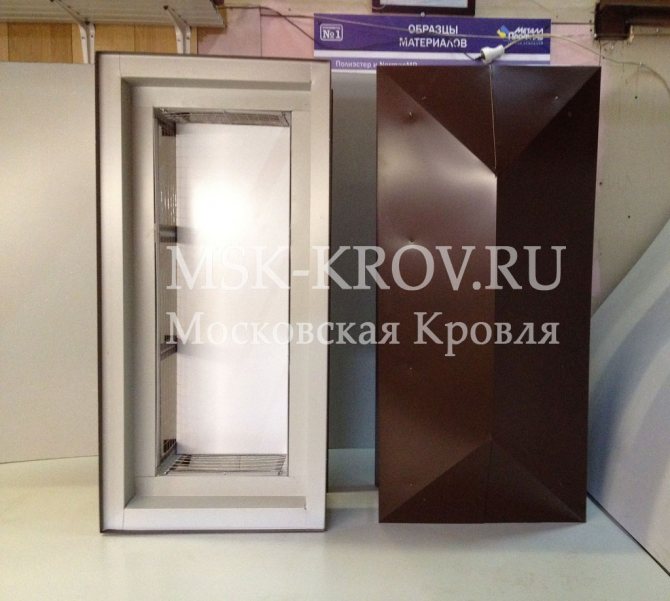
Pipe covers are not only functional structures, but also, as mentioned above, affect the exterior of the structure. Today, you can easily order a product that will decorate your home decor and will please the eye for many years. If we compare a metal box for a chimney pipe with casings made of other materials, then it is the least presentable.
However, this problem can be easily solved with the help of special decorative coatings, which can be purchased at any specialized store or ordered with home delivery using the Internet. Decorative coating for metal casings will give your box a presentable appearance. Today you can find a wide variety of colors and textures of such coatings, so everyone can choose the option they need.
A decorative coating consisting of a polymer material must be applied to the metal. The polymer material mimics the structure of another material (wood, stone, etc.). The use of such decorative coatings makes it possible to make a brickwork pattern on a metal cover, while a real brick pipe will be reliably protected by this cover from environmental influences.
Available in the following colors:
| RAL 1014 | RAL 5005 | RAL 7024 |
| RAL 1015 | RAL 6002 | RAL 8017 |
| RAL 3005 | RAL 6005 | RAL 9003 |
| RAL 3009 | RAL 7004 | RAL 9004 |
| RAL 3011 | RAL 7005 | RAL 9006 |
| RR 32 | RR 11 | RR 29 |
Other colors and coatings - on request
If you choose a color from stock items, then the strips (add-ons and drips) can be picked up the next day. Intake hoods and chimneys are made within 5 working days. If the color is customized, then the production time is individual, but in any case it increases by 1-3 weeks due to the delivery of materials.
Powder painting is possible in any RAL color, including those with additional effects.
Installation of the steel case
A steel case is the most common option for organizing a protective casing for a chimney. Consider the process of installing a steel casing on a chimney:
- The case can be purchased or made by hand, using steel sheet, profiles and ordinary screws for this.
- A steel casing is installed on the main pipe.
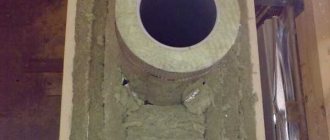
- At the third stage, the space between the main pipe and the case is filled with heat-insulating material, which must be selected based on the heating temperature of the chimney.
- Finally, the case (made of galvanized or stainless steel) must be painted with oil paint.
Metal insulation
This design reliably protects the ceiling and roof from possible fires. The metal box is most often made of galvanized, metal sheets, stainless steel. The thickness of the material must be at least one millimeter. In the middle of the sheet, you need to make a special hole for the chimney outlet.
Such a casing can be purchase in construction and specialized retail outlets, where devices for stove structures and bath rooms are implemented.
Installation can be done by hand. You just need to mount the structure in the opening on the roof, and then bring out the pipe through the casing to remove the smoke. A hole in the ceiling must be made between the rafters.
Installation of a box for an asbestos-cement chimney
Consider how the casing is installed on an asbestos-cement chimney pipe:
- First of all, it is necessary to prepare the pipe for the installation of heat-insulating material and a box.To do this, it is necessary to clean it from dust and dirt.
- In the second step, you need to place the thermal insulation material in a case made of galvanized steel or roofing iron. Mineral wool can be used as a heat insulator. The thermal insulation material is located along the entire length between the casing and the pipe.
Helpful information! When choosing an indicator of the cross-section of the case, one important factor must be taken into account, namely, the distance between the casing and the chimney must be at least 6 cm. This space is necessary for free placement of the heat-insulating material.
- The upper part of the pipe is mounted with a slight slope.
- The niche between the asbestos-cement chimney and the pipe must be filled with cement mortar. For these purposes, concrete of the M-150 brand is perfect.
Mineral wool can be used to fill the space between the pipe and the casing
It is recommended to assemble such a case from several parts. This is a necessary measure to simplify the installation of the heat insulator.
Brick chimney box
For a brick pipe, you can choose a standard galvanized steel cover or another option. For example, plaster a brick chimney over a heat insulator. Let's consider this process step by step:
- First, it is necessary to clean the brickwork of the pipe from dirt and dust.
- Next, you need to install metal profiles on the chimney. For this, ordinary dowels are used. First of all, it is necessary to fix the upper and lower profiles, and then insert the racks into them. Racks are fixed with self-tapping screws.
- At the third stage, the installation of heat-insulating material is carried out. It must be placed between the grilles and fixed by means of special dowels with "skirts". The heat insulator must completely cover the surface of the brick chimney.
- Then the thermal insulation material must be covered with a vapor barrier material, which is represented by a special film.
- At this stage, it is necessary to fix the plaster mesh over the vapor barrier film. The mesh must adhere tightly to the surface, therefore it is recommended to use dowels with "skirts".
- The chimney is plastered with a pre-prepared cement mortar. It is necessary to apply the plaster in an even layer over the entire surface of the structure.
After the layer of plaster has dried, you can revet the chimney with decorative tiles or galvanized sheets.
For the box, you can use wooden, plywood boards, fiberboard or chipboard, but they must be protected from moisture by an outer coating
Box of wooden boards
A wooden board case can be made in two ways. Let's consider the first way:
- First of all, you need to make a wooden frame, focusing on the size of the chimney.
- Further, the finished frame is revetted with slate.
- In the third stage, wooden shields are installed around the pipe.
- Finally, it is necessary to fill the space between the metal pipe and the wooden panels with thermal insulation material. The following can act as heat-insulating material:
- glass wool;
- slag;
- dry land.
Consider the installation technology of the second method:
- Wooden shields are mounted around the pipe, forming a box. The distance between the metal pipe and the wooden board must be at least 5 cm (preferably 10).
- In the second stage, the internal seams are lined. For this you can use asbestos sheets.
- Further, slate is mounted on asbestos sheets.
- At the fourth stage, you need to cover up the outer seams of the box made of wooden panels. For this, you can use a cement mortar.
- Next, slabs of cinder concrete are mounted (at a short distance from the metal pipe).
- Plates must be reinforced using ordinary wire.
- At the end, the space between the slabs and the pipe is filled with mortar. For the solution, you must use gypsum and clay.
Protecting the chimney from destruction under the influence of natural factors is an important measure that will extend the life of the chimney. For the protective box, you can use different materials that are available to any craftsman today.