Balconies and loggias for residents of city apartments are a very important element of the living space. Considering the limited area of apartments, the cramped habitation in the conditions of close urban development, balconies become a pleasant addition to our everyday life. Someone wants to make an additional comfort zone in the apartment out of the balcony, while others, on the contrary, try to use the balcony space as a living space. In either case, in order to achieve the desired effect, balconies and loggias must be insulated. Of particular interest among netizens is the work on insulation of the ceiling in the loggia and on the balconies. We will try to figure out how it is necessary to achieve high-quality thermal insulation of the balcony space by installing heaters.
Preliminary work
Before proceeding with the direct insulation of the ceiling on the balcony, you need to carry out a lot of preparatory work. Insulation work must be consistent.
The first and main preparation work - glazing of the balcony. Until now, there are still many balconies in houses built in Soviet times, which not only were not glazed, but they did not even have balcony frames. Although even today some developers are building houses with unglazed balconies. Without reliable balcony frames with good glazing, it makes no sense to engage in insulation. Nowadays, there are many companies and firms producing plastic balcony frames. But you need to choose not cheap, but high-quality and reliable. This does not mean that the most expensive. You can find companies that care about their authority in the service market, and therefore provide quality products at quite affordable prices.
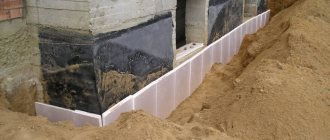
The next step - waterproofing. It is carried out by eliminating any cracks or cracks through which heat can escape and which can be sources of cold air from the street and moisture. Cold and moisture from the outside will provoke the appearance of mold and mildew, which are known to be harmful to human health.
The source of heat loss and direct input of cold with moisture can be corners. If the gaps are large enough, they can be closed by blowing in the polyurethane foam. After drying and cutting off the remaining part of the foam, cover this place, and possibly the molding of the entire corner, with a cement-sand mortar, facade putty or a putty for sealing cracks, such as "Trowel" or "Karbolat".
Note: You can also use special rubber or bitumen-rubber sealants if the cracks and seams for sealing are small.
By all means, the floor slab must be made from the inside, not accessible for moisture from the outside to pass through. For this, you can use various building mixtures such as "Penecrit" or "Penetron".
The sequence of works on the insulation of the balcony
Even after glazing and eliminating direct sources of cold, it will still be cold enough on the balcony. If the floor is concrete, the walls are bare brick, then by insulating only the ceiling, little will change. The floor and walls also need insulation. In addition, each job has its own sequence. The insulation of the balcony or loggia is also there. And this: floor insulation, wall insulation, and then ceiling insulation.
Insulation of the floor using a lag
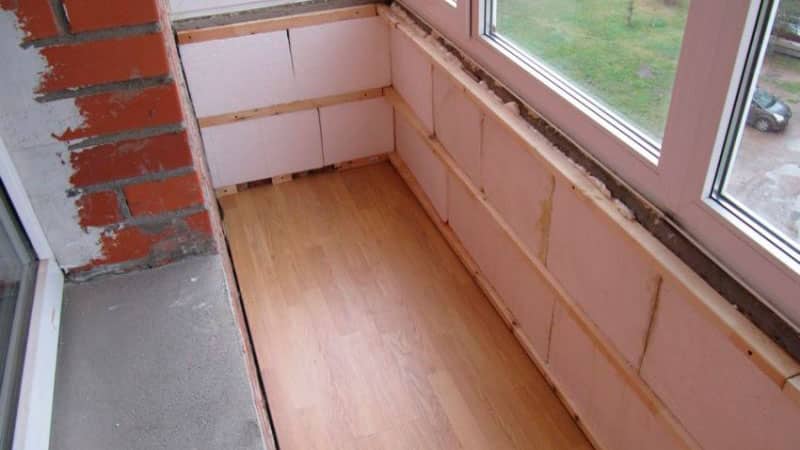
You can insulate the floor in different ways. You can make a wooden floor on logs, if the height of the floor allows, the space under the floor is well insulated with polystyrene or expanded polystyrene.And if the height of the floor does not allow, then glue foam / polystyrene on the floor, lay a reinforcing mesh, and pour a layer of cement-sand screed on top. Floor covering (linoleum, laminate) can be laid on the mounted wooden or poured floor.
Walls can also be insulated in different ways. It can be a wooden / metal frame with insulation inside and external cladding with wooden or plastic lining. And you can insulate it by gluing foam / polystyrene, reinforcing it with a mesh, and finishing with plaster and putty mixtures.
After warming the floor and walls, you can safely go to the ceiling.

Preparatory procedures
Starting the main event, it is worth getting as much information as possible about the algorithm of actions for a successful result. First, free the balcony from unnecessary things and objects that will interfere with the comfortable work. The next step is the choice of materials.
The budget option implies that drywall will be fixed to the surface of solid insulation, which will be penoplex, and the finish will be painting or wallpapering. They will create the necessary thermal insulation and make the balcony a complement to the common living space, decorated in the appropriate style.
An alternative is an environmentally friendly and easy-to-clean lining. PVC and plasterboard panels can be used as insulation in various regions with stable climates and changeable weather conditions. When choosing which material to buy for DIY repair, pay attention to the characteristics: softness, strength and durability, the ability to fill openings and cracks.
The parameters of the frames selected for the glazing of the loggia depend on which type will be most relevant for you. Due to the fact that they are installed before insulation, it is necessary to decide on suitable materials at the stage of planning the modernization of the space.
What is the best way to insulate the ceiling?
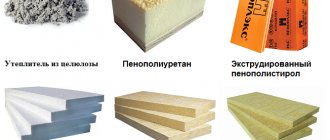
The construction market has a large assortment of heaters. Among them are the most famous and popular heaters - mineral wool, polystyrene, expanded polystyrene (penoplex). Which one is better to choose?
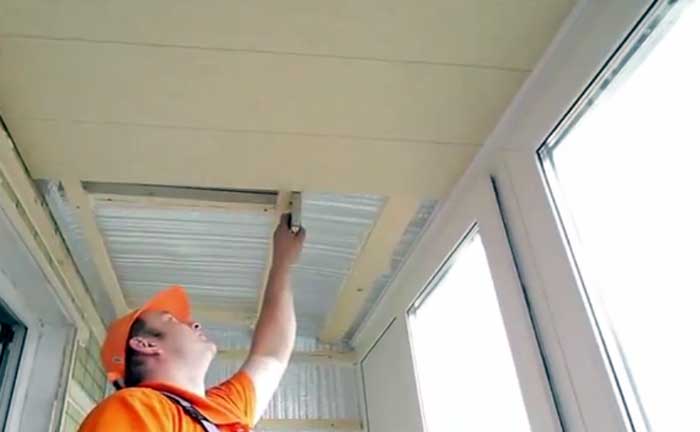
Demonstration of how you can insulate the ceiling on a loggia with penoplex, attaching it to the surface with glue and dowels
All insulation is good. But nevertheless, polystyrene or penoplex have proven themselves better due to their density and non-hygroscopicity. In addition, they can insulate the ceiling on the balcony with your own hands as on a wooden frame with subsequent cladding, and in a more economical way - direct adhesion to the ceiling with fixation until completely dry. Then reinforcement with mesh and screed with a putty mixture. Another positive point of polystyrene or polystyrene foam is the convenience of working with it. Speaking of mineral wool (mineral wool), while working with it, some elements are thrown into the air, which create problems for allergy sufferers. You need to work with her in goggles and a respirator. When working with expanded polystyrene, this is not necessary.
If the question arises - what to choose, you can safely take penoplex or polystyrene foam on a wooden crate.
Fastening a heat insulator when insulating a balcony with your own hands
We installed the foam boards, now it is necessary to make a second layer of insulation on top, which is insulation from moisture. It is necessary to limit the penetration of warm air from the inside of the room onto the insulation so that there is no condensation. If this is not done, then you will constantly have water on your balcony in winter, and wet insulation will not work 100% (the effectiveness of the material is almost halved). Let's see how to do it right.
Step 1: we take a piece of isolon, turn it with the foil side into the room and fasten it with screws with a wide head directly to the plate. It will be enough to screw 1 self-tapping screw every 25-30 centimeters, it is not worth tightening too much. Can be glued to double-sided tape.
Step 2: we take another piece of material, lay it with an overlap of 15-25 centimeters to avoid heat loss at the joints and also screw it to the nepoplex plates.
Step 3: all joints must be glued with metallized tape, which will make an additional seal of the material.
Important: if you have not yet finished the walls with insulation material, it is necessary to fasten the isolon with a margin of 25-30 centimeters along the edge of the ceiling so that it hangs on the walls. In the future, this will help to avoid heat loss in the corners between the ceiling and walls.
We can assume that we have already done the insulation of the balcony ourselves and spent a small amount of money. After installing the insulator, you can start finishing.
Step by step installation
First you need to take the following tool:
- puncher;
- screwdriver;
- roulette;
- pencil;
- spirit level, level (80-100 cm long);
- a hammer;
- tracer;
- drywall knife.
Markup
It is necessary to mark the level of the ceiling, that is, where it is planned that the plane ends. This is necessary so that when the ceiling is completely mounted, it does not interfere with the window sash opening. Therefore, it is important that the ceiling does not reach at least 2 cm to the open sash. If the facing material is a wooden lining, it is 1.5 cm thick, which means that the ceiling lathing must be set at a distance of 3.5 cm from the sash.
Since usually balcony frames are set on a level, starting from the frame elements, you can get an exceptionally flat line in the horizon along the window. It also needs to be transferred to the opposite wall. The spirit level will help with this. Along the adjacent wall, the line from the window is transferred to the opposite wall. Marks are placed in the four corners with a pencil. The tracer connects these marks. In this case, you cannot do without a partner.
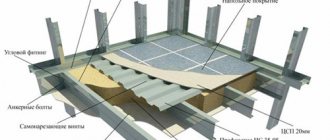
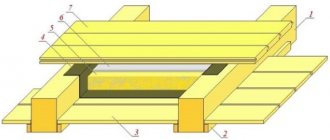
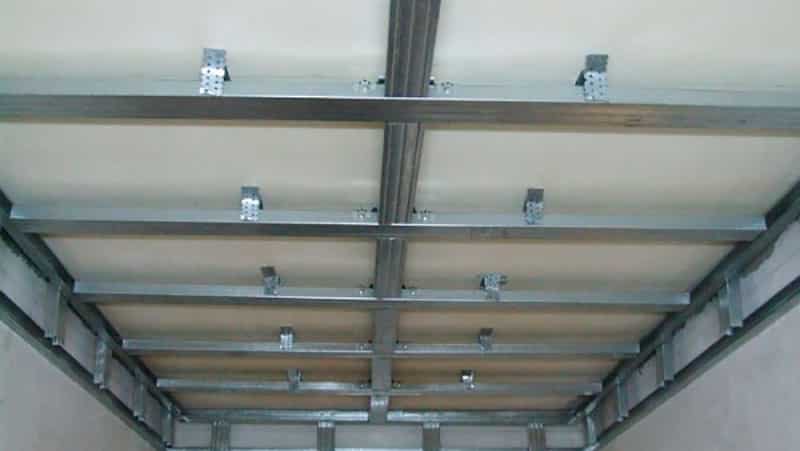
Installation of the lathing
After marking, you need to mount the lathing from the rail or timber. Focusing on the line along the perimeter of the balcony ceiling, a bar / rail is placed along its entire length, fixing to the ceiling. The puncher drills holes along the place where the timber will be in increments of 60 cm, a nylon dowel with a diameter of 8 mm is hammered into the holes with a hammer, and then a screw corresponding to the diameter of the dowel is screwed through the timber with a screwdriver. If, due to the unevenness of the laying of the slab, the timber deepens from the horizon mark, then in the place of the screwed-in self-tapping screw under the timber you need to put a piece of wood and fix it with a small nail so that it does not jump out from under the timber over time. By the same principle, the timber is placed against the wall.

Wooden lathing on the balcony ceiling
First, a beam is installed at the window and at the opposite wall, and the middle beam is set flush with the already installed ones. The spirit level will help you check that all the bars are in the same horizon line. This will keep the ceiling flat.
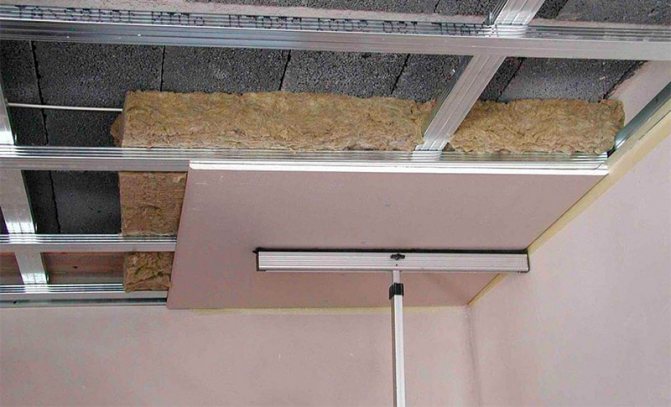
If in the plans the balcony is sheathed with plasterboard, then the crate should be made of metal profiles CD and UD. Thanks to the markings, there is a line around the perimeter of the balcony. Using a perforator, we nail the UD profile on brick (concrete) walls, and fasten it with self-tapping screws along the plastic window frame. Will fit "fleas", self-tapping screws 9.5 mm long. The CD profile is installed along the width of the balcony with a step of 40 cm. For rigidity, the CD profile is fixed with U-shaped hangers, which are attached to the ceiling with 6x40 dowels, and the profile itself is screwed with a flea screwdriver. The spirit level will help to check the single plane of the CD-profile with UD attached to the walls.
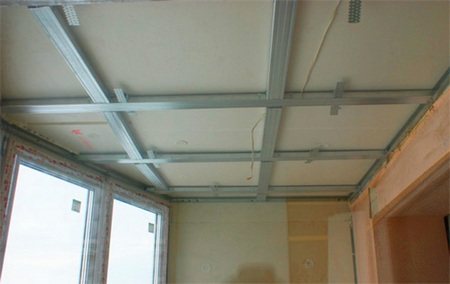
Ceiling lathing with metal profiles
Insulation laying
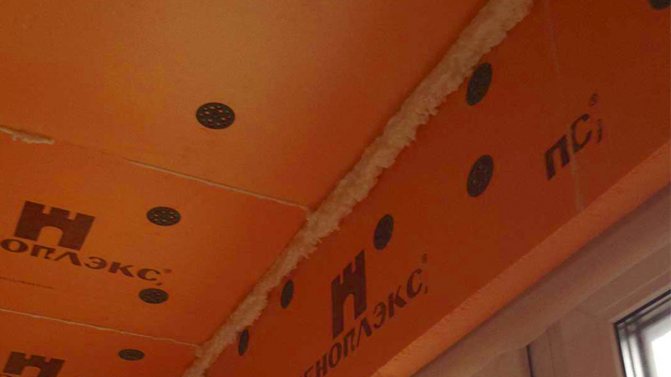
After the crate is mounted, you can lay insulation: expanded polystyrene, foam or mineral wool. Having measured the width between the beams or the profile with a tape measure, cut the required size from the sheet of insulation with a knife on drywall. The size must be made 2-3 mm larger than the desired size, so that the cut pieces of foam will fit very tightly into the space of the crate. This will allow it not to fall out when nailing the facing material (you can use glue for high-quality fixation of the insulation). It is advisable to blow out any small cracks with polyurethane foam.

We carry out insulation of the ceiling with penoplex, laying it between the wooden crate
Important: If the insulation is made with mineral wool on a metal frame, then you need to make sure that it also fills the space behind the profile. The metal tends to freeze, the surrounding mineral wool will not allow this.

Fastening the finishing material
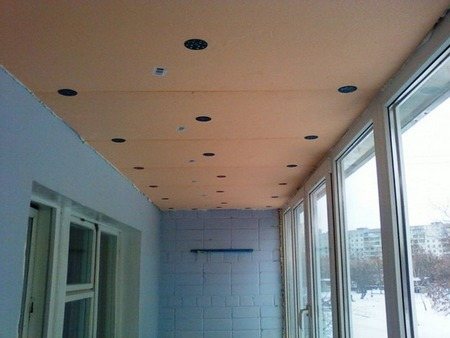
For finishing the ceiling we will use an easy-to-install and truly versatile material - drywall. It will be possible to glue wallpaper, apply a layer of plaster or fix any other material on it. Let's take a closer look at how to install drywall.
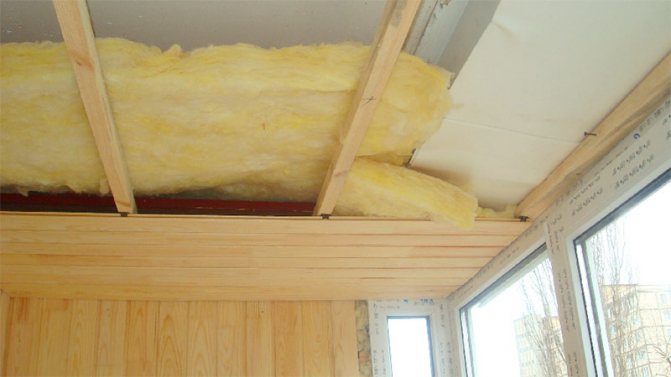
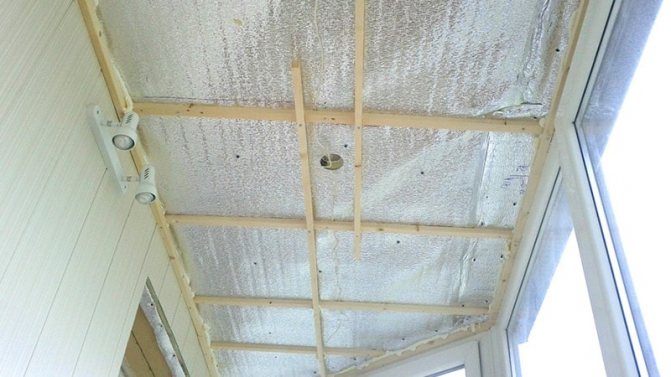
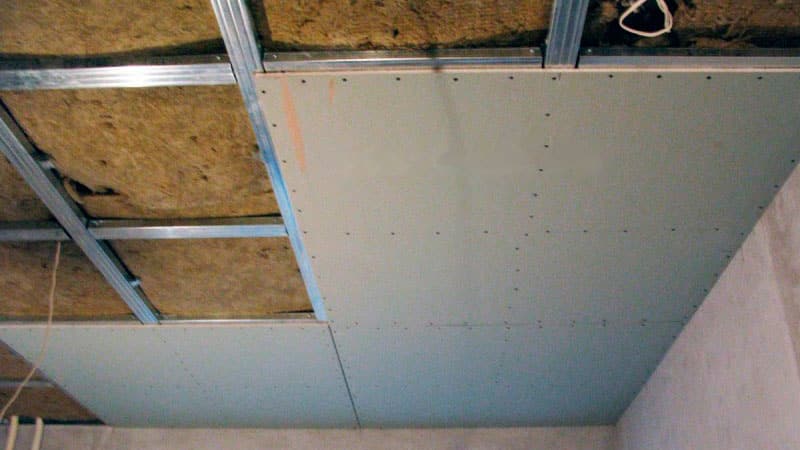
Step 1: attaching the lags... We need an air cushion between the insulator and the false ceiling, this is easiest to do with a 50x40 wooden bar (you can use a metal profile), which is fixed at a distance of 5 centimeters from the isolon. For fastening, use a corner and dowels. The frequency of wooden logs (or metal profiles) is 50 centimeters. We fix the first lag at the lowest point of the ceiling, all the rest we fix according to the level, as in any construction operation.
Step 2: screw drywall to wooden joists... We use self-tapping screws and a screwdriver, if necessary, you can cut drywall sheets the desired size (cut the paper shell and then break along the line).
Step 3: finishing work. We seal the seams with a finishing putty and prime the drywall with a primer for subsequent plastering or wallpapering.
Thus, you can make the insulation of the balcony of a Khrushchev house with your own hands, "stalinka" or a modern apartment in a new building. The approximate time to complete the work is 1-2 days, but it can be done in a few hours.
Another possible sequence of work
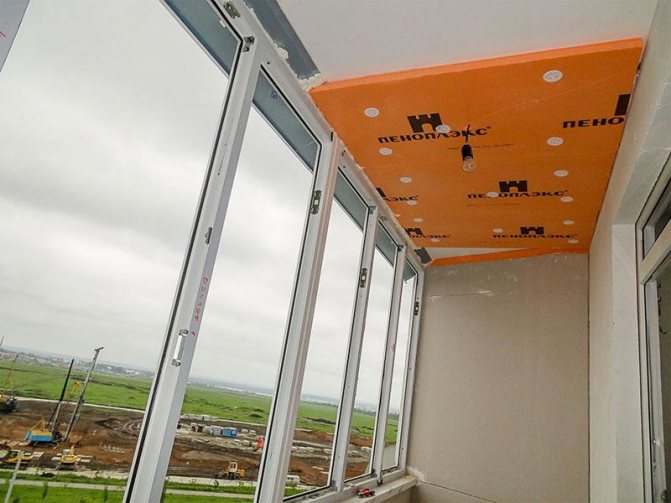
In the above version, there was the following sequence of warming the ceiling of a balcony or loggia with your own hands: lathing - laying a heat insulator - facing. But there is another option with the reverse sequence of insulation and installation of a wooden crate or metal frame. Its essence is as follows. Even before the installation of the lathing / metal frame, a layer of foam / foam insulation is created over the entire area of the balcony ceiling. It is glued to the ceiling with special glue, and with plastic dowels, often called "fungi", is fixed at five points on the sheet - four in the corners of the sheet and the fifth in the center. The joints of the sheets should be foamed with polyurethane foam for additional insulation.
We fix penoplex to the ceiling of the loggia
The same can be done by insulating the ceiling with mineral wool. Plastic "fungi" fix it well during insulation, press it tightly against the concrete surface. If the glued polystyrene / penoplex will not undergo additional finishing (plaster), then a layer of foil-clad heat reflector (penofol, isolon) can also be pulled over the insulation. If mineral wool is chosen for insulation, then the heat reflector must be installed... It contains several important and useful properties: thermal insulation, sound insulation, waterproofing, vapor barrier and wind insulation. The joints of the heat reflector are glued with adhesive tape intended for it. And then you can already mount a crate of beams or a frame made of metal profiles, which will additionally press the insulation.

Fixing the lathing when insulating the ceiling with mineral wool
But you need to remember that such a scheme is good when the balcony plastic frame is not installed close to the floor slab... Otherwise, the distance from the top of the sash to the slab may be less than five centimeters. And this is very little for a layer of insulation, plus the thickness of the frame / lathing, the thickness of the facing material.
The choice of insulation
The market for thermal insulation materials offers various options for insulating ceilings. As a rule, lightweight heat insulators are more often used for the balcony. Moreover, the number of layers of material depends on the region of residence and the minimum temperature in winter.
The work on insulating the loggia consists of several stages:
- installation of waterproofing and vapor barrier, if necessary;
- laying a layer of insulation;
- installation of a frame or lathing for finishing;
- ceiling sheathing. For decoration, wooden lining or PVC panels are often used. The materials are resistant to the climatic conditions of the balcony, withstand temperature extremes, high humidity.
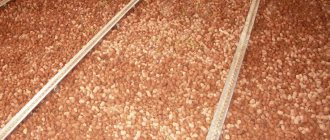
Not so long ago, sawdust or expanded clay, which were mixed with clay, were used to insulate balcony ceilings. Today, such options for thermal insulation are extremely rare, since they are laborious and not always effective.
For insulation, liquid modern heaters are also used - thermal paints. The thickness of the 1 mm layer of such a heat insulator is similar to the insulation of the ceiling with polystyrene foam with a layer of 5 mm. However, before work, you will need to prepare the surface of the ceiling (clean it from debris and dust, cover with a layer of primer), apply thermal paint with a brush, roller or spray gun.
The best and easiest to use heat insulators will be the following materials:
- mineral wool... High thermal insulation properties, affordable price are the main advantages of this insulation. Raw materials are made from glass, stone or slag. Release form - rectangular slabs or rolls, differing in density. Minus - cotton wool absorbs moisture well;
- foil polystyrene foam... The main advantage lies in the combination of the heat-reflecting characteristics of foil and foamed polyethylene. Foil returns 90% of the heat to the room, and polyethylene prevents warm air currents from leaving the room. The thickness of foil-clad polystyrene foam is from 1 to 20 mm, while the thermal insulation properties of the material correspond to a 10 cm thick layer of mineral wool;
- Styrofoam... It has long been used by builders for arranging thermal insulation in different rooms. The foam is based on air-filled cells. The main advantages of the material are low price, lightness, small thickness, long service life;
- penoplex is an extruded polystyrene foam. The high-strength material is easy to work with, resistant to moisture and light in weight.
And if the floor is the last one?
If your apartment is on the top floor, then in order to insulate the ceiling on the balcony, the approach to the insulation process should be somewhat more serious. First, there is a real threat of leakage from the roof. Therefore, care must be taken that the roof of the balcony is properly isolated from water and melted snow to the balcony. Secondly, it would not hurt, before installing the lathing, to carefully isolate all corners from moisture penetration. Thirdly, after installing the lathing and laying the insulation, pull the steam barrier over the entire ceiling area, before facing with clapboard or other materials.
Insulation of the balcony ceiling from A to Z on the advice of professionals
Many faced the problem of condensation on the balcony, fungus or mold, and also paid huge sums for heating a private house or apartment. All this can be eliminated by doing professional insulation of the balcony from the inside with your own hands.
Now we will spend a minimum of funds on building materials, a few hours of time, and as a result, we will get a room with excellent thermal insulation and the correct hydro-barrier. Only 1200 rubles and the ceiling of the balcony will be as insulated and insulated as possible in the best way! Why pay more if you can do it yourself in a few hours?
Preparation for finishing
After the floor, walls and ceiling have been insulated, you can start finishing. If the entire balcony was planned to be faced with wooden clapboard, then nothing prevents this from being done. If the ceiling is faced with plastic clapboard, then the rest of the walls can be finished not only with the clapboard itself, but, if desired, with putty mixtures. This can be done before the ceiling cladding.
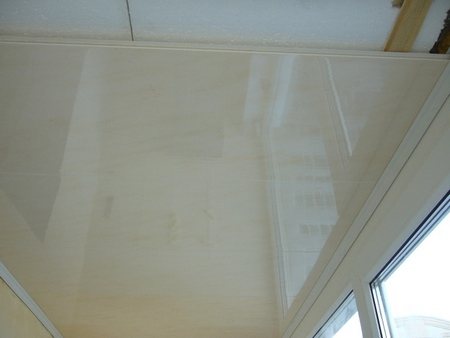
We carry out the finishing of the ceiling with plastic panels after it is insulated with foam
If the balcony was sheathed with plasterboard, then in preparation for finishing it is possible to include cleaning the surface of walls and ceilings from dust in order for there to be good adhesion of the putty mixture to the surface. This is done by wiping the surfaces with a damp sponge or by priming.