The legislative framework
To begin with, the chimney from the sauna stove heats up quite strongly. Especially if the stove is wood-burning. And since the ceiling in this structure is most often made of wood, there is a correspondingly high probability of its ignition on contact with the chimney. Of course, if the chimney is a brick structure, then the likelihood of a fire is reduced. But today, in the age of modern technologies and materials, sauna stoves are metal structures with metal chimneys. This means that the temperature of the metal shell is exactly the same as that of carbon monoxide gases passing through the chimney.
Therefore, there are several legislative acts, namely SNiPs, which clearly indicate what you need to pay attention to, and what points in the process of installing a chimney from a sauna stove must be taken into account in order to guarantee high fire safety of the facility.

SNiP 2.04.05-91: "Heating, ventilation and air conditioning" Source en.decorexpro.com
So, the main set of rules and regulations that are used in the process of installing a chimney in a bath is SNiP 2.04.05-91 called "Heating, Ventilation and Air Conditioning". In this code, namely in the section "Stove heating", which starts from position 3.62, it is clearly described what requirements are imposed on stove chimneys. We will not go deep into each paragraph of the document, we will simply designate those of them that relate to the topic of our article.
First of all, a few words about the stove itself. First, the temperature of its walls should not exceed + 120C. Secondly, if a fan is installed on the chimney, which provides the necessary indicator for removing carbon monoxide gases, in other words, an exhaust hood, then it will accordingly be necessary to provide an artificial flow of air from outside the room. Thirdly, the stoves must be installed only at the inner walls of the bath, which are erected from non-combustible materials, or the walls must be sheathed with non-combustible materials.
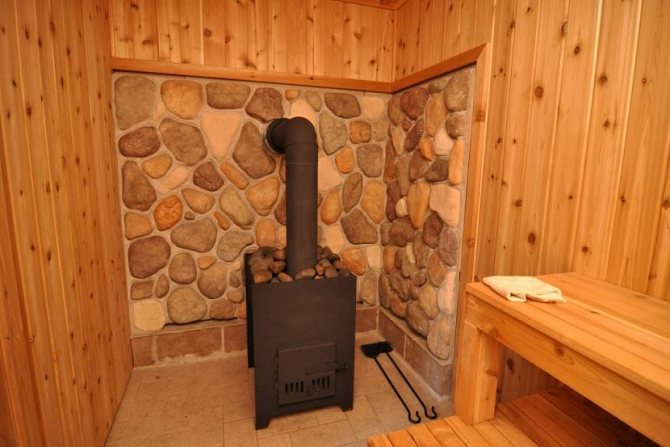
The stove in the bathhouse near the wall, which is sheathed with stone Source stroisovet.com
Now about the chimney.
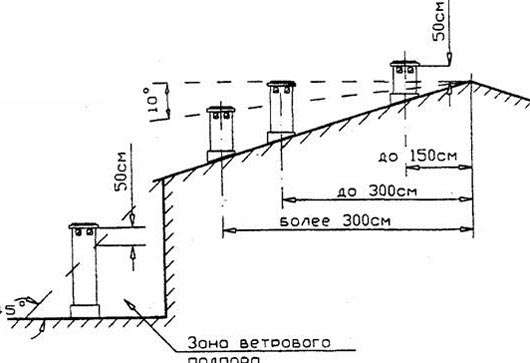
- Her take out at least half a meter above the ridge
, or the same parameter is used above the plane of the flat roof of the bath. Special attention
pitched roofs
where the pipe can exit
anywherestingray
, not necessarily next to the skate. But the height of the outer part of the chimney is determined by the same parameter. - If a bath
- a structure that
attached to the mainhome
, or is
part
this house, then
chimney out
necessarily
above the ridge
the roof of the house by the same half a meter. - The brick chimney must be vertical
.
- Metal pipes can be partially laid at an angle
, but with the condition that the angle of inclination does not exceed 30 °, and the length of the inclined section does not exceed 1 m. In this case
inclined part
in the plan of the section should be exactly
same
like
vertical
... Plus, her
inner surfaces
must be
smooth
. - If a bath roof
covered
combustible
roofing materials, then it must be installed on the chimney
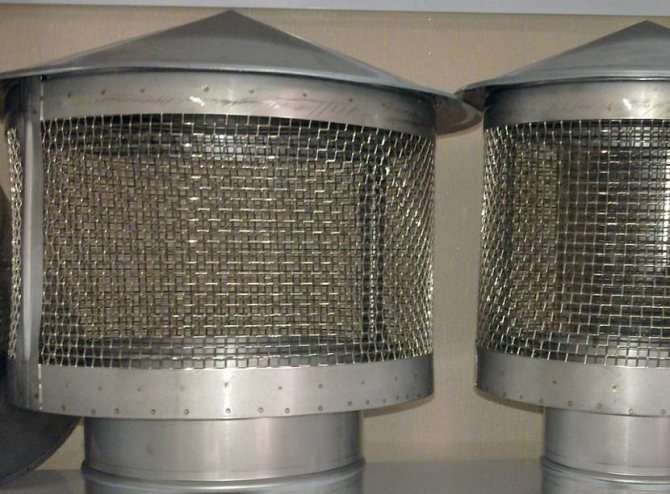
spark arrester
in the form of a metal lattice with cells no larger than 5x5 mm.
Spark arrester for chimney Source banyaprofi.ru
Our site presents the best 684 bath projects at a price of 66,000 rubles. And also you can get acquainted with the most popular models of other buildings - gazebos, garages - from construction companies presented at the exhibition of houses "Low-rise Country".
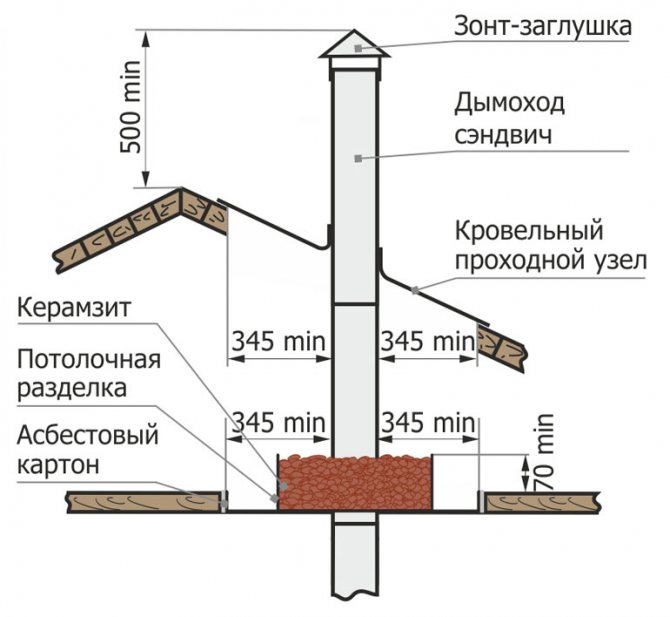
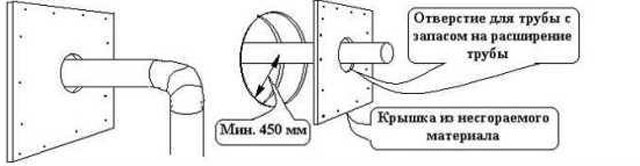
Now, what does SNiP say about the exit of the pipe from the bath to the roof? To begin with, a passage through a ceiling structure is called an opening. And the part of the pipe structure passing through the opening is cut. So the latter should be at least 70 mm more than the thickness of the opening along the length of the chimney on each side.That is, it turns out that the protective element that protects the opening from the pipe should protrude into the room and towards the attic at a minimum distance of 7 cm. This is done in order to ensure fire safety.
Further, with regard to the width of the opening relative to the section of the chimney. It should be noted here that SNiP contains a reservation that this parameter should be sought in the recommendations from the manufacturer of the furnace equipment. And take it as a basis for installation work. But there is an appendix in the document numbered "16", which is designated as "mandatory". It indicates these ratios, which are often taken as a basis by many builders and installers.
The opening for the chimney must be wide in accordance with SNiP standards.
So in this appendix it is indicated that the distance from the chimney to the edge of the opening, not protected from fire, should be 0.5 m, and when protected from fire - 0.38 m.And this distance must be filled with non-combustible material. And one more important point. It is impossible to join parts of the chimney inside the opening. That is, the passage must be solid in order to avoid depressurization of the chimney during its operation.
So, everything is with SNiP. As you can see, in this legislative document everything is, in principle, laid out on the shelves. If you strictly follow these norms and requirements, you can guarantee the high quality of the final result. Now let's look at how to correctly pass the chimney through the ceiling in the bath.
The most popular manufacturers and construction companies are gathered at the exhibition and presented on our website. Here you can find contacts, choose and order any service, including the installation of metal structures (sheds, greenhouses, etc.), roof repair, construction of fences and barriers. You can communicate directly with representatives by visiting the Low-Rise Country exhibition of houses.
Safety regulations
In order for the bath to be comfortable and safe, and the heating device to work without interruption and not cause a fire or injury, the following safety rules should be followed when installing and operating the chimney:
- Sagging and warping of the elements of the flue system are not allowed.
- Pipe turns are allowed, but no more than three.
- The distance from the chimney to the walls must be at least 50 cm.
- All connections must be made in such a way that none is inside the wall, ceiling or in the place where the roof passes.
- The margin for thermal insulation in the ceiling and roof made of combustible materials is made at least 100 cm when installing a single-wall pipe, at least 20 cm when installing sandwich sections and 6 cm for a chimney or a combined chimney. For the passage of a non-combustible roof, a margin of 13 cm is enough.
- If the chimney is more than 1.2 m above the roof, it must be additionally secured with guy ropes.
- All connections must be reliable and tight. If a depressurization of the unit is detected, it should be repaired immediately. If smoke appears at the junction of pipes or shaft elements, the operation of the heater is stopped, and the joint is repaired.
- During operation, it is necessary to carry out preventive measures: cleaning the pipe from soot deposits, discharging condensate from the drip. This will extend the service life of the chimney and the heater.
- When the draft decreases or overturns, as evidenced by the smoke of the steam room or boiler room, as well as sparks and hum in the firebox, it is necessary to clean the chimney.
- After a long break in the use of the bath, the chimney and the heating device may become clogged or airy. In this case, it will not be possible to heat the bath. It is better to inspect, repair and clean the chimney before starting the heat generator.
We recommend that you familiarize yourself with: Sealing the chimney with heat-resistant sealant
Chimney laying through the ceiling
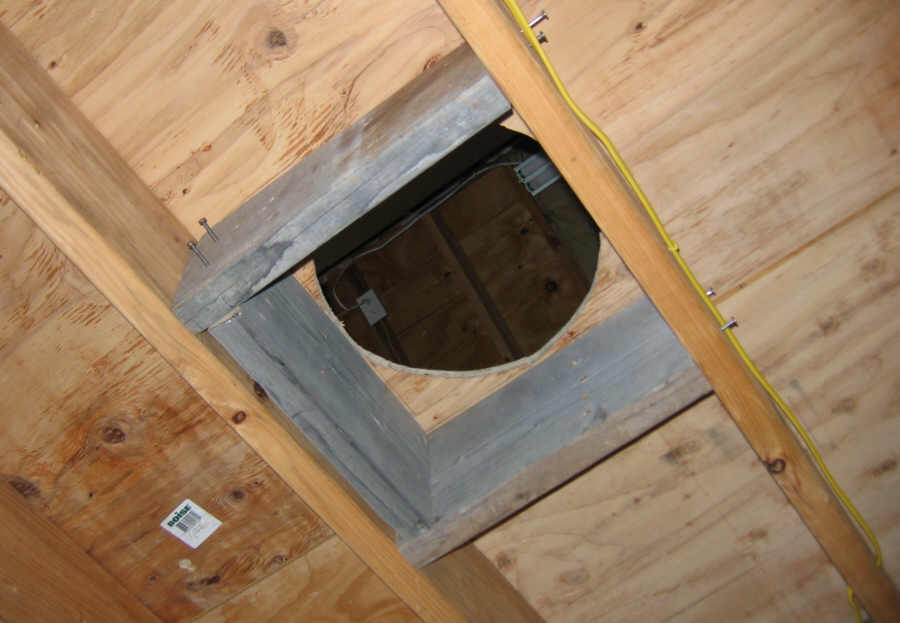
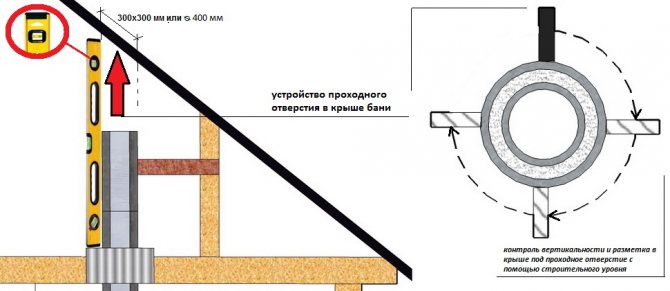
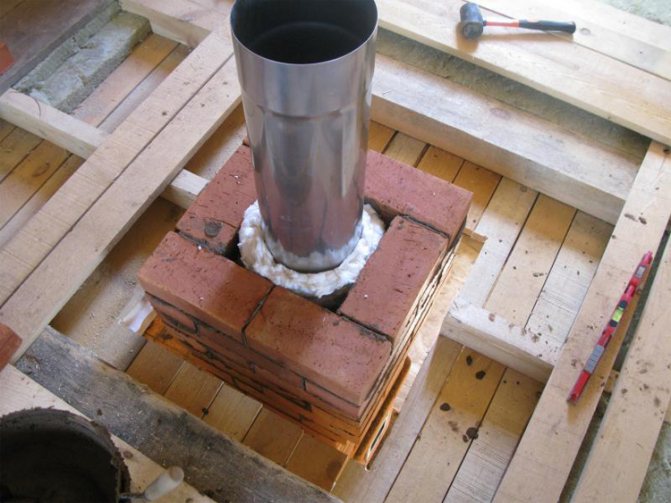
Usually, the opening in the ceiling is planned at the stage of drawing up the project. Therefore, immediately a hole is left in the ceiling: square or round. But sometimes you have to make a hole in an already constructed floor. How it can be done simply:
- Install the stove over
the place of its installation
. - Applied to the ceiling plumb line
so that
the tip of the weight exactly matchedwith the center of the chimney of the sauna stove
. - A cross mark is made on the ceiling
.
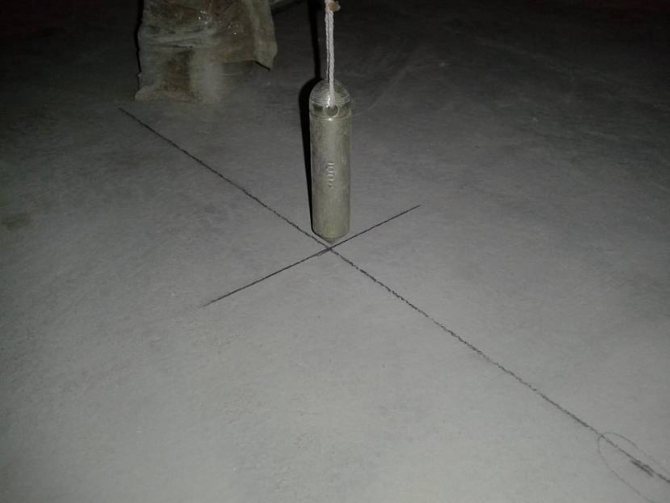
To determine the location of the opening in the ceiling, use a conventional plumb line Source samibm.ru
- They make a small through hole
drill and drill.
- Then they move to attic
and hang the plumb line so that it
cargo
exactly
coincided
from
drilled hole
in the overlap. Put a mark on the roofing material. - Then you need to decide on size and shape
opening
... And apply them to the floor and roof using a pencil or marker. - Usually the floor material and the roof covering are cut jigsaw or hacksaw
.
So, the opening is ready, now it remains to do the cutting. There are many options, we suggest considering one of the simplest.
It could beinteresting!
In the article at the following link, read about the technology of building a flat roof bath, the nuances of the process and the materials used.
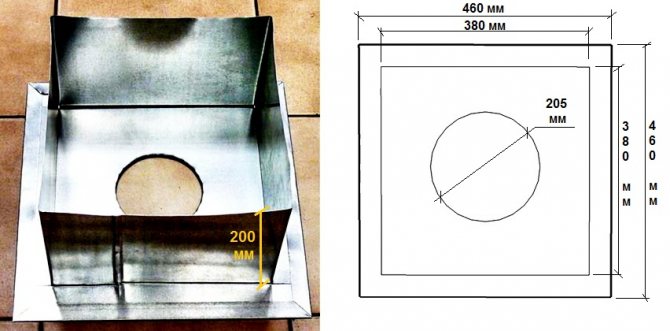
How to cut
To do this, you need a steel sheet, preferably galvanized. It is cut into two equal parts. The size of the parts should be 5 cm larger on each side in relation to the dimensions of the opening. The shape must match the shape of the opening. In each part, in the middle, a hole is made with a diameter equal to the diameter of the chimney. It should be added that the place where the chimney is installed does not always coincide with the center of the opening in the ceiling. Therefore, this must be taken into account when cutting a hole in the metal sheet. Pay attention to the photo below, where this situation is shown. This usually happens if the stove in the bath is installed in the corner of the room.
Chimney passage not through the center of the opening in the ceiling Source tulaxyq.qogilen.ru.net
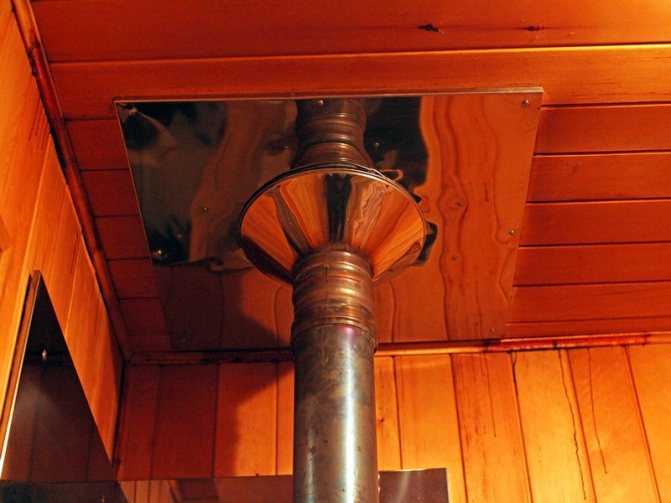
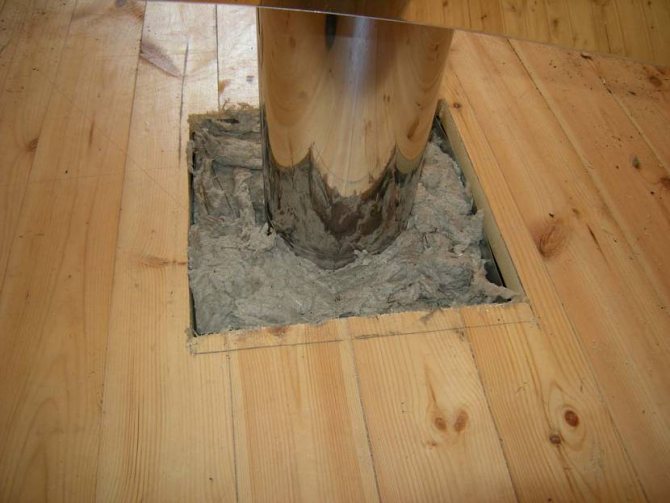
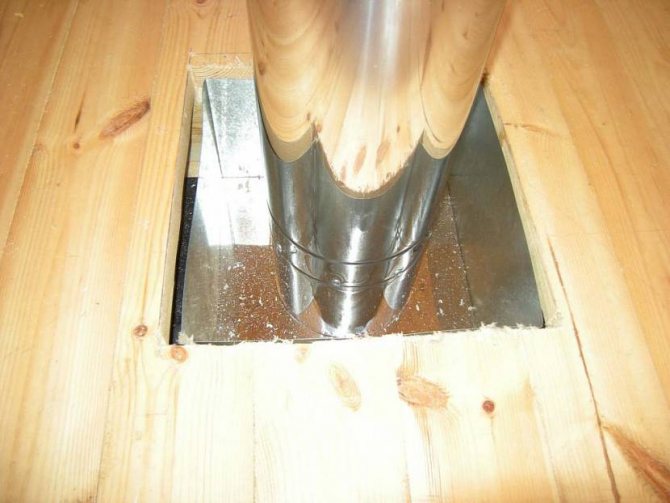
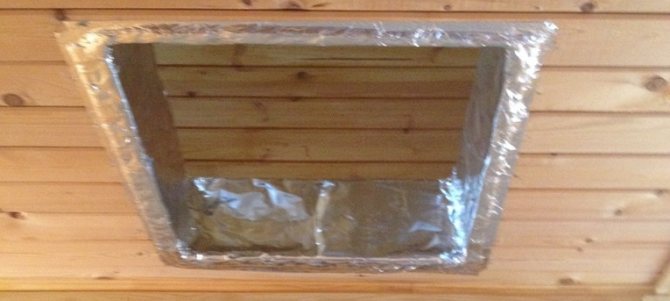
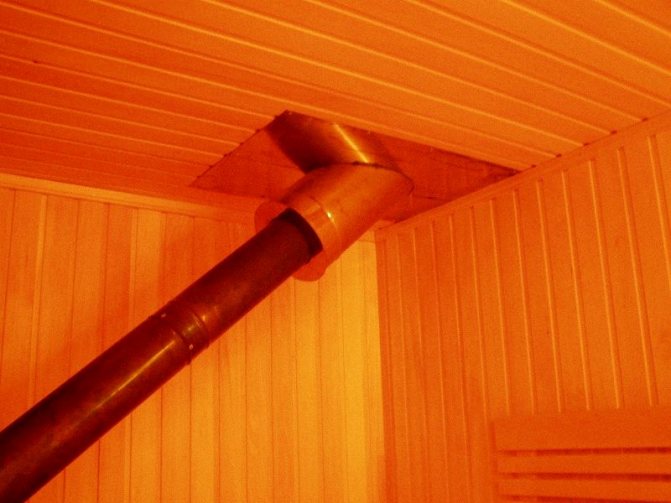
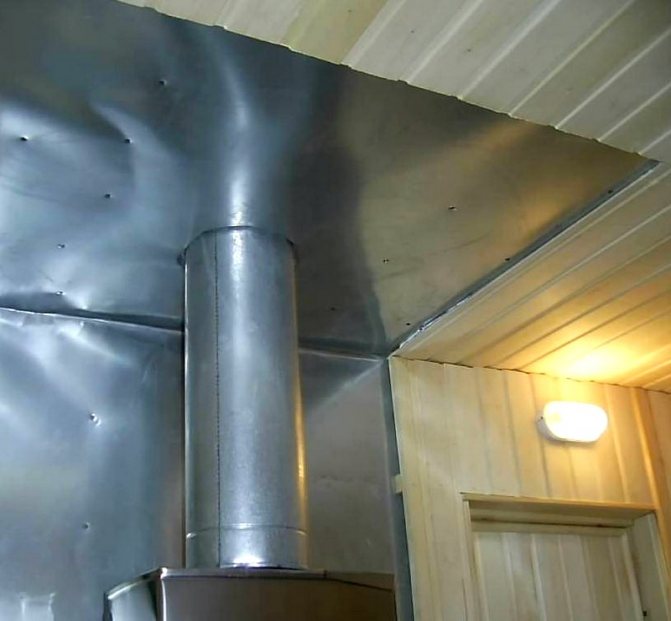
One part of the steel sheet is put on the chimney, which is then installed on the sauna stove so that it passes through the opening. This part is attached to the ceiling in the bath with self-tapping screws. The main task is to close the free space of the opening.
Then, from the side of the attic, a non-combustible heat-insulating material is laid in the opening. It can be expanded clay, mineral wool slabs, asbestos and others. The main task of the contractor is to fill the entire space of the opening and cutting up to the upper plane of the bath overlap.
After that, a second part, cut from a steel sheet, is put on the pipe, and also installed on the ceiling, screwing to it with self-tapping screws. It is necessary to take into account the fact that the hole in the metal sections for the pipe must be at least 5 mm larger than the outer diameter of the chimney. This is also indicated in SNiP. The thing is that during the heating process, the metal pipe will expand, which means that a tight junction can lead to deformation of the entire structure.
Self-installation of a chimney for a bath
The installation method depends on what material is planned to be used for the production of the chimney. There are some rules that must be taken into account when making a chimney yourself:
- The device must not be docked with other pipes.
- The smoke evacuation structure should not have horizontal sections longer than 1 m.
- During the heating season, the chimney of the bathhouse must be cleaned at least 2 times.
- The structure must extend at least 0.5 m beyond the roof.
Installation of a steel sandwich chimney through the ceiling
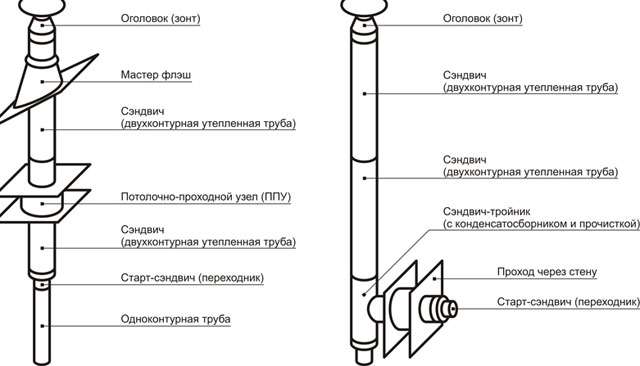
The first thing to consider is a sandwich chimney.Manufacturers supply products along with a set of additional parts, which include:
- knee;
- tees;
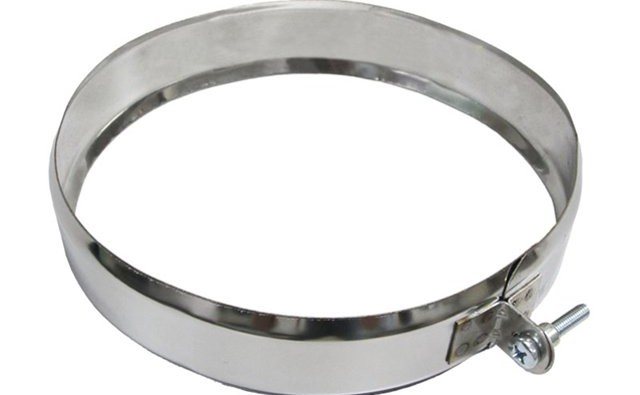
- clamps;
- stubs;
- ceiling and walk-through units;
- headbands;
- protective screens.
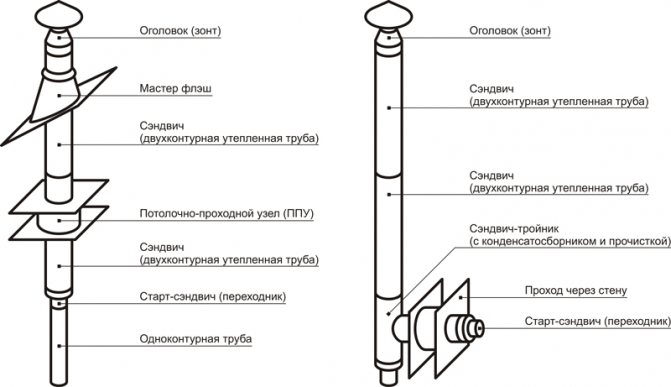
The diagram will allow you to understand the technology of installing a stainless steel chimney
A step-by-step guide to assembling a steel chimney:
- First of all, using a plumb line, you need to mark the points of exit of the branch pipe through the roof and ceiling structure. Next, you need to prepare a recess for the size of the pipe. It is worth remembering that a distance of about 10 cm should be left between the sandwich pipe and the wooden ceiling parts along the perimeter of the recess.

The dimensions of the opening should be approximately 10 cm larger than the dimensions of the chimney - Thermal insulation can be done with mineral wool. It will be necessary to close the place where the pipe passes through the ceiling. Do not worry about cotton wool becoming damp, as the high temperature dries it out quickly.
- It will be necessary to remove all dimensions and determine the installation site for the unloading unit. It is recommended to do it in the attic. It will take on the loads of the pipe that comes out of the ceiling. In addition, the unloading unit is able to eliminate lateral vibrations.
The unloading unit takes the load of the pipe coming out of the ceiling - If the distance between the floor base and the attic is large, then an unloading unit should be installed. If the distance is less than 1.5 m, then auxiliary props are not required. The unloading unit can be constructed from steel corners and fasteners. The corners must be fixed to the rafters. The fixation should be as reliable as possible.
- You will need to mount an initial pipe on the outlet of the stove. It should fit into a large pipe with an interference fit; during the purchase process, you need to choose the right dimensions.
An initial sandwich tube must be installed on the furnace outlet. - The narrow pipe should enter the outlet at the furnace outlet without covering it. Pipe sections must be inserted into each other. Places of transition and bending should be additionally secured with clamps.
Places of passages and bends of pipes must be fixed with clamps - In the place where the branch pipe passes through the ceiling structure, it is necessary to put a groove to cover the outlet recess. This will also make the chimney more stable. A larger diameter pipe must be welded to the cutting, which will be used as an adapter. This will increase the area of the stop and eliminate deformation in the event of heavy loads in the lateral part. The adapter will allow the chimney to move freely up and down. To avoid heat loss due to loose parts, it is recommended to use mineral wool. It must be placed under the cutting piece and carefully tightened to the ceiling with nails or self-tapping screws.
To close the outlet in the ceiling, you need to install a cut - Holes must be prepared in the lathing and roofing. Next, seal the exit point of the smoke exhaust device. This requires an adapter. The joints must be coated with sealant. It is recommended to put another sheet on the coating and fix it with self-tapping screws with rubber washers. The remaining gaps are sealed with a sealant. The pipe outlet must be 55 cm above the roof level.
The vertical position must be controlled by the building level - A fungus should be mounted at the top of the chimney.
Video: installation of a chimney from sandwich pipes through the ceiling
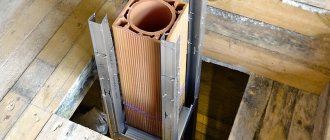
Installing a ceramic chimney through the ceiling
The sequence of actions will be as follows:
- First of all, you need to prepare the place where the device will be placed. If there are irregularities on it, they must be eliminated. Installation of chimneys is allowed on a separate base near the heating device or on its upper surface.For masonry, a special adhesive mixture is used, since the solution cannot provide the required strength.
For masonry, you need to use special glue, since the solution will not be able to provide sufficient strength - Prepare metal rods 1 m long and 5–10 mm in diameter. With their help, you will need to additionally secure the structure. This will preserve the integrity of the chimney. Next, you need to make recesses in the ceiling and roof. There is no need to make a stock in terms of dimensions, since the device will be able to protect wooden parts from high temperatures.
- In the next step, you need to install 2 halves of the ceramic. The lock should be greased with an adhesive mixture.
The first block must be filled with an adhesive mixture - Next, you need to check the location of the halves. If necessary, they can be trimmed. Iron rods should be inserted into the side recesses. The gaps between the reinforcement and the ceramic are filled with glue. It is not necessary to completely fill the cavity. Place the glue so that it connects the rods and ceramics in 3-4 places.
- A heat-insulating material should be wrapped around a ceramic pipe, slightly tightened with an iron wire or a clamp. It is not necessary to tighten too much, as the heat insulator should not be compressed. As a material for heat insulation, pressed mineral wool is mainly used.
- The pipe will need to be installed in the recess of the ceramic, and then check its location. To speed up the process, you can wrap all the pipes with insulation at once. The number of nozzles corresponds to the height of the chimney.
You can check the location of the pipe using the building level - The next ceramic block is mounted with glue. Another pipe is inserted into the socket first. Wipe off excess glue from the inner pipe immediately, there should be no drips.
The lock of ceramic parts must be greased with glue and the excess must be removed. - Actions are performed by analogy, in the process it is important to monitor the location of the chimney.
- To fix the chimney in the attic, it is necessary to cut the slats according to the dimensions of the recess, install them around the perimeter of the chimney and nail them firmly to the attic.
- The roof should be sealed at the chimney outlet. This is done using additional elements that are sold ready-made.

At the place where the chimney exits through the roof, you will need to install a pass-through unit
Video: installation instructions for a ceramic chimney
Installing a chimney through the wall
- The first step is to determine the place where the channel will be located inside the building and the chimney in the wall is brought out. To protect the inner base of the bath walls from overheating, an iron sheet screen should be installed. In the place of the passage, you need to prepare a hole, the dimensions of which exceed the diameter of the pipe.
To protect the wooden wall from overheating, you need to install a sheet metal screen - The chimney must be connected to the inlet of the stove using an adapter. Next, you should put on a piece of pipe with a shutter.
- The details must be fastened with iron clamps. The joints are treated with a sealant that is not afraid of high temperatures. The chimney must be brought up to the point of passage through the wall. If you need to turn the pipe and lay a horizontal section, you will need to use 45 ° and 90 ° bends.
- In the place where the structure passes through the obstacle, a fire-resistant box must be placed. It is made from iron or asbestos cement. In the free space formed between the walls of the box and the pipe, you need to place a thermal insulator that does not ignite.
- From the street side, you need to fix a part of the smoke removal system in the form of a tee, in the lower part of which there is a condensate container.
When installing tees, you need to install brackets for support - The branch pipe is completed with vertical sections until the required height is reached. To fix it, you need to use iron brackets.The distance between the elements is at least 1 m.
After the chimney device is assembled, you will need to melt the stove. If the smoke comes out of the firebox quickly, it means that the work has been done correctly.
How to lead a chimney from a bath through the ground
To run a pipe through the ground, you need to insulate it. A regular layer of bitumen will not work as the pipe will be at a high temperature. The sequence of actions will be as follows:
- You will need to prepare several lined pipes, the diameter of the first should be 5-10 cm less than the diameter of the second. One pipe must be placed in another. It is advisable to entrust the assembly process to a professional tin worker.
- Pipes can be assembled from several parts. The joints are fastened with clamps. There should be 3 spacers between each clamp, otherwise the chimney structure may lead when falling asleep.
- The joints should be treated with a heat-resistant sealant.
- The outer pipe, which is located in the ground, will need to be covered with bitumen.
The instruction may seem simple, but it is recommended to entrust the execution of this work to experienced specialists.
Video description
The video shows how to make the passage of the chimney in the bath through the ceiling:
It could beinteresting!
In the article at the following link, read about how to choose the right bathhouse: the main assessment criteria when building a building on a suburban area.
Ready cuts
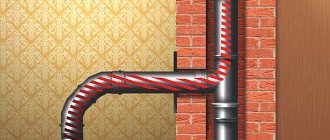
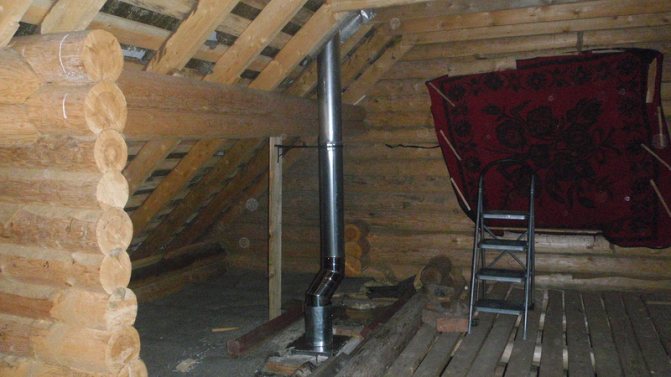
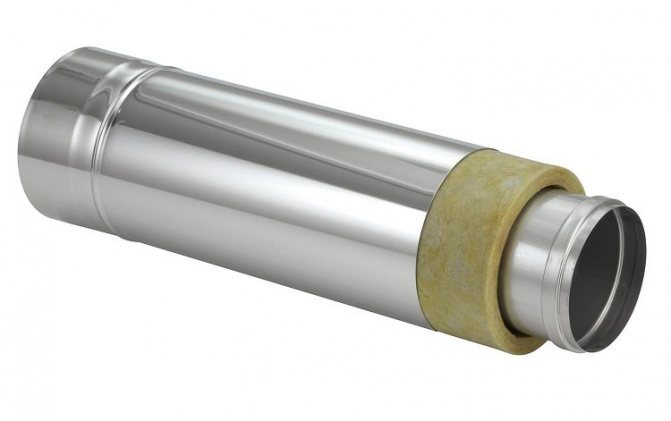
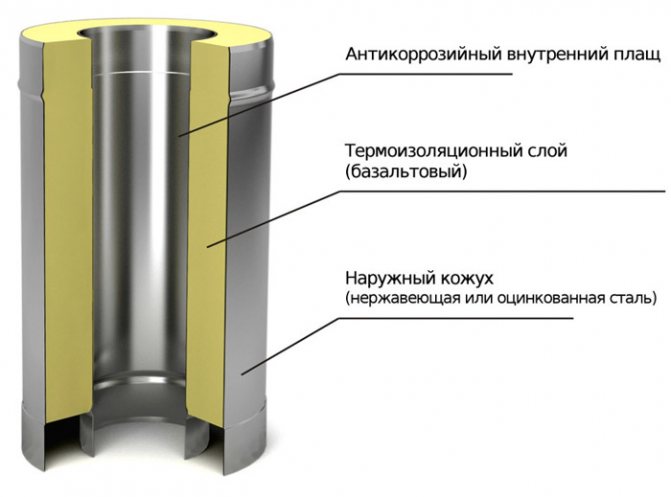
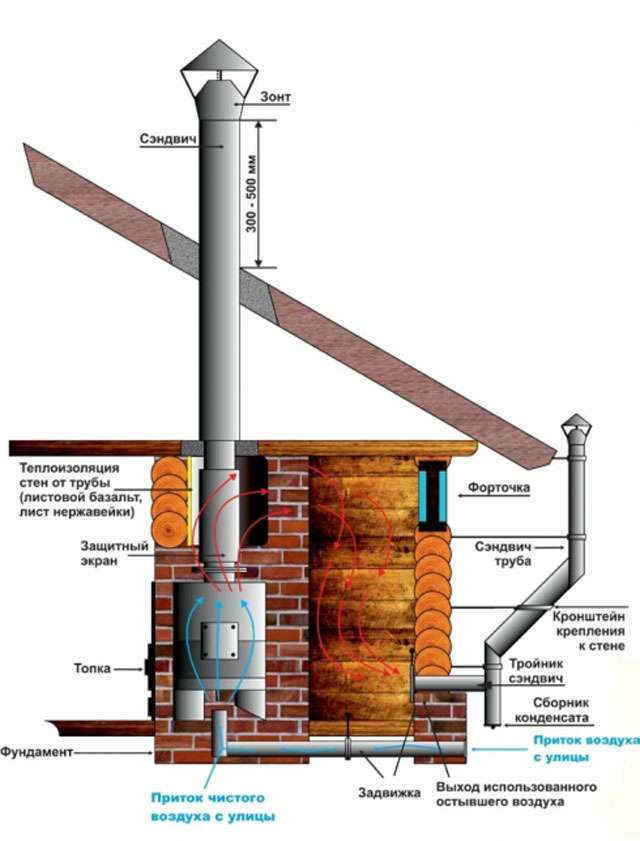
We must pay tribute to the manufacturers who offer sauna stoves and chimneys for them today, in which safe operation measures have already been taken into account. These are the so-called sandwich pipes. That is, this is a structure that is a pipe in a pipe, and a heat-insulating material is laid between them. Usually mineral wool or polyurethane.
That is, the stove chimney itself is of two types of pipes: single and sandwich. The first is installed in the bathhouse, the second is laid through the ceiling opening, a cold attic room with access to the street, that is, through the roofing material. In this way, two tasks are solved at once:
- Overlap protection against
heating
. - Protection from condensation
inside the chimney, which negatively affects the metal due to the formation of foci of corrosion.
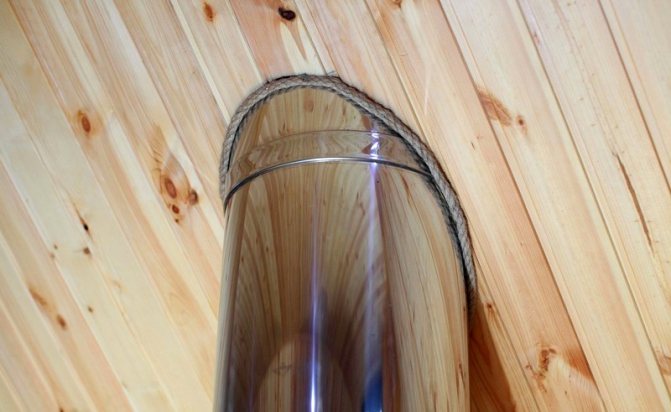
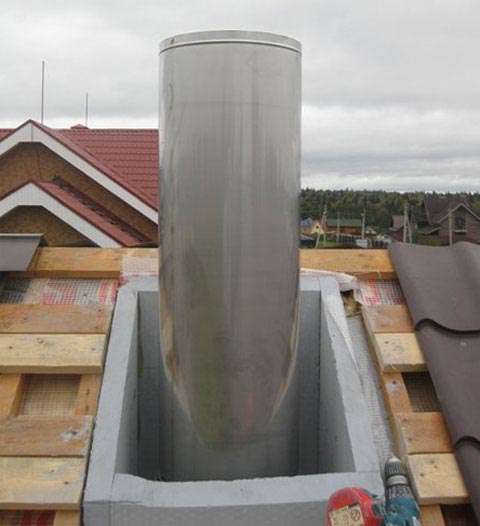
The photo below shows just this type of chimney, which is laid through the floor structure in the bath.

Sandwich chimney passing through the ceiling Source stroyfora.ru
Now about the exit of the chimney in the bath through the roof.
It could beinteresting!
In the article at the following link, read about when you need a 2-storey house, the pros and cons of the second floor, purpose and operation.
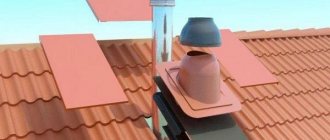
How to pass a pipe through roofing material
More recently, this was associated with the use of concrete mortars, which filled the free space between the chimney and the roofing. Thus, a sealed layer was created, and the issue of fixing the pipe was solved. Today no one uses these methods.
The best option is to install special hoods on the roof, made of heat-resistant flexible and resilient plastic. This device is put on a chimney sticking out of the roof structure and fixed to the roof with self-tapping screws. In the construction of the hood there are fields with which it is pressed against the roofing material, creating an airtight abutment. It is in the fields that fasteners are screwed, for which mounting holes are made in the factory.
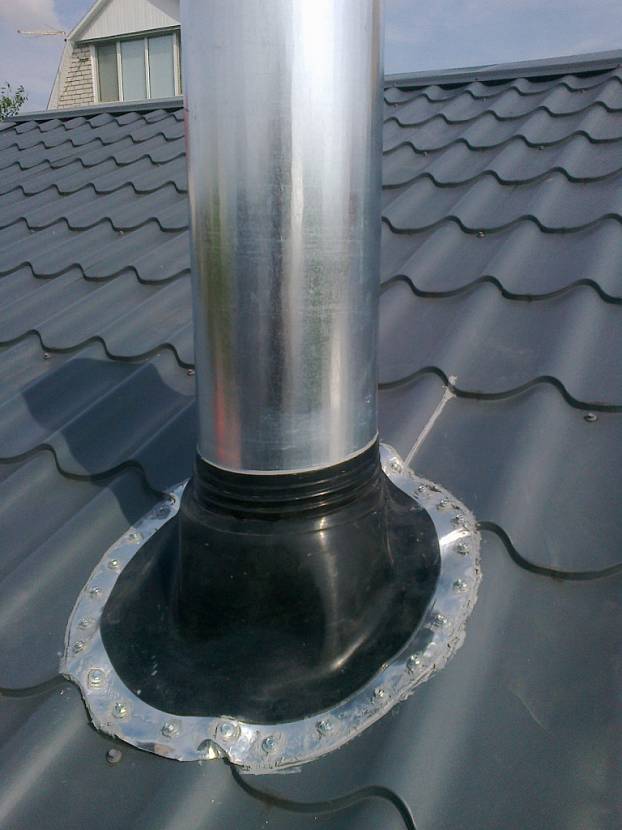
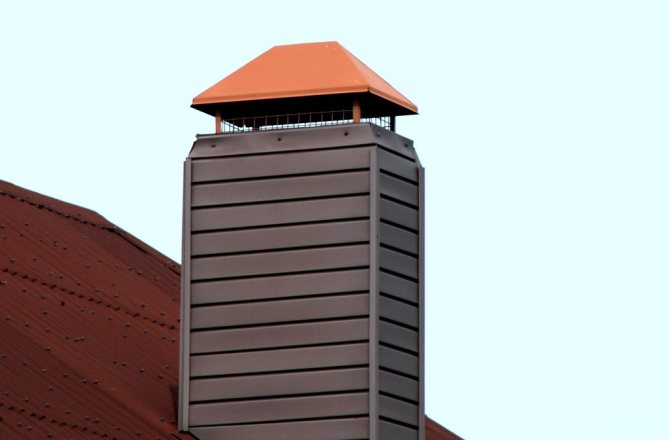
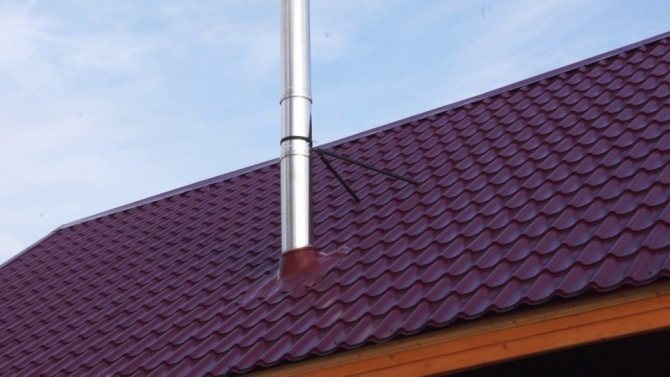
Passage under the chimney through the roof in the form of a plastic cap Source snd-line.kiev.ua
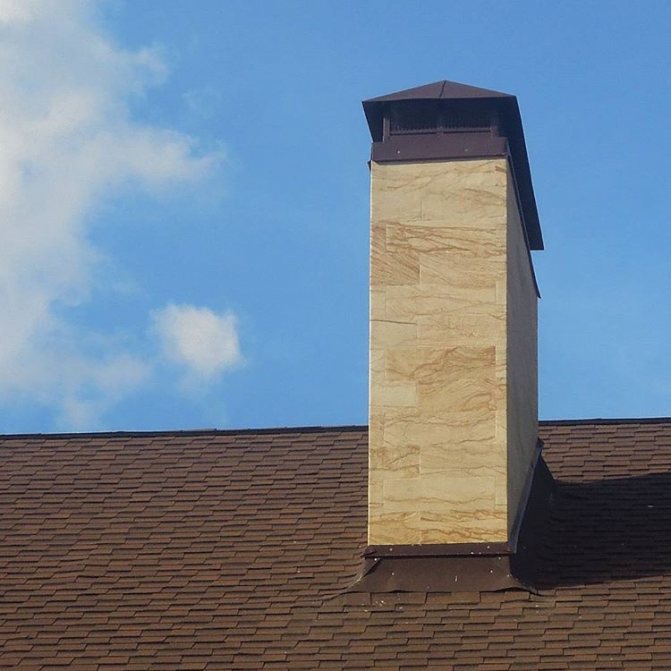
If the roof is covered with a flat roofing material, for example, bituminous shingles, then a passage through its structure can be made, as in the formation of an opening through the ceiling.Only the upper part of the metal protection should be a hood, so that atmospheric precipitation does not cause leaks through the roof. In the photo below, this variant of the formation of the passage is very clearly visible.
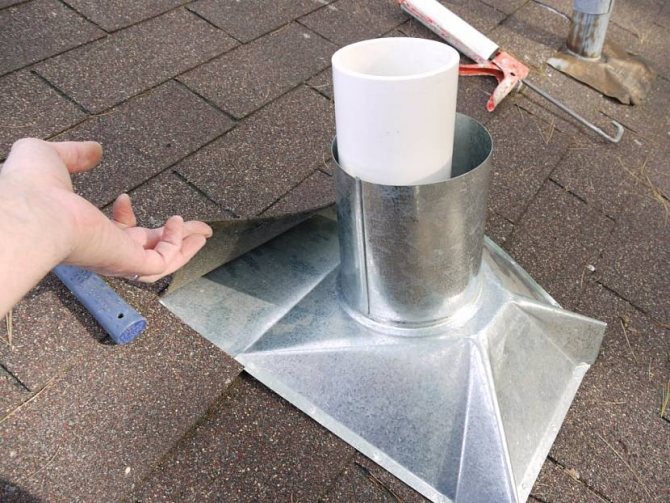
Closing the chimney passage through the roof with a metal cap Source plotnikov-pub.ru
In fact, the process of installing a chimney through the roof of a bath is not an easy process. Don't try to deal with it yourself. This will not lead to anything good. It is better to pay a foreman who has been doing this type of work for a long time to ensure the guaranteed high quality.
Chimney types
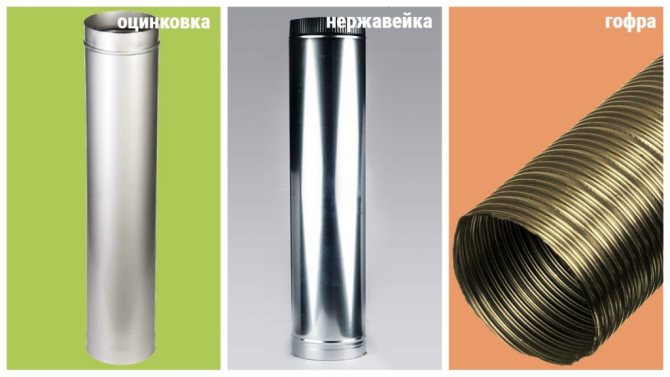
Smoke exhaust structures, both external and internal, can be made of various materials and their combinations:
- Single-circuit chimney. They use steel galvanized or stainless steel pipes, less often - asbestos-cement. This type of chimney is mounted only inside the bath, since the chimney without insulation and an external casing on the street quickly cools down, becomes overgrown with soot deposits and cannot maintain good draft. Especially a lot of soot is deposited on asbestos-cement pipes. At the same time, an additional foundation is not needed for a single-circuit chimney, and its construction will not require high costs either for consumables or for installation.
- Brick smoke mine. A cheap and very popular type of chimney. The brick heats up and gives off heat to the room for a long time, while its surface is more reliable in terms of fire safety. However, the construction of a brick structure is a full-fledged construction work that requires certain skills and significant time and labor costs. The structure turns out to be cumbersome and heavy, therefore, a foundation is required for it. In addition, condensate settles on the rough inner surface of the shaft, destroying the masonry, and soot forms, which is why the chimney has to be frequently cleaned.
- Chimney sandwich. You can buy a set of ready-made sections for assembling a chimney, each section consists of two pipes and a non-combustible thermal insulation layer. The pipes can be made of galvanized steel, stainless steel or heat-resistant ceramics. Installation resembles the assembly of a designer and does not take much time, and the finished chimney is less dangerous than a single-circuit one, although it can also be used as a heat source. Due to the insulation, the smoke inside the chimney cools down more slowly, soot and condensate settle less on the walls, so the chimney provides good draft and needs less cleaning.

Note! Steel sandwich pipes are lightweight and do not need foundation equipment. However, a sandwich that combines an outer steel casing with an inner ceramic pipe is much heavier and the chimney from such sections cannot be erected without a foundation.
- Combined chimney. Such a smoke exhaust system requires financial and time costs, but combines all the advantages of other types of chimneys. A smooth steel or ceramic pipe is used as a smoke channel, and the outer shaft is built of brick, foam or expanded clay concrete. A non-combustible insulation is placed between the shaft and the smoke channel. Such a chimney is efficient, safe, unpretentious in operation and durable.
We recommend that you familiarize yourself with: Installing welded fences and fences from a profile pipe with your own hands
Carrying out works
Building a brick chimney through the ceiling and roof in stages with your own hands is more difficult than installing a metal structure. Every step is important here, the tightness of the pipe and the safety of people are at stake.
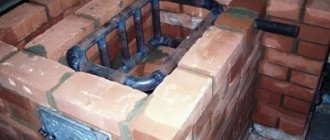
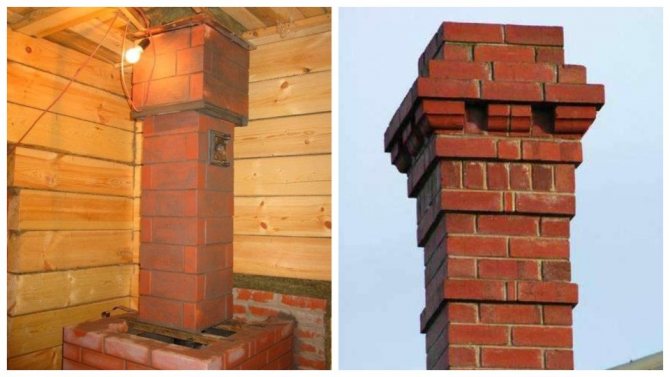
Brick chimney masonry
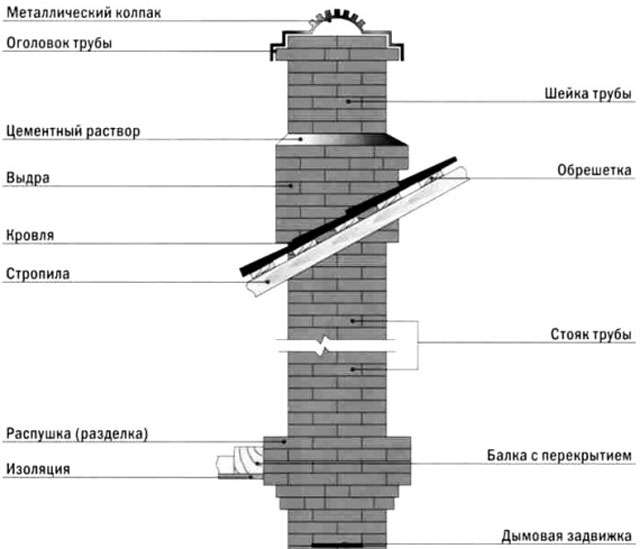
Consider what a brick chimney is as an engineering structure. These are the following elements:
- An overhead pipe with a valve coming from the furnace.
- The fluff neck starting 5-6 rows to the ceiling. Fluff - expansion of the outer part of the chimney by 25–40 cm.
- The riser is a pipe from the attic to the roof.
- Otter is a four-sided extension to protect the attic from precipitation.
- Neck.
- Head with cap or deflector.
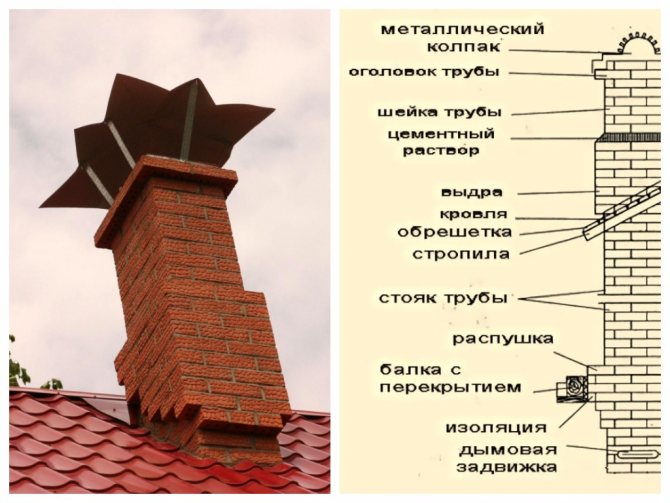
Elements of a brick chimney
Next, we will consider the installation of the chimney step by step.
Foundation... If the installation scheme is ready, the next step is to fill the rectangular foundation.
The height of the base is at least 30 cm, the width is 15 cm more than the width of the chimney. The foundation is made of brick or reinforced concrete.
Chimney construction... A few tips:
- to get the required thrust, build a pipe with a height of at least 5 m;
- for the installation of the chimney, use refractory or solid red brick, and for the bundle - cement-clay mortar;
- if you are an inexperienced stove-maker, cut the brick with a grinder;
- watch the thickness of the seams, they should not exceed 15 mm;
- use metal reinforcement to form extensions.
It is important that the structure has straight corners and smooth walls.
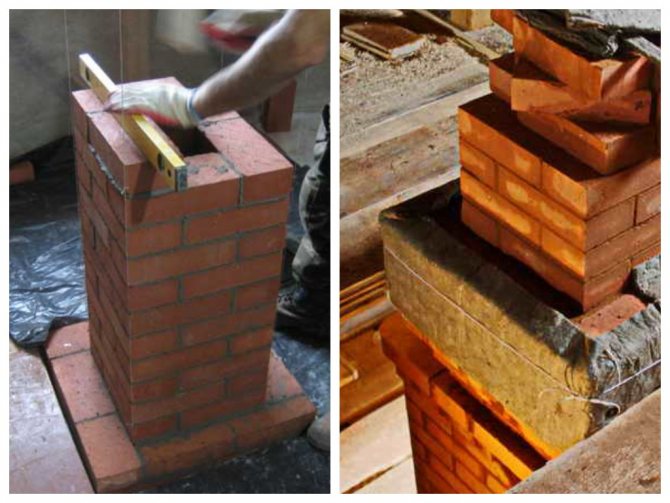
Construction of a brick chimney
Butchering... Cutting or fluffing starts from the second row. The brick is pushed outward about ⅓ of its length, breaking into smaller pieces. The sixth row is laid out without shifting outward. Its size should correspond to the fifth, and the seventh and eighth to the first row. The seventh row is completed - the fluff is ready, then the otter is laid out.
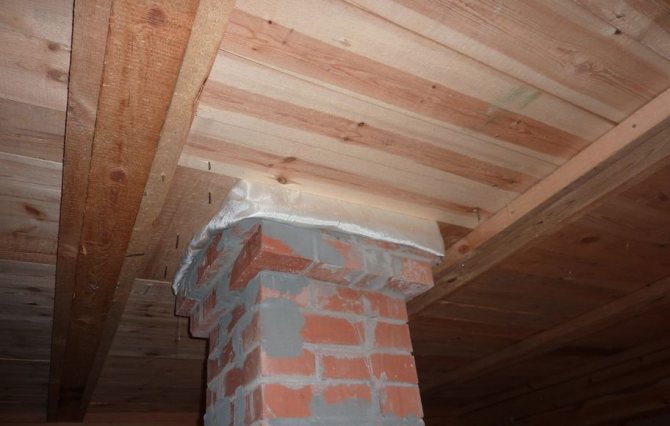
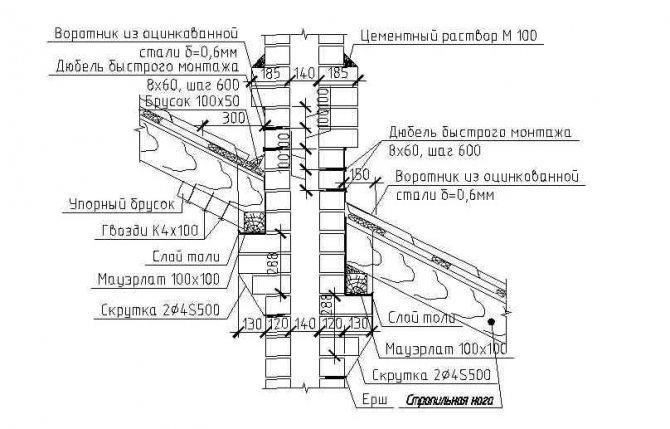
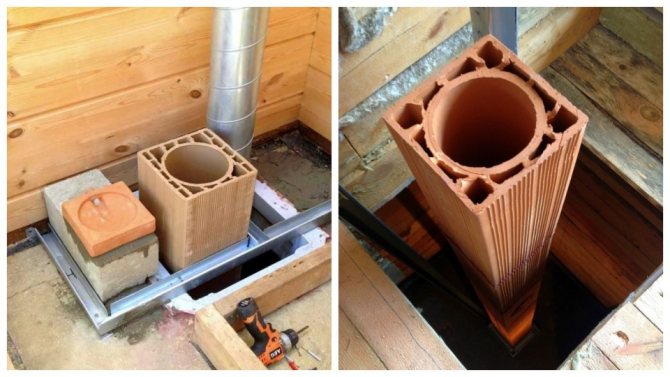
Flare - expansion of the pipe at the point of transition through the ceiling. The purpose of the expansion is to protect the wooden ceiling components from fire. The minimum thickness of the fluff is one brick. The place of expansion of the pipe is insulated with asbestos sheets or construction felt.
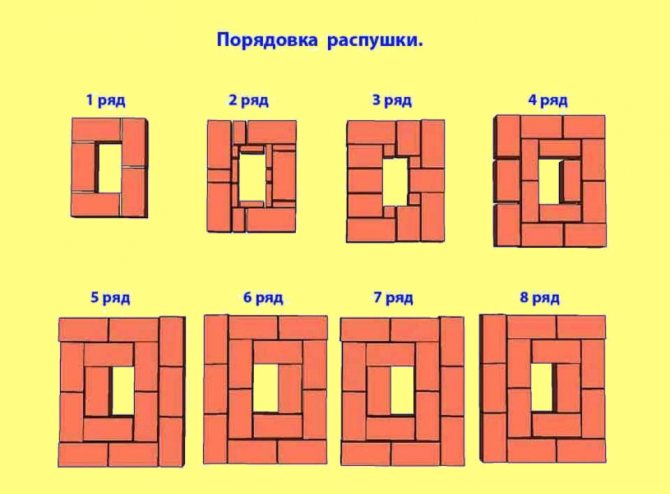
Fluffing order
Inside plastering... Internal plaster is needed to achieve smoothness of the pipe and level the temperature difference in the hot - the first channel and the cold last one. Indeed, it is possible to plaster the inner surface, theoretically this will reduce the percentage of soot settling. But stove-makers do not recommend this method.
It is technically difficult to eliminate defects and irregularities inside the pipe in this way. With frequent temperature changes, the plaster can fall off and clog the chimney.
Practitioners advise to coat the walls with mortar during masonry. Lay the brick, squeeze out the mortar and gently smooth it up and down with the palm of your hand.
Insulation and finishing of the upper section of the pipe... Pipe insulation is an effective way to protect against condensation that destroys the chimney. Methods vary depending on the type of chimney.
A brick pipe is more difficult not only to build, but also to insulate. Popular options:
- Plaster, slag-lime mortar is laid on a fixed mesh in 3-5 layers. The first is liquid, the rest are thick. The latter is chalk or lime paint. The thickness of the coating is 3-4 cm. With this method of protection, the heat loss of the outer part will decrease by ¼.
- Facing with heat insulators, usually basalt slabs. Insulation procedure: sheathing, laying of a vapor barrier film, metal siding or plaster. This method reduces heat loss by 50%.
- "Box". Wooden boards are sheathed with slate, installed around the pipe. The inner surface of the "box" is filled with glass wool or sand.
Insulation of a brick pipe
Construction of a metal structure
Installation of such a structure is much easier than building a brick chimney. If you wish, you can install the pipe yourself. This will require an accurate calculation of the length and height of the structure. This is followed by the assembly and thermal insulation of the chimney.
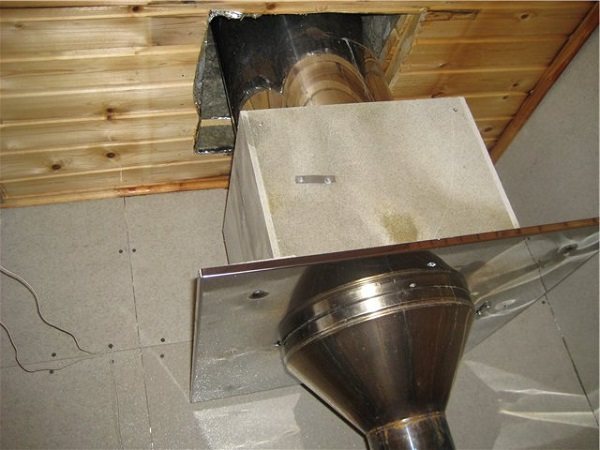
Hole in the ceiling and roof... How to make a chimney correctly? The passage of the pipe through the ceiling is a crucial moment associated with compliance with fire safety standards specified in SP 2020.
The simplest solution for removing the pipe is to buy a ready-made assembly: a metal box with a fixed stainless steel plate.
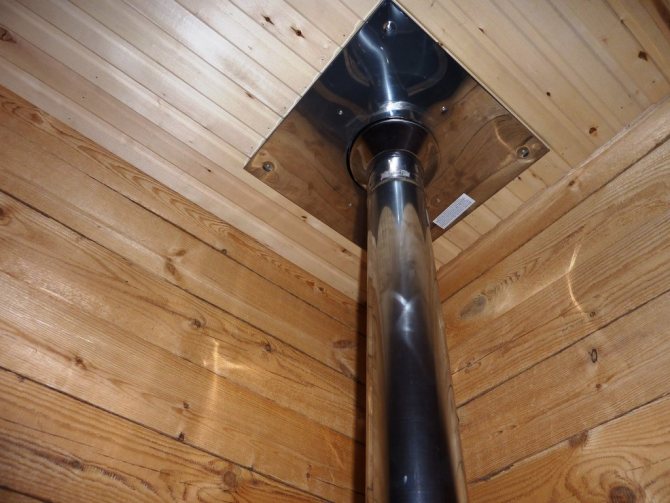
Ceiling pipe passage through the ceiling
If we are talking about a pass-through unit made by yourself, make a hole in the ceiling according to the drawing, then:
- Lay down the heat shield.
- Tap the insulation with metal strips.
- Direct the pipe from the oven to a straight section at the intersection with the overlap.
- Place strips of insulation around the edges and secure with self-tapping screws.
The chimney must not have more than three elbows. Rigid fastening of the pipe is prohibited due to possible deformation and displacement.
Thermal insulation... As a rule, the issue of thermal insulation of a metal pipe is decided at the preparatory stage. Otherwise, you will have to rebuild the roof.
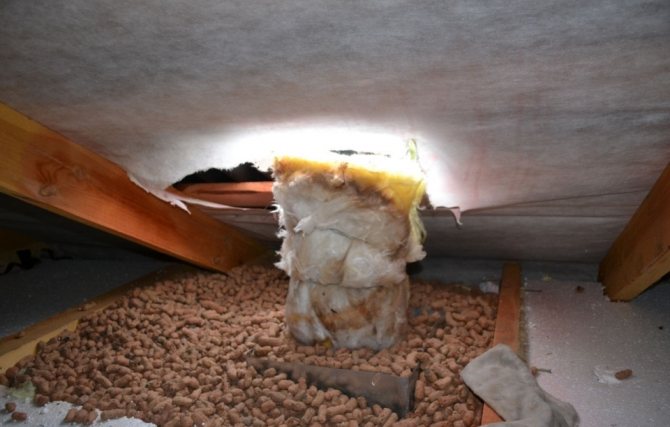
Thermal insulation of the chimney in the attic
The material is selected taking into account the power of the furnace and the characteristics of the fuel, that is, the combustion temperature is at least 300 ° C. Usually they use mineral wool, basalt slabs or cylindrical foil insulation.
The recommended distance between the chimney and the roof is at least 25 cm. If the roof is covered with flammable materials, install spark arrestors.
Metal pipes are also insulated using self-made sandwich structures:
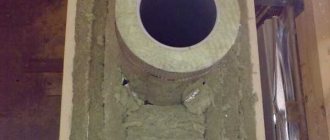
- A hole is made in the overlap 25 cm larger than the diameter of the pipe.
- The metal pipe is wrapped with a 5 cm layer of mineral wool.
- The insulation is fixed in the old fashioned way with steel wire, wrapping it around the pipe, or with special clamps.
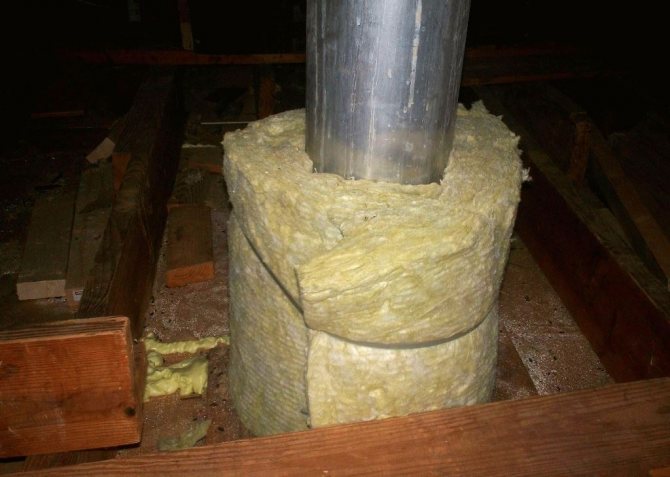
Chimney thermal insulation
The upper shell of the "sandwich" is put on the chimney through the opening of the overlap.
Collecting elements... Chimney connections are classified as “smoke” and “condensate”. Let's consider their features.
"Through the smoke"... Each subsequent section of the pipe is put on the lower one from above. This reduces the resistance of the combustion products moving from the bottom up. Such compounds are used in furnaces with high temperature gases.
"By condensate"... This assembly is suitable for continuously operating ovens. Design principle: the top of the pipe goes into the bottom. Thus, the condensate flows freely into the sump.
Moisture on the surface is dangerous. It mixes with soot and forms acids that destroy the chimney.
The main part of the liquid condenses at the points of pipe connections, which leads to depressurization. Therefore, the "condensate" assembly is used in continuously operating furnaces.
For baths, the stoves of which work periodically, the smoke assembly is suitable.
Cap... The cap on the chimney is not put on for beauty - this is an important element for the stable removal of combustion products. The purpose of the cap:
- enhances traction by deflecting air flow;
- protects the structure from precipitation, debris;
- increases heating efficiency.
To protect against large debris and birds, a mesh is inserted into the chimney.
The hood consists of a lid and a drip for water drainage.

Chimney cap
In the manufacture of the visor, heat-resistant, corrosion-resistant metals are used:
- Galvanized metal.
- Stainless steel.
- Copper.
Pipe placement options
Professionals advise to bring the chimney through the ridge, since in this place it is quite simple to organize the adjoining of the roof to the chimney. Thanks to this arrangement, it is possible to avoid the formation of snow pockets and reduce the likelihood of leaks. But this installation method also has disadvantages. So, in this case, it is simply necessary to create a rafter system, in which the ridge bar does not perform load-bearing functions.
It is also possible to organize the rupture of the ridge strip with additional reinforcement of its ends. In addition, cutting the pipe on the roof can result in additional costs if a circular chimney is used. The fact is that there are practically no components on the market that are used to organize the passage of such a chimney through the ridge. Therefore, it is recommended to use chimneys with square or rectangular cross-section (about
Chimney installation methods for various stoves
Brick is now increasingly used in the manufacture of chimneys for baths. Although both brick and stainless steel have their own positive and negative qualities, their installation is somewhat different.
Installation of a chimney to a steel stove
The chimney installation is started after installing the stove. The process begins with the connection of several supports with the clearances necessary for the installation of wider asbestos or sandwich pipes - they have increased fire resistance.
Although, it is still undesirable for open fire to hit them. In this regard, up to the first elbow, a steel pipe is installed in the bath, and after that - a sandwich pipe.
Lastly, a protective cone from precipitation is installed on the upper end of the chimney. The lower part of the pipe is closed, as a rule, with a plug, through which in the future it will be possible to drain the collected condensate and clean the inner surface of the chimney.
Fastening the chimney to a brick stove
The scheme for installing a chimney for a bath on a brick stove is also simple, and all the work can be done by hand.
The construction of the chimney begins after the last brick row of the stove is laid - often this corresponds to the 12-19 row, when the upper level of its side doors is reached.
Somewhere on the 21st row, two channels are created, the size of which is equal to one brick. Then they will be connected into one channel. At this stage, three quarters are added to the right in order to cover the free space above the core. You will get a gap between the main masonry and the core of 2-3 cm.
The voids are filled with mineral wool. Row 22 will completely cover the core, and you can move on to shifting the channels to the central part.
To prevent cracks from forming on the floor over time, an additional row of bricks can be laid above the core.
The chimney is narrowed on the 23rd row. Laying is carried out in five. At this stage, they put the valves - first one, and the second - through the row. Further, the type of masonry gradually changes to fluff.
Carrying out all the work on installing the pipe for the bath with your own hands, make sure that no cracks form, since condensation may appear in such places in the future. In addition, do not use pipes with a larger diameter than required, as the gas will not be able to rise at the proper speed and it will cool faster.
Thermal insulation
Thermal insulation is required when installing the chimney. It will prevent the formation of condensation and increase the efficiency of the furnace.
Chimney thermal insulation
Depending on the material of the chimney, a thermal insulation option is selected.
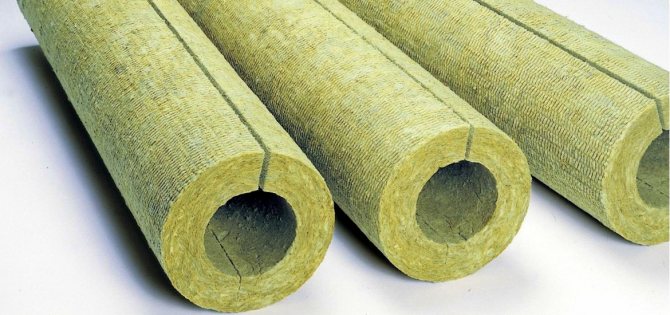
Mineral wool
Basalt (stone) wool is a refractory and dense heat insulator. The material is used for external and internal work. Insulation is produced in the form of rolls, cylinders, plates, with and without foil. Basalt cylinders are used in heating systems with exhaust gas temperatures up to 300 ° C. Mats and slabs - in systems with a temperature of 450-700 ° C.
The advantage of dense material is that it is easier to install on the pipe. To securely fix the insulation, clamps are used.
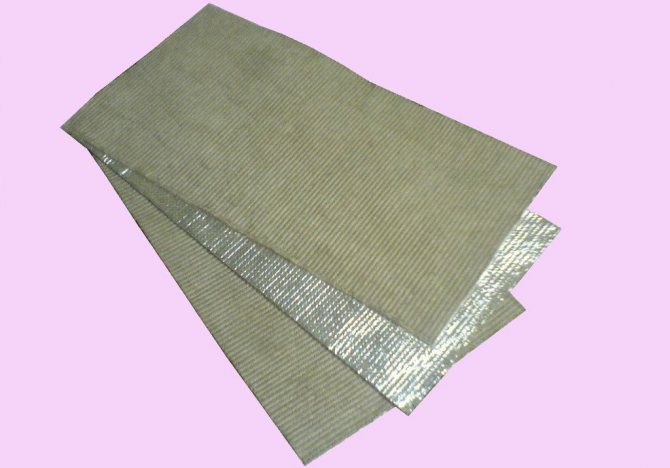
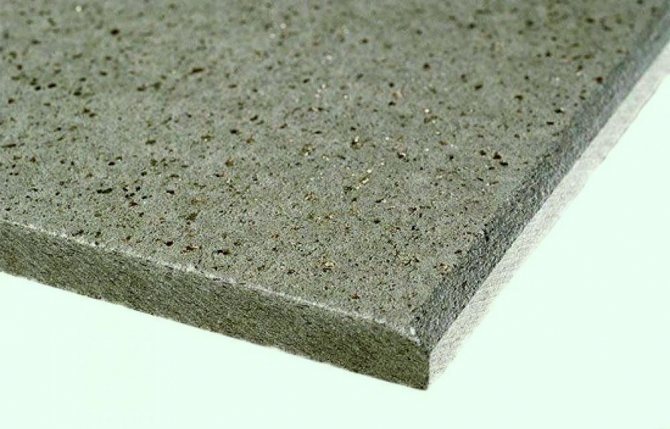
Basalt cardboard
Basalt fiber cardboard is a heat insulator that has recently appeared on the shelves of construction hypermarkets.
Basalt cardboard
Material characteristics:
- Sheet 5–19 mm thick, high density.
- Withstands temperatures of 900 ° C.
- Resistant to moisture.
- Flexible.
- The service life is 50 years.
To increase the effectiveness of the insulation, the number of layers is increased and the basalt cardboard is fixed with clamps.
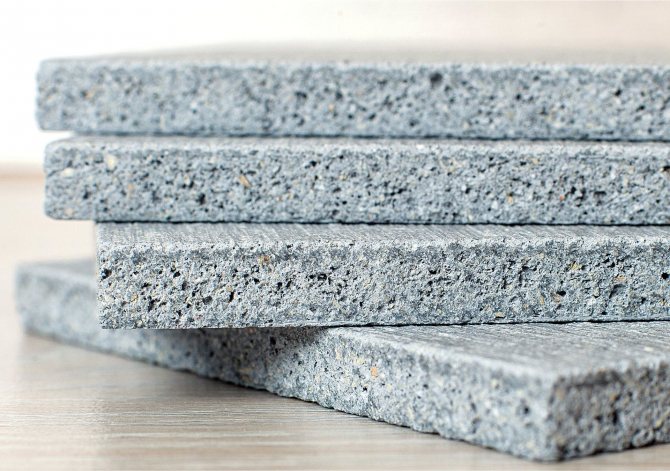
Minerite
The material is a fiber cement board with the addition of special fibers and mineral additives to the base, which increase the strength.
Minerite
Moisture-resistant and refractory minerite is used in baths and saunas for thermal insulation of transitions in ceilings and installation of thermal protective partitions.
Parameters:
- withstands temperatures from -80 to + 450 ° С;
- has high hardness and density;
- has good sound insulation;
- resistant to temperature extremes.
Minerite is easy to use - you can cut the material with a hacksaw, and fix it with self-tapping screws.
Fire resistant drywall
A distinctive feature of fireproof drywall is its versatility. According to the method of application, the material is classified as wall, arched, ceiling, for chimneys, etc.
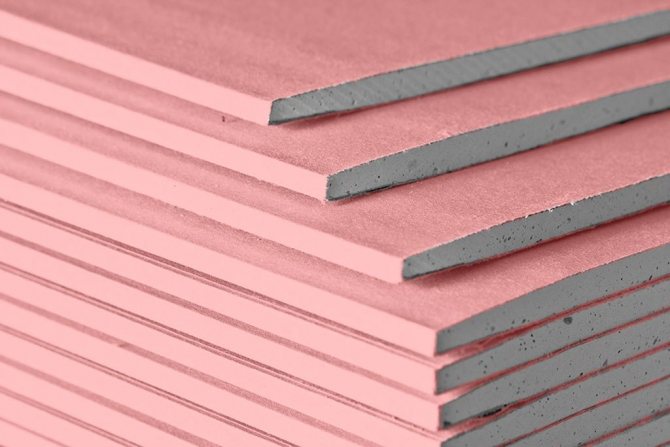
Fireproof drywall
Characteristics of fireproof drywall:
- Standard sheet size: 1.5–3 m by 1.2 m (thickness: 12–15 mm), gray.
- Impregnated with flame retardant.
- Convenient for installation.
- Can be veneered with most finishing materials.
- Possesses good sound-absorbing properties.
The disadvantage is low refractoriness at high temperatures. Therefore, it is better to use it not for a chimney, but for protecting building structures from the heat of the furnace and chimney.
Glass-magnesium sheet
New materials come to the market and compete with the classic ones. We are talking about a heavy-duty water-repellent glass-magnesium heat insulator.
Glass-magnesium sheet
Material advantages:
- moisture resistance;
- environmental friendliness;
- strength;
- heat and sound insulation due to the specific structure of magnesia;
- light weight.
Disadvantages - high cost and excessive hardness, which complicates installation work.
Sealing round flue pipes
Chimneys with circular cross-section often have a three-layer construction with a ball of thermal insulation inside. Fastening the pipe to the roof is organized using ready-made joints made of steel sheets, which are connected to a special apron - a cap. See also: "How to bypass a pipe with metal tiles."
You can make the roofing passage yourself. To do this, you need a regular flat sheet of metal. This part is attached to the roof structure. It is impossible to fix the apron tightly on the chimney. First, screws, staples or nails can damage the insulation inside. And secondly, by rigidly fixing such a chimney to the roof, it can be damaged in the future, since the rafters can shrink, and the chimney itself on the roof of the house will expand under the influence of temperatures (read the detailed article: “How to equip the passage of a pipe through the roof ").
Pipe connection training video:
In order to protect the junction, a steel clamp with a heat-resistant gasket is put on over the chimney pipe.
This element closes the joint, protecting it from moisture penetration. The installation of the pipe itself and the organization of its passage through the roofing material in this case remain unchanged.
Along the perimeter, the apron can be pasted over with lead or aluminum tape.
Instead, it is allowed to use an oval-shaped lead part profiled along the roofing material. In this case, it is important to bring the upper edge of the apron under the roof, and its lower edge is overlapped over the lower part of the slope. Thus, the water flowing down the slope gets onto the apron and from there flows down it onto the roof slope.
Also remember that before fixing the pipe to the roof, you must first install the heating boiler.
About
Roof pipe laying
It is sometimes quite difficult to organize the correct abutment of the chimney on the roof, since the roofing cake is solid and in the end it should remain continuous over the entire area (read: "Laying a pipe made of bricks with your own hands"). SNiP requirements clearly describe the conditions for placing combustible materials around the chimneys. And the material from which steam and waterproofing of modern roofs is made is just one of such materials.
Therefore, depending on the selected type of chimney, the insulation films should be at least 13-25 cm from the pipe. A ceramic pipe for the chimney is considered a good option.
But how, in this case, the pipe is drawn on the roof of the house?
The optimal solution is to separate part of the roofing cake from its main plane.
For this, the following can be applied:
- rafter legs on the sides of the pipe;
- transverse beams installed above and below and having rafter thickness.
That is, in a simple way - it is necessary to create a kind of box made of wood, which reliably separates the hot pipe from the roofing pie. In this case, the requirements of SNiP should be adhered to, since wooden elements must also be placed from the chimney at a certain distance.
The box for the pipe on the roof is filled from the inside with non-combustible heat-insulating material. For this, basalt wool can be used.
The adjoining of the layer of hydro and vapor barrier to the installed box is performed using the standard method:
- insulation sheets are cut with an "envelope";
- the edges of the material are brought to the cross beams or rafters, where it is fixed with nails or staples;
- the waterproofing film is clamped with battens and counter battens.
The vapor barrier film is fixed with a base for laying the attic finishing material; - in order for the insulation to be reliably protected from moisture ingress, in the places where the insulation film is adjacent to the walls of the box, it is necessary to arrange an airtight seal from an adhesive composition or special adhesive tape.
Where it is not recommended to install a chimney pipe
The most unfortunate place for the passage of the chimney are the joints of two slopes - the valleys.
It is almost impossible to achieve a high-quality adjoining of the pipe to the roof in such a place, while the water flow flowing down from the roof slopes will create an additional load on the chimney pipe. In addition, snow will accumulate here in winter. As a result, the roof may leak.
As in the case of the passage through the ridge, this method requires the organization of a more complex rafter system in the valleys.
Necessary calculations for the project
Stoves in baths are not installed at their own discretion, but according to calculations.
When arranging heating in a bath, follow the technologies and SNiP. Unauthorized design changes can lead to fire and destruction of the building.
To calculate the diameter of the pipe, you need to know the power of the furnace, the rest can be determined from the ready-made diagrams.
Parameters for rectangular pipes with a furnace power of 3.5 kW - 140x140 mm, for 5.2-7.2 kW - 140x200 mm.
The diameter of the round pipe should not be less than the diameter of the furnace outlet.
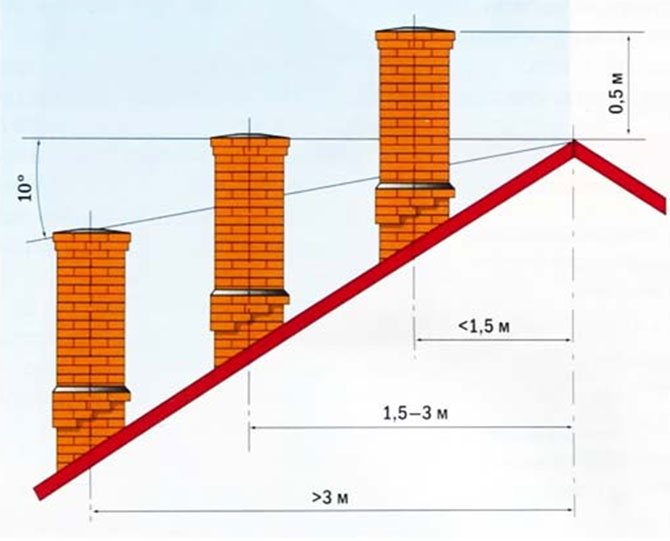
The height of the pipe depends on the height of the room and the material of the roof.
The pipe is placed on the roof at a distance of 1.5 m from the ridge - so that it is 0.5 m higher than it. At a greater distance, the height of the pipe and ridge will be equal, which will disrupt the normal outflow of combustion products.
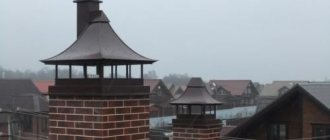
Chimney on the roof of the bath
Chimney variations and designs
It is worth considering the device of a chimney in a bath for a wood-burning stove. Typically, this design includes pipe, flanges and connecting components. The main thing is that the finished chimney can withstand high temperatures without emitting harmful compounds at this moment.
In order for the chimney located in the wall of the bath to retain as much heat as possible, it should be placed with a shift inside the room - then the draft will be as efficient as possible. If, for some reason, this goal cannot be achieved, provide for sufficiently thick walls, the width of which is determined based on the ambient temperatures.
For example, if the temperature outside does not drop below -20 ° C, then a wall thickness of 38 cm is sufficient, however, if the frosts sometimes fall below the above indicator, then the thickness will have to be increased to 58-65 cm.
DIY winter tent: drawings
1. We take duralumin ski poles. We will make vertical tubes of the frame from them. As for the horizontal tubes, they should be slightly thinner. The upper joints of the ribs of the future tent are made in the form of tees, which end in cylinders (length 5 cm). It is very important that the diameter of the cylinders is the same as that of the pipes to be connected.
2. We proceed to fixing the lower ends of the vertical tubes to the skis.A shaped lock plays the main role here. At the lower end of the tube, we find a T-shaped tongue, and then carefully insert it into a metal plate attached to the ski. It remains to turn the tube 90 degrees.
3. To connect the frame of the tent with the box, we use 2 duralumin tubes bent at the ends from the old folding bed. The end of the docking piece must be secured to the end of the folded tube. At its other end, we install a latch, which, during docking, with its tongue, will fall exactly into the hole on the second bent tube.
4. The box will be connected to the tubes mentioned above using the round eyes on the ski racks. They can be made from copper or steel strip and then attached to the uprights.
5. Now you need to pull the awning. Place metal plates with slots on the lower edge of the material. It is through these slots that the U-shaped staples driven into the side ends of the skis will pass. We fix the connections with the shoe laces. To keep the tent well on the ice, you need to equip it with anchors (2 pieces). Each such anchor is a pocket knife with two blades at the ends.