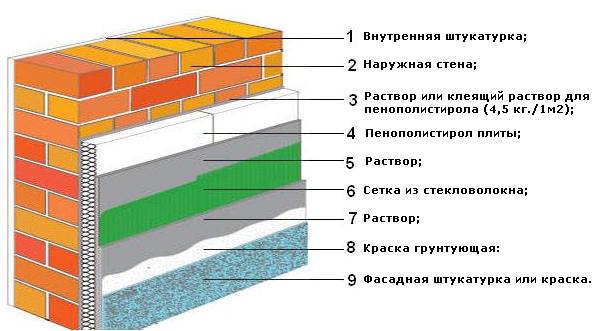
A lot depends on how well the house is insulated: the microclimate and air temperature in the premises in winter and summer, saving money during the heating season. That is why close attention is paid to wall insulation during the construction and restoration of the building.
Do-it-yourself home insulation with foam plastic
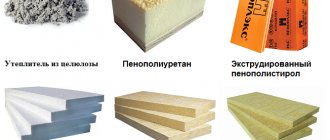
You can insulate the walls inside and outside with different materials: mineral wool, isolon, glass wool, foam. The last option is the most profitable and technically available.
Do-it-yourself home insulation with foam plastic
Why is styrofoam most commonly used?
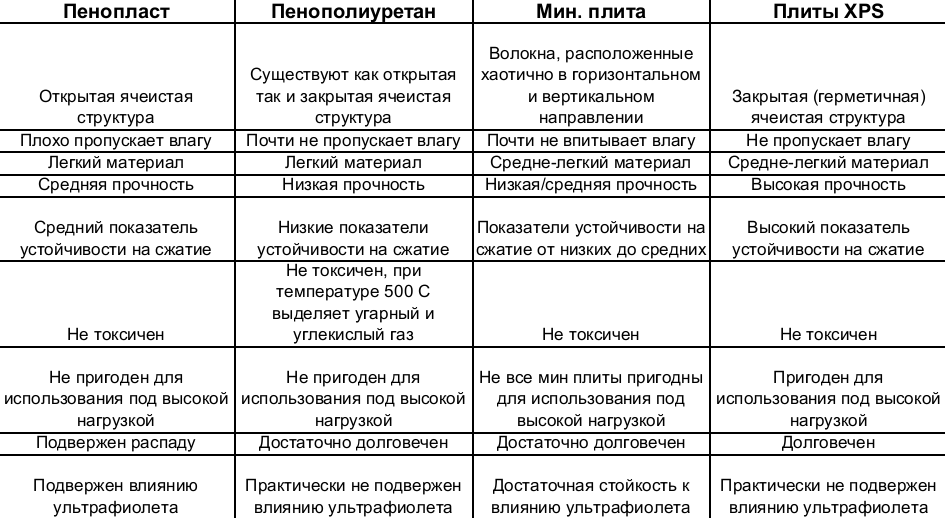
Comparative characteristics of insulation materials
- Material weight. Polyfoam is a very light material, with its help you can insulate various buildings: frame, panel board, brick, block. Lightweight foam does not carry additional stress on walls and foundations.
- Ease and simplicity of installation. When working with foam, special tools are not required, the material does not need additional processing and is easily cut into fragments of any size.
- Resistance to moisture. Styrofoam does not accumulate moisture, does not absorb water when wet. The material will not rot, mold or insect pests will not start in it.
- Air permeability and heat saving properties. Due to its porous structure and the presence of air bubbles in the structure, the foam perfectly retains heat and "breathes". Thanks to the material, a healthy microclimate is maintained in the house, the "greenhouse effect" is not created.
- Affordable price. Despite its undeniable advantages, foam is an "economy class" material and has a low price.
- Easy to transport. Lightweight material does not require special conditions for loading, transporting and unloading.

Styrofoam characteristics
Materials for external thermal insulation of the house
There are several common heat-insulating materials used for external insulation:
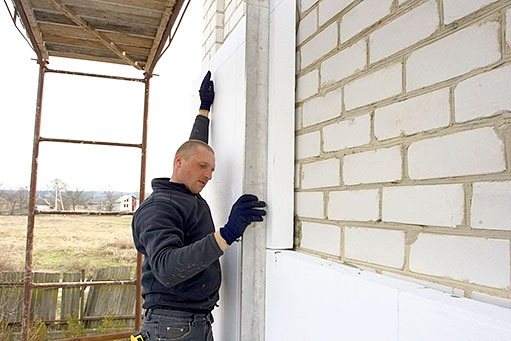
- Styrofoam. At the moment, the cheapest and most popular insulation. Often it does not meet the recommended requirements for thermal insulation of premises, but foam is still used as the most affordable thermal insulator. It is very suitable for external thermal insulation of stone, brick and panel houses, since masonry, brickwork and concrete do not require ventilation, unlike wooden walls.
- Mineral wool. The most suitable option for thermal insulation of wooden houses, since this material has a high ventilation coefficient. It has a higher cost compared to foam.
- Polyurethane foam is very good at insulating walls both inside and outside. It is a foamed, rapidly solidifying liquid, which makes it difficult to work with. The fact that this material is supplied in liquid form is also a plus, since it allows you to achieve maximum adhesion to the insulated surface, which makes it indispensable for installing thermal insulation indoors.
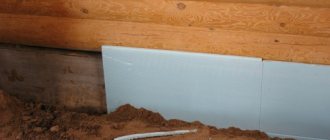
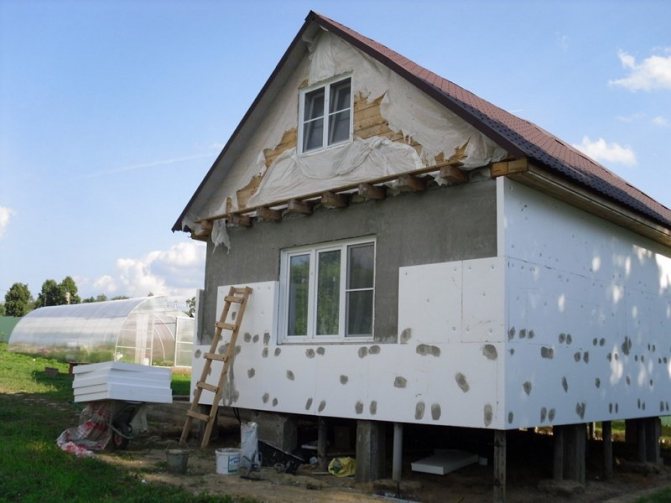
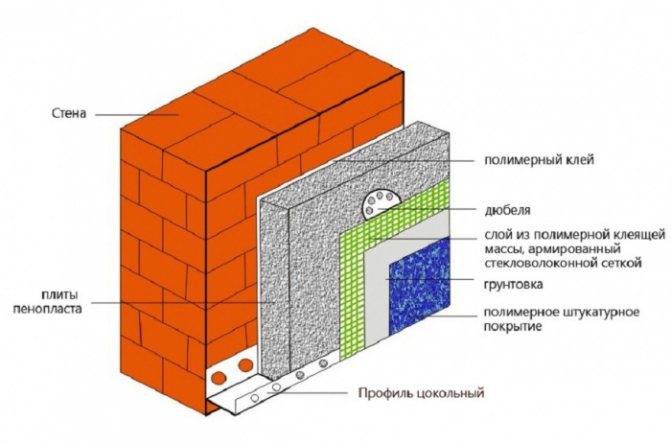
Thermal insulation of the outer walls of the house using polystyrene foam
Since polystyrene is a rather dimensional material in thickness, it is best to insulate the outer walls of the house with it. With internal insulation, the useful area of the room is lost.
External insulation of the walls of the house can be divided into several stages.
- Acquisition of the necessary material and tools.
- Preparing the walls.
- Erection of scaffolding or scaffolding for the installation of insulation.
- Installation of polystyrene.
- Finishing the walls of the house.
Thermal insulation of the outer walls of the house using polystyrene foam
Materials and tools
- Marking beacons.
- Chopping cords.
- Styrofoam plates.
- Adhesive for fixing foam.
- Comb for applying glue.
- Dowels with large umbrella hats.
- Reinforcing mesh.
- Adhesive for mesh mounting.
- Primer for wall treatment.
- Foam for sealing wide gaps.
- Sandpaper.
- Rotary hammer with a set of long drills.
- Roller for applying primer.
- Special foam trowel for smoothing irregularities.
- Spatula for applying glue.
- Level and tape measure.
- Basic set of locksmith tools.
Which foam should you choose?
Firstly, the choice of foam is determined by the climatic characteristics of your region. So, the insulation of a wooden house outside in the Krasnodar Territory is carried out with 40-50 mm expanded polystyrene, and for effective thermal insulation of the walls of buildings in Yakutia and the Far East region, plates with a thickness of at least 150 millimeters are needed.
Secondly, the cost of the material is no less important factor. For example, S-25 - the standard version of foam with a density of 25 kg / m3 - costs about 1900 Russian rubles per cubic meter, and a material with a higher density - S-35 - will cost you almost twice as much.
Thirdly, if we talk about choosing the density of the foam, then you should not choose too dense insulation, since it will have a higher thermal conductivity, which means that the insulation will be less effective.
We recommend using C-25 foam. It has sufficient strength and density, and is also quite affordable.
Preparing the walls of the house for insulation
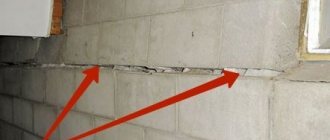
The walls on which the insulation will be attached must be carefully prepared. All cracks and voids need to be repaired; damaged sections of the wall are best restored. In the presence of large differences - more than 5 cm, it is advisable to level the plane of the wall, otherwise it will be difficult to properly fix the insulating material.
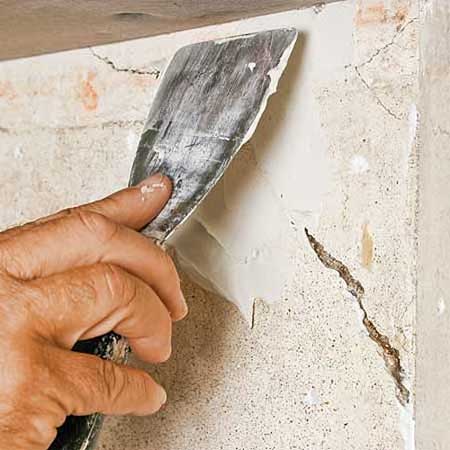
Crack repair
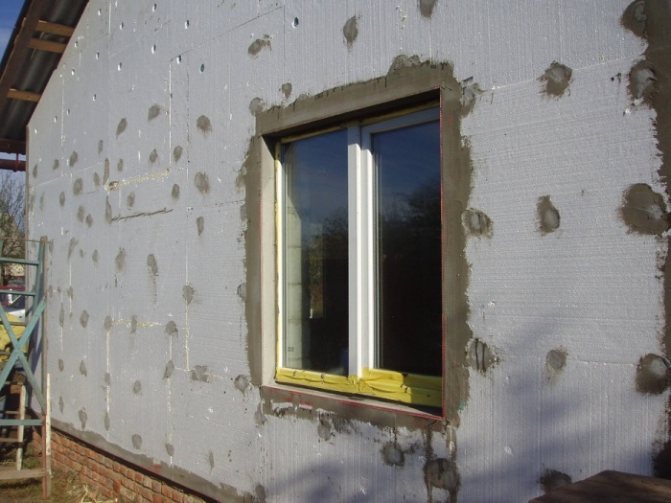
It is not advisable to start work on a rainy day or mount the material on wet walls. If the house is being renovated, it is recommended to install the insulation after replacing windows and doors.
It is recommended to carefully prime clean walls before fixing the foam. The deep impregnation liquid can be applied with a roller or spray. The primer will protect the wall from corrosion and moisture, improve the adhesion of the adhesive solution to the foam.
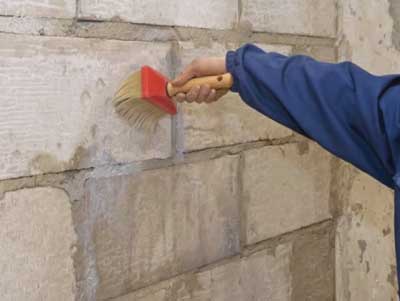
Preparing the walls of the house for insulation
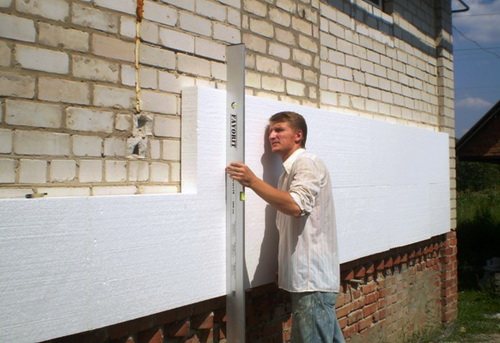
Before attaching the material to the wall, it is advisable to expose beacons. Chopping cords are pulled between the beacons. This will allow the foam to be attached with minimal deviation.
Myth - It is expensive to insulate the facade
If you decide that it is absolutely necessary to insulate the facade and there is no return to your decision, the time will come to purchase materials. In order to sheathe an entire house, you will need a relatively large amount of money.
To reduce heating costs, many home and apartment owners think about insulation. One of the possible options is to insulate the facade with foam plastic (EPS or EPS). The work is not the easiest, but you can do it yourself. It is important to know the technology. We will talk about it in detail, in detail, further.
Correct insulation of the facade with foam gives good results
Installation of foam on walls
After pre-processing the walls and installing beacons, you can start installing the foam.
Step 1. Dilution of the glue. The dry mixture must be diluted with water. The consistency of the glue should be creamy, without lumps and other impurities. It is best to dilute the glue in portions.
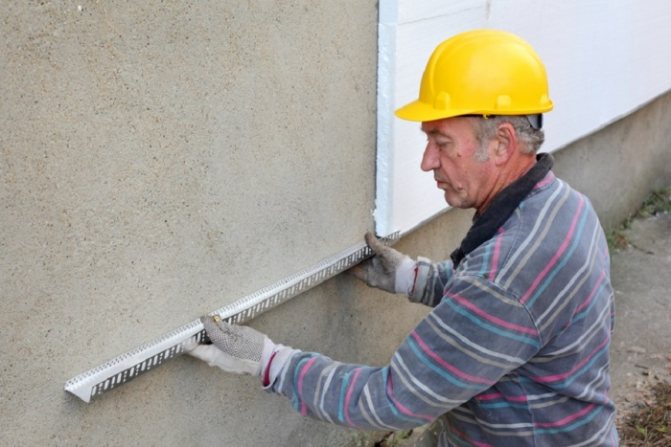
Step 2. In order for the first row of foam to be even, it is recommended to start attaching the insulation to the metal profile. Using a tape measure and a level, you need to mark the line along which the first row of insulation will be attached. Then, along this line, you need to drill a metal profile to the wall.It additionally contributes to better fixing of the insulation to the wall.
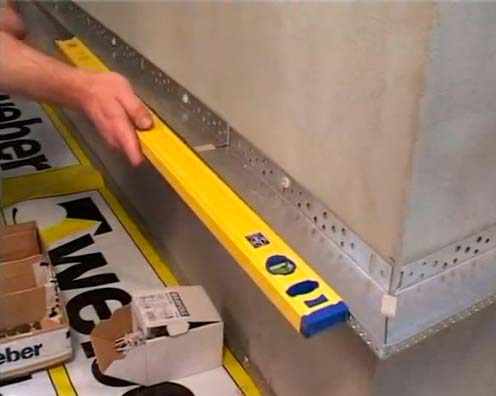
We fix the basement profile
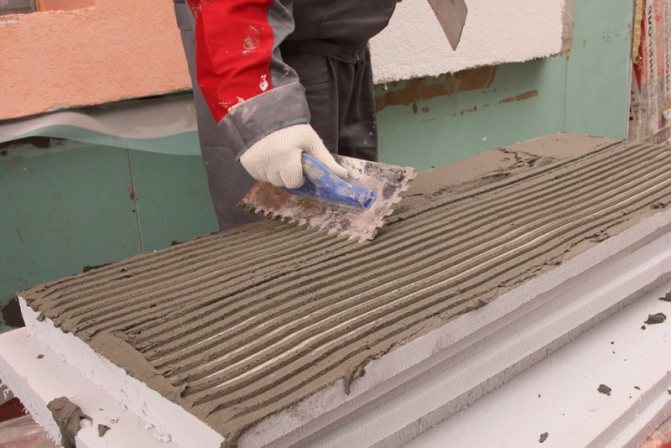
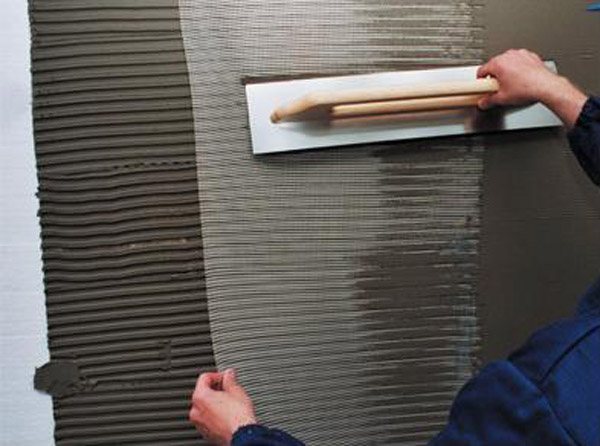
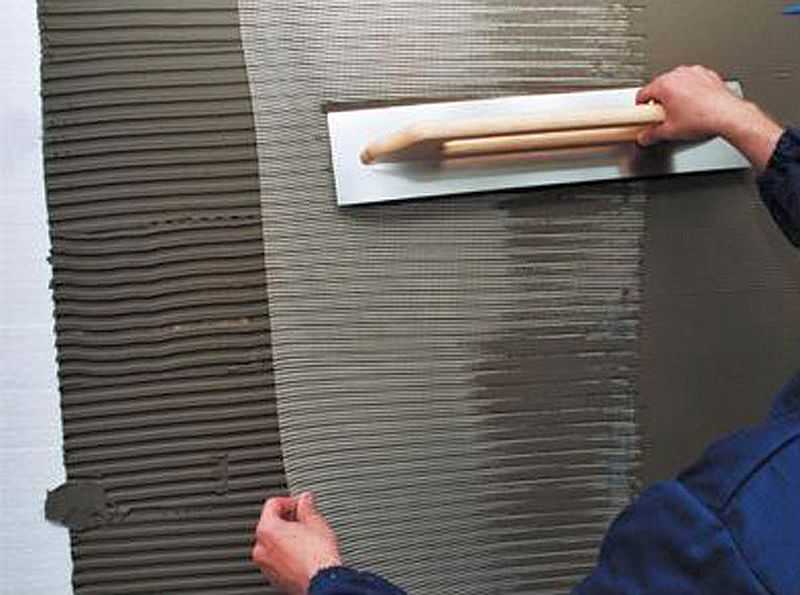
Step 3. Glue is evenly applied to the surface of the foam with a comb. If the surface of the wall is not too flat, then more adhesive can be applied to the insulation to maximize the adhesion.
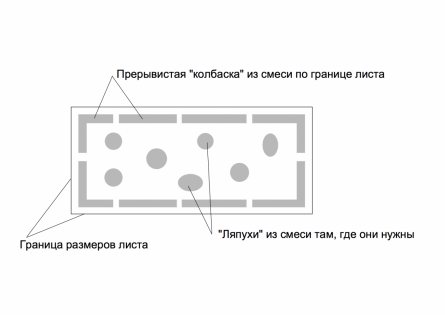
Scheme of applying glue under a sheet of insulation on the wall

Apply glue
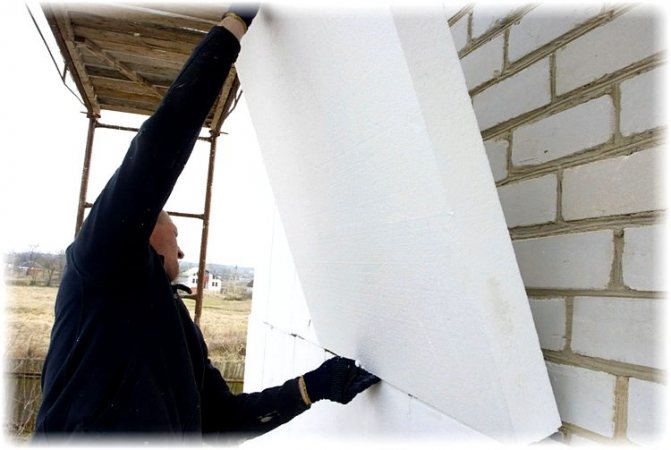
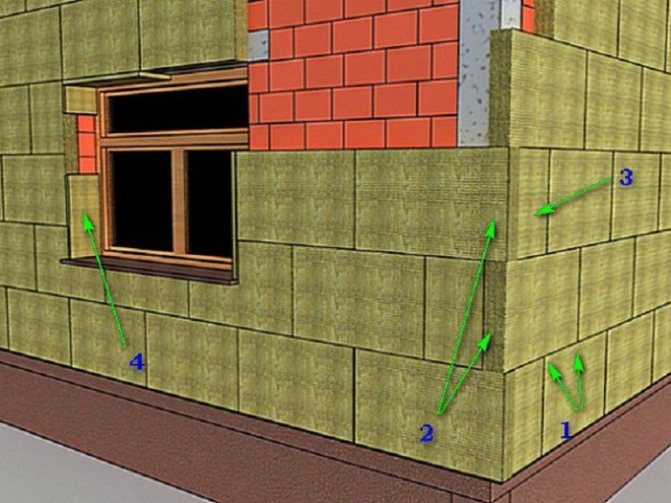
Step 4. The first row of foam is laid out. It is recommended to glue the material on the wall from the bottom up. It is also recommended to apply glue between the insulation boards so that there are no gaps.
Installation of foam on the facade
Step 5. The second row of foam is glued offset from the first row. This will provide a better bond of the material and minimize gaps between the slabs. Do not forget about applying glue to the abutting ends of the plates for better sealing. If there are too large gaps between the foam plates, polyurethane foam can be used to seal them.
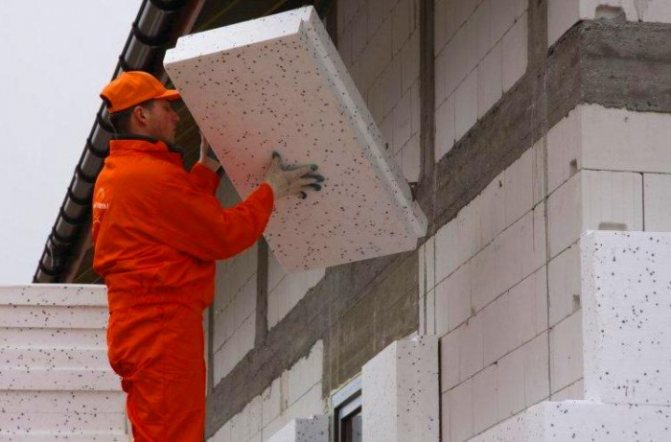
Step 6. At the corners of the house, the foam must be fastened with such an allowance to completely cover the protruding areas.
Step 7. Before installing the next row, do not forget about putting up beacons.
Step 8. In this way, all rows of insulation are glued.
We will learn how to properly insulate a house with polystyrene foam. What is needed for this?
Today, many people, looking at their gas and electricity bills, take their heads and think about what they can save on.
Many people come up with the idea - "We need to insulate the house!". And without a doubt we can say that this is a great idea.
Saving, with high-quality insulation, reaches 35%, and the heat in the room is retained by about 30% more.
There are many options, such as foam-aerated concrete, mineral wool insulation, foamed polyethylene. But one of the most popular materials for insulation is still foam.
Is it possible to insulate a house with polystyrene foam?
It is possible and even necessary. Not only does this offer the opportunity to reduce heating costs, but it also allows you to update the look of your home by post-processing the façade.
There is an opinion that polystyrene is environmentally hazardous because of what and how it is made.
But it should be noted that with a quality foam manufacturing process and with proper installation of this material, the level of harmful substances is significantly lower than the MPC norm - the maximum permissible concentration.
This material is most often used for insulation, not only because of its price (the price is one of the lowest among materials for insulation), but also because of the ease of use during installation and its properties.
Despite the prevailing opinion about the fire hazard of foam, there are many facts that suggest otherwise.
Polyfoam does not support the combustion process and can ignite only in direct contact with an open fire, but if you stop exposure to open fire, then the foam extinguishes itself within four seconds.
And the energy released during the combustion of foam is 5 times less, which means a lower combustion temperature.
And the foam also has low water absorption, excellent wind and sound insulation properties. So, if installed correctly, this material will serve you for a long time and will warm you from many external influences.
What kind of foam to insulate?
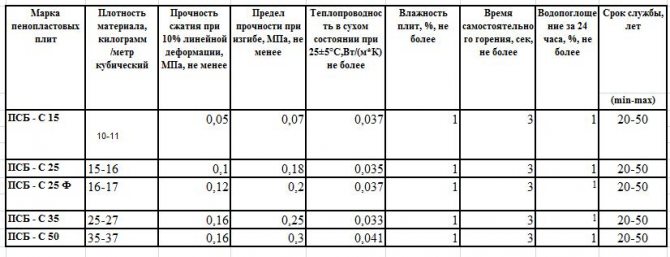
Typically, various types of foam are used for insulation under different markings, ranging from PSB-10 to PSB-50.
The larger the number in the marking, the thicker the plastic, because the number in the marking indicates the density of the material.
Different types of foam are used for different tasks.
In the insulation of the facades of private houses and residential apartments, foam plastics with markings from PSB-25 and higher are most often used, since they have the best thermal insulation properties.
The more heat you want to keep and the more you want to protect your home from external sounds, the more dense material you need to choose.
Insulation from the inside
It is possible to insulate a home with foam plastic both inside and outside, however, outdoor insulation is more common and there are several reasons for this.
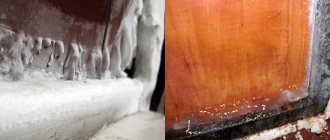
Without insulation at all, zero temperature, the so-called "temperature zero", is inside the wall, approximately in the middle.
After internal insulation, "temperature zero" moves inside the house, to the border of the insulation and the wall.
As a result, due to the sharp temperature drop at this border, condensation forms, which is fraught not only with mold and fungus, but also with the destruction of the adhesive layer on which the insulation is held.
Of course, this can be avoided with the help of special coatings, but this already makes insulation with foam plastic not so profitable.
The house should be insulated from the inside when there is no way to insulate it from the outside.
Insulation outside
Insulation of facades is the best way to keep warm in a room, which is why many people resort to it.
External insulation is more beneficial in that it does not have such problems as internal insulation, and even does not steal the space inside the room, which inevitably takes up insulation.
A big plus is that when the facade is insulated, there is no need to move out of the insulated room, because absolutely no action is taken inside.
Moreover, the external insulation almost does not bear the load on the foundation and allows you to show all your imagination in the final coating of the insulation with finishing plaster.
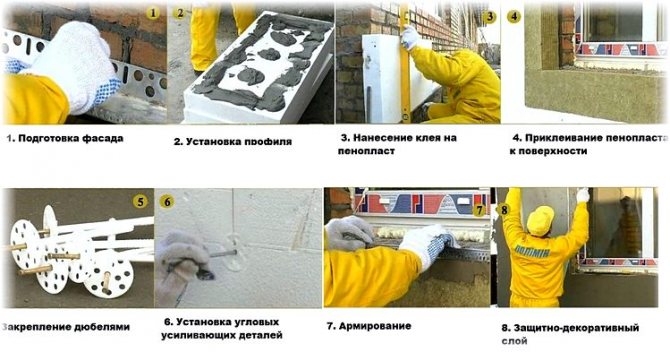
We insulate with our own hands
You can insulate the facade of your house on your own, and therefore I would like to provide step-by-step instructions for the correct installation of insulation on the facade of your home.
Facade surface preparation. No special preparation is required if the facade of the house has not been covered with any additional materials.
Therefore, a necessary part of surface preparation consists in treating the façade with a suitable primer.
The choice of materials for insulation.
Before purchasing a material for insulation, it is necessary to fully measure the area of the house that you are going to insulate.
Do not forget to subtract door and window openings from the total area.
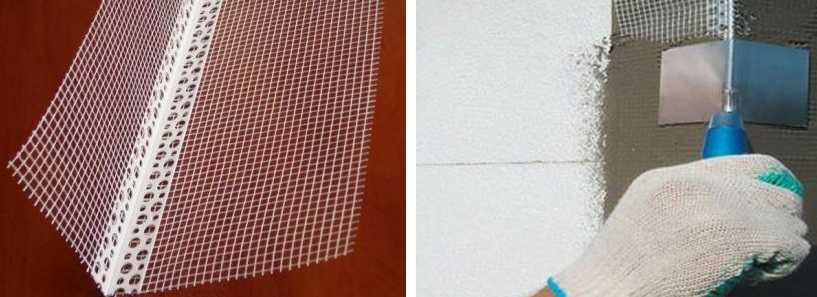
Also, in addition to the foam itself, you will need high-quality glue for insulation, painting corners for corners, painting plastic net and umbrella dowels for better fixing of the foam.
A finishing putty is also required, with which the foam will be processed after installation.
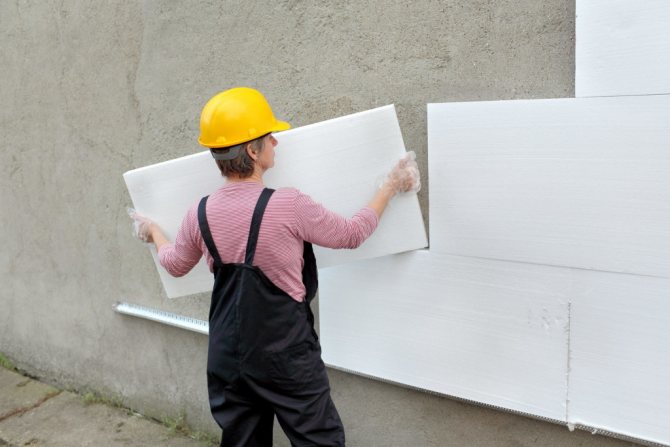
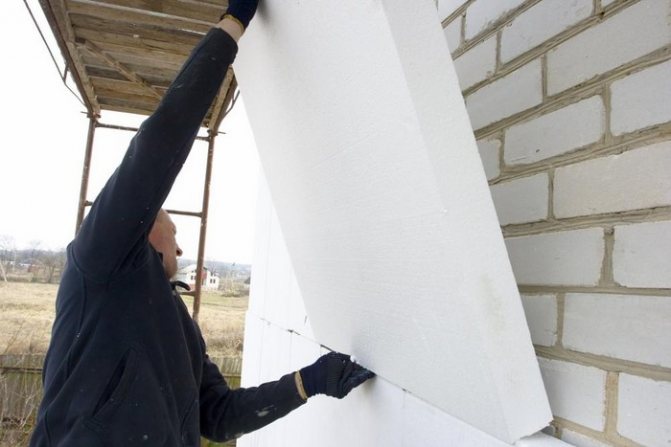
Bonding styrofoam to the building facade. This process does not take as long as it might seem. A pre-prepared adhesive solution is applied to the foam plastic in an even layer.
The same manipulations are carried out with the wall. After that, the foam is pressed against the wall and tapped for better contact with the surface. After that, the foam is attached with dowels - one in each corner and one in the center.
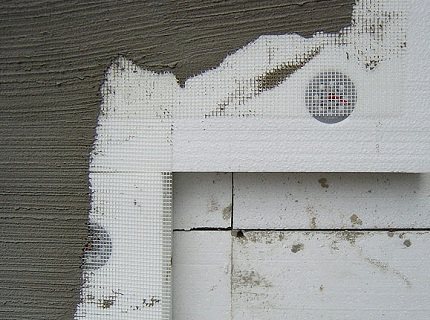
Styrofoam putty. Putty on styrofoam takes a long time.
First, you need to strengthen the corners with special corners for reinforcement, and then putty, not forgetting to use a plastic mesh.
Styrofoam can be coated with many fillers: mineral, acrylic, silicone. It can also be coated with CM11 ceresite.
Summing up, we can say that foam is one of the most convenient, easy-to-use and most suitable materials for insulating your home.
The main thing is to correctly install high-quality material, and it will serve you for a long time and will perfectly store the heat of your home.
Video - advice
In this video, we would like to give some tips on how to insulate your home with Styrofoam, which is best suited for this purpose.
This video will help you avoid common mistakes when installing insulation and will greatly simplify the installation process itself.
Testimonials
About a year ago I insulated my private house with my own hands using foam.
Whoever says what is an awesome thing. Costs have really decreased, and the house has become noticeably warmer.
True, I suffered a little with editing, because I had never done such a thing before. But in general, I am more than satisfied with the result, I hope to soon recoup the money spent in full
hauzdecor.com
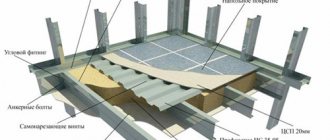
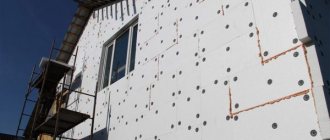
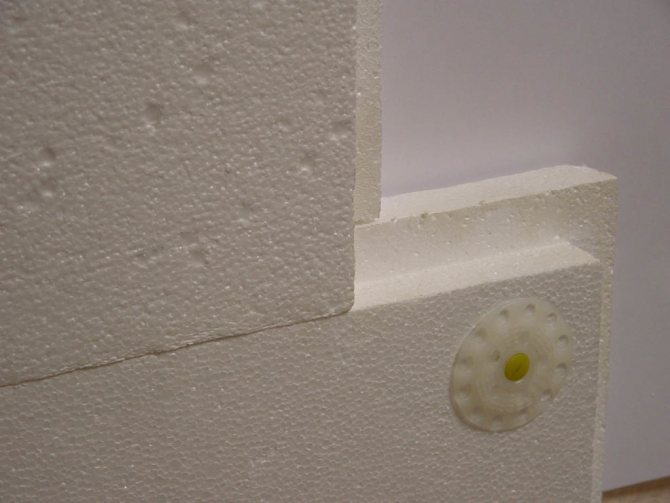
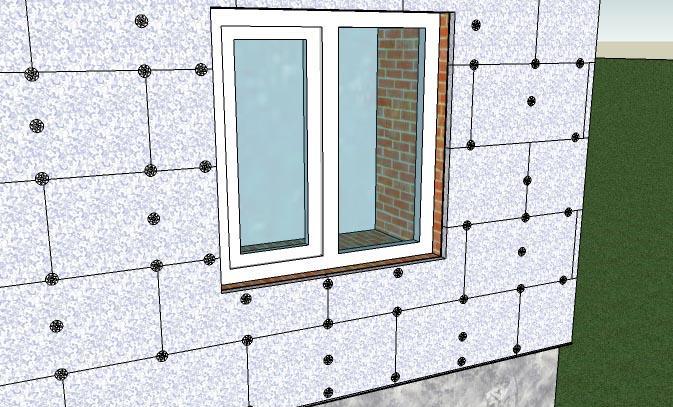
Additional fixation of the foam
After the walls of the house have already been insulated, it is recommended to further strengthen the fixation of the material. For these purposes, a perforator and special fastening accessories are used - anchors with wide plastic caps, inside which a metal hairpin is driven.
When choosing the size of the fittings, you need to know that for high-quality fixation, the anchor is recommended to be recessed into the wall by 40 mm. If the thickness of the foam is 40 mm, the thickness of the adhesive layer is 10 mm, the length of the anchor should be 90 mm.
Step 1. It is desirable to fix the foam sheet with 4-5 anchors. For these purposes, holes are drilled in the insulation and the wall. The length and width of the drill must be equal to the dimensions of the fastening hardware.
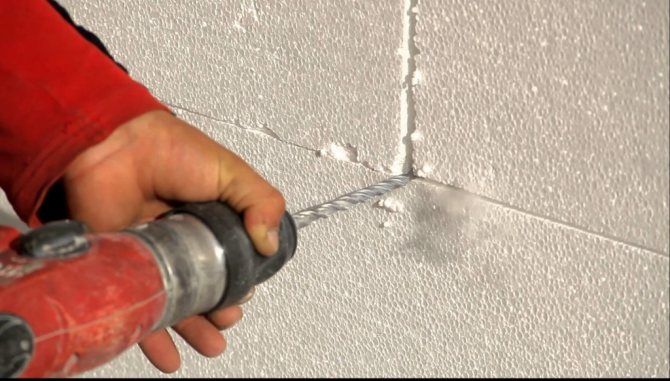
Preparing the foam for the installation of the umbrella dowel
Step 2. After drilling, plastic fittings are inserted into the holes. The caps of the anchors need to be slightly sunk into the polystyrene in order to later hide them with a layer of plaster.
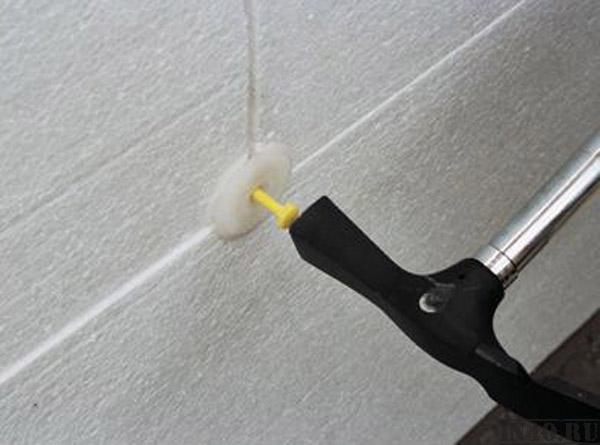
We fix the dowel
Step 3. Metal studs are inserted inside the plastic anchors and hammered with force until they stop.
Step 4. In this way, all sheets of foam glued to the walls are fixed.
Styrofoam plates
The main characteristics of the foam
Like any materials, foam for facade insulation has various technical characteristics, as well as positive and negative qualities.
The most important for insulation are four parameters that you should pay attention to when choosing a material:
- Strength - for various brands it ranges from 11 kg / m³ to 37 kg / m³. The ability of the heat-insulating layer to deform and its resistance to stress depends on it.
- Density - ranges from 10 kg / m³ to 50 kg / m³ and directly affects the weight of the heat-insulating “cake” and its resistance to mechanical damage.
- Thermal conductivity - is in the range of 0.038 - 0.043 W / (m ◦C). Shows how much heat is passed by the material.
- Thickness - sheets are produced from 20 to 100 mm. The scope of use is determined depending on this indicator.
For insulation of facades with foam, in an average climate, sheets 50 mm thick are quite enough. If the climate is colder or the walls are very thin, then it is possible to increase the thickness of the insulation to 100-150 mm.
Most often, the foam is produced in square sheets with a side of 100 mm or in the form of a rectangular plate with dimensions of 1000 × 500 mm.
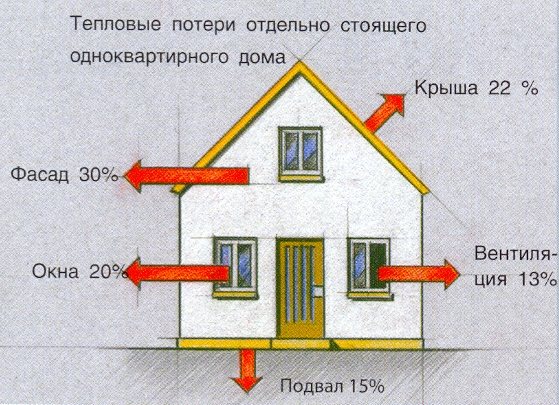
Heat loss of a building through supporting structures
The main advantages when arranging thermal insulation include:
- availability is one of the cheapest insulation materials. For facade foam plastic, the cost does not exceed 2500-2700 rubles per m³;
- versatility - choosing the indicators of thickness and strength, you can use it for different zones of insulation;
- lightness - low weight simplifies fastening and does not harm the base, even in the case of significant wear on the facade surface;
- thermal conductivity - higher than that of similar materials, 50 mm foam is equal to a brick wall 1 meter thick;
- durability - the declared service life is up to 50 years;
- resistance to decay, mold and fungi;
- practically does not absorb moisture from the air, therefore it does not require the creation of a vapor barrier layer;
- static - regardless of the period of use, it does not deform and does not shrink;
- simplicity - very easy to install, even without professional skills.

Foam for insulation in the form of slabs
Despite the positive qualities, there are several negative points:
- flammability - polystyrene belongs to the class of combustible materials, which requires careful use. Better yet, use a material with a fireproof impregnation;
- harmful emissions - when burning, decomposes into chemical components with the release of harmful corrosive smoke;
- excellent housing for rodents, but correct installation with insulation removes this problem.
Considering the solid preponderance of the advantageous characteristics, foam plastic for thermal insulation of facades is gaining more and more popularity among the private sector and in the scale of state reconstruction of high-rise buildings.
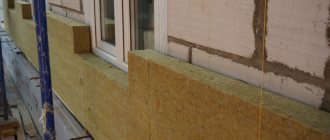
Wall decoration, insulated with foam
After the insulation of the walls is completed, you can proceed with the finishing and beautification of the facades of the house.
How to glue polystyrene correctly
Step 1.Using a foam trowel, smooth out all the bumps at the joints of the foam sheets. The grater removes the excess glue layer.
Step 2. Walls insulated with foam must be primed.
Step 3. After the primer is dry, you can start applying the putty. Spread the putty evenly over the surface of the foam. The optimal layer is 2-3 mm.
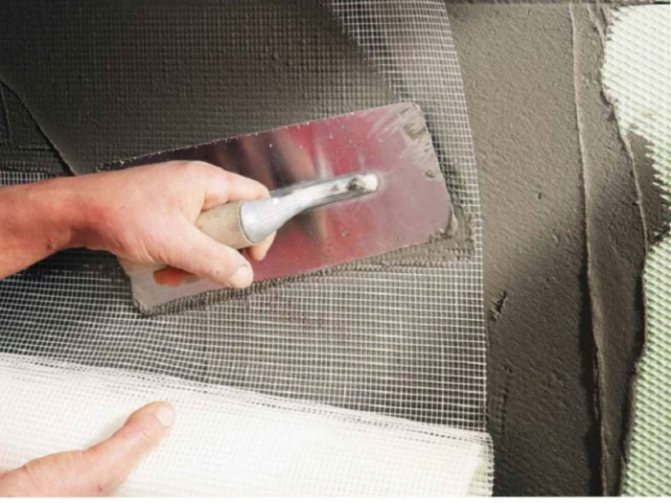
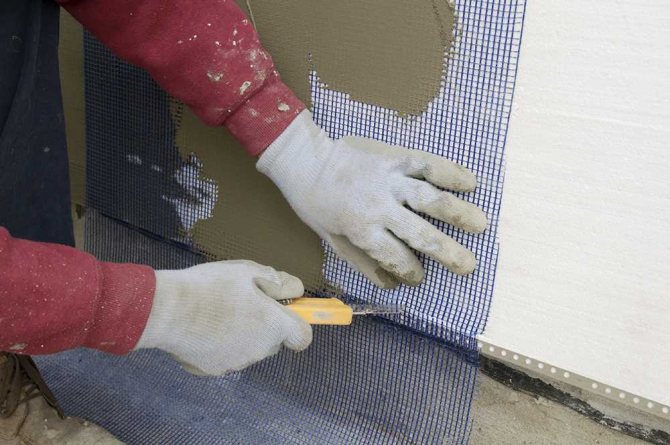
Step 4. While the putty has not dried, a reinforcing mesh is attached on top of the layer. The material must be sunk into the mortar with a spatula. It is advisable to reinforce small sections of the wall - 1-2 meters. The mesh is overlapped. When working with a spatula, it is required to carefully smooth out all irregularities. Ideally, the mesh should be hidden under a layer of putty.
Step 5. After the walls have been reinforced, you need to wait until the solution is completely dry. Then the wall is treated with coarse sandpaper. The abrasive removes all irregularities, drops and sagging on the wall surface.
Step 6. The wall cleaned from defects is once again treated with a primer.
Step 7. Using a wide spatula, apply the leveling compound to the wall. With its help, you can achieve perfect surface smoothness.
Wall decoration, insulated with foam
Step 8. Finishing the facades. For these purposes, various materials are used: paint, decorative plaster. You can also ennoble the facade of the house with mosaics, natural or decorative stone, facing bricks. If you plan to use these materials, you do not need to use leveling compounds.
Application of plaster to polystyrene
If all the required materials and tools are available, it is not difficult to insulate the house with foam on your own. The main thing is to wait for good weather and observe safety precautions when working at height.
Tips on how to properly insulate a house with foam
Even long before the onset of cold weather, each owner begins to prepare his house for winter. Someone decides the question simply: with the appearance of subzero temperatures, he sets the heating to the maximum, but even this may not save in severe frosts, and today you have to pay a lot for energy resources. Therefore, it is logical first of all to carry out effective insulation. By spending a certain amount on it once, you will pay less for gas or electricity.
Housing must be properly insulated. So that the warmth does not escape from the house, today there are many possibilities, including the most modern technologies, for example, sprayed technologies. But in fact, polystyrene still remains one of the most demanded. Some are insulated from the inside, but from the outside it will be more correct in all respects. You can read more about this in our other articles. And also watch the video.
Knowing the technology, you can insulate your own home with your own hands.This will require the appropriate tool and material. From the tool you will need:
- hammer drill or powerful drill;
- knife - it needs to be sharpened well;
- spatulas to putty foam;
- a hammer.
The correct device of the so-called thermal fur coat includes covering the surface of the walls of the house with a kind of flaky, if possible, hermetic cake on an adhesive basis.
The main material is actually the foam itself with a thickness of at least 5 cm of the 25th density, and if the density is higher and the foam itself is thicker, then this will be correct. To insulate the walls with foam, you will need fasteners: nails, plastic dowels, while the dowel should enter at least 0.5 cm.You can use self-tapping screws and dowels, and so that they do not completely enter the foam, make metal linings with your own hands.
Before purchasing the material, carry out careful measurements of the walls to determine the required number of slabs.
You will also need assembly glue: you can use the one used for gluing ceramic tiles. Various adhesives for expanded polystyrene have shown themselves very well in recent years. Using them can make your work more efficient. After the completion of the foam insulation work, the entire surface will need to be covered with a reinforced mesh with a cell of 0.05 cm, so it will also need to be purchased in advance. You will also need a primer and putty or decorative plaster for wall decoration.
Preparation for wall insulation ↑
Having all the necessary materials and tools, do not rush to immediately fix the plates. There is still preparation to be done. If there is old finishing material on the surface of the wall, then it must be removed. The walls themselves must be very even, otherwise, in places where there are depressions, there will be voids and the insulation can break through with an accidental impact. It is normal if the tolerance for wall unevenness is ± 1-2 cm.
Video lesson: stages of wall insulation ↑
Do I need to be primed?
Definitely - it is better to prime. However, if the budget is very cut, then you need to look according to the circumstances: if the wall is flat and nothing is pouring out of it, then you can skip this operation. And if you removed the old cracked material, and the house continues to crumble, then it will be correct to thoroughly clean the plane of the wall, and then prime it. If the house is old and the wall does not cease to crumble after a long cleaning, then you will have to prime it with deep penetration soil using a sprayer, and then plaster it, adding PVA glue to the solution. As you can see, it is easy to prepare the walls before insulating the house with Styrofoam, but before insulating the roof with Styrofoam, you need to do a lot more preparatory work.
What needs to be done before the walls are insulated? ↑
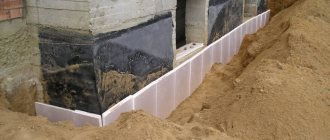
Before starting the main work, you need to solve the issue of ebb tides on the windows and external slopes. The ebb must be installed so that it protrudes 4 centimeters, otherwise water will get on the wall. If there is a void under the windowsill, then it must be eliminated: fill it with the same foam. Insulate the outer slopes with a sheet of foam plastic of a lesser thickness than for the facade. Moreover, it should protrude beyond the plane of the slope by about 1 cm.
We start to insulate ↑
There are no particular difficulties in warming with foam plastic at home, so that almost everyone can do it with their own hands if they wish. The work consists of the following stages:
- the glue is diluted with water to an average consistency;
- using a notched trowel, the glue is applied to the wall of the house, but not on the entire surface at once, but for now only under one sheet of foam;
- the sheet is firmly pressed against the wall;
- secure by driving dowels in opposite corners and in the middle. The holes for the fasteners should already be drilled using a hammer drill.
Further - everything is the same. Glue is applied to the joints. Cut off pieces of foam only with a sharp knife, a power tool is inappropriate here.
We mount a reinforced mesh ↑
In order to properly install the reinforced mesh on your house insulated with foam plastic, you need to cut it into strips, and then glue it using the same technology as the overlapping wallpaper. The mesh is jammed during work, so it is better to level it with a spatula. For a better fit of the mesh to the foam, it should be primed.
Video: Secrets of quick styrofoam stickers on walls ↑
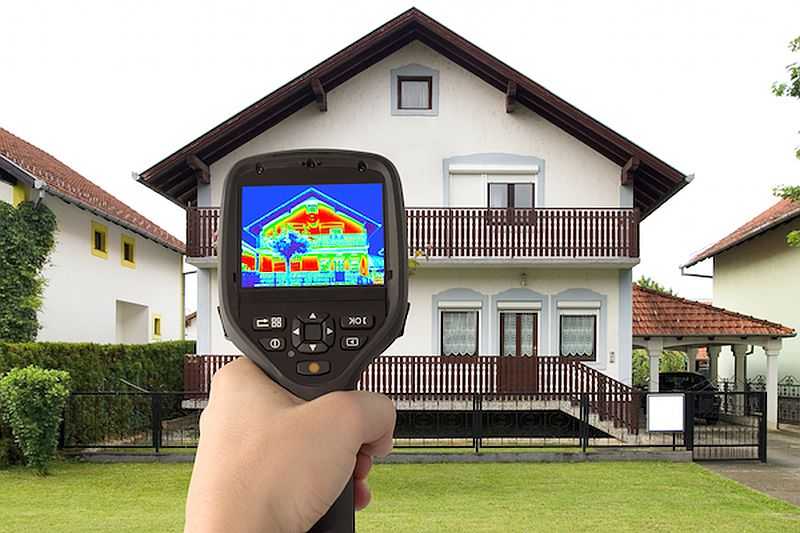
Video: what are thermal imagers and their application in construction ↑
Thermal imager - a device designed to monitor the temperature distribution of the investigated surfaces. The temperature distribution on the object of study is displayed on the screen of the thermal imager in the form of color fields — a specific temperature corresponds to a specific color. The monitor usually displays the temperature range of the surface entering the lens. In recent years, thermal imagers have been actively used in the construction industry to locate heat leaks. Thermal imager - a new word in construction:
So you learned how to insulate the house with your own hands, but in order for everything to have a complete look, you also need to plaster it with decorative plaster or apply an external finishing putty, and paint it on top.
teplolivam.ru