Siding nowadays occupies one of the leading places among the materials for cladding houses. It is not only an excellent element of the appearance of the house, but also contains the property of insulation.
Additional insulation of the house is the main goal of the owners, because no one has ever refused additional comfort and savings on heating!

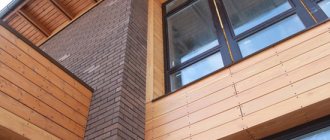
House cladding
Siding for house cladding
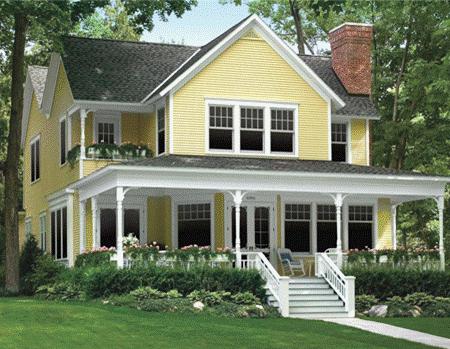
This design option is not chosen by chance. This material is capable of performing not only a protective function, but also looks very interesting and aesthetically pleasing. Facade cladding provides excellent protection to walls from atmospheric agents, improves the appearance of the house, perfectly hides some imperfections, irregularities, surface defects, which is especially important in old buildings.
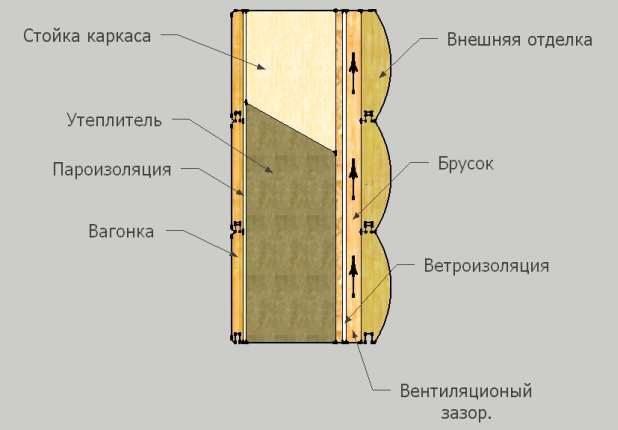
Externally, a siding wall looks like a planked wall.
Siding consists of strips of various widths and lengths, equipped with latches. Thanks to this, they are easy to attach to each other. The length of the siding can be up to 6 meters, and the thickness reaches 10 millimeters.
Siding house cladding technology
- All of the following points are general. The feasibility of carrying out individual works, the choice of material parameters (for example, the thickness of the insulation) is determined on the spot, based on the deterioration of the building, its location, the climatic conditions of the region, and so on.
- An instruction is only a certain algorithm of actions, the sequence of which is unchanged. But the nuances of the work (for example, how to make caulking) at each stage are determined individually for each house.
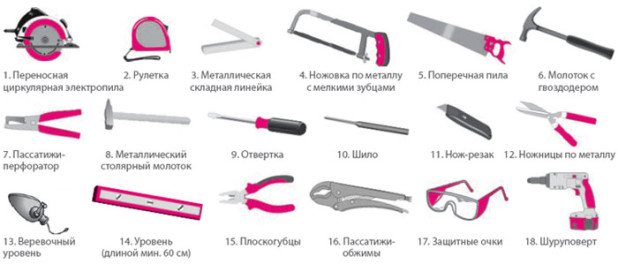
Siding Installation Tools
Preparation
- Dismantling everything that closes the walls. They should be "bare" to the base (tree).
- Surface cleaning. Everything is removed - paint, adhering pieces of plaster, dust, old material with which the cracks were sealed.
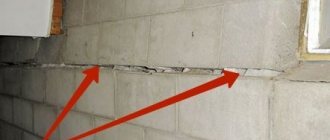
- Visual inspection around the perimeter. At this stage, all damage to the wood is identified and ways to eliminate defects are determined. It may be necessary to replace a couple of logs (beams), a window block. But if there really is such a need, then it is better to do it right away, and not postpone until the next repair.
- Processing with special / compositions. For wooden buildings, these are not only antiseptics, but also fire retardants.
- Caulking. Even if at first glance this is not required, additional insulation still does not hurt. Especially when you consider that any material has its own shelf life. The whole caulking process is described in detail here.
Vapor barrier
The material should cover the entire perimeter of the building. It is best to "fasten" it to the wood with staples - it is safer than nails. This means you need a stapler (construction). The simplest one will cost no more than 1,150 rubles.
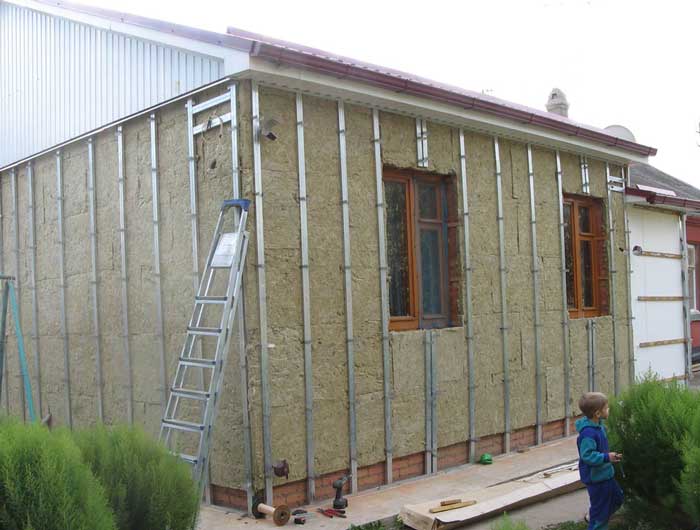
Supporting frame
Considering that the walls of wooden buildings have the correct geometry, siding fastening is not difficult. The question is - from what to build a frame-crate? There are 2 options - wooden slats and metal profiles (aluminum guides). What's better?
From a practical point of view, wood should not be used. Why?
Firstly, such slats, unlike metal ones, are not perfectly flat (along the longitudinal axis). They all have some kind of curvature. For example, after drying during storage. Consequently, the frame itself will be somewhat curved. When attaching the cladding board, this will become noticeable.
Secondly, since the work is outdoor (and this is, among other things, dampness on the street), in the process of operation, the crate can "lead". The result is deformation of the siding.
Taking this into account, the author considers all the recommendations for the installation of a wooden lathing to be not entirely correct. And what to do is up to you, dear reader.

What to consider when installing siding:
- All parts (guides, strips) are not attached close to each other. The optimal gap between them, taking into account thermal deformation, is of the order of 3 - 5 mm.
- Fasteners (self-tapping screws) are used only in brass or steel with a protective coating.
- If the length of the rail is not enough, then a composite guide is made. With vertical assembly, the upper profile should overlap the lower one (overlap of the order of 3 - 4 cm).
- In the area of openings, J-type profiles are mounted. To create a contour, they are stacked either with an overlap, or end-to-end (with preliminary trimming at the ends under 450).
What to focus on when choosing cell sizes
- The length of the siding boards.
- Insulation dimensions.
This should be determined at the preparation stage. Make a plan for each wall and draw it in a grid. If you first clarify the linear parameters of commercially available materials, then it is not difficult to choose the optimal frame geometry.
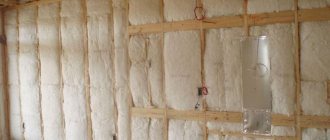
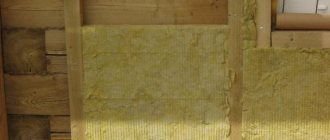
House insulation
And again the question - what to choose? It is not worth using expanded polystyrene as a heat-insulating material, despite all its advantages. Its slabs have a dense structure, and it will not let the wooden walls "breathe". The best option is mineral wool. Its plates are somewhat compressed and inserted into the cells. Straightening, they are fixed in place rather rigidly. The process of insulating the walls of a wooden house is described in detail here.
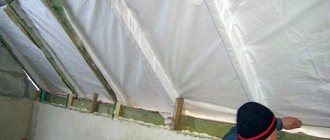
Waterproofing
It is fixed on the crate in the same way as a vapor barrier with staples. To reduce the number of joints, it is advisable to buy membranes rather than roll materials. Calculated to completely cover the wall.
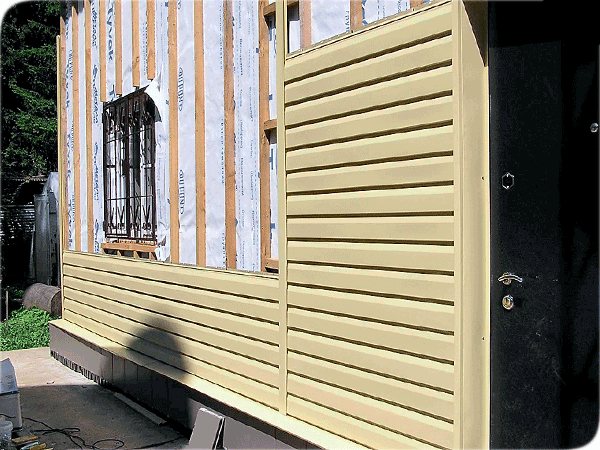
Siding installation
The manufacturer encloses the instructions, so it makes sense to indicate only the main points.
- The work is carried out from the bottom up. All boards are laid out horizontally. The lower part of the first is fixed on the starting plate (with a latch), and the upper part is fastened with self-tapping screws. They must be placed every 35 - 40 cm exactly in the center of the holes. They have an elongated configuration, and with thermal deformation of the siding, they will provide free longitudinal displacement of the workpiece along the axis. For the same purpose, the fasteners are not screwed tightly into the rail.
- All other boards follow the same principle.
- The upper (finishing) bar is mounted above the latter.
Helpful hints
When planning finishing work, you should familiarize yourself with the weather forecast. If precipitation is expected in the coming days, it is better to adjust your plans. As already noted, after dismantling the old cladding, the walls should dry out. In the cold season, PVC siding cannot be dealt with, since at low temperatures the material breaks down quite easily.
All specific information must be examined. For example, how to calculate the correct amount of siding? After all, the boards will have to be cut, revealing areas with complex geometry. What are additional elements and which ones will be needed? How to properly mount a metal profile? There are a lot of questions.
By doing the cladding with your own hands, you can save well (up to 40%) by refusing the services of specialists. This is a plus. But there is also a minus - the lack of practical experience. And this will begin to affect even at the stage of preparation. It is unlikely that a person who has not previously dealt with facade finishing will be able to accurately calculate not only the required amount of basic materials (insulation, sheathing boards, etc.), but also everything that is called additional elements. What to advise?
2017-10-17 Evgeny Fomenko
Calculation of the amount of material
When the construction of a house has come to one of the final stages - external wall cladding, then when using such material as siding, it is necessary to carry out careful calculations on its quantity and volume of accompanying materials. Only in this case, the cladding of the house with siding with insulation with your own hands will be done competently and efficiently.
Pros and cons
The positive qualities of siding facade decoration include:
- Long service life.
- Minimal care.
- The ability to use this material on almost any surface.
- Siding does not lend itself to decay, corrosion, microorganisms.
- Convenience and ease of installation.
- Strength.
- Attractive appearance.
- Relatively low cost.
Each type of siding has certain disadvantages:
- Metal siding is difficult to transport as the sheets do not bend. In addition, this material is not elastic, and when a dent appears, it is difficult to fix it.
- Wood siding is not resistant to environmental influences and needs protection. It is highly flammable and not suitable for use in humid environments.
The most common vinyl siding, it also has its drawbacks:
- Immunity to mechanical damage.
- Difficulty of replacement. You cannot remove the sheet separately and change it, you will have to change a large area.
- Large coefficient of expansion when changing temperatures (you have to solve the problem with the use of gaps between the sheets).
- Poor thermal insulation.
- The material melts with strong heating.
Calculation of the required amount of material and accessories
To calculate the cladding, the simplest formulas are used
After choosing the appropriate type of cladding, it is advisable to calculate the amount of material required. You can calculate home siding using several options, each of which has its pros and cons.
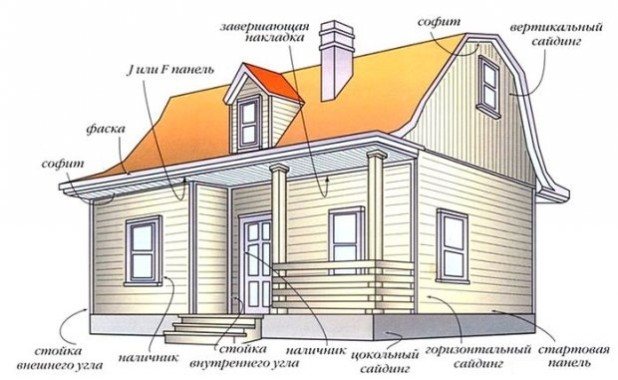
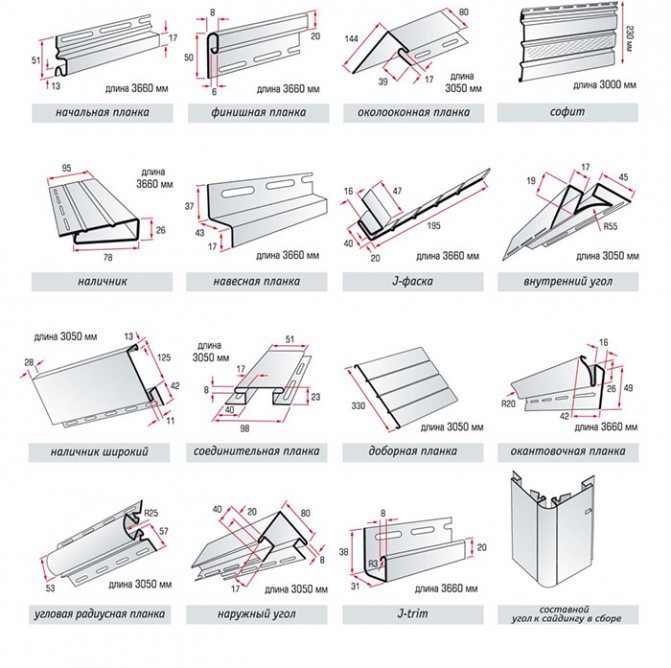
Siding of a wooden house is made using the following components:
- outside corners - sold in a standard length of 3 meters. To save on corners, trims are often used - however, in this case, seams between individual elements will be noticeable, which will have a bad effect on the design. As a last resort, trim can be applied on the side of the house invisible to passers-by. However, one should not forget that the corners are not only a decorative, but also a protective element. To calculate the quantity, you should measure the lengths of the outer corners of the house, and divide the resulting value by 3 - as a result, we get the number of required products;
- internal corners - the lengths of these corners are measured and, as in the previous case, the resulting number is divided by 3;
- starting strips - the entire perimeter of the house and the sum of the values of the openings for the doors are measured. The second is subtracted from the first number. The result is divided by 3.8 meters (standard length of products) - the number of required starting bars is obtained;
- special J-profiles - have a standard length of 3.8 meters. Installed in places where additional outbuildings are adjacent to the building;
- strips for window openings - length 3 meters;
- window tides - such tides are already available on plastic windows. But if the windows are of a different type, ebb tides will have to be installed additionally;
- finishing strips - these products are designed to attach the eaves on the roof to the walls;
- h-profiles - parts are connecting elements for joining siding panels together. When performing installation work, do not overlap the products, without using H-profiles. Lap joints are not weather resistant. Plus, connections without H-profiles just don't look good.
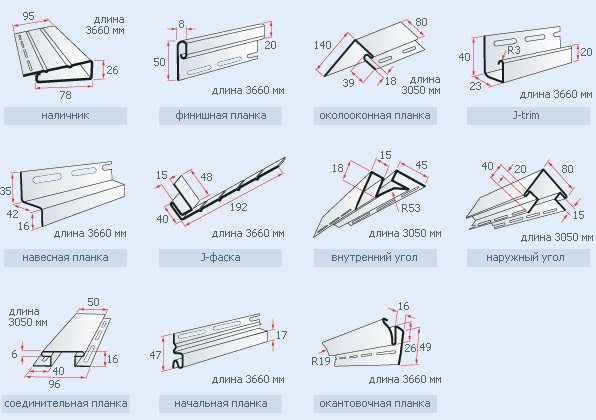
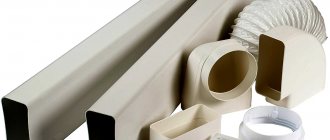
The following additional elements are used in house cladding
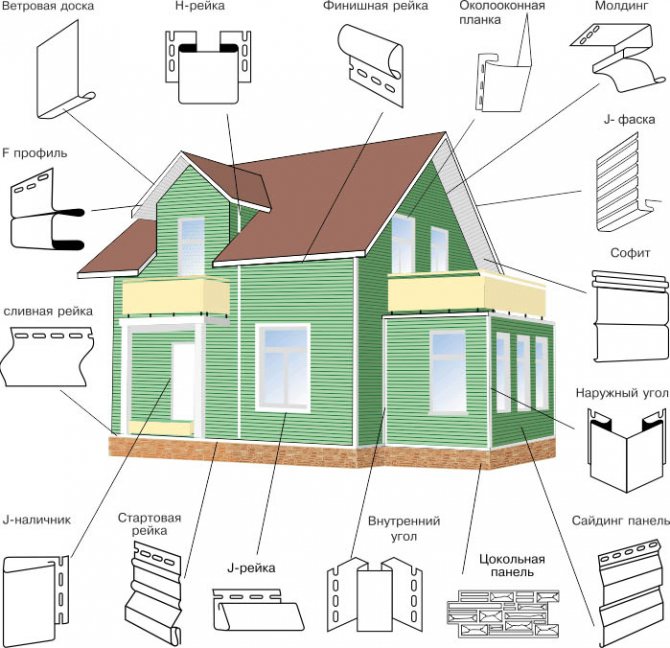
Schematic arrangement of additional elements when installed on a building
There are more specific details:
- a drain bar is an alternative to window sills;
- wide J-profiles, or platbands - are installed around windows and doorways, if they are in the same plane with the walls of the building.
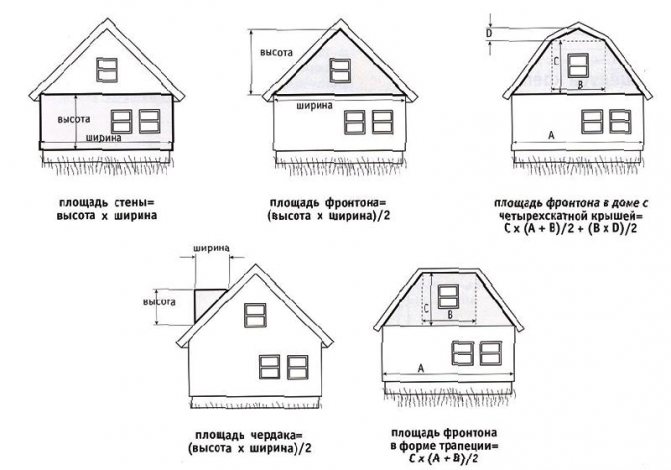
Finally, the main element will be ordinary siding panels. There are two methods for calculating their number:
- The total surface area of the walls on which the siding will be installed is calculated. The area of openings for doors and windows is subtracted from it. The resulting number is divided by the area of one siding panel.
- To save more material, you should draw a diagram of the walls of the building on a certain scale. Further, in this diagram we draw siding panels, reduced in the same scale as the proportions of the walls of the building. This way, you will see what small areas are left uncovered by the solid panels - they will be filled with scraps. Despite the full adherence to the technology of finishing a wooden house, it is possible that a certain number of panels will be damaged during installation. To take this into account, you should buy 5-10% more products than necessary.
In addition to the main components of the finishing material, you will need galvanized steel screws. Usually, 1 sq. m of siding requires 20 self-tapping screws. The length of each self-tapping screw should be 25 - 30 cm. It is imperative to use washers so as not to damage the surface of the cladding.
In principle, nails with similar characteristics can be used. However, this is not recommended as there is a high risk of damaging the sheathing when hammering in nails.
In addition, the technology of installing vinyl siding requires that the screws or nails do not enter completely - it is required to leave a thermal gap of 1 - 2 mm. Screwing in a self-tapping screw to the desired distance is much easier than driving a nail, especially if an automatic screwdriver is used.
Required tools and materials
It is first necessary to determine the area of the walls and the type of roof in order to correctly calculate the amount of material.
Before starting work on cladding a house with siding, you should prepare the necessary materials and tools.
For installation you will need:
- Bulgarian.
- Metal knife.
- A hammer.
- Screwdriver.
- Drill and hammer drill (when working on concrete walls).
- Screwdriver.
- Roulette, better laser. If it is absent, you can take a level and a square.
- Ladder.
Types of thermal insulation materials
The decision to sheathe the house with siding allows you to simultaneously insulate the walls from the outside. For these purposes, you can use various materials that differ in shape and method of installation:
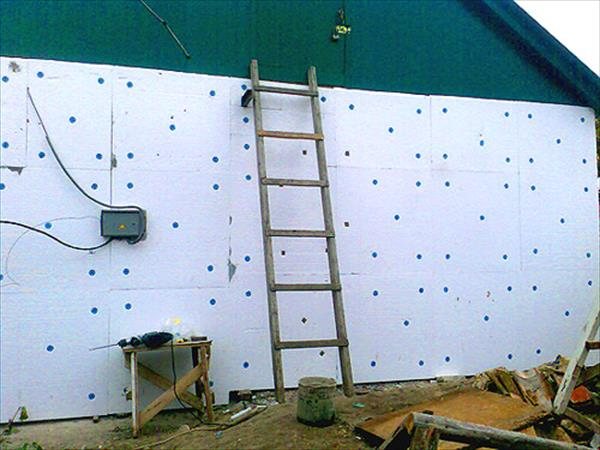
- Polyfoam is lightweight, easy to attach and has an affordable price. Its service life is limited to 10-15 years, after which it begins to deteriorate. In the event of a fire, the material burns and releases toxic gases.
- Mineral wool is available in rolls and slabs. It retains heat well, absorbs noise, passes steam well (allows walls to breathe), does not burn. Basalt wool, which has excellent characteristics and makes it easy to work with, has proven itself best. How to use it to insulate a house, see the video.
- Extruded polystyrene foam has good thermal insulation properties, is not afraid of moisture, provides sound insulation, and has a long service life. Dangerous when burning, as it gives three times more heat than wood.
- Polyurethane foam is a lightweight and durable universal insulation. The liquid mixture is sprayed directly onto the surface to be insulated, where it foams and solidifies, taking the shape of the surface. The material has good adhesion, does not rot and is chemically neutral. Outside wall application requires the involvement of professionals and special equipment, it cannot be done on your own.
Preparatory work
Preparation for house cladding includes the following types of work:
- Dismantling of protruding parts (door frames and window openings, ventilation grilles).
- Possible cracks in the walls in the area of windows and doors are sealed. For this, you can use cement mortar or polyurethane foam.
- If an old house is being cladding, all of the old cladding should be removed. Prepare the surface: clean it from dirt and dust, chipped plaster, remove mold, replace possible rotten areas and treat them. Houses made of wood should be pre-treated with antiseptic agents, and the foam blocks should be coated with a primer.
The surface must be flat and clean. Although the siding can hide small defects.
It is very convenient to build a special assembly table for work, it is installed under a canopy. A circular saw is attached to it. Here, the material itself can be stored on pallets.
Preparatory procedures
Before starting finishing work, the walls of the house must be carefully prepared for cladding by following the following procedures:
- Remove items that can complicate the finish: downpipes, curtain rods, outside lights, ebbs, window and door shutters.
- Free walls from climbing plants, non-functional protrusions, pins, nails, and other fasteners.
- Cover holes, crevices and cracks in the walls using either silicone sealant or regular tow.
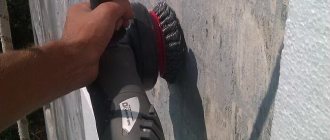
- Level the walls: remove loose plaster and prime the surface with a primer to eliminate possible wall level drops.
- Clean the primed surface and treat it with moisture-proof and antiseptic compounds. Subsequent installation work can only be started after these finishing wall coatings are completely dry.
Important! If a wooden house is sheathed, its facade must be additionally coated with a fire retardant primer.
How to sheathe a house
Siding installation is carried out in several stages:
- Surface preparation.
- Frame or lathing device.
- Creation of a steam, hydro and thermal insulation layer.
- Installation of siding sheets to the crate.
Many are trying to replace the frame with a crate, it is extremely undesirable to do this for the following reasons:
- The frame allows you to hide the unevenness of the surface of the house.
- Thanks to it, you can make a thermal insulation layer, since the siding does not have sufficient thermal insulation.
- There is space between the material and the wall of the house, so that air can pass freely. This will provide protection against mold and mildew.
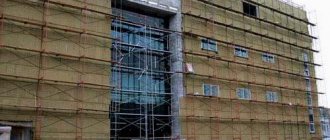
The choice of insulation and its installation
Not any heat-insulating material is suitable for insulation. It is also worth noting that such heaters as expanded polystyrene or polystyrene foam will need to be selected depending on the pitch of the frame racks.
The use of mineral wool avoids such problems, but its cost is higher. The exact thickness of the insulation is determined using a heat engineering calculation.
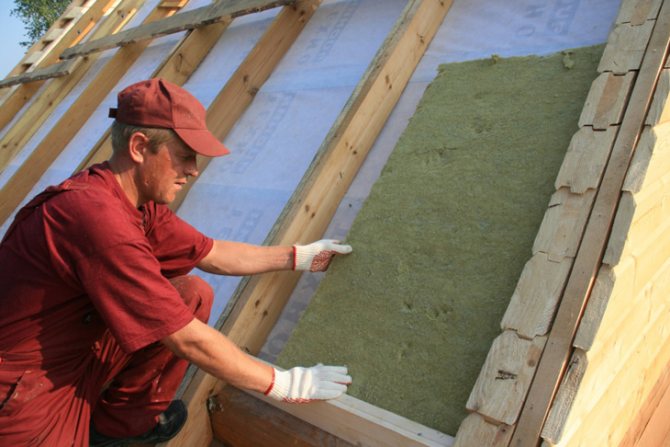
Insulation is laid strictly between the frame guides
Most homeowners, before sheathing a wooden house with siding, will probably find out that siding may not have its own insulation layer, so the installation of insulation is required if the region experiences freezing temperatures.
Thermal insulating material is inserted between the battens of the battens. Individual plates can be attached with self-tapping screws. It is recommended to secure the upper part of the insulation with a thin strip.
Step-by-step instruction
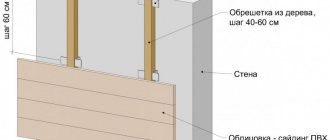
- The choice of material for the frame. The material for the lathing is selected depending on the material from which the walls are made. For a house made of wood, you should take wooden blocks, and on concrete walls or made of foam blocks, it is more advisable to purchase a metal profile with galvanization. It will allow you to secure the siding with high quality and ensure a long service life.
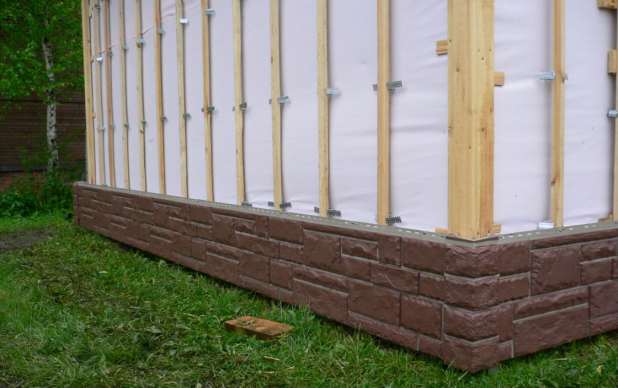
- Wireframe creation. A starting profile is installed at the basement, and a finishing profile should be placed at the top of the wall, at the roof. They must be connected to the longitudinal profiles using larger self-tapping screws - 9.5 millimeters. In this case, it is better to purchase self-tapping screws in the form of a drill, and not just with a pointed end. The battens should be fixed directly to the wall surface. For this, dowels are used, they are inserted into previously prepared holes, which are drilled with a perforator. The longitudinal profile should be fastened in 35-40 centimeters increments. In the area of window openings, window strips are attached, and doorways are edged with J-profiles. The vertical elements are not fixed close to the basement and the roof; it is necessary to leave gaps of up to 6 millimeters so that the guides do not bend when the temperature changes.
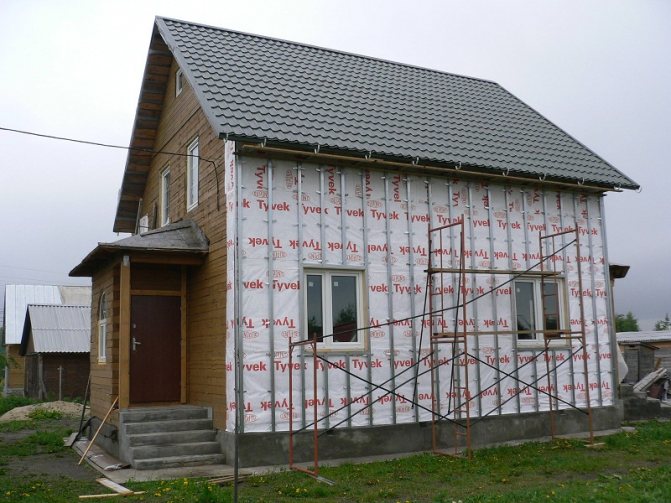
- Creation of a waterproofing layer and lining of insulation. Waterproofing is required for walls made of wood and aerated concrete blocks. It is advisable to use a moisture and windproof membrane that can be attached directly to the wall of the house if no thermal insulation layer is created. Then there is space between this layer and the siding for ventilation. If thermal insulation is created, then the waterproofing is attached to this layer. And then an additional crate is created to provide ventilation of the sheathing.
- Installation of panels. The panels should be installed only after all elements of the lathing and guides are fixed in place, heat and waterproofing is created. The first row of panels is attached to the starting strip. From below, you need to install the element until the lock clicks, and from above it is fixed on the guide using self-tapping screws. Fastening is carried out strictly in the center of the grooves on the siding, with a step of about 40 centimeters. The remaining panels are also fixed in the bottom-up direction, from the plinth to the roof or window opening. They should not be rigidly fixed, the panels should "walk" a little from side to side. The top row should be attached to the finish bar.

The actual installation of siding
Installation should be started from the doorway.
The first siding panel is attached at the bottom to the starting plank, and the top edge is fixed with nails or screws.
Advice! It is worth using self-tapping screws with electric screwing. It's faster but also safer. The hammer can inadvertently damage the siding panel when struck.
Further, the same principle is implemented. The rest of the panels overlap the previous panel. It is best to leave a distance of 5-6 millimeters at the junction with the corner strip.
It so happens that the length of the panel is not enough for the length of the wall. When such a situation arises, it is worth joining them using a special interconnecting rail.
Panels that are mounted under or above a window usually require a slight adjustment. To do this, the panel is applied to the desired place, the length and depth of the cut are marked, and then it is cut out with the help of tools. After that, the panel is attached to the place using a near-window strip.
The installation of the last external siding panel is carried out in this way: the final rail is attached at the wall level, after which the siding panel closes in the remaining place with a characteristic click or slight crunch. The top is closed using the same technique.
At the end of the article there will be video files that describe many of the nuances of this laborious process.
How to sheathe a house with insulated siding
Thermal insulation should be done in wooden and concrete houses, as well as when creating a ventilated facade. Correctly install the insulation between the longitudinal guides.
This layer is done as follows:
- A vapor barrier is laid on the wall.
- Next comes the thermal insulation material.
- A waterproof membrane is attached on top.
To fasten the material, one more crate should be created, the guides in it are fixed horizontally.Or there is an option to make a recessed lathing, the width of the guides should exceed the layer of thermal insulation.
Preparation before cladding a wooden house
Before sheathing your wooden house from the outside, you need to prepare the facade for subsequent work.
The list of preparatory actions includes the following dismantling work:
- removal of plants from the facade;
- removal of tree branches that may interfere with installation in the future;
- removal or replacement of rotten boards and frame elements of old cladding;
- removal of old cladding;
- checking the frame for verticality using a level.
Since a ventilated facade implies the presence of a frame and additional protective layers, then they need to be mounted.
Advice
When installing panels, the following points should be taken into account:
- It is advisable to start sheathing not immediately after the construction of the house, especially if the structure is made of wood.
- Ideal for fixing panels are aluminum nails. They should be placed strictly in the center of the elements.
- It is better to cut the panels with an electric saw or a hacksaw.
- Be sure to use a level for a smoother device.
- It is not necessary to tightly fasten the elements of the cladding material to the frame; it is necessary to leave gaps between the nails and the material, at least 1 millimeter.
- The fixing holes on the panels are made in an elongated shape. This allows the siding to move freely with changes in temperature.
Fastening siding
Siding is not the cheapest type of building insulation. Siding panels are subject to significant thermal expansion. Under the influence of external temperatures, the siding "walks". They are mounted from below, having previously fixed the starting rail in level.
The panels are fixed with self-tapping screws, screwing them into the middle of the mounting holes. Each subsequent part is snapped into the groove of the previous one.
During winter installation, the gap between the panels should be increased to 8-10 mm, which will compensate for the temperature movement of the supporting structures.
Avoid the following mistakes during installation:
- panels cannot be mounted side-by-side. Without clearance for thermal deformation, the siding coating will warp or lead;
- it is not recommended to fix self-tapping screws along the edges of the panels, which can lead to its breakage;
- the starting guide must be fastened tightly and strictly in level, otherwise the coating will be damaged.
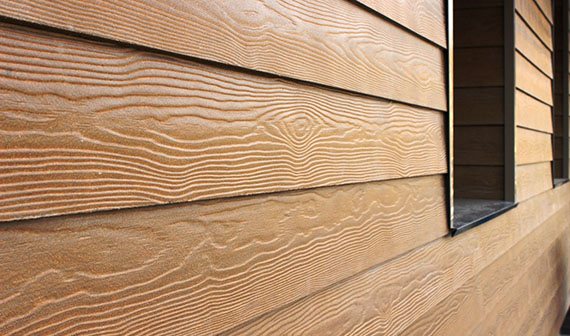
Cement siding
This is one of the newest types of siding. In its manufacture, cement is mixed with cellulose fibers. The mass is exposed to high temperatures and, as a result, a highly durable and reliable siding is obtained. This material is used for facing cottages, private houses. It is produced in the form of panels on which a texture pattern can be applied. The advantages include resistance to sunlight and wind. This fire-resistant and moisture-resistant material is not afraid of temperature extremes and rotting. Cement siding is easy to cut and drill. There are no knots, cavities in it.
Installation is most often done on a wooden or metal frame, or directly on walls made of timber, stone, brick, etc. Cement siding should be installed at least 150 mm above ground level. Each subsequent row should not overlap the previous one by more than 30 mm. For fastening, galvanized screws or nails are used.
Cement siding is very popular today, and soon it will certainly take one of the first places among finishing materials.
Wood siding
This is the most expensive type of this material group. Its main advantage is environmental safety. It is distinguished by its high aesthetic, practical and ergonomic properties. Disadvantages of the material are high cost, high maintenance costs and short service life.
Wood siding is produced in the form of panels with a maximum width of 155 mm and a length of up to 5.5 meters. It is made by high-tech pressing of wood fibers.The binding component is additives. They ensure the strength of the material and its water resistance. The topmost layer consists of five layers of paint. Wooden siding perfectly imitates valuable wood species. The color range includes 28 shades.
Finishing cost
Today, many companies offer their services for siding houses, cottages. The price of such work depends on the cost of the services of this company, on the complexity of finishing, the cost of the material, the size of the building. If the owner of the house wants to sheathe his house with siding on his own, then he will have to pay only for the material. If he decided to entrust this work to a firm, then, of course, he is interested in how much it will cost.
So, you have decided to sheathe the house with siding. The price of a master's work per square meter ranges from 400 to 600 rubles. The cost of vinyl siding is from 250 to 500 rubles per square meter. The price of metal siding starts at 300 rubles per square meter. Basement siding costs about 400 rubles per square meter.
The price of materials must also include the cost of all additional elements: corners of openings, fasteners, lathing elements.
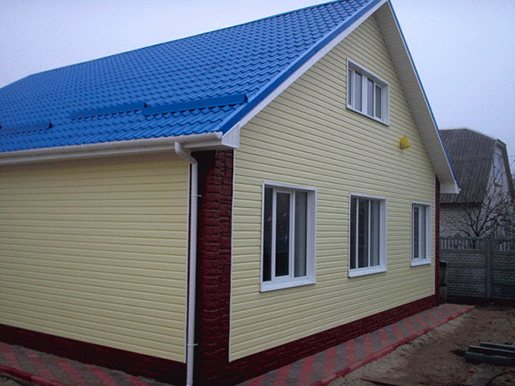
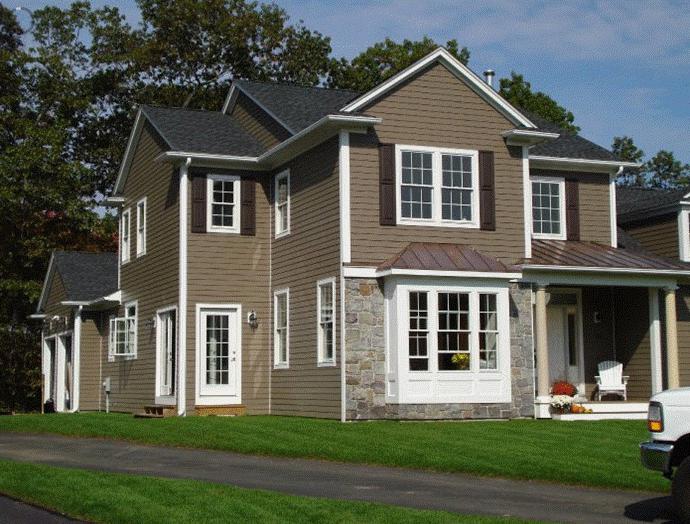
Photos of houses clad with siding can be seen in specialized publications. Some photos are presented in our article.
Today we tried to tell you how to sheathe houses with siding, how you can do it yourself. We hope that our information will be useful to you.
Advantages and disadvantages of siding
Such a finishing material as siding has several varieties, each of which, in turn, has a number of pros and cons:
- Made of wood. It is an environmentally friendly, natural material that can withstand low (up to -500C) temperatures, it is quite convenient for installation. But at the same time it can quickly ignite, therefore, it requires additional processing, and is also not suitable for insulation in wet areas.

- Wood pulp. Environmentally friendly, natural, in demand for arranging ventilated surfaces, has a low cost, but at the same time has a short operational life.
- Vinyl. The most popular type. Manufacturers of such material guarantee a long service life, up to half a century. It has good resistance to temperature extremes, corrosion, external damage and ultraviolet light. Non-toxic and non-flammable. It is produced in a wide range of colors, while the ratio in terms of quality and price is very acceptable. Among the shortcomings, one can note the speed of melting, the cladding requires additional vapor and waterproofing, replacing one panel requires disassembling a part of the already clad surface.
- Metallic. Relatively inexpensive, but durable, fire-resistant material that practically does not fade from sunlight. Easy to install, can hide various communications, as well as mask irregularities and defects in the walls. The main disadvantage is the relative fragility of the outer polymer coating. If it is accidentally damaged, then corrosion may soon form in this place.