The first types of ovens
It is worth saying a little about what the first types of this device were. In ancient times, there was an expression "wash in black". This expression came from the fact that the first home-made sauna stoves did not have a chimney. All carbon monoxide was removed from the bath through the door. Despite this disadvantage, the rest of the devices were very practical. They were made from environmentally friendly clay bricks. This material is characterized by a high level of fire resistance. The furnace itself looked like a domed hearth.

Oven requirements
Over time, homemade sauna stoves became more and more popular and acquired new elements, for example, a chimney. Today, there are already formed concepts and requirements that the furnace must meet in order for it to be successfully operated.
- The first is the availability of sufficient thermal power, as well as the possibility of its regulation. It is very important to note here that this parameter is highly dependent on the type of material that was used to construct the building. A homemade stove for a bath with the same power can be perfect for a bar object, but at the same time be completely unsuitable for a frame building.
- The presence of a heat accumulator and a steam generator is considered quite important. These devices are necessary in order to be able to change the mode of heat and moisture.
- There should be practically no materials in the room, whose temperature, when heated, will exceed 150 degrees Celsius.
What are modern metal ovens like?
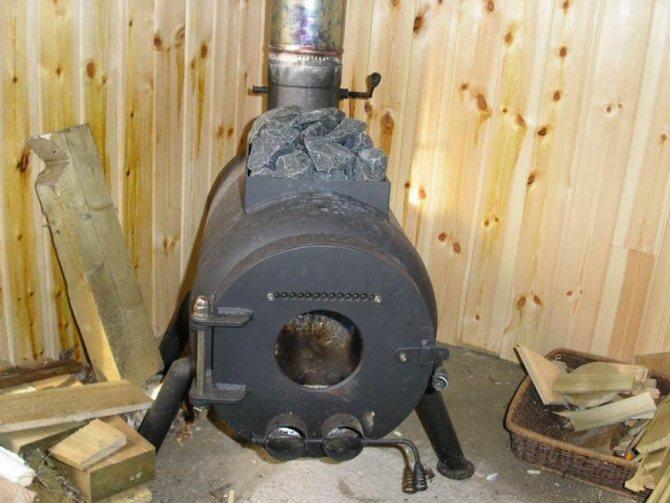
The simplest home-made metal stoves for a bath are the so-called "potbelly stoves". They consist of a box with a pipe and a door, they give little heat, but they require a lot of firewood. We can say that such stoves are simply a relic of the past.
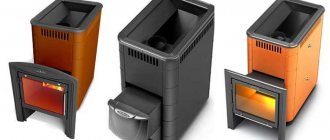
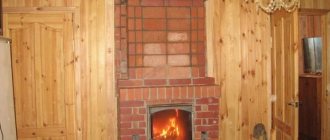
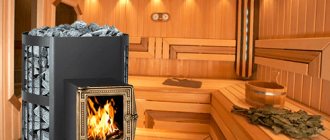
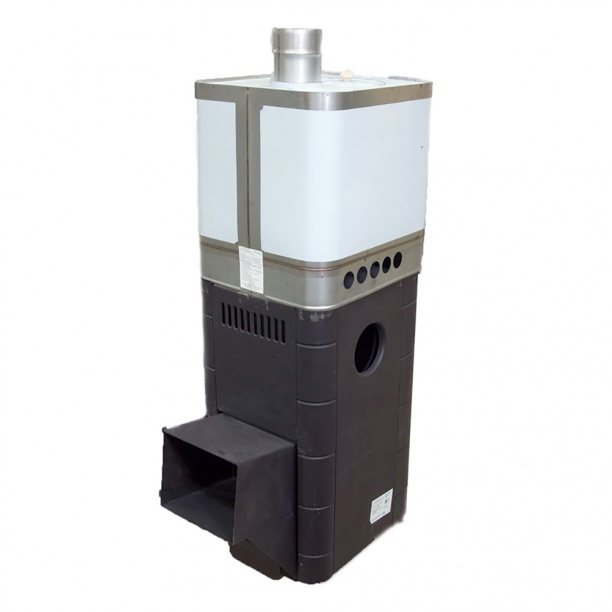
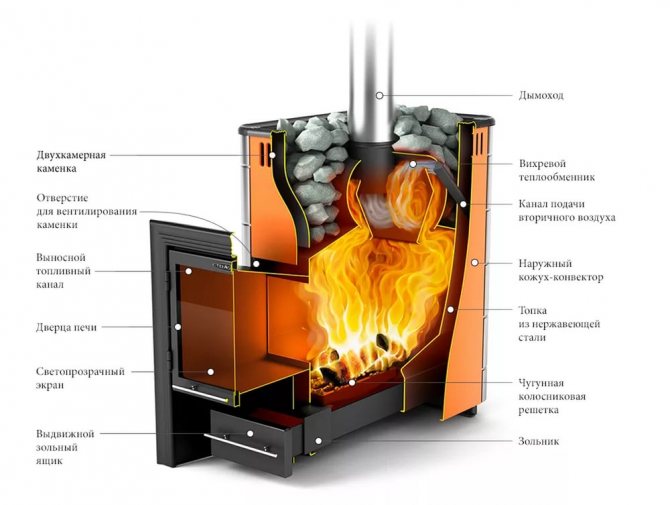
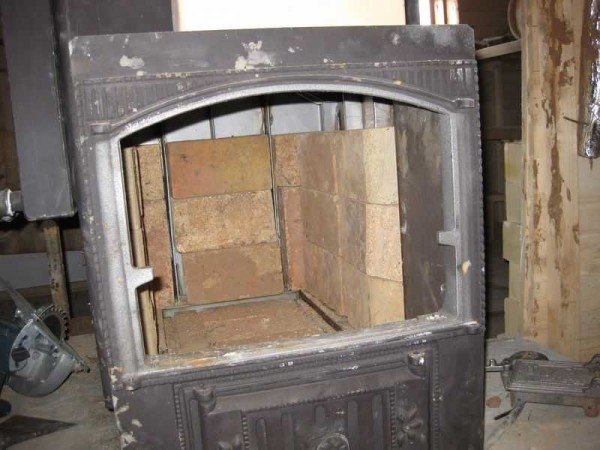
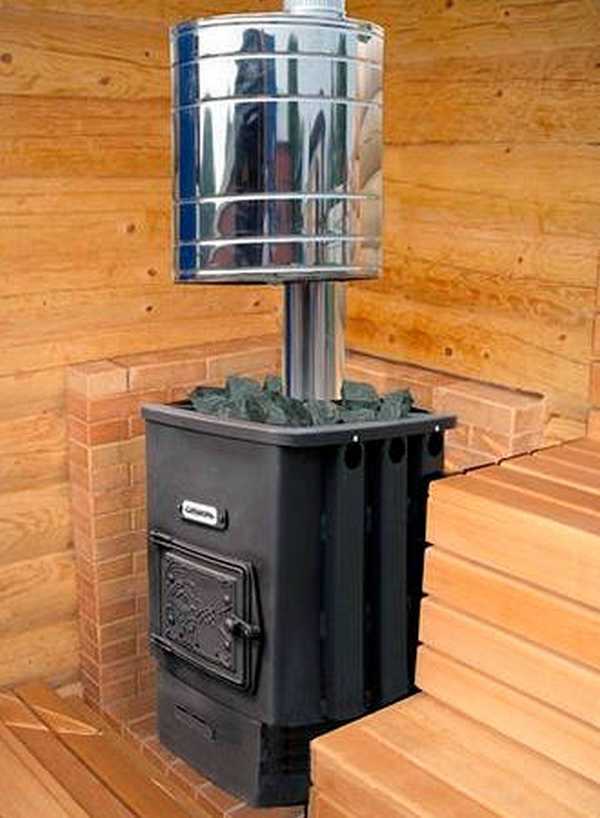
Modern metal sauna stoves are much safer. They are made mainly of sheet iron 4-5 mm thick, with a well-thought-out special thermal chamber for stone backfill. Often their design provides for a water tank - even up to 70 liters in volume. But the most important thing is that a metal furnace is necessarily laid out with refractory bricks. After all, this is the only way to avoid burns and allow the air to warm up evenly.
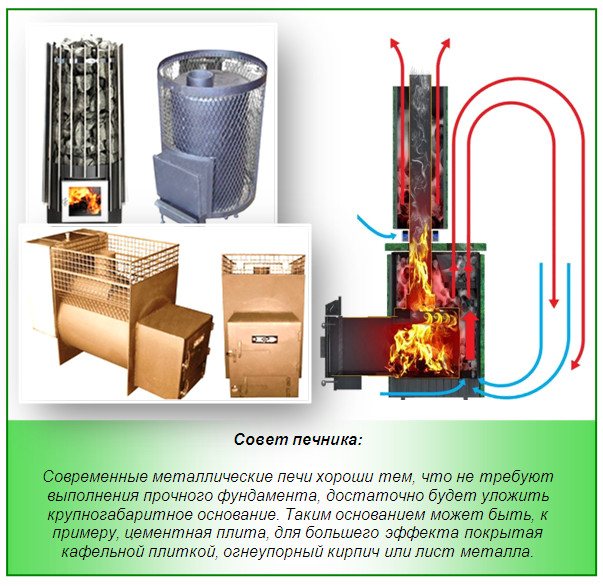
All in all, metal stoves for a bath, drawings are of three types: closed, open and combined. The first one is especially convenient in small family saunas due to its compactness - inside and outside it is built up with red bricks for the sake of heat capacity. The bricks themselves are fixed in it with wire clips, and a grate for stones is installed in the middle of the furnace.
Ovens of an open design have a tank with a smaller volume, and an open heater. A steam room with such a stove heats up much faster, and to increase the heat capacity, the stones are covered with a screen galvanized cover. But the combined metal furnaces are made of steel sheets with a thickness of 3-5 mm and consist of a firebox with two valves, a blower and a grate, and two pipes 10 and 14 cm in diameter, with four holes for a pipe and a bypass elbow. There is an iron stove for a bath of different types and types of fuel:
- Electric
The design of electric metal furnaces consists of a body with heating elements and heat-insulating materials.
- Gas
These are iron sauna stoves with a thermostat for power regulation. A safety device is responsible for the safety of the unit, which instantly shuts off the gas supply if the fire is out.
- Wood burning
Such ovens heat up more slowly, but they delight with the warmth of a real fire and a pleasant smell. But they require a lot of fuel, as well as constant care for them.
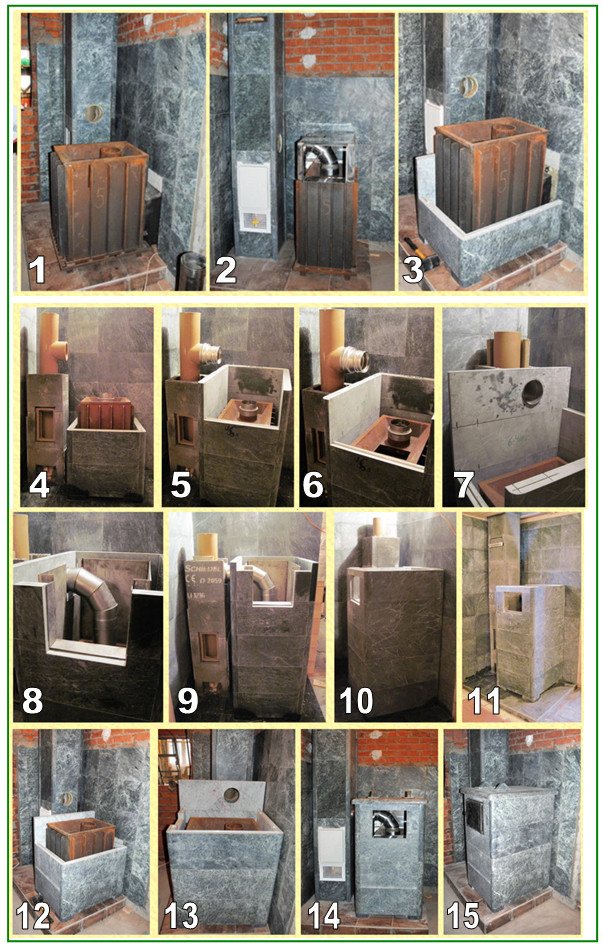
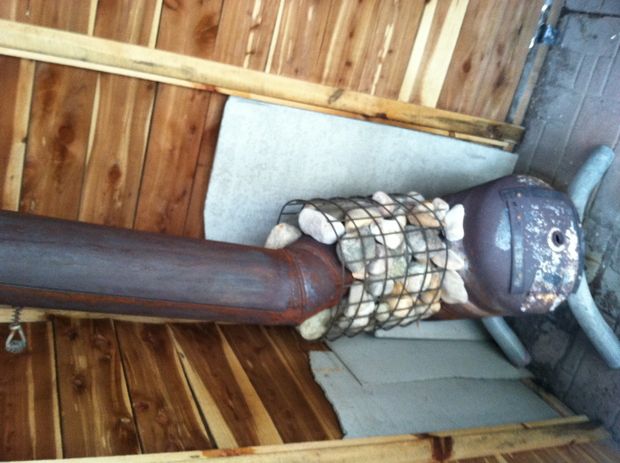
An example of installing a heat-resistant screen on a stove and lining it with soapstone - soapstone
Furnace type
Currently, there are two fundamentally different types of ovens. You need to choose one of them before you start making a homemade sauna stove.
The first option is called a "hot" bath. The temperature of the walls of such a bath can reach 100 degrees. The advantage of this type of stove and bath is that it melts quite easily in a short period of time. This option is perfect for those objects that are used occasionally, rather than on a permanent basis. However, there are also disadvantages to such devices. It is quite easy to heat them up too much, which makes the bath easy to turn into a sauna.
The second option is the "cold" type of oven. The process of kindling such a device is longer than in the first case, but the walls will not heat up too much. The maximum temperature will be 50 degrees, which means that it will be impossible to burn yourself about them. The process of heating a room with a "cold" stove takes longer, since the heating takes place as follows. Special channels absorb cold floor air, which then passes through the furnace firebox, heats up and is already warmed up through the top. This makes it possible to adjust the temperature inside the building.
Types of devices
Material from which it is made
On the market there is a huge selection of stoves for a bath with a water tank of various models and shapes. The most versatile are rectangular and square options. But even a round stove can easily decorate the interior of your bath. The materials for the manufacture of such devices are metals, brick and stone.
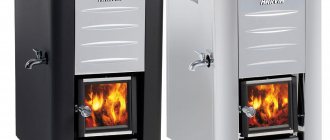
- Metal stoves for a bath with a water tank are made of cast iron or steel. Each of these metals has advantages and disadvantages.
The advantage of a cast iron stove for a bath is the ability of this material to quickly accumulate heat. Heat transfer is slow, which ensures long-term heating of the room. But due to the temperature difference, the cast iron material can deform, which is its main disadvantage. In addition, it is expensive, a steel device will be much more affordable.
Stainless steel oven differs in its heat resistance, compactness in size, ease of installation. In addition, steel, unlike cast iron, does not deform with sudden changes in temperature and will serve you for more than a decade. But the iron furnace may not provide uniform heating, since it has a small heat capacity. In order to eliminate this, the furnace is lined with bricks.
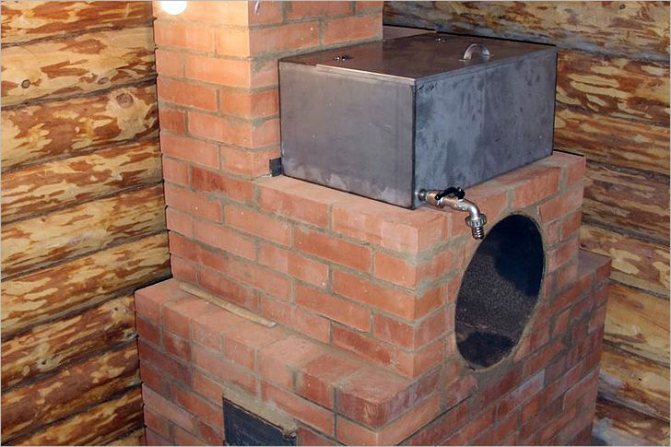
- Brick stoves for a wood-fired sauna with a water tank have a beautiful appearance. They have excellent performance characteristics: heat dissipation, strength, durability, ease of use. The main disadvantage is that you will not find ready-made brick ovens in the store. It is necessary to deal with the development of the layout and manufacture yourself. Or use the services of a master. But the price of such a furnace is quite high due to the cost of consumables.

Furnace fuel type
The most common fuel is wood. They are highly efficient, easy to use, quick to ignite and give off heat. Preference should be given to wood from deciduous or fruit species: oak, birch, alder, cherry, apple. They can be used for aromatherapy purposes.
You can also liquefy conifers, but remember that they emit tar when burned. Its adhesion to the chimney will further lead to clogging with soot.
Sometimes stove owners use coal heating. It burns longer than wood.Even a small stove with fuel in the form of a corner is capable of heating large enough stirrers. But its combustion temperature is also much higher. Therefore, not every construction for a bath is capable of withstanding long-term use of this type of fuel.
Heating a bath with briquettes and pellets is less common. This is due to the fact that they burn out quickly. A large amount of such fuel is required in order to maintain a high temperature in the bath for a long time.
Devices that are not heated with fuel, but from the electrical network are becoming more and more popular. An electric stove can be combined with a wood stove. This way you can select the heating method you want.
Classification of furnaces according to the design of the tank and firebox
- Ovens with a built-in water tank were the first to hit the market. Their design is characterized by the placement of the tank inside the firebox. Taps are made to drain water. Water enters the tank through a special hole. The main disadvantage of this type is that the tank requires constant filling with water. This requires energy and water. The water evaporates and creates moist air, even when not required.
- A hinged oven tank works on the same principle as a built-in one. Only it is placed on the side of the device using special hooks. The boiling of water in such a tank begins much earlier than the bath space warms up. During this process, cold vapor, uncomfortable for a person, is released.
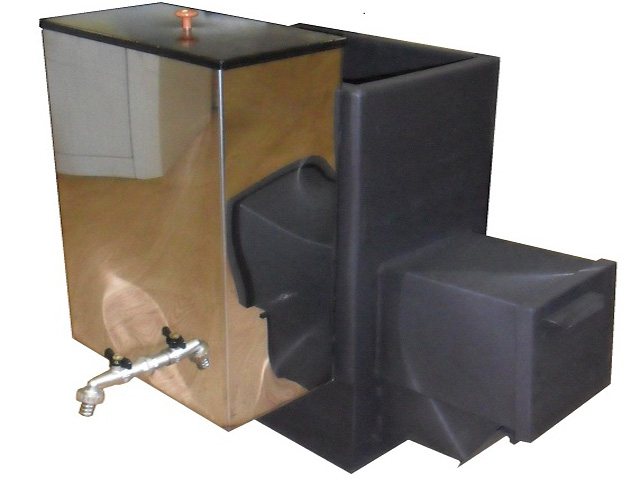
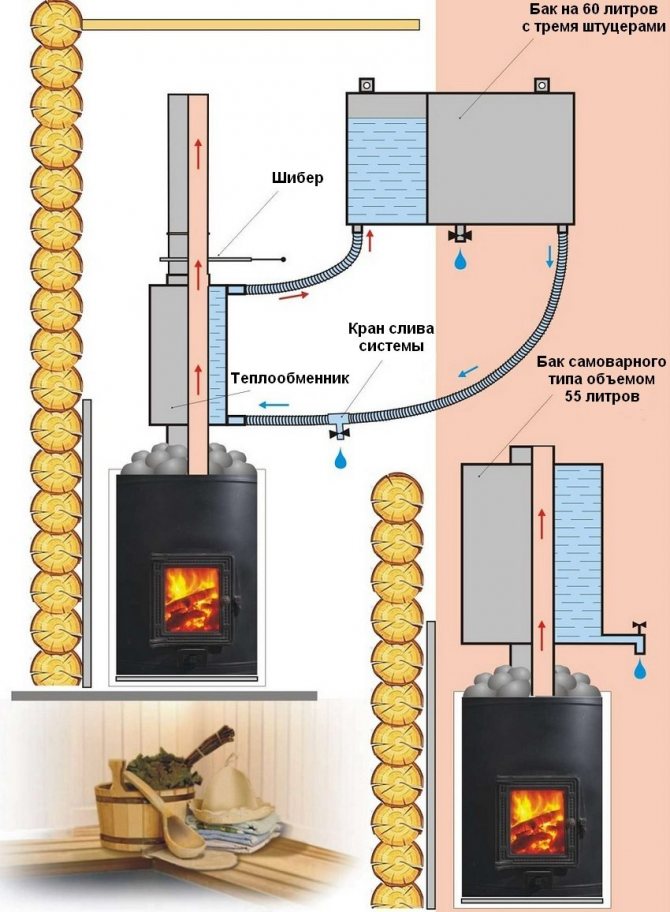
- A stove for a bath with a remote water tank is the most optimal option. You can easily control the temperature of the water in it. The heating process takes place due to the energy of the flue gases. Its installation is possible not only in the steam room, but also in the washing, shower, dressing room and in any other room. There are two types of tank and pipe designs. The first are samovar-type tanks. These tanks are installed on the chimney 50-60 cm above the firebox. They significantly save space in the steam room and, due to heat exchange, heats a large amount of water per hour - 60-100 liters. A portable tank for a sauna stove can be heated in a different way. A small tank with two pipes is attached to the chimney, which is connected to a large container of water.
- There are also sauna stoves with a remote firebox and a water tank. With this option, the firebox and the tank can be placed in separate rooms. They are able to satisfy even the most demanding customer.
Metal type furnace
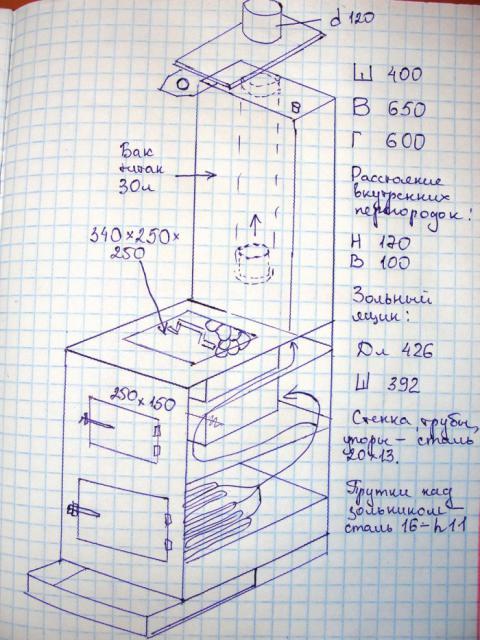
A fairly common type is a homemade sauna stove with a tank. The view, which will be described later, will also be distinguished by the presence of a built-in stove in the upper part of the stove. The flame will heat the stove from all sides, which will significantly increase the efficiency of the device. Naturally, the size is a completely individual matter. They will depend on two criteria: the size of the bath and the number of people who wash. A medium-sized object will be described as an example.
A homemade metal bath stove will have the following parameters:
- External heater dimensions. Width - 50 cm, length - 50 cm, height - 80 cm.
- Internal heater dimensions. Width and length - 40 cm each, height - 50 cm. It is important to note here that the distance between the walls of the outer and inner heaters should be 5 cm along the entire perimeter.
- The oven itself will have such dimensions. Width - 50 cm, length - 90 cm, height - 50 cm. The length of the equipment can be changed at your discretion. For example, if you shorten it to the size of a heater, that is, up to 50 cm, then the water tank will be mounted on separate stops. If you increase the length, then the volume of the tank will also increase.
- Liquid tank. Width - 40 cm, length - 50 cm, height - 60 cm. The tank will hold 120 liters of water. This is usually enough for 3-4 people to wash.
General characteristics of metal stoves for a bath
To make it pleasant to steam in the bath, it is necessary to install an appropriate stove in it.Take this issue with all responsibility, then you can choose the right option for yourself. There are several options for sauna stoves, it can be either cast iron or metal, or a classic wood-fired sauna. You can also find gas ovens, which are gaining more and more popularity.
Advantages of metal sauna stoves
Baths equipped with metal stoves are quite widespread. The popularity of such furnaces is due to a fairly simple method of manufacturing and installation.
The main advantages of metal sauna stoves include the following:
- heating rate. With the correct selection of parameters, metal furnaces are able to warm up a room in 1.5-2 hours. When compared with alternative options for stoves, then such indicators are the highest;
- low cost of manufacturing. Compared to other options, a metal oven made by yourself will cost much less. At the same time, it will not be inferior in characteristics to possible analogues;
- long service life. If you have selected the right material, in accordance with the parameters of the heated room, then such a structure can serve for a long time (up to 25 years);
- reliability. You do not have to worry about the problems associated with smoke in the bathhouse. The main thing is to initially make the correct assembly, as well as adhere to all instructions during operation;
- creation of design forms. A little imagination and you can create an exclusive stove according to your own drawings, the main thing is that its internal structure is not violated.

As you can see, metal stoves have a lot of advantages, thanks to which they can be attributed to a popular way of equipping Russian baths. In order for the firebox to work properly with each heating, installation must be carried out in accordance with safety regulations. Otherwise, the oven will not produce the required heat and maintain a constant temperature.
The device of a metal stove for a bath
Before considering the main stages of manufacturing a metal furnace, you need to understand its structure. All ovens made of metal have approximately the same filling, consisting of several parts.
A metal sauna stove has the following components:
- fuel chamber (firebox), which includes: a blower, an ash pan and a door. Fuel (wood, coal, briquettes) is fed into the chamber, where the combustion process is carried out under the influence of the blower. With the help of an ash pan, the remains of the burnt fuel (ash, ash) are collected. To do this, there is a special mesh in it, which must be periodically cleaned. The firebox can be lined with stone both inside and outside;
- container with stones (bunker). Located in the upper part of the fuel chamber, it is a grate with stones placed on it. The bunker can be made both open and closed. If it is necessary to replace stones or simply add steam, then the container is equipped with an additional door. Please note that the bunker in this case must be closed;
- water tank (capacity). Usually located at the very top of the oven. The container surrounds the chimney, which allows it to heat up during the vaping process. The tank is equipped with a special drain valve, which allows access to hot water;
- chimney. It is usually made of a metal pipe, and allows you to remove gases generated during the combustion of fuel outside the room.
The functioning of a metal oven in a bath is impossible without the use of all of the above elements. Interacting with each other, they allow the stove to generate heat as efficiently as possible, giving us incomparable pleasure.
Arrangement of a metal bath furnace
As yours has already mentioned, the firebox is equipped with a bunker with heated stones, which help to maintain the necessary heat for a long time. Without stones, the walls are not able to maintain the desired temperature for a long time. In addition, during the heating process, the metal emits strong infrared radiation.
To avoid overheating the stove, you need to equip it with a firebox, using one of the following methods:
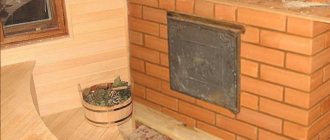
- Furnace lining. This method provides for lining the furnace firebox with heat-resistant bricks, laying it on an edge (60 mm thick). In this case, a significant part of the useful heat goes into the brick, which protects the room from IR radiation. A heated stone retains heat in itself longer, but the lining also has a negative property. Since smoke, which has a very high temperature, takes part in this process, this method is quite fire hazardous. To somehow cool the smoke, the firebox is equipped with a water tank. There is also a more complex option when the stove is equipped with a special heating shield.
- The sarcophagus is a brick screen lined around the furnace. In this case, the metal walls are equipped with windows or doors that allow you to regulate the temperature in the bath. However, this method also has a drawback - with constant heating, the metal cools poorly and burns out. For this option, it is better to purchase thick metal.
Professional advice: most often the back and top parts of the firebox burn out. When assembling a metal oven, use the thickest plate or heat resistant steel for these parts. It is they who will determine the service life of your structure.
In any case, when choosing one or another method of arranging the firebox, please note that the metal stove must be welded tightly. The seams are most susceptible to burnout. The thicker the fillet welded, the longer your oven will last.
Preparatory work
Since a homemade iron sauna stove is made of a material that is prone to incandescence, it must be hardened before assembling the device. After all the necessary parts are cut out, they must be heated in any way until the metal turns red. When this moment comes, then you can begin to slowly cool the material. It often happens that after the procedure for dispensing the raw material, it jars. It's not a problem. You can return the shape with a hammer. It is also worth re-measuring all sheets. If some are too far out of the frame, then you need to cut them again to the desired dimensions. This is a very important point, since it will exclude the possibility of metal warping during the operation of the furnace.
Some features of the metal furnace
The peculiarities of homemade iron bath stoves are that the metal will heat up very soon, which will ensure rapid heating of the room. However, the metal also cools down very quickly. If firewood is used as fuel, they will burn out very quickly. All this leads to the fact that you will have to add new portions of fuel quite often in order to ensure a consistently high temperature in the room. Fast combustion is also due to the fact that a grate is often made inside the device. This part is made of sheet metal with many holes. Such an element significantly increases traction, due to which the air flow is too large, which causes the wood to burn quickly. The way out of this situation is quite simple - you do not need to make a grate.
It is necessary to seal the firebox door as much as possible, as well as make several holes that will be covered with a sheet of metal. Thus, it will be possible to adjust the air supply.
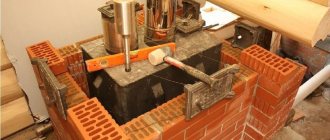
Step-by-step manufacturing instructions
The process of manufacturing and installing a stove from a barrel for a bath is divided into several stages.
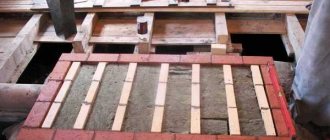
Arrangement of the foundation
It is better to prepare the base for the heater when building a bath.For this:
- a separate pit is dug out with a depth below the level of soil freezing,
- sand and crushed stone are laid on the bottom, then expanded clay or broken brick left during the construction of the house,
- the layer of insulation and cushions must be compacted. To do this, fill it with water and compact the soil with a tamper. Then a liquid solution is poured onto the pillow, after it has set, we lay a layer of roofing material and make a pedestal for the furnace,
- it can be made entirely of concrete, but such work will require preparing the formwork and mixing a large amount of mortar. This will increase the cost of our design. Therefore, for the pedestal, we lay 2 rows of bricks, the first row is 800 mm larger, and the second is laid out according to the size of the barrel. Do not put 3 rows in the middle of the 2nd layer of bricks. This gap will serve for arranging the ash pan and blower. To do this, it is necessary to fix the door with the handle to the brick, completely covering the groove.
The foundation for the oven is ready. While the solution is solidifying, we will deal with the protection of the walls and ceiling.
Wall and ceiling protection
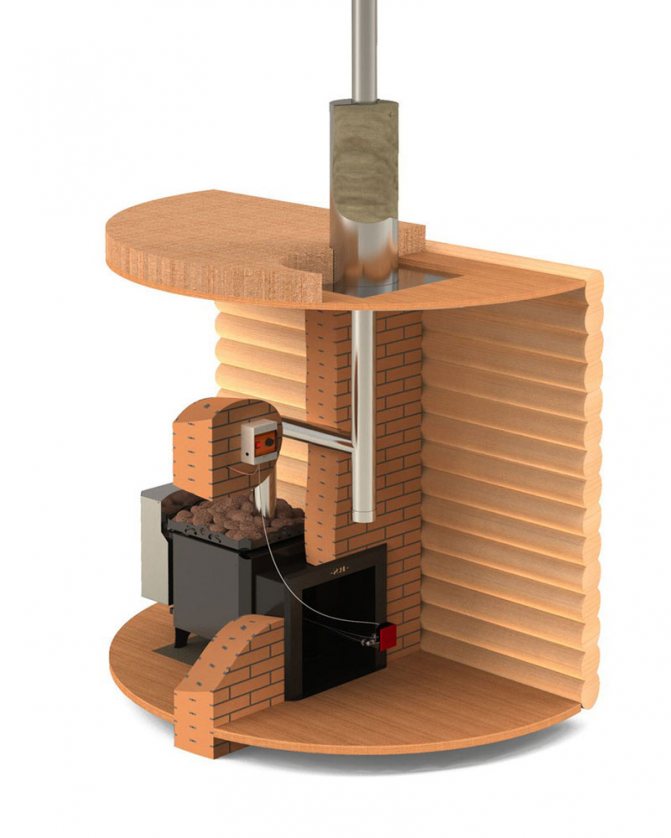
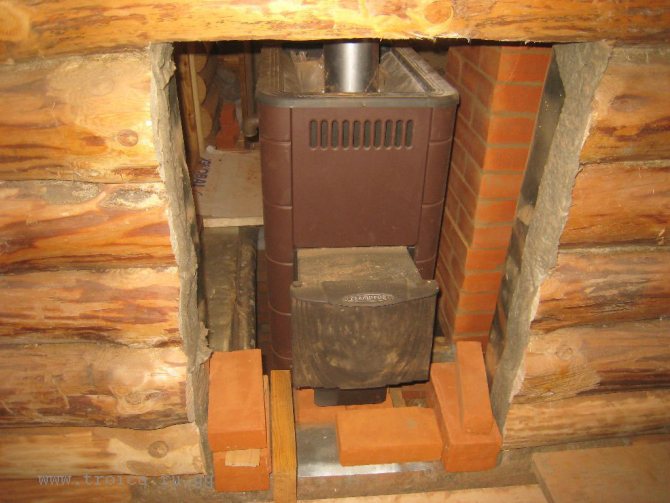
Installing a metal stove in a wooden bath can cause deformation of wall and ceiling details if there is insufficient clearance between the stove and wood surfaces. And as the worst thing, excessive heating of the planes can cause smoldering and fire of the tree. Therefore, the minimum distance to combustible surfaces is not less than 1000 mm.
In addition, it is better to cover the surfaces of the walls and ceiling with protective screens with an external foil finish. Such a screen will not allow the lining to deform. In addition, by reflecting heat from the foil, the protection will allow you to heat the steam room faster. In our version, the metal barrel is lined with bricks, so the size to the wall can be reduced to 200 mm.
Protective Sheets
Stove construction manufacturing
In parallel with the work on the foundation and protection of the walls, we are starting to manufacture the heater itself. To do this, we perform the work in the following sequence:
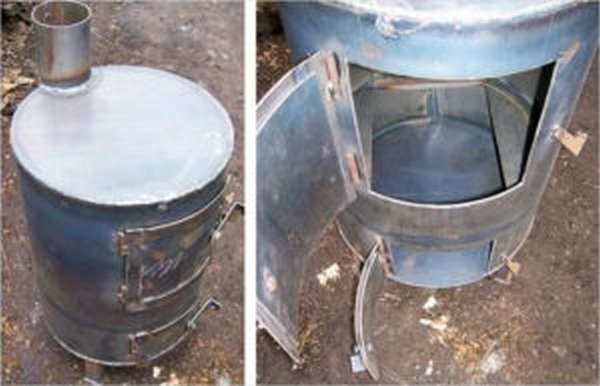
- In the bottom of the barrel, in the middle, mark and cut out a 350/400 mm groove with a grinder. We reinforce its edges with a steel knitting wire with a cross section of 5-6 mm. This groove is necessary for removing ash and wood residues into the ash pan chamber.
- For better heating of the bath, you can weld 4 tubes to the bottom, 2 to opposite sides, with a diameter of 32 mm. We place them closer to the walls, bending them at an angle of 900. We take them out of the barrel in the upper part of the furnace. To do this, we retreat from the edge by 250 mm and bring out 2 tubes on each side. Convection parts need to be welded well. Now the cold air will pass through the pipes, warming up to come out from above with a stream of heat. Such a stove for a bath from a barrel will allow you to quickly heat up the room, without wasting firewood.
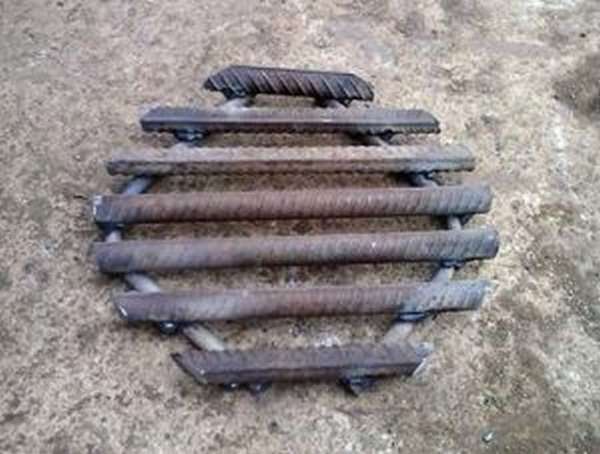
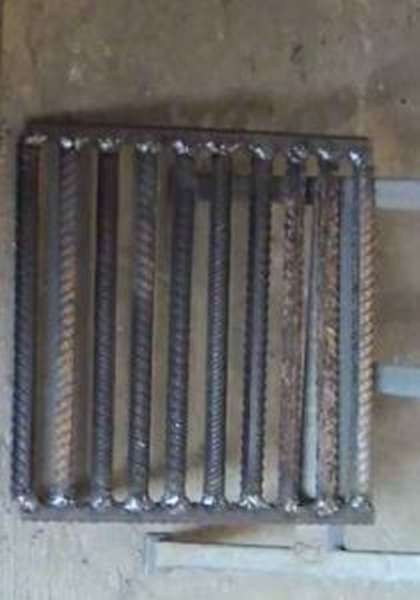
- We mark a distance of 100 mm from the bottom and make a grate from the reinforcement. The distance between the rods is 5-6 mm. On top of the longitudinal parts, we fix 2-3 crossbars for the rigidity of the grate. In places where convection tubes pass, we attach the rods to them.
Grate
Another option
- We cover the inside of the firebox with refractory bricks, placing it vertically along the walls. This will reduce heat loss.
- We measure the barrel and mark 1/3 of its length for arranging the firebox. We mark and fix 2 corners for making a lattice on which stones will be laid. The distance between the corners is 300 mm. With a step of 50-70 mm, we weld the reinforcement rods and make a lattice. When welding, remember that considerable pressure from the stone layer will be exerted on this grate, so check the quality of penetration.
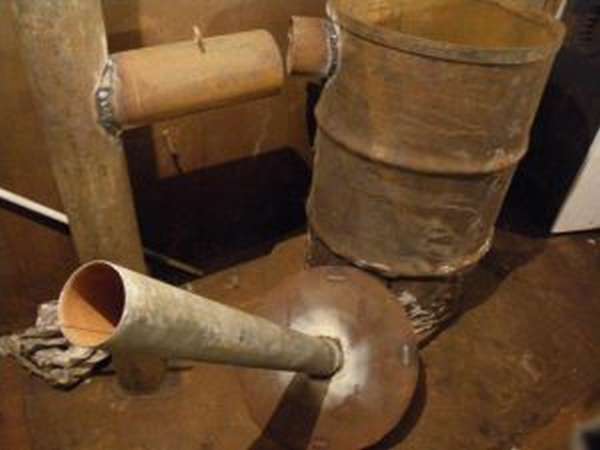
- Having decided on the back and front sides, we cut out a hole in the back for the chimney pipe and weld the bend. The other end of the bend must be vertical. At the end of the branch we make a gate valve. To do this, we burn a hole in the pipe, insert a bar into it to the opposite wall.
Vertical and horizontal bends
- Now from sheet metal we make a circle in diameter slightly smaller than the cross-section of the pipe. In the "pancake" we cut a segment and join the part with the bar. Having grabbed and made sure that the pancake is in the correct position, it is securely welded to the bar. On the second section of the bar protruding from the bend, you can weld a handle or simply bend it at an angle. This design will allow you to regulate traction.
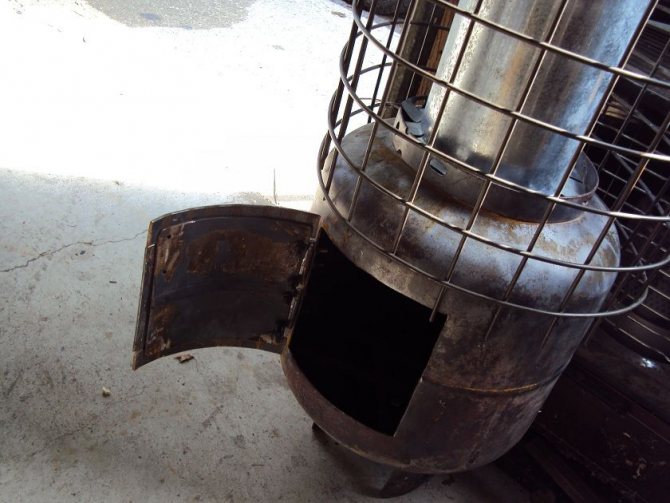
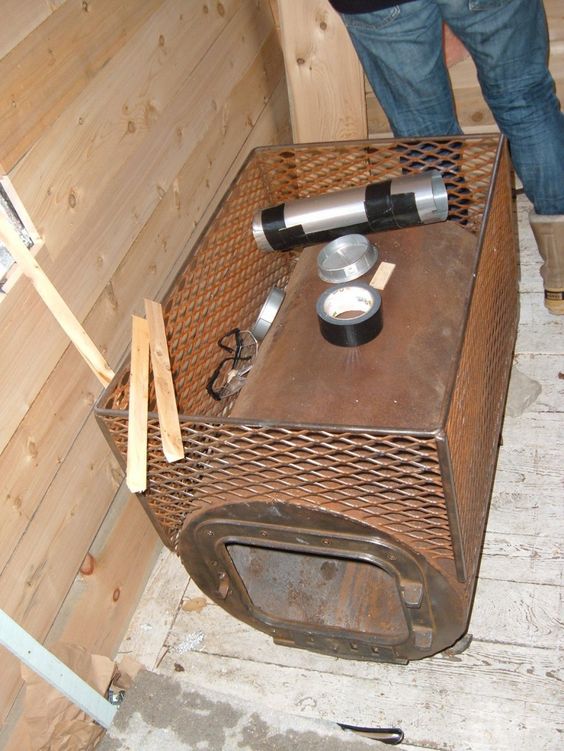
- On the front side of the combustion chamber we mark and cut a 400/300 mm hole. We grab the wire on the edges of the cut part along the contour and fasten the asbestos rope to tightly close the door. We make a handle from the corner and install the door on 2 self-made hinges from a bar and 2 sections of profiles. To close the door, you can make a homemade latch or order an eccentric lock from a turner.
Hole example
Hole example 2 (without grille installed)
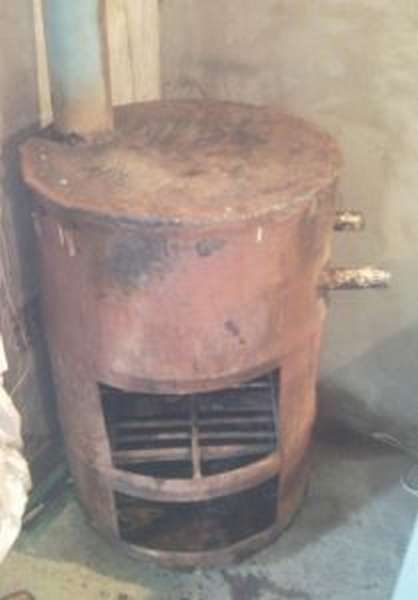
- Cut off the top of the barrel, put stones on the grate.
- We mark on top of 100 mm and grab the corner pieces. We put the barrel lid on them, adjusted to size. An asbestos cord can be used for sealing. Do not weld on the top. In this case, it is easy to replace stones and completely disassemble the stove for repair.
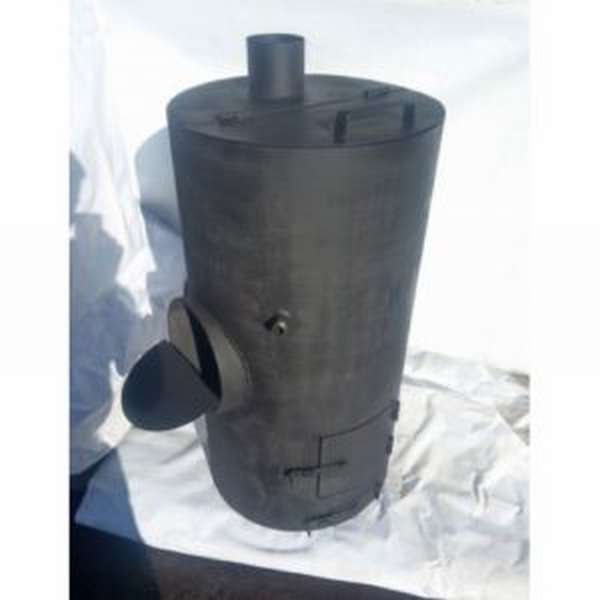
- We install the stove on the foundation. If desired, it can be fixed by welding a corner to the barrel and screwing self-tapping screws into the prepared holes. But the oven is very heavy, so it will stand securely.
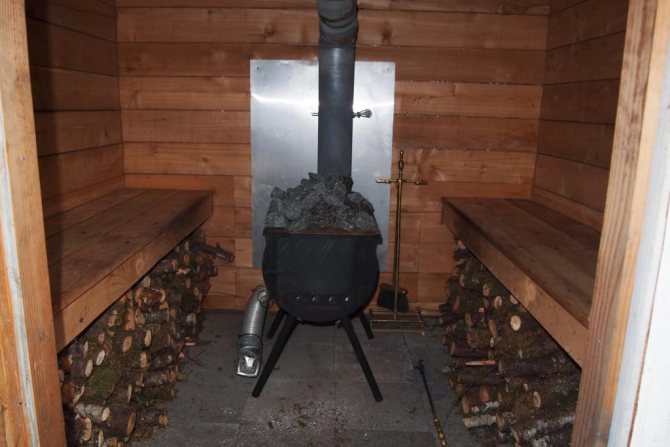
- We spread a layer of stones to the top of the barrel. Now, when heated, you can splash kvass from a gang on them and enjoy the fragrant steam.
- We cover the stove with bricks up to half or the top of the barrel. In this case, we will protect ourselves from burns when touching the iron. It is better to seal the voids between the bricks and the pipe with a clay mortar.
Our sauna stove is ready. It remains to complete the work on the arrangement of the chimney and proceed to the test "start-up".
One of the design options (without water tank)
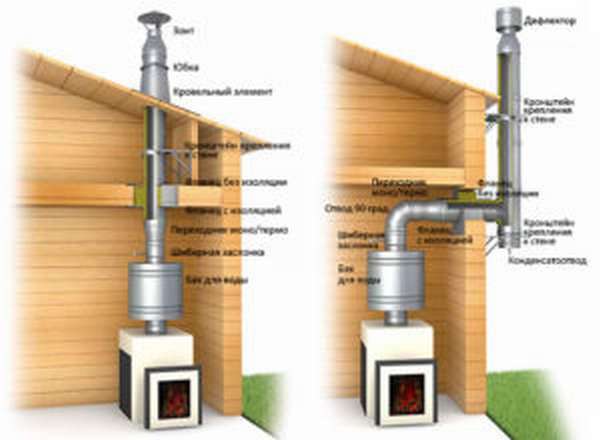
Chimney arrangement
For the chimney, it is better to use a sandwich - pipes with a corrugated outer layer. Such pipes are equipped with an additional layer of thermal insulation and do not require preparation when passing through ceilings. Approaching the roof exit, you will have to switch to an asbestos-cement or steel pipe. At this point, the pipes are securely fastened to clamps screwed to the wall.
Pipe outlet
The place of passage of the chimney to the roof or outer wall must be reliably insulated against heat loss. To do this, we wrap the pipe with min. or glass wool, and fill the voids with polyurethane foam.
The pipe must be at least 1000 mm higher than the roof ridge and its end must be covered with a protective cover. The chimney outlet will need to be securely sealed with a layer of waterproofing. To secure a long hood, use steel cable or wire braces.
Pipe outlet options
Final work and design check
Everything is ready to light the first batch of firewood. To do this, completely fill the firebox with firewood and lay out small chips from the edge. Pour water into the container. After making sure that there is traction, we light the wood and close the door. Do not be alarmed if the convection tubes and stones start to smoke. Open the doors and turn on the hood. At the first start-up, residues of oil and other combustible substances burn out from the stones, walls of the barrel and pipe.
It may be necessary to add a second load of firewood, but it is important to ensure that the stove is smoke free. We pour out the water from the water heater, it is not suitable for bathing. After that, you can fill in cold water and flood the stove to heat the bath and supply steam.
Assembly instructions
Homemade iron sauna stoves are made according to the following principle.
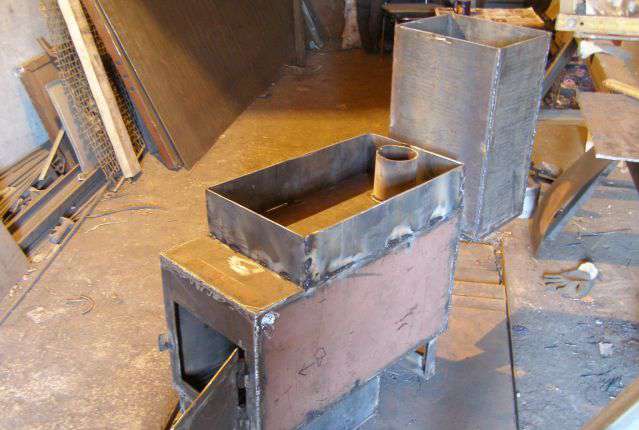
The first stage is the preparation of raw materials. You need to purchase sheet metal. The greater the thickness, the better, but too thick material is very expensive, and therefore it is better to focus on figures such as 1.5-2 mm.
The second stage is drawing up a drawing or sketch of the furnace, which will indicate all the dimensions.This will help you not to make mistakes in further work, and will also show you exactly how much sheet metal is needed to make the device.
The third step is cutting. All dimensions are transferred from sketch to metal and all parts are cut. It is very important to follow a few simple conditions. Any angle must be 90 degrees, the opposite walls must be as identical as possible. Burrs that remain after working with a grinder must be removed.
Homemade stove for a bath from a pipe
The easiest and cheapest option for making a homemade metal stove is a pipe construction. For its construction, you will need a small amount of materials that can be easily found in the construction markets.
To make a furnace, you will need: a welding machine, a metal pipe with a diameter of 50 cm, a thickness of 1 cm, and a length of 1.5 meters, electrodes, a grinder, iron sheets 3-9 mm thick, reinforcement 10 mm thick, cement, crushed stone, brick , sand and clay.
Making a furnace requires welding skills. If you don't have any, then we advise you to first practice on unnecessary pieces of metal.
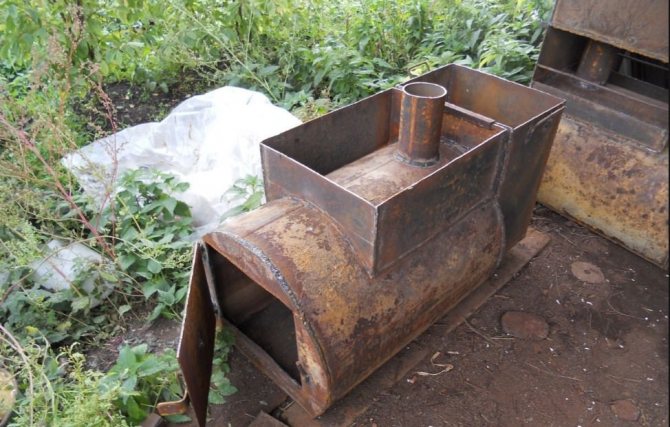
How to make a stove from a pipe:
- Cut the oven tube in two. One will be used for the firebox and heater, it is 90 cm, and the other will have a length of 60 cm - this is a water tank.
- 7 cm recede from the bottom of the larger pipe segment, and a rectangle with a width of 20 cm and a height of 6. A steel plate must be welded above the cut.
- You also need to make a hole for the grate, 4 holders are welded to it.
- A little higher, make a door for the firebox with dimensions of 25x30 cm, hang it on the hinges and weld the latch.
- A stove must be made from a 30 cm pipe segment, for this a door 25-30 cm is cut out in it, and then the structure is welded over the firebox. Fill half the volume of the stove with stones and fit the steel sleeve.
- A tank for heating water is made from another section of the pipe. To do this, weld steel covers on both ends of the pipe. Make a hole for the chimney and weld it. Make a faucet with a valve and connect the structures together.
Now you just have to check the oven and install it indoors. It is very important to comply with all the rules.
Welding
Naturally, to connect the parts of a homemade iron bath furnace, you will have to use a welding machine.
First stage. Two sidewalls are placed on the edge at right angles, which is very important. They are caught among themselves. It is very important here to correctly adjust the current strength, since the arc should not overheat the metal, otherwise there will be an uneven and fragile seam. Each grip should be a few millimeters long. Such clamps will be enough for 4-5 pieces for each corner. During welding, it is important to control the position of the sheets, as they will be pulled to the side when the seam is formed.
Second phase. Two pre-welded corners are put together, the corners are checked, if everything is in order, then you can grab the opposite sides of the furnace. The result is a box to which you need to add a bottom and a roof.
Stage three. Naturally, the next step is fixing the bottom and roof. This is done in the same way as the assembly of the box.
Stage four. After the box with the bottom and the roof welded is assembled, you can start cutting out the door near the heater. For these works, you can use a grinder or welding. When the work is completed, the sheet of metal is knocked out with a hammer and removed to the side.
Fifth step. Several holes must be made in the outer heater from below. Pipes will be inserted into them, on which the inner heater will stand. It is important to note here that the holes must be horizontal, at the same level.
An example of the construction of a homemade stove
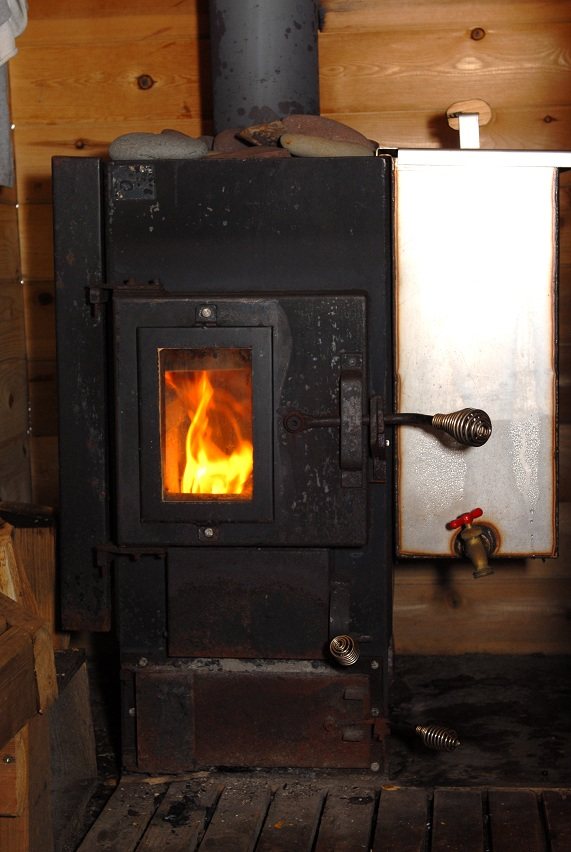
A homemade metal bath stove emits harsh heat. That is why many people prefer brick units. But the metal option has many advantages:
- High heat transfer from metal. A steam room with an iron stove heats up in an hour or an hour and a half. The brick stove will have to be heated for several hours.
- This is a sealed structure, from which carbon monoxide gases escape into the chimney pipe. In this regard, the device of a brick stove is clearly not up to par. If you are not an expert and did it yourself, then there is a high probability that there will be gaps in the structure between the brickwork. Through them, smoke will seep into the interior of the bathhouse.
- Even if you use damp wood, a homemade metal stove will recycle it.
By the way, the installation of a stove for a house or a bath must begin with the installation of a chimney, after which the device adapts to it.
So, making a sauna stove with your own hands will not be very difficult if you have the skills to work with a welding machine. There are only two large elements in its design - the combustion chamber and the water tank. It is best to use pipes with a wall thickness of at least 10 mm for a homemade unit.
Stove installation sequence
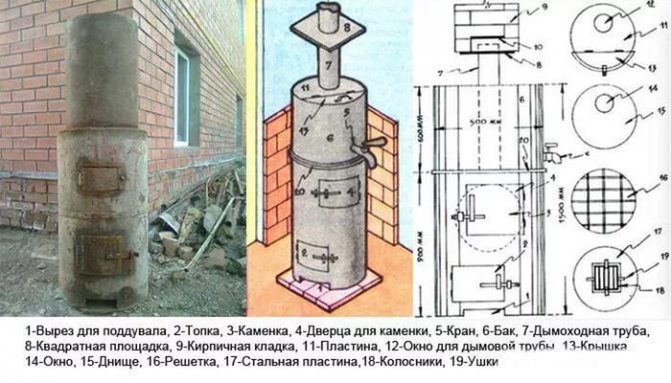
Sauna stove drawing
The installation of the furnace is carried out in the following order. First, place the pipe vertically and divide it into two equal parts with a horizontal pancake. It is welded with an airtight continuous seam, preferably on both sides. The lower part will be a firebox. A grate is installed in it and a door is made for loading firewood, and a blower is necessarily cut out from below. In a horizontal pancake, a hole is made for the chimney, where the chimney is inserted and welded.
Stones are poured into the formed upper space - this will be a heater. Now several pieces of metal fittings are welded to the main pipe along the perimeter. A tank is located on them, into which a vertical pipe is inserted. It will be an extension of the stove chimney. By the way, the tank can be removable or one-piece with a heating device.
Now you can assemble the oven and try it out. Firewood is kindled in the firebox, stones are laid in the stove, and water is poured into the tank. After 1.0–1.5 hours, the steam room and water should warm up to the required temperature. If everything is in order, and you are completely satisfied with the work of the stove, you can proceed to installing it. Have you installed it? Be sure to brick it. This will protect you from burns and will distribute heat energy evenly throughout the room.
Such a furnace device from an ordinary pipe is not the only option. Instead of a pipe, metal sheets can be used. Then the stove will have a rectangular cross-section, but this will in no way affect the quality of the heat output of the device. By the way, do not pay attention to the appearance of the unit. Naturally, it will be inferior to factory counterparts. This nuisance is fixable, since you will cover the unit with bricks. But for its masonry, if you are a layman, we recommend inviting a master. Whatever you say, but the aesthetic side of any business must be at the highest level.
Pipe selection
A fairly common option is a homemade stove for a bath from a pipe. The main requirement for a pipe that will be used as a furnace is to ensure uniform and rapid heating. At the same time, the thickness must be sufficient to successfully withstand high temperatures for a long period of time. The most optimal dimensions for such raw materials are considered to be a diameter of 0.5 to 0.55 mm and a thickness of 8 to 12 mm. It is worth adding here that the diameter of the material will affect the amount of fuel required for kindling. Therefore, for homemade wood-burning stoves for a bath, it is very important to choose the right pipe diameter.
Is the shape of the stove important?
Metal sauna stove blueprint
The question of which furnace shape works efficiently and which one does not work very well is asked today by many ordinary people who decided to independently make a furnace out of metal. The difference, of course, is:
- Rectangular structures are more resistant to temperature changes.Although experts say that even they need to be reinforced with corners that serve as stiffeners. We add that in the corners of this structure, the temperature is always lower, which simplifies the maintenance process.
- Cylindrical stoves made of thick metal have high mechanical strength.
- Horizontal specimens distribute heat unevenly compared to vertical specimens. In the latter, the most heated part is the combustion chamber, from where the heat is evenly distributed vertically both along the structure of the unit and throughout the entire volume of the room.
And yet, the strength of the structure is primarily influenced by the selected metal, especially its thickness. The thicker, the more reliable, although this increases the weight of the product. But keep in mind that the sheet metal changes its linear dimensions during heating, which affects its strength. If you do not install stiffeners, then the likelihood of warping and cracking increases dramatically.
Furnace construction from a pipe
Before starting work, it is important to decide on the design of the furnace. The thing is that they can be both horizontal and vertical. Each option has its own advantages and disadvantages.
The vertical version differs in that it takes up quite a little space on the floor. Therefore, it is most often used in rooms with limited space.
If you use the horizontal version, it will be possible to position the stove in such a way that the firebox will be taken out into the dressing room. In the steam room itself, only the part responsible for steam generation will be located - the heater.
The advantages of homemade metal bath stoves
Homemade metal ovens have their own advantages and disadvantages. Therefore, you need to weigh the pros and cons before you start making them.
Advantages of metal ovens:
- Metal bath stoves heat up very quickly, therefore, rooms equipped with such structures do not need to be heated for a long time;
- Homemade sauna stoves will cost you inexpensively;
- High-quality welding of a metal furnace, will provide it with a long service life;
- Correct assembly of the stove will exclude the possibility of an explosion or smoke in the room.
All these advantages are inherent in properly assembled metal stoves. Such a ready-made design is quite expensive, but its home-made counterpart will cost you "a penny". However, such designs also have some disadvantages.
Cons of metal stoves for a bath:
- A homemade metal stove not only heats up quickly, but also cools down suddenly;
- Iron bath stoves cannot provide heating for all bath rooms, therefore this option is acceptable only for small suburban buildings.
Cons, as you noticed, these ovens also have. And they are significant enough. Therefore, it is impossible to say for sure whether a metal structure will suit you. It all depends on the specific situation.
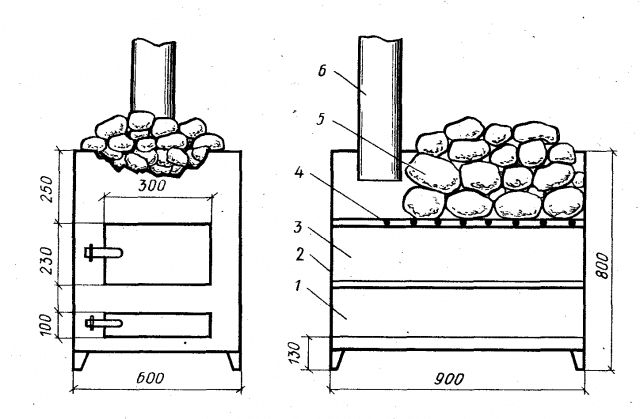
Horizontal version of the oven
The first thing to do is cut out the firebox. A piece of pipe of the required size is removed. Most often, a sufficient length will be 0.7-0.9 m.
Next comes the process of assembling grates from metal frames and rods. They are welded parallel to the frame at a distance of about 50 mm from each other.
Inside the existing firebox, prepared grates are mounted. If ready-made products were originally purchased, then they can be welded onto the corners inside the oven. On the upper side, it is imperative to cut a hole 15-20 cm in diameter. A very important point. It is best to place the hole at least 15 cm from the back wall. Thus, the gases will not be immediately removed from the device, but will take part in heat exchange for some time. This is very important, especially for home-made sauna stoves in Yekaterinburg, for example, where the temperature drops quite low in winter.
Remote water tank
Such a system for heating water in a bath is possible only when using stoves with heat exchangers. Many manufacturers of sauna stoves design their stoves so that they can be installed in the firebox, they also offer ready-made heat exchangers. Almost all leading domestic manufacturers have furnaces with heat exchangers:
- Vesuvius
- Volcano
- Thermophore
- Ermak
- Theklar
- Teplodar
- Heat
- Barbara
- Feringer
If you are going to buy a ready-made oven, it would be more rational to buy a heat exchanger from the same manufacturer: it was designed for this system and should work well. There will be no problems with connecting the heat exchanger to the sauna stove: outlets from the stove are provided with taps. Connect pipes and a remote tank to them.
Assembled tank to pipe
Furnaces with heat exchangers have features of use:
- Fill the system with cold water. If cold water is poured into a red-hot stove, a large temperature difference arises in the heat exchanger, which leads to a different magnitude of temperature expansion and can rupture it.
- When connecting the heat exchanger to the water tank and choosing a place for their installation, remember that for normal water circulation, the length of the pipes should not exceed 3 meters. This length is sufficient for installing the tank behind a wall in an adjacent room. If this option does not suit you, you will need to build in a pump that will provide the required speed of water movement.