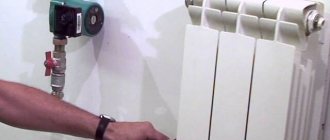
Anyone can assemble an electric boiler with their own hands - in terms of operational characteristics, prefabricated units are not much inferior to factory products. With a responsible approach, a homemade boiler can be even more reliable and more durable than a factory-made machine.
This also applies to electric boilers for heating a private house, known for their economy and high performance. Parts for assembling such equipment are widely available, and the manufacturing process itself can be cheaper than buying a finished device.
Classification of homemade boilers
There are three types of electric boilers. The first option is working on heating elements. They are equipped with a tubular electric heater, which, under the action of electricity, heats up and transfers heat to the liquid. The heater is insulated so that the heating medium is not energized.
The second option is inductive action. It is equipped with a winding transformer, with the heating pipe acting as an induction coil. Heating of the coolant occurs due to eddy currents arising on the winding.
Finally, the third option, electrode - the liquid is not only a heat carrier, but is also an integral part of the electrical system. It is quite simple to assemble an electrode boiler with your own hands, but high requirements are imposed on the electrical safety of this equipment.
Design
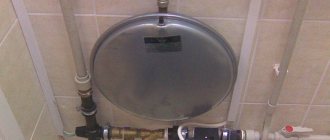
In fact, a homemade electric boiler is a piece of pipe with built-in electrical fittings. This is very convenient, especially if you make the unit removable: then the maintenance and service of the equipment will be greatly simplified.
If the unit is placed not in a pipe, but in a separate housing, then additional sensors can be installed that will automate the operation of the heating system, increase efficiency and reduce energy consumption. In addition, when it is necessary to replace the boiler with another, it will be possible to do this without violating the integrity of the system circuit.
What is needed to make a homemade boiler:
- a cylindrical boiler with a volume of about 3-4 liters or a pipe with flat plugs at the top and bottom;
- three nozzles sized for your pipes;
- Heating elements;
- nuts;
- automatic air vent from above;
- ball valve at the bottom (for draining liquid from the boiler, if necessary).
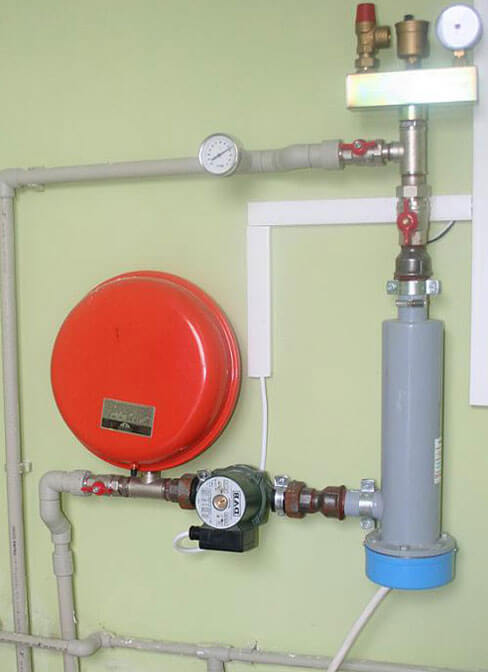
In the finished homemade electric boiler, or welded from a cylinder with plugs, you need to make holes and weld nuts on them to connect to the pipes. In the lower part of the boiler, weld in a branch pipe with a valve for draining the liquid. Thus, you will have a boiler with supply, return and filling of the boiler. Above there are three couplings for the installation of electrical heating elements and an air outlet. The boiler is three-phase. All boiler controls are brought out into a separate box. For convenience, in emergency order, you can even output directly (although we do not recommend doing this).
Where to put the heating elements on top or below you choose. Both options take place. There are pros and cons to both. The heating element is inconvenient to change from below, but it is protected from air. From above, the heating element is easy to change, but an automatic air vent is needed from above. In an electric boiler, when the heating elements are at the top, then the air also accumulates at the top. But the risk from overheating of heating elements without water is removed by the fact that the couplings on top of the 32nd are cut to 20 mm. This results in a shorter air pocket. In addition, there is an automatic air vent on top for the release of accumulated air. The remaining air is drawn in through the pipeline.Thus, the problem of boiler safety is solved and possible overheating due to air at the top of the boiler is eliminated.
Difficulties of operation
The disadvantage of any electric heater is the danger of exceeding the limit for connecting electrical equipment in a private house. So, the total power of all electrical appliances used in a home should not be more than 15 kW.
To service a private house with an area of about 100 m2, an aggregate with a capacity of at least 10 kW is required.
Therefore, by connecting an electric boiler with your own hands, you divert only 5 KW of energy to the use of other devices. To increase the consumption limit, you need to obtain a special permit.
To make a homemade electric heating boiler with a tubular electric heater, you will need the following set of materials:
- steel sheet with a thickness of more than 2 mm;
- a piece of steel pipe (length and diameter depend on the capacity of the unit);
- three-phase heating elements (it is not recommended to use heaters with a built-in relay, as they wear out quickly).
First, the future bottom of the boiler must be cut out of the steel sheet. The bottom dimensions must correspond to the pipe diameter. Then, it is required to make a flange from the same metal - a ring whose inner diameter is equal to the outer or inner diameter of the pipe, depending on how the part is planned to be fixed to the body. The ring width is usually 30 mm.
Further, a cover with a diameter corresponding to the outer diameter of the flange is made from a steel sheet. The cover and flange are connected with 6 bolts, holes are made in advance in the mounting locations. Several more holes are drilled in the lid - their size should correspond to the size of the heating elements planned for installation.
The bottom should be welded to the boiler body first, and the flange should be welded next. The cover is mounted only after the tubular heaters are firmly fixed on it. A sealing gasket made of water-resistant material is inserted between the heating elements and the cover.
Between the cover and the flange, there is another gasket made from a car camera. This gasket must be an exact replica of the flange, including bolt holes.
Installation of branch pipes
Before closing the boiler with a lid, fittings are installed in its body for connecting pipes of the heating system, having previously cut out suitable holes. It is important that there is a thread at the ends of the nozzles: this is required for the installation of inlet taps, which will allow to shut off the circulation of the coolant in the circuit if the electric boiler needs to be repaired. A pipe for draining hot liquid is located at the top of the unit, it is advisable to build it directly into the cover. The cooled heat carrier is fed through the pipe from the bottom.
When the pipes are installed, the boiler is completely assembled and connected to the network. Sometimes its design can change: for example, not only the cover, but also the bottom is mounted on the flange. The device is versatile and can be easily adapted to the technical parameters of the home heating system.
Electric installation work
During electrical work, the contacts of all the heating elements of the boiler are connected to the block, and the neutral wire is connected to it. Sometimes heating elements are immediately short-circuited to this wire without using a block.
The cross-section of the wire core must correspond to the load that the heating elements create: then the home-made electrical unit will work without failures.
A phase wire is connected to the contact of each heater, passed through the circuit breaker. The cable cross-section is selected based on the load created by all the included heating elements at the same time.
All wires must be insulated, special attention must be paid to ensure that their bare parts do not come into contact with the metal cover of the boiler.
To make an induction boiler you will need:
- a piece of plastic pipe with thick walls;
- copper wire with a diameter of 7 mm;
- welding inverter with a power of 15 A.
Two nozzles are attached to the plastic pipe, having previously made the corresponding holes. Its internal space is completely filled with wire cuttings 40-50 mm long.
Then an induction coil is created: the wire is carefully wrapped around the pipe, the total number of turns is about 90. The coil is connected to the inverter. The resulting homemade heating boiler is mounted directly into the pipeline by cutting out a section of the pipe.
Varieties of cultivators
Garden cultivators are represented by a wide variety of models, which differ from each other in a number of ways.
- By weight... Lightweight models have a mass of 9 kg-10 kg. The heaviest models can weigh up to 50 kg.
- By power... This parameter ranges from 1-2 liters. from. up to 7-12 liters. from. It should be borne in mind that more powerful machines are able to cope with heavier soil.
- By appointment... In accordance with this sign, there are cultivators:
- steam (their task is continuous processing);
- universal (they can handle continuous and inter-row processing);
- tilled crops (work for them is soil cultivation and weed control in the aisles).
IN set some models may include attachments for soft soil, lawn care, plowing.
By price electric cultivators also differ. The cost of electric cultivators fluctuates from 3 650 rubles, for example: cultivator Prorab E. T. 754 MY13 PRC, invented in Russia, up to 22 900 rubles, for example: Mantis MY13 USA, invented and produced in the USA.
Moreover, both models mentioned above have approximately the same weight (9 kg and 9.5 kg), equal power (750 W), processing width (30 cm), 4 cutters in a set. The American version is distinguished by the special (serpentine) shape of the cutters and their rotation speed (240 rpm). Such a device not only plows the land, but also loosens it, gets rid of weeds, works at a depth of 25 cm (when plowing) or 3 cm - 10 cm (when cultivating). The warranty period is 2 years, but with reasonable use it will last much longer.
The Russian invention has a cutter diameter (provides plowing depth) - 22 cm. It has a particularly favorable price-quality ratio. The warranty period is 1 year.
Recent Entries
Chainsaw or electric saw - what to choose for the garden? 4 mistakes when growing tomatoes in pots, which are made by almost all housewives Secrets of growing seedlings from the Japanese, who are very sensitive to the earth
Considering more powerful a variant from the South Korean company Hyundai (Hyundai) T 2000-E, it differs from previous models in weight (30 kg), engine power (2000 W) and soil processing width (55 cm). The unit has cost 13,000 rubles... Individual parts are reinforced with metal protection and have a manufacturer's warranty of up to 100 years. The forged cutters used in this model also contribute to a longer service life.
Assembling the electrode boiler
It is also easy to make an electrode heater. To do this, the master will need:
- iron pipe with a diameter of 57 mm with thick walls;
- iron sheet with a thickness of more than 2 mm;
- inner electrode with a diameter of 25 mm;
- gaskets made of paronite or rubber and connecting clamps.
As in the previous cases, you need to start by connecting the pipe fittings to the future boiler drum. From one end, the pipes are welded to the unit, from the other, they are threaded.
Making an electrode boiler with your own hands, a hole is drilled in the body for a plug. An electrode is attached to the latter; it is installed inside the boiler. At the final stage, the homemade body is welded by installing a cover and bottom cut from an iron sheet.
After cleaning the welds, it is necessary to check them for permeability. For this, the welding places are covered with soapy foam, and pressure is generated inside the housing with an air press. Where bubbles appear, the boiler will leak. When all identified faults are eliminated, you can treat the body with enamel paint.
The boiler will work properly if the water in the heating system of the house contains soda. The latter is added in order to increase the current strength: you can calculate this indicator by dividing the power of the unit by 220.
It is quite possible to build a heating boiler in country houses that are not connected to the central gas pipeline even on your own. In this material, we will talk about how to make an electric heating boiler with your own hands. We will consider 3 available options for electric boilers - heating elements, electrode and induction.
Using diagrams and drawings
Not everyone knows how to make a pipe bender at home, but many would like to learn this.

Diagram of a device for bending pipes
Before you start making an electric pipe bender with your own hands, you need to calculate everything, familiarize yourself with several drawings, and choose among them, in your opinion, the most suitable one. When a person has no special education or has never done such things, then it is not so easy to make even the simplest equipment on his own. It is clear that it is best to consult with a specialist who already has experience in the manufacture of such devices. If there is no such master nearby, it does not matter, since the worldwide "Internet web" will come to the rescue. With its help, you can not only familiarize yourself with text information, but also choose diagrams, drawings, watch a video on how to properly make an electric pipe bender with your own hands. Although, it is advisable not only to see, but also to download the necessary drawings, video, where step by step the process of making a device for bending round as well as shaped pipes is described.
For example, you can use such a drawing to make an electric pipe bender, with which you can easily make a pipe bending device yourself.
Important! When making a device with your own hands, its cost will be much lower than a factory analogous tool, and the quality is the same.
What tools will be needed
In order to assemble homemade electric heating and face the minimum of hassle, you need to have quality tools at your disposal.
For work you will need:
- welding machine - it is most convenient to work with an inverter model;
- torch - if you do not know how to use a gas torch, it is better to use a plasma one;
- grinder - you will even need 2 models - a large one for a disc with a section of 230 mm and a small one for a disc with a section of 125 mm;
- electric drill;
- a hammer;
- core;
- tape measure and compasses.
How to make an electric cultivator with your own hands?
In order to enjoy all the advantages of mechanized labor, it is not at all necessary to purchase a walk-behind tractor. Anyone who is more or less familiar with technology can make a useful device.
To work you will need:
- serviceable motor from a meat grinder;
- 2 pipes;
- corners;
- screw;
- wheels with axles;
- scrap.
Instruments:
- welding machine;
- pliers, sledgehammer, hammer;
- a set of keys.
Electric boiler on heating elements
Diagram of an electric boiler with a do-it-yourself tenom is the simplest to execute and has been known for a long time.
The principle of operation of the heating element boiler
The device of all household appliances in which heating elements (heating elements) are installed is the same. When the power is turned on, the voltage is supplied to the heating element, which gradually heats up and transfers the thermal energy to the liquid located around it.
The advantages of such devices:
- a wide range of heating elements of various shapes and powers;
- the ability to use in any heating system with liquid heat carriers;
- insulation is installed on the boiler body, so that the voltage is supplied exclusively to the heating element;
- do not require complex maintenance;
- the heating level is very easy to control, even with a minimal set of automatic controls.
Among the disadvantages of a homemade electric boiler of this type are:
- "Gluttony" in the consumption of electricity, since it takes 1 kW of power to heat 10 m2 of area;
- impurities in the coolant accumulate on the heating element in the form of scale, so it must be cleaned about once a year;
- The heating element can function only in the presence of liquid, it is recommended to install an idle speed sensor with it.
The procedure for assembling a boiler with heating elements with its own rivers
Before making an electric boiler with your own hands, you should take care of the availability of a reliable power line. Only equipment with a capacity of no more than 6 kW can be connected to ordinary networks with a voltage of 220 V and a frequency of 50 Hz. If a more powerful boiler is required, a three-phase wiring and a separate input must be made for it.
So, we start assembling a homemade electric heating boiler from a pipe with a cross section of 159 mm with a wall thickness of 10 mm. This pipe will serve as the boiler drum. For it, you will need either a factory-made hemisphere with a section of 159 mm and a thickness of 10 mm, or sheet metal with a thickness of 8 mm or more of a similar section.
The roof of the boiler, into which the heating elements will subsequently be embedded, can be made from a channel with a thickness of 8 mm.
We cut a ¾ inch sleeve into the boiler dome. We will screw the drain valve into this sleeve. In addition, you will need 2 1-inch pipes for inflow and return. The threads on the branch pipes can be made both internal and external. It all depends on which one is more convenient for you to work with.
To relieve excess pressure, you need to prepare a branch pipe for the tie-in of the bypass channel. You will also need 3 adapters, into each of which a heating element for an electric boiler will be screwed. One more adapter will be needed for the thermal sensor. In addition, you will need holders for automation.
Please note that it is advisable to cut the threads on the pipes and adapters immediately.
Prepared threaded pipes, the same as on heating elements, must be immediately screwed into the adapters. This is necessary so that the thread is not damaged during welding to the roof. To mark the insertion points of heating elements, the outer diameter of the pipe must be divided into 6 equal sectors according to the size of the radius. Then we draw three identical sectors strictly at an angle of 120 °.
The next step is to start cutting. Having finished with the markings, using a plasma cutter, cut out the holes for the pipes for the heating elements. They should only be cut along the outer contour. With all other connections, this is not critical.
We start welding. First, we intercept the pipes at several points so that they are not led. Then we check the accuracy of the location, if necessary, tap it lightly with a hammer, and then make a continuous seam.It is important that the adapters for heating elements in an electric boiler for heating with their own hands protrude 1 cm above the surface of the boiler arch.
We proceed to cutting the arch from the channel. In its center we make a hole for the air valve branch pipe, after which we weld the branch pipe itself. On the side we make a hole for the temperature sensor and also weld the pipe under it.
All protrusions, burrs and remnants of welding work must be carefully cleaned with a grinder. The inner surface of the vault platform should be perfectly flat. The pipes for installing heating elements will protrude only 1 cm from the outside.
We got a rather powerful electric boiler with our own hands with 3 heating elements. If you need a simpler unit, according to the same principle it can be assembled for 1 or 2 heating elements.
When is an electric pipe bender used?
For working with a large number of products
Such a homemade pipe bender can be used to perform not only complex, but also the most important work on the required section of the pipeline.
Important! With the help of an electric pipe bender, you can bend steel pipes of any diameter and with any wall thickness used in the installation of pipelines, the required bending radius.
Unlike manual construction, which is most often used at home, an electric machine is used to process risers in large quantities.
During the laying of pipe communications, it is often necessary to deal with structural elements with turns. It is clear that ready-made devices are the ideal option in such cases.
But, firstly, they are not always at hand, and secondly, it happens that standard jumpers cannot always be used for a specific section of the pipeline.
For making joints with a precise angle
For example, if it is necessary for the pipe to run at an angle of 90⁰, then using an electric pipe bender, you can easily make the necessary connection with your own hands with an accuracy of one degree. The main advantage of such a homemade device is that the arms and bed do not feel any recoil, although its force is equal to the force that the equipment of the hydraulic type creates. Therefore, the pipe bending machine can be placed on soft surfaces and even on a wobbly base.
Assembling a heating boiler on electrodes
Devices of this type began to be actively used only in the last 10-15 years. These are more technological devices in comparison with heating elements.
Design
In electronic electric boilers, the liquid plays the role of a heating element. A self-assembled electric boiler of this type is a metal case, inside which an insulated steel electrode is located.
0 is supplied to the body, and the phase is applied to the electrode. When the voltage is applied, the water ions begin to oscillate at a frequency of 50 hertz. In this case, the liquid gradually heats up. Due to this property, such boilers are also called ionic.
The dimensions of the electrode boilers are small. They can be made from a pipe with a cross section of up to 320 mm and a length of up to 60 cm.However, an electric boiler for heating a house with your own hands can be made much smaller.
Benefits:
- small size, thanks to which the ion boiler can be placed even in a small apartment;
- the absence of the so-called "dry run", which guarantees the boiler's serviceability, since without liquid inside it will not work;
- resistance to voltage drops;
- high speed of heating and cooling, which means ease of adjustment;
- efficiency in electricity consumption in comparison with devices on heating elements.
Among the disadvantages of such boilers are the following points:
- an important condition for the effective functioning of the electrode boiler is the level of thermal conductivity and the quality of the coolant;
- the device must be reliably grounded, as there is a great risk of electric shock;
- it is important to exclude the possibility of air entering the system, otherwise, the electrodes will become unusable due to corrosion.
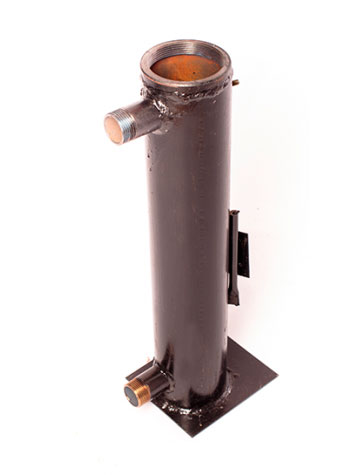
Assembly instructions for a homemade electrode boiler
As a body for an electric heating boiler with our own hands, we use a pipe with an internal section of about 50 mm and a length of 40 cm.In addition, you will need a solid rod with a diameter of 20 mm and a length of 30 cm, as well as two adapters with a cut internal thread. At the end of the rod, we drill a blind hole with a thread for a Ø10 mm bolt.
We prepare the pipes. 1 we will weld at the end of the pipe, and the other at the side. In order for the side pipe to fit perfectly to the pipe, it is cut with a grinder, and then polished with a round file.
We cut the holes for the pipes. If no cutter is available, many small holes can be drilled around the circumference. The work is brought to the ideal with a file and a round file. The hole for the side pipe must be located 10-15 mm from the edge of the pipe.
The next step is to weld the pipes to the pipe. To prevent them from being led, first they do spot welding in several places, and then they impose a continuous seam.
We are preparing a platform for an electric boiler. To do this, you can take a sheet of fiberglass with a thickness of 2 cm and cut a piece of 120 × 120 mm using a metal hacksaw. Then, in this platform, you need to drill one hole in the center, and four around the perimeter. The cross-section of the holes should be 10-12 mm.
Through the holes around the perimeter, the fixings of the boiler body will be passed, and the central hole is intended for fixing the steel electrode.
We proceed to fixing the boiler body to the platform. To ensure a secure fit, four Ø12 mm nuts can be welded to the body on 4 sides. Bolts Ø10 mm will easily pass through them.
These nuts must be welded with a slight offset from the platform. To ensure it, it is necessary to screw the nuts of suitable size onto the bolts, thread them into wide nuts, and fix them again with smaller ones from below. Thus, it will be easier to carry out the welding work.
At the last stage, we carry out the final assembly of the boiler. To do this, cut out a rubber gasket with a section slightly larger than the outer diameter of the boiler. In its central part we make a hole and pass an electrode through it. Then we install the body on the platform and screw it on.
Assembly instructions for a homemade induction boiler
It is worth noting that often the instruction on how to make an induction-type electric boiler is so complicated and contains such labor-intensive drawings that self-assembly of the equipment looks rather dubious. However, we found a non-standard solution.
Before you make an electric boiler for heating yourself, you will need to purchase an induction oven with a power of 2.4 kW and 3 meters of profiled pipes Ø25 × 50 mm with walls 2.5 mm thick.
If we consider how this structure will work, then first we collect a flat container from the profile - a liquid will move along it. And then we fix the induction stove to the pipe and connect it to the network. Everything together will look like a saucepan on the stove.
The pipe must be cut as accurately as possible. You will need several pieces of 400 mm, carefully deburred at the ends.
Since the liquid inside such a boiler will move like a snake, it is advisable to take an even number of pieces of pipe so that the inlet and outlet are located on the same side - so it is more convenient to connect them to the heating circuit.
Since the profile pipes are not perfectly straight, they must first be joined with blunt edges with sharp ones and numbered so as not to be confused later.
At the next stage, the joints between the pipes must be boiled. We lay the structure on a flat surface, tighten it with a clamp and weld it. First, we do spot welding so that the structure does not lead, and then we carry out major seams.
Now we need to close the end of our container. For this we use a steel strip cut from profiled pipes. We carry out welding in a similar way - first pointwise, and then overhaul.
We also weld the strip on the opposite side, not forgetting to install the inlet and return pipes on the outer pipes. To ensure the maximum contact area of the container with the stove, all seams must be carefully cleaned.
So that our boiler can be hung on the wall, 2 corners must be welded on its back, in which the induction stove will be placed, as well as hanging loops.
The last stage of work is painting. Heat resistant paint can be used. This completes the assembly work. You can hang up the boiler and connect it to heating and electricity.
When buying an induction oven, make sure that it is designed for continuous operation. Otherwise, a system restart is required every 2 hours.
Outcomes
Each of the listed models is fully functional and reliable. Everyone will make the choice in favor of any of them independently. The main thing is to be attentive to the work and, in case of difficulty, to consult with knowledgeable people.
Making an instantaneous water heater with your own hands is a great idea if you suffer from a lack of hot water in the summer or want to organize a shower in the country. You can make a flute pipe yourself, because it is quite simple. You will find out what you need for work and what stages you have to go through in the article.
We wrote in detail about how the boiler works in the article "".
Let's list the main nodes and consider the principle of operation. The body of the device is equipped with a flow heater, which is placed in a protective flask, so it is practically not subject to scale. Water flows through the heater to reach the optimum temperature. The advantage of doing this is that you can get hot water at any time.
To create an electric water heater, the most important thing is to purchase a heating element. You have two options:
- Simple - buy a new item in the store. It is important to choose the right power: an ordinary network will not withstand more than 5 kW, and for a summer residence it is better to take 3-4 kW.
- Make a homemade heating element.
What you need to make a heater:
- Spiral (heating element).
- Copper tube for the manufacture of the protective case.
- Two steel tubes with ½ thread.
- Steel sheet 3 mm thick.
- Nichrome wire.
- Heat resistant glue.
- Anti-corrosion paint.
- Gas-burner.
- Welding machine.
- Bulgarian.
- Drill.
- Metal brush.
- Sharp core.
- Electrodes.
- A hammer.
How to make a heating element yourself:
- Twist the copper tube spiral. Make at least three turns spaced apart.
Twisting the tube can bend in bends. To avoid this, we recommend filling the cavity with sand and closing the edges with plugs.
- Wrap the wire tightly around the tube so that there are no gaps between the turns. Secure the ends with heat-resistant glue.
- To obtain more power, the coils are powered in parallel. With sequential power supply, heating will be worse.
- The element is then placed in a copper tube and sealed.
To accurately manufacture an electrical device, you need to calculate the materials.
Calculation for the manufacture of a direct-flow heating element
It is necessary to calculate the dimensions of the future heater, how much copper wire and pipes are required.
How much wire might you need? To take a shower with normal pressure and water heating, the power must be at least 5 kW. From the calculations below, you can see the current strength:
P = IxU; I = P / U = 5000 W / 220V = 23 A
Therefore, take care of normal indoor wiring in advance. It is better to use a cable with a thick gauge. Now calculate the indicators using the following formula:
R (maximum resistance 1.1 ohm x mm² / m) = p (wire resistance) x L / S (cross-sectional area).
How do I know the cross-sectional area? By calculation method only:
S = πr² = 3.14x0.5² = 0.8 mm²
Wire length:
L = 8.8 / 1.4 = 6.2 m
Divide this number by the number of turns of the heating element.
Let's say the dimensions of the tube are 10 mm and the thickness is 1 mm. When winding the wire parallel, the distance between the turns should be 2 mm.
What is required to create with your own hands
The device is a simple design that you can do yourself. A do-it-yourself electric shepherd is much cheaper than professional equipment.
Making such a pen, even for cattle (cattle), in the simplest case, requires a fence from only one wire line.
The basis is taken from pillars of metal or wood, pointed at one end and threaded at the other. Stretch electrical cables up to 200 m long.
Insulators are screwed onto the thread. The posts should have a length of one meter to 120 cm, they are located at a distance of approximately 10 m from each other.
If they are metal, installation is simplified. A crossbar is welded to the pointed end to help install the structure.
The generator is purchased or made independently, for which the following elements are taken:
- a special coil, for example, from a car;
- battery;
- transformer;
- multiple transistors.
The electric shepherd circuit is implemented on a small plate hidden in a wooden box.
Important! Do not decrease the resistance of the converter by increasing the voltage to get more effect from the design. After all, the current passing through the cable will not be harmless to animals and people.
Electric shepherd scheme
The design, like the diagram of this device, is simple. The main part consists of a wire through which current is transmitted from a source - an ignition coil.
It is also a voltage-to-pulse converter, which must be short so as not to be harmful when transmitted at a specific frequency. Three 555 timers are also required.
The generator is also easy to make. A ready-made transistor is used that performs the function of transmitting pulses. The ignition coil used in the electric shepherd circuit has two functions.
This is generating voltage and converting it into pulses that are transmitted to the fence (as opposed to the car, where they go to the candles).
Be sure to read:
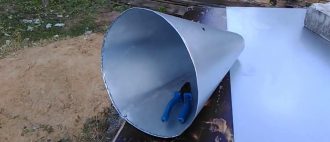
How to make a cone for slaughtering poultry with your own hands, how much does such equipment cost
The next (after creating the source) stage is the assembly of the structure, including the pillars and mesh (wire). And then the fence is connected to the generator.
Important! A scheme with short pulses should be chosen, as long and powerful pulses can lead to the animal being unable to leave the lesion site. Unpredictability in behavior occurs due to muscle spasm. By that time, another electric shock will come, which can kill.
The selection of characteristics at the output of the current device is done for each type of pets. Therefore, you should familiarize yourself with the publications of various authors on the Internet or other sources.
There are several patterns to choose from with wavelength parameters for different animal sizes. But this characteristic can be adjusted on your own if you have more thorough skills of the radio amateur.
One of the schemes for workover is shown below:
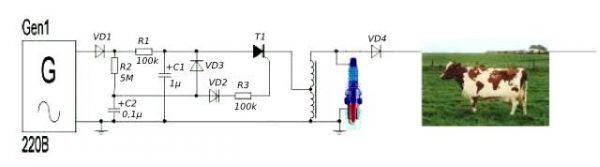
It is rather simplified.
Applied here:
- diodes (VD1, VD3) - КД226В and (VD4) - from 10 kV;
- resistance - 1 W;
- capacitors - 400 V;
- dinistor (VD2) - KN102I;
- thyristor (T1) - KU202N;
- coil.
Shepherd materials
When purchasing materials for a fence, first of all, they are guided by the distance between the supports - about 10 m. The wire must be with an anti-corrosion coating so that it can be used longer.

When purchasing materials for a fence, first of all, they are guided by the distance between the supports - about 10 m
When making a fence with your own hands, it is better to take galvanized, diameter within 2 mm. You will also need porcelain or ceramic insulators.
They are not afraid of moisture, natural phenomena. Although you can use ordinary plastic bottles, cut to the desired size.
Conditions for making an effective hedge
There are a number of conditions for the functioning of an electric shepherd:
- A perimeter-installed fence is made of metal wire or mesh. The latter cannot touch the ground.
- The support posts must be able to withstand high voltages.
- The source of high-voltage pulses must be grounded.
Important! An electric fence should scare the animal away, not harm it.
Number and height of lines
The height of the support posts is selected differently for each type of animal (optimally 1 meter). In the simplest case, the wire is stretched in 1 row, which is suitable for cattle. And also in two, three or more lines. The mesh that is most suitable for the bird is also applicable.

Be sure to read:
How to check eggs for an embryo at home: we assemble an ovoscope with our own hands
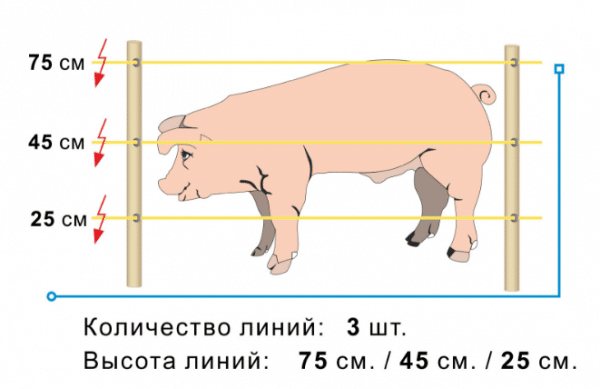
Number and height of electric shepherd lines for pigs
DIY installation
To install, you first need to decide on the area of the site. Support pillars can be at a distance of no more than 10 m from each other. The perimeter is divided into this interval.
The required number of pillars is obtained. Each of them must be equipped with an insulator to which the wire is attached. A simple option is a plastic bottle without a bottom, put on a pole. It is convenient to make turns of wire around the throat.
It is desirable to provide the wire with bright ribbons for greater visibility. People are warned with an inscription. Using a ready-made generator or making it from an ignition coil and three 555 timers, you need to ground the source.
To do this, take one or more metal rods 120 cm deep into the ground by a meter. At the end of the installation, the structure is divided into sections, complemented by a gate.
How to assemble a flow heater yourself
Prepare all parts before starting assembly. The metal needs to be cleaned of rust; for this, a drill with a brush attachment is used. Keep in mind that the diameter of the sheet must exceed the dimensions of the heating element flask.
Mark the places on the sheet where the spiral will be located. Use a drill with a drill bit larger than the heater foot. Punch holes to secure the bolts. Make holes at the end of the product with a core. They should be located strictly in the middle.
Make two sketches with the grinder. Follow the diagram and markup. In the second version, the holes are not needed. As a result, you get the bottom and top of the device. Then proceed like this:
- Connect the part with the holes and the tubular heating element. Make sure that all connections are tight, then weld the parts together.
- Make sure that the length of the flask does not exceed the coil size by more than 1.5 cm. Otherwise, it must be shortened.
- In the pipe, make two holes for the water supply, at the top and at the bottom.
- Weld the pipe sections with the unthreaded side facing the bulb.
For mechanical heating to work, you need to adjust the temperature. Therefore, install a thermostat next to the heating element. It is better to install the start button on the surface of the tank.
- Weld on the two bodies that were cut from the sheet.
- Install the grounding bolt inside the camera.
- Connect the device to water and run to test.
- Inspect how tightly the parts are sealed, whether there is any leakage.
- If everything is in order, turn off the device, prime and paint the surface with anti-corrosion paint.
If desired, you can organize gas or wood heating of water. But then it is better to make a storage-flow housing.
A simple home-made device is not safe, so you need to constantly monitor its operation, control the flow of water so that the heating element does not work in vain. After all, this technique does not have safety sensors.
Want to save a few thousand rubles? And it is true when this skillful person refused such an opportunity. In this case, we will focus on the manufacture of an elementary instantaneous water heater. Surely in the summer, many suffer from the lack of hot water in the country, and finances do not allow buying a finished product. Or you just feel sorry for the money. If you have the necessary skills and ingenuity, then we suggest you try yourself in the role of a local Kulibin.
Manufacturing of instantaneous water heater
So, we have a heating element available (purchased or homemade - at your discretion). Now it remains to think out the further design of the instantaneous water heater.
We need bucket (pan)
,
drill driver
,
rubber gaskets
,
choke
(½ or ¾ "fitting), ball valve. We make several holes in the bottom for the best fixing of the heating element. For this, we also need rubber gaskets, which should be placed inside the container.
Outside, the heating element is fastened with nuts and bolts.
The simplicity of the design lies in the fact that cold water must be immediately supplied to the heating element spiral. Therefore, in the bottom of the tank we make holes for the tube, connect a drain fitting or fitting to it. Its size depends on the size of the thread of the pipe of the water supply system.
You can already easily connect a water riser to this fitting. We recommend installing a drain valve at the pipe outlet. In the future, it will be very convenient to connect a shower head to it, for example.
The internal structure of the heating element
Temperature regulator
we also need. Anyone can play his role, the simplest
thermostat
... You can get it from any broken electric kettle. In the kettle, the thermostat is designed together with a heating coil. We do not need the heating element, you will throw it away, and we just need a part of it in the form of a thermostat and a power button.
It is mounted next to the heating element, which makes it possible to determine the current water temperature as accurately as possible. And the button to control it will be more convenient to place on the surface of the case.
As a result, we get a small storage-flowing water heater, which heats 15 liters of water almost instantly.
Thermal insulation of the case
also will not be superfluous. Not only will it help keep the hot water warm, but it will also protect you from accidental burns. As an external case, you can use a larger container into which this tank can fit. Or you can build a kind of pallet with edges out of tin, where the tank will fit. At the same time, it is better to put the tank on wooden planks, and fill all the voids with polyurethane foam or ecowool.
Boiler advantages
There are undeniable advantages of a boiler, consider them:
- Temperature sensor that works automatically. In the event of a malfunction, it simply turns off. From the point of view of fire safety, then, of course, the production boiler wins, since it is equipped with several types of interlocks. But if we consider the situation with homemade - then everything is at your discretion.
- Water flow sensor and pressure sensor. Of course, the boiler evens out pressure drops, withstands water hammer, and also easily copes with high water pressure. Saving water with a boiler is beneficial only if it is small. For example, a 50 liter boiler consumes a sufficient amount of electricity, so that water savings are practically not noticeable. As soon as there is insufficient pressure in the water supply system (less than 0.6 bar), the boiler is automatically turned off. As for the instantaneous water heater, even with a minimal water flow, the amount of water flowing out per minute is about 1.5 liters.
On sale there are instantaneous water heaters with production assembly and quality assurance.
They are fixed in place of the crane and have a presentable appearance.For added safety, the chassis must be grounded as the equipment is powered.
In more expensive models, a shower head is included in the kit, which is very convenient for summer residents. But, unfortunately, the price of such a device is quite impressive.
If you attach a pan or any large container to the flow heater, it will also become storage. Use a brass nipple to screw in the hoses.
Installation of an articulated metal crane will greatly simplify the operation of the drive. Without a tap, it will be more like a washstand, which is highly impractical. Pay attention to the tightness of the drive (the lid must be welded with argon welding) and the entire structure as a whole. Insulate the case and make it safer.
When using a storage instantaneous heater, pay attention to the meter readings: in rural areas, the maximum power is about 4 kW.
If an ordinary electric kettle draws 1.5-2 kW, and a TV set of 1 kW, then you can already calculate which electrical appliances can be turned on at the same time and which cannot. If the meter is automatic, then it will simply knock out the plugs, since the fuses will go off, which can be replaced. But if your meter does not have fuses, then turning on the pump for pumping water, an electric stove and a TV at the same time can cause a fire in the wiring.
Safety rules when using a homemade water heater
Remember that a self-built device is nevertheless dangerous to use, because it has a minimum of protection against overheating, boil-over and electric shock. Therefore, you need to protect yourself as much as possible.
Be sure to ground your water heater!
Since such products are most often needed in summer cottages, it is best to ground the boiler on a land plot. To do this, you need an iron frame: bury it in the garden. Let the steel tape go from her to the house.
The simplest design does not have any protective sensors to prevent overheating. Therefore, when using a homemade water heater, be as careful as possible and monitor the water level yourself!